Pricing is an inevitable part of an eCommerce business, isn’t it? And customers make decisions based on the pricing and offers you provide in your store. The pricing of your products should be determined and planned according to the type of your products you are selling, the demand for them in the market, and the purchase capability of the customers you are targeting. There can be many types of customers in your business, whom you can categorize based on user roles. There will be wholesalers and retailers who would like to buy products in bulk and get a price adjustment and discount, and there will be vendors, shop managers, and so on. So you might have to set different special pricing for different user roles. This will help you to make new customers stick to your store as well. So, in this article, let us discuss WooCommerce role based pricing and how you can implement it in your store.
Importance of Role Based Pricing
In physical stores as well as eCommerce stores, there will be common customers who buy 3-5 individual products, and other vendors, wholesalers, and retailers who would like to purchase products in bulk. When these bulk buyers make purchases, they will expect a discount or some price adjustment from your side. As they are resellers, they need to sell the bulk purchased products in their respective stores.
And in many physical stores, there will be a price adjustment for regular customers if they frequently buy products from your store. The same can be executed in an online store using a robust WooCommerce plugin. If the customers find you are selling products at a lesser price compared to your competitors, they would definitely choose you over and over. So in terms of sales as well as attracting new customers, role based pricing is a key point in a WooCommerce business.
How to Implement Role Based Pricing in Your WooCommerce Store?
As I have mentioned in the above paragraph, you can implement the role based pricing using a robust plugin. In this article, I would like to explain 3 ways you can set up role based pricing using 3 different WooCommerce plugins. If you do not want to go for a plugin, you can even apply role based pricing in your store programmatically (if you are comfortable with coding). To know how to apply role based pricing programmatically, you can refer to an article: How to Add Discount Programmatically on WooCommerce?
The 3 ways you can set up role based pricing are:
- Using a dynamic pricing and discount plugin.
- Using a role based pricing plugin.
- Using a Request a Quote plugin.
Let us check how you can set up role based pricing in your WooCommerce store using these plugins.
Set WooCommerce Role Based Pricing Using ELEX WooCommerce Dynamic Pricing and Discounts Plugin
Well, ELEX WooCommerce Dynamic Pricing and Discounts Plugin is basically a dynamic pricing and discounts plugin, which helps you to apply different discounts and offers in your WooCommerce store. It is packed with 9 default discount rules as you can use to fill the details and apply discounts on your products based on the quantity, price, and weight of your products. You can also set free products or gifts using this plugin. To know more about the different rules available in this plugin, refer to an article: Everything You Need to Know About WooCommerce Dynamic Pricing.
In each discount rule, you can make the specific rule eligible only for specific user roles. How? Check the steps below.
How to Add User Roles to Be Eligible for Discounts?
First, you need to install and activate the plugin in your WooCommerce store. To know the basic set up details and different tabs and other features available on this plugin, you can go through its documentation: How to Set Up ELEX Dynamic Pricing and Discounts Plugin for WooCommerce?
Go to the product page and subscribe to the plugin. And install and activate the plugin on your WooCommerce store.
You can go to your dashboard and navigate to WooCommerce > Dynamic Pricing.
A tab will be opened and you can find 9 different discount rules as follows.
- Product Rules
- Category Rules
- Combinational Rules
- Category Combinational Rules
- Cart Rules
- Buy and Get Free Offer (BOGO) Rules
- Buy and Get Offer (BOGO) Category Rules
- Tag Rules
- BOGO Tag Rules
You can choose any discount rule according to your requirements. To give you a precise idea, I take Product Rules.
Product Rules
Product rules are used to apply a percentage, flat or fixed price discounts to individual products, a specific product category, or to all products in customers’ shopping cart based on the quantity, price, and weight of the products.
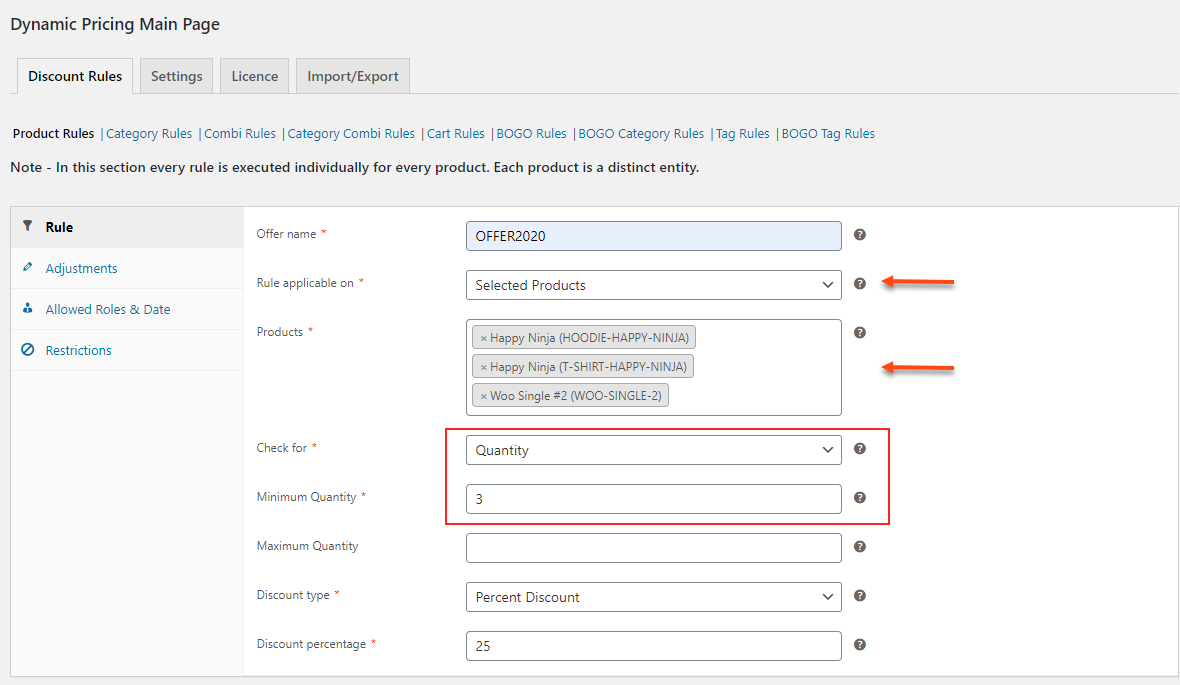
Now, I am going to set up a discount rule. Check the below screenshot.
In this screenshot, I have chosen 3 individual products such as Happy Ninja Hoodie, Happy Ninja T-shirt, and a Woo Single. If a customer purchases a minimum of 3 products of any of these items, they will be eligible for a 25% discount.
So, that is the discount rule. But this special pricing should not be applicable to all the customers in your store. For that, in this example, you can apply this special pricing only for the vendors and editors in your store. To apply this discount for the specific user roles exclusively, go to the Allowed Roles & Date tab.
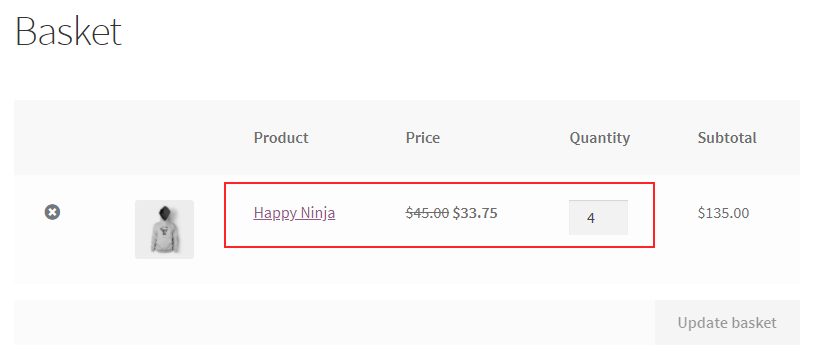
When you click on the field to enter the allowed roles I have marked above, a drop-down list will appear, from which you can choose the required user roles. In the above screenshot, I have chosen Editor and Vendor user roles. If any customer who comes under the role of editor or vendor, they will be eligible for a discount of 25% as in the below screenshot. To be eligible for the offer, they need to log in with their vendor or editor login (according to this example) details of your store.
This is an example when a vendor or editor logged in and added 4 Happy Ninja (which we have chosen to be eligible for product rules) in their shopping cart. You can see a 25% discount had been applied to the price of the individual products.
Similarly, you can apply the discount to special users individually based on their email IDs and purchase history.
Set Special Pricing to Customers Based on Their Email ID and Purchase History
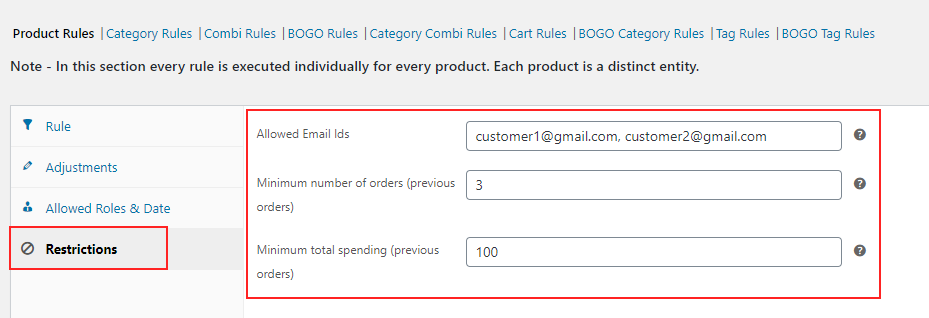
For configuring this, you can go to the Restrictions tab of the rule and enter the email IDs of customers for making them eligible for this discount. And you can also enter the minimum previous orders to be done by the customers in your store and the minimum amount must be spent previously by the customers to be eligible for the particular offer. Check the below screenshot.
In the above screenshot, I have added email IDs of 2 customers separated by a comma, and the minimum order as 3, and the maximum spending on previous orders as $100. The customers who match the conditions will be eligible for the special discount you have set.
You can also set other advanced features in this plugin in accordance with the requirements. After setting up the features, you can save the rules.
Let us move on to the second method using which you can set up WooCommerce role based pricing with a WooCommerce role based pricing plugin: ELEX WooCommerce Catalog Mode, Wholesale & Role Based Pricing.
Set WooCommerce Role Based Pricing Using ELEX WooCommerce Catalog Mode, Wholesale & Role Based Pricing
ELEX WooCommerce Catalog Mode, Wholesale & Role Based Pricing plugin, as the name indicates, is a complete package that offers a handful of advanced features for your WooCommerce store. This plugin mainly focuses on the 3 functions for your WooCommerce store. They are:
Switching Your Store into Catalog mode
With this plugin, you can switch your WooCommerce store into a catalog mode and remove the Add-to-Cart button and customize the button text according to your requirements. You can also redirect your customers to a particular page when they click on the button. This functionality will be very useful if you are switching your store into a wholesale platform as well as when you are facing any stock issues on specific products, or your site is undergoing some maintenance work.
Please note: If you want to switch your store into ‘Request a Quote’ mode directly with advanced features to make the better customer experience to receive orders as quotes, and allowing the customers to request a quote of products with or without the ‘Add to Cart’ option, you can integrate ELEX WooCommerce Request a Quote Plugin. This plugin allows you to set up a custom form into which the customers should be redirected for requesting a quote and makes the ‘Add to Quote’ option available only for specific user roles.
Wholesale Pricing
This feature is similar to the functionality we have discussed above. You can apply wholesale pricing to your products by giving some price adjustments to the wholesale users. This can be done using a fixed price adjustment or a specific percentage of the actual price of the products. And you can also switch the store to catalog mode or Request a Quote mode for allowing customers to contact you or request a quote for placing bulk orders.
Role Based Pricing
The main focus point of this article is role based pricing. As you know, your store might have different types of customers such as wholesalers, retailers, and individual customers, editors, etc. You may need to offer the products at different prices for different user types. If you have regular customers, you may like to offer a special price to them to make them stick to your store. You can also set up this price adjustment for individual regular users using the advanced features of this plugin.
This can be done globally by assigning different price adjustments for different user roles on the plugin dashboard. Or, you can go to individual product pages and assign different prices for different user roles explicitly for the respective product. We shall go through the configuration of that in this article later.
Now, let us check how we can configure different prices for different users on your WooCommerce store with ELEX WooCommerce Catalog Mode, Wholesale & Role Based Pricing plugin.
First, go to the product page and subscribe to the plugin. And install and activate the plugin on your WooCommerce store.
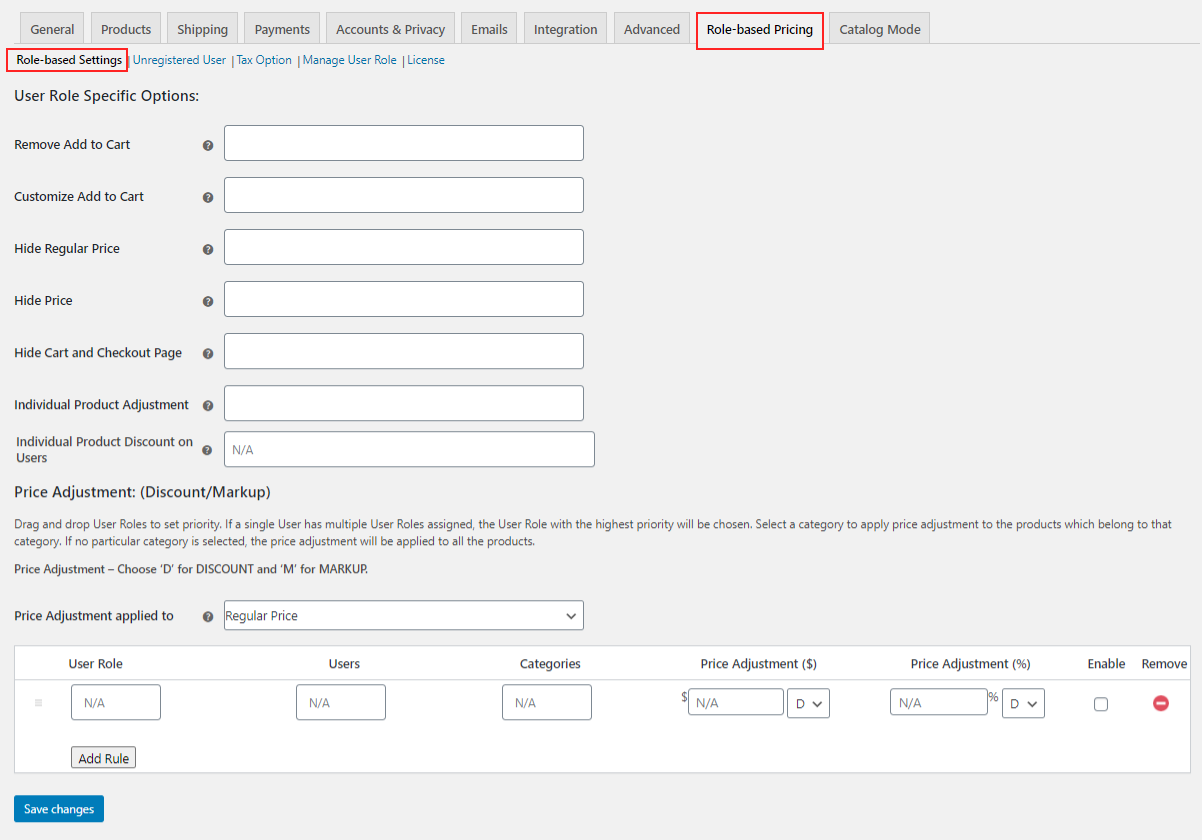
Then go to WooCommerce > Role-based Pricing.
A tab will be opened wherein you can add the user role specific options including a number of customization options.
You can remove the ‘Add to Cart’ option from the Shop page and/or individual product pages for specific user roles as you can choose the required user roles from the drop-down list. And you can add a placeholder text in the place of the Add to Cart option even including a link to redirect to some other page in your store.
Also, you can customize the Add to Cart button of the products from the Shop page and/or product pages for selected user roles. You can even change the button text separate for the Shop page and separate for individual product pages. Here also you can add a custom URL to redirect the selected user roles to some other pages in your store while they click the button.
Another option available in this plugin is, you can hide the regular price of Simple products that have a sale price from specific user roles by selecting them from the drop-down list. Similarly, you can hide the product price of the products for selected user roles. This feature will automatically hide the Add to Cart of the products as well.
Another role-based option available in this plugin is, you can restrict the access of Checkout as well as Cart page to selected user roles.
Individual Product Adjustment
This option is very important if you want to apply role based pricing for individual products from the product level. That is, you can choose the user roles from the drop-down list and these roles will be displayed on the individual product page dashboard. From there, you can add the price for each user role.
As you can choose user roles for price adjustment at an individual product level, you can choose individual users by entering the first characters of the customer’s name/email ID, and choose the customers from the list. Check the screenshot.
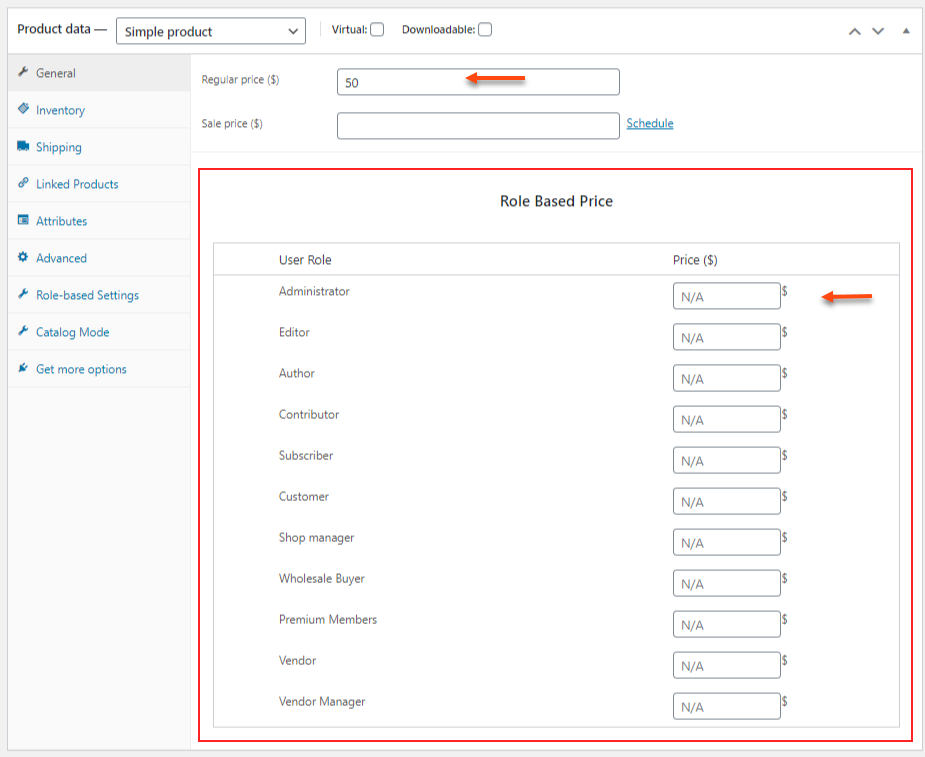
After saving the settings, this will be reflected on the individual product page as in the below screenshot.
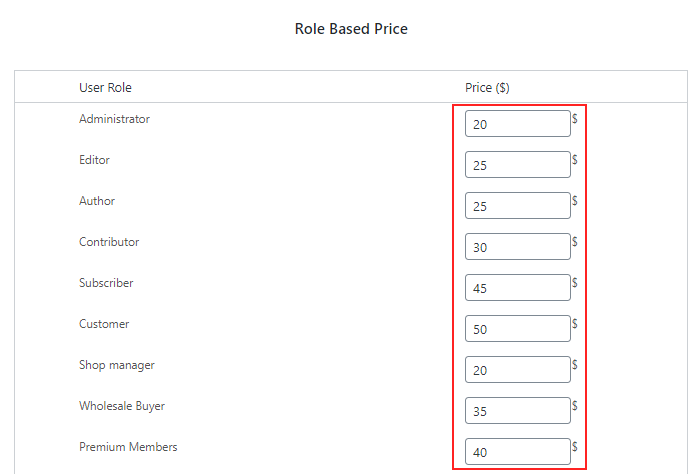
As you can see, the regular price of the product is $50. You can enter different prices for different user roles here. The customers can purchase this product at the price you have entered here. Check the below screenshot.
Set Up Role Based Pricing Globally
For setting up the role-based pricing globally for all products together, you can go to the bottom of the same tab and set the pricing for each user role and individual users.
Click Add Rule to add the price adjustments.
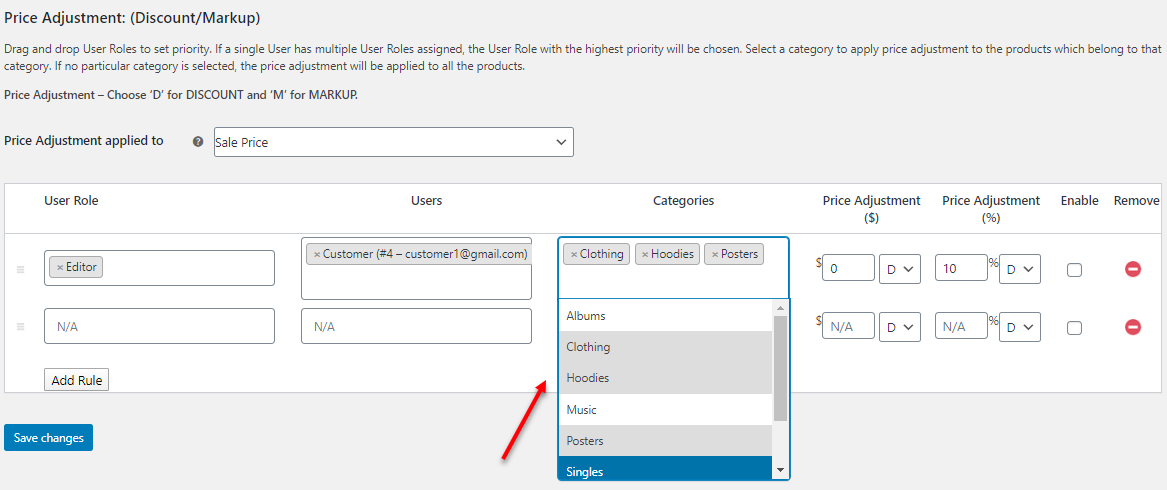
Here, you can apply the discount/markup on either Regular Price, Sale Price, or on both Regular Price & Sale Price of products under specific categories or all categories in your store for specific user roles, individual users by entering their email IDs.
Check the screenshot.
Here in this screenshot, I have chosen the user role Editor and an individual customer. And chosen the categories such as Clothing, Hoodies, and Posters. When the individual customer and the customers under Editor role log in and try to purchase from your store, a 10% price adjustment on Sale price will be eligible for them if they are purchasing products from the 3 categories – Clothing, Hoodies, and Posters.
Similarly, you can set a fixed or a percentage of price adjustment for different user roles and users for the selected product categories or for all products in your store.
Set WooCommerce Role Based Pricing Using ELEX WooCommerce Request a Quote Plugin
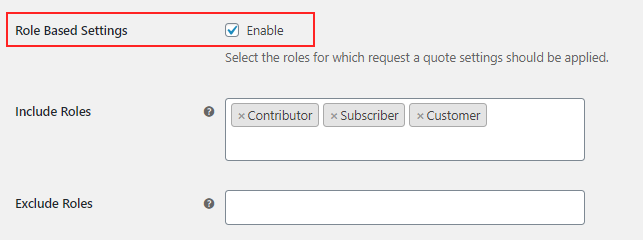
This method will be a little bit different from the method we have checked above. In the previous two methods, you can directly assign the user roles and set the price adjustment or discount to them. This plugin can only be used for role based pricing if and only if you need to switch your store into ‘Request a Quote’ or catalog mode.
The idea of Using ELEX WooCommerce Request a Quote Plugin for Role Based Pricing
ELEX WooCommerce Request a Quote Plugin is basically used to switch your store into ‘Request a Quote’ mode with or without the ‘Add to Cart’ option. If some users need to request a quote for specific products because of bulk purchase, or if your site undergoes maintenance work, or there are some stock issues and so on, you can opt for this plugin. But to apply role based pricing, you need to choose the user roles to be available for the Request a Quote mode in your WooCommerce.
Rather than adding into the cart, they can add the products and their quantity into a Quote list, which can be displayed on a custom page. After listing the required products, customers can fill a form, which you can set according to your requirements in the plugin dashboard by tagging corresponding WooCommerce billing address entities. After filling up the form, customers can submit the quote list to you. You can check the quote and approve or reject the quote. If you have Approved it, you can offer a custom price adjustment to the specific customer. This method is not regarding a ‘user role’ based pricing. It is based on individual user based pricing.
If you want to use this method, follow the below steps.
First, go to the product page and subscribe to the plugin. And install and activate the plugin on your WooCommerce store.
Then, go to the Dashboard > Plugins > Installed Plugins > ELEX WooCommerce Request a Quote Plugin> Settings.
You can set up the required features and customization options according to your requirements with the help of the documentation of the plugin: How to set up ELEX WooCommerce Request a Quote plugin?
After placing the quote order from the customer’s side, you can go to WooCommerce > Orders.
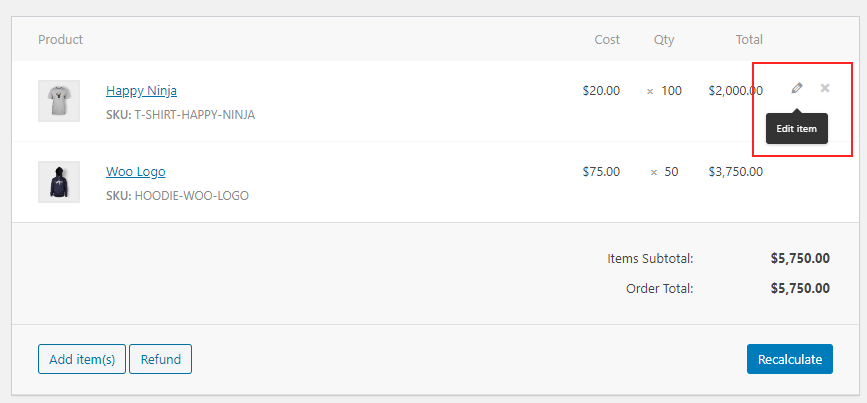
From the list of orders, choose the required quote order and go to its dashboard. Before approving the quote request by changing the order status, you can change the price as in the below screenshot.
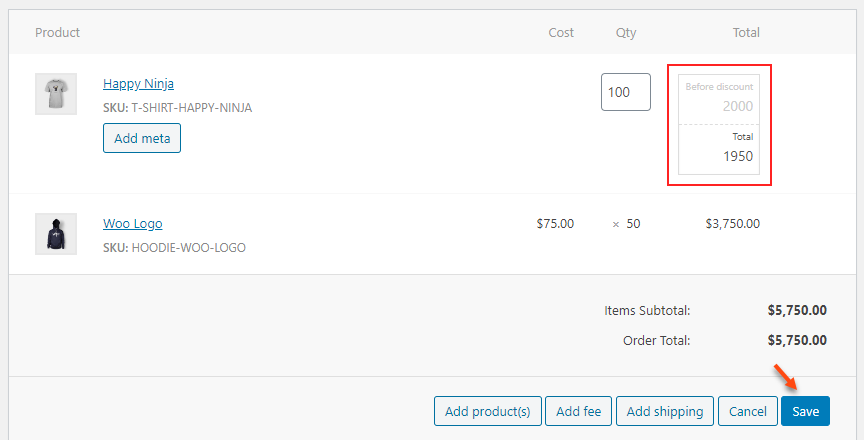
You can navigate to the list where the products are requested by the customer. In each product’s row, you can find the edit option and delete option if you hover on the marked place in the above screenshot. If you click on the Edit option, you can edit the price from your side. Now the total price of the product Happy Ninja is $2000. If the customer purchases products in bulk and requests a quote, you may offer it at a price adjustment. Here, for example, I am adjusting the price to $1950. Check the below screenshot.
You can see the price before the discount and you can edit the price accordingly and click Save.
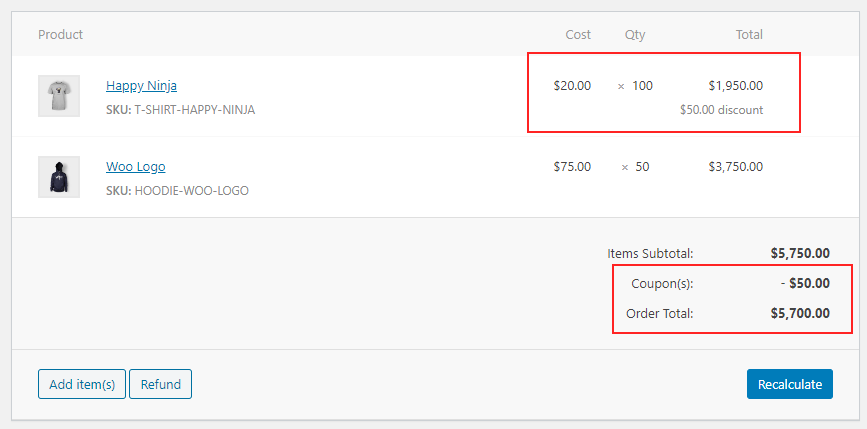
You can see that the discount has been applied to the order and deducted as a Coupon from the Subtotal of the order.
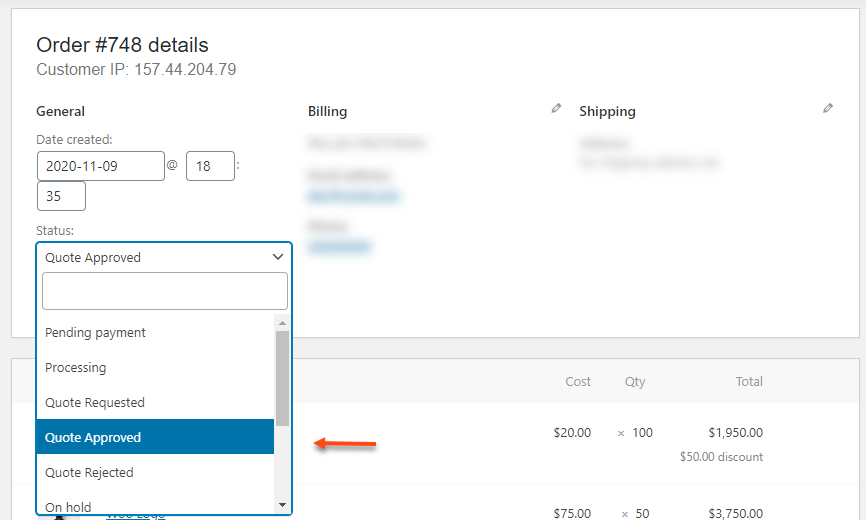
Now, you can change the status to ‘Approved’. An email will be triggered to the customer with a link to initiate the payment.
This is how it works when you want to apply user-specific pricing with ELEX WooCommerce Request a Quote Plugin.
To sum up,
Since WooCommerce is highly flexible to adopt any functionality, you can set up the required functionality in your store with a robust plugin. The only task in this is choosing the right plugin. Here in this article, I have explained 3 ways you can set up role based/ customer-specific pricing. You can choose the plugin according to the requirements and the nature of your shop. If you need to apply different offers and discounts based on user roles and specific users, you can choose the Dynamic Pricing and Discounts plugin. If you need to directly apply a price adjustment for product categories or specifically for individual products for different user roles or specific users, go for the Role-based pricing plugin. Or, if your store needs to be in a catalog mode or ‘Request a Quote’ mode and you need to apply user specific price adjustment, you can go for the Request a Quote plugin.

