What can we help you with?
How to Set Up ELEX WooCommerce Stamps.com Shipping Plugin with USPS Postage? (with Video)
This article intends to provide detailed, step-by-step instructions that’ll help you understand, how to set up ELEX Stamps.com Shipping Plugin with USPS Postage for WooCommerce. Refer to the product page to know more about other various features of the plugin.
Stamps.com is a leading provider of Internet-based postage services. It provides service to small businesses, enterprises and online retailers to print official United States Postal Service (USPS) stamps and shipping labels. Stamps.com sends customers a digital scale to weigh letters and packages to ensure the correct amount of postage is applied to the piece of mail. The amount of postage applied is then deducted from the customers’ Stamps.com account. Customers can print postage on envelopes, regular paper or adhesive labels.
Our Stamps.com Shipping Plugin with USPS Postage for WooCommerce provides easy, seamless integration of WooCommerce with Stamps.com services. In addition to accessing real-time shipping rates, the plugin also provides print label and shipment tracking facilities.
Watch the complete setup guide for WooCommerce Elex Stamps.com Shipping Plugin with USPS Postage for WooCommerce here:
Overview
Some of the major highlights of the plugin include:
- Real-time shipping rates: Based on the shipping destination address, product weights, and dimensions, the plugin fetches real-time rates from USPS.
- Print shipment label: You can print shipping labels from order pages in the back-end of your WooCommerce store. Postage is automatically paid on the printed labels using your Stamps account.
- Shipment Tracking: The tracking number returned from Stamps.com while generating the label will be added to order notes and sent as part of the order completion email. Shipments can be tracked by customers as well as shop owners.
- Box Packing: You can select the desired box packing method. This will also affect the shipping rates displayed on your cart/checkout page.
- Compatibility: The plugin is now compatible with TM Product Extra Options and TM Product Extra Options Weight AddOn.
All these features (and many more!) are bundled into one solution to serve your WooCommerce-Stamps.com shipping integration needs for your online store.
Getting started with Stamps.com Shipping Plugin with USPS Postage for WooCommerce
Read an article to know how to complete the checkout process on ELEX. You can also read how to download, install, activate ELEX plugins.
Once the plugin is installed and activated, you can navigate to plugin settings in two ways:
- Dashboard > WooCommerce > Shipping > Stamps.com – USPS (or)
- Dashboard > Plugins > Installed Plugins > Stamps.com WooCommerce Extension (USPS) > Settings.
Now that we have explored the features of the plugin, and have installed it, let’s get down to configure the plugin.
General Settings
The general settings are as shown below.

Real-time Rates: Tick this checkbox to access real-time rates from USPS.
Common API Settings
The API Setting fields are as follows.
- User Name and Password: For accessing Stamps.com APIs, you need to register with Stamps.com. After registration, you will receive User Name and Password. Enter the received credentials in the respective text fields.
- Debug Mode: If you are not getting proper rates ( lesser or higher than expected), not getting all the available shipping options, or not getting any rates at all, then you can tick the Enable Developer Mode checkbox to find the error(s). You can also see the warning(s) by our WooCommerce Stamps.com Shipping plugin.
By enabling debug mode, you can trace issues using log. You can see information about debugging at the top of the cart and checkout page. After enabling debug mode, add a product to the cart. Go to the cart or checkout page to see the debugging information.
For detailed information on debugging, see how to troubleshoot Stamps.com Shipping Plugin for WooCommerce?.
- API Mode: You can switch between Test and Live mode for making a purchase and printing labels.
The test mode does not involve any real money transaction and can be used test features and settings, before going live. You should contact Stamps.com to obtain test credentials and test API URL. In addition to this, you should request them to whitelist your website host IP and your personal computer IP so that you can access/view the label URLs (generated in test mode). - Insurance: Insurance provides coverage in the event that the packages are lost or damaged while in transit. If a shipper requires protection for items, then insurance may be arranged at an additional cost by USPS. For more information on insurance, see USPS Insurance – Stamps.
The plugin offers three options for insurance –- Customer Choice: If you select this option, customers will get an insurance field in the checkout page, where they can choose to opt for insurance for the packages.
- Mandatory: Applies insurance to all the packages compulsorily.
- No insurance (default option): Insurance is not applied to the packages.
- Parcel guard Terms and conditions: If you have set the insurance to Customer Choice or Mandatory, click and accept the parcel guard terms and conditions provided by Stamps.com to enable an added layer of protection to your shipments.
Click Save Changes to save the settings.
Rates & Services
This section contains settings that will determine the services that will be made available to the customers in your store. The settings are as shown below.
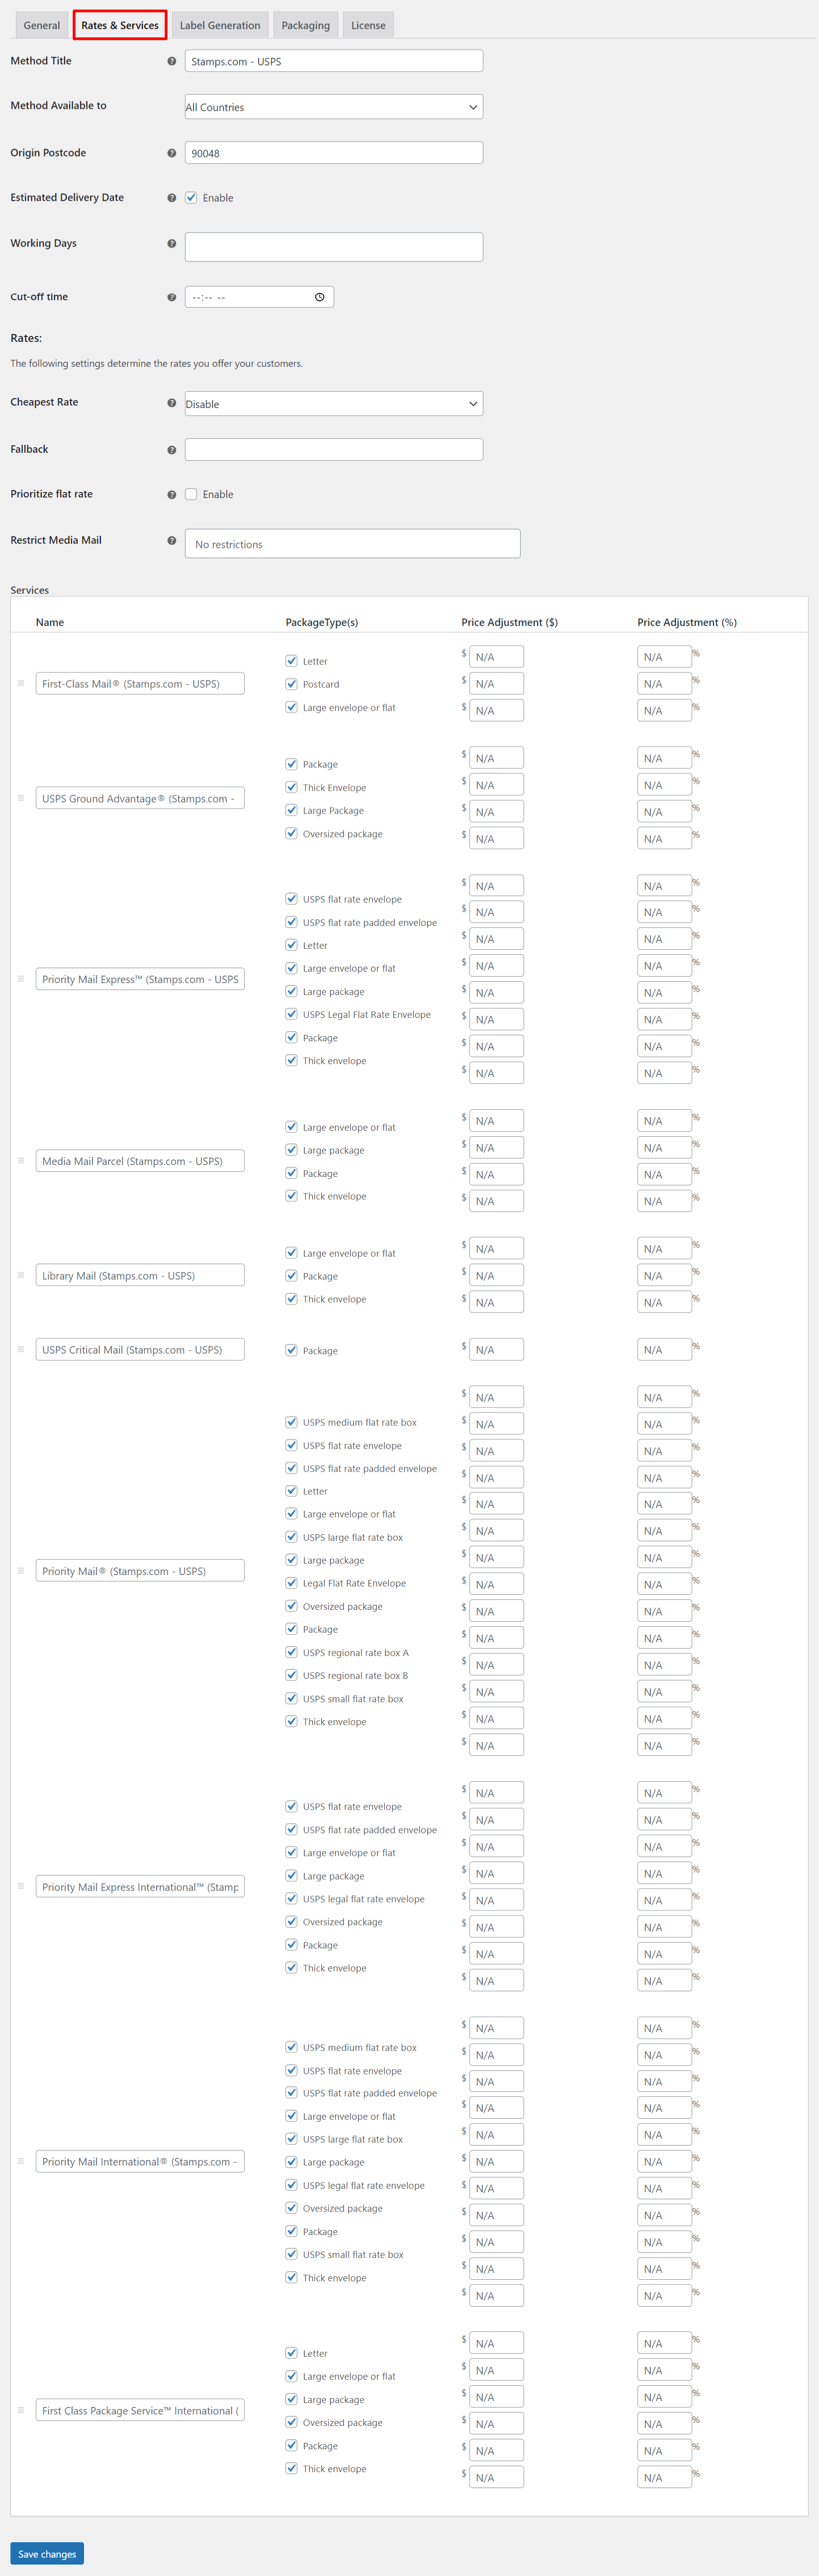
- Method Title: Allows you to set a custom title for the Stamps.com shipping method. This title will be visible on the cart and checkout page under Shipping options.
- Method Available to: This field allows you to select countries, for which the Stamps.com shipping method will be available.
There are two options:- All Countries: Choose this option if you offer the Stamps.com shipping method all over the world. This option is selected, by default.
- Specific Countries: Provides options to select desired countries. The Stamps.com shipping method will be available only in selected countries.
- Origin PostCode: Enter the postcode of the sender. This postcode will be used for calculating shipping rates.
- Estimated Delivery Date: Enable the checkbox for displaying the estimated delivery date of the selected services of Stamps.com-USPS.
- Working Days: Select your working days from the drop-down menu for calculating the estimated delivery date, as shipments only happen on working days.
- Cut-off time: This is also necessary for calculating the estimated delivery date. You can enter a cut-off time here, the order placed after the cut-off time will be shipped on the next working day.
Rates
The following settings determine the rates you offer to your customers.
- Cheapest Rate: Once enabled, the plugin will show only the cheapest rate from the returned rates in the cart and checkout pages.
- Fallback: If Stamps.com fails to return any rates, the fallback will be applied. This allows your customers to check out the process even when stamps.com does not return any rates.
- Priorities Flat Rate: Tick this checkbox if you wish to give higher priority to flat rates when package rates and flat rates are available together.
- Restrict Media Mail: Select the Shipping class for which you want to disable the Media Mail rate. Read more about Media Mail, here.
- Stamps.com Services: Stamps.com provides different kinds of shipping methods which are suited to different needs of the customer. Our WooCommerce Stamps.com shipping plugin supports the following services –
USPS Domestic Services –
- First-Class Mail® Letter
- First-Class Mail® Postcard
- First-Class Mail® Large envelope or flat
- USPS Ground Advantage ® Package
- USPS Ground Advantage ® Thick Envelope
- USPS Ground Advantage ® Large Package
- USPS Ground Advantage ® Oversized package
- Priority Mail Express™ USPS flat rate envelope
- Priority Mail Express™ USPS flat rate padded envelope
- Priority Mail Express™ Letter
- Priority Mail Express™ Large envelope or flat
- Priority Mail Express™ Large package
- Priority Mail Express™ USPS Legal Flat Rate Envelope
- Priority Mail Express™ Package
- Priority Mail Express™ Thick envelope
- Media Mail Parcel Large envelope or flat
- Media Mail Parcel Large package
- Media Mail Parcel Package
- Media Mail Parcel Thick envelope
- Library Mail Large envelope or flat
- Library Mail Package
- Library Mail Thick envelope
- USPS Critical Mail Package
- Priority Mail® USPS medium flat rate box
- Priority Mail® USPS flat rate envelope
- Priority Mail® USPS flat-rate padded envelope
- Priority Mail® Letter
- Priority Mail® Large envelope or flat
- Priority Mail® USPS large flat-rate box
- Priority Mail® Large package
- Priority Mail® Legal Flat Rate Envelope
- Priority Mail® Oversized package
- Priority Mail® Package
- Priority Mail® USPS regional rate box A
- Priority Mail® USPS regional rate box B
- Priority Mail® USPS small flat-rate box
- Priority Mail® Thick envelope
USPS International Services –
- Priority Mail Express International™ USPS flat rate envelope
- Priority Mail Express International™ USPS flat rate padded envelope
- Priority Mail Express International™ Large envelope or flat
- Priority Mail Express International™ Large package
- Priority Mail Express International™ USPS legal flat rate envelope
- Priority Mail Express International™ Oversized package
- Priority Mail Express International™ Package
- Priority Mail Express International™ Thick envelope
- Priority Mail International® USPS medium flat rate box
- Priority Mail International® USPS flat rate envelope
- Priority Mail International® USPS flat rate padded envelope
- Priority Mail International® Large envelope or flat
- Priority Mail International® USPS large flat rate box
- Priority Mail International® Large package
- Priority Mail International® USPS legal flat rate envelope
- Priority Mail International® Oversized package
- Priority Mail International® Package
- Priority Mail International® USPS small flat rate box
- Priority Mail International® Thick envelope
- First Class Package Service™ Letter
- First Class Package Service™ Large envelope or flat
- First Class Package Service™ Large package
- First Class Package Service™ Oversized package
- First Class Package Service™ Package
- First Class Package Service™ Thick envelope
Our WooCommerce Stamps.com shipping plugin also enables you to select package type(s) for the required service. The available package types are listed in the table below.
| Package Type | Description |
| Postcard | It is a single sheet of paper, but to qualify for mailing it must be: Rectangular, At least 3-1/2 inches high x 5 inches long x 0.007 inches thick, No more than 4-1/4 inches high x 6 inches long x 0.016 inches thick. |
| Letter | A mail piece with its own special envelope or a piece that will be folded to letter-size. To qualify for a mailing letter, it must be: Rectangular, At least 3-1/2 inches high x 5 inches long x 0.007 inches thick, No more than 6-1/8 inches high x 11-1/2 inches long x 1/4 inch thick. |
| Large Envelope or Flat | Large envelope or flat. Has one dimension that is between 11 ½” and 15” long, 6 1/8” and 12” high, or ¼” and ¾ thick. |
| Thick Envelope | Thick envelope. Envelopes or flats are greater than ¾” at the thickest point. |
| Package | Package. The longest side plus the distance around the thickest part is less than or equal to 84” |
| Small Flat Rate Box | USPS small flat rate box. A special 8-5/8″ x 5-3/8″ x 1-5/8″ USPS box that clearly indicates “Small Flat Rate Box”. |
| Flat Rate Box | USPS medium flat rate box. A special 11” x 8 ½” x 5 ½” or 14” x 3.5” x 12” USPS box that clearly indicates “Medium Flat Rate Box” |
| Large Flat Rate Box | USPS large flat rate box. A special 12″ x 12″ x 6″ USPS box that clearly indicates “Large Flat Rate Box”. |
| Flat Rate Envelope | USPS large flat rate box. A special 12″ x 12″ x 6″ USPS box that clearly indicates “Large Flat Rate Box”. |
| Flat Rate Padded Envelope | USPS flat rate padded envelope. |
| Large Package | Large package. The Longest side plus the distance around the thickest part is over 84” and less than or equal to 108”. |
| Oversized Package | Oversized package. The longest side plus the distance around the thickest part is over 108” and less than or equal to 130”. |
| Regional Rate Box A | USPS regional rate box A. A special 10 15/16” x 2 3/8” x 12 13/ 16” or 10” x 7” x 4 3/4” USPS box that clearly indicates “Regional Rate Box A”. 15 lbs of maximum weight. |
| Regional Rate Box B | USPS regional rate box B. A special 14 3/8” x 2 2/8” x 15 7/8” or 12” x 10 1/4” x 5” USPS box that clearly indicates “Regional Rate Box B”. 20 lbs maximum weight. |
| Legal Flat Rate Envelope | USPS-supplied Priority Mail flat-rate envelope 9 1/2″ x 15″. Maximum weight 4 pounds. |
You can enable desired services with package types in the Services table. The unchecked services will not be displayed on the website even though they are available services from USPS.
Please go to USPS Mail & Shipping services for detailed information on each service.
The services table is divided into the following four columns:
- The first column represents all service names. You can set a custom service name in the given text field.
- In the second column, you can select the packages that you want to offer. By default, Package (as package type) is enabled for all the services.
- The last two columns are used for price adjustments. You can add or subtract the required amount to/fro actual shipping cost. Use minus sign (-) for subtracting the amount. You can specify the price in percentage or amount value.
For example, consider the shipping cost of First-Class Mail (Letter) returned by Stamps.com is $5.
Case 1: Price adjustment of $5, for First-Class Mail –
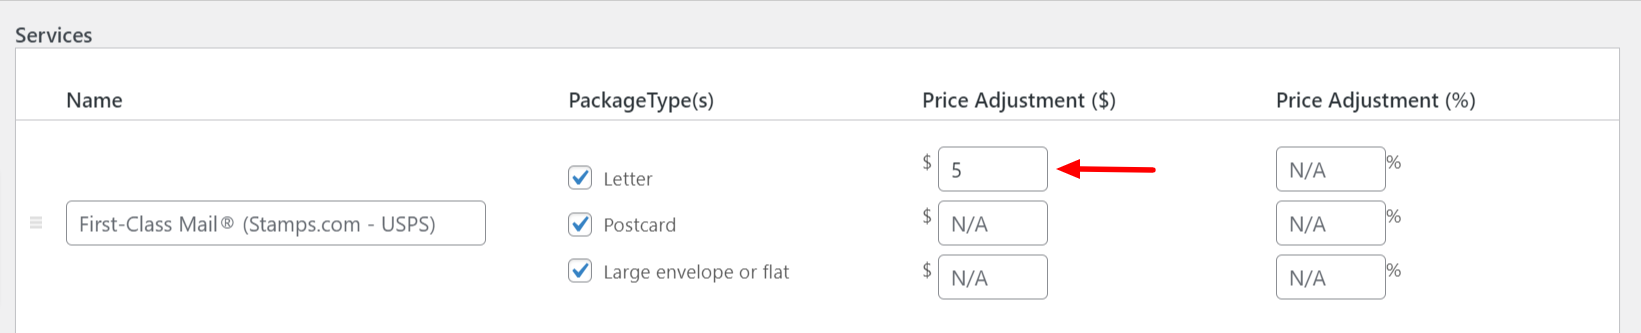
The total cost displayed for Regular Post is $10 ($5+$5).
Case 2: Price adjustment of 10%, for First-Class Mail –
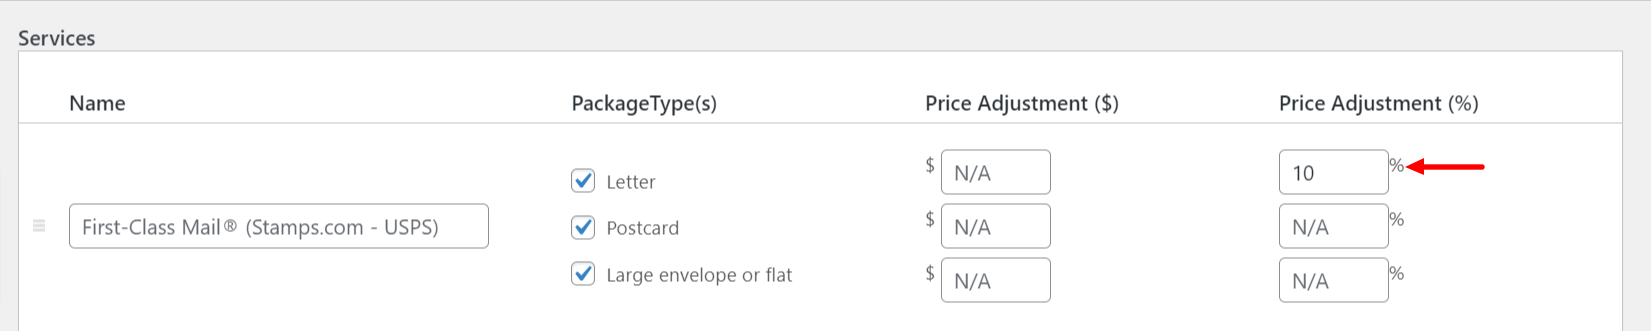 The total cost displayed for First-Class Mail is $5.5 (the 10% of 5 is added to 5).
Case 3: Price adjustment of $5 and 10%, for First-Class Mail –
 The total cost displayed for First-Class Mail is $10.5 (the 10% of 5 is added to 5 + 5 to get actual).
Click on the Save changes button to save the settings.
To arrange the ELEX USPS Shipping Services on top of other shipping services on the cart and checkout pages, refer to the code snippet article.
Label Generation
The following settings are required for generating shipping labels.
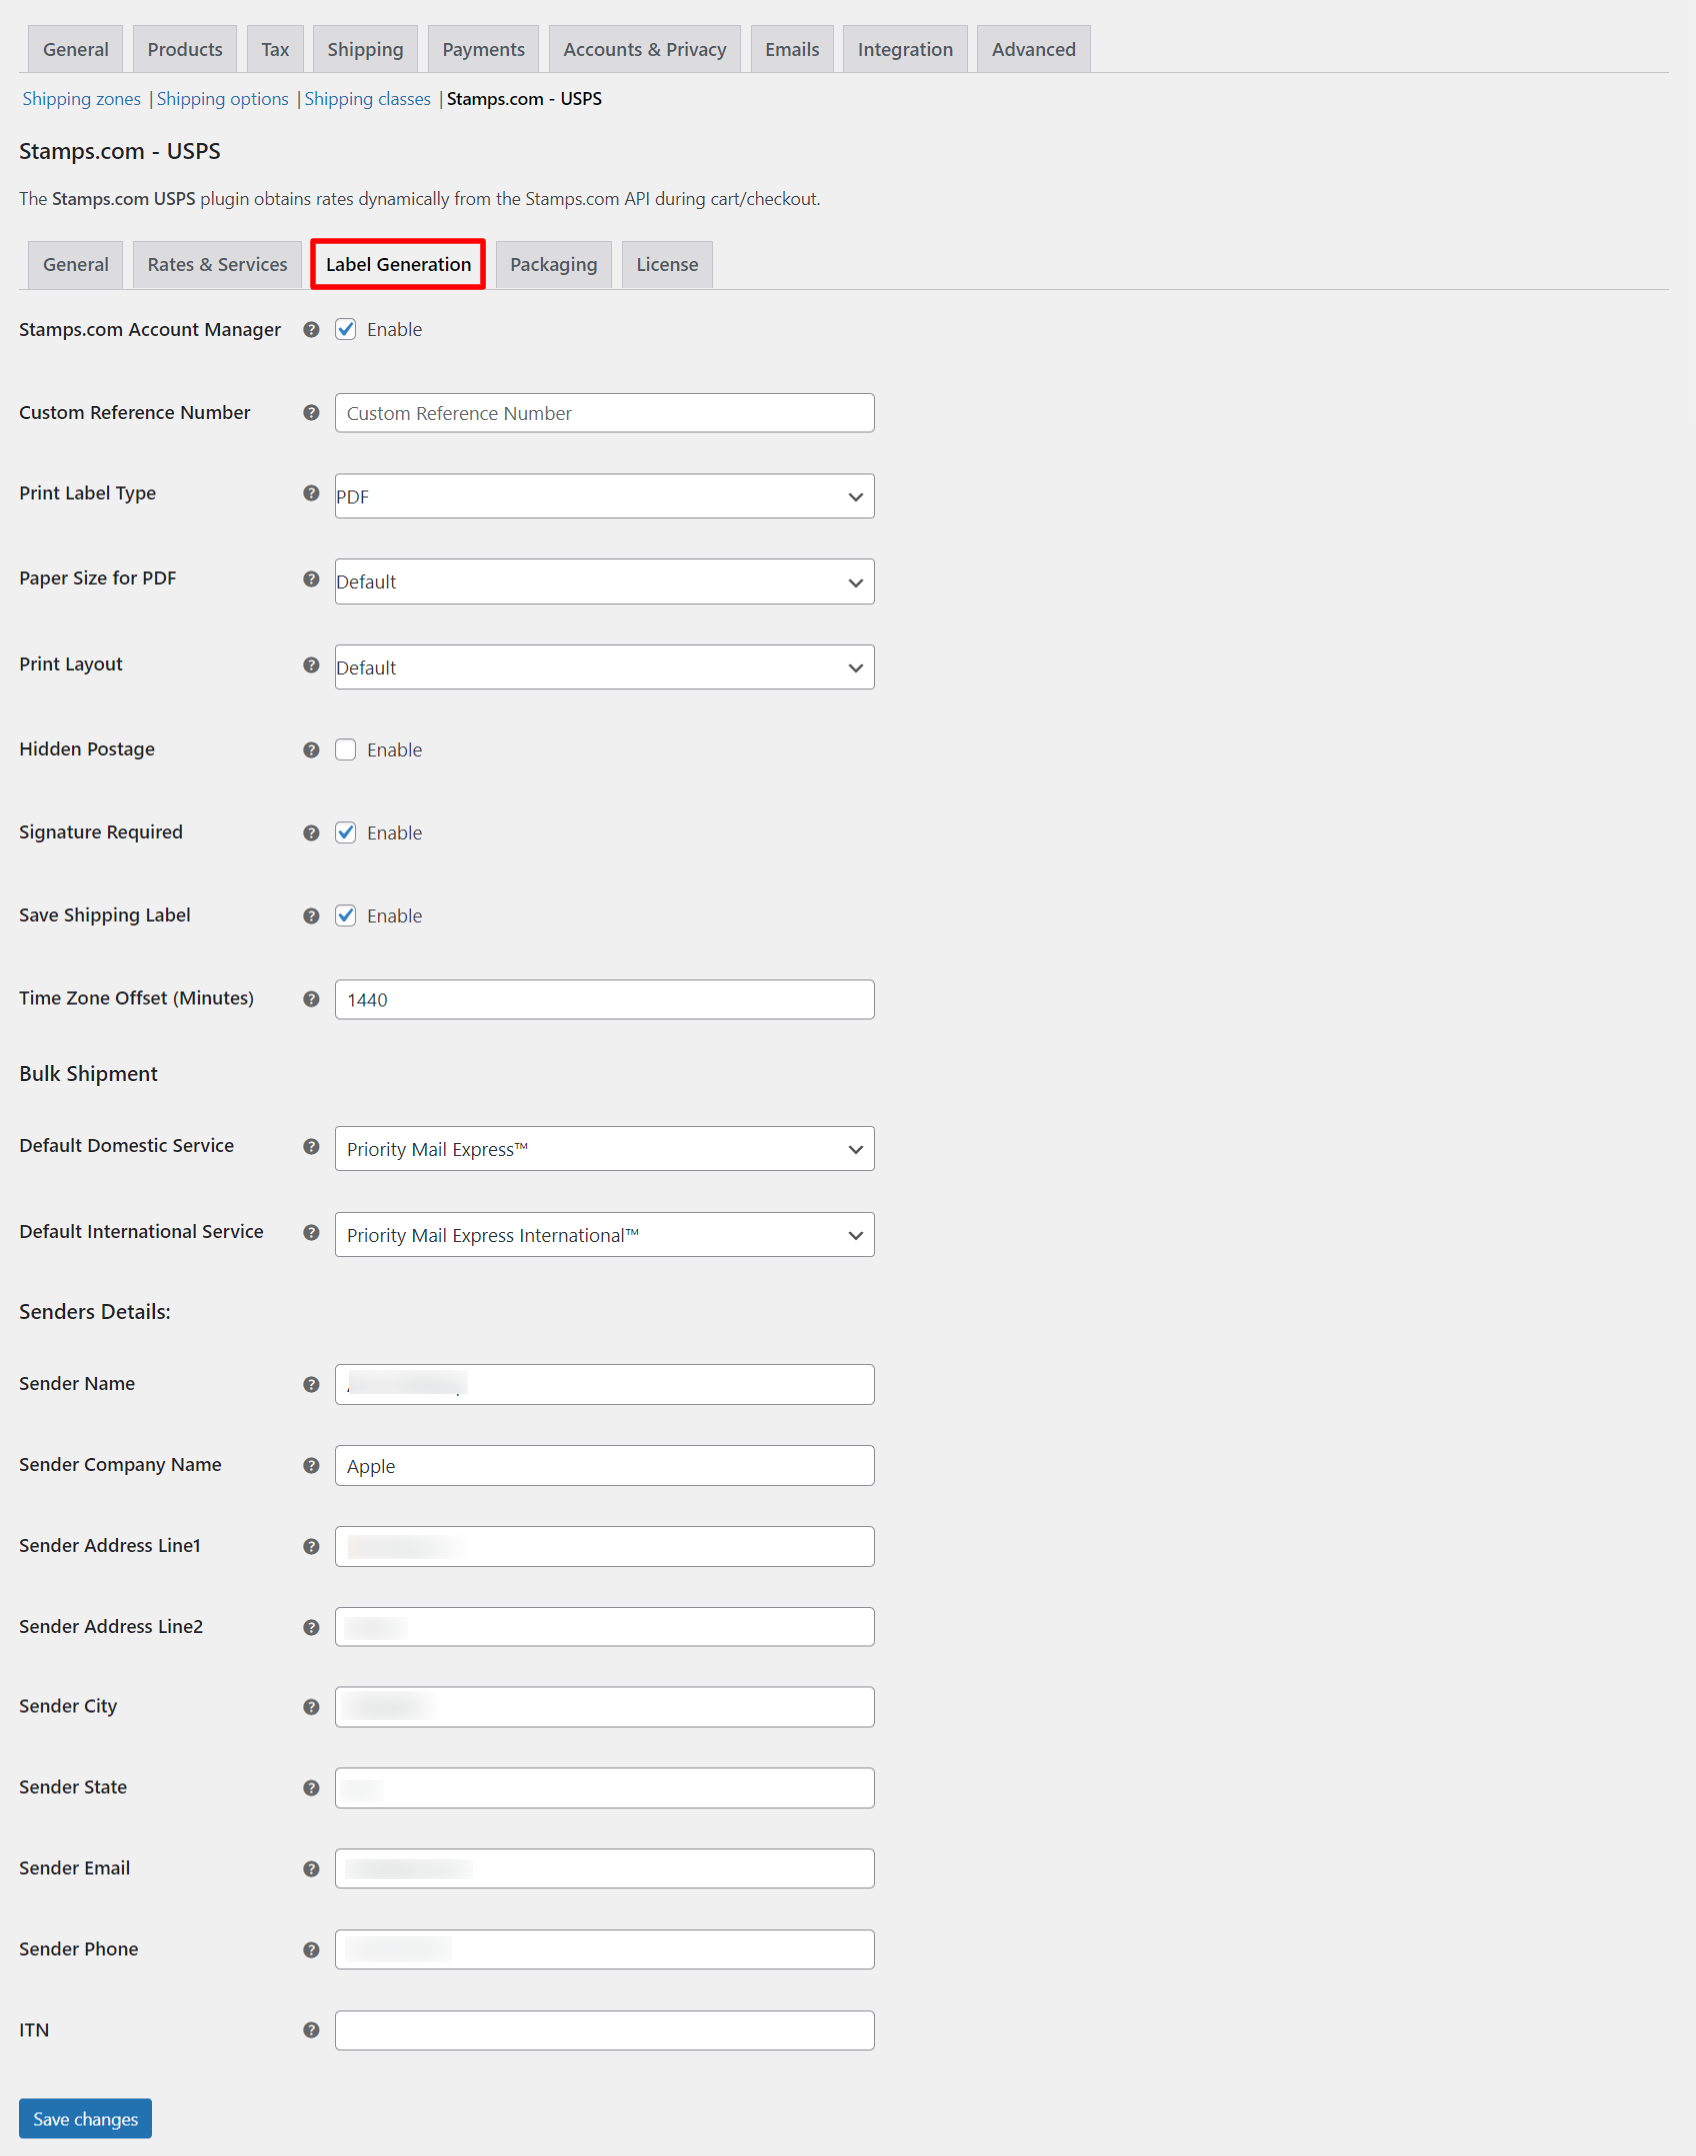
- Stamps.com Account Manager: Tick this checkbox to enable account manager meta box in WooCommerce admin order pages. With this setting, you can add funds to your Stamps.com account to purchase more postages.
- Custom Reference Number: Enter your tax registration number in this field. You can enter the taxation number you would get after the registration based on the country to which you are exporting or shipping packages. Preface the number value with ‘IOSS’, or the specific text based on the destination country to help the customs distinguish the IOSS, VAT, or any other country’s identification number from other issued tax identification numbers. The maximum field size is 40 characters. This value will be passed to the customs and printed on the shipping label.
- Print Label Type: You can choose the desired format for printing labels from the following options –
- PNG: This option prints the label in Portable Network Graphics which is a raster graphics file format that supports lossless data compression.
- GIF: This option prints the label in Graphics Interchange Format which is used on the World Wide Web due to its wide support and portability.
- JPG: This option prints the label in Joint Photographic Experts Group which is most commonly used for storing and transmitting photographic images on the World Wide Web.
- PDF: This option prints the label in Portable Document Format which is used to present documents independent of the application, software, hardware, and operating system.
- Paper Size for PDF: Paper sizes support by our WooCommerce Stamps.com plugin are as follows –
- Default: Uses default page size.
- Label 85X11: Uses letter size paper (8.5 x 11 inches) to print labels.
- Label Size: Uses label size paper (4 x 6 inches) to print labels.
Note: The above sizes apply only when image type is PDF.
- Print Layout: This setting determines the format of the label image. The availability of the given options will vary based on shipping service and label format.
Following are the options provided by our plugin –- Default: Uses the default print layout.
- Healthy: Label of 4×6 inches gets generated. For Critical Mails, this option generates labels for windowed envelopes.
- NormalLeft: Label of 4×6 inches gets generated on the left side of the paper.
- NormalRight: Label of 4×6 inches gets generated on the right side of the paper.
- Normal4X6: Label of 4×6 inches gets generated. This option only applies to Critical Mails and Library Mails.
- Normal6X4: Label of 6×4 inches gets generated. This option only applies to Critical Mail.
- Normal75X2: Label of 7.5×2 inches gets generated. This option only applies to domestic First Class or Priority packages.
- NormalReceipt: Label of 6×4 inches and receipt gets generated.
- NormalCN22: A 4×6 label on an 8.5×11 sheet with Customs Form CN 22 gets generated.
- Hidden Postage: Tick the checkbox to hide the actual postage amount on the Print label. This feature is useful for users who wish to hide the actual postage amount from the recipients of packages.
- Signature Required: Enabling this option will add a signature required message on the shipping label.
- Save Shipping Label: Enabling this option will automatically save the generated shipping labels to wp-content/uploads/Stamps_Shipping_Labels.
- Time Zone Offset (Minutes): If you wish to change the shipment creation time on the printing label, you can specify the time value in minutes that will be added to the current time. To reduce the time from the existing time, use the minus (-) sign before the time value.
- Bulk Shipment: For bulk shipment, you can select default domestic and international service. Select the desired options for both services from the given list. This default service will be chosen when no USPS service is selected during checkout.
- Sender Details: Enter the sender name, company name, address, and contact information in the respective text fields.
- ITN: Enter ITN for international shipping. ITN means Internal Transaction number, used for some international packages that use the multi-page form and may require Electronic Export Information (EEI) to be filed through the Automated Export System (AES).
For more information about ITN, see what is an Internal Transaction Number (ITN)?
Packaging
You can get real-time rates for items using API. With a price calculator, you get real-time postage rates for domestic, as well as international shipping. Real-time rates are calculated based on product dimensions and weight, and the best-fitted box rates are returned from USPS. These rates will depend on the method used for packing the parcel. Our ELEX WooCommerce Stamps.com USPS plugin offers three types of parcel packing methods.
They are as shown below.

1. Individual Packing
In this option, each item in the cart is packed separately. Total shipping cost is calculated by adding the shipping cost for each item. This option is selected by default.
For example, the shipping cost of Item X is $10. If the customer adds two quantities of Item X to the cart, the total shipping cost is $10 x 2, which is $20.
2. Pack into boxes with weight and dimensions
If packing items individually does not suit your business, then you can define custom box sizes under Box Dimensions section. All the cart items are packed into custom boxes defined in Box Dimensions settings. The best fit box is automatically chosen from the defined boxes. This is the recommended option. You can read through setting up box dimensions to understand box packing in detail.
The settings are as shown in the screenshot below.

Packing Algorithm: You can pack items in following two ways –
- Volume Based Packing – With this algorithm, the items are placed in the box based on the total volume of both items and the box they are packed into.
- Stack First Packing – Using this algorithm, items are stacked or pilled unto one another, based on either length, width or height of items as well as the box they are packed into.
To know more about this algorithm, read what is stack first algorithm?
Box Dimensions: This setting is applicable only when Pack into boxes with weight and dimension is selected. Here, you can define the outer and inner dimensions of boxes. Outer dimensions are the dimensions of the package. Inner dimensions are the dimensions of the product.
For heavy packing box, enter the weight of the box so that it is added to the product weight, to calculate shipping rates. You can tick the respective Letter checkbox if you want to mail letters. Based on your requirement, you can add or remove box dimensions.
Tick the Enable checkbox of the respective boxes to enable or activate them. If these checkboxes are unchecked, you will not be able to use the selected box(es).
3. Order Total Weight:
Enter the maximum weight limit for packages. In this option, the weight of all the cart item is summed up and items are packed with maximum weight limit in the box(es) and passed to API to get rates. In addition to this, you can specify the process of packing, that is, you can pack heavier items first, pack lighter items first or pack items purely divided by weight.
Below is a screenshot showing the order total weight settings.

- Box measurement unit: Tick this checkbox to consider the unit of weight and dimension selected in WooCommerce settings. If this setting is unchecked, pounds and inches (lbs/inc) for weight and dimension will be taken by default.
Finally, click Save changes to save the plugin settings.
Stamps.com settings at the Product level
Different products might need a different level of processing. Hence, our plugin provides three important product level settings for stamps.com shipping as shown below.

- HS Tariff Number (Stamps): HS is a standardized system of names and numbers to classify products. Shop owners can provide the HS number of the product so that international shipments are processed smoothly.
- Country of manufacture (Stamps): Enter the country code where the product is manufactured.
- Customs Declared Value: Allows you to give custom product price for Customs purpose. Instead of the product price, this value will be sent in the API request.
For example, if the product price is $10, and you define the customs value in this setting as $15, the customs value, $15, will be sent in the request.
- Stamps Delivery Signature: If you are selling products that are targeted to adults, or want signatures when deliveries are made, select one of the following options:
- Delivery Confirmation: The US Postal Service can tell you the date, time and zip code where your item was delivered, giving you peace of mind. If the postal carrier tries to attempt delivery, you’ll get the date and time of that attempt, too. This service is now called USPS Tracking.
- Signature Required: In this service, the item can be delivered only after obtaining a signature.
- Signature Confirmation: In this service, a signature is required from the recipients of their packages. Although USPS Tracking proves that a package was delivered to a particular address, Signature Confirmation proves that it was actually received by the intended recipient or his agent.
- Adult Signature Required: This service requires the signature of someone who is 21 years of age or older at the recipient’s address.
- Adult Signature Restricted Delivery: This service requires the signature of a specific addressee (or authorized agent), who must be 21 years of age or older.
- None: To completely disable delivery signature option.
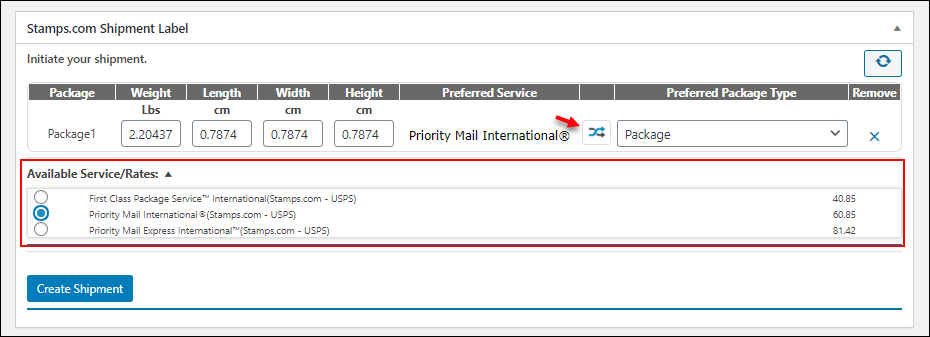
Select Preferred Service Before Creating the Shipment
Before creating the shipment of individual orders with Stamps.com, you can choose the preferred service of USPS from your side by changing the service chosen by the customer.
You can click on the button marked on the below screenshot, and choose a preferred service from the list before creating the shipment.
Tips
Let’s now see how these settings are applied.
Demonstration
Once all the plugin settings are configured and saved, you can move to the front end of your WooCommerce store to see the affected changes.
A screenshot of the sample cart page is shown below.

How to print shipping labels in WooCommerce Stamps.com shipping plugin?
The following steps show how to generate a shipment label when an order is placed with a Stamps.com account:
- Open an order to view order details. The Generate Packages button for the order is displayed as shown in the screenshot below.

- Once you click on Generate Packages button, selected shipping service, package type, and the package details are shown. The available services with their respective costs are listed as well. You can also select separate services for each package and select desired package type. The rates are dynamically updated based on package type.
If you want to add additional packages, then click on the Add Package button and enter the weight and dimensions of the package.
Click on Create Shipment to proceed with label printing, as shown in the below screenshot.

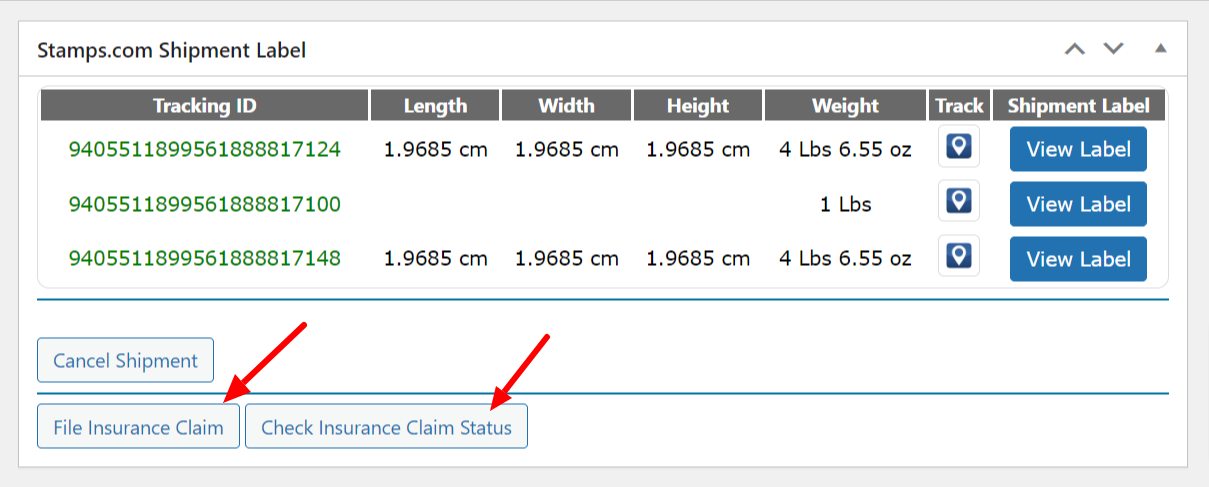
- The shipment is finally created, and a shipment tracking ID is generated, as shown in the screenshot below.

To file a claim for your shipments insured by Stamps Parcel Guard Insurance, click File Insurance Claim. You can also track the status of your claim right from your WooCommerce orders page by clicking Check Insurance Claim Status.
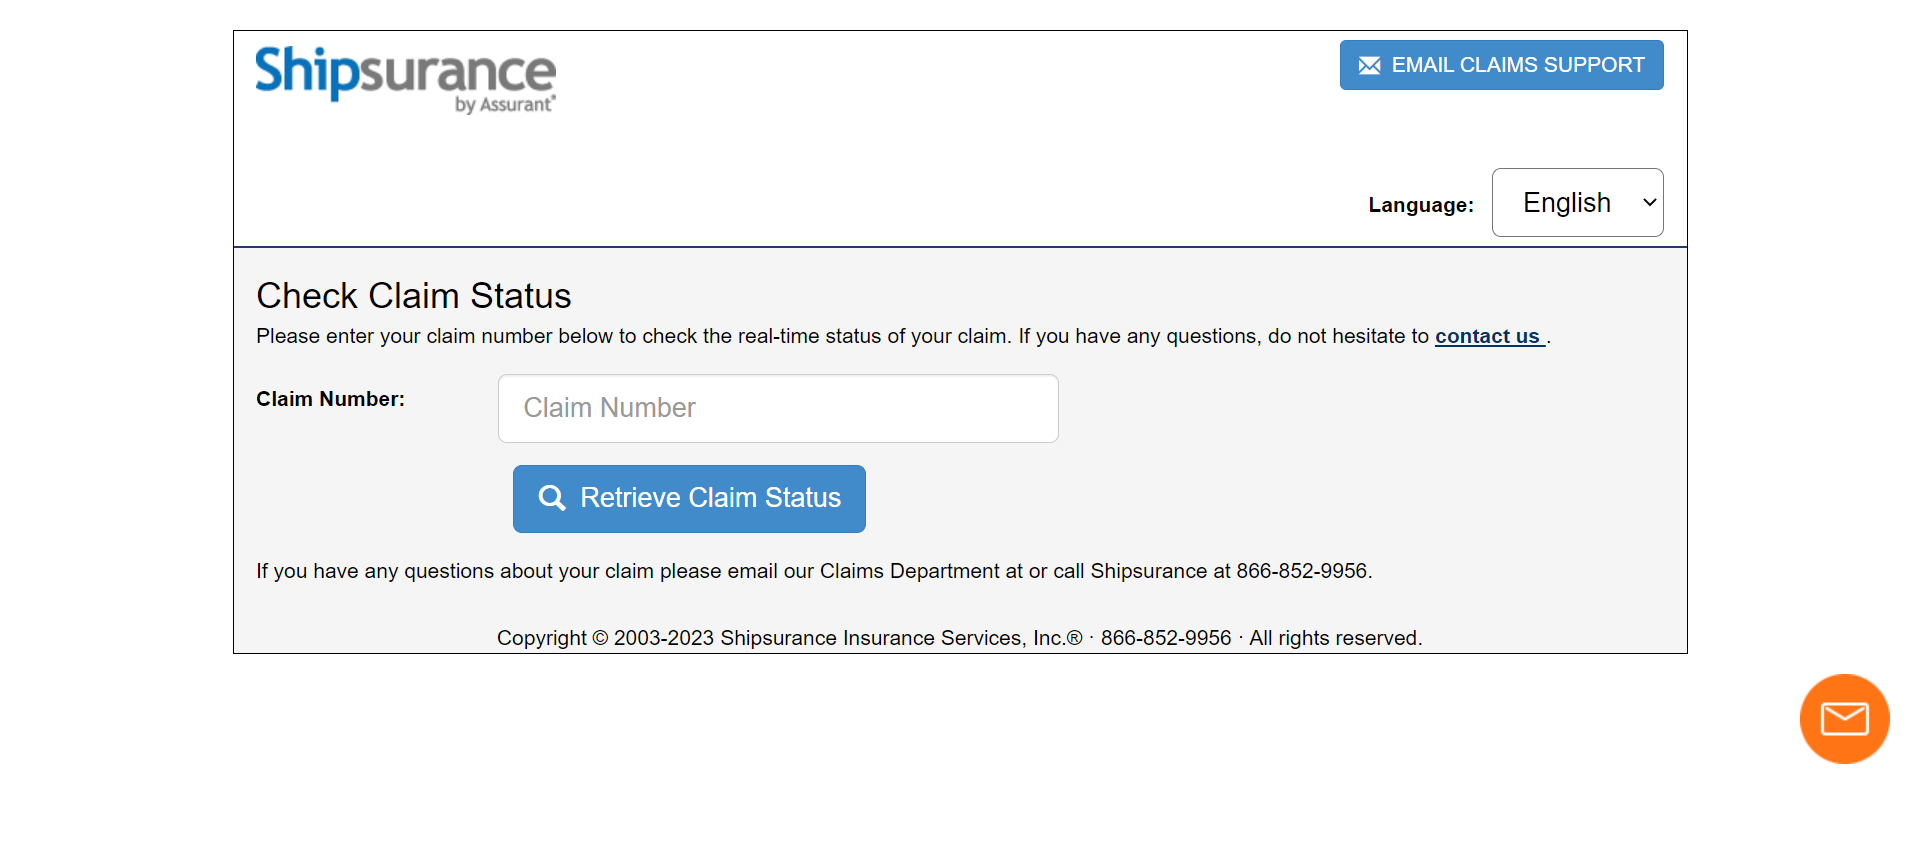
Upon clicking FIle Insurance Claim, you will be redirected to the Insurance claim page wherein you will have to fill in all your order and insurance details and add any necessary documents. Once you file your claim, you will receive a claim number which you can later use to check your insurance claim status.
On clicking Check Insurance Claim Status, you will be redirected to the check claim status page where you can enter the obtained claim number to track the progress of your insurance claim.
- The shipment label is now ready to be printed. To do so, click View Label.
A screenshot of a sample Stamps.com shipment label is shown below.

With our WooCommerce Stamps.com-USPS plugin, you can print labels for international shipping with Customs Declaration Forms as well. A sample international label is shown in the below screenshot.

How to download WooCommerce Stamps.com shipment labels?
Not only can you print shipping labels, but you can also download respective PDFs too. This option is available in WooCommerce Orders page. To do this, go to Dashboard > WooCommerce > Orders.
A sample screenshot is shown below.

Click on Stamps.com icon in the Actions column, to download the shipment label.
How to create WooCommerce Stamps.com shipment labels in bulk?
You can generate shipment labels in bulk on the WooCommerce Orders page. Select the desired orders to print the labels, and select Create Stamps USPS Shipment option from the Action list, and click on Apply button.

How to track shipments with WooCommerce Stamps.com shipping plugin?
Once the shipment tracking ID is generated, you can enter the desired shipment date and click on Save/Show Tracking info button, as shown in the below screenshot.
Once the shipment tracking information, you will receive a confirmation message, as shown in the screenshot below.
How to add funds to my Stamps.com Account?
If you have enabled Stamps.com Account Manager in the plugin settings, you can see a Stamp.com Account meta box on WooCommerce edit order page. Here, you can add funds to our Stamps.com account for postage.
The setting is as shown in the below screenshot.

How to generate Stamps.com USPS shipping labels in bulk?
To generate shipping labels in bulk, you would need our ELEX WooCommerce Stamps.com USPS Bulk Label Printing Add-On. Once you have purchased this add-on, you can read how to bulk print Stamps.com USPS shipping labels to set up the add-on.
How to auto-generate and email Stamps.com USPS shipping labels?
To generate automatically generate and also email Stamps.com USPS shipping labels, you would need our ELEX Stamps.com USPS Auto-Generate & Email Labels Add-On. Once you have purchased this add-on, you can read how to auto-generate and email Stamp.com USPS shipping labels to set up the add-on.
How to schedule a USPS Pickup Request with Stamps.com?
Scheduling USPS pickup request is not made easy with ELEX WooCommerce Stamps.com-USPS Pickup Request Add-On. Read the product documentation to understand the add-on in detail.
How to Hide Shipping Methods Based On Destination Countries (US & Canada)?
To offer free shipping only for the United States and Canada billing addresses and, make available the international USPS shipping rates for all other countries, check out the code snippet.
To know more about the product, check out Stamps.com Shipping Plugin with USPS Postage for WooCommerce.
Or check out the documentation section for more related articles.
For any queries, contact our support team.