Running an e-commerce business involves a multitude of tasks, and among them, managing shipping can be both time-consuming and intricate. WooCommerce, a powerful e-commerce platform, offers a range of solutions to automate and simplify various aspects of your online store.
In this article, we’ll delve into the process of auto-generating and emailing shipping labels in WooCommerce for EasyPost (FedEx, UPS, Canada Post & USPS), Australia Post, DHL, and Stamps.com USPS. By implementing this efficient workflow, you can save valuable time, enhance accuracy, and provide a seamless experience for both you and your customers.
The Role of Shipping Labels in E-commerce
Shipping labels serve as the passport for your products as they journey from your warehouse to your customer’s doorstep. Automating the generation of these labels not only expedites the shipping process but also reduces the likelihood of errors that can arise from manual entry.
Benefits of Auto-Generation of Shipping Labels
- Time Efficiency: Automating the shipping label process frees up your time, allowing you to focus on other critical aspects of your business.
- Accuracy: Automated processes are less prone to human error, ensuring that the shipping information is correct.
- Customer Satisfaction: Swift and accurate shipping contributes to a positive customer experience, fostering loyalty and repeat business.
Auto-Generate and Email EasyPost Shipping Labels
The ELEX WooCommerce EasyPost Auto-Generate & Email Labels Add-On is a valuable extension that seamlessly integrates with your WooCommerce store, simplifying the task of shipping label creation and distribution. It automates the label generation and emailing processes for shipping carriers such as FedEx, UPS, Canada Post & USPS. Here are some of the key highlights of this add-on:
- Automated Shipment Creation: The add-on automates the process of creating shipments and generating shipping labels. When an order reaches a specified status, the add-on takes care of everything, ensuring that your orders are ready for shipping.
- Email Notifications: The add-on sends email notifications to keep you and your customers informed at every step of the shipping process. You’ll receive notifications when orders are placed, shipments are created, and even when there are issues with generating labels.
- Customization Options: Customize the email notifications to meet your specific needs. You can choose who receives these notifications and tailor the content to reflect your brand’s voice.
Before you start using the ELEX WooCommerce EasyPost Auto-Generate & Email Labels Add-On, you’ll need to ensure that you have the following in place:
- ELEX EasyPost (FedEx, UPS, Canada Post & USPS) Shipping & Label Printing Plugin for WooCommerce (Core plugin)
- ELEX EasyPost Auto-Generate & Email Labels Add-On
Now that you have the prerequisites in place, let’s dive into the process of getting started with the ELEX WooCommerce EasyPost Auto-Generate & Email Labels Add-On:
Step 1: Set Up the ELEX WooCommerce EasyPost Shipping Plugin
Before you can begin automating label generation, you need to configure the core ELEX WooCommerce EasyPost Shipping Plugin settings. The documentation demonstrates the detailed steps to do so. Configure the plugin settings according to your shipping needs. This includes setting up shipping carriers, rates, and other essential details.
Step 2: Configure the Add-On
Once your core shipping plugin is configured, it’s time to set up the ELEX WooCommerce EasyPost Auto-Generate & Email Labels Add-On. Follow these steps:
Navigate to WooCommerce > Shipping > EasyPost > Add-on – Auto Generate Labels.
In this section, you’ll find various settings to configure:
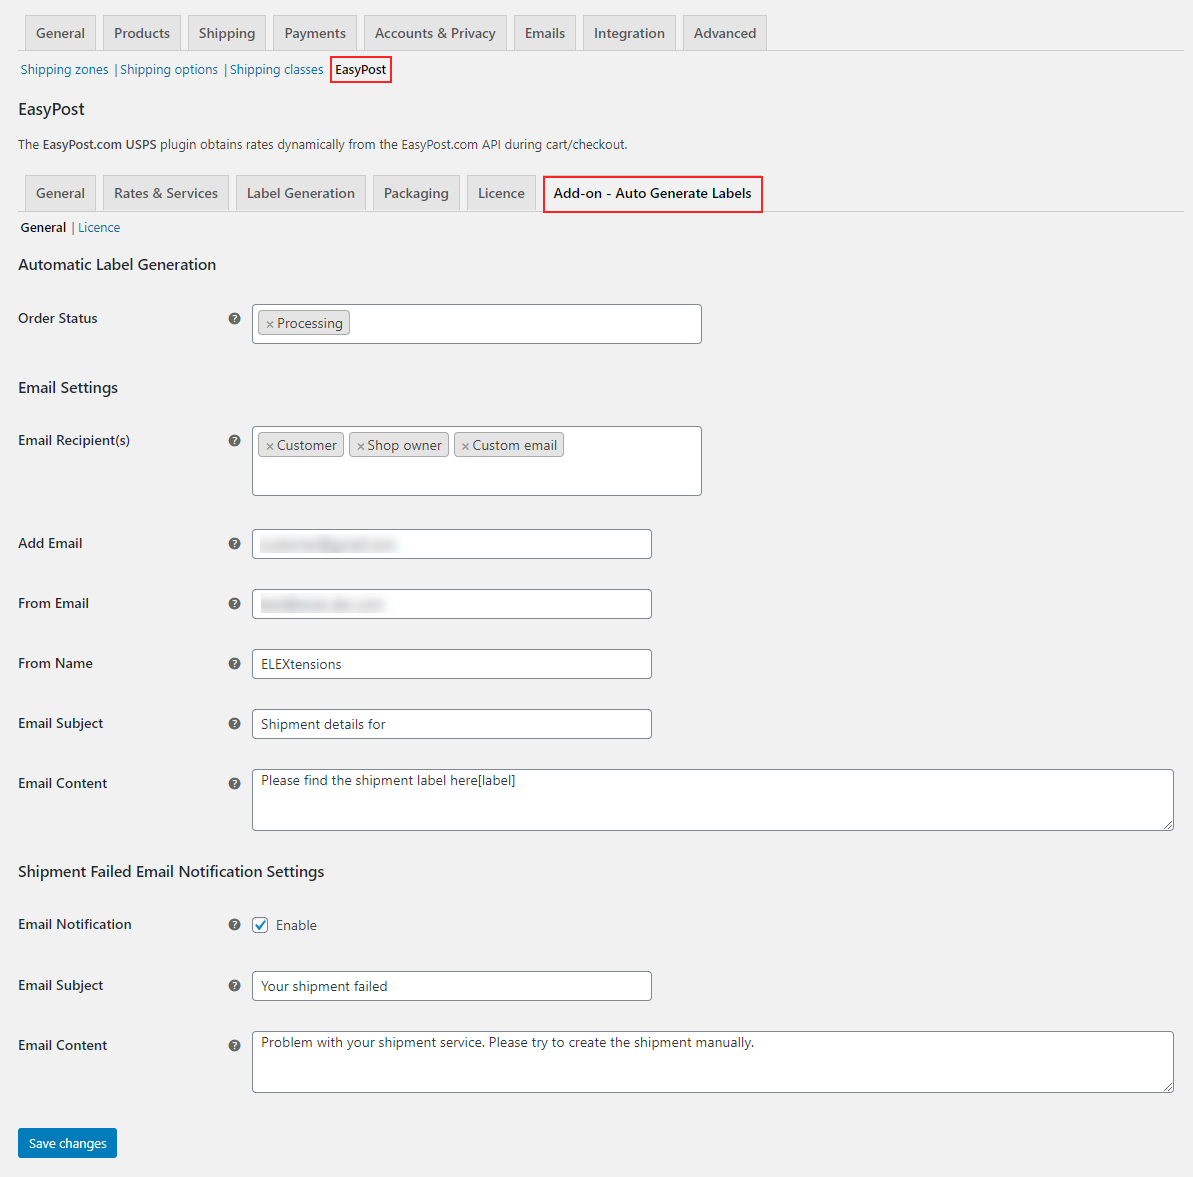 Order Status
Choose the WooCommerce order status(es) for auto-generating shipping labels. The add-on creates shipments and labels when an order transitions to one of these statuses.
Email Settings
The email settings for the add-on are crucial to keeping you and your customers informed. Here’s what you can configure:
- Email Recipient(s): Choose whether you want to send auto-generated emails to the customer, the shop owner, or custom recipients. If you select the custom email option, you can add multiple email addresses separated by commas.
- From Email: The add-on typically uses your store’s admin email address as the sender’s email address, but you can choose to enter a different one if needed.
- From Name: Enter the sender’s name, which can be your name or your organization’s name.
- Email Subject: Create a subject line for your emails. If you’re sending emails to customers, consider using catchy phrases or terms that reflect your business. The order IDs will be automatically appended to the subject line.
- Email Content: Craft the content of your emails to describe your customers’ orders. The label(s) will be added to the end of the content automatically.
Shipment Failed Email Notification Settings
There might be instances where a shipment fails to create. In such cases, the add-on helps you notify others of the failure of shipment creation via email. This way, you can quickly address the issue and manually create the shipment and labels.
Configure the following settings for shipment failed email notifications:
- Email Notification: Enable this checkbox to activate shipment failed email notifications.
- Email Subject: Enter a subject line for your shipment failure emails. The respective order ID will be appended to the subject line.
- Email Content: Craft the content for shipment failure notifications.
Once you’ve configured all these settings, click “Save Changes”.
Demonstration
Let’s see how the ELEX WooCommerce EasyPost Auto-Generate & Email Labels Add-On works in action:
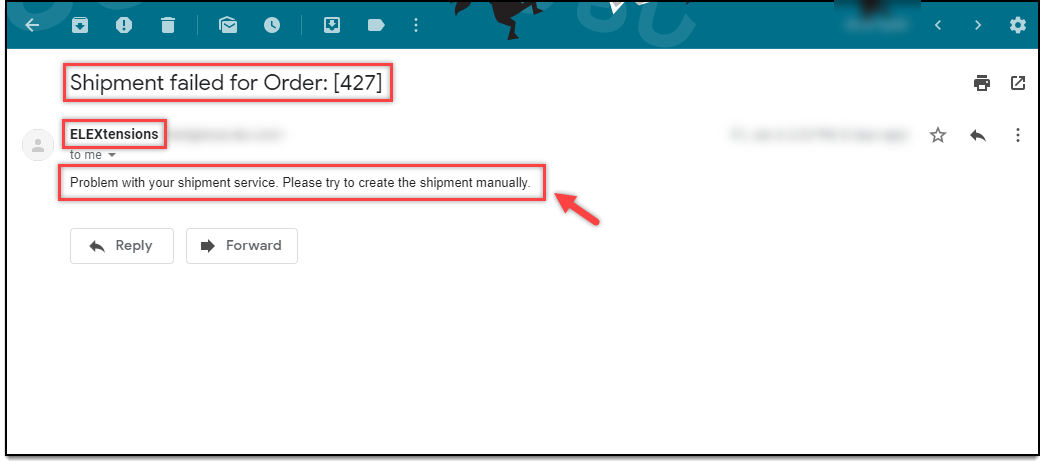
Case 1: Shipment Failure
In this scenario, a shipment fails to create an order. The email recipient receives a notification email informing them of the issue. This is an example of the email that will be sent out:
 Case 2: Successful Order Placement
When an order is placed successfully using an EasyPost shipping service, the add-on automatically creates shipments through the ELEX EasyPost Shipping Plugin. It then notifies the selected email recipient(s) with the necessary information. Here’s a sample of what the email notification for a successful order placement looks like:
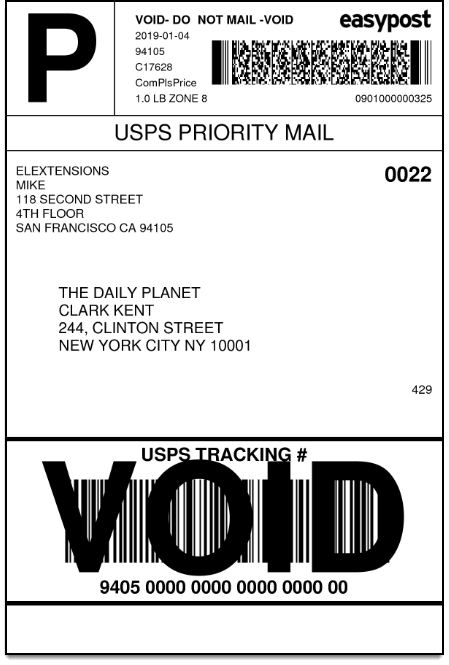
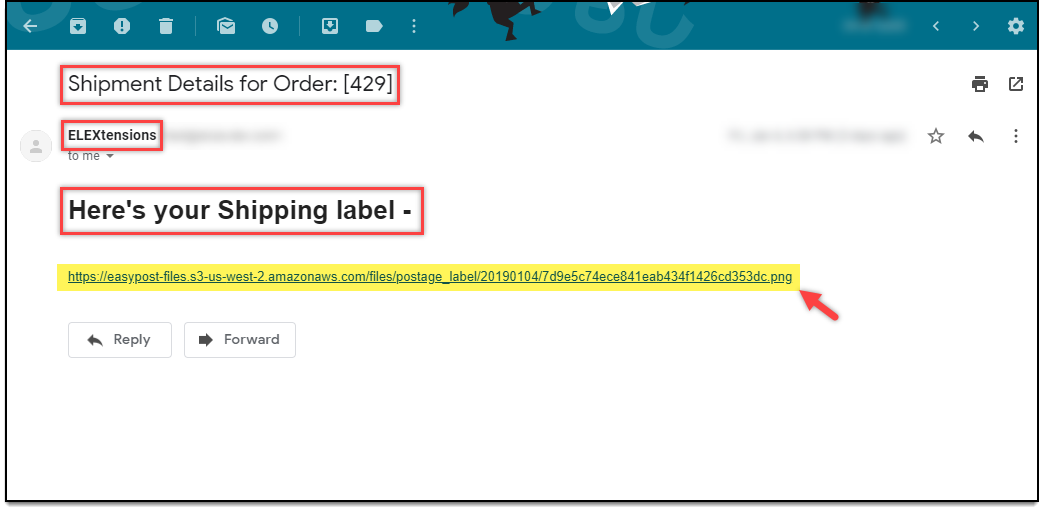 As shown in the image above, you can click on the provided link to view the shipping label for the respective order. Below is a sample label generated by the ELEX EasyPost Shipping Plugin:
 Auto-Generate and Email Australia Post Shipping Labels
The ELEX WooCommerce Australia Post Auto-Generate & Email Labels add-on is a game-changer for WooCommerce store owners, offering automation in the creation and communication of Australia Post shipping labels. Let’s look at some of its important features:
- Automated Shipment Creation: Once an order reaches a specified status, the add-on takes charge, automatically creating shipments and generating shipping labels for each package in the order. This eliminates the manual effort and potential errors associated with label creation.
- Email Notifications: The add-on keeps you and your customers informed by sending email notifications. From order placement to shipment creation, you receive timely alerts. Customers can also be notified, enhancing their overall experience.
- Shipment Tracking: The email notifications not only contain the label but also provide a tracking URL. Recipients can easily track their shipments, adding transparency and convenience to the entire shipping process.
- Failure Notifications: In cases where a shipment fails to be created, the add-on ensures that you are promptly notified. This proactive notification allows you to address the issue swiftly, either by resolving it or by manually creating the shipment.
Before diving into the setup, ensure you have the following in place:
- ELEX WooCommerce Australia Post Shipping Plugin with Print Label & Tracking
- ELEX WooCommerce Australia Post Auto-Generate & Email Labels Add-On
Once that’s in order, let’s proceed with setting up the add-on:
Step 1: Set Up the ELEX WooCommerce Australia Post Shipping Plugin.
Configure the plugin settings according to your specific shipping requirements. This includes setting up carriers, rates, and other essential details. The documentation demonstrates the detailed steps to do so. Configure the plugin settings according to your shipping needs.
Step 2: Configure the Add-On
With the core plugin set up, it’s time to configure the ELEX WooCommerce Australia Post Auto-Generate & Email Labels Add-On:
Navigate to WooCommerce > Shipping > Australia Post > Auto Label Generate Add-On.
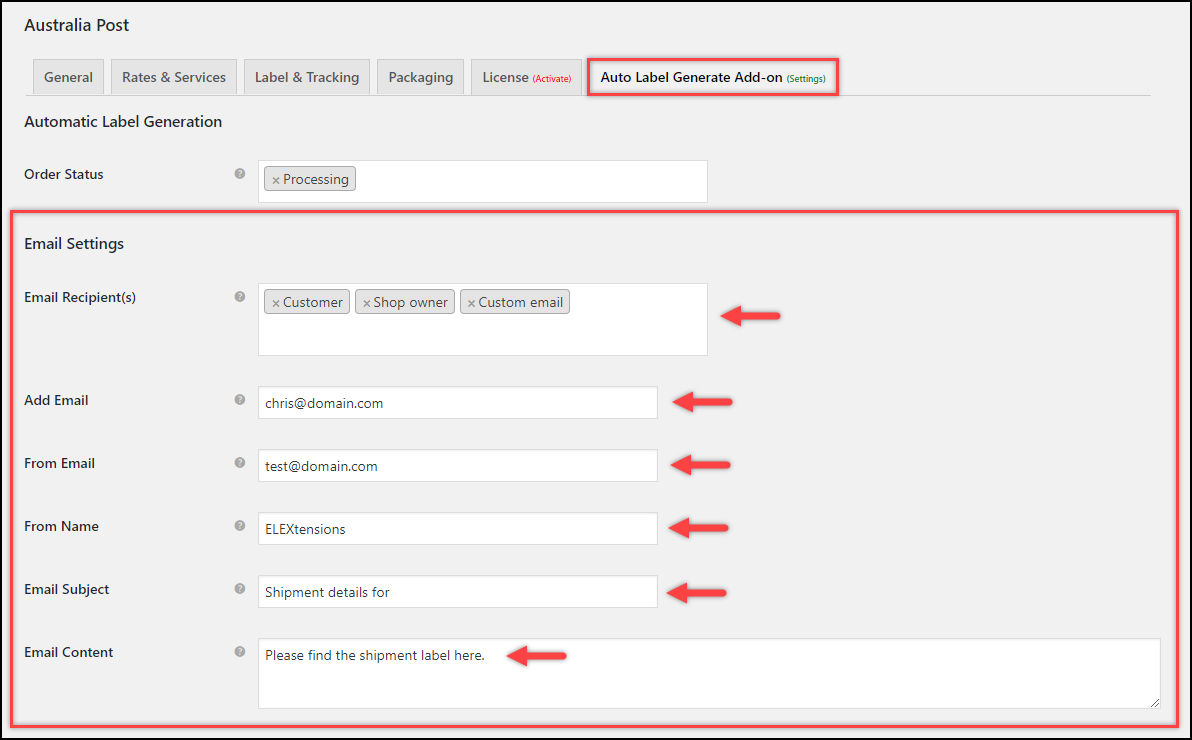 In this section, you’ll find various settings to configure, including:
Order Status
Choose the WooCommerce order status(es) from the provided drop-down list for which you want to auto-generate shipping labels. When an order transitions to one of the selected statuses, the add-on springs into action, creating shipments, generating labels, and dispatching them via email.
Email Settings
The email settings for the add-on are crucial for keeping you and your customers in the loop. Customize the following:
- Email Recipient(s): Choose whether to send auto-generated emails to the customer, the shop owner, or custom recipients. For custom recipients, you can add multiple email addresses.
- From Email: The add-on typically uses your store’s admin email address, but you can enter a different one if needed.
- From Name: Enter the sender’s name, which could be your name or your organization’s name.
- Email Subject: Craft a subject line for your emails. If sending to customers, use catchy phrases or terms that reflect your business. Order IDs are appended automatically.
- Email Content: Describe your customers’ orders, and the label(s) will be appended at the end of the content.
Shipment Failed Email Notification Settings
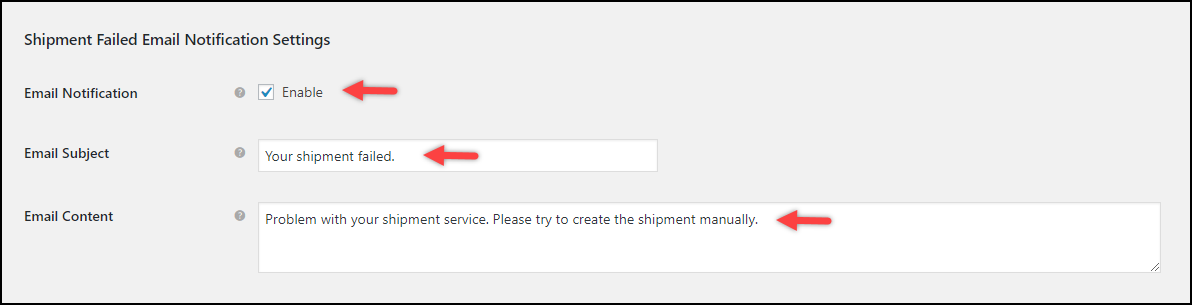 In instances where a shipment fails to be created, the add-on ensures you are promptly informed. Configure the following settings:
- Email Notification: Enable this checkbox to activate shipment failed email notifications.
- Email Subject: Enter a subject line for your shipment failure emails. The respective order ID will be appended to the subject line.
- Email Content: Craft content for shipment failure notifications.
Once configured, click “Save Changes” to apply your settings.
Demonstration
Let’s walk through a scenario to demonstrate the functionality of the ELEX WooCommerce Australia Post Auto-Generate & Email Labels Add-On:
Case: Successful Order Placement
When an order is successfully placed using the Australia Post shipping service, the add-on kicks in, automatically creating shipments through the ELEX Australia Post Shipping Plugin. It then notifies the selected email recipient(s). This is an example of how the email notification appears:
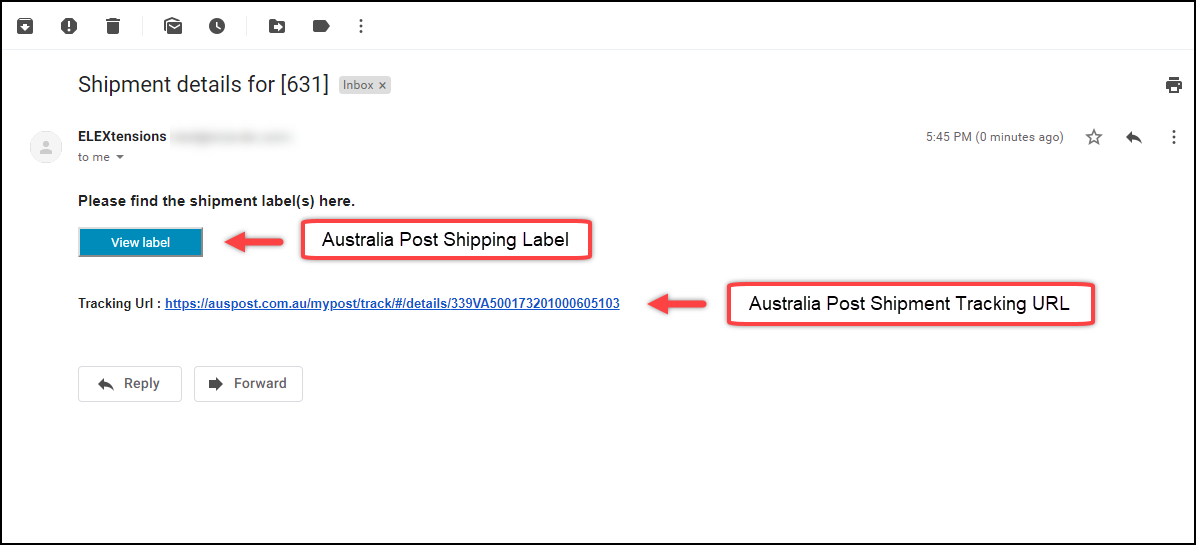 As shown in the image above, clicking on the provided link allows you to view the shipping label of the respective order. To track the shipment, simply click on the provided shipment URL. Each label has a separate shipment tracking link.
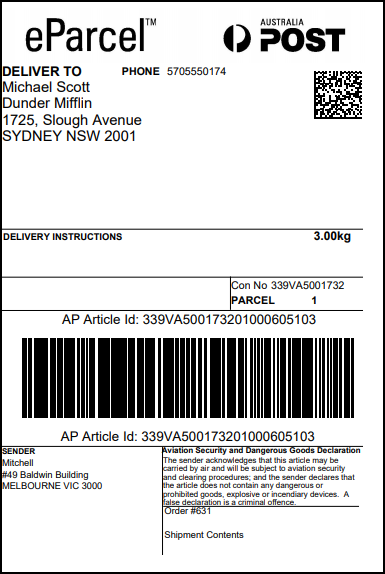
Below is a sample label generated by the ELEX Australia Post Shipping Plugin:
 Auto-Generate and Email DHL Express Shipping Labels
The ELEX WooCommerce DHL Express Auto-Generate & Email Labels Add-On streamlines the process of auto-generating DHL Express shipping labels. Here are some key features that make this add-on a must-have for optimizing your shipping process:
- Automated Shipment Creation: This add-on takes care of the entire shipping process. When an order reaches a specified status, it automatically generates shipments and creates shipping labels for each package in the order. It can even generate return labels if needed.
- Email Notifications: The add-on ensures that you and your customers are informed at every step of the shipping process. It sends email notifications when orders are placed and shipments are created.
- Shipment Tracking: The email notifications sent by the add-on contain tracking URLs. This allows recipients to easily track their shipments, providing transparency and peace of mind.
- Failure Notifications: In cases where a shipment fails to be created, the add-on proactively notifies you. This notification allows you to take swift action, whether it’s resolving the issue or manually creating the shipment.
Before you can start using the ELEX WooCommerce DHL Express Auto-Generate & Email Labels Add-On, you need to ensure you have the following in place:
- ELEX WooCommerce DHL Express / eCommerce / Paket Shipping Plugin with Print Label (Core plugin)
- ELEX WooCommerce DHL Express Auto-Generate & Email Labels Add-On
Step 1: Set Up the ELEX WooCommerce DHL Express Shipping Plugin
The core label printing process is managed through the ELEX WooCommerce DHL Express Shipping Plugin settings, not the add-on settings. Therefore, start by configuring the core plugin. The documentation demonstrates the detailed steps to do so.
Install and activate the ELEX WooCommerce DHL Express Shipping Plugin. Configure the plugin settings to match your specific shipping requirements. This includes setting up carriers, rates, and other crucial details.
Step 2: Configure the Add-On
With the core plugin properly configured, it’s time to set up the ELEX WooCommerce DHL Express Auto-Generate & Email Labels Add-On:
Navigate to Shipping > DHL Express > Auto Label Generate Add-On in WooCommerce.
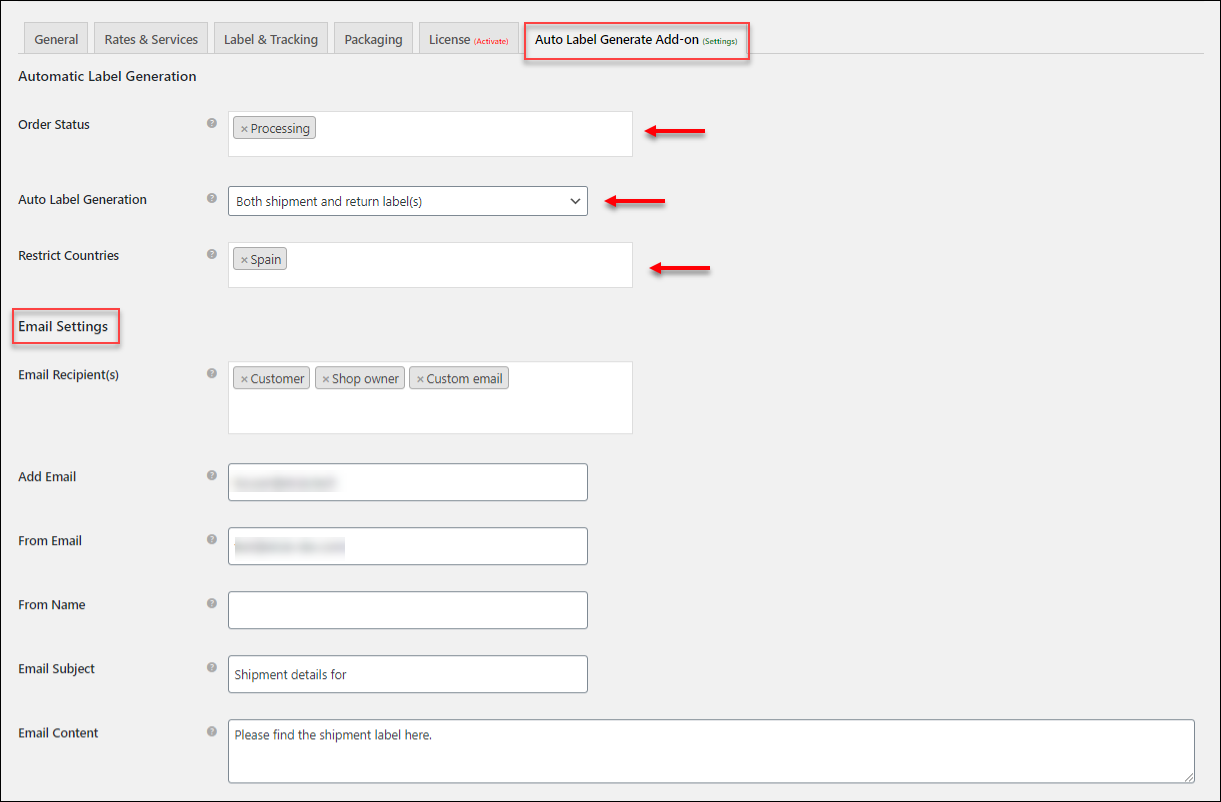 In this section, you’ll find various settings to configure, including:
Order Status
Choose the WooCommerce order status(es) for auto-generating shipping labels. The add-on creates shipments and labels when an order transitions to one of these statuses.
Auto-Label Generation
You have the flexibility to choose whether to generate only shipping labels or both shipping labels and return labels. For return label generation, you’ll need to enable the return label generation setting and provide the Return Label Account Number in the Label & Tracking settings of the parent plugin.
Restrict Countries
If you need to restrict the automatic generation of shipment and return labels for certain countries’ shipping addresses, you can select those countries from the drop-down list.
Email Settings
The email settings for the add-on are crucial for keeping all parties informed. Customize the following:
- Email Recipient(s): Choose whether to send the auto-generated emails to the customer, the shop owner, or custom recipients. For custom recipients, you can add multiple email addresses.
- From Email: By default, the add-on uses your store’s admin email address as the sender’s email address. However, you have the option to enter a different email ID if necessary.
- From Name: Enter the sender’s name, which could be your name or the name of your organization.
- Email Subject: Create a subject line for your emails. If you’re sending emails to customers, consider using catchy phrases or terms that reflect your business. Order IDs are appended automatically.
- Email Content: Describe your customers’ orders, and the label(s) will be appended at the end of the content.
Shipment Failed Email Notification Settings
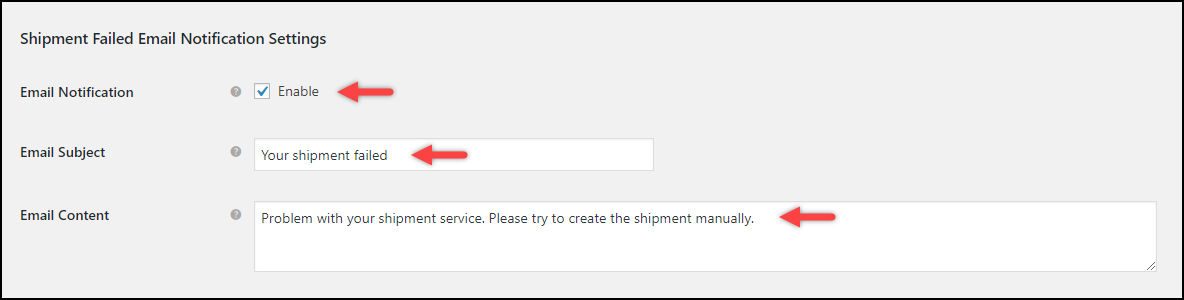 In cases where a shipment fails to be created, the add-on ensures you are promptly notified. Configure the following settings:
- Email Notification: Activate this checkbox to enable shipment failed email notifications.
- Email Subject: Enter a subject line for your shipment failure emails. The respective order ID will be appended to the subject line.
- Email Content: Provide content for shipment failure notifications.
Once you’ve configured all the settings to your satisfaction, click the “Save Changes” button to apply your settings.
Demonstration
To fully grasp the functionality of the ELEX WooCommerce DHL Express Auto-Generate & Email Labels Add-On, let’s walk through a scenario:
Case: Successful Order Placement
When an order is successfully placed using the DHL shipping service, the add-on springs into action. It automatically creates shipments through the ELEX WooCommerce DHL Express Shipping Plugin and notifies the selected email recipient(s). Here’s a sample email notification:
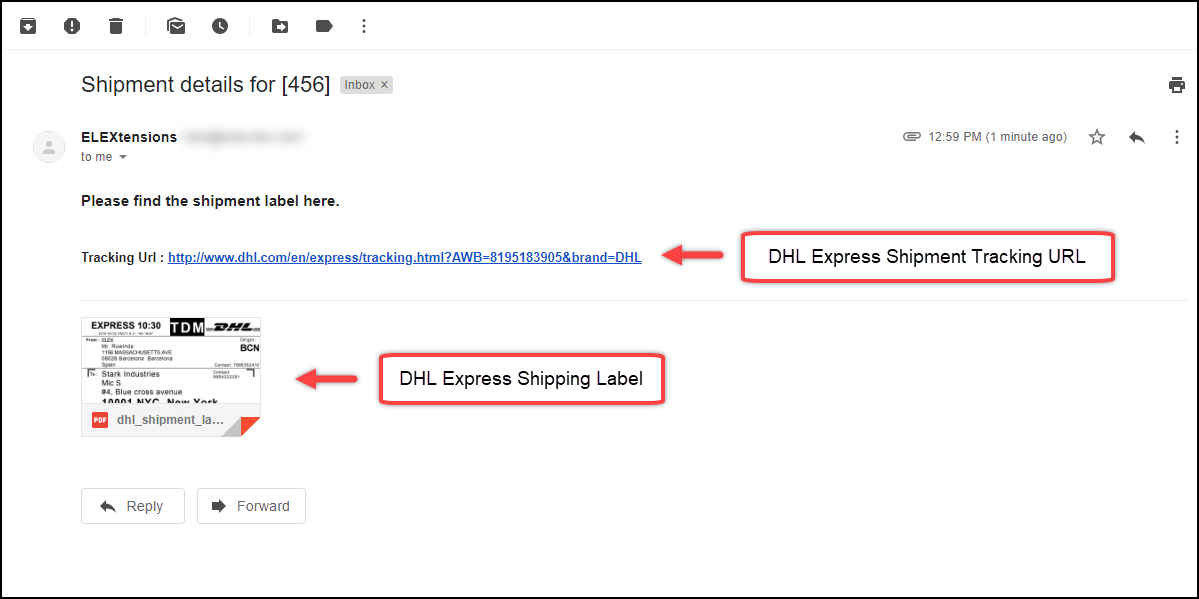 As shown in the image above, you can click on the provided link to view the shipping label of the respective order. To track the shipment, simply click the respective shipment URL. Each label has a separate shipment tracking link.
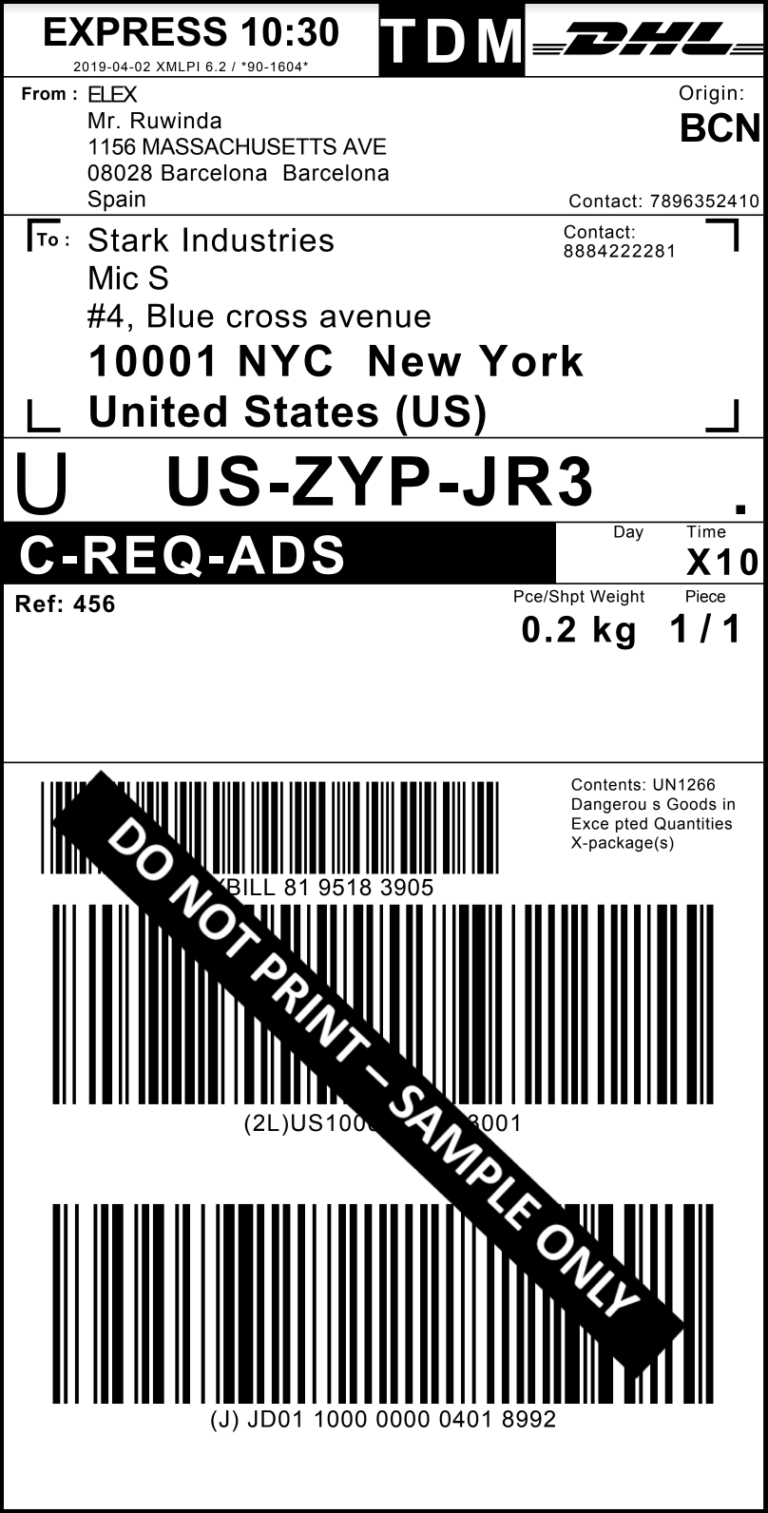
Below is a sample label generated by the ELEX DHL Express Shipping Plugin:
 Auto-Generate and Email Stamps.com USPS Shipping Labels
The ELEX Stamps.com USPS Auto-Generate & Email Labels Add-On is designed to simplify the shipping process for WooCommerce store owners. Here are some key features that make this add-on an essential tool for efficient shipping management:
- Automated Shipment Creation: The add-on takes care of the entire shipping process. Once an order reaches a specified status, it automatically generates shipments and creates shipping labels for each package in the order.
- Email Notifications: Stay informed at every step of the shipping process. The add-on sends email notifications to the shop owner whenever an order is placed and a shipment is created. Additionally, you have the option to notify your customers for enhanced transparency.
- Shipment Tracking: The email notifications sent by the add-on contain tracking URLs. This allows recipients to easily track their shipments, providing real-time updates on the status and location of their packages.
- Failure Notifications: In cases where a shipment fails to be created, the add-on proactively notifies shop owners. This notification allows you to quickly resolve the issue, whether it’s related to shipping service selection or other factors, and manually create the shipment.
Before you can start using the ELEX Stamps.com USPS Auto-Generate & Email Labels Add-On, you need to ensure you have the following in place:
- ELEX Stamps.com Shipping Plugin with USPS Postage for WooCommerce (Core plugin)
- ELEX Stamps.com USPS Auto-Generate & Email Labels Add-On
Step 1: Set Up the ELEX Stamps.com USPS Shipping Plugin
The core label printing process is managed through the ELEX Stamps.com USPS Shipping Plugin settings, not the add-on settings. Therefore, start by configuring the core plugin:
Install and activate the ELEX Stamps.com USPS Shipping Plugin.
Configure the plugin settings to match your specific shipping requirements. This includes setting up carriers, rates, and other crucial details. The documentation demonstrates the detailed steps to do so.
Step 2: Configure the Add-On
With the core plugin properly configured, it’s time to set up the ELEX Stamps.com USPS Auto-Generate & Email Labels Add-On:
Navigate to WooCommerce > Shipping > Stamps.com-USPS > Add-on – Auto Generate Labels.
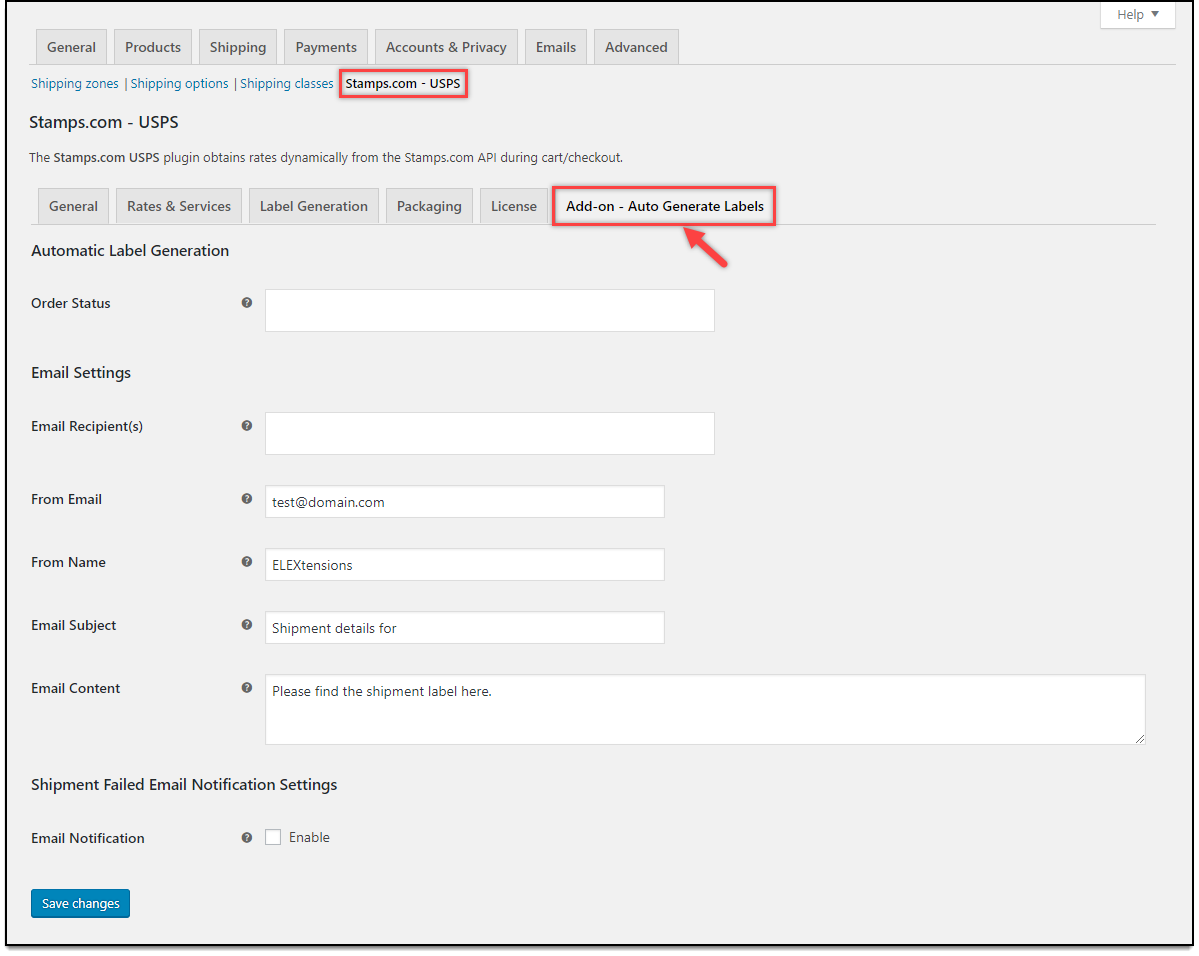 In this section, you’ll find various settings to configure:
Order Status
Choose the WooCommerce order status(es) for auto-generating shipping labels. The add-on creates shipments and labels when an order transitions to one of these statuses.
Email Settings
The email settings for the add-on are crucial for keeping all parties informed. Customize the following:
- Email Recipient(s): Choose whether to send the auto-generated emails to the customer, the shop owner, or custom recipients. For custom recipients, you can add multiple email addresses.
- Add Email: This setting appears when you select the custom email option for the email recipient. You may enter multiple email addresses by separating them with commas.
- From Email: By default, the add-on uses your store’s admin email address as the sender’s email address. However, you have the option to enter a different email ID if necessary.
- From Name: Enter the sender’s name, which could be your name or the name of your organization.
- Email Subject: Create a subject line for your emails. If you’re sending emails to customers, consider using catchy phrases or terms that reflect your business. Order IDs are appended automatically.
- Email Content: Describe your customers’ orders, and the label(s) will be appended at the end of the content.
Shipment Failed Email Notification Settings
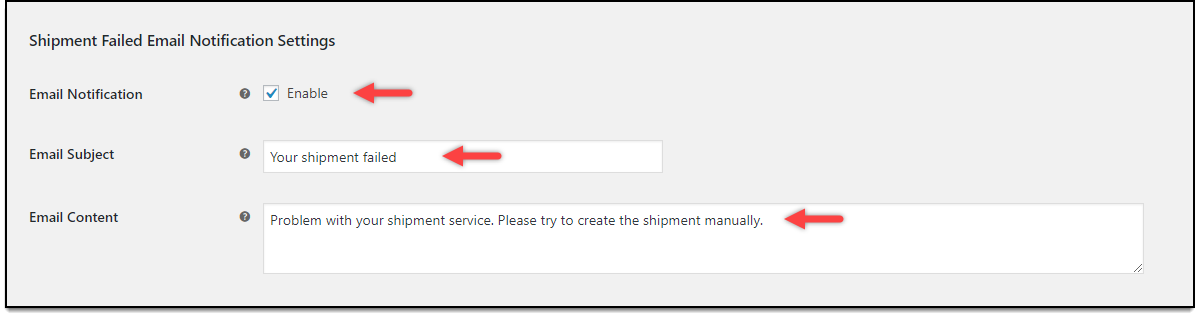 In cases where a shipment fails to be created, the add-on ensures you are promptly notified. Configure the following settings:
- Email Notification: Activate this checkbox to enable shipment failed email notifications.
- Email Subject: Enter a subject line for your shipment failure emails. The respective order ID will be appended to the subject line.
- Email Content: Provide content for shipment failure notifications.
Click “Save Changes” when you’re through making adjustments.
Demonstration
To fully understand the functionality of the ELEX Stamps.com USPS Auto-Generate & Email Labels Add-On, let’s walk through a scenario:
Case: Successful Order Placement
When an order is successfully placed using the USPS shipping service, the add-on springs into action. It automatically creates shipments using the ELEX Stamps.com USPS Shipping Plugin and notifies the selected email recipient(s). Here’s a sample email notification:
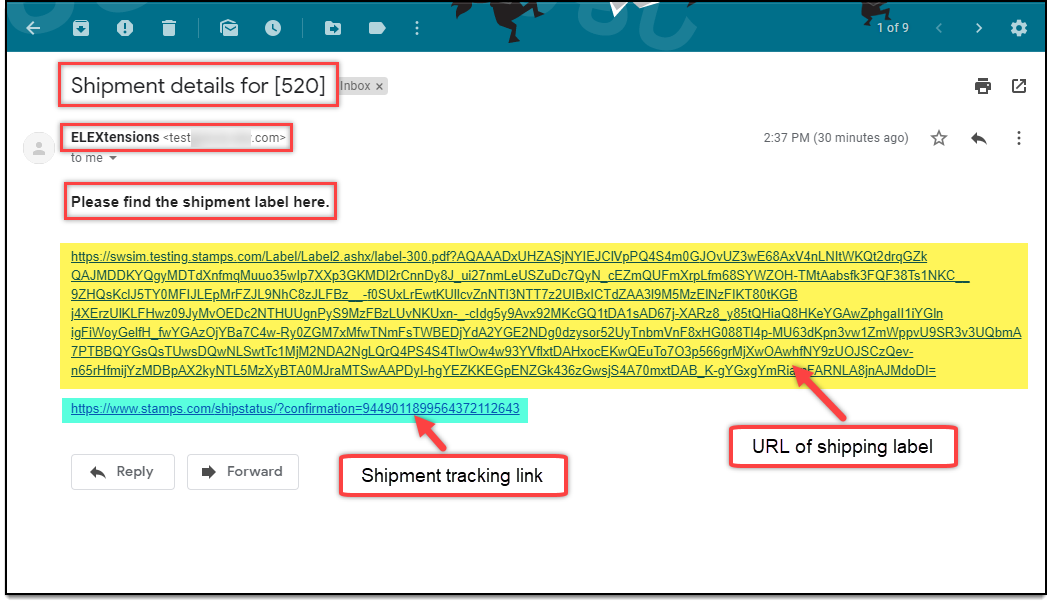 As shown in the image above, click on the provided link to view the shipping label of the respective order. To track the shipment, simply click the respective shipment URL. Each label has a separate shipment tracking link.
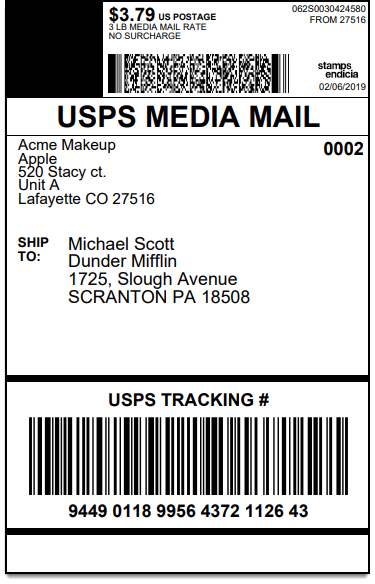
Here is a sample label created using the ELEX Stamps.com USPS Shipping Plugin:
 Wrapping Up
Automating the process of generating and emailing shipping labels in WooCommerce is a pivotal step toward optimizing your e-commerce operations. By following the steps outlined in this guide, you can enhance efficiency, reduce errors, and elevate the overall customer experience.
In order to succeed in the fiercely competitive industry of e-commerce, it’s important that you leverage the potential of automation in your store. If you have any questions regarding the auto-generation and emailing of shipping labels, please let us know in the comments section below.

