What can we help you with?
How to set up WooCommerce DHL Express in ELEX WooCommerce DHL Shipping Plugin with Print Label?
This article intends to provide detailed, step-by-step instructions that’ll help you set up WooCommerce DHL Express with ELEX WooCommerce DHL Shipping Plugin.
Deutsche Post DHL is a German logistics company, and is undoubtedly a front-runner in the field of logistics, particularly for those via sea and airmail. The company provides customized supply chain solutions, handling everything from contracts, delivery, and reverse logistics as well.
DHL Express is a division of DHL, which caters to international courier, parcel, and express mail services. It provides a wide range of express parcel and package services, along with shipment tracking facilities.
With our ELEX WooCommerce DHL Express / eCommerce / Paket / Parcel Shipping Plugin with Print Label, you can fetch real-time rates on your WooCommerce store. You can generate shipment and return labels for your packages and can configure shipment tracking for your orders as well. In addition to this, the plugin provides an option to pack items individually, or use custom boxes. Not to mention, you can either use your DHL account rates or listed rates. This plugin comprises DHL eCommerce, DHL Paket, and DHL Parcel as well, you can enable desired DHL services, as per your shipping requirement. The plugin also supports multi-vendor setup and is compatible with WooCommerce Multi-Vendor Support for ELEX Shipping Plugins.
Overview
Some of the major highlights of the plugin include:
-
- Provide real-time rates: The real-time shipping rates will be displayed on the cart and checkout pages.
- Offer Insurance: Every shipment is transported on a limited liability basis as provided by DHL. If the shipper requires greater protection, then insurance may be arranged at an additional cost by DHL.
- Adjust shipping rates: Set up custom amount or percentage adjustment for shipping rates.
- Print Shipment & Return label: Print shipment and return label of custom size and format.
- Request Archive Air Waybill: For package safety and custom clearance purposes, you can request a DHL waybill.
- Packing Options: You can pack items individually, or pack them into custom boxes based on the weight and dimensions of the package.
- Verify customers during package delivery: You can configure to accept signatures during delivery of the package, and/ or even verify whether the order recipient is an adult (18+).
- Added Code Snippet to send State as City: For specific countries without zip code, the plugin will consider the state name as the city.
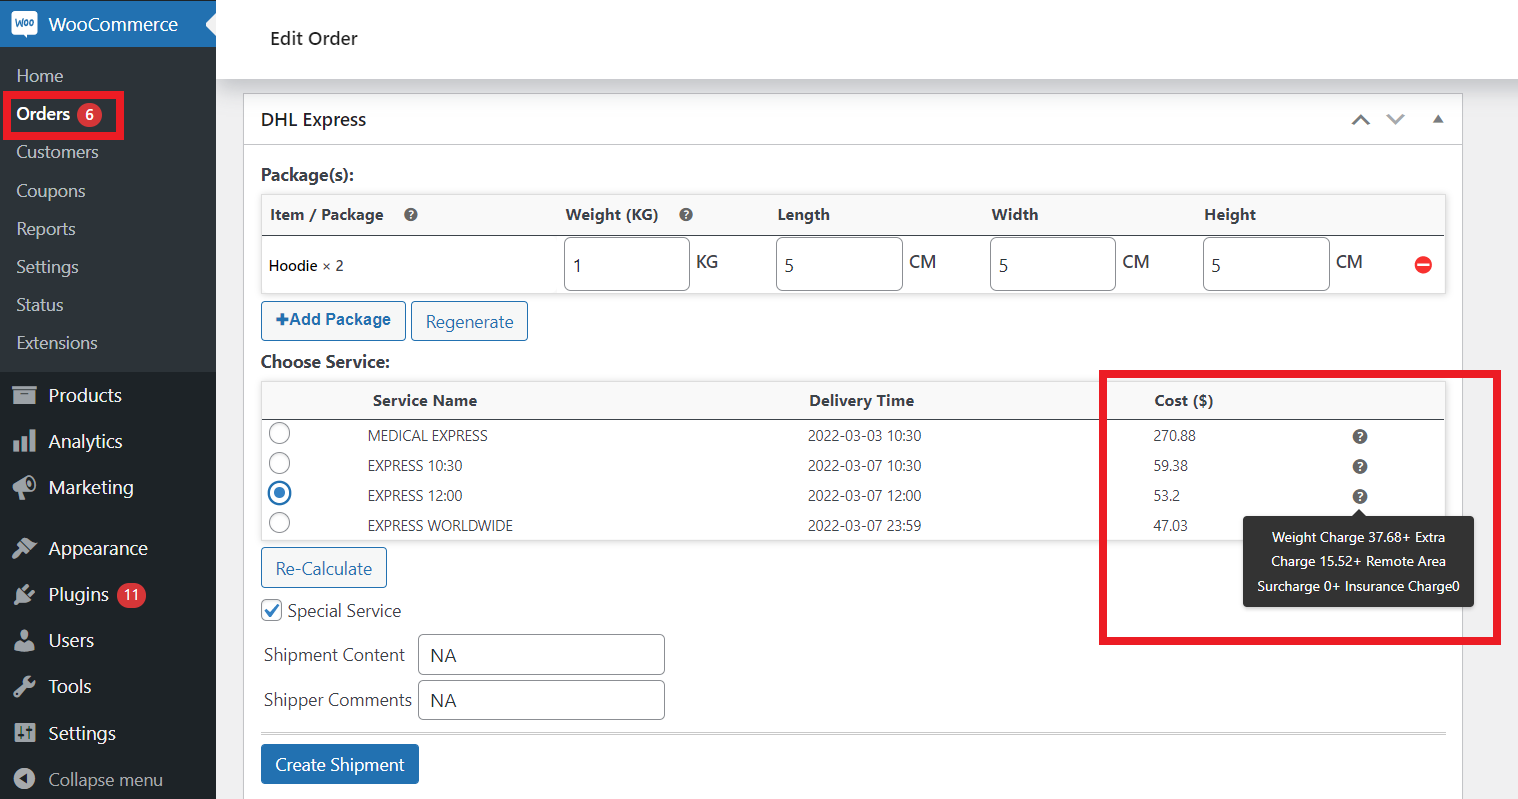
- View service breakdown charges: Now you have the option to view the service breakdown charges on the WooCommerce Orders page.
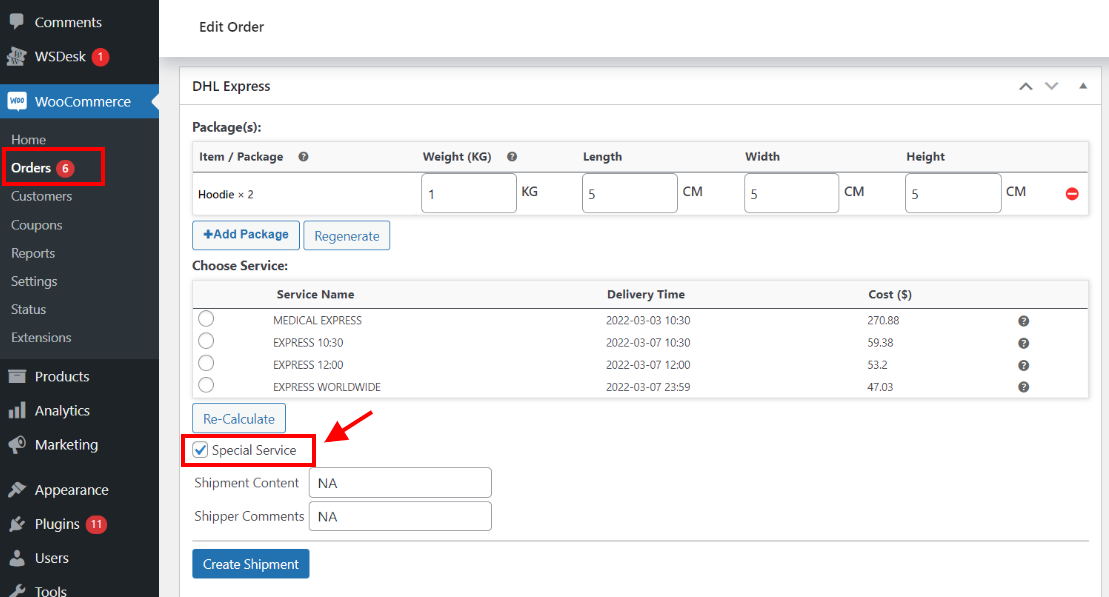
- Enable or Disable Special Services: You can choose to enable or disable the special service offered by DHL from the WooCommerce Orders Page.
All these features (and many more!) are bundled into one solution to serve your DHL WooCommerce needs for your online store.
Getting started with ELEX WooCommerce DHL Express shipping plugin
Read an article to know how to complete the checkout process on ELEX. You can also read how to download, install, and activate ELEX plugins.
Once the plugin is installed and activated, you can navigate to plugin settings in two ways:
- Dashboard > WooCommerce > Settings > Shipping > DHL Express (or)
- Dashboard > Plugins > Installed Plugins > ELEX DHL Express/DHL Paket WooCommerce Shipping with Print Label > DHL Express.
All right, now let’s get down to configuring the plugin.
General Settings
First up, is the general settings of the plugin. The settings are as shown below.
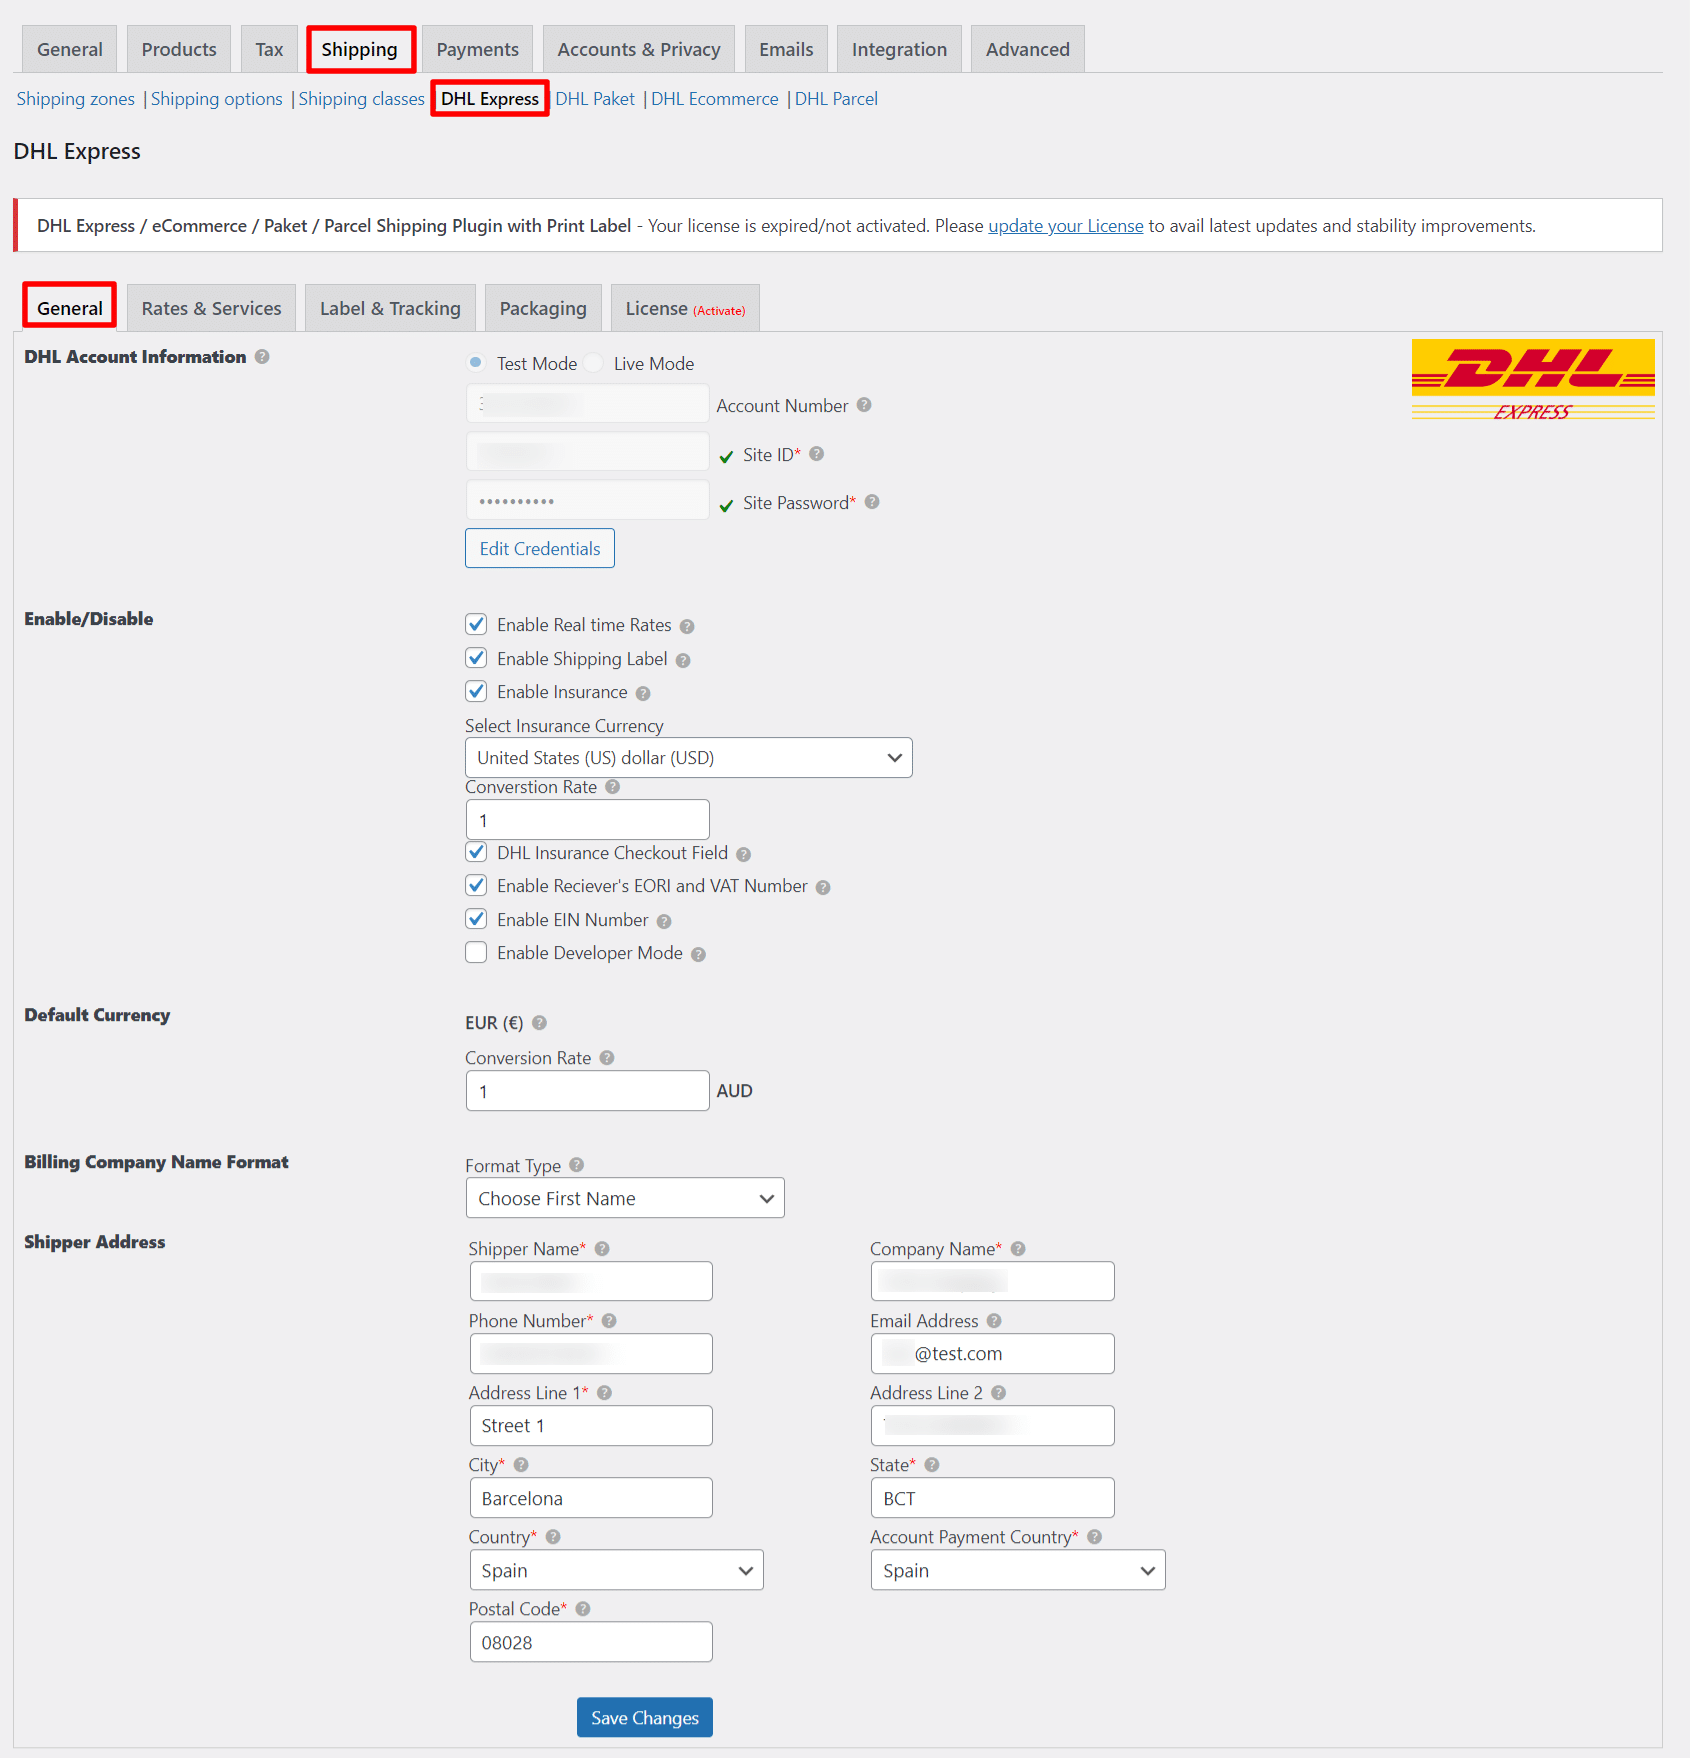
- DHL Account Information: In this setting, you can toggle between the test or live mode, by providing respective credentials. These credentials include Account Number, Site ID, and Site Password.
How to get DHL Credentials?
For getting Site ID and Site Password, countries other than the United States (UK and rest of the world), should contact the DHL account manager. The account manager must request integration with ELEX via DHL pre-sales department. The pre-sale department will then provide the live credentials.
For folks in the United States, you need to write to xmlrequests@dhl.com, along with your account details like account number, address, and so on.
For Australia, you are prompted to contact DHL Express via email at onlineshopping.au@dhl.com.
To know how to create a DHL Express account and configure the credentials on the plugin, refer to the article – How to Create a DHL Express Account and Configure them in ELEX DHL Express Plugin?
Note: Even if you have DHL credentials for Australia, you still need to contact onlineshipping.au@dhl.com and get a new set of credentials for them to work with our solution. This small effort on your part is totally worthy to ensure seamless fulfillment solutions for your business.
To know how to use two DHL accounts for domestic and international shipping at the same time, refer to this article – How to Set Up Two DHL Accounts for Domestic Shipping and International Shipping?
- Enable Real-time rates and Shipping Label: Tick on the respective checkbox(es) to enable your desired service/setting. Enable Shipping Label, if you want to generate DHL Shipping labels for your store.
- Enable Insurance – Tick this checkbox to enable insurance for packages. You can even select the desired currency for conversion, and specify the conversion rate.
- DHL Insurance Checkout Field – Once enabled, customers will get the checkbox to add insurance to their packages, on the checkout page. Refer to the screenshot of the sample checkout page, in the latter part of this article.
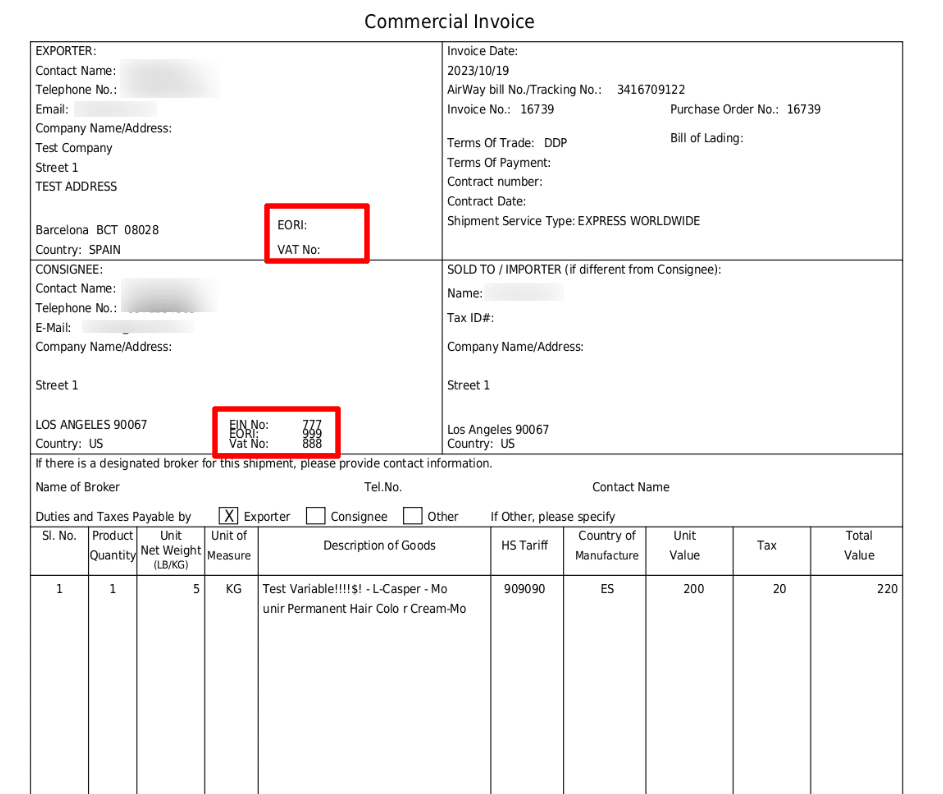
- Enable Receiver’s EORI and VAT Number – Enable this option to add fields for customers to enter their EORI (Economic Operators Registration and Identification number) and VAT number on the Checkout page. The EORI and VAT number entered by the customers will be present on the commercial invoice.
- Enable EIN Number: The Internal Revenue Service (IRS) normally assigns a unique nine-digit number known as an EIN (Exporter Identification Number) to each business. It is necessary when sending packages from the United States to another country. The entered EIN number will be added to the generated commercial invoice.
- Enable Developer Mode – If you are not getting rates, or any services properly, enable the developer mode to debug error(s).
- Default Currency: This field displays the default currency of the country you have specified in your shipper address. If your store currency is different from DHL currency, then a text field appears, where you can enter the conversion rate.
- Billing Company Name Format: Receiver Company name is a mandatory field according to DHL Express API version 10. By selecting the first option “Mandatory”, you can make the Company name field mandatory on the checkout page. Alternatively by selecting the second option “Choose First Name”, the plugin will send the Receivers’ first name to DHL in order to include the receiver’s Company Name as the receiver’s First Name.
- Shipper Address: Enter your shipper address information in the given fields. Remember to specify this address, as this will be used for calculating real-time rates.
- Account Payment Country: Select the country for DHL account payments. By default, the shipper country is taken as an account payment country. If your shipper country differs from the DHL account payment country, choose the required option from the list.
Once all settings are configured, click Save Changes.
Configuring Rates and Services
This section contains settings that affect how the rates will be calculated and the list of DHL services you’ll offer to your customers.

The settings are as shown below.
Show/Hide functionality: You can show or hide the following functionalities –
- Show Delivery Time: On enabling this, the estimated delivery date will be shown for each DHL service.
- DHL Account Rates: When enabled, the plugin will fetch DHL account-specific rates.
- Breakdown charges: When enabled, customers will be shown breakdown charges on cart and checkout pages. The breakdown charges include weight charges, DHL handling charges, and remote area surcharges. Store owners can also view the breakdown of the charges while creating shipments on the WooCommerce Orders page.
- Insurance Charges: Once enabled, show the insurance amount separately in the breakdown charges.
- Remote Area Surcharge: Once enabled, shows the remote area surcharge separately in the breakdown charges.
- Cheapest rates: Only the cheapest rates from the qualified services will be shown on the cart and checkout page.
- Is Dutiable? – By default Dutiable is set to “ NO” for all domestic and EU regions. You can enable it for international non-EU shipments.
- Exclude DHL Tax: Enable this setting to exclude DHL tax from its returned services. The rates returned will be shown excluding any tax. This setting will also be useful if you want to apply the default WooCommerce tax settings, instead of the DHL tax.
- UTF-8 Support: Tick this checkbox to enable UTF-8 character set support. This setting will be useful while printing labels for UTF-8 characters for languages like Chinese, Japanese, and so on. While calculating shipping rates, you can use the address fields in your own language characters and DHL will accept it. Even the commercial invoice, after the shipment is created, will now support all language characters.
- Method Config: In this setting, you can set a custom DHL method name, and specify countries where you wish to offer DHL shipping service(s).
- Block for Specific Countries: Instead of selecting the desired countries, you can choose block countries as well. The DHL Express shipping method will not be shown to the selected countries in this selection field.
- Insurance for Specific Countries: Select desired countries for which you want to show the insurance option to customers on the Checkout page.
- Working Days: Tick the desired working days for the delivery. The estimated delivery date will be shown to the customer based on the days selected in this setting.
- Cut-off Time: Choose the desired cut-off time. If an order is placed after the cut-off time, the next working day will be chosen as the shipping date in the request to DHL API. The estimated delivery date will be displayed based on this shipping date. Please note that the time format will be based on the date and time format of your system.
- Lead Time (Days): If you know there will be a shipping delay due to inventory shortages or delivery delays, you can set a lead time for your shipment. Based on the number of days you enter in the lead time settings, the estimated delivery date will be shown.
- Fallback Rate: The fallback shipping rate will be presented to customers so they can check out if DHL is unable to return any shipping quotes for any technical reason. To disable this feature, leave the field empty.
- Shipping Services & Price Adjustments: This table contains all the DHL services supported by our WooCommerce DHL plugin. You can check/uncheck desired services.
- Following are the DHL services supported by our WooCommerce DHL plugin:
-
Service Code / Product Code Service Name / Product Name Product Content Code 1 DOMESTIC EXPRESS 12:00 DOT – National Express shipping of goods and documents. A domestic door-to-door delivery before 12:00 noon on the next possible business day (only available to specific areas) 2 B2C BTC 3 B2C B2C 4 JETLINE NFO 5 SPRINTLINE SPL 7 EXPRESS EASY XED 8 EXPRESS EASY XEP 9 EUROPACK EPA B BREAKBULK EXPRESS BBX C MEDICAL EXPRESS CMX D EXPRESS WORLDWIDE DOX – International express shipping of non-dutiable shipments outside the EU with delivery before 18:00 on the next possible business day E EXPRESS 9:00 TDE – International express shipping of dutiable shipments with delivery before 9 am in the USA, Canada, and Mexico (only available to specific areas) F FREIGHT WORLDWIDE FRT G DOMESTIC ECONOMY SELECT DES H ECONOMY SELECT ESI – Used when shipping dutiable shipments from the United Kingdom to a destination outside the European Union, to be delivered during Normal Business Hours I DOMESTIC EXPRESS 9:00 DOK – National Express shipping of goods and documents. A domestic door-to-door delivery before 9:00 a.m. on the next possible business day (only available to specific areas) J JUMBO BOX JBX K EXPRESS 9:00 TDK – International express shipping of non-dutiable shipments with delivery before 9 am in the USA, Canada, and Mexico (only available to specific areas) L EXPRESS 10:30 TDL – International express shipping of non-dutiable shipments with delivery before 10.30 am in the USA, Canada, and Mexico (only available to specific areas) M EXPRESS 10:30 TDM – International express shipping of dutiable shipments with delivery before 10.30 am in the USA, Canada, and Mexico (only available to specific areas) N DOMESTIC EXPRESS DOM – National Express shipping of goods and documents. Domestic delivery by the end of the next possible working day O DOMESTIC EXPRESS 10:30 DOL P EXPRESS WORLDWIDE WPX – International express shipping of dutiable shipments outside the EU with delivery before 18:00 on the next possible business day Q MEDICAL EXPRESS WMX R GLOBALMAIL BUSINESS GMB S SAME DAY SDX T EXPRESS 12:00 TDT – International express shipping of non-dutiable shipments and documents with delivery before 12 noon (only available to specific areas) U EXPRESS WORLDWIDE ECX V EUROPACK EPP W ECONOMY SELECT ESU – Used when shipping from the United Kingdom to a destination within the European Union, to be delivered during Normal Business Hours X EXPRESS ENVELOPE XPD Y EXPRESS 12:00 TDY – International express shipping of dutiable shipments and documents with delivery before 12 noon (only available to specific areas) Note: Service code P (Express Worldwide) is used widely for international shipments for dutiable shipments outside the EU. So, if a customer is trying to use service code P, the ‘Is Dutiable’ option should be enabled in the Rates & Services section. If it’s not enabled, the rates will not be displayed in Checkout. Also, the ‘Duty Payment’ option in Label & Tracking should be chosen as a shipper or recipient. If it’s set to none, it’s not possible to create a shipment on the order page of WooCommerce, as the duties are calculated based on the option chosen in the ‘Duty payment’ option.
Not only does the plugin fetch real-time rates, but it also provides an option to adjust those prices. The prices can be adjusted in terms of amount or percentage value. You can adjust the shipping price by adding/subtracting the required amount to/from the actual shipping cost. Use the minus sign(–) for subtracting the amount.
For example, consider the shipping cost of DOMESTIC EXPRESS 12:00 returned by DHL is £5.
Case 1: Price adjustment for DOMESTIC EXPRESS 12:00 is £10, as shown in the screenshot below.

The total cost displayed for DOMESTIC EXPRESS 12:00 at checkout is £15 (£5+£10).
Case 2: Price adjustment for DOMESTIC EXPRESS 12:00 is %10, as shown in the below screenshot.

The total cost displayed for DOMESTIC EXPRESS 12:00 at checkout is £5.5 (£5+£0.5 – 10% of £5).
Case 3: Price adjustment for DOMESTIC EXPRESS 12:00 is £10 and %10, as shown in the screenshot below.

Total cost displayed for DOMESTIC EXPRESS 12:00 at checkout is £15.5 (£5 + £10 + £0.5).
Click Save Changes once all settings are configured.
Configuring Label and Tracking settings
In this section, you can configure settings for label printing and shipment tracking.
![]()
The settings are as shown below.
- Enable/Disable functionalities: Tick the checkbox to enable desired functionality:
- Paperless Trade (PLT): When enabled, DHL’s Paperless Trade service will be activated, and a receipt will be generated for the commercial invoice to customers.
DHL’s Paperless Trade service allows you to electronically transmit commercial and proforma invoices, eliminating the need to print and physically attach them to your shipments. Moreover, it saves you valuable time when preparing your shipments. This free service will help you save paper and printing costs, whilst also making a positive contribution to the environment. Remember, to use this feature, your DHL account must be integrated with the PLT service.
For more information, see DHL Paperless Trade. - Saturday Delivery (SD): This is a special service where shipments can be delivered on Saturdays as well.
- Enable Default Service for Label Generation: When enabled, the same shipping service selected by the customer during checkout will be printed while generating labels.
Else, you can change the shipping service from the WooCommerce edit order page while generating shipment labels. - Show only chosen services on Rates & Services section: When enabled, shows only services chosen in the Rates and Services section, while generating labels. If the customer is not using DHL services on the cart page to process the order then they will need to mandatorily enable Show only chosen services on the Rates & Services section. Otherwise, They will get no rates and services on the order page to generate labels.
- Enable Direct Download: Tick this checkbox to configure a single-click download for labels and invoices, instead of following the traditional document printing procedure. This option is available only for PDF files. ZPL2 and EPL2 format labels will be downloaded regardless of whether this setting is enabled or not.
- Enable Customer to Print Label: Choosing this option will allow customers to print labels from their My Account page.
- Paperless Trade (PLT): When enabled, DHL’s Paperless Trade service will be activated, and a receipt will be generated for the commercial invoice to customers.
- Shipping Label: This setting allows you to select your desired label size and format.
You can print labels in the following sizes:- 8X4_A4_PDF: This option generates labels in an A4-PDF format with a size of 8 x 4 inches.
- 8X4_thermal: Generates labels with a size of 8 x 4 inches. It is suitable for ZPL2 and EPL2 formats.
- 8X4_A4_TC_PDF: This option generates labels in TCPDF format with a size of 8 x 4 inches.
- 8X4_CI_PDF: This option generates labels in PDF format with a size of 8 x 4 inches for CI printers (compact printers).
- 8X4_CI_thermal: Generates labels in PDF format with a size of 8 x 4 inches for CI thermal printers (compact printers).
- 8X4_RU_A4_PDF: This option generates labels in an RU-A4-PDF format with a size of 8 x 4 inches.
- 8X4_PDF: Generates labels in PDF format with a size of 8 x 4 inches.
- 8X4_CustBarCode_PDF: Generates labels in PDF format with custom bar-code information of the size of 8 x 4 inches.
- 8X4_CustBarCode_thermal: Generates labels in ZPL2 and EPL2 format with custom bar-code information of the size of 8 x 4 inches.
- 6X4_A4_PDF: Generates labels in an A4-PDF format with a size of 6 x 4 inches.
- 6X4_thermal: This option generates labels with a size of 6 x 4 inches. It is suitable for ZPL2 and EPL2 formats.
- 6X4_PDF: Generates labels in PDF format with a size of 6 x 4 inches.
Likewise, you can print labels in the following formats:
- PDF Output: Prints labels in Portable Document Format, which is used to present documents independent of the application, software, hardware, and operating system.
- ZPL2 Output: Suitable for printing on Zebra branded printers.
- EPL2 Output: Suitable for printing on media of reduced space. Although it supports bitmaps (and therefore, arbitrary images), its use is usually for labels including bar-code information.
- Shipping Contents Description: You can provide a description of the shipping contents. This description will be printed on all the printed documents and is usually required for security checks and customs.
This setting is also present under DHL Express settings in the WooCommerce edit order page, while generating labels. - Shipper Comment: Enter a default shipper comment. You can also change it from individual order pages.
- Company Logo: This allows you to set a custom logo for your shipment and return labels.
- Duty Payment: When transporting goods across international borders, shipments are subject to duties and taxes as determined by customs in the destination country. You can choose to whom the duty tax will be charged.
Following are the possible options:- None
- Shipper
- Recipient – You need to select one of the following Terms of Trade:
- Delivered At Place (DAP)
- Delivered Duty Unpaid (DDU)
- Delivered Duty Paid (DDP)
- Ex Works (EXW)
- Free Carrier (FCA)
- Carriage Paid To (CPT)
- Carriage and Insurance Paid to (CIP)
- Delivered At Terminal (DAT)
- Free Alongside Ship (FAS)
- Free on Board (FOB)
- Cost and Freight (CFR)
- Cost, Insurance & Freight (CIF)
- Third-Party/Other – Enter the Duty Payment Account Number of the third party personnel. Some online stores or customers may designate or enter into an agreement with a third party, in which the third party agrees to take over some or all of the tax withholding, reporting, and payment responsibilities.
- Archive Air Waybill: A DHL waybill is a shipping document that helps in services like ensuring package safety, and customs clearance and works as proof of consignment to track the shipment.
Tick this checkbox to send a waybill with every shipment label generated with DHL express. You can choose to print either one or two archive documents.
There are a lot of other things that you can achieve with the waybill. To know more about the Waybill service in DHL, read this article.
- Bulk Shipment: For bulk shipment generation, you can select default domestic and international services. Select desired options for both services from the given list. This default service will be chosen, when no DHL service is selected during checkout.
- Special Service: Choose the default service type if your products are restricted commodities or dangerous goods. You can even enable this setting for a specific product(s) in the Special Service setting under the Shipping settings tab of individual product page settings. Once this setting is enabled, a compliance warning will be displayed on the DHL labels.
Available options include:- None
- DANGEROUS GOODS (HE) PI965 1A/1B
- DANGEROUS GOODS (HE) PI966/PI967
- LITHIUM-ION PI965 SECTION II (HB)
- LITHIUM-ION PI966 SECTION II (HD)
- LITHIUM-ION PI966 SECTION II (HV)
- DANGEROUS GOODS (HE) PI968 1A/1B
- DANGEROUS GOODS (HE) PI969/PI970
- LITHIUM METAL PI969 SECTION II (HM)
- LITHIUM METAL PI970 SECTION II (HW)
- LITHIUM-ION PI967 SECTION II (HV) LITHIUM METAL PI970 SECTION II (HW)
- CONSUMER GOODS ID8000 (HK)
- DANGEROUS GOODS (HE) FLAMMABLE GAS
- DANGEROUS GOODS (HE) NON-FLAMMABLE GAS
- DANGEROUS GOODS (HE) FLAMMABLE LIQUID
- DANGEROUS GOODS (HE) NON-FLAMMABLE LIQUID
- DANGEROUS GOODS (HE) FLAMMABLE SOLIDS
- DANGEROUS GOODS (HE) SPONTANEOUS COMBUSTION SUBSTANCES
- DANGEROUS GOODS (HE) SUBSTANCES DANGEROUS WHEN WET
- DANGEROUS GOODS (HE) OXIDIZER
- DANGEROUS GOODS (HE) Organic Peroxides
- DANGEROUS GOODS (HE) TOXIC SUBSTANCES
- DANGEROUS GOODS (HE) CORROSIVES
- DANGEROUS GOODS (HE) MISCELLANEOUS
- LITHIUM-ION UNDER PROVISO
- LITHIUM METAL UNDER PROVISO
Now you also have the option to enable or disable the special service on the WooCommerce Orders page while creating shipments.
- Return Label: Tick this checkbox to enable return label generation. You should provide your import DHL account number for using this functionality. You can also enable the option to enter a different address rather than the default shipper address.
- Tracking: Tick this checkbox to enable the shipment tracking facility.
- Commercial Invoice: Basically we have two options. One is the Classic Invoice generator, the other one is the DHL Invoice Generator. DHL Invoice generator uses the DHL API to generate the Commercial and Proforma invoice printed. Whereas, the Classic invoice generator uses the FPDF libraries to generate Commercial invoice prints, without making any external API calls.
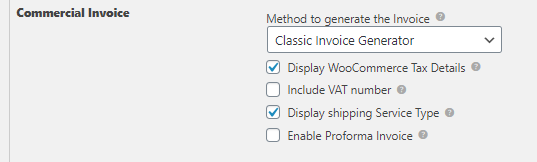
- Display Woocommerce Tax Details: Enable this setting to include WooCommerce tax details in the commercial invoices. If you have tax calculated for an order whose shipment is created, the tax will be included in the Commercial Invoice just next to the discount field.
- Include VAT number: Enable this option to include the VAT number in the commercial invoices. You need to specify the required VAT number in this setting.
- Display shipping Service Type: Enabling this setting will display the shipping service type in the commercial invoices.
- Enable Proforma Invoice: Once enabled, you can create a proforma invoice. The proforma invoice should be generated and downloaded before shipment creation. In the classic setting, you can generate the proforma invoice before generating the shipment for your order.

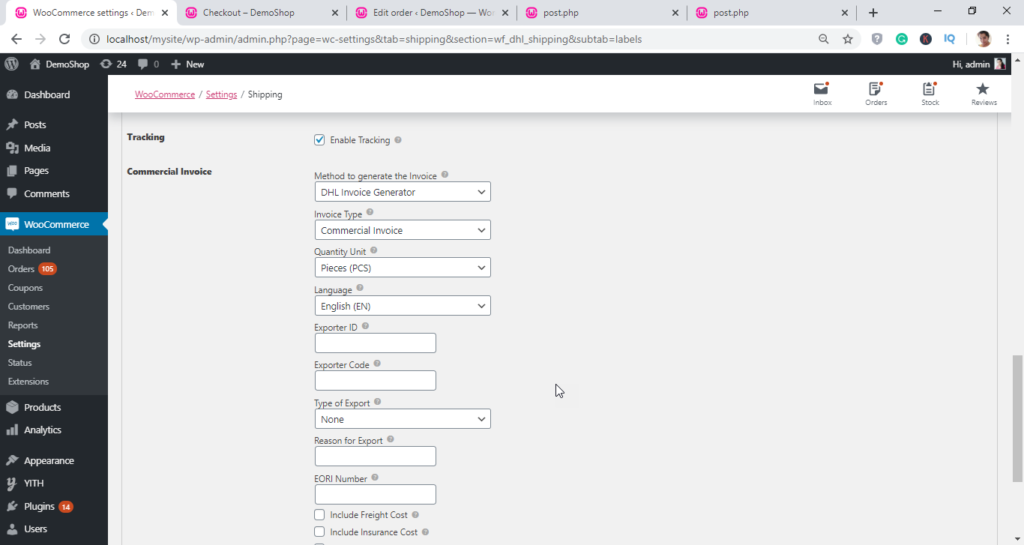
- When you choose the DHL Invoice Generator, you are provided with two types of Invoices. One is the Proforma invoice, the other is the Commercial invoice. If you use DHL for commercial purposes, then you need a Commercial Invoice. If you are not using it for commercial purposes, then you need the Proforma invoice.
- Invoice Type: You can choose either Proforma or Commercial here. Upon choosing you can generate a Performa invoice or a Commercial Invoice. The label helps to distinguish both.
- Quantity Unit – Choose a unit to distinguish or define the quantity.
- Language: You can select the language from the drop-down to get your label printed in the same language chosen.
- Exporter ID: Enter exporter ID.
- Exporter Code: Enter the exporter Code.
- Type of Export: Choose the type of export from None, Permanent, Temporary, Re-export.
- Reason for Export – Enter the reason for export.
- EORI Number – It is a unique number for shipper identification.
- Include Freight Cost – Enable the option if you want to include the freight cost in the invoice.
- Include Insurance Cost – Enable this option, if you want to include insurance cost in the invoice.
- Include VAT– Enable this option if you want to include the VAT number in the Commercial Invoice.
- Signature for Classic Invoice: You can add your signature using this option, and it will appear on the generated invoices. Recommended dimensions are 160 x 70, with PNG Transparent as the recommended picture format.
Here is an example of a sample Classic Invoice with a signature:
- DHL Email Service: This allows you to append additional messages that will be part of the DHL email notification service.
- Pickup: Tick this checkbox to enable pickup service. Further settings will be displayed, where you can specify the number of days for schedule pickup, provide pickup time, and details of pickup personnel. Store owners can request DHL for picking up their parcels by clicking the ‘Pickup request’ option in the admin while creating a shipment. After successfully placing the pickup request, the store owner will get a unique booking number. You can cancel the request later if needed.
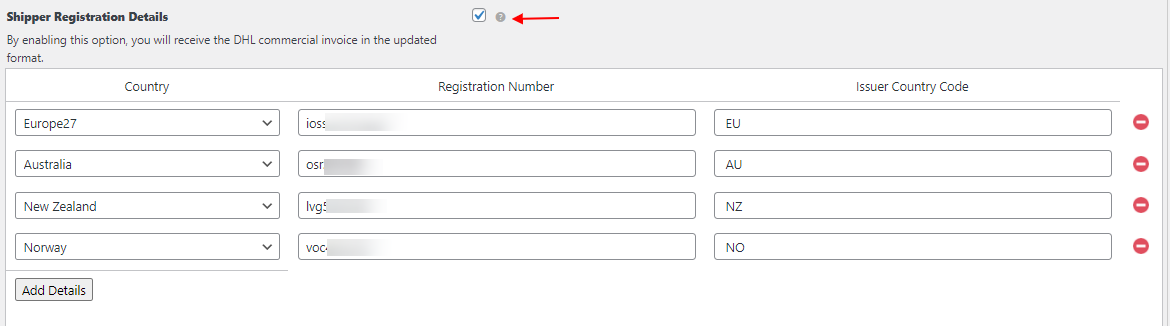
- Shipper Registration Details: Enable this option to include the shipper’s tax registration details. By enabling these details, you can generate the Commercial Invoice which includes these details. It will be useful when you ship products to New Zealand, Norway, Australia, and 27 EU countries. If you do not provide this option, customers would be required to pay the tax amount when they receive the packages.
You have to register to LVG for New Zealand, VOC for Norway, OSR for Australia, and IOSS for EU countries to get your registration numbers to ship products to those countries.
Also, enter the following country codes as per requirements:
- New Zealand – NZ
- Norway – NO
- Australia – AU
- EU countries – EU
Choose the required countries and enter the details.
 Once all settings are configured, click Save Changes.
Setting up Packages
This section contains settings that help you decide how items will be packed, before sending them to DHL Express.
Packaging Options
Our WooCommerce DHL plugin provides three parcel packing methods. They are:
1. Pack Items Individually
In this option, each item in the cart is packed separately, and this is the default option. The total shipping cost is calculated by adding the shipping cost for each item. The settings are as shown below.

You can either choose Pounds, Inches (lbs, in) or Kilograms, Centimeters (kg, cm) for the package unit.
Package-Type: You can choose the desired package type from the following options:
- DHL Box –These are the most commonly used boxes for packing. These boxes are populated by default when you install the plugin.
- Flyer – This option is suitable for Bound documents and Flat materials.
- Your Pack – With this option, the item will be packed into a customized box, defined in your DHL accounts.
For example, the shipping cost of product X is £10. If the customer adds two quantities of product X to the cart, then the total shipping cost will be £20.
2. Pack into boxes with weight and dimensions
If packing items individually do not suit your business, then you can define the required box sizes under the Box Sizes table. All cart items are packed into custom boxes defined in the Box Sizes table. A few boxes are populated by default, after the installation of the plugin. The best fit box is automatically chosen from the defined boxes.
Just like the previous option, you can either choose Pounds, Inches (lbs, in) or Kilograms, Centimeters(kg, cm) for the package unit.
The settings are as shown below.
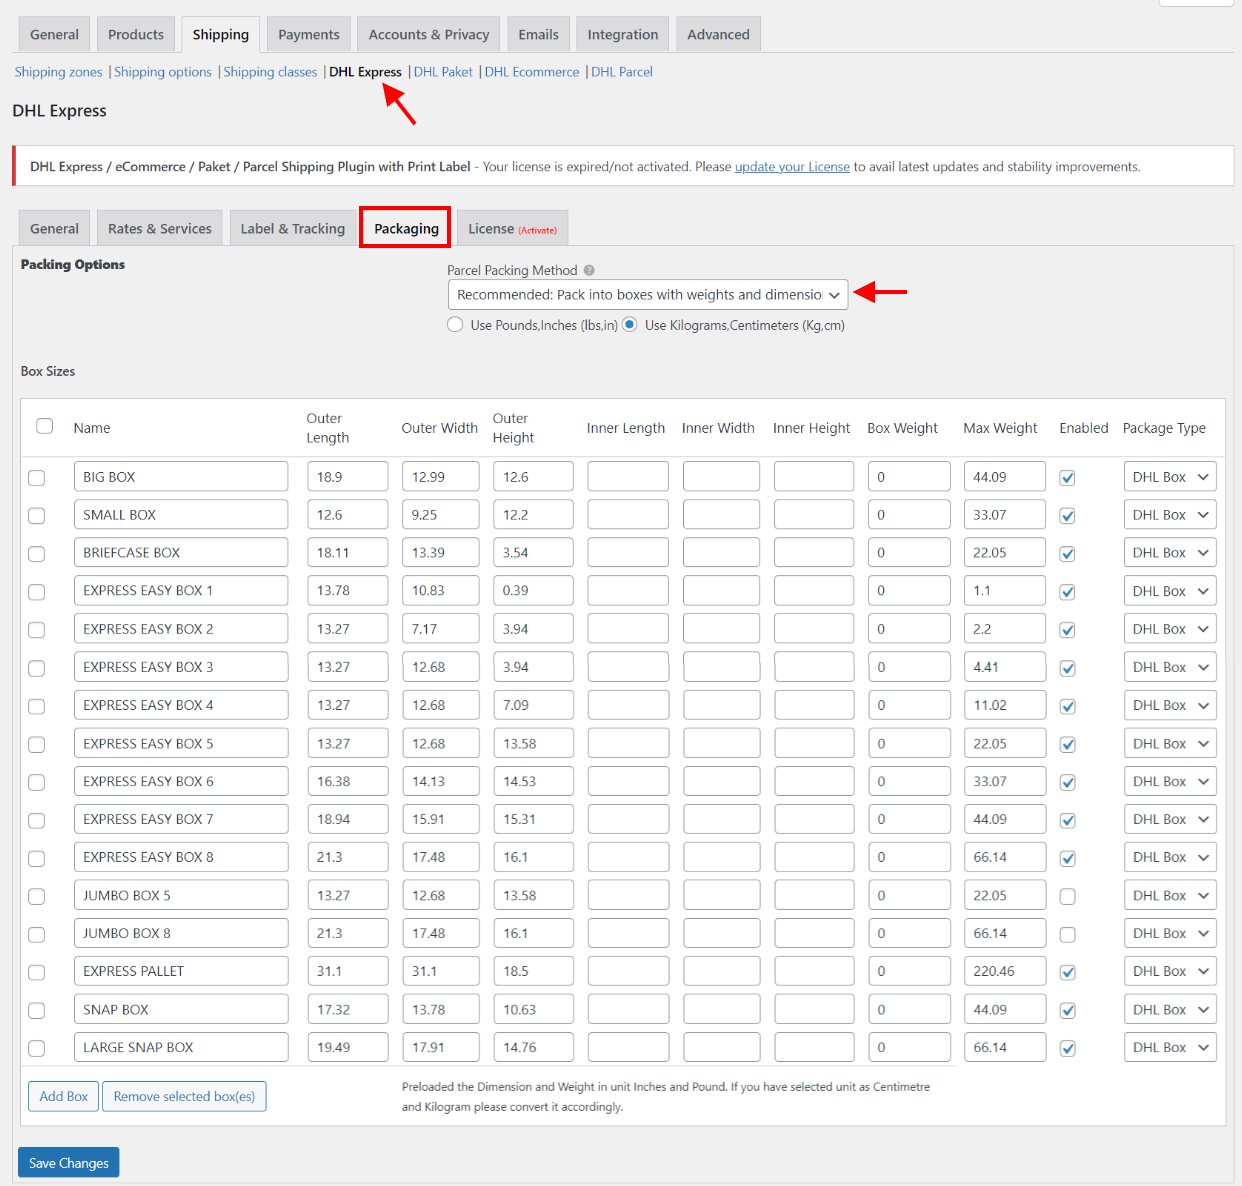
Here, you can define the dimensions of boxes. For a heavy packing box, enter the weight of the box so that it gets added in product weight, in order to calculate the shipping rates. You can customize the best fit box(es) according to your product(s), by clicking the Add Box button. Based on your requirements, you can add or remove boxes. Likewise, you can also enable or disable a particular box by selecting or deselecting a name checkbox.
In addition to this, you can select the required package type for the required box/flyer from the Package Type drop-down list. The available options are as given below:
- DHL Box – These are the most commonly used boxes for packing. These boxes are populated by default when you install the plugin.
- Flyer – This option is suitable for Bound documents and Flat materials.
- Your Pack – With this option, the item will be packed into a customized box, defined in your DHL accounts.
For example, consider a product X with dimensions 12 x 10 x 3, and weight 1 lbs. You can set up custom boxes as shown in the screenshot below.

Box Sizes DemonstrationCase 1: If one unit of product X is in the cart, then EXPRESS EASY BOX 3 will be selected for packing.
Case 2: If there are two units of product X in the cart, then EXPRESS EASY BOX 4 will be selected.
Case 3: If three units of product X are present in the cart, then EXPRESS EASY BOX 5 will be selected.
In the same way, you need to define sizes for each logical box according to the packing style being followed for different products with different quantities.
Note: There is a possibility that an item(s) may remain unpacked because the available box(es) cannot accommodate it. It is also possible that item size/shape is irregular, hence it cannot be clubbed together with other items. Such items are packed individually.
3. Weight-based
In some business cases, you may wish to pack items according to their weight. If you are using this option, make sure that you have set accurate weights for your products in the respective product settings. This is an important setting, and must not be overlooked.
And just like the other two options, you can either choose Pounds, Inches (lbs, in) or Kilograms, Centimeters(kg, cm) for the package unit.
The weight-based package settings are as shown below.
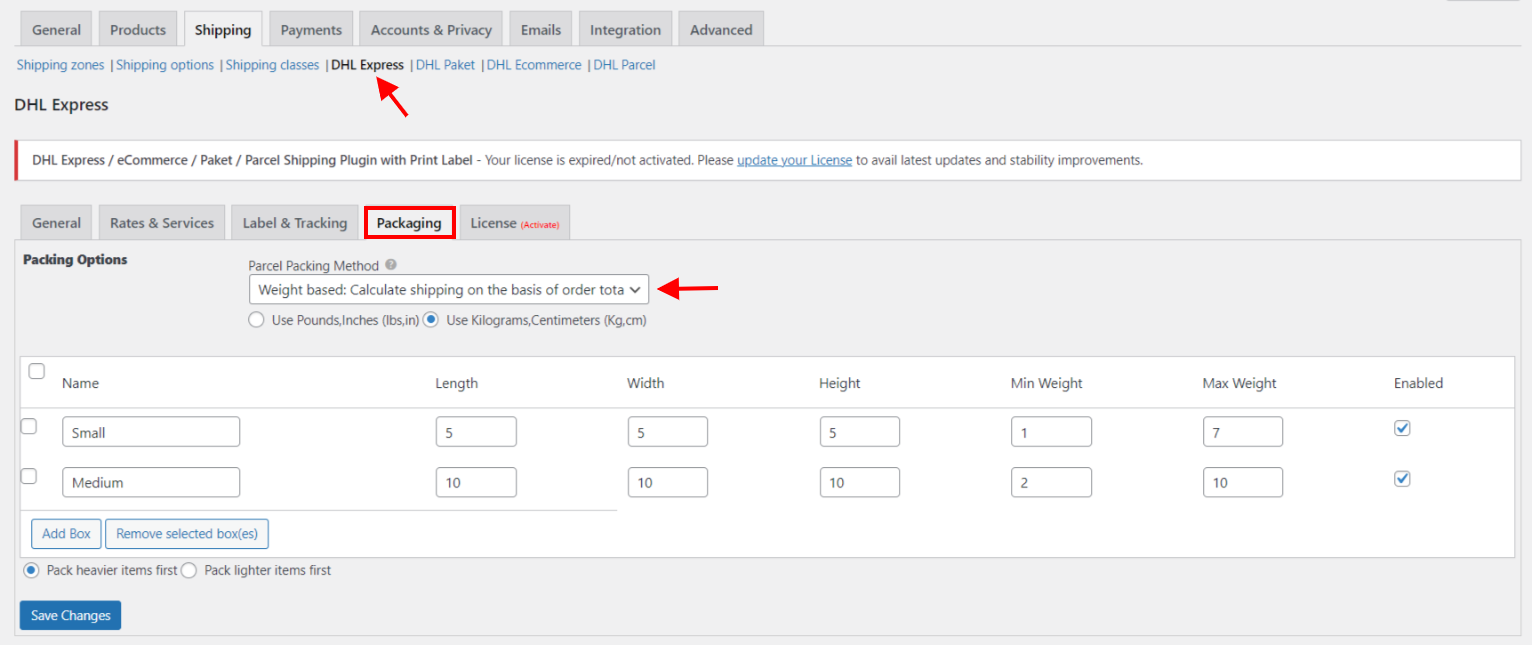
Our WooCommerce DHL plugin provides the following methods for packing the items:
- Pack heavier items first
- Pack lighter items first
Finally, click Save Changes.
DHL Express features at the Product level
Our WooCommerce DHL plugin provides custom-built settings for individual products. The settings are as shown below.

- HS Tariff Number (DHL): HS is a standardized system of names and numbers to classify products. Shop owners can provide HS number of the product so that international shipments are processed smoothly.
- Country of Manufacture (DHL): This field is used to mark the product’s country of manufacture. This is reflected in the label and commercial invoice.
- Signature options(DHL): This option allows you to select the signature option for delivery of shipments. The available options include:
- Delivery Signature
- Content Signature
- Named Signature
- Adult Signature
- Contract Signature
- Alternative Signature (or)
- No Signature Required
- Special Service(DHL): If a product belongs to restricted commodities and dangerous goods, select the appropriate special service for the product. This service information will be printed on the shipping label for transit.
Available options include:- NONE
- NOT APPLICABLE – States that the product is not a restricted commodity or a dangerous good.
- DANGEROUS GOODS (HE) PI965 1A/1B
- DANGEROUS GOODS (HE) PI966/PI967
- LITHIUM ION PI965 SECTION II (HB)
- LITHIUM ION PI966 SECTION II (HD)
- LITHIUM ION PI966 SECTION II (HD)
- DANGEROUS GOODS (HE) PI968 1A/1B
- DANGEROUS GOODS (HE) PI969/PI970
- LITHIUM METAL PI969 SECTION II (HM)
- LITHIUM METAL PI970 SECTION II (HW)
- LITHIUM ION PI967 SECTION II (HV) LITHIUM METAL PI970 SECTION II (HW)
- CONSUMER GOODS ID8000 (HK)
- DANGEROUS GOODS (HE) FLAMMABLE GAS
- DANGEROUS GOODS (HE) NON-FLAMMABLE GAS
- DANGEROUS GOODS (HE) FLAMMABLE LIQUID
- DANGEROUS GOODS (HE) NON-FLAMMABLE LIQUID
- DANGEROUS GOODS (HE) FLAMMABLE SOLIDS
- DANGEROUS GOODS (HE) SPONTANEOUS COMBUSTION SUBSTANCES
- DANGEROUS GOODS (HE) SUBSTANCES DANGEROUS WHEN WET
- DANGEROUS GOODS (HE) OXIDIZER
- DANGEROUS GOODS (HE) Organic Peroxides
- DANGEROUS GOODS (HE) TOXIC SUBSTANCES
- DANGEROUS GOODS (HE) CORROSIVES
- DANGEROUS GOODS (HE) MISCELLANEOUS
- LITHIUM ION UNDER PROVISO
- LITHIUM METAL UNDER PROVISO
- Visual Check of Age: Tick this option to allow visually checking the age of the receiver, before accepting the shipment.
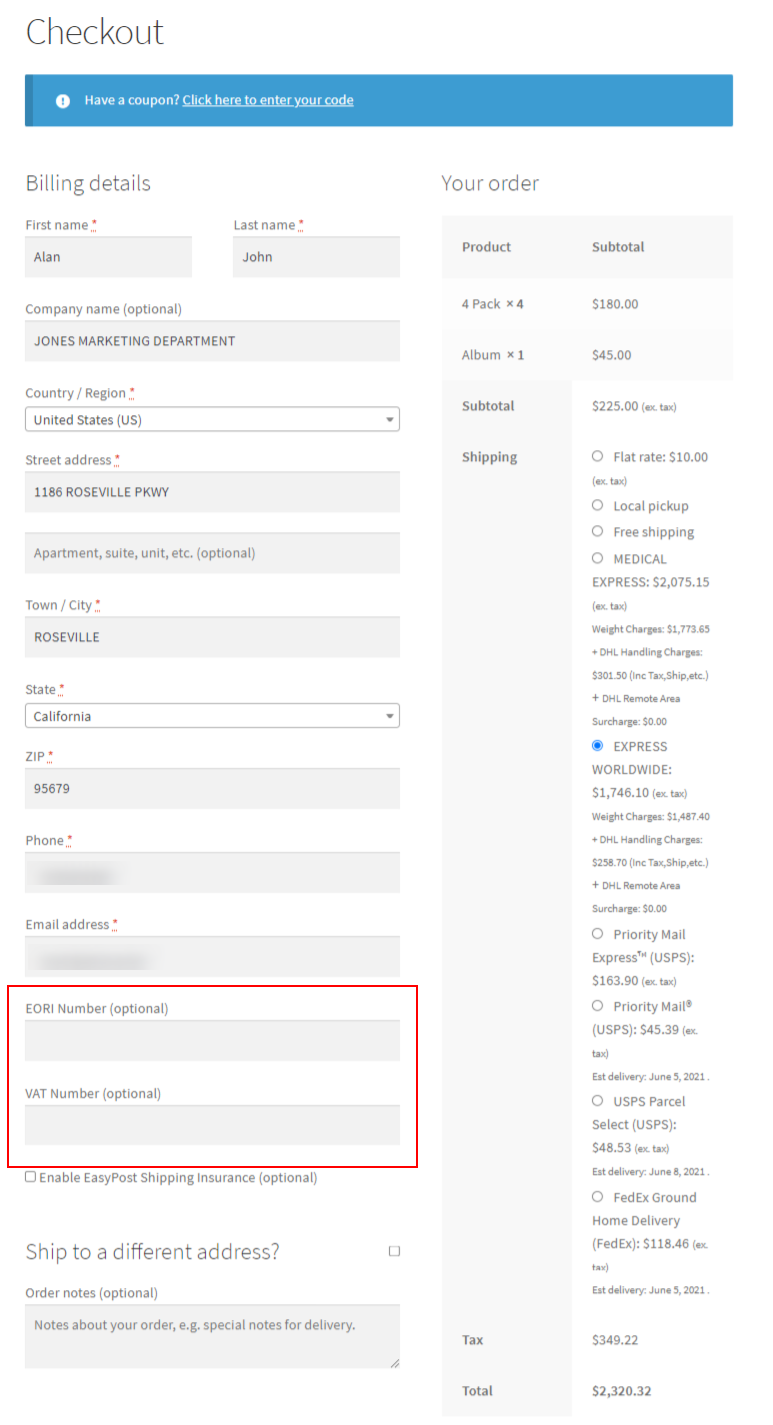
DHL Services on the Checkout page
The following screenshot shows how DHL services will be displayed on the checkout page.

If you have enabled Reciever’s EORI and VAT Number under General settings, customers can enter their EORI and VAT number on the Checkout page if required.
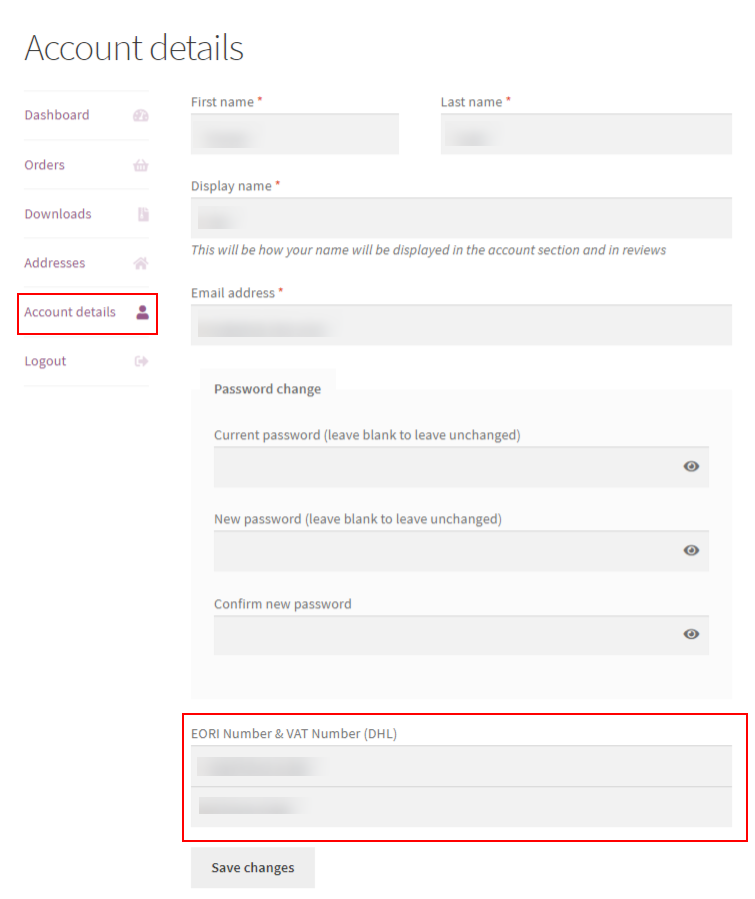
If a registered customer has entered their EORI and VAT number for the first time, it will be automatically saved on your store. The customers can find their details under My Account > Account details.
This EORI and VAT number of customers will be added to the commercial invoice. Also, it will display your EORI and VAT number if you have configured it in this plugin.
Check an example:
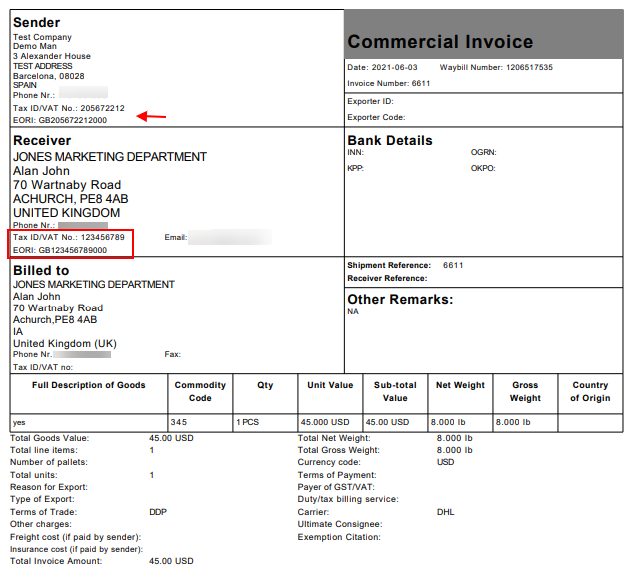
The commercial invoice with all mandatory details is necessary to ship products to the EU countries. To know how does this plugin comply with all EU regulations for authorized shipments to these countries, refer to the article – How Does the ELEX WooCommerce DHL Plugin Comply with EU Regulations?
How to generate a Proforma Invoice and print the Shipment label?
Go to WooCommerce > Orders section, and select an order to print shipment label. Scroll down to find the DHL Express meta-box.
Generating Packages and Printing Proforma Invoice
- Click on the Generate Packages button to start generating packages.

- Next, the packages will be generated and the shipment is ready to be created. But before that, you need to generate Proforma Invoice, as it should be generated and printed before the shipment is created for the order. Click on the Generate Proforma Invoice button to proceed.

- In the next step, the Proforma Invoice is ready to be printed. Click Proforma Invoice as shown in the screenshot below to preview the shipping label.

Below is a sample Proforma Invoice generated using ELEX WooCommerce DHL Shipping Plugin.

Creating Shipment, Printing Shipping labels & Commercial Invoice
- Once the packages are generated, you can see the weight(s) and dimensions of the item(s). The store owners need to select the DHL shipping service and click Create Shipment to start creating the shipments of the order.

- After the plugin creates the shipment, the shipping label is generated. If there are multiple items in the order, the shipping labels will be included in a single PDF along with Archive Air Waybill.
Below are the sample shipping labels generated for our order.

And the print the Commercial Invoice, click on the respective Commercial Invoice button, as shown below.

The below screenshot shows a sample Archive Air Waybill document.

How to print Return Shipment labels?
Just like printing shipment labels, you can print return labels as well.
To do this, go to WooCommerce > Orders section, and select the order to print a return label.
- Next, click on the Process Return Shipment button to start the return shipment process.
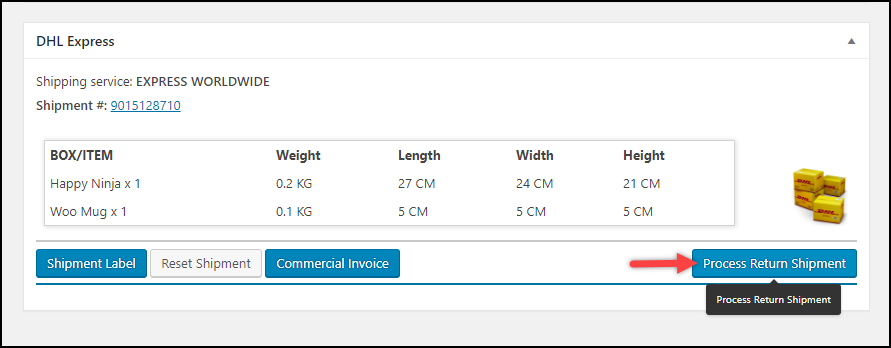
- Next, the plugin allows store owners to select the desired items and also the quantity to return. In the demonstration below, we have returned one item (Happy Ninja) from the whole order.

- This will lead us to the next step, where you need to create the return shipment. Proceed as shown in the screenshot below.

- The return label is now ready to be printed. Click Return Label as shown in the screenshot below.
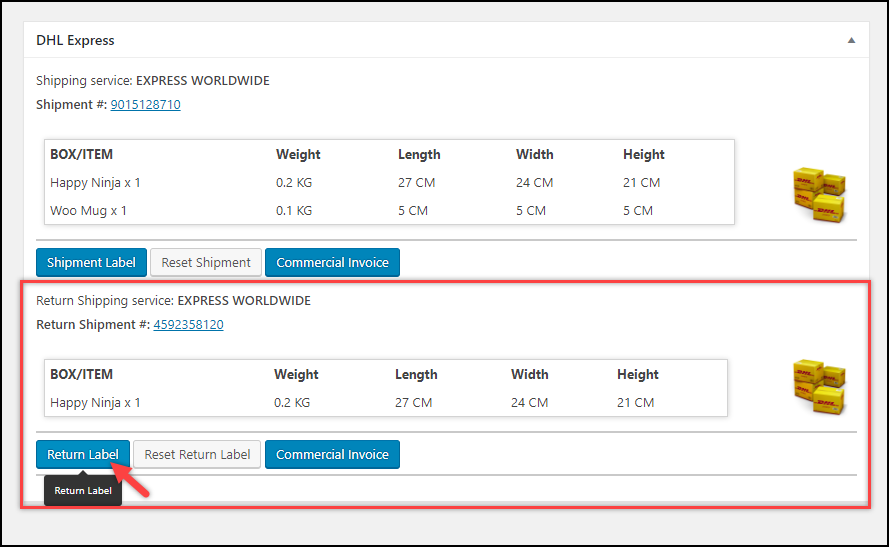
A sample return label is as shown below.

If you have enabled the Archive Air Waybill setting, an archive document will be attached with a shipment label. A sample archive document is shown in the screenshot below.

How to track your Shipment?
Your customers can track the shipment under Orders section on their My Account page. Click on the order number of the desired order to be tracked. The tracking ID appears as shown in the screenshot below.
Click on the tracking pin number, or tracking ID to track the status of the DHL website. You can also click on the search icon in the Tracking Information section to view your shipment tracking status.
A sample shipment tracking status is shown in the following screenshot.
How to create a Pickup request for your DHL Shipment?
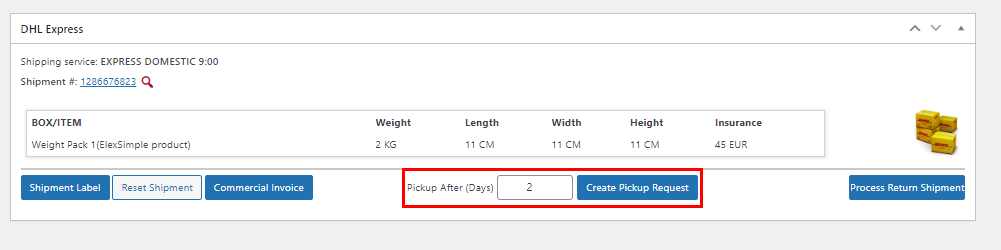
Whenever a pickup option is enabled in the settings for your order, you can generate a pickup request for your DHL order while processing the order.

When you enable the pickup option, you can provide details like the pickup time and personnel details in the settings. On the order processing page, you get an option to create a pickup request. You can also choose to schedule the pickup after a set number of days by using the Pickup After (Days) functionality.
Upon clicking the same, you get a Pickup booked confirmation number and an option to cancel the pickup request.
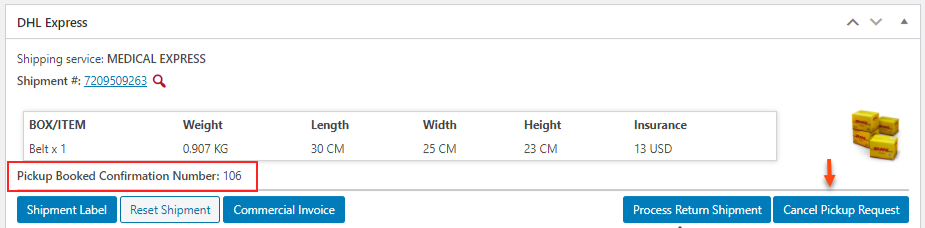
If you have clicked the Cancel Pickup Request option, the pickup request will be canceled and the confirmation number will be removed. You can request the pickup for the same order later if required.
How to download Shipment labels?
Not only can you print shipping labels, but you can also download respective PDFs too. This option is available on the WooCommerce Orders page. To do this, go to Dashboard > WooCommerce > Orders.
A sample screenshot is shown below.

Click on the DHL icon in the Actions column, to download the shipment label.
How to create Shipment labels in bulk?
You can generate shipment labels in bulk in the WooCommerce Orders page. Select the desired orders to print the labels, and select Create DHL Express Shipment option from the Action list, and click on the Apply button.

Once you apply the bulk action to create the labels, you get the following message:

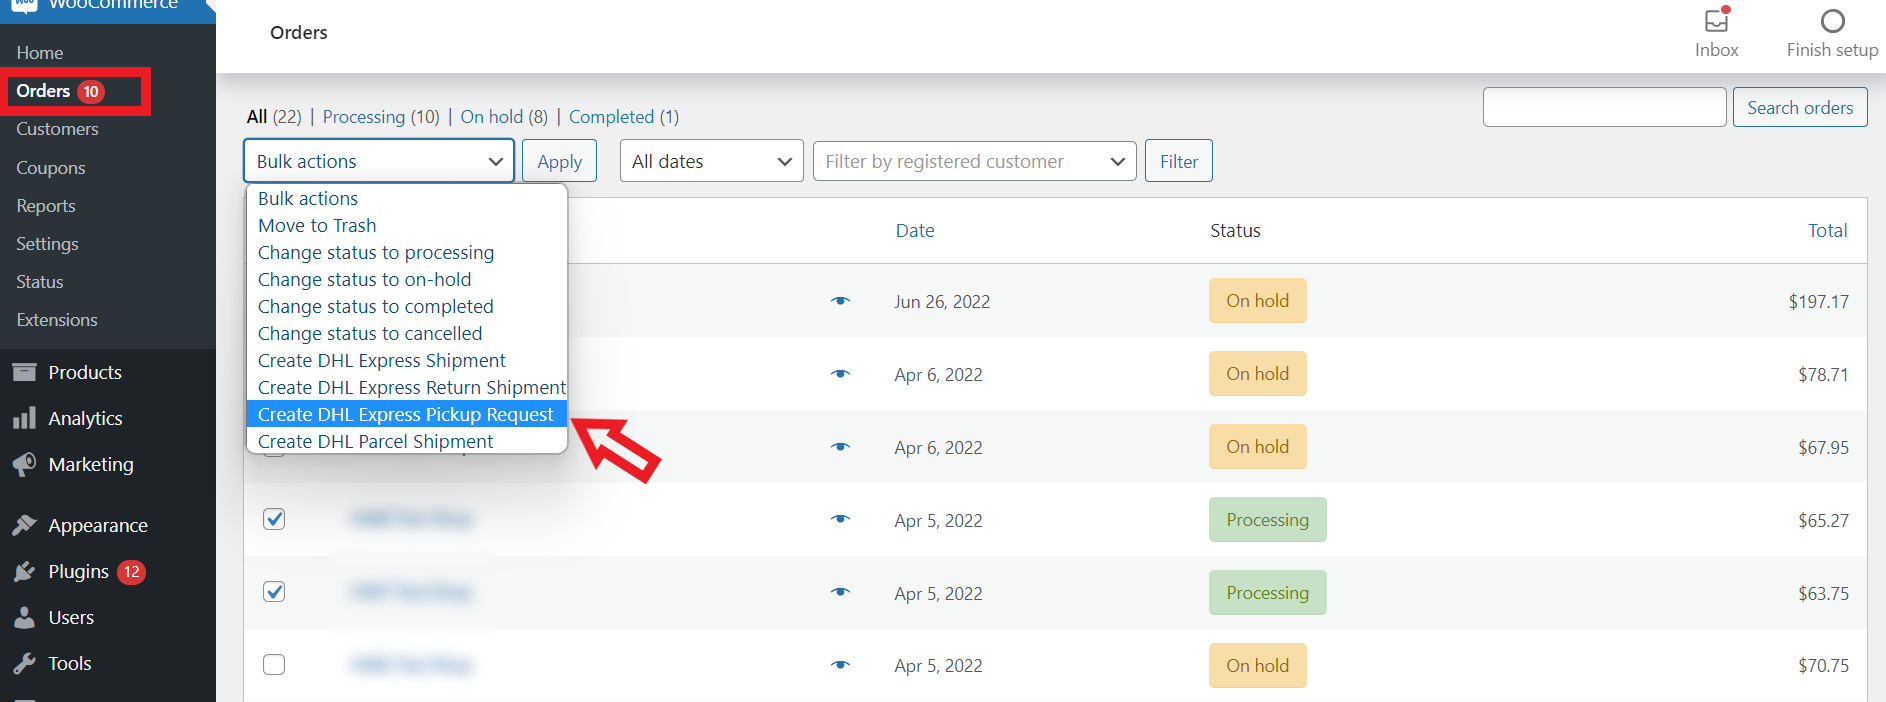
How to create DHL Express pickup requests in bulk?
You can create DHL Express pickup requests in bulk from the WooCommerce Orders page. Select the desired orders to create pickup requests, select Create DHL Express pickup request from the Action list, and click the Apply button.
Note: You can only create bulk pickup requests for those orders for which the shipment has already been created.
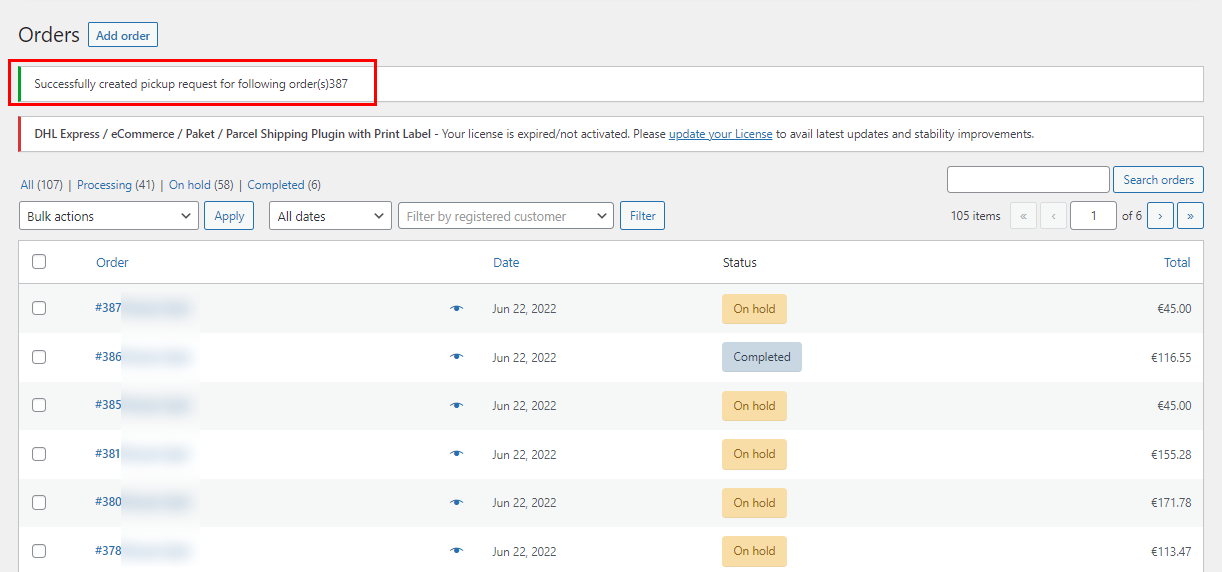
Once you apply the bulk action to create the pickup request, you will get the following message:
How to print DHL Express shipping labels in bulk?
To generate DHL Express shipping labels in bulk, you would need our ELEX WooCommerce DHL Express Bulk Label Printing Add-On. Once you have purchased this add-on, you can read how to bulk print DHL Express shipping labels to set up the add-on.
How to set up WooCommerce DHL Paket?
To set up the DHL Paket option, see How to set up DHL Paket shipping using ELEX WooCommerce DHL Express/Paket Shipping Plugin with Print Label?.
How to set up WooCommerce DHL eCommerce?
To set up the DHL eCommerce option, see How to set up DHL eCommerce shipping using ELEX WooCommerce DHL Express/Paket Shipping Plugin with Print Label?.
How to set up WooCommerce DHL Parcel?
To set up the DHL Parcel option, see How to set up DHL Parcel shipping using ELEX WooCommerce DHL Express/Paket Shipping Plugin with Print Label?
How to auto-generate DHL Paket shipping labels and email the labels automatically?
For auto-generating DHL Paket shipping labels and email the labels automatically to the configured recipients, check out the article: How to Auto-generate DHL Paket Shipping Labels & Email the Labels Automatically with ELEX WooCommerce DHL Paket Auto-Label Generation Add-On?
To explore more details about the plugin, go check out ELEX WooCommerce DHL Express / eCommerce / Paket Shipping Plugin with Print Label.
You can also check out other WooCommerce and WordPress plugins in ELEX.
2 Comments. Leave new
Please provide documentation for generating the Courier Report
Hello,
We have updated the documentation with steps to generate the Proforma Invoice. You can also read this article.