What can we help you with?
How to set up WooCommerce DHL Paket in ELEX WooCommerce DHL Express/eCommerce/Paket Shipping Plugin with Print Label?
This tutorial explains how to set up DHL Paket Shipping option using ELEX WooCommerce DHL Express/Paket Shipping Plugin with Print Label. Please refer to the product page to know more about the plugin features.
For WooCommerce DHL Express, read how to set up WooCommerce DHL Express?
Content
Overview
DHL Paket sends your shipment quickly, flexible, and securely with insurance and shipment tracking. It provides domestic mail service as well as international mail services from Germany.
With the help of ELEX WooCommerce DHL Express/eCommerce/Paket Shipping Plugin with Print Label, you can print labels with shipment tracking information, manifest, and export document for your shipment. The plugin allows you to pack items either individually, using built-in box packing, or based on weight.
This plugin does not show real-time rates, rather is used to generate labels and other shipping documents. If you wish to incorporate real-time rates functionality, you can make use of DHL eCommerce.
Getting started with WooCommerce DHL Paket
Read an article to know how to complete the checkout process on ELEX. You can also read how to download, install, activate ELEX plugins.
Once the plugin is installed and activated, you can navigate to plugin settings in two ways:
- Dashboard > WooCommerce > Settings > Shipping > DHL Paket (or)
- Dashboard > Plugins > Installed Plugins > ELEX DHL Express/DHL Paket WooCommerce Shipping with Print Label > DHL Paket.
Now let’s get down to configure the plugin.
Setting up DHL Paket
Let us break down the plugin settings into the following sections, to understand them in detail.
API and Account settings
The settings are as shown below.
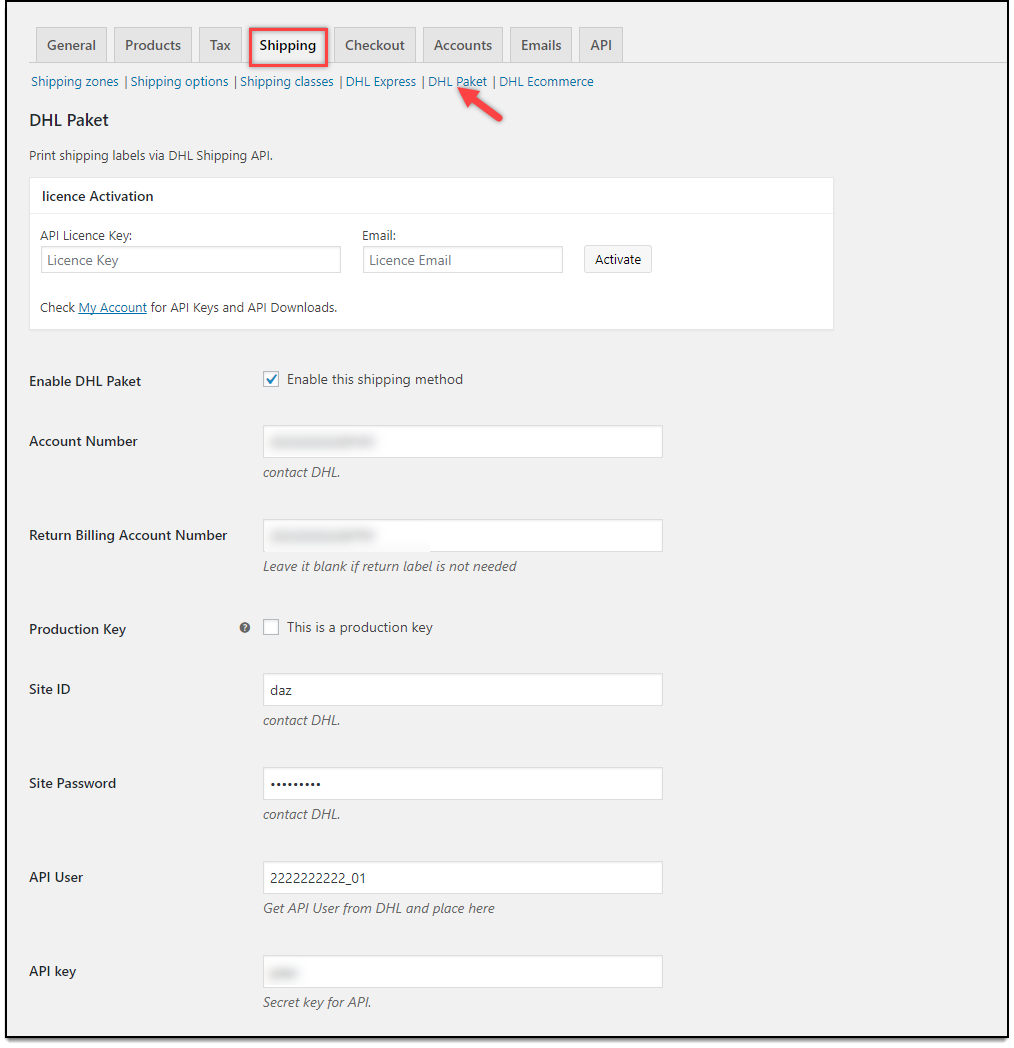
- Enable DHL Paket: First and foremost, tick this check box to use DHL Paket service.
- API settings: For accessing DHL Paket API, you need to register with DHL Paket. For more information about registration, see how to get DHL Paket Credentials?
Once you have registered, you will receive an account number, site ID, site password, API User and API key. Enter these credentials in the respective text fields, in the plugin settings.
- Return Billing Account Number: After registration, you get Return Billing Account Number from DHL Paket. Enter this number to provide a return label to customers, so that customer can return the product if needed.
Custom Shipment Message
Allows you to customize shipment message, which customers can see in order completion email. You can include placeholders for shipment ID, shipment service, and shipment date.
The placeholders are as follows:
- [ID] for Shipment ID
- [SERVICE] for Shipment Service
- [DATE] for Shipment Date
Below is a screenshot showing custom shipment message setting.

Remember, if you leave this field empty, a default message will be sent to customers.
Dimension/Weight Unit setting
Select desired units for weights and dimensions of the products. The selected unit type is passed to the API, for rate calculation.
Our WooCommerce DHL Paket provides two options, they are as follows:
- Pound & Inches: Product dimensions and weight will be converted to pound and inches before sending it to API.
- Kilograms & Centimeters: Product dimensions and weight gets converted to kilograms and centimeters.
Parcel Packing Method
This setting decides how items are packed before sending to DHL. There are three methods for parcel packing, they are as shown below.

- Individual Packing: In this option, each item in the cart is packed separately. Total shipping cost is calculated by adding the shipping cost for each item. This option is selected by default.
- Pack into boxes with weight and dimensions: If packing items individually or weight-based packing does not suit your business, then you can define custom box sizes under Box Sizes section. All the cart items are packed into custom boxes defined in Box Sizes settings. The best fit box is automatically chosen from the defined boxes. This is the recommended option. You can read through setting up box dimensions to understand box packing in detail.
Box Sizes: This setting is applicable only when Pack into boxes with weight and dimension is selected. Here, you can define the outer and inner dimensions of boxes. Outer dimensions are the dimensions of the package. Inner dimensions are the dimensions of the product. Based on your requirement, you can add or remove box dimensions. You can also enable or disable a particular box by ticking or unticking the checkbox, under the Enabled column.
Below is a screenshot of box sizes settings.
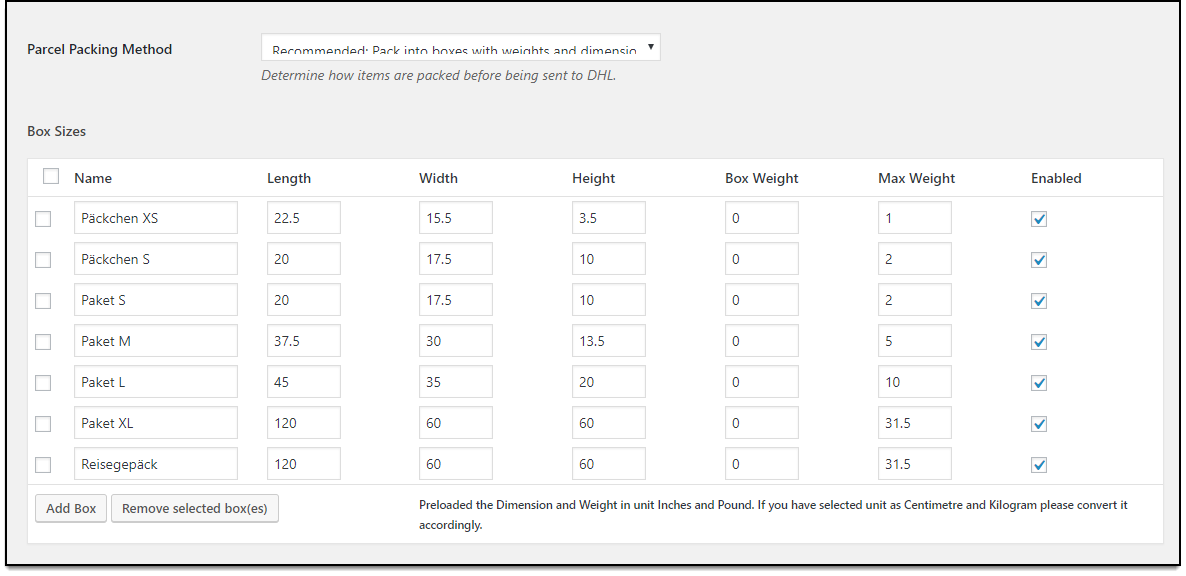
For example, consider you have product X of dimensions 11x8x2, and weight 1lbs. You can set the box dimensions as shown below.

Following are the possible cases:
- If there is a product X in the cart, then Paket@Small Box gets selected for packing.
- If there are two product X in the cart, then Paket@Medium Box gets selected for packing.
- If there are three product X in the cart, then Paket@Large Box gets selected for packing.
Likewise, you need to define sizes for each logical box, according to the packing style being followed for different products with different quantity.
- Weight-based: In some business cases, you may wish to pack items according to their weights. If you are using this option, make sure that you have set accurate weights for your products, in their respective product settings.
The settings are as shown below.

Max Package Weight: Enter maximum weight allowed for a single box.
Packing Process: You can pack items based on weight in either of the following ways:
- Pack heavier items first.
- Pack lighter items first.
- Pack purely divided by weight. For more information, read how to pack items based on weight?
Shipper address settings
Enter following address fields for calculating shipping charges.
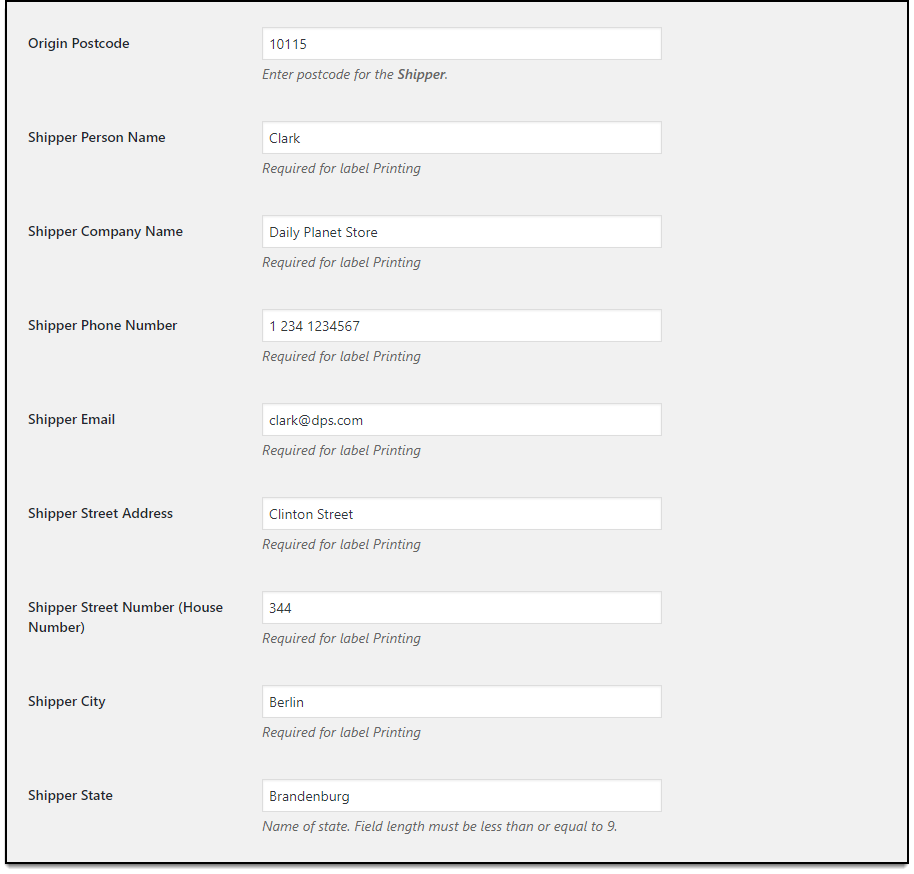
Enter your respective Origin Postcode, Shipper person name, Shipper Company Name, Shipper Phone Number, Shipper Email address, Shipper Street Address, Shipper City and respective state name.
Export settings
The settings are as given below:

- Export Terms of Trade: Enter the required Incoterms® with abbreviations of length three letters, which are published by the International Chamber of commerce, and are widely used in international commercial transactions.
Note: Incoterms® is a set of rules which define the responsibilities of sellers and buyers for the delivery of goods, under sales contracts for domestic and international trade. - Export Item Description: Enter product description for international shipping. This can be the name of the product, category of product, etc.
Debug Mode
If you are not getting proper shipment documents or any other malfunction, then you can enable Debug option to find an error(s). By enabling debug mode, you can trace the issue(s) using log. You can see information about debugging. Once you have enabled debug mode, try to get shipping document.
Advanced Settings
In addition to the above set of settings, our WooCommerce DHL Paket plugin provides the following advanced settings.
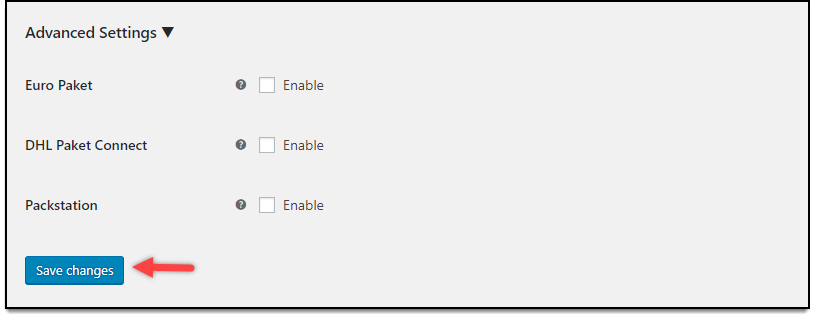
- Euro Paket: DHL Paket provides a tailor-made option for business-to-business parcel shipping, fast, reliable delivery to 27 European countries. For more information, check out DHL Europaket.
Tick this checkbox, to enable delivery to 27 European countries.
- DHL Paket Connect: This service is available only within the Europe region. An important point to remember is that if the above Euro Packet setting is also enabled with DHL Paket Connect setting, the plugin automatically takes only the former service into consideration.
You can read the DHL Paket Connect terms and conditions to understand in detail.
- Packstation: With DHL Paket services, you have complete and flexible control over when you receive your parcel. You get to decide when and where you want to take delivery of your shipments. It can be a Packstation, where you can receive your parcels conveniently with your needs. See DHL recipient service – Packstation.
Tick this checkbox, to receive your parcel, based on your need. On the checkout page, the customer needs to select the checkbox of the ship to a different address. According to the address, the list of available Packstations is displayed to the customer, so that the customer can select the convenient Packstation to receive the parcel.
Finally, click Save Changes to save the plugin settings.
Tips
How to Print Shipment documents?
With our WooCommerce DHL Paket plugin, you can print shipping labels, return labels, manifests, and export documents. You can generate these documents only when the shipment is created, for the desired order(s).
Creating Shipment
Once a customer places an order, you can create shipment for the order in the back-end of your WooCommerce store.
Here’s how you should create shipment:
- Go to Dashboard > WooCommerce > Orders.
- On the order page, click the #OrderNumber for which you want to create a shipment, and print the label.
The sample edit order page is as shown in the screenshot below.
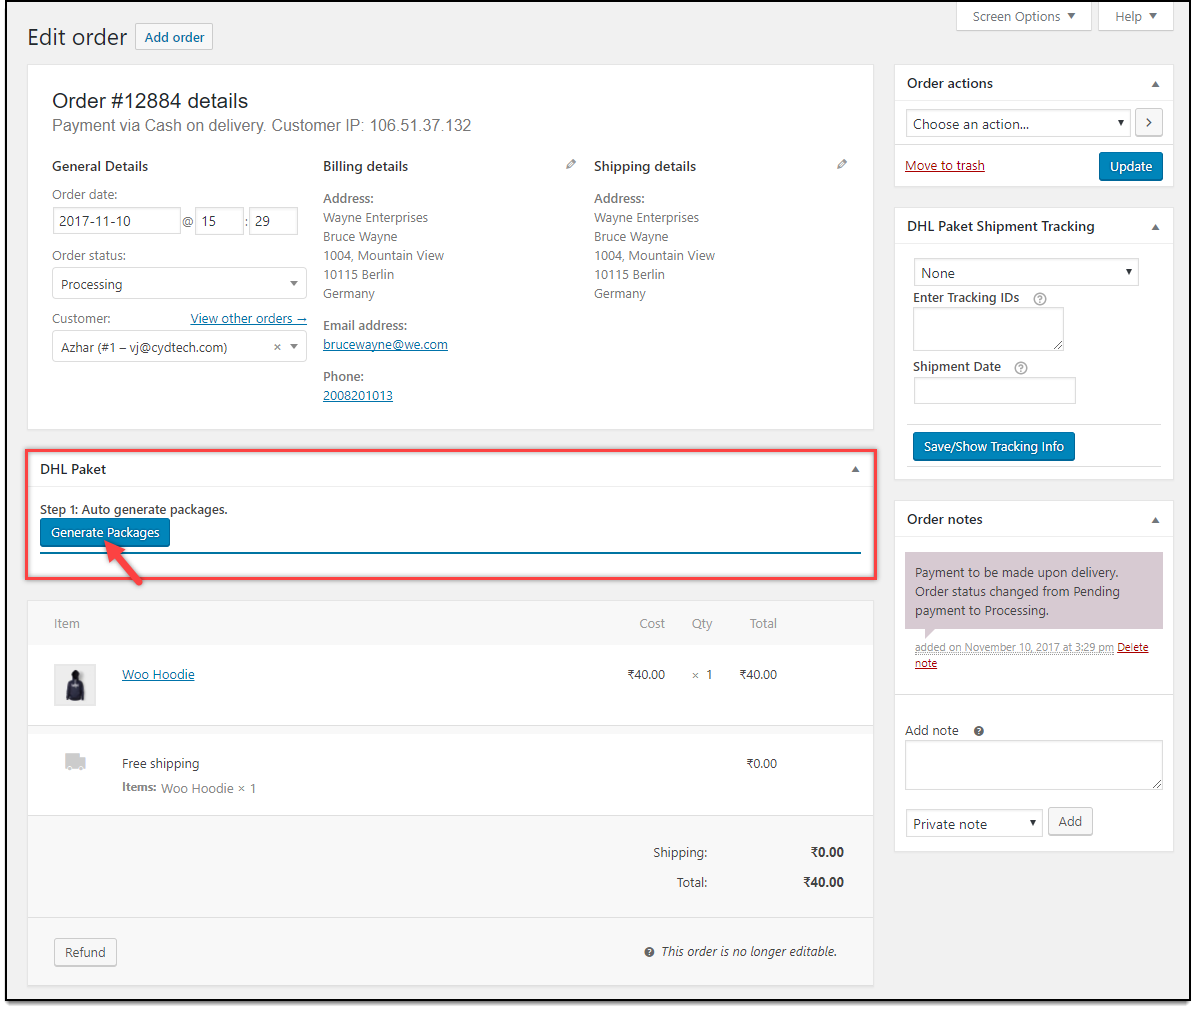
- Click on Generate Packages button. The package for the respective order is automatically generated. You can add an additional package using +Add Package option, or remove an existing package using red button placed on the extreme right of each package.
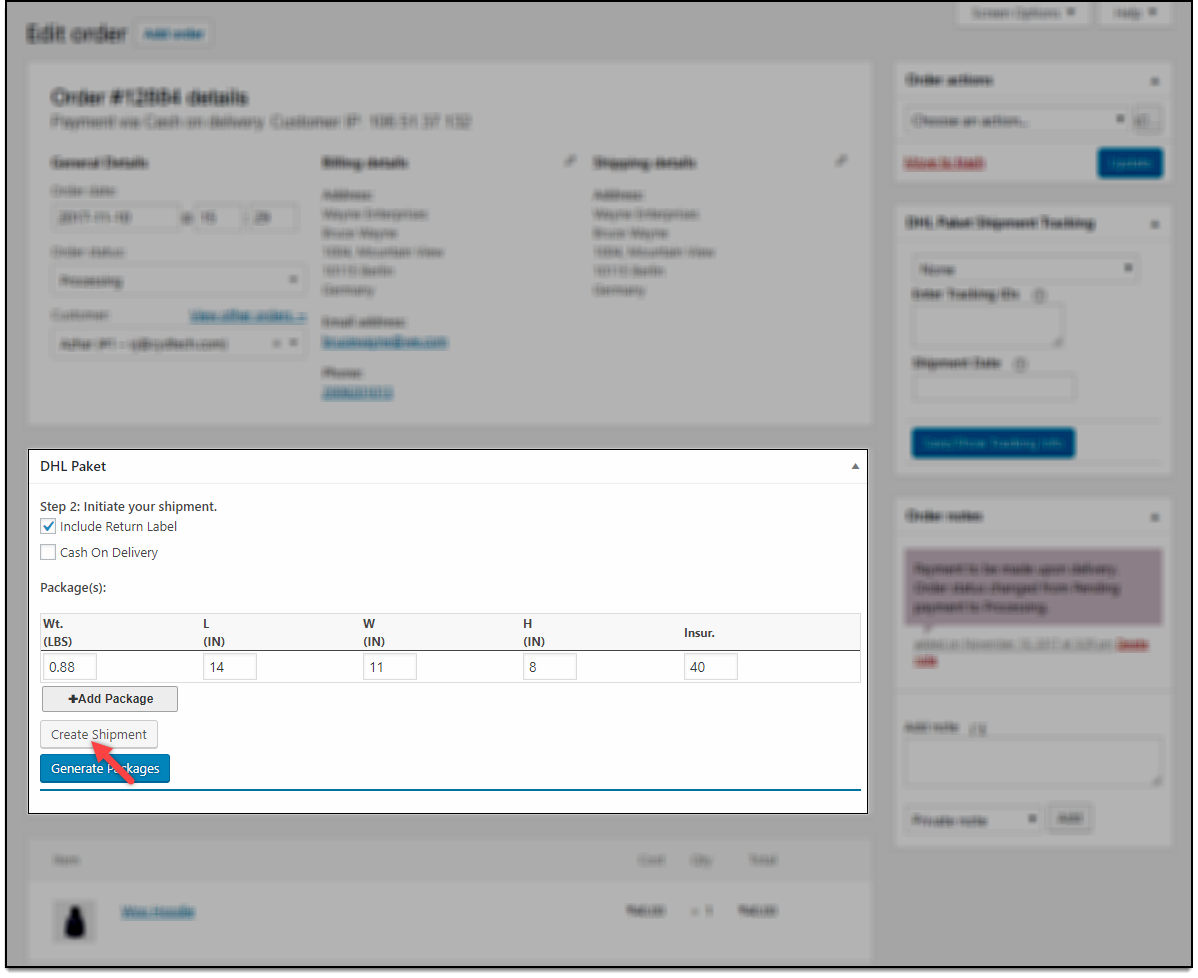
- Finally, click Create Shipment.
Printing Labels
Once the shipment is created, two important settings are affected, as shown in the screenshot below.
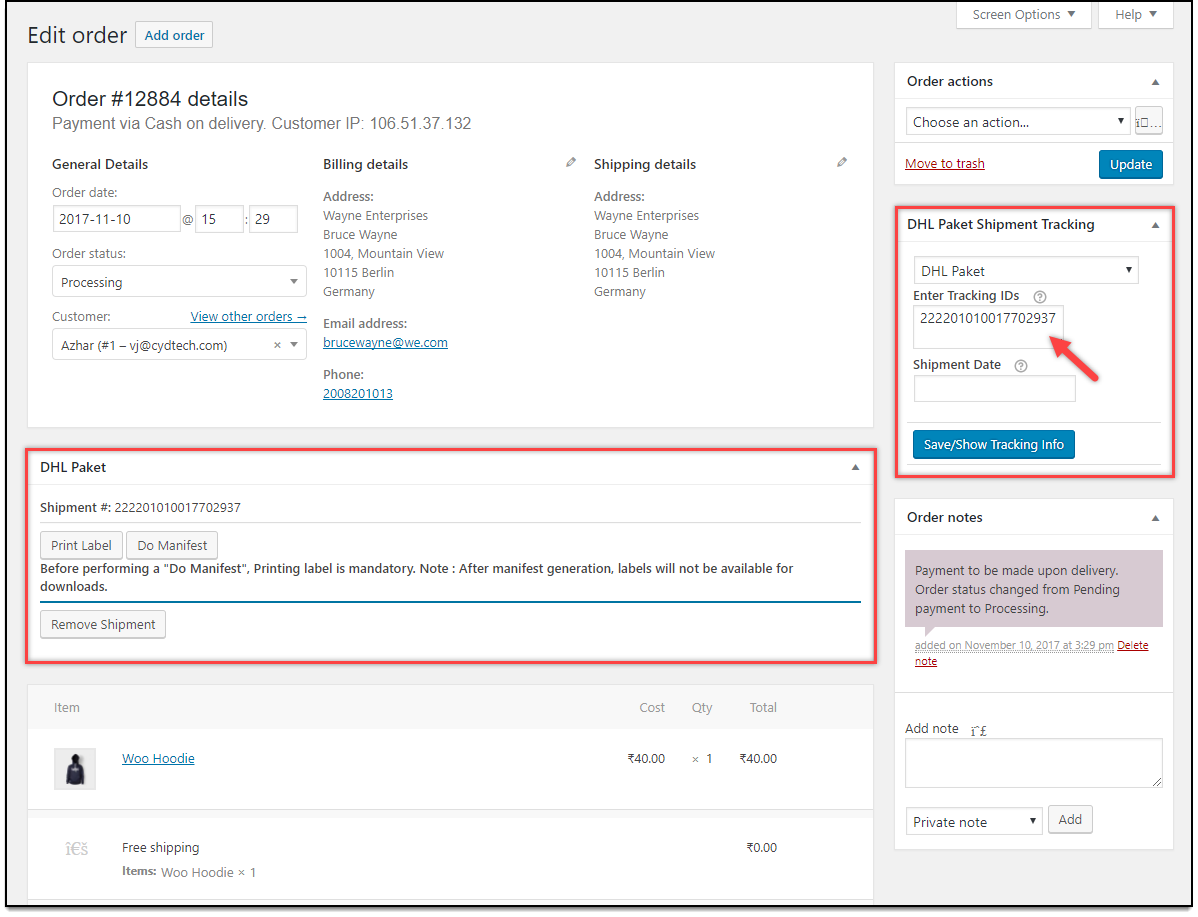
- Print Documents: You can print shipment label with a return label, export documents for international shipping, and manifest for the selected date.
- Shipment Tracking ID: The tracking ID is automatically generated when a shipment is created. Select the shipment date, and click Save/Show Tracking Info.
DHL Paket Shipment Documents
Following are the documents that are generated for your WooCommerce orders, using WooCommerce DHL Paket service.
Shipment Label
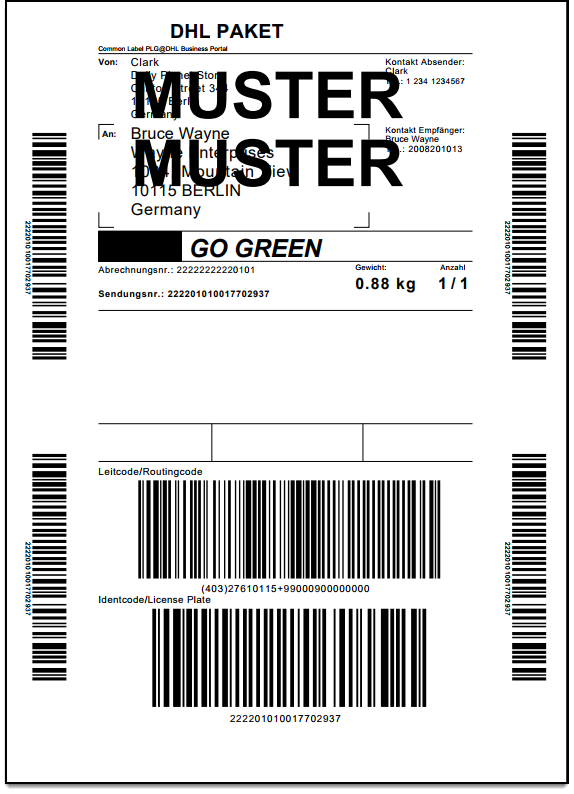
All created shipment labels are stored in your host site database. All these labels can be downloaded in a file and can be printed multiple times.
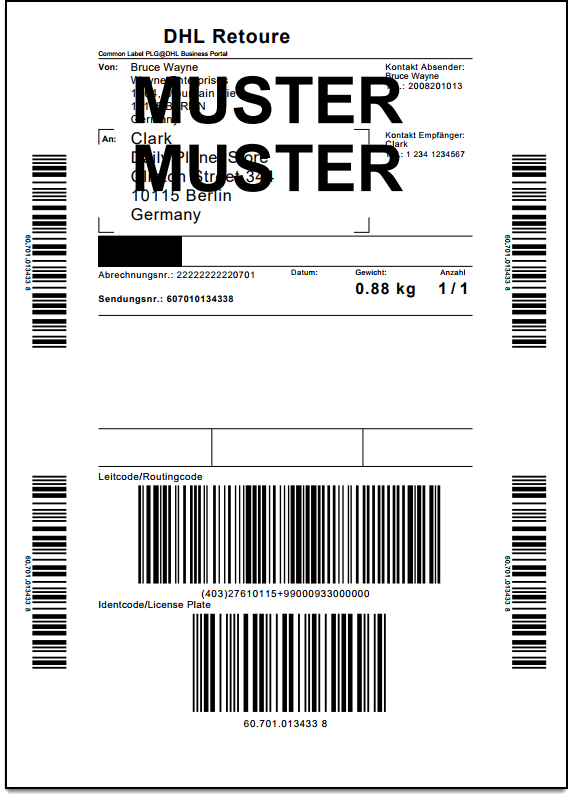
A sample shipment label is shown in below screenshot.
Return Label
If you have enabled return label option while creating a shipment, you’ll receive a return label with shipment label as well. But remember, return labels cannot be generated for international services.
Below screenshot shows a sample return label.
Manifest
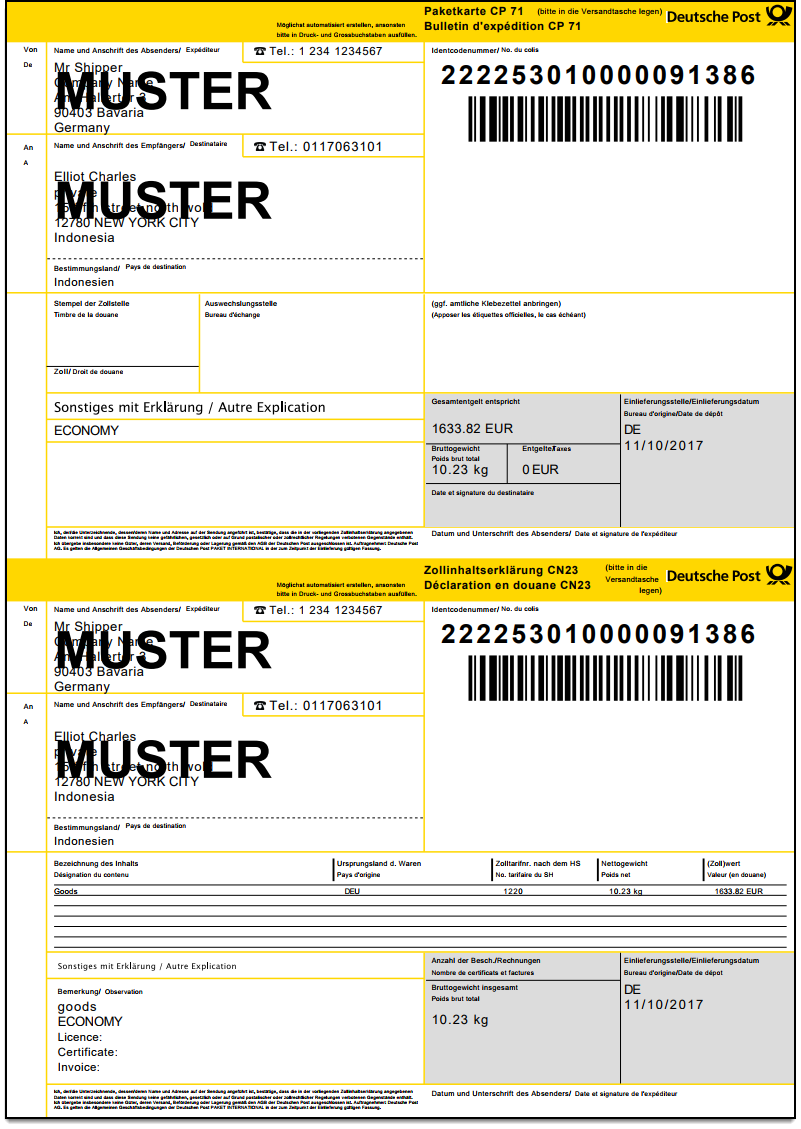
Manifest is a document detailing shipment contents. It is printed for all the orders for the selected date. Remember, you should print labels before printing Manifest. Once Manifest is generated, you cannot print/download shipment labels.
To print Manifest, click Do Manifest button. Further settings appear as shown in the screenshot below.

Next, select a date and click Get to proceed further. Manifest for the said order will be generated, as shown in the below screenshot.
Export Document
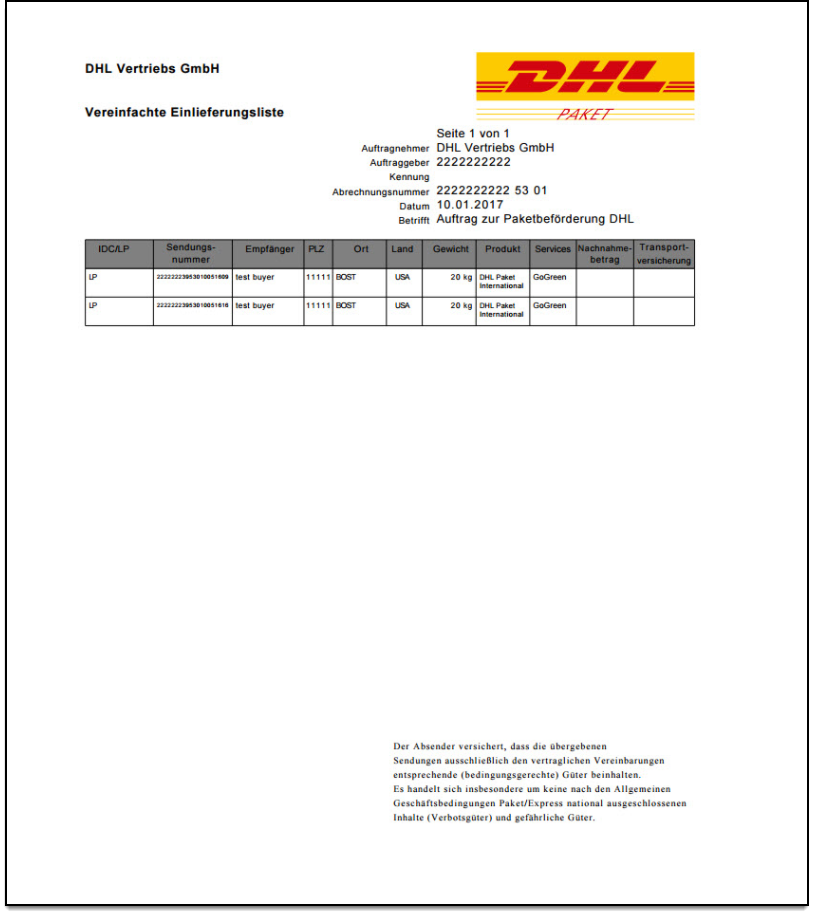
When you are shipping internationally, the export documentation is required for your shipment. A new button titled Get Export Document will be seen in the DHL Paket printing box when the package is shipped internationally.
A sample export document is shown in the screenshot below.
How to track shipments with DHL Paket?
Customers can track their shipment in their My-Account page. Under the Orders tab, customers can select the desired order number to view order details. The shipment tracking information will be displayed as shown in the screenshot below.
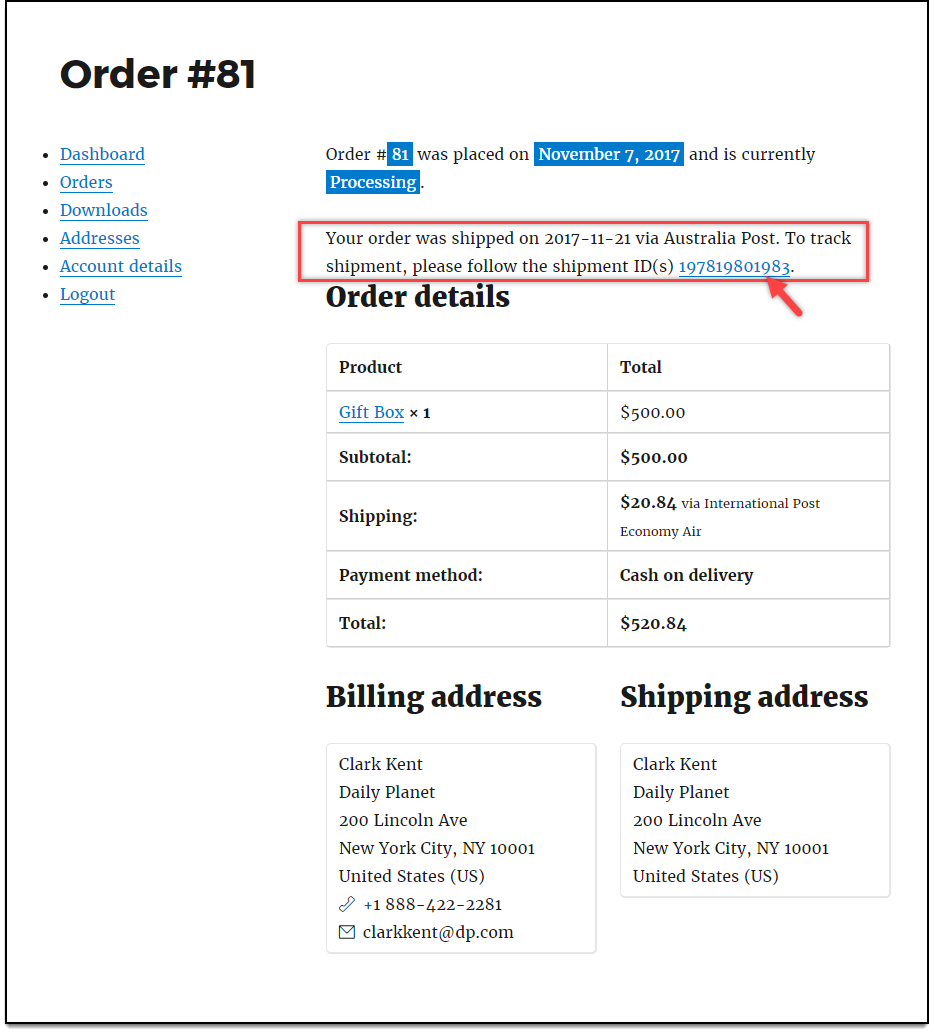
Customers can click on shipment tracking ID to track the status of the package. In addition to this, customers also get shipment tracking information through order completion email.
How to set up WooCommerce DHL Express?
To set up DHL Express option, see How to set up WooCommerce DHL Express in ELEX WooCommerce DHL Express / eCommerce / Paket Shipping Plugin with Print Label.
To explore more details about the plugin, go check out ELEX WooCommerce DHL Express / eCommerce / Paket Shipping Plugin with Print Label.
Check out the documentation section for more related articles.
You can also check out other WooCommerce and WordPress plugins in ELEX.
