Feeling overwhelmed by customer inquiries, complaints, and requests on your WooCommerce store? You’re not alone! Streamlining customer support is crucial for business success, but managing it all can feel like juggling flaming bowling pins.
Enter the helpdesk ticketing system: your secret weapon for organizing requests, prioritizing issues, and delighting customers. Don’t worry, no technical jargon here!
In this guide, we’ll break down the benefits, steps, and best practices for easily integrating a helpdesk ticketing system into your WooCommerce store.
Imagine calm, organized support, with happy customers singing your praises! So, buckle up and prepare to conquer customer support like a champion!
What is a Helpdesk Ticketing System?
A helpdesk ticketing system is a software solution designed to streamline and organize customer support and issue resolution processes within an organization. It provides a centralized platform for managing customer inquiries, complaints, and requests in the form of tickets.
Each ticket represents a unique customer issue or request and includes relevant information such as the customer’s query, the status of the ticket, and any actions taken to resolve the issue.
Key features of a helpdesk ticketing system include:
- Ticket Creation: Users, typically customers or internal staff, can create tickets by submitting their inquiries or issues through various channels such as email, web forms, or live chat.
- Ticket Organization: Tickets are organized and categorized based on factors like priority, issue type, or customer status. This helps in efficiently managing and prioritizing tasks.
- Automated Ticket Assignment: The system can automatically assign tickets to the appropriate support agents or teams based on predefined rules or criteria, ensuring a quick response.
- Communication Tracking: All communication related to a ticket, including customer interactions and internal discussions, is logged and easily accessible. This ensures that everyone involved in resolving the issue has the necessary information.
- Status Tracking: Tickets go through various statuses (e.g., open, in progress, resolved), allowing teams to track the progress of each inquiry or issue.
- Knowledge Base Integration: Integration with a knowledge base allows support agents to access relevant articles, FAQs, or documentation to assist in issue resolution. This can also empower customers to find solutions independently.
- Automation and Workflows: Automation features can be implemented to streamline repetitive tasks, trigger alerts, and enforce workflows for issue escalation or resolution.
- Customer Self-Service: Some ticketing systems offer customer portals where users can create, track, and manage their tickets independently, reducing the need for direct communication with support teams.
- Integration with Other Systems: Integration capabilities with other business systems, such as CRM, live chat, and e-commerce platforms, ensure seamless data flow and a holistic view of customer interactions.
By utilizing a helpdesk ticketing system, organizations can enhance their customer support processes, improve issue resolution times, and ultimately provide a more efficient and satisfactory experience for both customers and support teams.
Understanding the Need for a Helpdesk Ticketing System
 Before diving into the integration process, it’s crucial to grasp the significance of a Helpdesk Ticketing System in the e-commerce landscape. A Helpdesk ticketing system acts as a centralized hub for managing customer queries, concerns, and issues.
By converting each customer interaction into a ticket, businesses can efficiently track, prioritize, and resolve inquiries in a systematic manner.
A helpdesk ticketing system plays a crucial role in the operation and success of a WooCommerce store. Here are some key reasons highlighting the importance of a helpdesk:
Customer Support
- Responsive Assistance: A helpdesk ticketing system enables timely responses to customer inquiries, concerns, and issues.
- Problem Resolution: It serves as a central hub for addressing customer queries, providing solutions, and resolving issues promptly.
Enhanced Customer Experience
- Positive Interactions: A well-managed helpdesk ticketing system contributes to a positive customer experience, fostering trust and loyalty.
- Smooth Transactions: Customers appreciate a seamless process, and a helpdesk ticketing system ensures that any hitches in the buying process are swiftly addressed.
Order Tracking and Information
- Order Inquiries: Customers often have questions about their orders. A helpdesk allows them to track orders, request updates, and seek information about their purchases.
- Delivery Status: Providing real-time information on shipping and delivery enhances transparency and customer satisfaction.
Reduced Cart Abandonment
- Assistance with Purchases: A helpdesk can assist customers who face challenges during the checkout process, reducing the likelihood of cart abandonment.
- Product Information: Customers may seek additional information about products, and a helpdesk can provide the necessary details, encouraging purchases.
Efficient Issue Resolution
- Centralized Communication: Having a centralized platform for customer communication streamlines issue resolution and prevents cases from falling through the cracks.
- Automation: Automated responses and ticketing systems in a helpdesk can efficiently categorize and prioritize issues for quicker resolution.
Feedback Collection
- Customer Insights: A helpdesk is an invaluable tool for collecting customer feedback, which can be used to improve products, services, and overall customer satisfaction.
- Quality Improvement: Understanding customer concerns helps in identifying areas for improvement and refining business processes.
Brand Reputation Management
- Timely Responses: Quick responses to customer issues contribute to a positive brand image.
- Public Relations: Resolving customer problems through a helpdesk can prevent negative public reviews and promote a positive online reputation.
Compliance and Record Keeping
- Documentation: A helpdesk provides a documented trail of customer interactions, which is essential for compliance and record-keeping purposes.
- Audit Trail: Having a record of customer communications is valuable for tracking the resolution of issues and ensuring accountability.
Introducing WSDesk – A WooCommerce Helpdesk Ticketing System Plugin
Introducing WSDesk, a powerful WooCommerce Helpdesk Ticketing System Plugin designed to revolutionize customer support for online businesses. WSDesk seamlessly integrates with your WooCommerce store, providing a centralized platform to manage customer inquiries, issues, and requests.
With WSDesk, customers can easily create tickets through various channels, streamlining the submission process. The plugin organizes and categorizes tickets, ensuring efficient task management and prioritization.
Automated ticket assignment and workflow features expedite response times, while the tracking system logs all communications, offering a comprehensive overview for support teams. WSDesk’s integration with knowledge bases empowers agents with quick access to relevant information, facilitating prompt issue resolution.
With robust reporting tools, organizations can gain valuable insights into support metrics, aiding in continuous improvement. WSDesk is not just a plugin; it’s a customer-centric solution, enhancing the overall helpdesk experience within the WooCommerce ecosystem.
Key Features of WSDesk
Ticket Management
Create, track, and manage customer support tickets within the WooCommerce environment. Each ticket is linked to a specific order, providing context and streamlining the resolution process.
Email Notifications
Automated email notifications keep customers informed about the status of their tickets. From creation to resolution, customers receive updates, fostering transparency and trust.
Knowledge Base
Empower customers to find answers independently by creating a Knowledge Base. The Knowledge Base serves as a self-help resource, reducing the volume of incoming queries.
Custom Forms
Tailor support forms to gather specific information from customers when they submit a ticket. Custom forms ensure that support agents receive all the necessary details to address issues promptly.
Integration with Chat Plugins
WSDesk integrates seamlessly with the ELEX live chat plugin – WSChat, providing a holistic customer support experience. Agents can effortlessly switch between tickets and live chat conversations within a unified platform.
Step-by-Step Guide to Integrating WSDesk with Your WooCommerce Store
Before we begin: Ensure you have a WooCommerce store and the WSDesk plugin with an active subscription. Let’s dive in!
Step 1: Install and Activate the WSDesk Plugin
- Log in to your WordPress dashboard.
- Navigate to Plugins > Add New > Drag and drop the downloaded WSDesk plugin.
- Click “Activate” to bring WSDesk to life!
- Provide the API Licence Key and API Licence Email to activate the plugin. Your Elextensions My Account page is where you can locate your API Licence Key. Also, provide the unique product ID you obtained when you purchased the plugin from Elextensions.
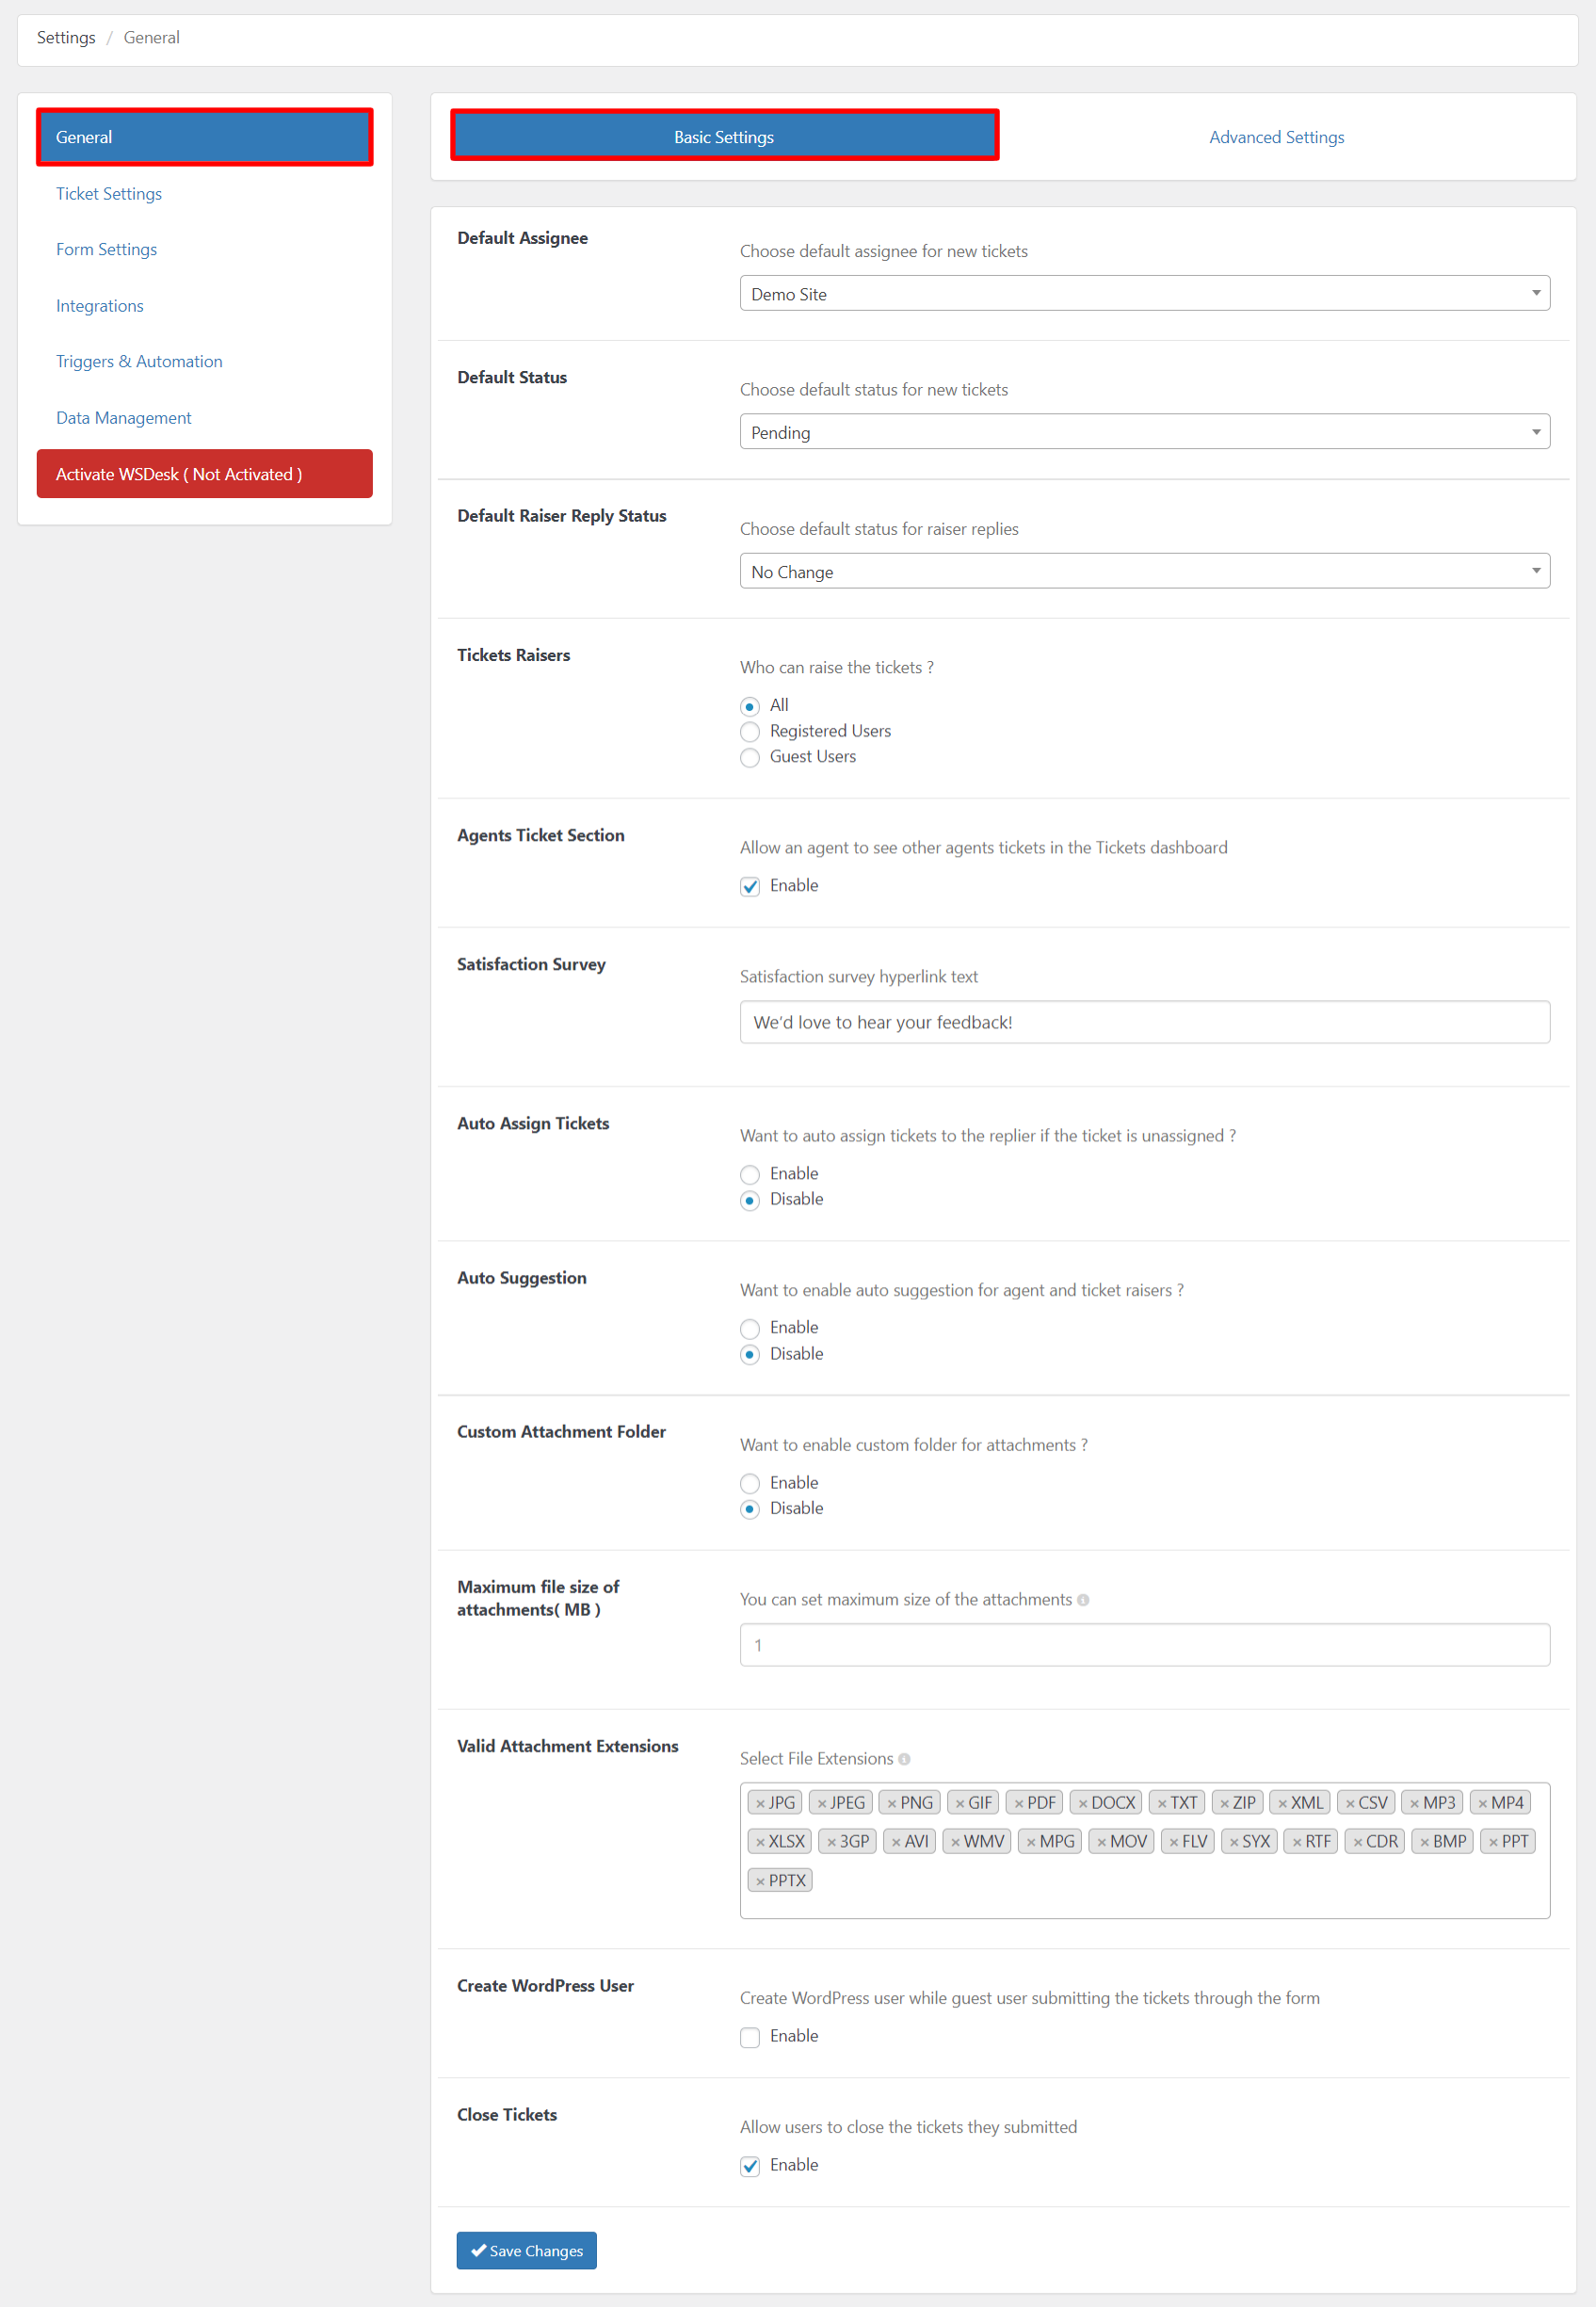
Step 2: General Settings
Basic Settings
 Default Assignee: Set a default assignee for tickets, choosing from agents created in WSDesk or opting for no default assignee.
- Default Status: Assign a default status to new tickets, selecting from pre-set and user-created options.
- Default Raiser Reply Status: Choose the default status for replies from the ticket raiser, such as ‘Unsolved’ or ‘Solved’.
- Ticket Raisers: Define which users can raise tickets—options include ‘All,’ ‘Registered Users,’ or ‘Guest Users.’
- Agents Ticket Section: Enable agents to view other agents’ tickets in the Ticket dashboard.
- Satisfaction Survey: Add custom hypertext for customer feedback in email communications.
- Auto Assign Tickets: Automatically assign unassigned tickets to the replier.
- Auto Suggestion: Enable auto-suggestion for ticket raisers and agents based on title, content, and tags of articles.
- Custom Attachment Folder: Define a custom folder for attachments, allowing for organized storage.
- Maximum File Size of Attachments: Specify the maximum file upload size in megabytes.
- Valid Attachment Extensions: Choose supported attachment extensions or accept all if none are selected.
- Create WordPress User: Redirect guest users to create a WordPress account upon successful ticket submission.
- Close Tickets: Allow users to close their support requests from the front end by enabling this option.
Advanced Settings
 Show Excerpt on Auto-Suggestion: Enable to display custom text, rather than the first sentence of the post, in auto-suggestion results.
- Display Ticket As: Choose between HTML or Text format for viewing and replying to tickets.
- WSDesk API: Create WSDesk tickets from any website by enabling this setting. Obtain a custom API key and add it to the API integration section of your website.
- Default Deep Link: Set a default view on the main ticket dashboard using deep links. For instance, if the deep link for the ‘Unsolved’ view is “https://yoursiteurl.com/wp-admin/admin.php?page=wsdesk_tickets&view=label_LL01,” adding it to the field makes ‘Unsolved’ the default view.
- Create Ticket Views: Sort tickets by ascending or descending order of their updated dates using endpoints (&order=DESC; &order=ASC) in the main ticket page URL.
- Debug Mode: Allows you to store database collation logs and email logs in the PHP error log.
- Powered by WSDesk Tag: Disable to remove the “Powered by WSDesk” tag from the front-end and support emails.
- Convert URLs to Hyperlinks: Enable the conversion of all URLs in ticket conversations into hyperlinks.

Click “Save Changes” to apply and save the settings.
Step 3: Ticket Settings
Ticket Fields
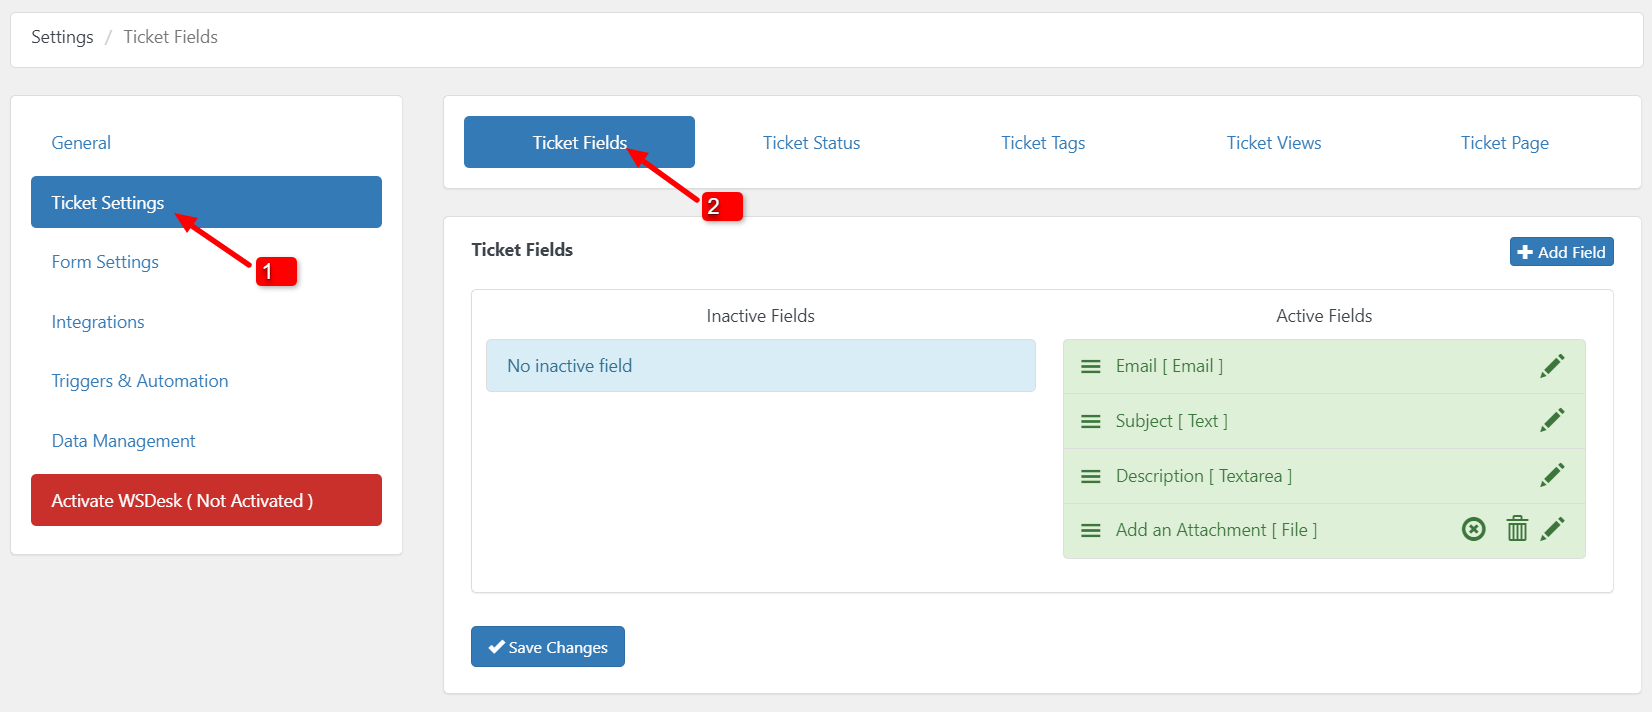 Managing Ticket Fields is simple:
Adding a Ticket Field:
- Click on the “Add Field” button in the top right corner of the dashboard.
- Select the desired input field, and additional settings for that field will be displayed.
- Customize the field title, visibility, restrictions, and other details.
Editing a Ticket Field:
- Click the edit icon of the respective ticket field to modify it.
- Edit both default and custom ticket fields as needed.
Activating a Ticket Field:
- New ticket fields are initially listed as inactive. Click the activate icon to enable a ticket field.
- Reorder ticket fields using the hamburger icon to determine their placement on the support form.
Deleting a Ticket Field:
- To remove a ticket field, click the delete icon of the relevant ticket field.
- Note that only user-created ticket fields can be deleted; default fields cannot be removed.
Ticket Status
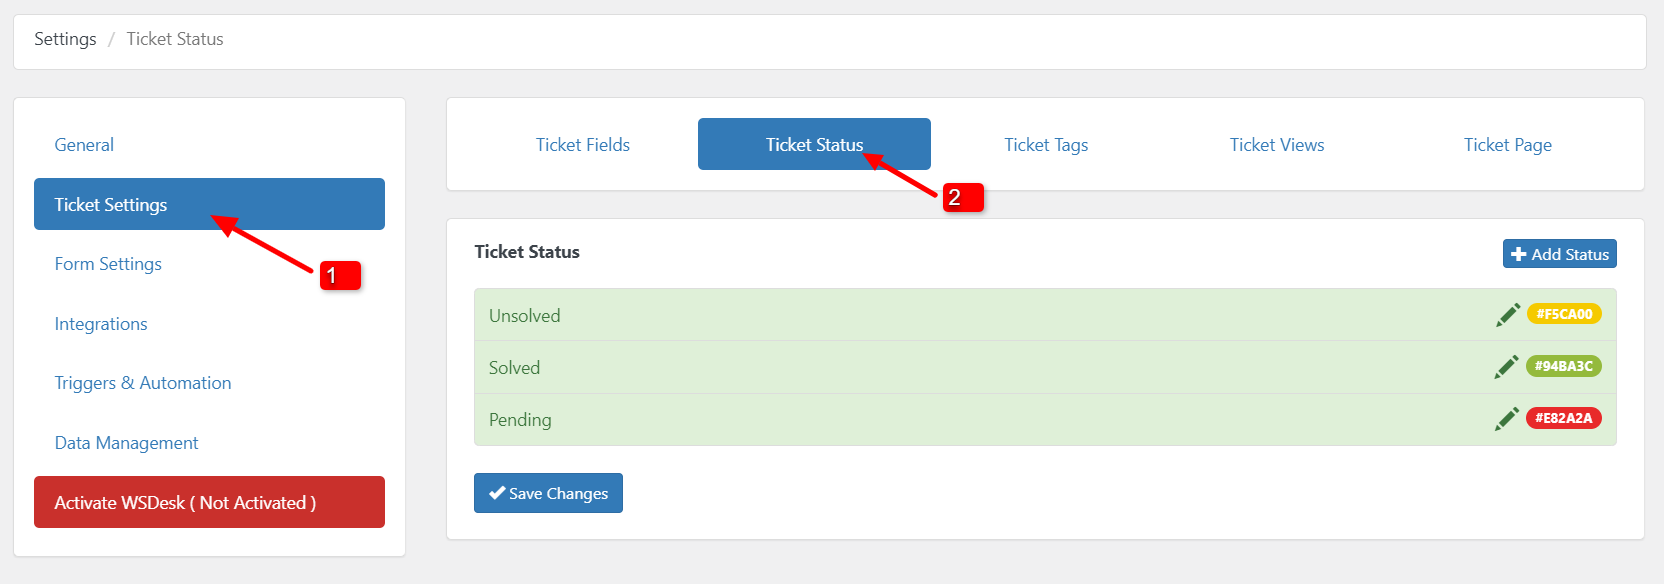 Ticket Status is vital for tracking the progress of tickets, with each status distinguished by a unique color. In this section, you can easily manage ticket statuses:
- Adding a Status: Click “Add Status” to create a custom ticket status. Specify the title, choose a distinctive color, and opt for filtering as needed.
- Editing & Deleting: Use the edit or delete icon to modify or remove a ticket status. Note that only user-created statuses can be deleted.
Ticket Tags
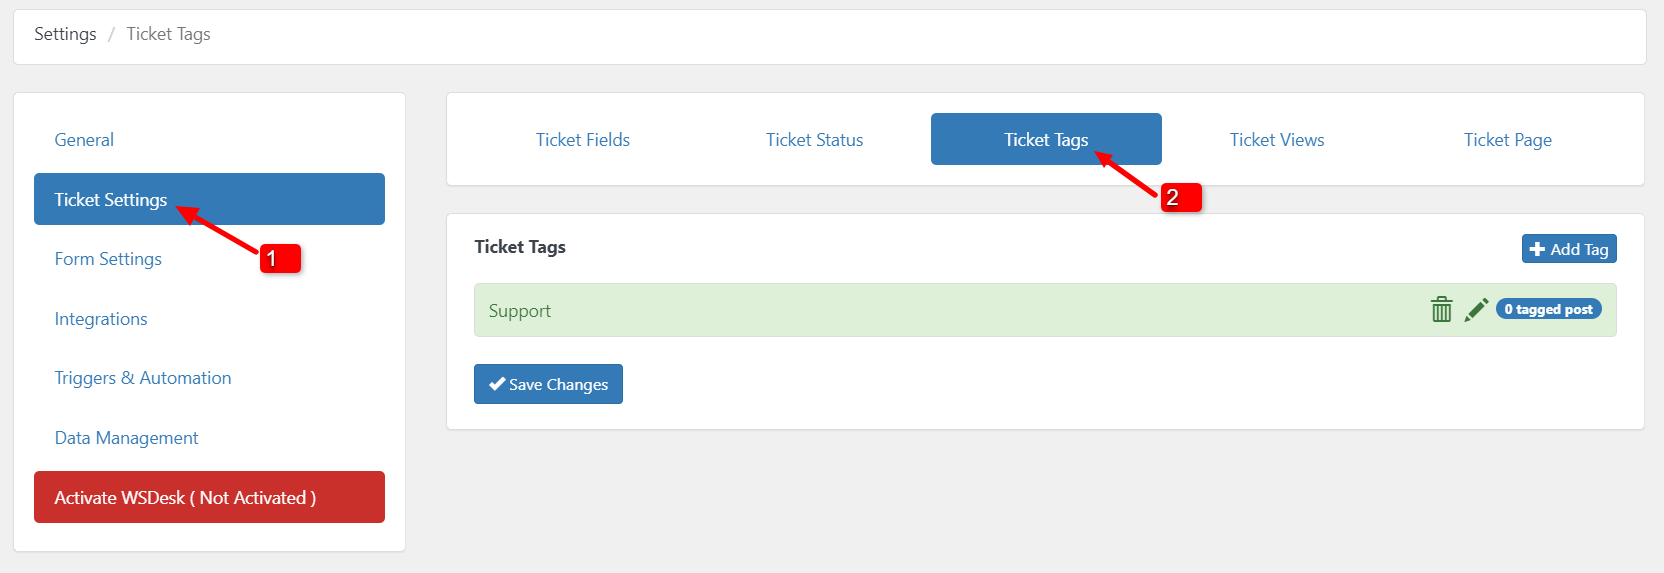 To manage Ticket Tags, navigate to the Ticket Status settings. Here’s how you can add, edit, remove, and configure tags related to a product:
- Adding a Ticket Tag: Simply click on the “Add Tag” button located in the top right corner of the dashboard. Provide a suitable title and select the relevant product or related posts. Once created, you can utilize the new ticket tag to filter tickets as needed. Remember to save your changes after configuring all settings.
- Editing & Deleting a Ticket Tag: To modify or delete a ticket tag, click on the respective edit or delete icon associated with the tag.
Ticket Views
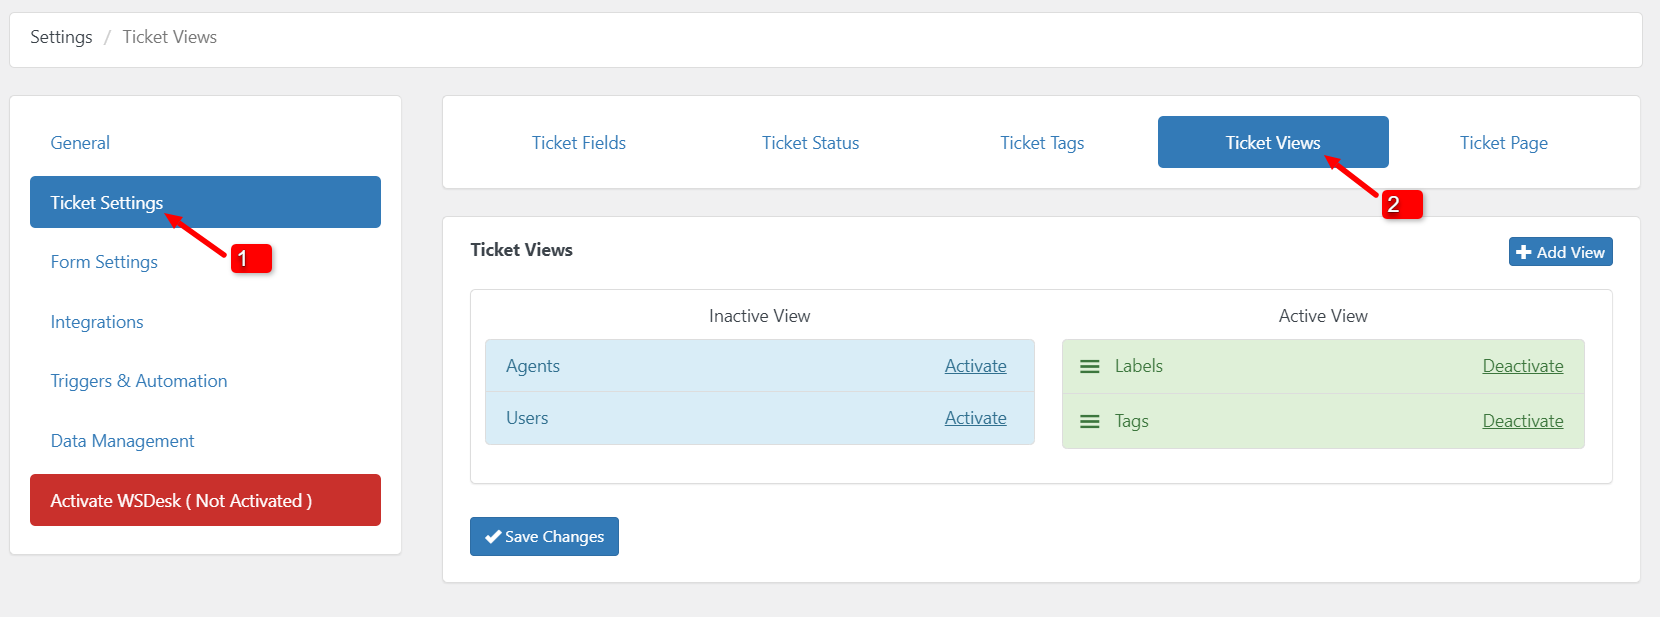 In this section, you can add, edit, remove, and configure ticket views. Here’s what you need to know:
- Adding a Ticket View: Click “Add View” to create a custom ticket view.
- Title: Provide a suitable title for the new view.
- Condition Format: Select from “AND” and “OR” conditions.
- Conditions: Select from various conditions like email, assigned label, assignee, tags, and more.
- Adding Multiple Conditions: Use “Add Conditions” to include multiple criteria.
- Grouping Conditions: Group conditions based on ticket status, assignee, tags, email, subject, or request type.
- View Display: Configure which users (Administrator, WSDesk Agents, WSDesk Supervisor) can access the new ticket view.
- Editing & Deleting: Use the edit or delete icon to modify or remove a ticket view. Only user-created views can be deleted.
Ticket Page
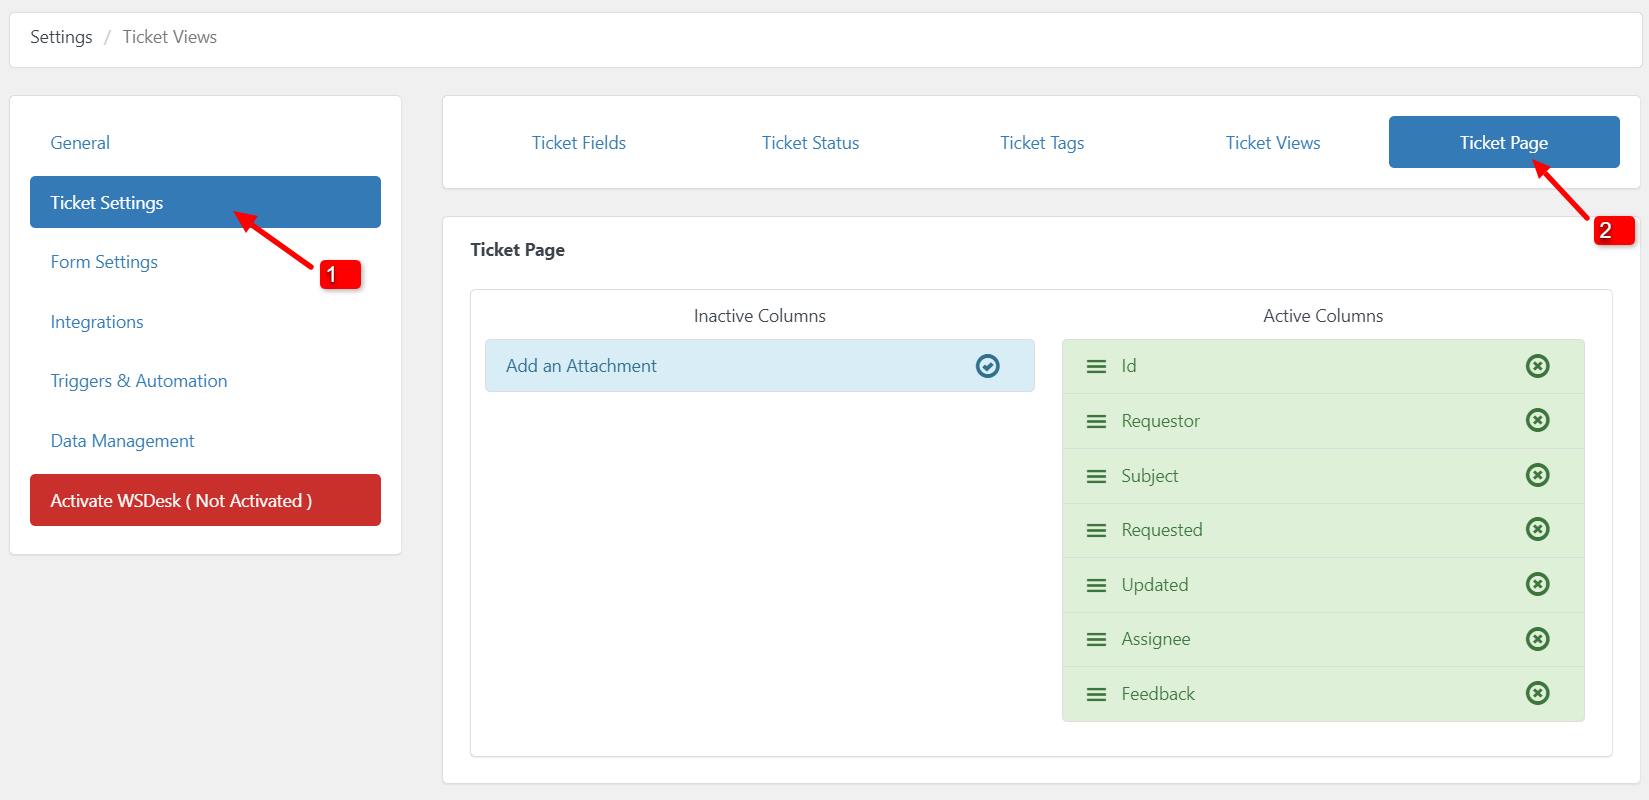 This page’s settings impact the columns in the Tickets dashboard. You can toggle default fields on or off and add Ticket Fields from the Ticket Fields dashboard.
Step 4: Form Settings
 This section allows you to customize the appearance of the support form in WSDesk – ELEX WordPress Helpdesk & Customer Support Ticket System Plugin. Configure input field sizes, set custom titles for forms and buttons, and manage redirect URLs. Key settings include:
- Form Width: Adjust the width of the support form input fields using percentage values.
- Existing Tickets Page Labels: Customize labels for unregistered users visiting the existing tickets page.
- Support Form Title: Customize titles for the main support form, new support form, and existing support form.
- Support Form Button: Edit the text for the Submit, Reset, and Existing Ticket buttons.
- Redirect URLs: Redirect users to specific URLs for actions on the WSDesk Support Page (e.g., login, register, submit ticket).
- Pay For Support Add-on: If using Pay For Support Add-On, set a minimum purchase credit, and configure redirect URLs for credit-related actions.
Click “Save Changes” to apply your customizations.
You can also activate WooCommerce, OpenAI ChatGPT, and Google Chat Integration as required. The integration documentation can be found in the product documentation.
Step 5. Data Management
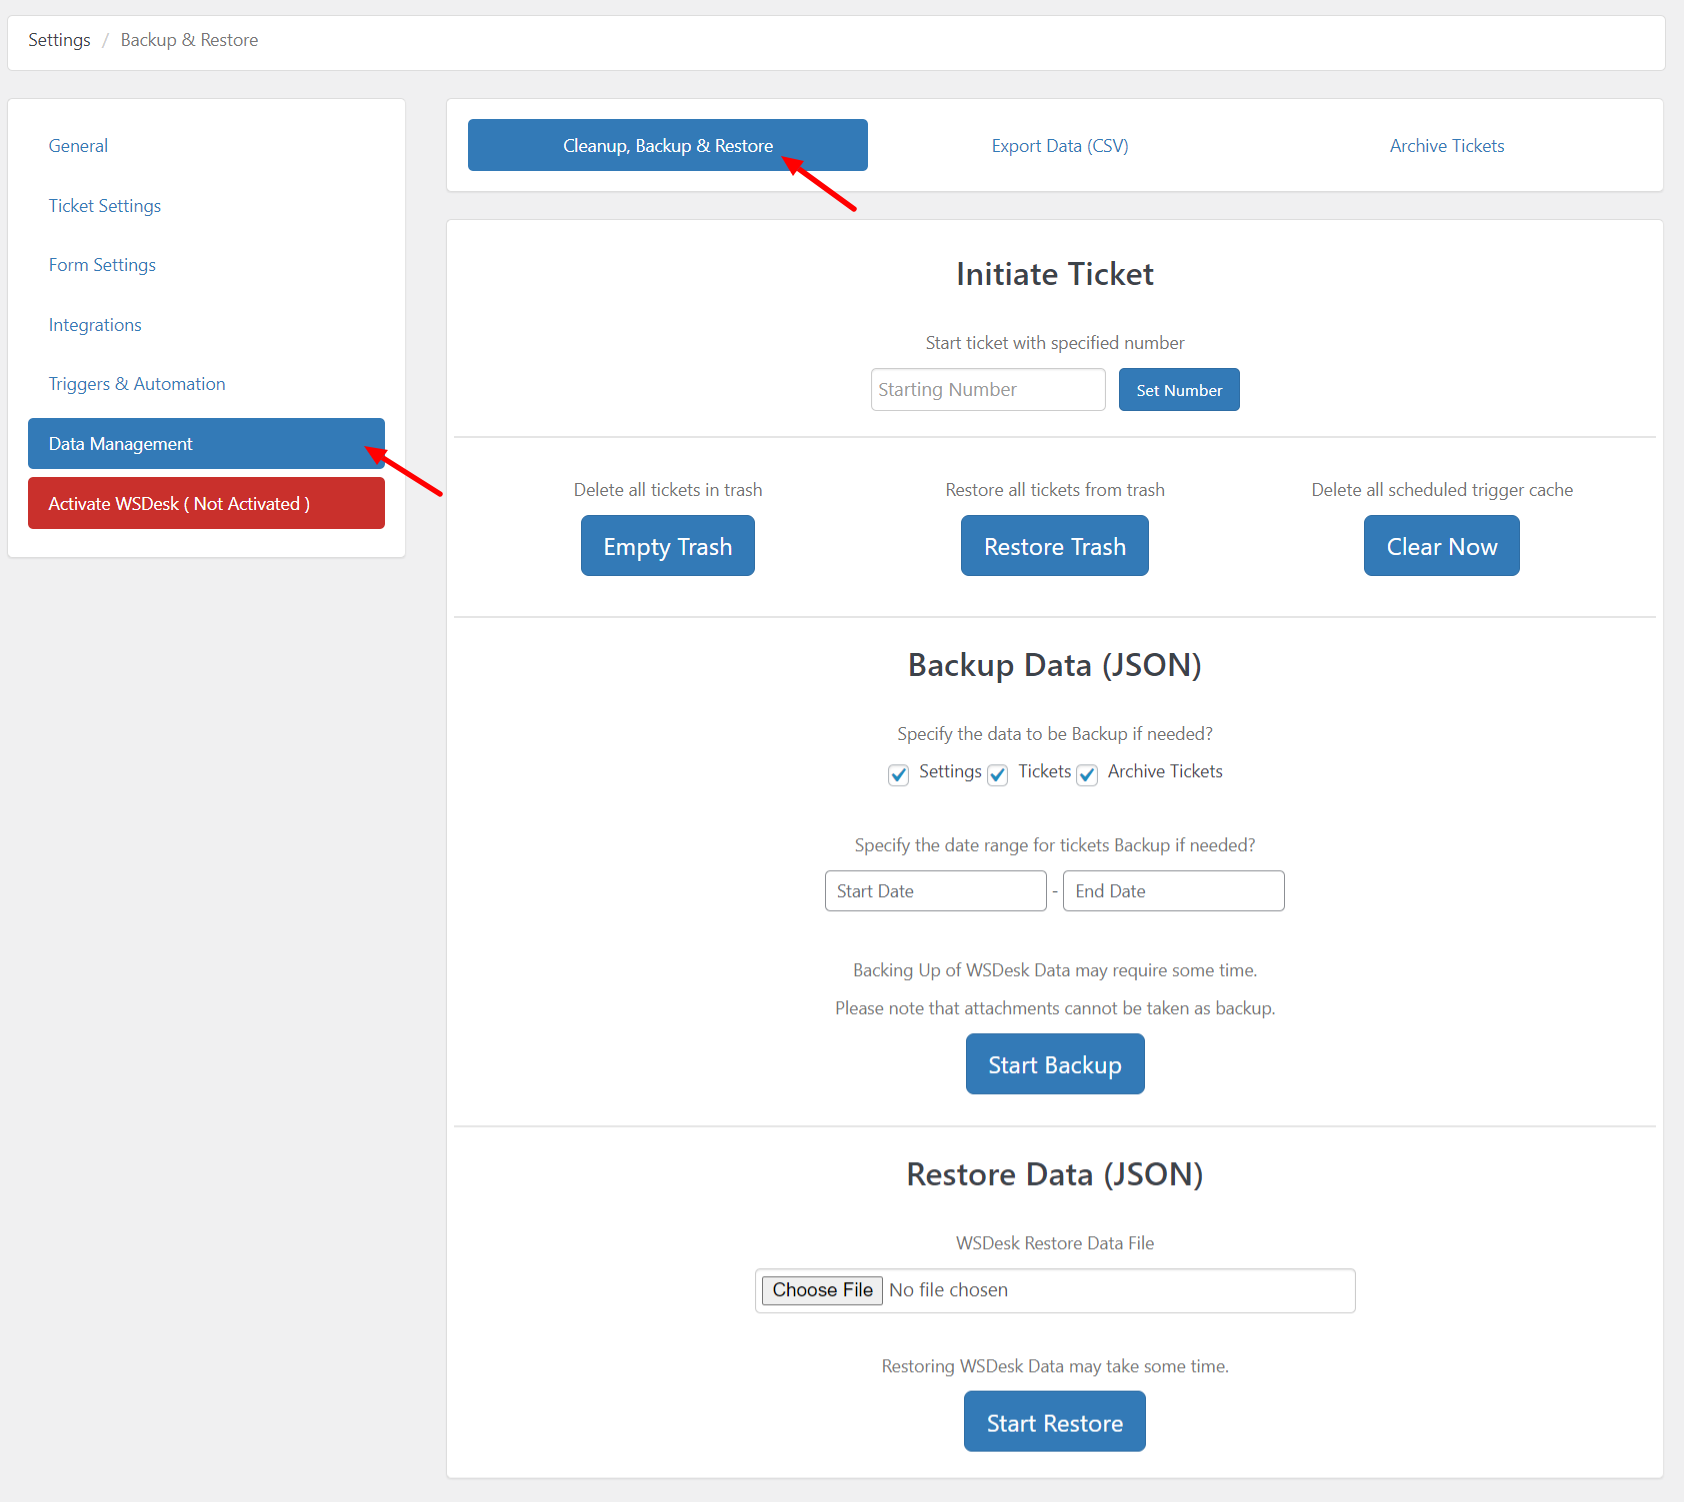 In the WSDesk Data Management section, you have control over your WSDesk data, including ticket and plugin settings backup, restoration, and ticket archiving. This section is separated into three tabs:
Backup and Restore:
- Easily manage WSDesk settings and ticket data cleanup, backup, and restoration using JSON for a smoother and lighter process.
- Options include initiating a custom ticket number, deleting or restoring tickets in the trash, and performing backup and restoration using XML files.
Export Data (CSV):
- Export ticket information in CSV format by selecting a date range and clicking the “Start Export” button. A convenient way to extract and analyze data.
Archive Tickets:
- Save time and streamline the ticket dashboard interface by archiving old tickets for future use or reference.
- Specify a date range and optional ticket status to archive tickets, or use the Tickets tab for bulk archiving.
- Archived tickets are accessible in the WSDesk > Archived Tickets dashboard, providing an organized view with the ability to restore tickets either from the dashboard or using the Restore settings in the Archive Tickets section.
Step 6. Agent Settings
 The Agents dashboard in WSDesk facilitates the addition and management of agent profiles, along with the configuration of agent roles, user rights, and associated Ticket Tags.
- Adding an Agent: To add a new agent profile, click on the “Add Agent/Supervisor” button in the Agents Dashboard.
Settings for Adding an Agent:
- Add Users: Enables the addition of a WordPress user role. You can either create a new user by checking the “Create new user” box or choose an existing user from the drop-down list.
- Eligible User Roles: Author, Shop Manager, Contributor, and Editor.
- WSDesk Role: Specifies roles for the selected user, including WSDesk Agents or WSDesk Supervisor.
- WSDesk Rights: Defines access rights based on the assigned WSDesk Role. For WSDesk Agents, rights include Reply to Tickets, Delete Tickets, Manage Tickets, and Manage Templates. For WSDesk Supervisors, additional rights include the Show Settings Page, Show Agents Page, Show Email Page, and Show Import Page.
- Add Tags: Allows the specification of tags for agents. Tickets associated with these tags are automatically assigned to the newly added agent.
- Managing Agent Profiles: Click on an agent’s name to access further settings in the Agent Profile section.
Agent Profile Settings:
Here, you can edit the agent profile, view reports, or revoke the WSDesk agent role for the user. This section provides comprehensive control and customization options for each agent within the WSDesk Helpdesk Plugin.
Step 7. Reports
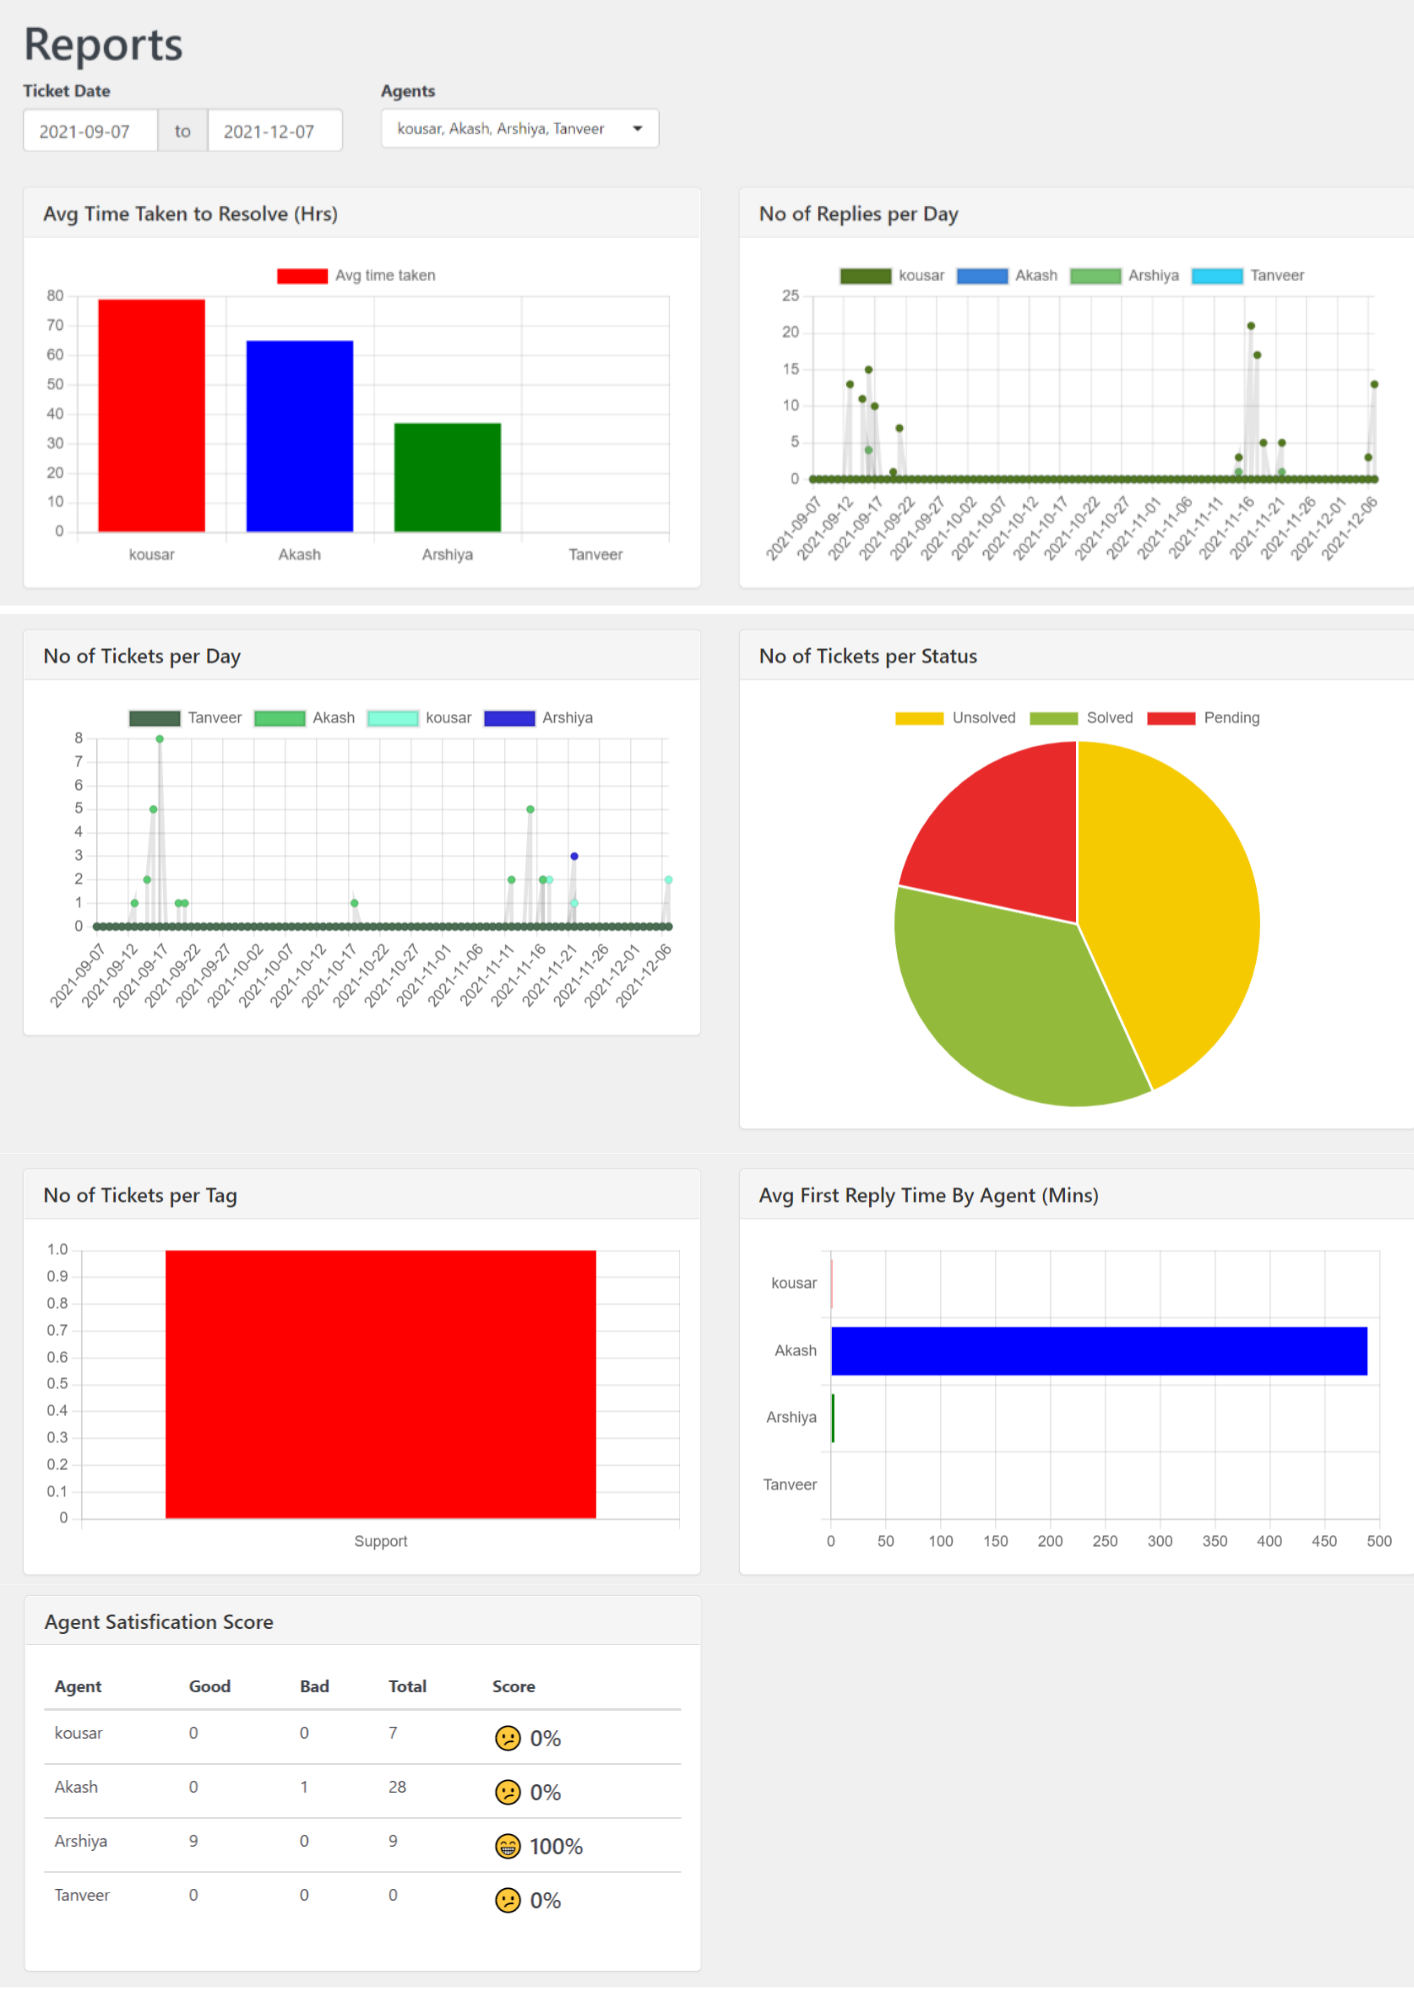 WSDesk Reports Dashboard provides a comprehensive overview of your data, allowing you to monitor key metrics such as ticket status, agent response times, and more.
Filter your reports by agents or durations, selecting options like Last 7 Days, Last 30 Days, or a Custom date range for tailored insights.
Sections in the Reports Dashboard include:
- Average Time Taken to Resolve (Hrs): Displays the average hours each agent takes to resolve a ticket.
- Number of Replies per Day: Highlights the daily count of replies sent by each agent.
- Number of Tickets per Day: Shows the daily count of tickets responded to by each agent.
- Number of Tickets per Status: Illustrates the number of tickets in various progress statuses.
- Number of Tickets per Tag: Displays the number of tickets in each tag category.
- Average First Reply Time By Agent (Mins): Allows you to view the average first reply time of each agent, providing insights into their efficiency.
- Agent Satisfaction Score: Presents satisfaction survey results, indicating positive and negative feedback as a percentage.
Step 8. Email Settings
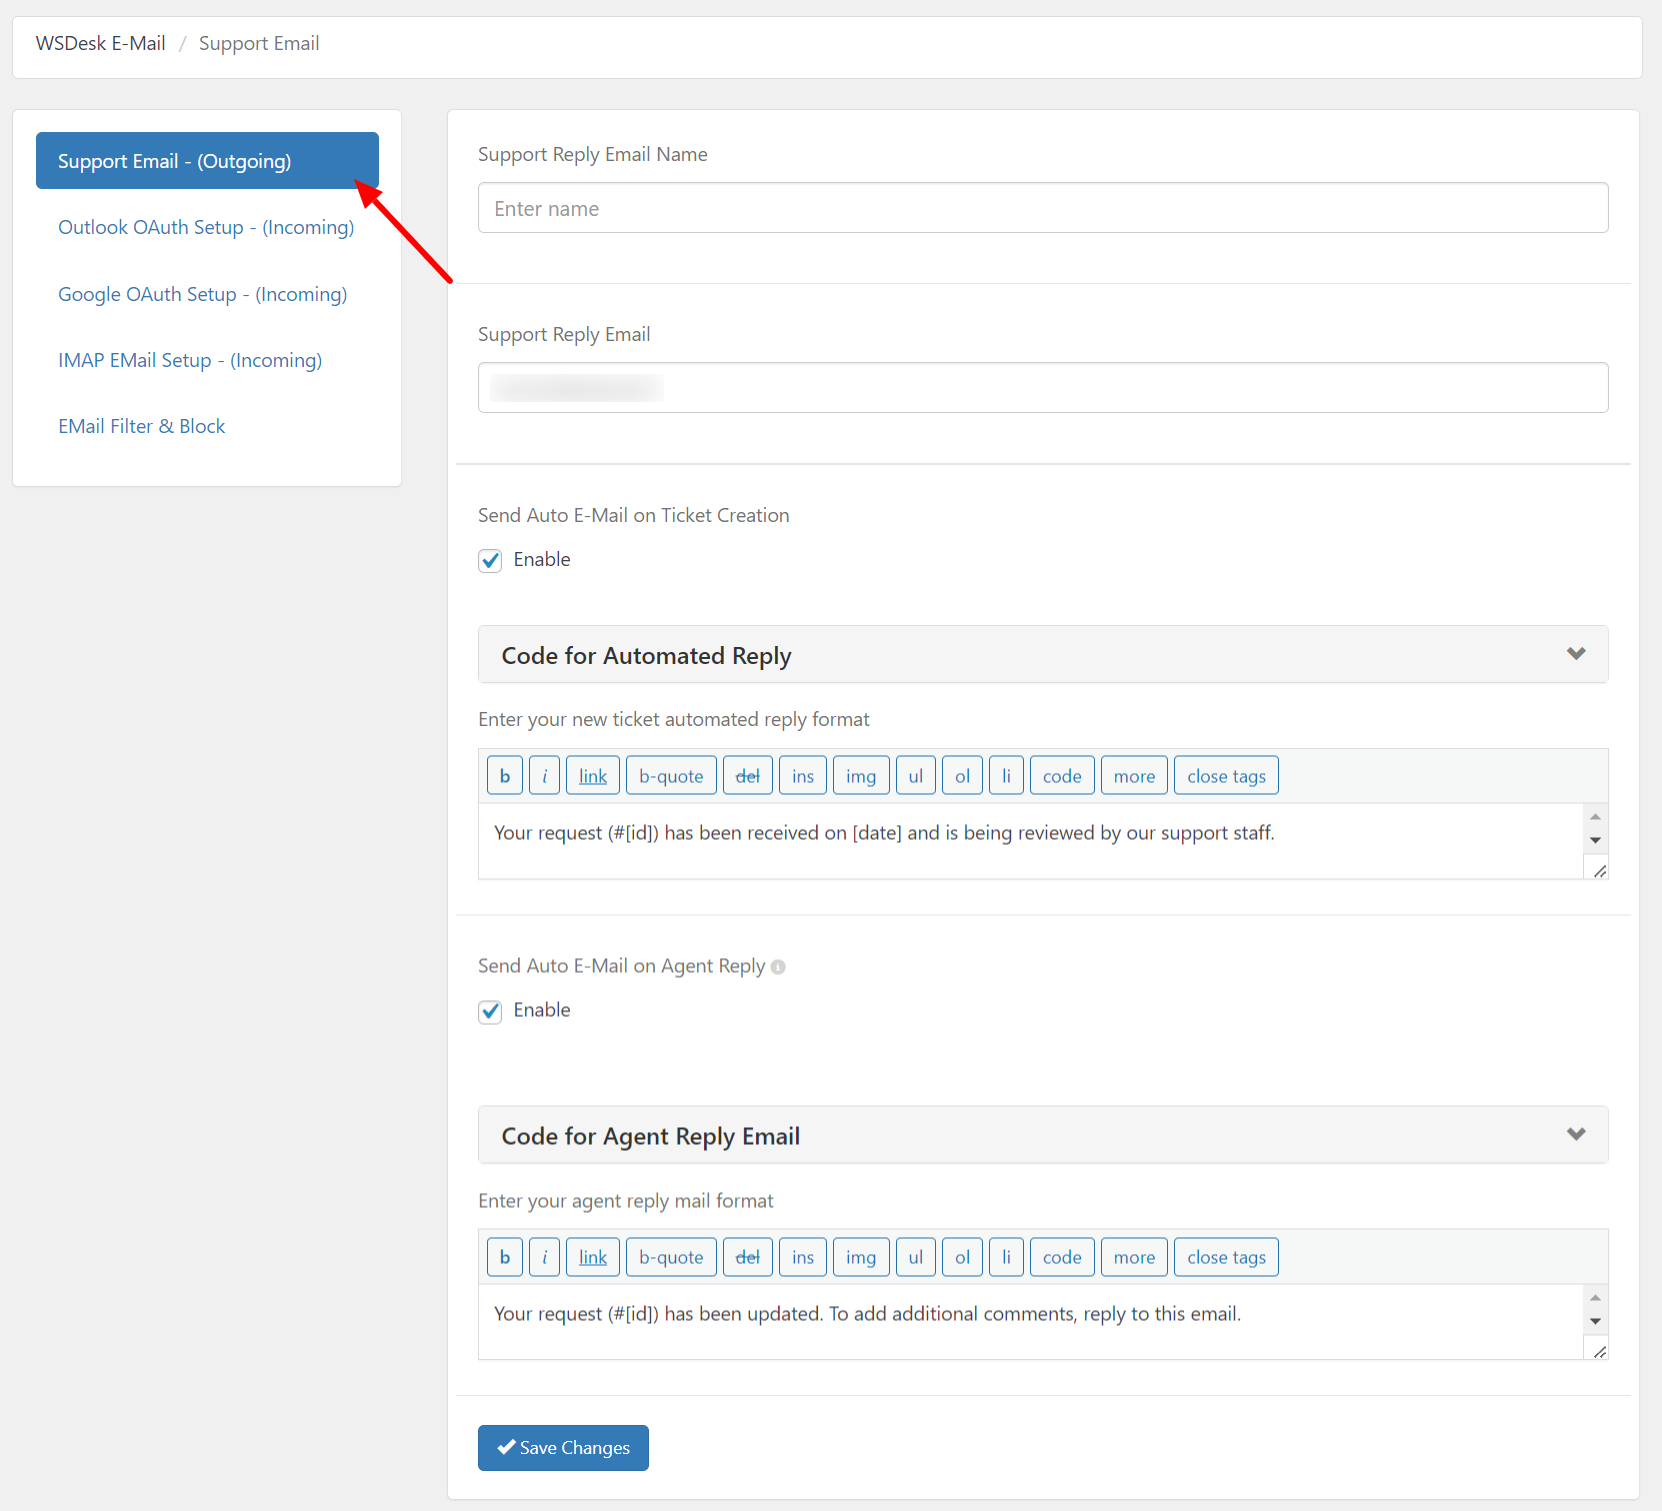 You can configure automatic responses, prevent or ban email addresses from submitting support ticket requests, and enable Google OAuth to send and receive tickets as emails without using your credentials in the email area.
These settings will enable you to set up WSDesk on your WooCommerce store. For further detailed step-by-step instructions, you can check out the product documentation.
Conclusion
Integrating a Helpdesk Ticketing System, especially one as versatile as WSDesk, is a strategic investment in the long-term success of your WooCommerce store.
By centralizing customer support processes, providing transparency, and empowering customers with self-help resources, WSDesk contributes to a positive customer experience.
Remember that successful integration goes beyond technical setup; it involves aligning your support processes with the unique needs of your customers. With WSDesk, you’re not just implementing a Helpdesk system; you’re elevating your customer support to new heights within the WooCommerce ecosystem.

