What can we help you with?
How to set up WSDesk – WordPress Helpdesk Plugin?
This article explains the step-by-step tutorial to set up WSDesk – WordPress Helpdesk Plugin. If you need help with the quick setup wizard, read its article for the same.
You can watch how you quickly start with WSDesk using this video :
Prerequisites
- Minimum PHP version supported – 7.1.8
- Minimum WordPress version supported – 5.3
- If you are using the basic version of WSDesk – WordPress Helpdesk Plugin, you must deactivate it before installing the premium version.
Installation
Downloading the plugin:
- Premium plugin – Once you have purchased the plugin, the zip file of the plugin can be downloaded from the API DOWNLOADS section in the Account settings.
- Free plugin – If you are looking for the free version, you can download the free plugin from the WSDesk free plugin page.
Read an article to know how to complete the checkout process on ELEX. You can also read how to download, install, activate ELEX plugins.
Activation
To activate the premium version of the plugin, follow the below steps:
- Move to the Settings dashboard of WSDesk – WordPress Helpdesk Plugin.
- Click the Activate WSDesk button.
The following settings are displayed.

- To activate the plugin, enter the API Licence Key and API Licence Email. You can find your API Licence Key on the My Account page of Elextensions. Also, enter the unique product ID that you received upon purchasing the plugin from Elextensions.
- If you have a multisite, then you need to activate the plugin in the root site instead of the sub-site. Only then will you be able to receive plugin updates.
Settings
The Settings dashboard consists of a list of vital configurations for setting up WSDesk – WordPress Helpdesk Plugin. You can see the following settings –
General Settings
The General settings are divided into two sections: Basic and Advanced.
Basic settings
The following are the basic settings of WSDesk – WordPress Helpdesk Plugin.
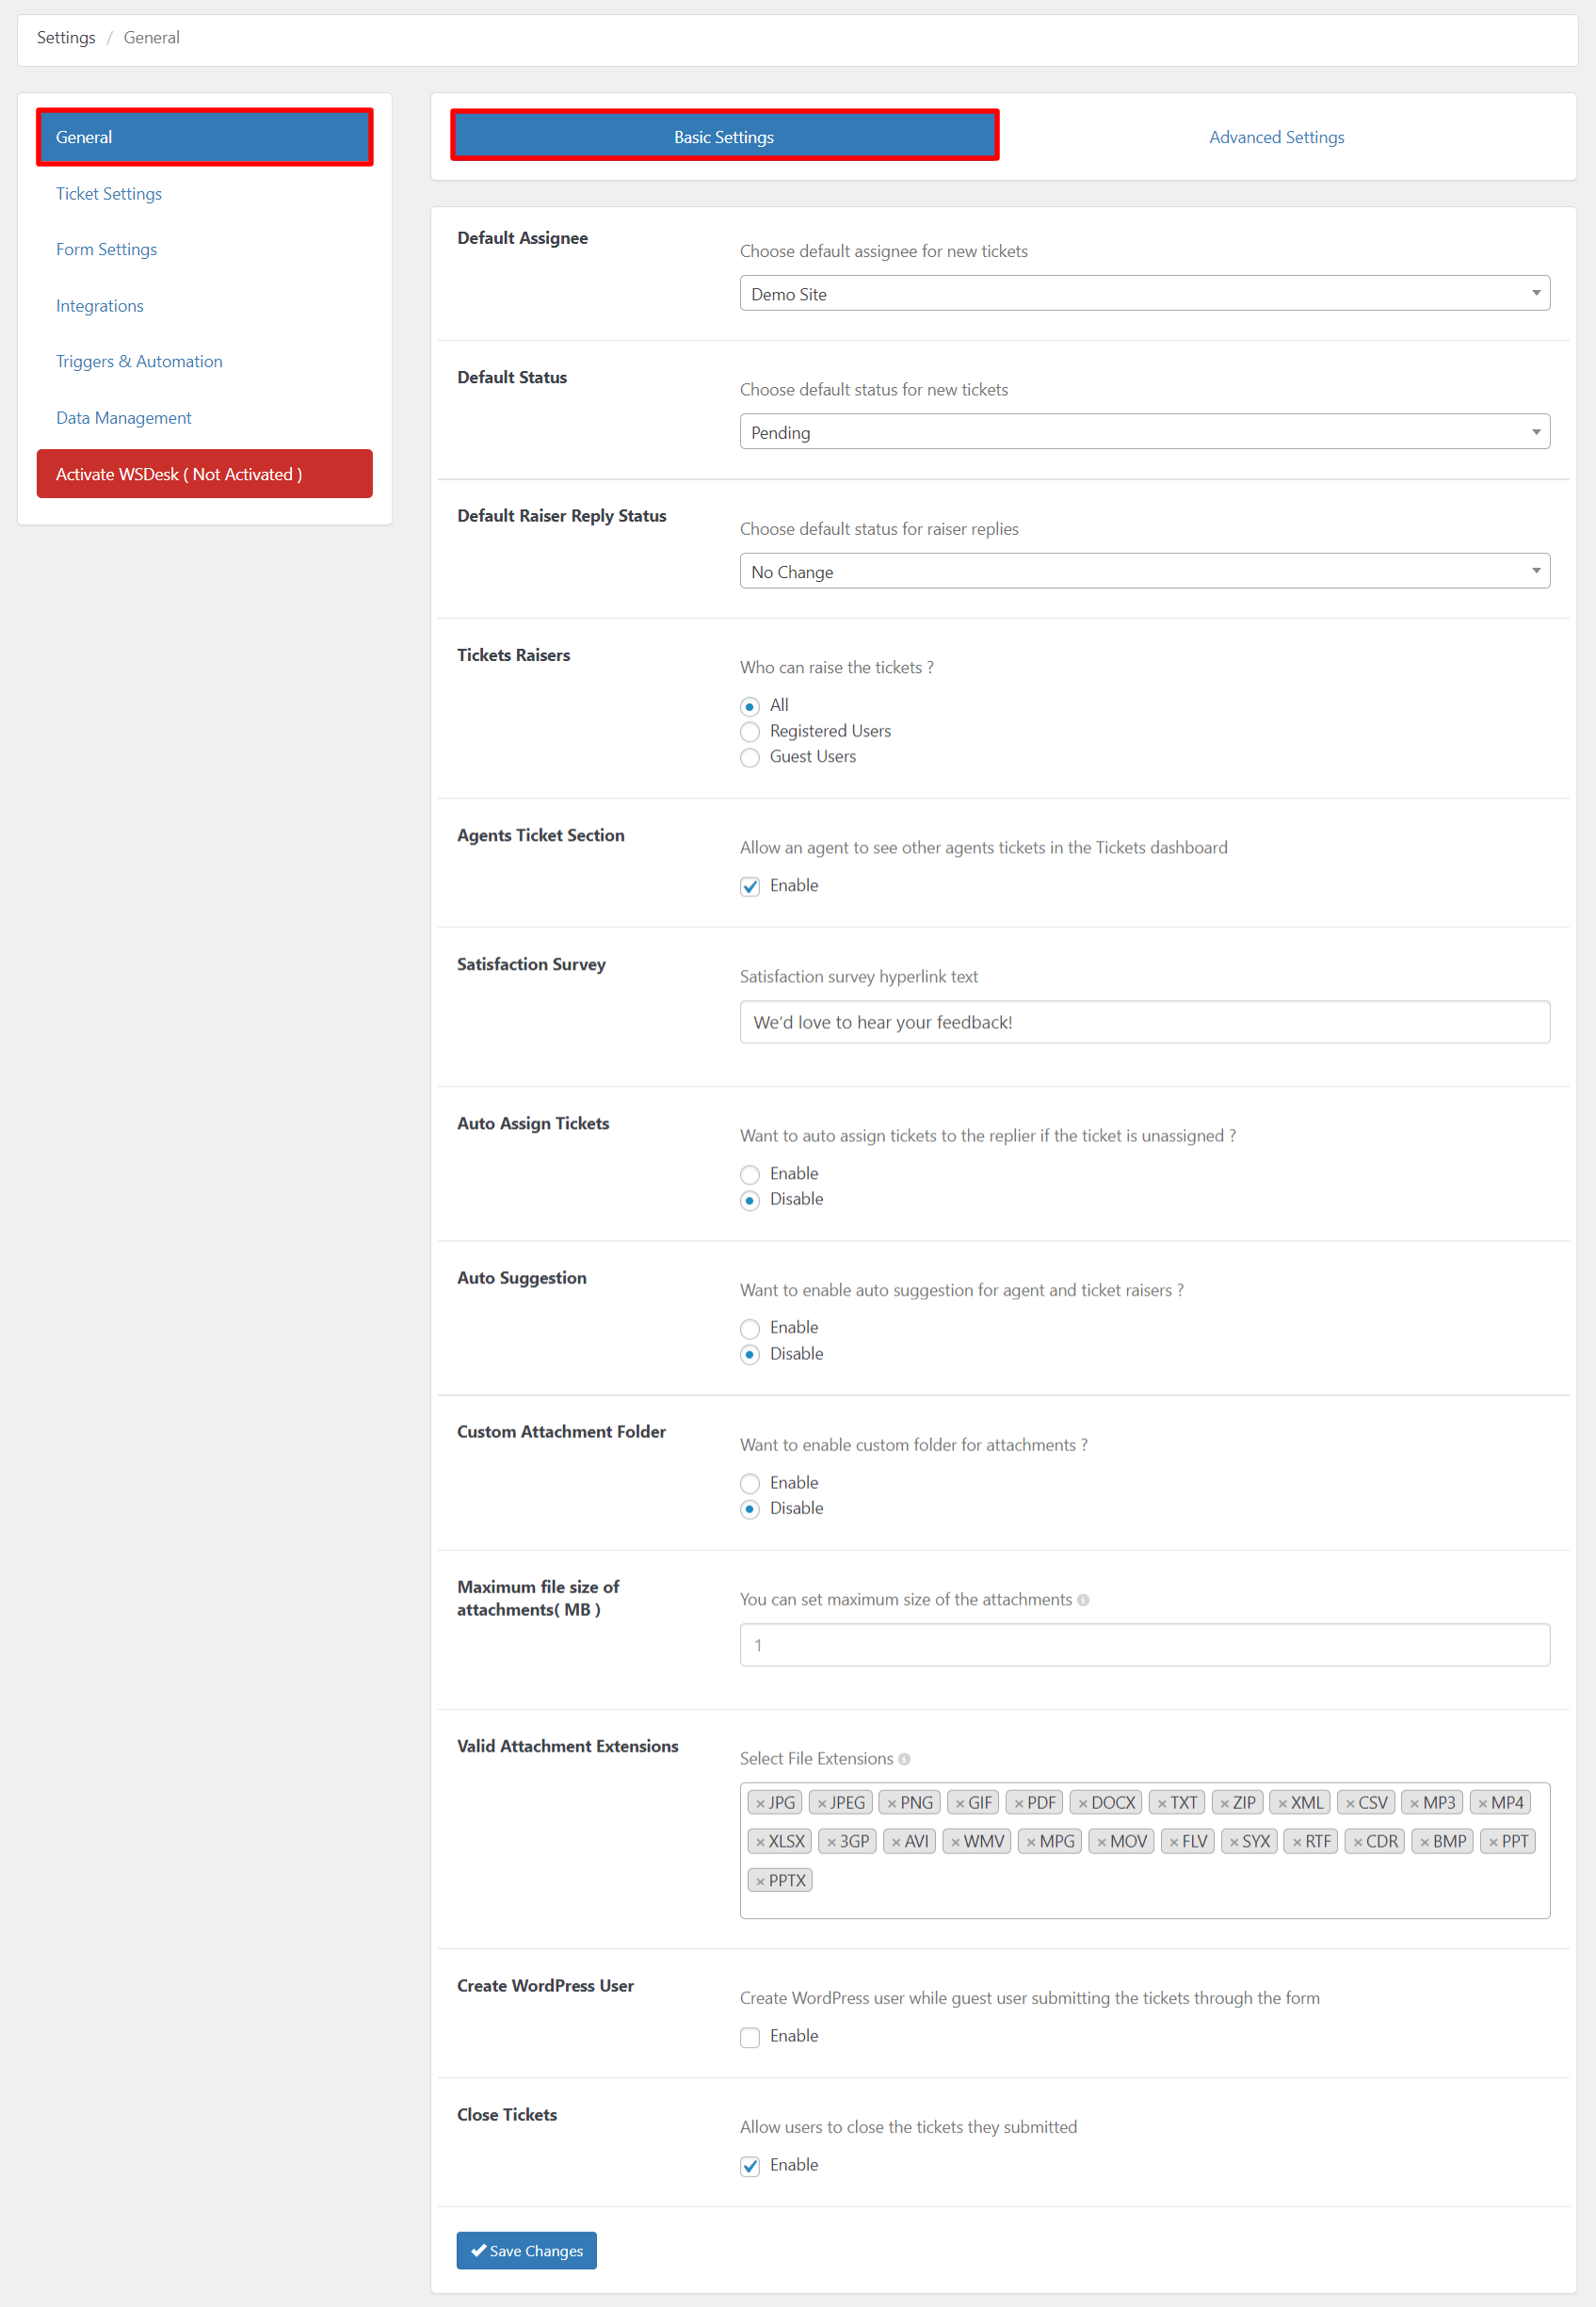
It includes the following:
- Default Assignee: Allows you to set a default assignee for the tickets. You can assign the tickets to agents based on Ticket Tags or choose the No Assignee option to not set a default assignee. The list of options contains all the Agents created in WSDesk.

-
- Default Status: Allows you to assign a default status whenever a new ticket is raised. The selection list contains all the default status as well as user-created ones. You can create custom status in the Ticket Status section.
- Default Raiser Reply Status: Select the default status for replies from the raiser. Available options include ‘No Change’, ‘Unsolved’, ‘Solved’, and ‘Pending’. This default status will be applied to new replies unless manually modified.
- Ticket Raisers: Enables you to determine which users can raise tickets.
There are 3 options –- All – Allows both registered users as well as guest users to raise a ticket.
- Registered Users – Allows only WSDesk registered users to raise a ticket.
- Guest Users – Allows only Guest users to raise a ticket.
- Agents Ticket Section: Enable this setting to allow an agent to see other agents’ tickets in the Ticket dashboard.
- Satisfaction Survey: Add the custom hypertext to be displayed on the mail to the customers that link to your website to add their feedback.


This hypertext will be displayed on the mail to the customers as:
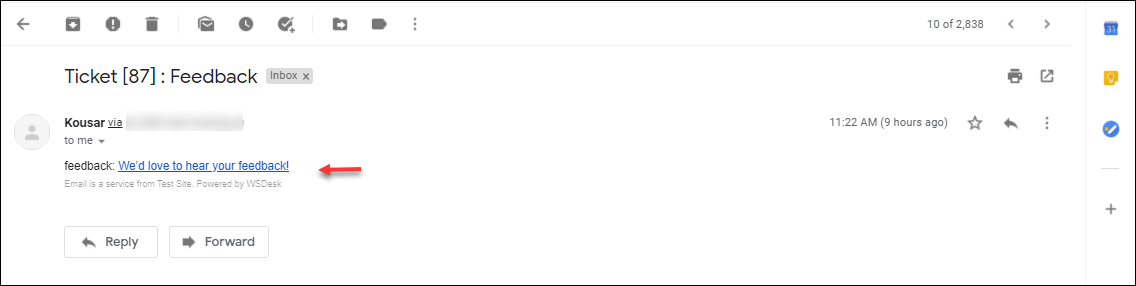
After clicking on the link, they will be redirected to the page where they can add their feedback. Check the screenshot:
- Auto Assign Tickets: Enable this setting to automatically assign the tickets to the replier, if the ticket is unassigned.
- Auto Suggestion: Allows you to enable auto-suggestion feature for ticket raisers and agents. The auto-suggestion works based on the title, content, and tags of the articles.
For Customers – When the auto-suggestion feature is enabled, the customers can view suggested articles in the subject field of the support form, when they start typing a subject. With this, the customers can read the articles related to their issues instead of raising the ticket. This will reduce the ticket count substantially, and will make your work a lot easier. This feature also supports tags. For example, if a customer types one of your post tags, articles with that tag will be displayed as suggestions.
Below is a screenshot showing how the auto-suggestion feature will be available to the customers in the contact form.

For Agents – If there is a frequent issue from multiple customers, agents may need to have a similar response. Hence in such a case, a blog article can be written and agents can view the auto-suggested article(s) when they reply to the tickets. They can provide customers with article links related to the issue. This will help agents provide a better solution to their customers in no time.
The following screenshot shows how the auto-suggested articles are shown to the agents while replying to the tickets.

- Custom Attachment Folder: Enable this setting to define a custom destination folder for all attachments. By default, the attachments are stored in the wp-content/uploads folder. Make sure the location exists before using it for storing attachments.

- Maximum file size of attachments (MB): Specify the maximum file upload size in megabytes. Make sure to skip decimal values. The default value is 1MB.
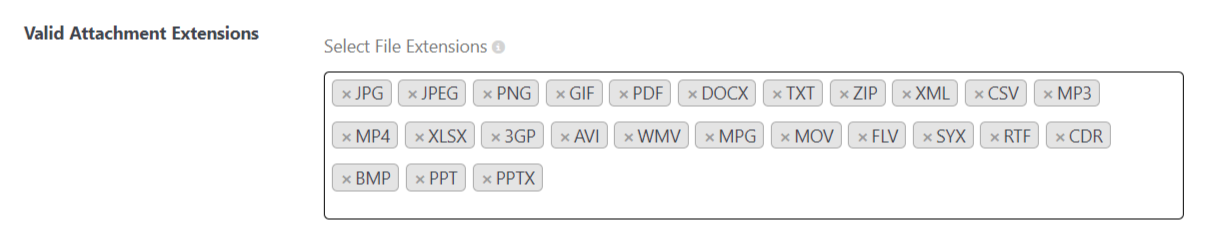
- Valid Attachment Extensions: From the drop-down list, select the desired attachment extensions. The supported extensions are JPG, JPEG, PNG, GIF, PDF, DOCX, TXT, ZIP, XML, CSV, MP3, MP4, XLSX, 3GP, AVI, WMV, MPG, MOV, FLV, SYX, RTF, CDR, BMP, PPT, and PPTX. All file extensions will be accepted if none of the options are selected.
- Create WordPress User: Enable this setting to redirect your guest users to create a WordPress account when they successfully submit a ticket. This is a good way to persuade your guest users to sign up for an account on your website.
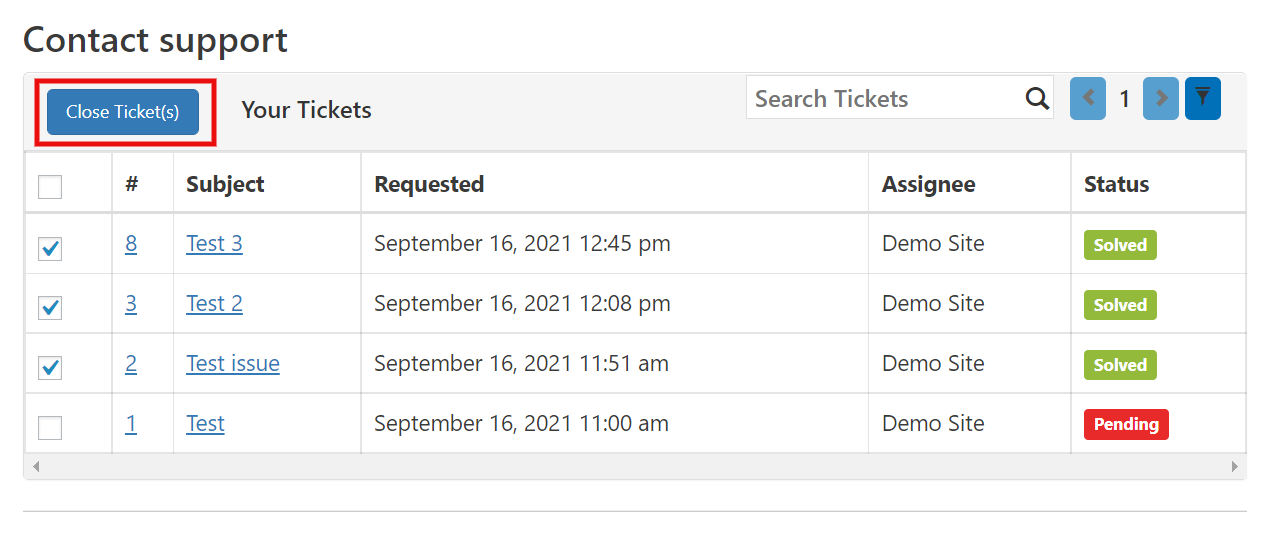
- Close Tickets: With this option, you can allow users to close their existing support requests from the front end. When you enable this option, users can select tickets and close them by clicking the Close Ticket(s) button.
Click on the Save Changes button to save all the settings.
Advanced settings
The following are the advanced settings of WSDesk.
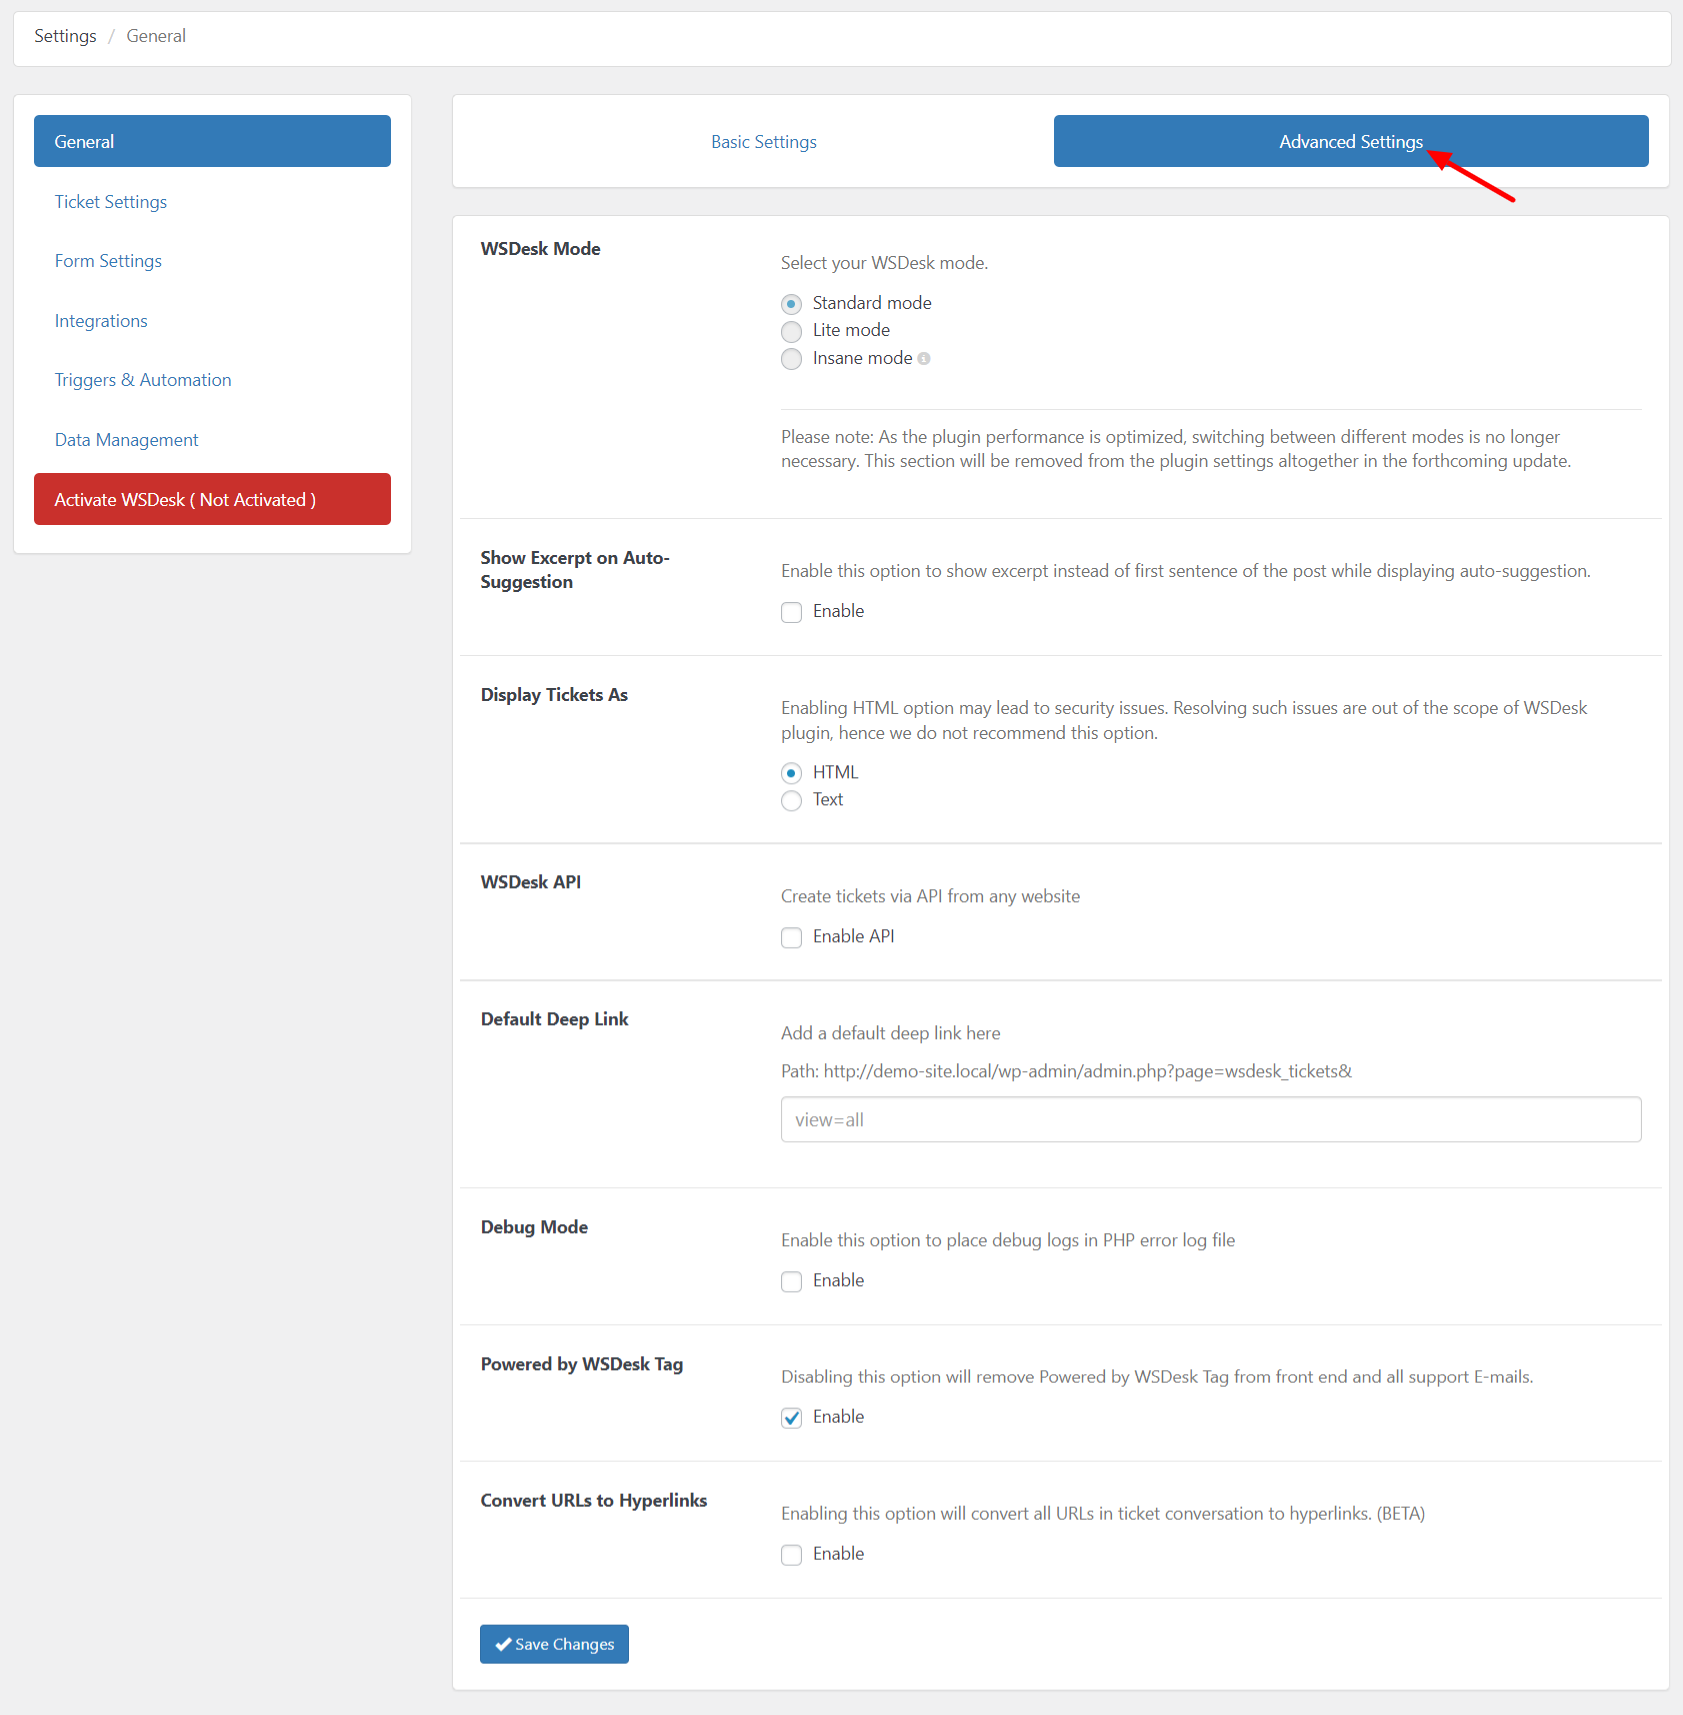
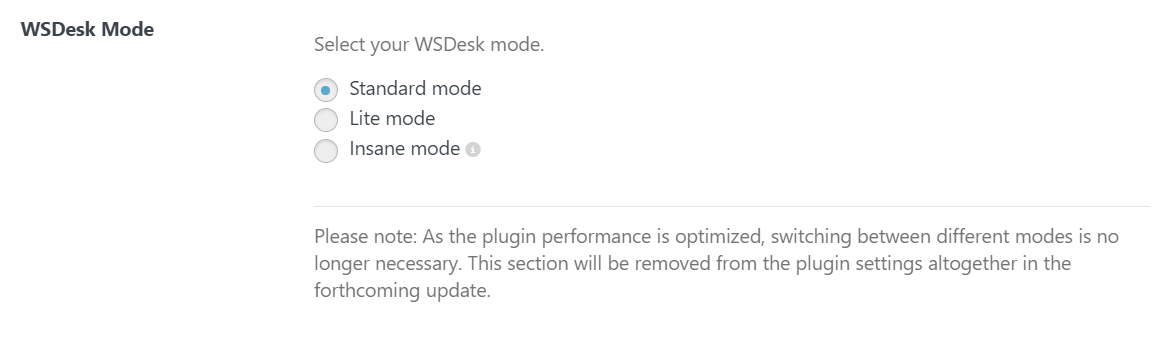
- WSDesk Mode: As the plugin performance is optimized, switching between different modes is no longer necessary. This section will be removed from the plugin settings altogether in the forthcoming update.
- Show Excerpt on Auto-Suggestion: Enable this setting to show custom text instead of the first sentence of the post, in the auto-suggestion results.
- Display Ticket As: You can choose either HTML or Text format to view the tickets. The tickets should also be replied to in the same format, as shown in the screenshot below.

- WSDesk API: This setting will let you create WSDesk tickets from any website(not just WordPress websites). Once this option is enabled, a custom API key will be shown which you need to add to the API integration section of your website.
- Default Deep Link: This feature helps you set a default view on your main ticket dashboard. As you know, on the main tickets dashboard, you can display all the tickets generated by your customers, and you can customize it based on different attributes that you select. WSDesk helps you make any of these attribute values to be the default view on your main tickets dashboard by adding their respective deep links.
For example, if the deep link of ticket view ‘Unsolved’ is “https://yoursiteurl.com/wp-admin/admin.php?page=wsdesk_tickets&view=label_LL01”, you can simply add it to the field to make ‘Unsolved’ the default view. Now, every time you or one of your support agents log in to the main tickets dashboard, the default view would be unsolved tickets. This way, you can use the deep link of any view to make it default.
Also, you can create a ticket view by sorting tickets in the ascending or descending order of their updated dates. For this, we provide two endpoints (&order=DESC; &order=ASC), which you can append to the URL of your main ticket page.
For example, if you want to display your latest updated tickets on top, you can add this deep link – https://yoursiteurl.com/wp-admin/admin.php?page=wsdesk_tickets&order=DESC. Similarly, you can reverse the order by appending &order=ASC.

Add the deep link of the view which you want to make default.
- Debug mode: You can enable this option to place database collation logs and email logs in the PHP error log file.
- Powered by WSDesk Tag: Disabling this option will remove the “Powered by WSDesk” tag from the front-end and all support E-mails.
- Convert URLs to Hyperlinks: Enabling this option will convert all URLs in ticket conversation to hyperlinks.
Click Save Changes to save the settings.
Ticket Settings
The Ticket settings contain all the settings related to ticket configuration.
They are divided into five tabs:
- Ticket Fields
- Ticket Status
- Ticket Tags
- Ticket Views
- Ticket Page
Let’s understand each section in detail.
Ticket Fields
Your customer will be able to raise a ticket on the support form displayed on the frontend of your website. The Ticket Fields section determines how you can add or edit input fields on a support form. These input fields include textbox, password, selection list, radio button, checkbox, number, email, date, text area, multiple attachments, IP address, and Google reCAPTCHA. Although the plugin supports Google reCAPTCHA versions v2 and v3, we recommend using v2.
To know how to configure reCAPTCHA on WSDesk, refer to the article – How to Add ReCAPTCHA in your Ticket Fields in WSDesk – ELEX WordPress Helpdesk & Customer Support Ticket System Plugin?
 You can add, edit, remove and configure the Ticket Fields.
The following settings will help you:
- Adding a Ticket Field: Click on Add Field button in the top right corner of the dashboard.
Next, select the desired input field, more settings for that specific field is displayed.
Below is a screenshot of the settings for the Selection input field.

Enter a custom field title in the given text box. You can set the visibility level and specify desired restrictions on users and agents. Enter other details like placeholder text, field values, and description for the field.
- Editing a Ticket Field: Click on the edit icon of the respective ticket field to modify or update it. You can edit default as well as custom ticket fields.
A screenshot of a sample ticket field for editing is shown below.

- Activating a Ticket Field: By default, all newly created ticket fields will be listed in the Inactive Fields column. Click on the activate icon button (as shown in the below screenshot) to enable a ticket field.
You can reorder the ticket fields using the hamburger icon in the ticket field. Based on this order, the ticket fields will appear on the support form.

- Deleting a Ticket Fields: To delete a ticket field, click on the delete icon of the required ticket field. Remember, only the user-created ticket field(s) can be deleted and not the default ones.
Ticket Status
Ticket Status is used to define the status of a ticket. With the help of these statuses, an agent can track the progress of a ticket. Each ticket status is differentiated by a unique color.

This section lets you add, edit, remove and configure a ticket status.
The following settings help you setup:
- Adding a Ticket Status: Click on Add Status button to add a custom ticket status of your choice.
Next, specify the desired status title, select a distinctive color to represent the ticket status and choose to use the ticket status for filtering.

- Editing & Deleting a Ticket Status: Click on edit icon or the delete icon respectively, to modify or delete a ticket status. Remember, only the user-created ticket status can be deleted.
Ticket Tags
Ticket Tags are used to filter tickets, products, posts and so on. These tags can be used for filtering the tickets and assigning it to specific agents.

You can add, edit, remove and configure tags related to a product.
Let’s see the available settings:
- Adding a Ticket Tag: Click on Add Tag button in the top right corner of the dashboard to add a new ticket tag.
 Adding a Ticket Tag

Enter a suitable title, and select the product or related posts. As seen earlier, you have the option to use the newly-created ticket tag to filter tickets.
Click Save changes once all settings are configured.
- Editing & Deleting a Ticket Tag: Click on the edit icon or the delete icon respectively, to modify or delete a ticket tag.
Ticket Views
Ticket Views are used to categorize the tickets in a menu-like structure in the Tickets dashboard.

This section allows you to add, edit, remove and configure ticket views.
You need to understand the following settings here:
- Adding a Ticket View: Click on Add View button to add a custom ticket view.

While adding a new Ticket View, configure the following settings:
- Title – Enter a suitable title for the Ticket View.
- Specify the Conditions Format – There are 2 choices to specify the condition format;
AND Condition ~ where both conditions have to be true &
OR Condition ~ where either one of the conditions can be true. - Select a Condition – You can select a condition from the available list.
The possible conditions are as follows:- Ticket: To Email (Forwarded From Email) ~ Filter emails forwarded from other email address(es).
- Ticket: Assigned -> Label (Status) ~ Based on Assigned Ticket Label Status.
- Ticket: Assigned -> Assignee ~ Based on Assignee (Unassigned, Current User or other user listed in the drop-down).
- Ticket: Assigned -> Tags ~ Based on Assigned Ticket Tags.
- Ticket: Field -> Email ~ Filter specific words in the email.
- Ticket: Field -> Subject ~Filter specific words in the subject of the email.
- Ticket: Field -> Description ~ Filter specific words in the description of the email.
- Ticket: Field -> Product ~ Filter based on your products.
- Ticket: Source -> Received Through ~ Filter based on how the ticket is received, i.e, through support form, email and so on.
- Adding multiple conditions & grouping them – Click Add Conditions to add multiple conditions.
You can group the newly created condition with the following conditions:- Ticket Status
- Ticket Assignee
- Ticket Tags
- Subject
- Request Type
- View Display – This setting lets you configure the type of user that will be able to see the newly-created Ticket View. You can choose Administrator, WSDesk Agents and/or WSDesk Supervisor.
- Editing & Deleting a Ticket View: Click on edit icon or the delete icon respectively, to modify or delete a ticket view. But remember, only the user-created ticket views can be deleted.
Ticket Page
The settings configured on this page affect the columns in the Tickets dashboard. You can enable or disable the default fields or include Ticket Fields that you’ve created in the Ticket Fields dashboard.
 In the above screenshot, ”Test” is a ticket field created in the Ticket Fields dashboard. Whereas, ID, Requestor, Subject, Requested, Assignee and Feedback are default columns that can be activated or deactivated anytime.
To enable a column, click the right tick icon of the field in the Inactive column. To disable them, click the cancel icon of the respective field in the Active column.
Form Settings
This section assists in customizing the display aspects of the support form.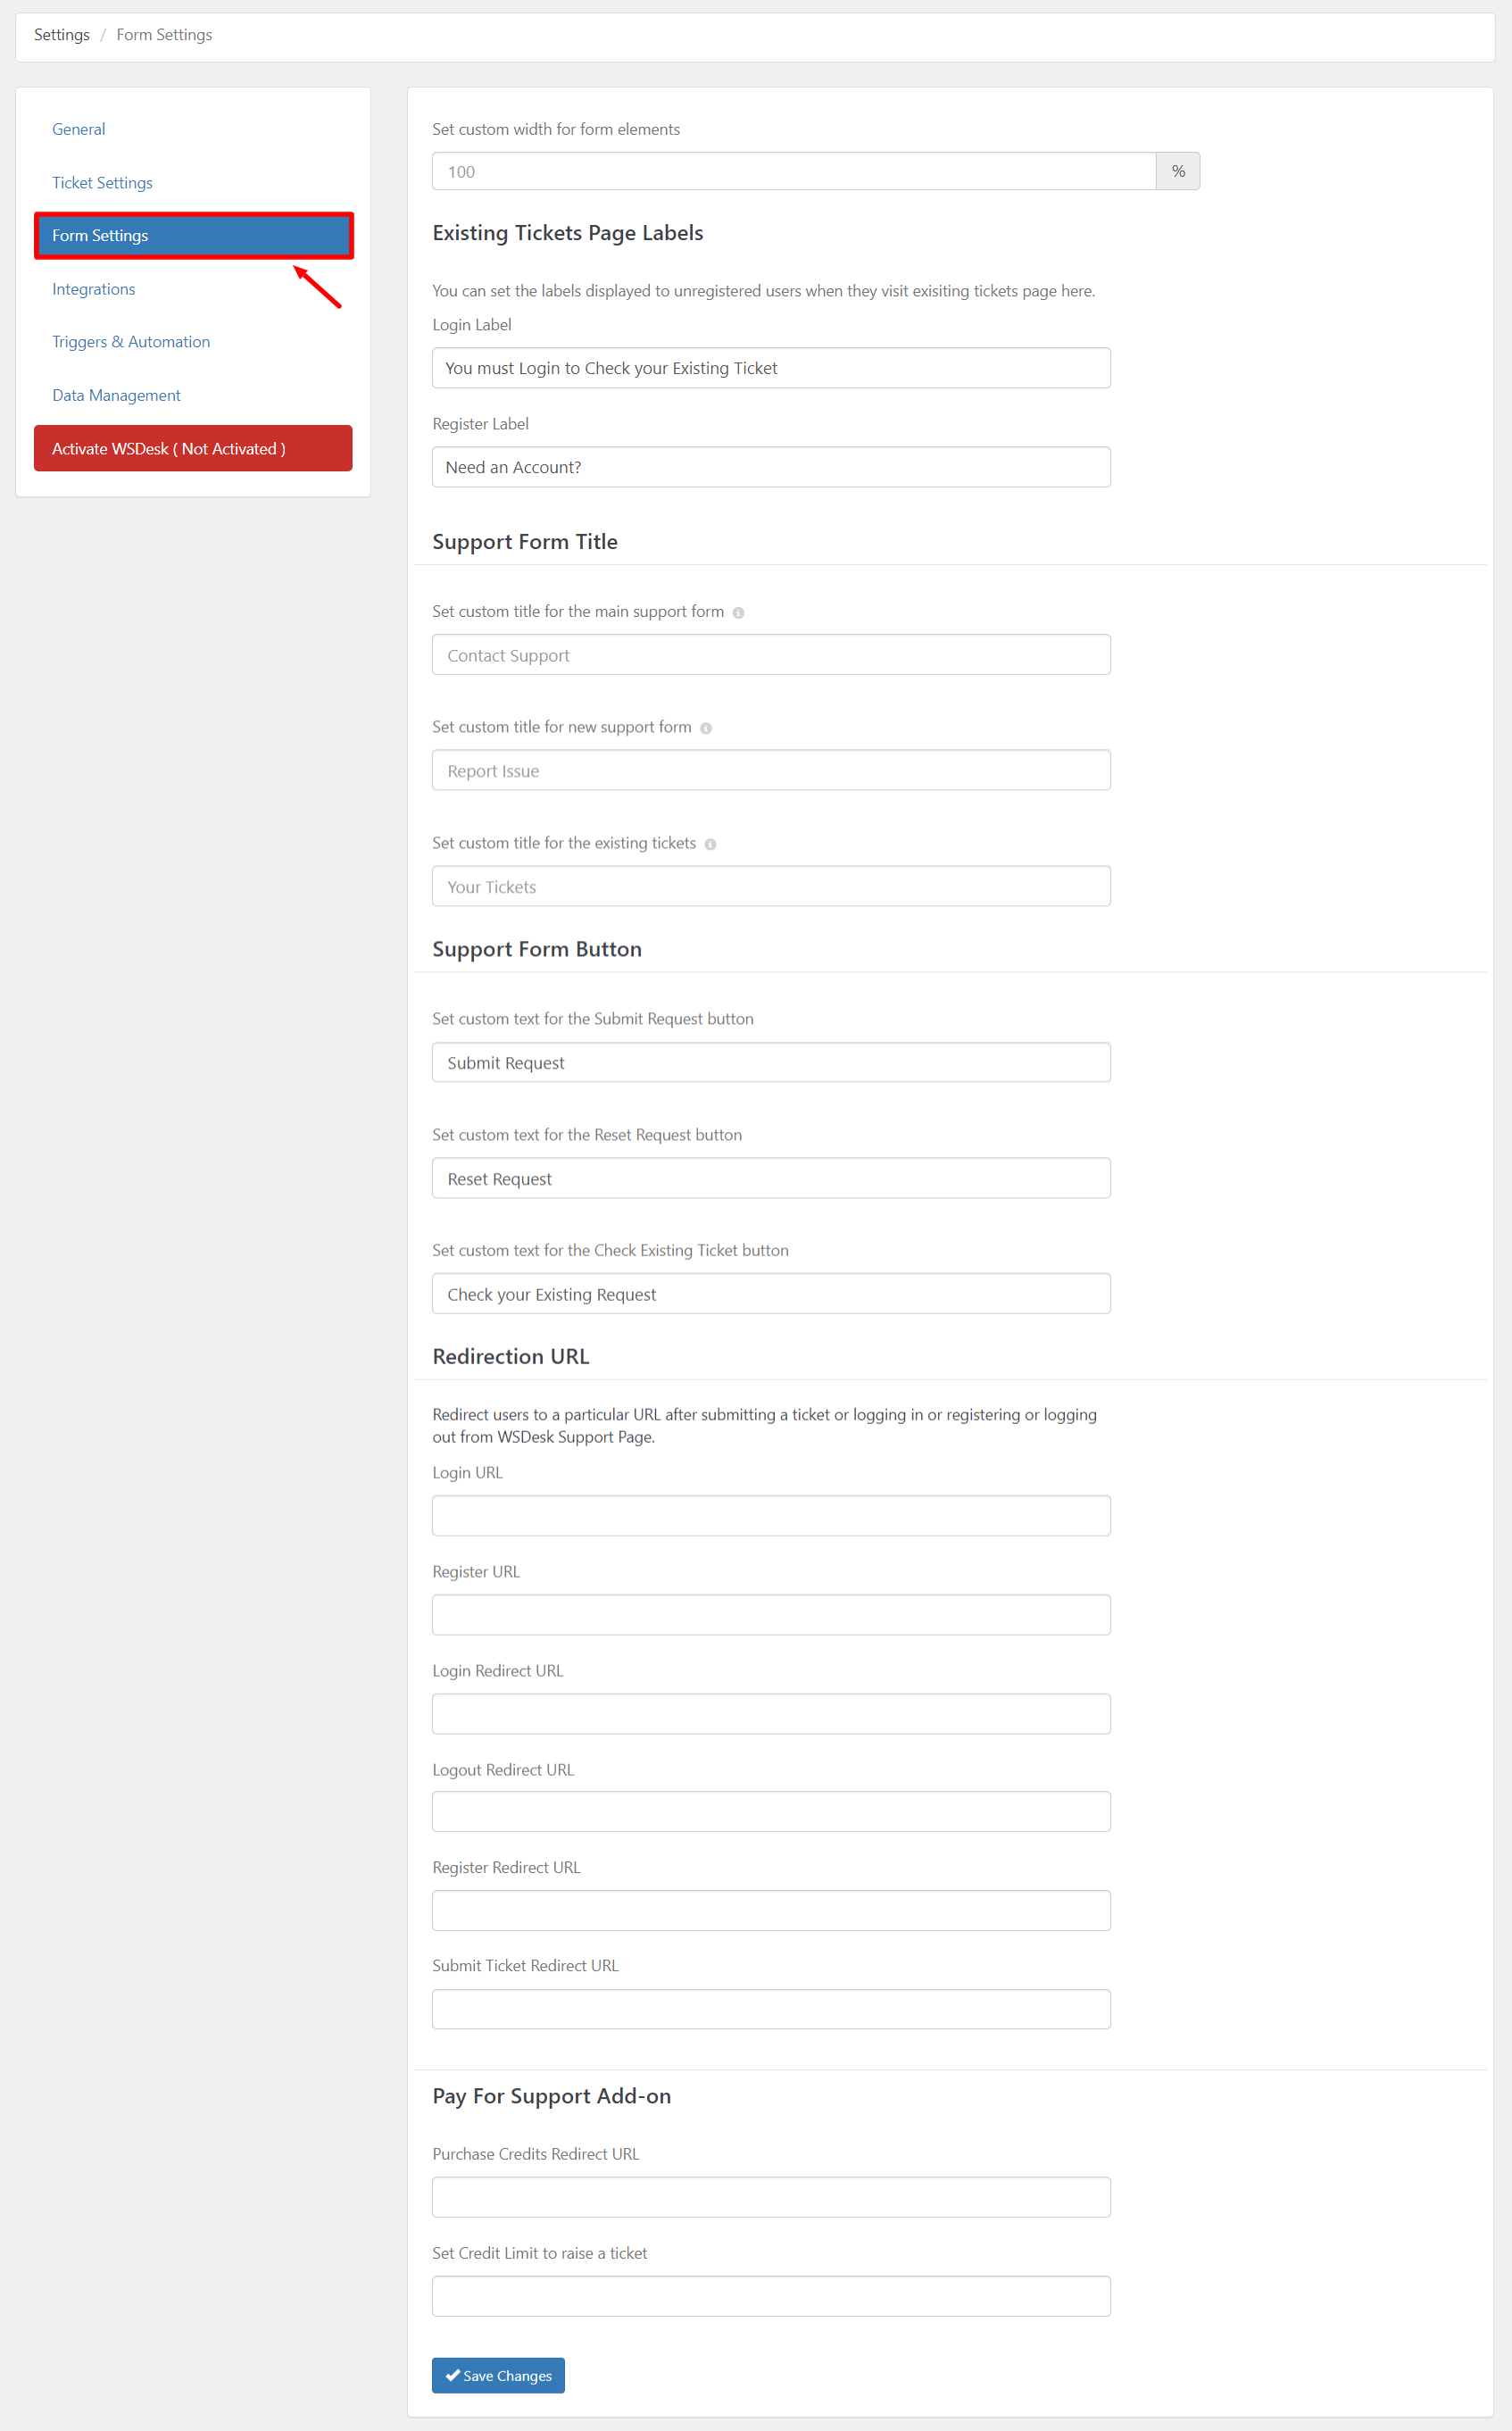
You can configure the size of the input fields and set custom titles for the support forms and form buttons as well. It consists of the following settings:
Form width: Allows you to customize the width of the input fields of your support form. This field takes percentage values for setting the width size.
Existing Tickets Page Labels
In these settings, you can set the labels displayed to unregistered users when they visit the existing tickets page.
Support Form Title
Customization for support form title.
- Main Support Form Title: Helps in setting a custom title for your main support form.
- New Support Form Title: Allows you to set a custom title for your support form.
- Existing Support Form Title: Allows you to set a custom title for existing tickets form.
Support Form Button
Customization for Submit, Reset and Existing Ticket button.
- Submit Request Button Text: Set custom text for the Submit button.
- Reset Request Button Text: Set custom text for the Reset button.
- Existing Ticket Button Text: Set custom text for Existing Ticket button.
Redirect URLs
You will be able to redirect users to specific URLs when they perform certain actions on the WSDesk Support Page.
Specify a URL to redirect for each of the below actions.
- Login URL: Add a link of a custom login page for customers when they try to submit a ticket by clicking the ‘Login’ button.
- Register URL: Add a link of a custom register page for guest users when they try to submit a ticket by clicking the ‘Register’ button.
- Login Redirect URL: Add a link to redirect users to a custom page when they login to submit a ticket.
- Logout Redirect URL: Add a custom link of a page to which customers should be redirected to after logged out from WSDesk.
- Register Redirect URL: Add a custom link to a page in which guest users should be redirected to after registering an account.
- Submit Ticket Redirect URL: Add a custom link to a page in which customers should be redirected to after submitting a ticket.
Please note the redirect works only when a user performs these actions on the WSDesk support page.
Pay For Support Add-on
If you are using Pay For Support Add-On, you can set a minimum purchase credit for a specific user to raise a ticket. If a customer does not have the credit balance to raise a ticket, redirect them to a specific page to make the purchase to get the credits.
- Purchase Credits Redirect URL: Enter the URL of the product page or any other page on which the customer should be redirected to, so that they can make the purchases to get the credits.
- Set Credit Limit to raise a ticket: Set the minimum credit limit for customers to be able to raise a ticket.
To know more about Pay For Support Add-On and how to configure it with your helpdesk system, check out an article: How to Set up WSDesk Pay For Support Add-On?
Click Save Changes to save the settings.
Integrations
WooCommerce Integration
WSDesk can easily integrate with the WooCommerce platform. This way your customers can directly raise tickets from the support form of your WooCommerce store. WSDesk makes use of a few aspects of your WooCommerce store for integration, which includes products, categories, tags, order details, and order prices.
The following settings need to be configured for WooCommerce integration:
1. WooCommerce Order details to be displayed in the customer ticket section:
The WooCommerce integration settings are available in the WSDesk Settings dashboard > Integrations as shown in the below screenshot:
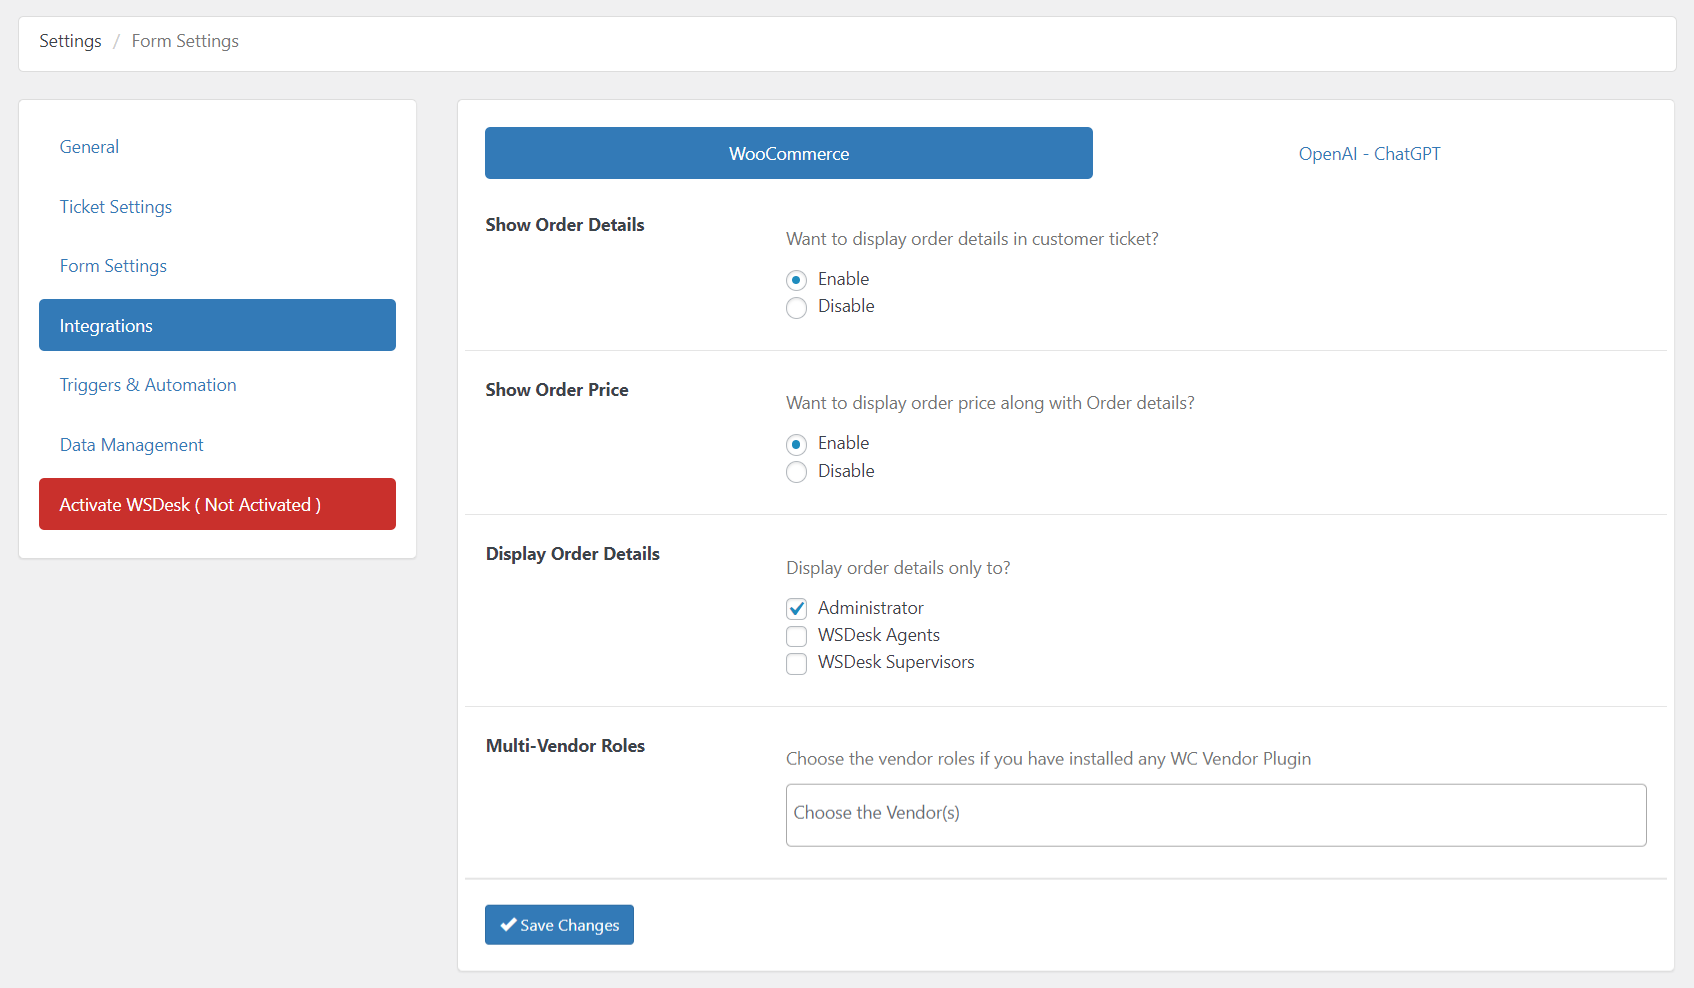
This section is configured to display WooCommerce order details in the customer ticket section. It contains the following settings:
- Show Order Details: Allows you to enable/disable displaying order details in the customer ticket section.
- Show Order Price: Allows you to enable/disable displaying order price along with order details in the customer ticket section.
- Display Order Details: Allows you to authorize the viewing of order details based on user roles.
- Multi-Vendor Roles: If you using any WooCommerce multi-vendor plugin and would like to integrate it with WSDesk, you can select vendor roles from the list that you want to integrate. This list contains all WordPress users of your website, WSDesk Agent, WSDesk Supervisor as well as vendor roles defined by your multi-vendor plugin.
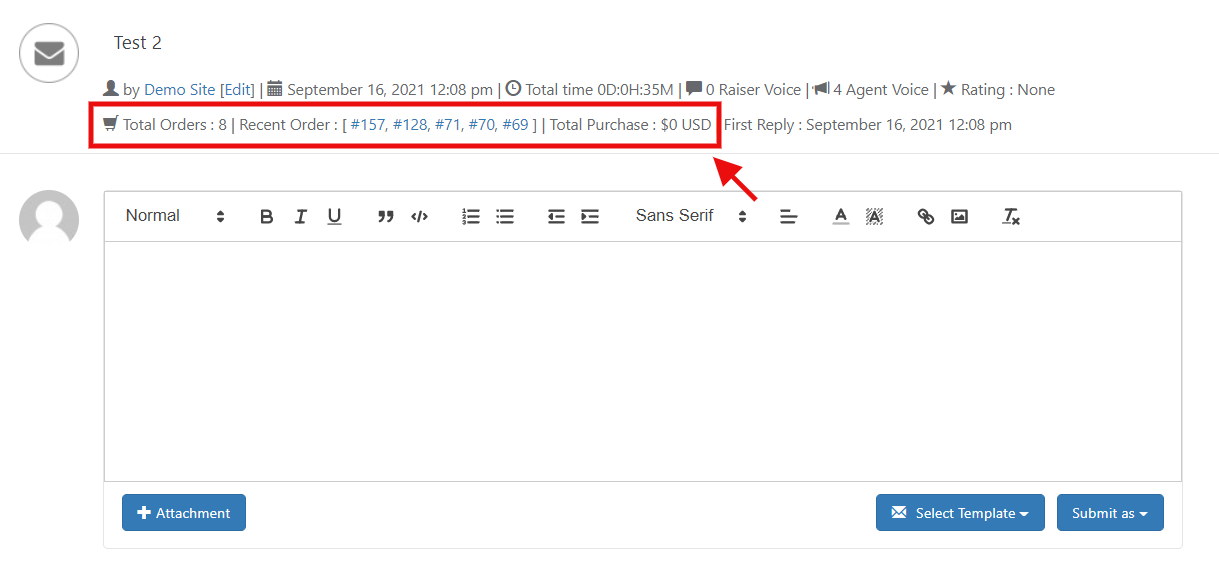
Once these settings are configured, the order details will be displayed in the customer ticket as shown in the below screenshot:
2. Using WooCommerce Products, Order ID, Categories, and Tags to create Ticket Fields:
WSDesk allows you to integrate your WooCommerce Products, Categories & Tags as Ticket Fields in the support form. With this feature, your customers can raise a ticket based on products, categories, and tags of your WooCommerce store. It will also be helpful in filtering the tickets.
Following are the settings to be configured:
- Head to Settings -> Ticket Fields section in WSDesk.
- To add a new field, move to the Add Ticket Field setting and check the Yes option.
Further settings are displayed as shown below:

If WooCommerce is installed on your site, you should be able to see 4 additional choices (apart from the default ones) that can be used for WooCommerce integration.
These choices include:
- WooCommerce Products
- WooCommerce Order ID
- WooCommerce Categories
- WooCommerce Tags
Select a field to proceed with the following settings:

You can set a custom title for the Ticket field and set its visibility and restrictions.
Enter custom values for the products and/or choose the Autofill products option to automatically fetch all the products from your WooCommerce store. You can add or delete the values based on your preference.
Enter other information like default values and descriptions.
The customers will be able to choose a WooCommerce product while creating the ticket through the support form.
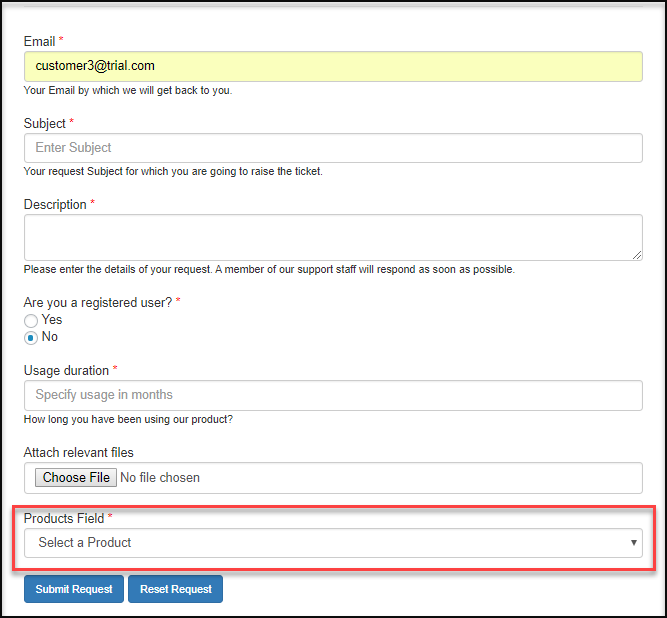
In the above example, customers can choose a product while creating a support request. Similarly, they can choose order ID, category or tags as well, if you customize your support form with these options.
OpenAI ChatGPT Integration
You can generate automated, contextually relevant replies with the help of WSDesk’s seamless integration with OpenAI ChatGPT. The integration settings can be accessed by navigating to the plugin settings > Integrations > OpenAI ChatGPT.
By integrating ChatGPT into WSDesk, automatic responses can be generated, spelling and grammar errors can be fixed, and a conversational tone can be transformed into a businesslike one.
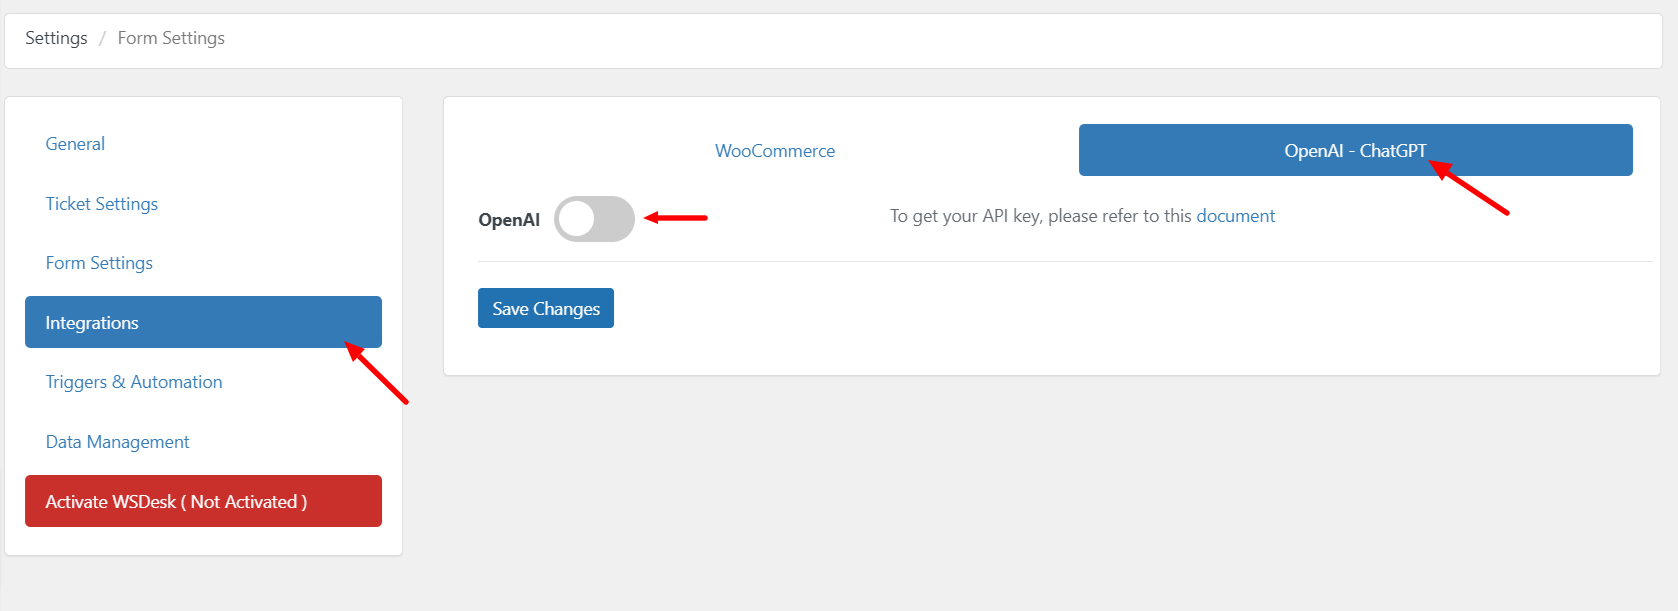
Simply enable the integration by toggling the switch, and then enter your OpenAI ChatGPT API key to begin using the two services together. If you don’t currently have an API Key for ChatGPT, you may create one by clicking here. If you want to learn how to generate a key for the OpenAI API, then read this article.
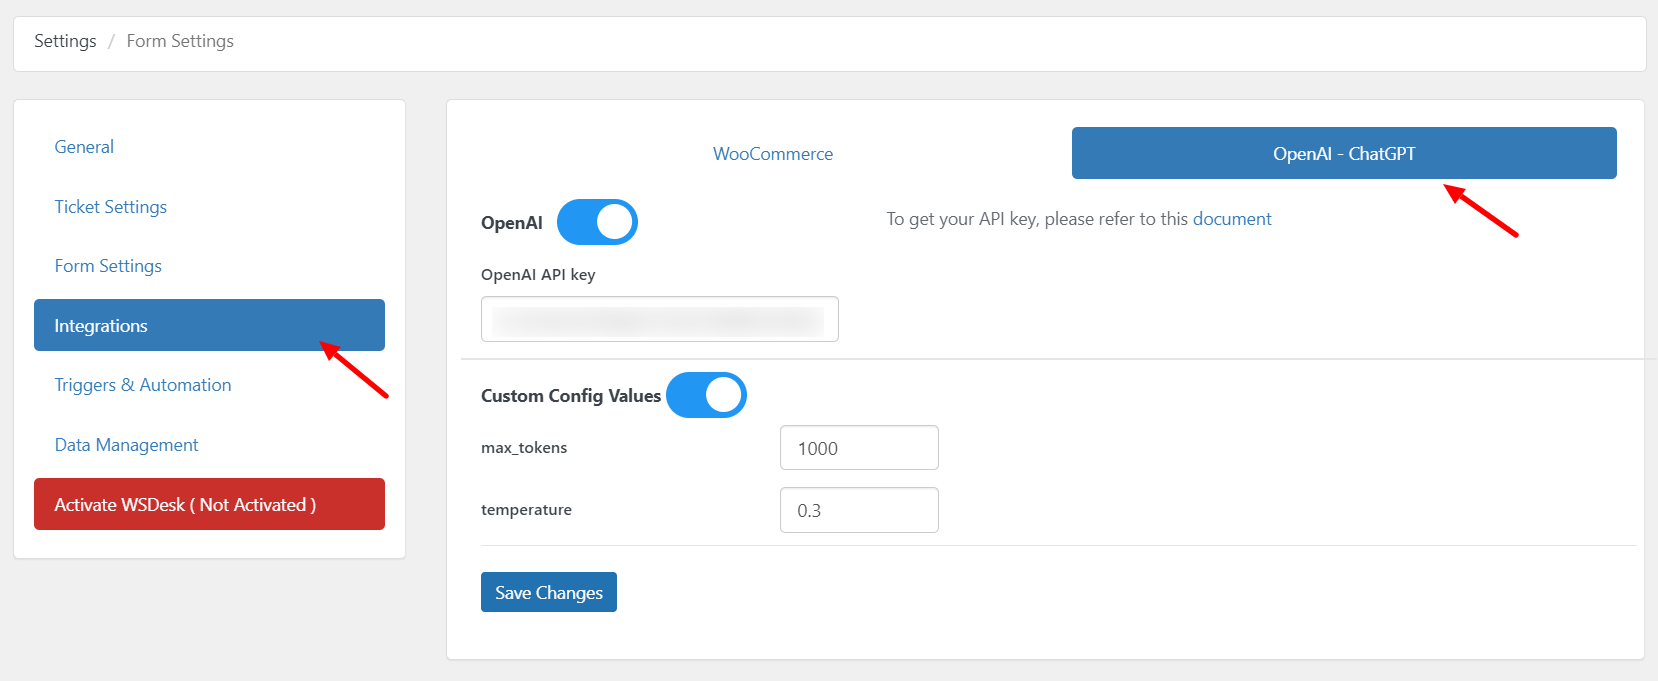
Custom Config Value
The Custom Config Value allows you to fine-tune the behavior of the language model by adjusting various parameters. It can affect factors like response length, creativity, and tone. Experiment with different values to achieve the desired output that aligns with your application’s needs. Check out this article to know more.
Max_tokens: Max Tokens determines the maximum length of the response generated by the language model. Setting a higher value may result in longer responses, while a lower value might lead to more concise outputs.
Temperature: The degree of randomization in the output text is adjusted by the temperature. A higher number, such as 0.8, encourages more originality and variety in responses at the expense of clarity. A smaller figure, like 0.2, leads to more targeted and predictable results. The ideal temperature is one that allows for a balance between originality and coherence.
The maximum token limit and temperature setting in WSDesk are both set by default to 1000 and 0.3, respectively.
Click Save Changes.
After integration, you can quickly respond to WSDesk support tickets with AI-generated responses. Check out the screenshot.
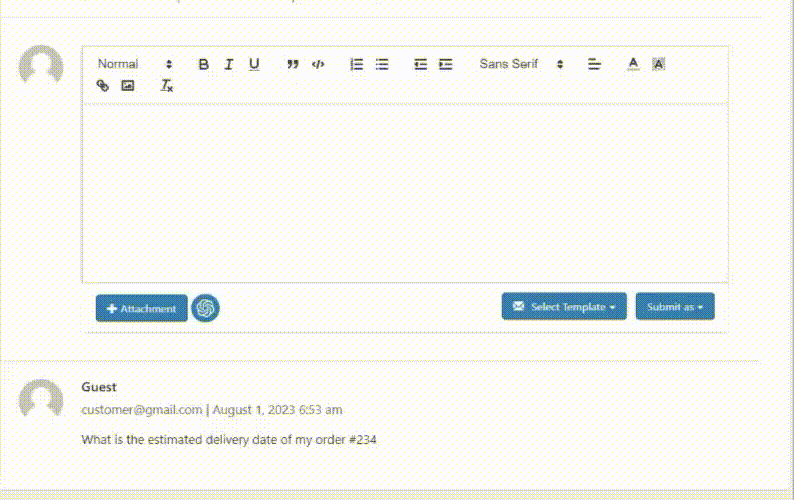
Undo: Reverses the most recent update.
Restore: Replaces the current text with the original text.
Spell Check: Check the text for misspelled words.
Change Text to Business Tone: Makes writing sound more professional and appropriate for business use.
Generate Reply: Automatically generates a suggested AI-generated response based on the input, which can be used as a starting point for your ticket replies.
Triggers and Automation
A trigger is an action that occurs in response to a certain event. With the help of these triggers, you can automate certain responses in WSDesk.

This section lets you add, edit, remove and configure triggers and contains the following settings:
Adding a Trigger: Click on the Add Trigger button to add a new trigger.

To add a new trigger, the following settings are relevant:
- Title – Enter a suitable title for the trigger.
- Specify Conditions Format – There are 2 choices to specify the condition format;
AND Condition ~ where both conditions have to be true &
OR Condition ~ where either one of the conditions can be true. - Select a Condition – You can select a condition from the available list.
The possible conditions are as follows:- Ticket: ~ Filter when either ticket is created or updated.
- Ticket: Submitted ~ Filter based on tickets submitted by either agents, anyone or ticket raisers.
- Ticket: Status ~ Based on whether the status is created or updated.
- Ticket: Assigned -> Status ~ Based on Assigned Ticket Status.
- Ticket: Assigned -> Assignee ~ Based on Assignee. The tickets can be assigned to a supervisor, agent, anyone, or based on unassigned tickets.
- Ticket: Assigned -> Tags ~ Based on Assigned Ticket Tags.
- Ticket: Source -> Received Through ~ Filter based on how the ticket is received, i.e, through support form, email and so on.
- Ticket: Field -> Email ~ Filter specific words in the email.
- Ticket: Field -> Subject ~Filter specific words in the subject of the email.
- Ticket: Field ->Description ~ Filter specific words in the description of the email.
- Ticket: Replied -> By – Filter tickets based on the assigned support agent.
- Group Condition – Allows you to add a second condition and group it using AND (or) OR condition format.
- Specify the Trigger Action – Allows you to specify the trigger action. You can also add additional actions. There are 4 possible actions that can be performed –
- Ticket: Change -> Label (Status) ~ Change the ticket label status once the event triggers.
- Ticket: Change -> Assignee ~ Change the ticket assignee once the event triggers.
- Ticket: Change -> Tags ~ Change Ticket tag once the event triggers.
- Ticket: Add -> Tags ~ Add the selected tag(s) when the event triggers.
- Notification -> Email to ~ Send notification email to agent(s) once the event triggers.
- Specify the Triggering Period – This attribute lets you set a triggering period for the newly created trigger.
There are 7 possible options –- Immediate Schedule
- Minute Schedule
- Hour Schedule
- Day Schedule
- Week Schedule
- Month Schedule
- Year Schedule
- Editing & Deleting a Trigger: Click on edit icon or the delete icon respectively, to modify or delete a trigger.
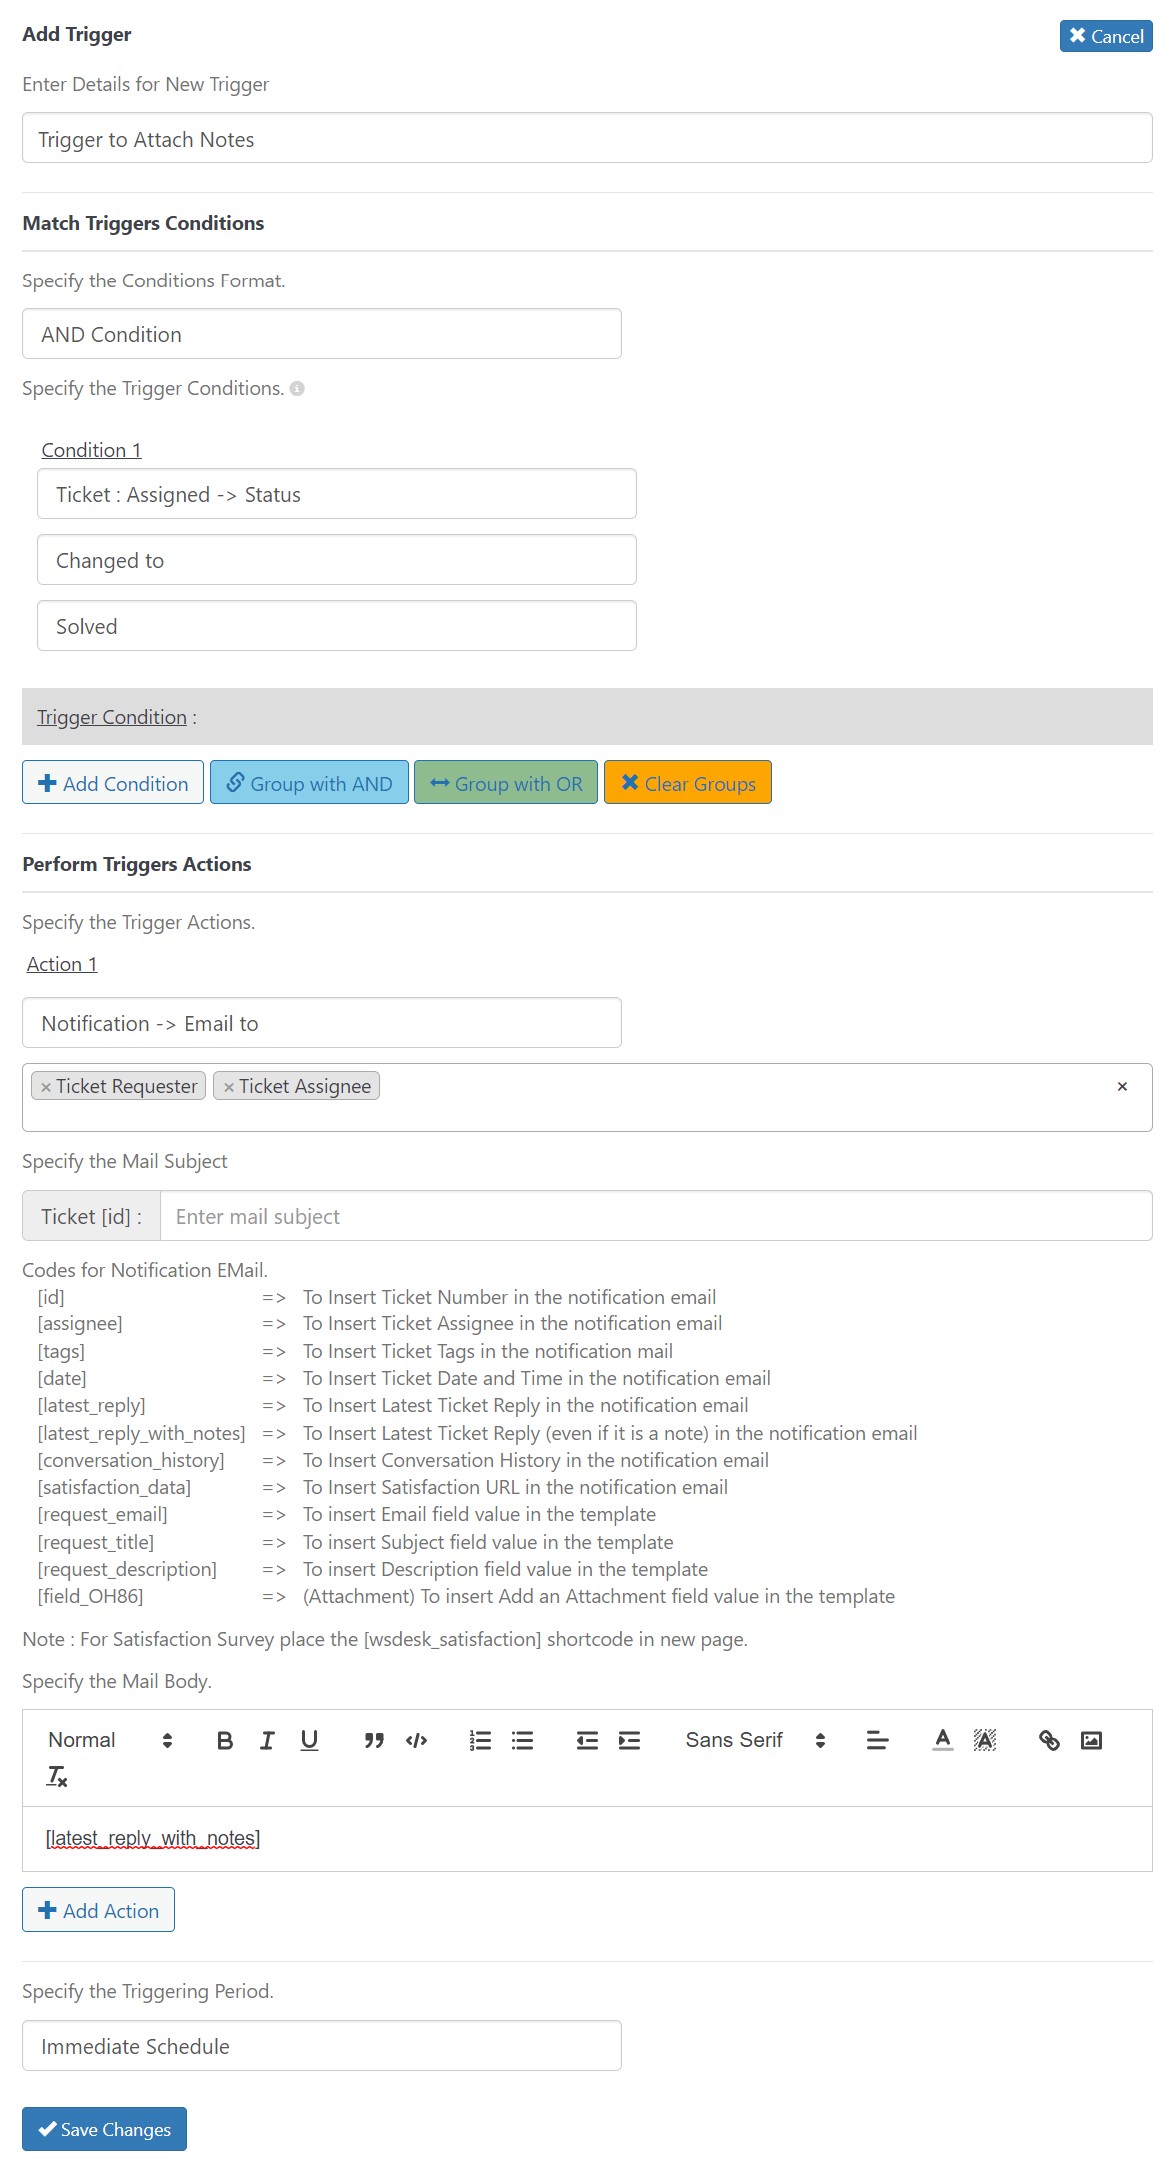
- Set a Trigger for Ticket Notes: This trigger will ensure that any additional information or updates provided in the notes section of a ticket reply are automatically sent to the customer the ticket requester, the ticket assignee, or any of the support agents. To set up this trigger create a condition: Ticket: Assigned -> Status > Changed to > Solved. Create the following action for the trigger: Notification -> Email to > Ticket Requester/Ticket assignee/Support agents. In the email body, enter the following shortcode: [latest_reply_with_notes]
Triggers can be used in many ways. One such use case is to create customer satisfaction surveys. To understand in detail, read how to set up Customer Satisfaction surveys & emails in WSDesk?.
Google Chat Integration
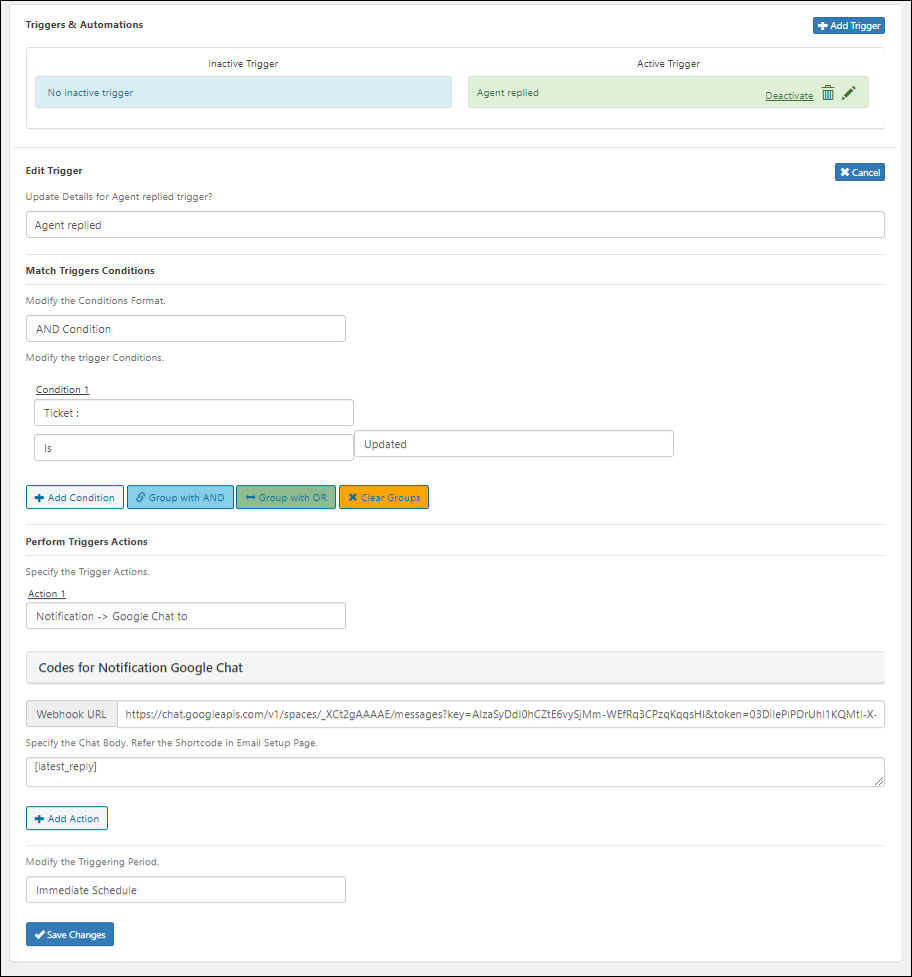
Integrate Google Chat for triggering messages or notifications to the agents or assignees in your business. For that, you have to create a new trigger.
Set up the title and required condition for triggering a message via Google Chat as mentioned in the creation of triggers.
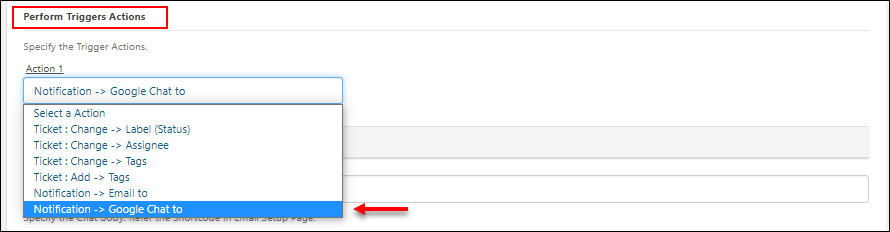
Go to Perform Triggers Actions.
Choose the trigger action as Notification -> ‘Google Chat to’.
Go to the agent’s Google chat. Click the button on the right side of the agent’s name and choose Manage Webhooks.
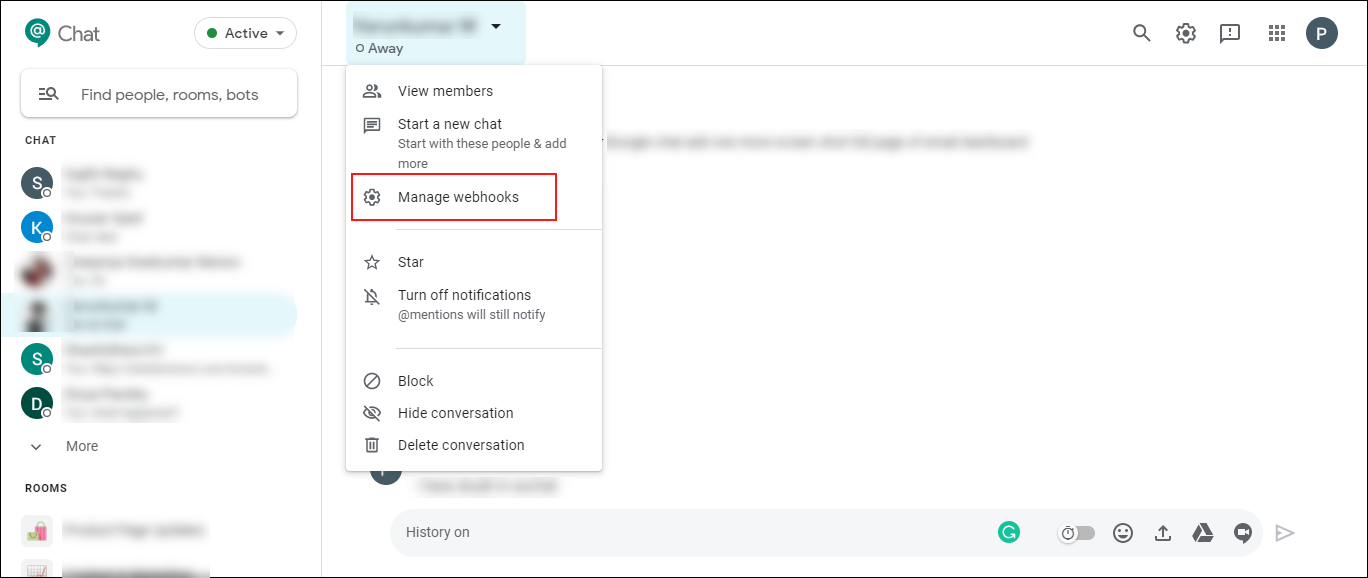
A pop up will appear after clicking on the option.
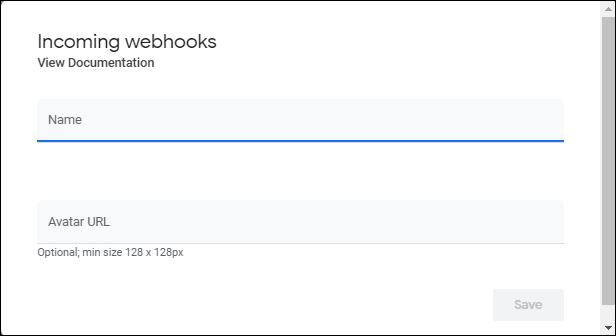
You can enter a name, for example, Support. And a gravatar URL of the agent if needed. After entering the details, click on ‘Save’.
A tab will appear with a link. Check the example.
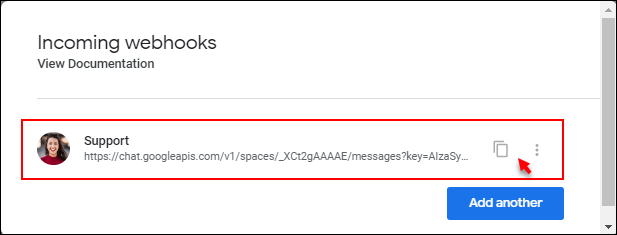
Here the name (‘Support’), and the gravatar you have added will display along with a link. You can copy the link. Then go to the plugin dashboard and paste it on the Webhook URL field.
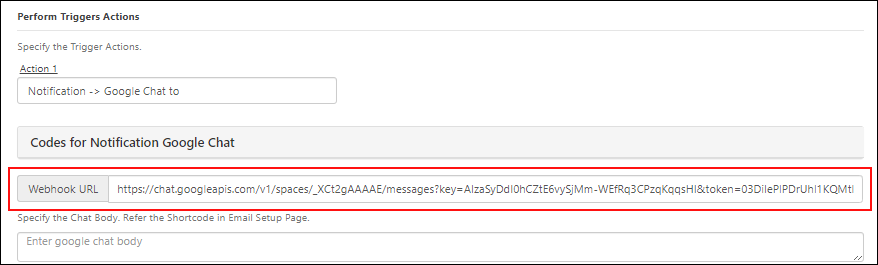
Click on the ‘Codes for Notification Google Chat’ for taking the shortcode for customizing the message to be triggered on Google Chat.

Copy the required shortcode and paste on the field marked by the arrow.
After setting up these details, you can save the changes.
Check an example,
In this example, when the ticket is updated, the last reply of the ticket (I have chosen the shortcode [latest_reply]) will be triggered to the assignee or agent’s Google Chat. Check the example:
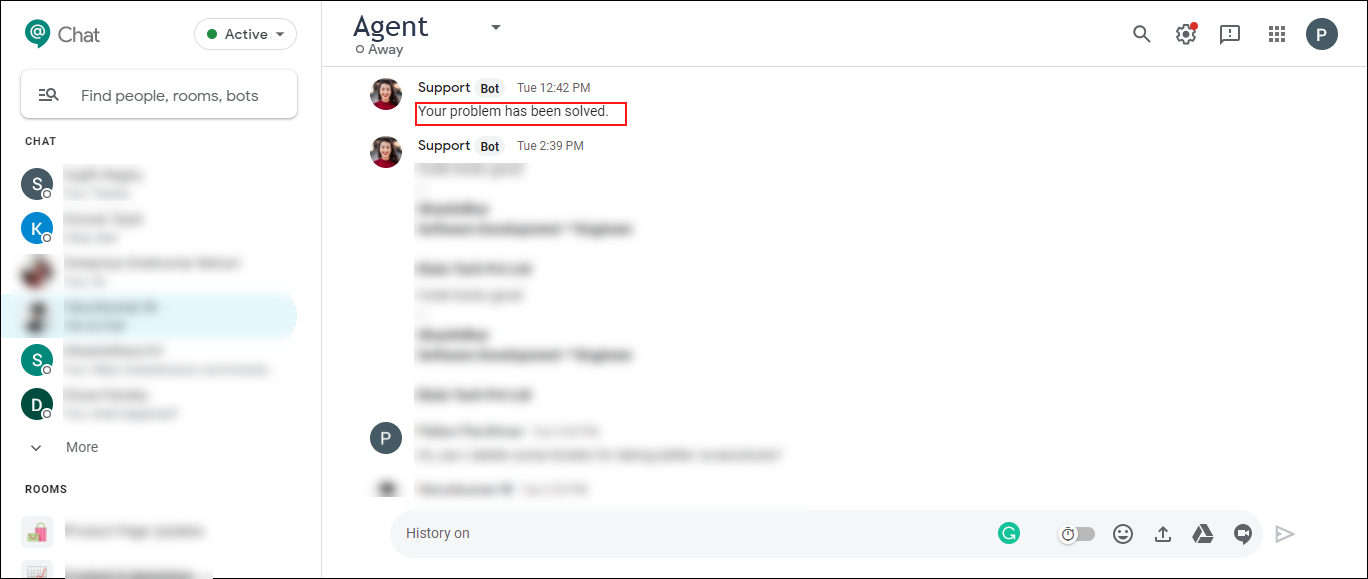
Here the last reply to the customer has been triggered to the assignee.
Similarly, you can trigger customized triggers to the assignees and agents across your business community.
Data Management
In this section, you can manage all your WSDesk data. You can backup and restore your tickets and plugin settings as well as archive tickets.
The Data Management section is divided into three tabs:
- Cleanup, Backup and Restore
- Export Ticket Data (CSV)
- Archive Ticket
1. Backup and Restore
The Backup and Restore section allows you to cleanup, backup and restore the WSDesk – WordPress Helpdesk Plugin settings and/or tickets data, among other options. This process is done using JSON, making it smoother and lighter to backup and restore the data.

This section contains the following settings:
- Initiate Ticket: Enter a custom number to set it as a starting ticket number.
- Delete & Restore and Clear tickets in Trash: Click on the Empty Trash button to delete all tickets in the trash. Likewise, click Restore Trash to restore all tickets from the trash, and click Clean Now to delete all scheduled trigger cache.
- Backup Data (XML): Allows to backup your WSDesk Settings and Tickets for a specified period of time. The backup data is stored in an XML file.

- Restore Data (XML): Allows you to restore a previously backed up data from an XML file.
2. Export Data (CSV)
The Export Data section allows you to export your ticket information in a CSV file. You can select the date range and click on the Start Export button to export it in a CSV file.

3. Archive Tickets
You can archive old tickets for future use or reference. This will save a lot of your time as you don’t have to scrape through all tickets while finding a ticket. The ticket dashboard interface will become more precise and lighter. Archiving tickets are a better option over backing the tickets if you have to use (or refer) some old tickets frequently.
To archive WSDesk tickets, you can need to specify the start and end date range and the desired ticket status (optional) that you have created in the WSDesk Ticket Status section.

You can archive multiple tickets together from the Tickets tab itself. For that, you can select the corresponding checkboxes of the tickets and choose ‘Archive Tickets’ from the drop-down list of ‘Actions’. Check the screenshot:
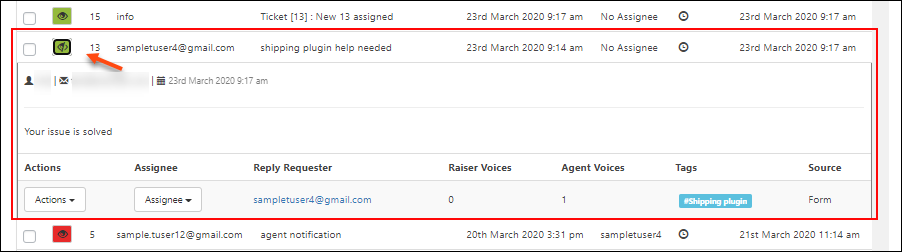
 You can also archive individual tickets from the specific ticket’s dashboard. Click on the Archive button for archiving the specific ticket. Check the screenshot:
The archived tickets will be stored in the WSDesk > Archived Tickets dashboard. A screenshot with sample archived tickets is shown below.
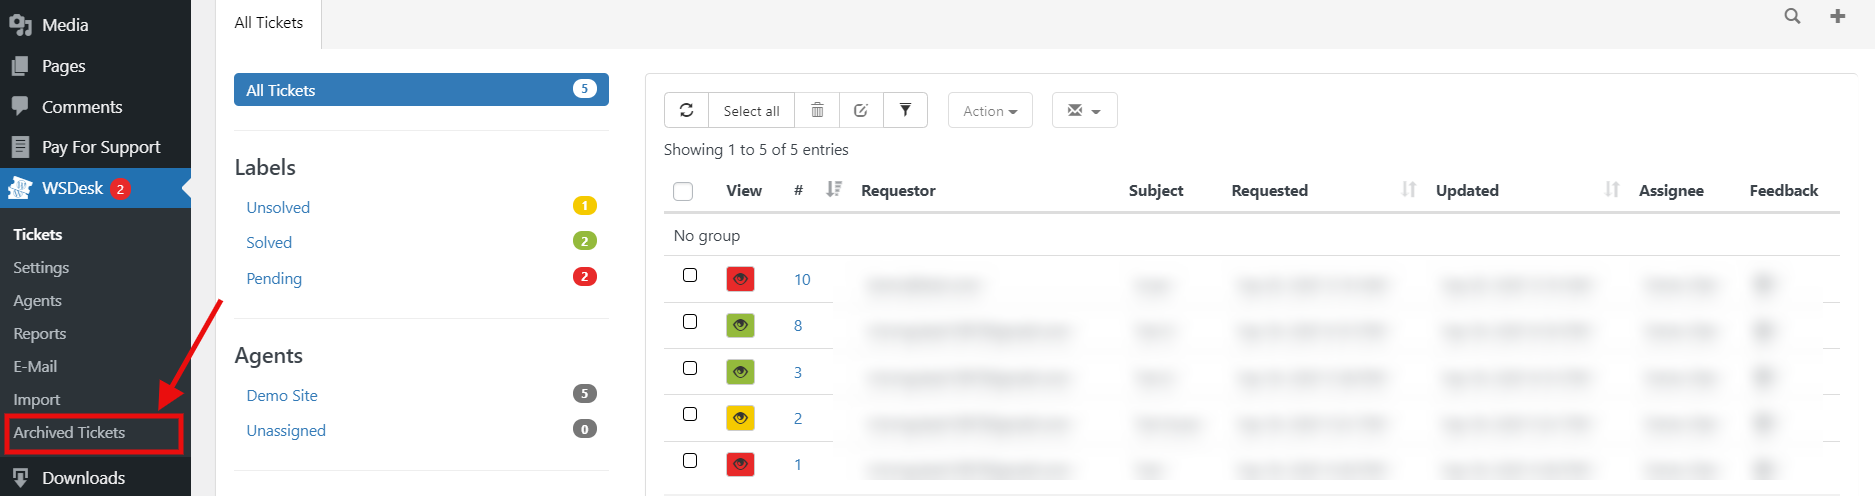
You can view the entire ticket details when you click on the view button of the respective ticket.
 Restoring archived tickets:
There are two methods to restore archived tickets –
1. From the Archived Tickets dashboard – You can select the desired tickets from the archived tickets dashboard and click on the restore icon to restore the tickets, as shown in the screenshot below.

2. Using Restore settings – This setting is placed in the Archive Tickets settings from where you archived the tickets in the first place. You can specify the start and end date and ticket status (optional) to restore the desired archived tickets.
Agents
The Agents dashboard contains settings for adding and managing agent profiles. You can also configure and manage agent roles, their user rights and associated Ticket Tags of each agent.

The following settings will help you with the configuration:
Adding an Agent
Click on Add Agent/Supervisor button to add a new agent profile.
 This section contains the following settings:
- Add Users: Allows you to add a WordPress user role to your website. You can tick the Create new user checkbox to create a new user by providing his/her user credentials. Else, choose existing users from the drop-down list.
Eligible user roles are Author, Shop Manager, Contributor, and Editor.
- WSDesk Role: Allows you to specify roles for the selected user.
There are two roles that can be assigned –- WSDesk Agents
- WSDesk Supervisor
- WSDesk Rights: Allows you to define access rights to the agents. The rights are defined based on WSDesk Role.
- For WSDesk Agents –
- Reply to Tickets
- Delete Tickets
- Manage Tickets
- Manage Templates
- For WSDesk Supervisor –
- Reply to Tickets
- Delete Tickets
- Manage Tickets
- Manage Templates
- Show Settings Page
- Show Agents Page
- Show Email Page
- Show Import Page
- For WSDesk Agents –
- Add tags: Allows you to specify tags to the Agents. By default, the tickets associated with the tags are assigned to the newly-added agent.
Managing Agent Profiles
Click on an agent name to reveal further settings.

You can edit the agent profile, view reports, or revoke the WSDesk agent role for the user.
Reports
The Reports dashboard helps to monitor your WSDesk data. It includes statistics about the status of tickets, agent response, and so on.
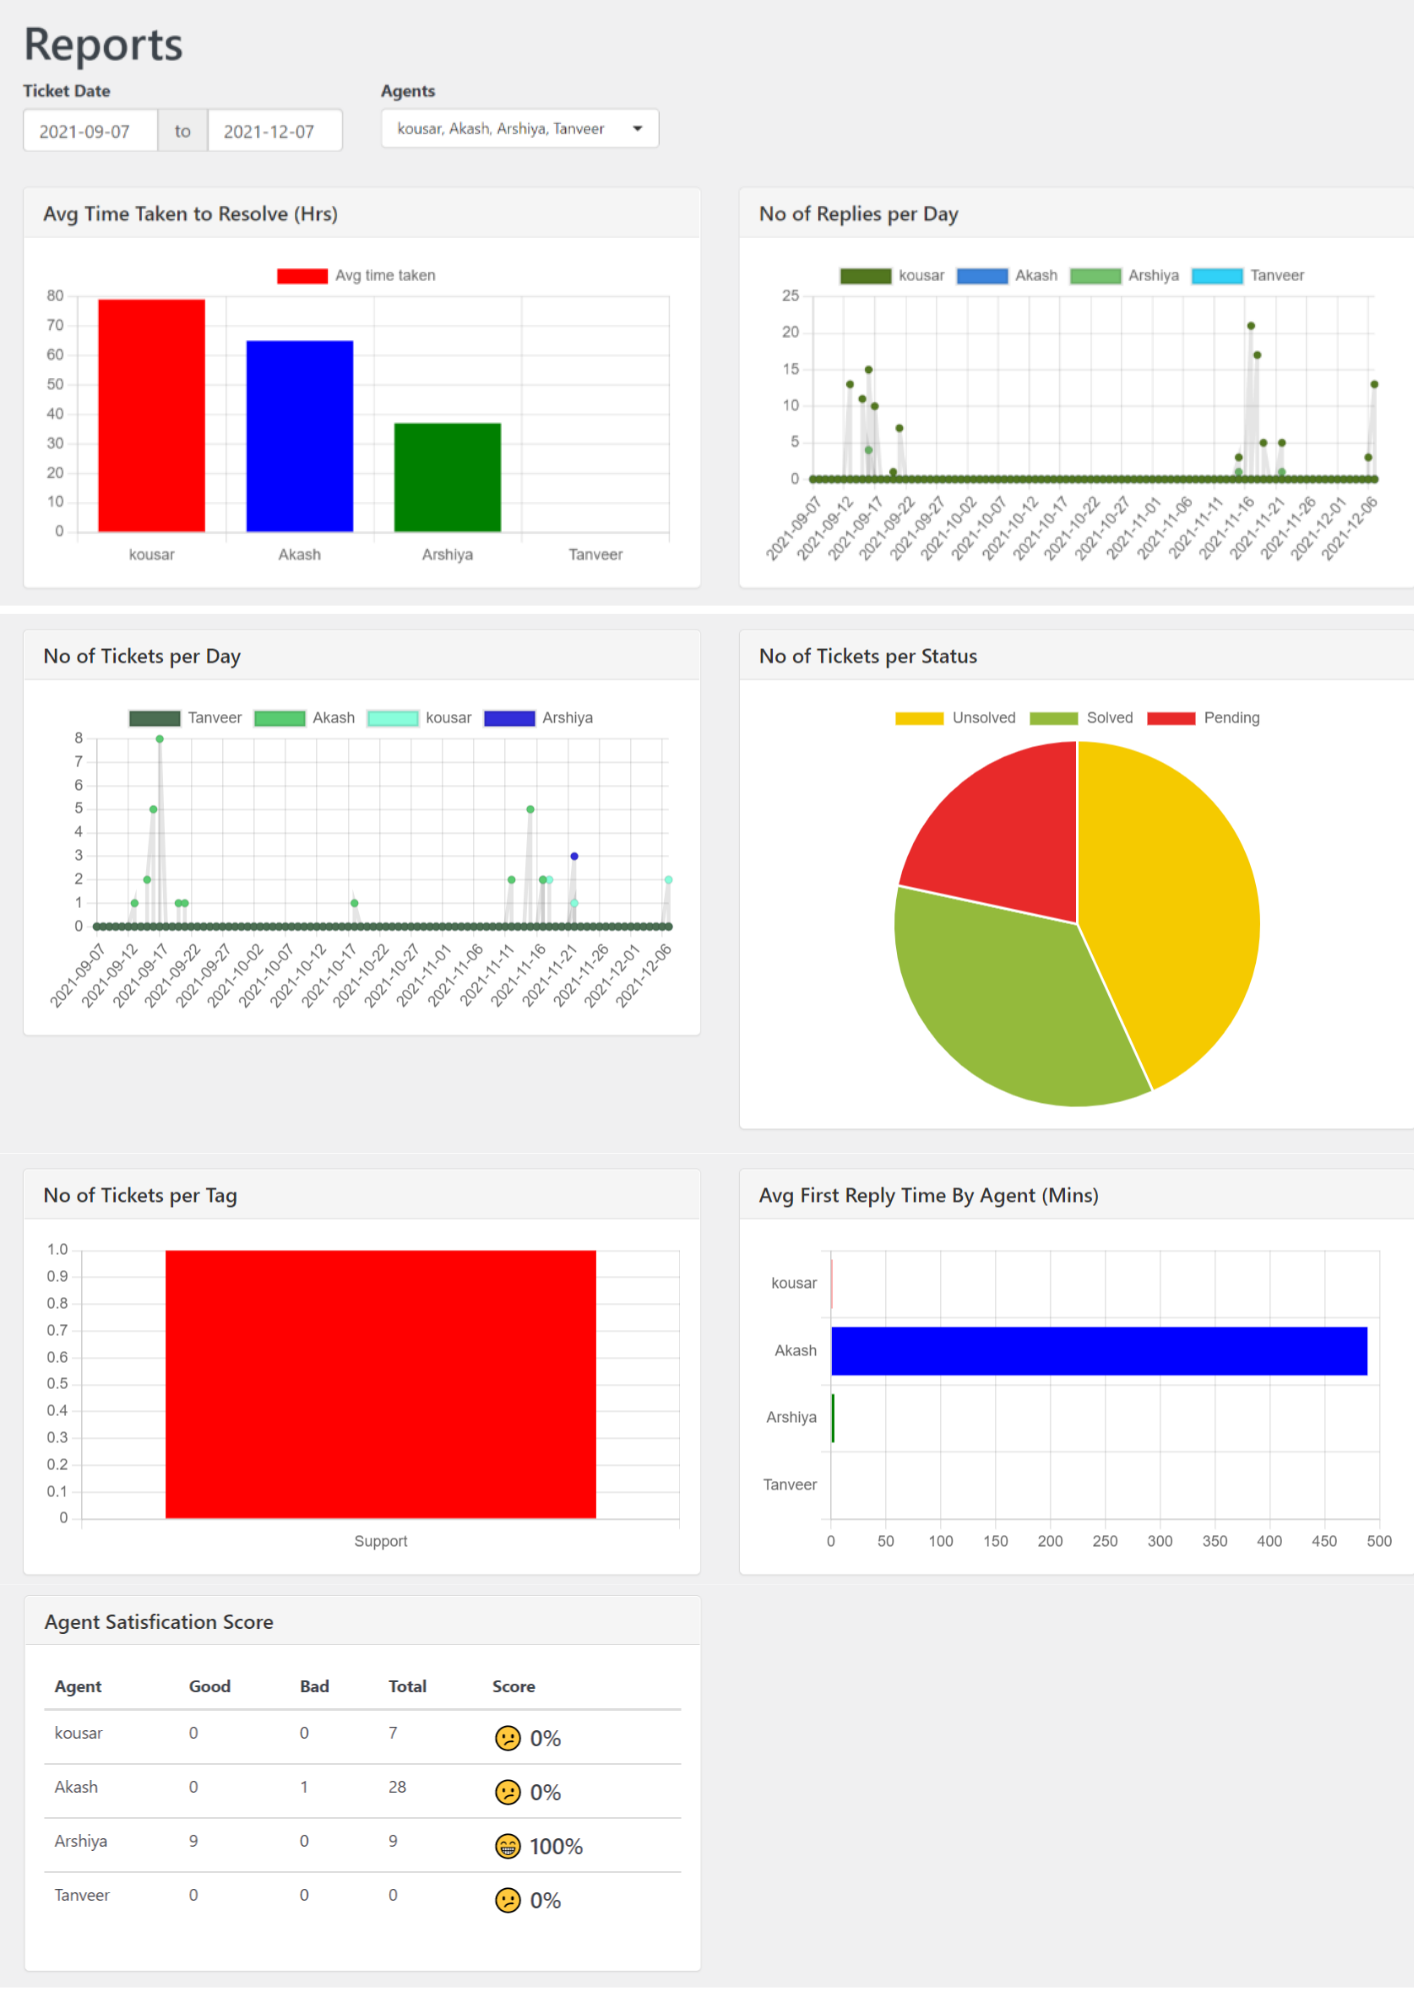
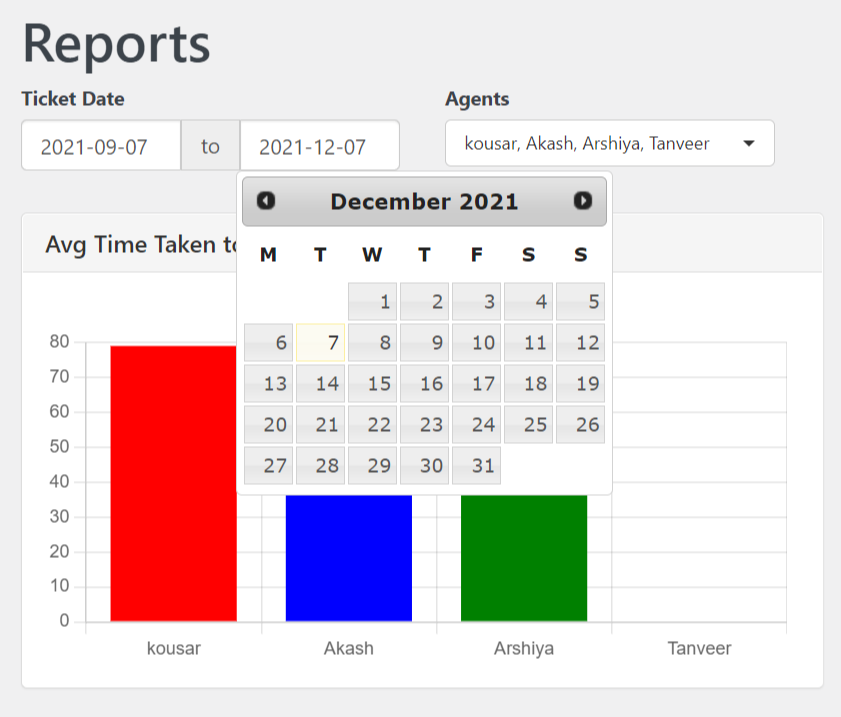
You can filter the reports based on the agents or durations (Last 7 Days, Last 30 Days, and Custom date range), as shown in the screenshot below.
The Reports dashboard is divided into the following sections:
- Average Time Taken to Resolve (Hrs): The average number of hours it takes for each agent to resolve a ticket.

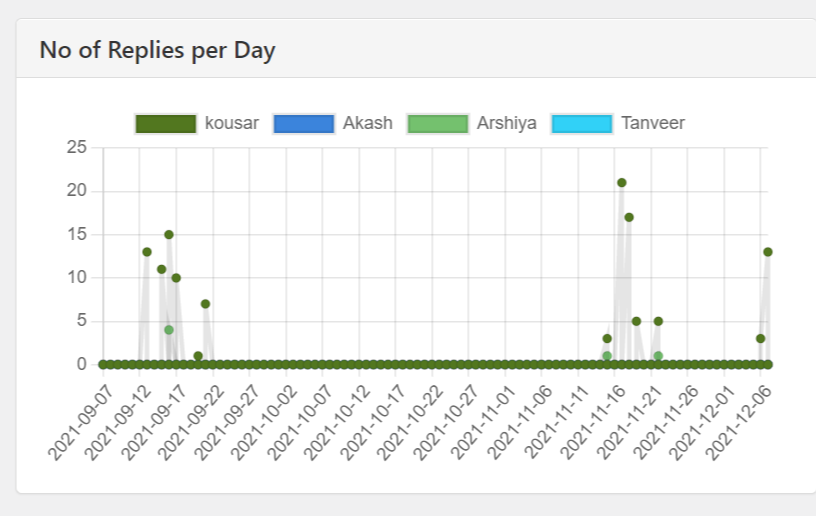
- Number of Replies per Day: This section shows how many replies each agent has sent per day.
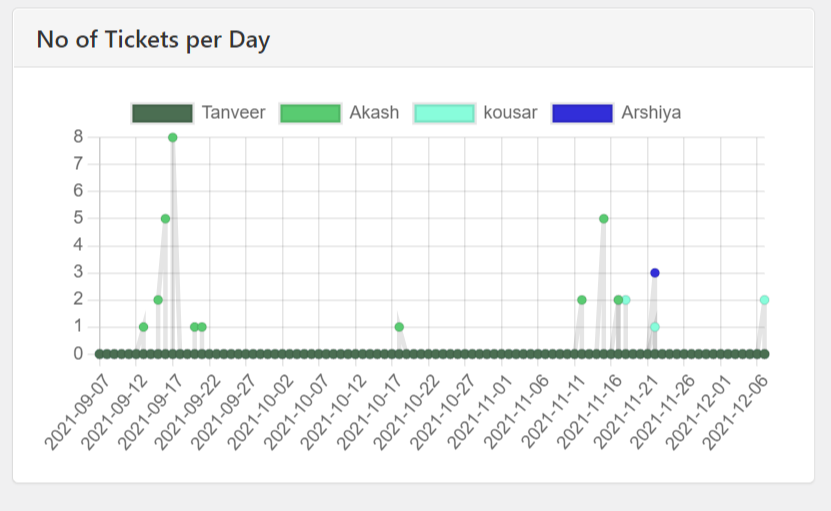
- Number of Tickets per Day: This section shows how many tickets an agent has responded to per day.
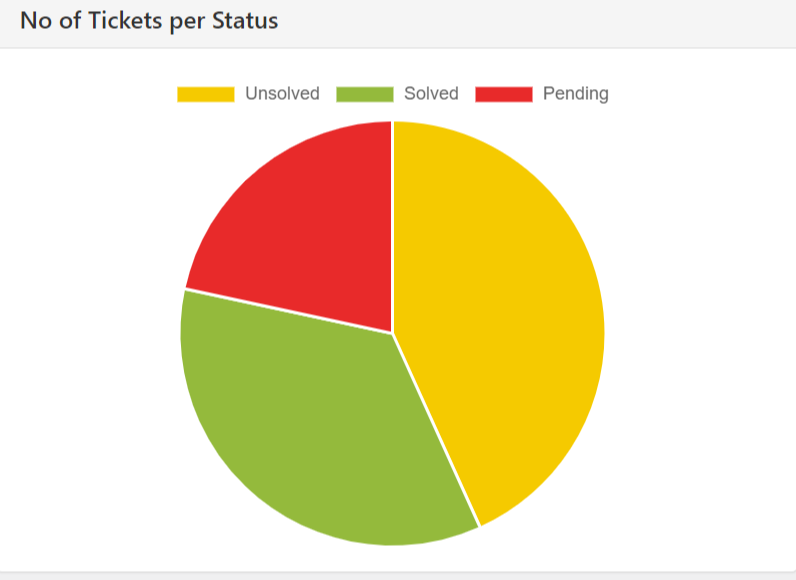
- Number of Tickets per Status: This section displays the number of tickets that are currently active in each ticket progress status that we set up in the previous steps.
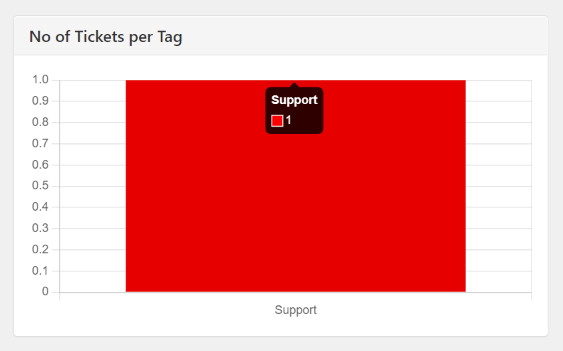
- Number of Tickets per Tag: The number of tickets that are currently active in each of the ticket tags that we created in the previous steps.
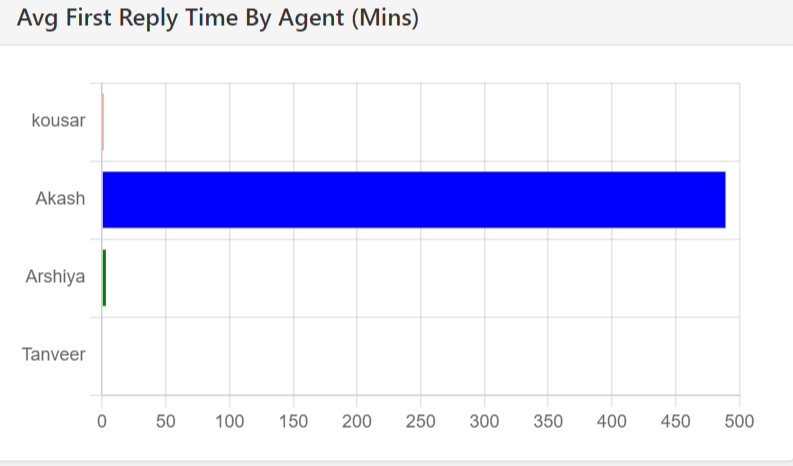
- Average First Reply Time By Agent (Mins): Here you can view the Average First Reply Time of each agent in minutes. To view the average first reply time of a particular agent, simply hover the cursor over the agent’s name. You’ll be able to see the total number of tickets that have been resolved by them as well as the average first reply time.
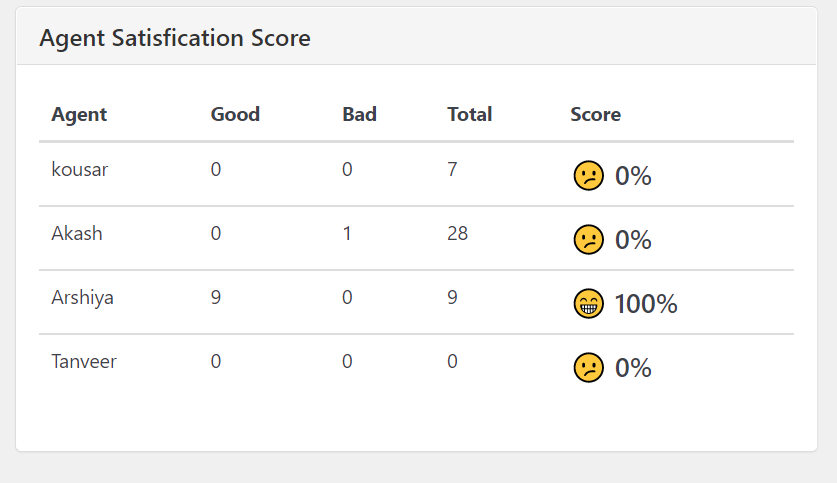
- Agent Satisfaction Score: Displays the satisfaction survey report, which includes both positive and negative feedback in the form of a percentage.
The Email dashboard contains all the settings related to your emails. You can also set up Google OAuth and IMAP Emails. You can block or restrict email address(es) as well.
It contains the following settings:
Support Email
The Support Email section contains settings that include configuring your email address and composing the body of the automated & agent reply emails.

The following settings are relevant:
- Support Reply Name and Email: Enter the desired name and email address that you wish to use it for customer support.
- Automated Email Reply: Tick Send auto email on the Ticket creation checkbox to enable and compose automated replies to customers once they raise a ticket.

You can compose reply emails using unique codes. The section also contains an editor to compose the reply email body.
- Agent Reply: Enable this setting to compose agent reply emails.

Agent reply emails can be composed using unique codes that constitute some value. The section also contains an editor to compose the agent reply email body.
Outlook OAuth Setup
Outlook OAuth is a protocol that allows users to grant third-party applications limited access to their Outlook accounts without sharing their login credentials. By implementing OAuth, you can securely integrate your application with Outlook services and access data such as emails, calendars, contacts, and more.
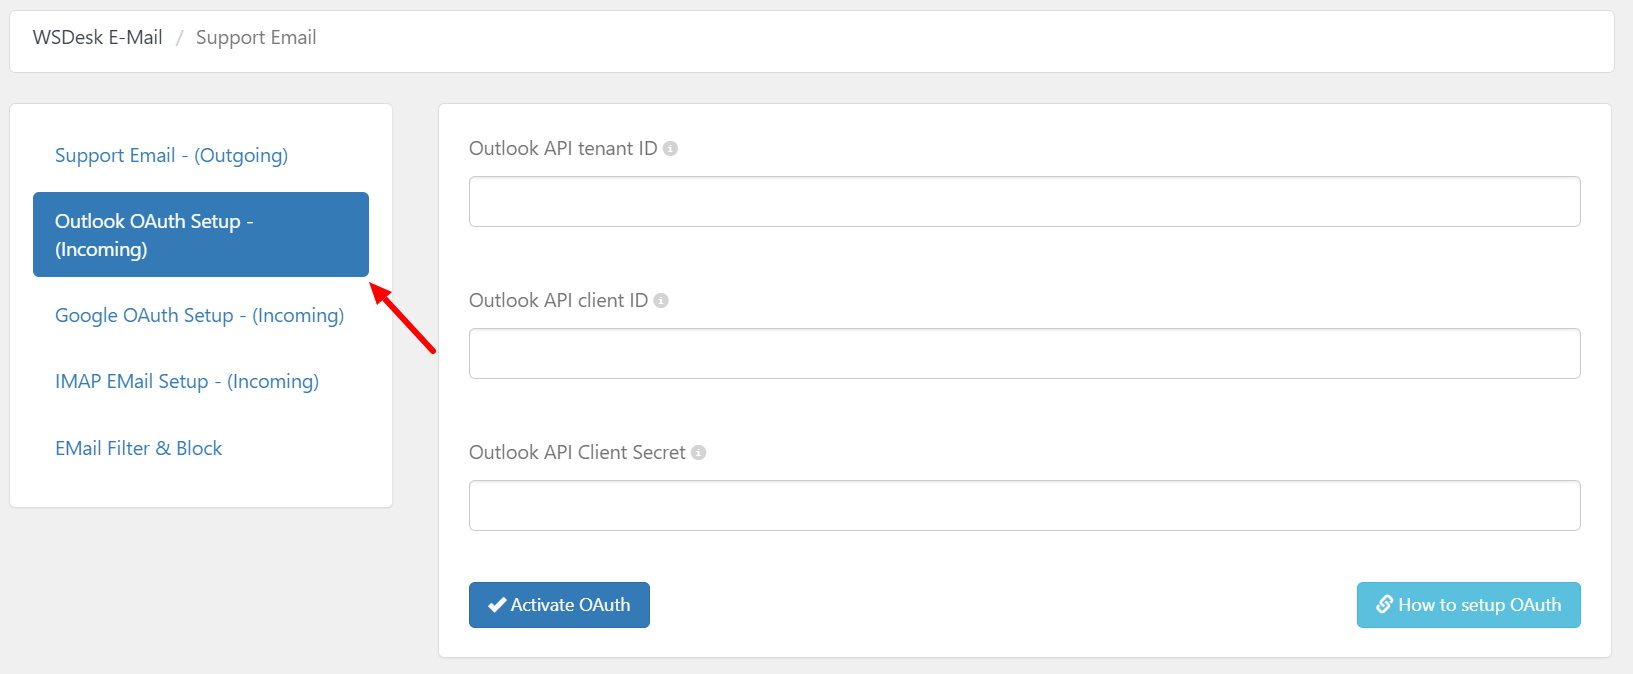
To activate OAuth in WSDesk, you need three important pieces of information – Outlook API tenant ID, client ID, and client secret. Upon entering all three, click Activate OAuth. You can read the following detailed article to know how to obtain Outlook OAuth credentials and configure them in WSDesk.
Google OAuth Setup
Google OAuth is used for Google authorization for accessing information from your Google account to your website without giving out the username and password. Information like emails from your Gmail account can be accessed easily with this process.
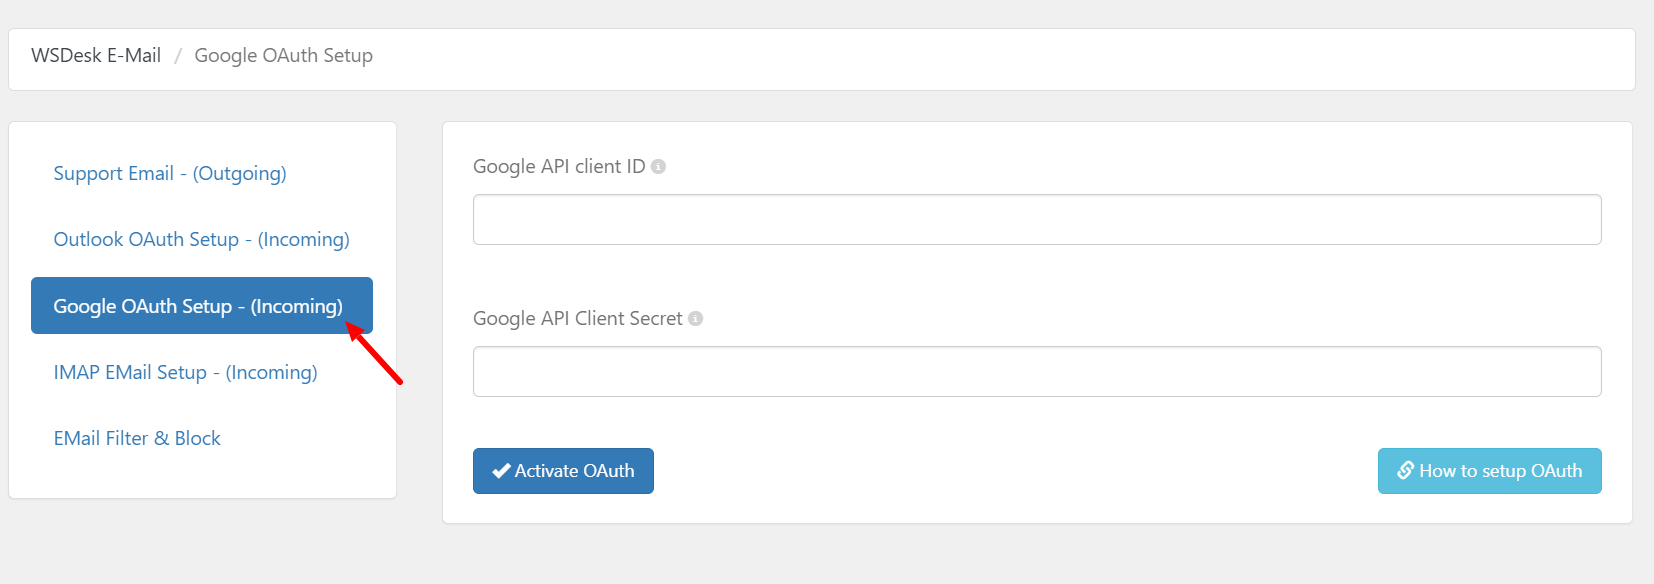
To activate OAuth in WSDesk, you need two important information – Google API Client ID and Google API Client Secret.
For personal Gmail account, read Setting up Google OAuth for WSDesk. And for the G Suite account set up, read how to configure Google OAuth credentials in WSDesk?
IMAP Email Setup
IMAP (Internet Message Access Protocol) is one of the popular email protocols used today for accessing emails from anywhere in the world via any number of devices. It is faster and can also be used offline.
You can add multiple IMAP accounts. When a customer sends a query to a particular email you have added here, the query will be converted into tickets automatically.
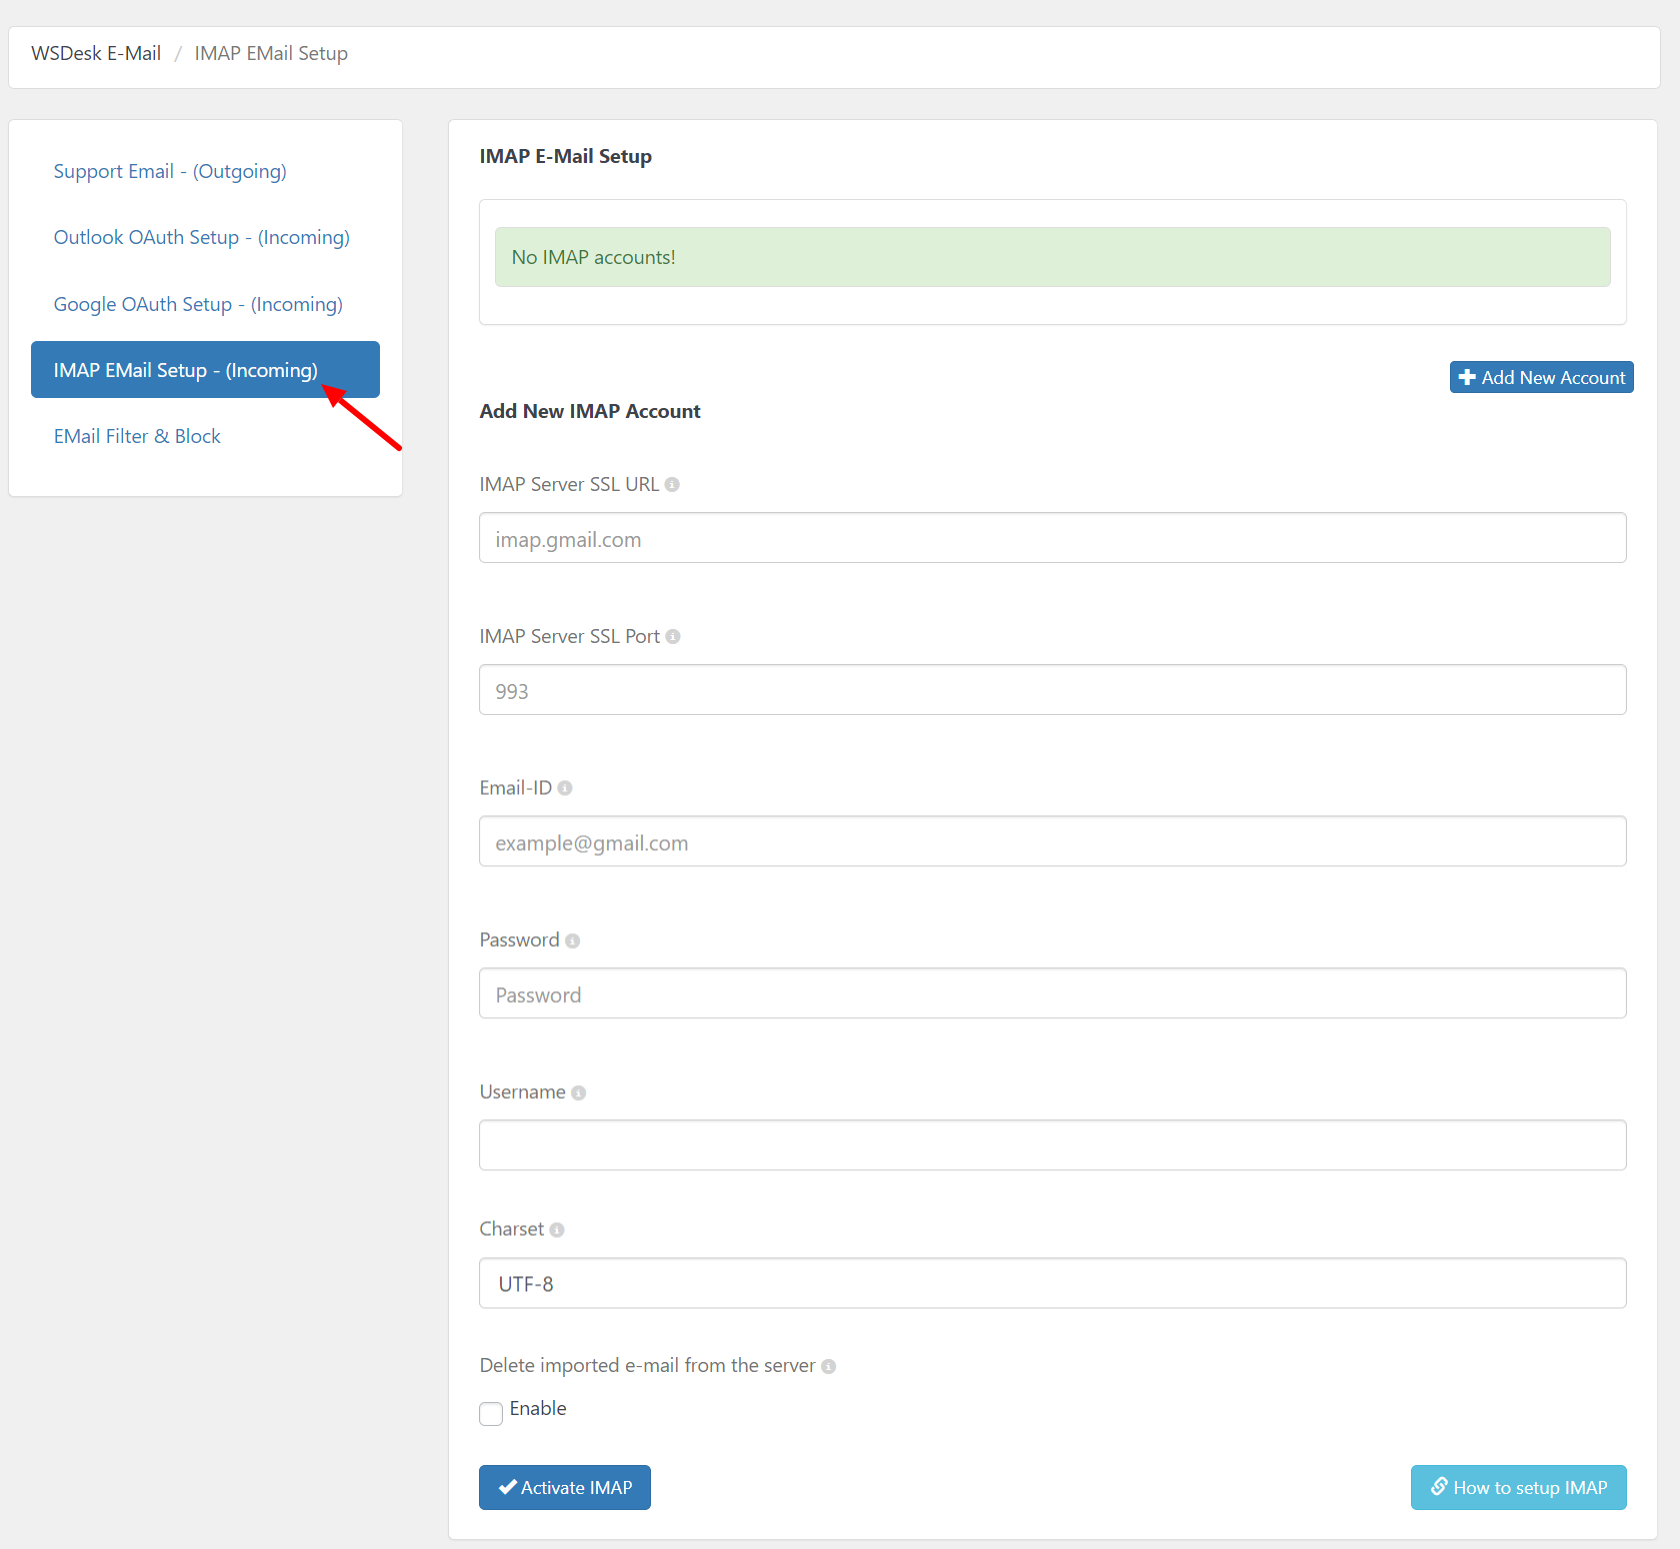
Enter IMAP Server SSL URL, SSL Port, email address, username, and respective password details in the given fields.
The plugin also allows you to delete imported emails from the server. Tick the checkbox to enable the same.
The IMAP Email Setup in WSDesk is done with the help of a hosting service provider.
You can read the following detailed article to know How to configure IMAP in WSDesk.
Note: If you see an error message – ‘IMAP is not enabled on your server. Please contact your service provider’, it could be because your web and email servers are different. If you encounter this error, install the PHP-Imap extension on your web server and enable it so that you will get an option to add your IMAP details from the email server. If the PHP-Imap extension is already present on your web server and still you see this error, make sure that you have enabled it.
Email Filter and Block
This section helps in filtering unwanted emails and blocking them. These settings help in adding or removing blocked email address(es) and provides options to block sending and/or receiving emails.
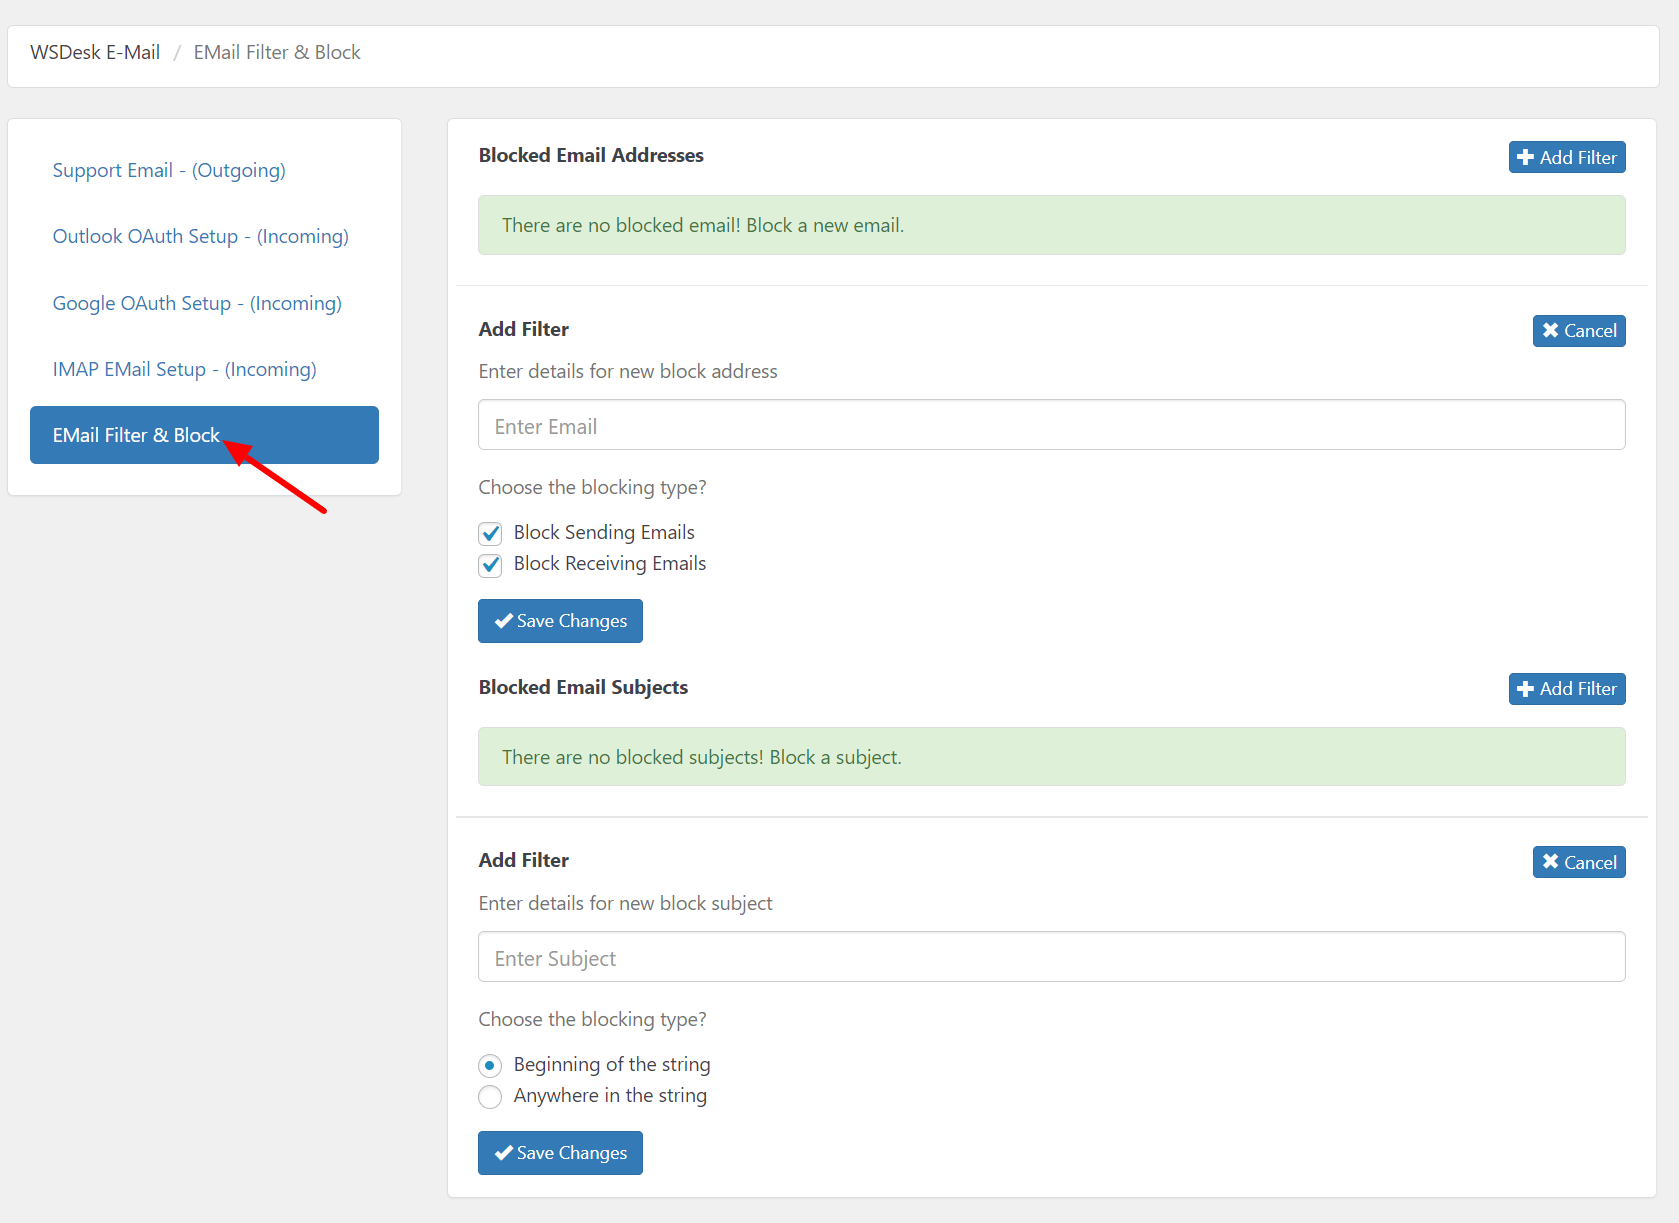
You can block or filter emails in two ways:
- Using Email Addresses: To add a new filter for email addresses, click on Add Filter button in the top right corner. Add email addresses to filter and choose the blocking type. That is, blocking sending and/or receiving emails from the entered email addresses. The blocked email addresses will be listed in the Blocked Email Addresses list as shown in the screenshot below.

- Using Email Subject Line: Similarly to email addresses filter, click on Add Filter on the right corner of the given section to add a new block filter for email subject lines. Enter subject text and choose the blocking type, that is, the entered text can be either at the beginning or anywhere in the subject line. The blocked email subjects will be listed in the Blocked Email Subjects list as shown in the below screenshot.

Once all settings are configured, save changes.
Import
The Import dashboard helps in importing tickets from other support systems.
Currently, you can import Zendesk tickets into the WSDesk system.

Once you click Activate Zendesk button, the following settings come into view:

The Zendesk ticket import requires the following credentials:
- Selecting Subscription Plan – Select the appropriate subscription plan which you previously used in Zendesk.
- Zendesk Access Token – Add access token from your Zendesk system.
- Zendesk Subdomain – Your Zendesk sub-domain name.
- Zendesk Username – Your Zendesk organization username.
In addition to this, you can also download the attachment locally.
To understand importing tickets from Zendesk in detail, read an article on Steps to import tickets from Zendesk.
Tickets
The Tickets dashboard displays all the tickets generated by your customers. Based on the configurations set, the Ticket dashboard will be displayed accordingly.
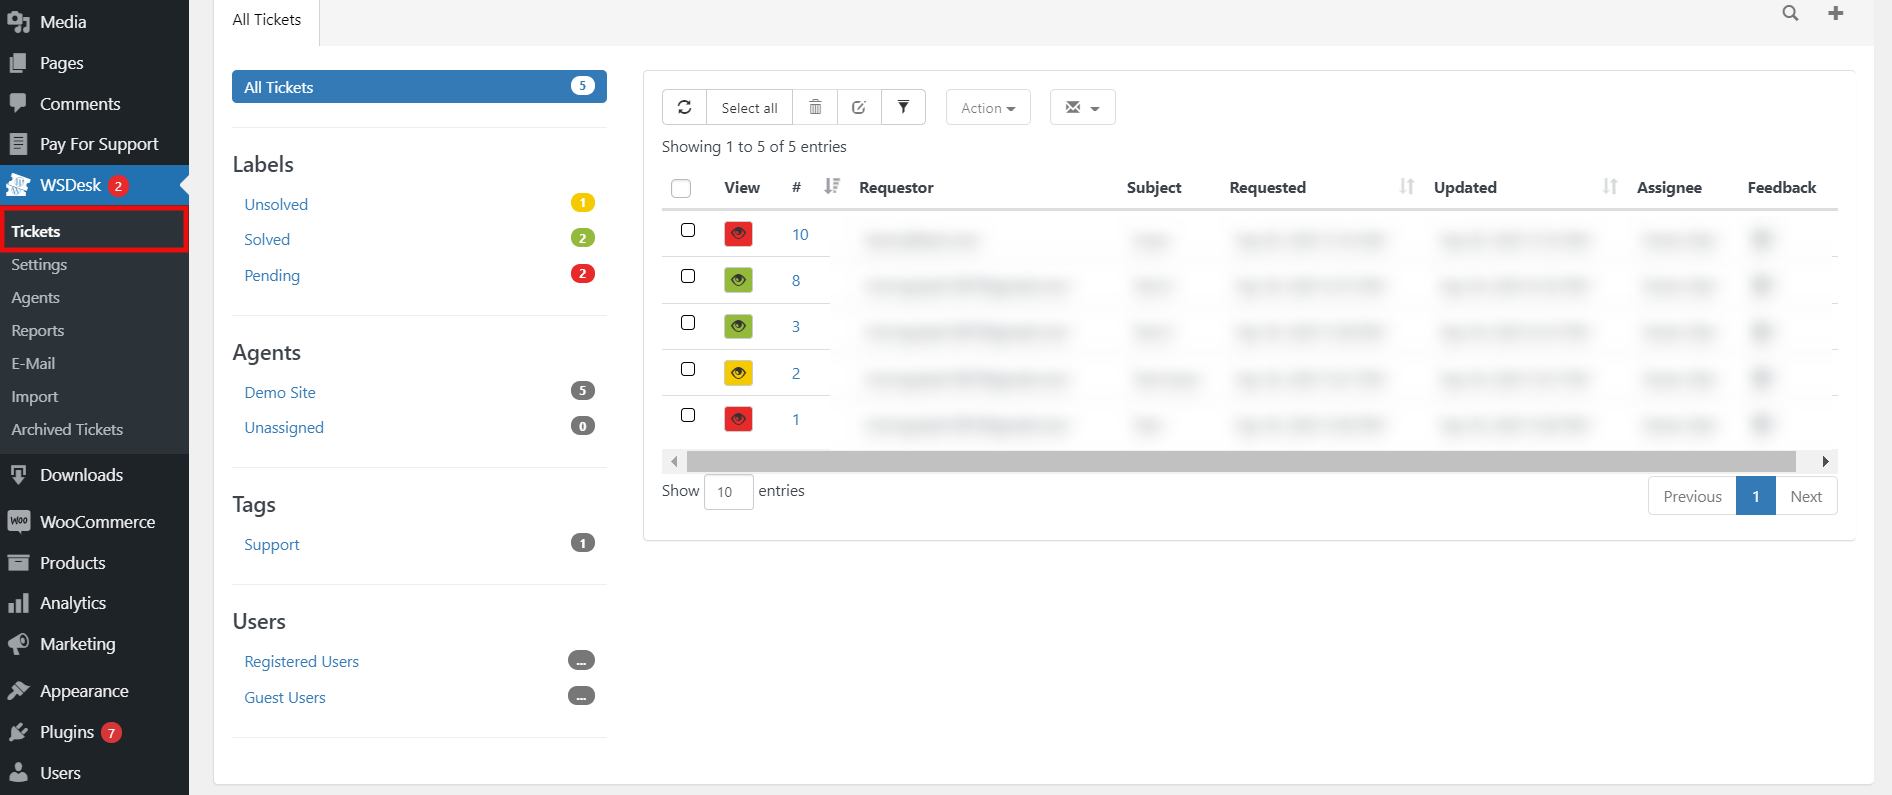
Let’s break down the ticket dashboard view to understand in detail.
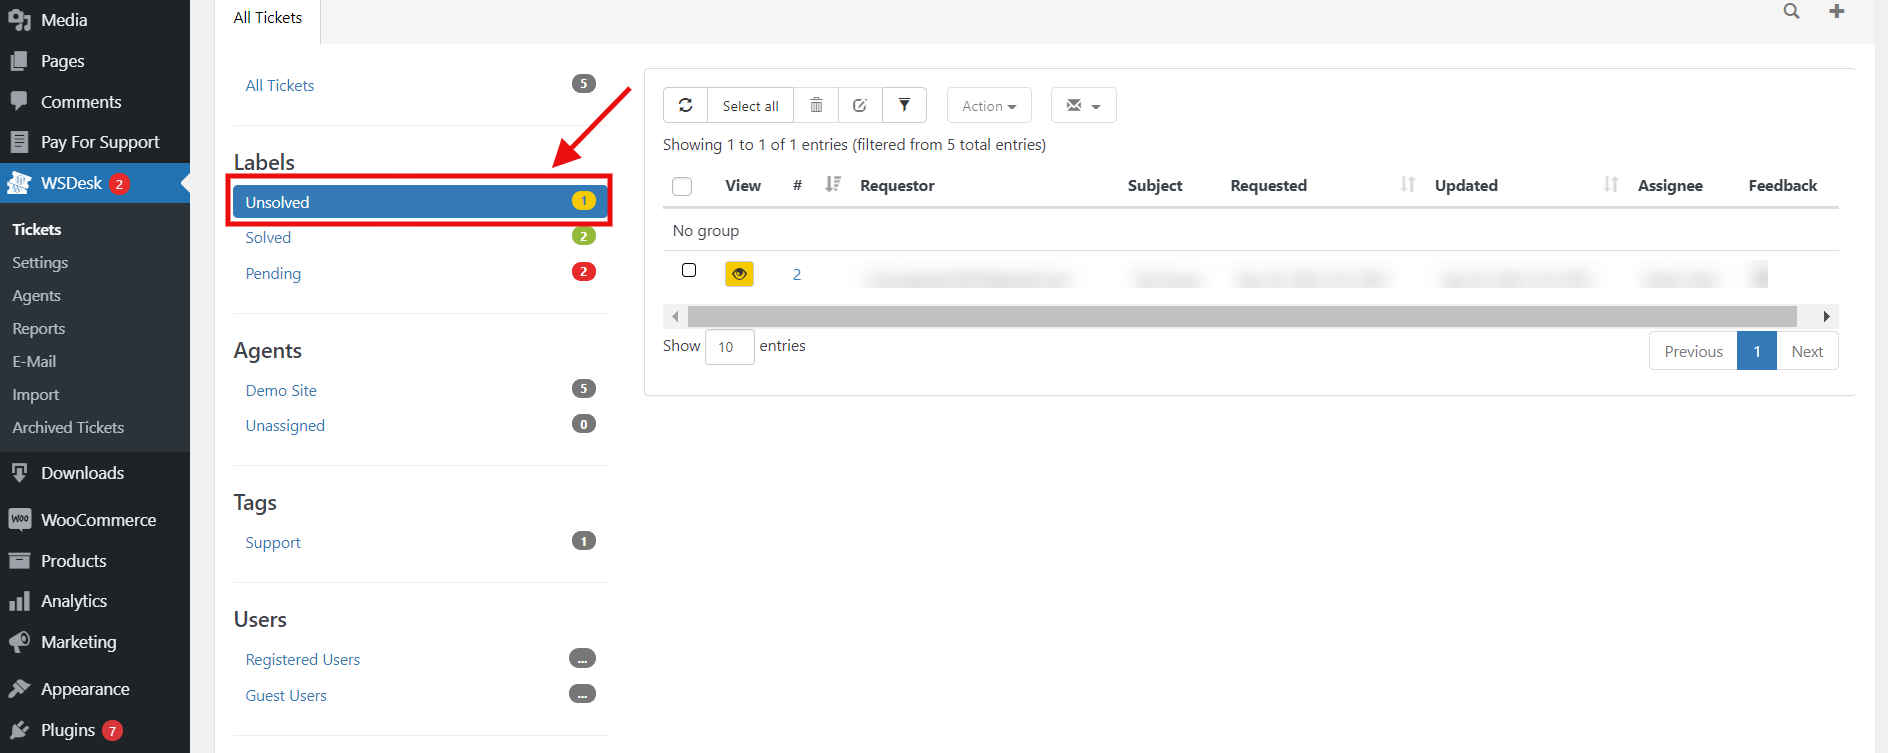
The left section contains views created in the Ticket Views section. These views are used to filter tickets for easy accessing. If any attribute included in the Ticket Fields, Ticket Labels or Ticket Tags is not configured for filtering, it will be not listed here.
The right section displays all the tickets generated by the customers. The tickets are sorted based on the last updated ticket. The ticket information includes ticket status color code, ticket number, requester username/email address, the subject of the email, requested date, the agent assigned, and customer feedback.
Viewing a Ticket
To get a quick view of a ticket, click on the viewing icon of the ticket. This view provides some quick information about the ticket such as issue details, options to change the ticket status label, Ticket Tags, Ticket Assignee and so on.

To view the complete conversation between the ticket raiser and the agent, click on the specific ticket row.

By default, the left section contains the Ticket Assignee drop-down list(to assign the ticket to agents), CC text field – to add emails for CC(as in carbon copy in the context of emails) and Ticket Tags – to add tags associated with tickets. This section can be updated in the ticket views section.
The right section consists of ticket details, WooCommerce order detail(conditional), reply editor and the complete conversion of agent and customer.
The ticket can be refreshed by clicking the Refresh button beside the button to merge tickets. Also, changes/updates made to ticket properties can be saved when an agent is updating the ticket status when replying to the ticket. The ticket status can also be updated directly without any replies.
Adding a New Ticket
You can also add a new ticket to this dashboard. Click on the + (plus) icon in the top right corner of the dashboard.
Once you click the icon, the following settings are displayed.

You need to fill the following fields to add a new ticket:
- Assignee: Lists all the possible ticket agents of WSDesk. You can decide to whom to assign the new ticket and select accordingly.
- Tags: Lists all the Ticket Tags. Select the appropriate tag for the ticket.
- Raiser Email: Enter the ticket raiser’s email address.
- Ticket Subject: Enter the subject header for the issue to be raised.
- Description: Enter a detailed description of the issue. You can include one or more attachments for the ticket respectively. You can also specify the Ticket Label while submitting the ticket.
Creating a Reply Template (Canned Responses)
It allows you to create a standard message template for replying to the tickets quickly. If there are several tickets that require a similar reply, you can create a custom template of your own. This will save you time and reduces the effort to type the same message for several tickets.
To create a reply template, move to the Tickets dashboard and click the message icon placed on top of the dashboard. Further options appear as shown in the screenshot below.

You can select an existing template or create a new one by clicking Create Template. The following window appears where you can compose the reply template using the short-codes.

Following is a screenshot showing how you can use the message template while replying to the tickets. When you click on an existing template, it will be appended to your reply text. It will not override the existing text that you typed. You can find more information on Canned responses, here.

Merging Tickets
WSDesk allows you to merge two or more tickets easily.
Follow the below steps to merge tickets:
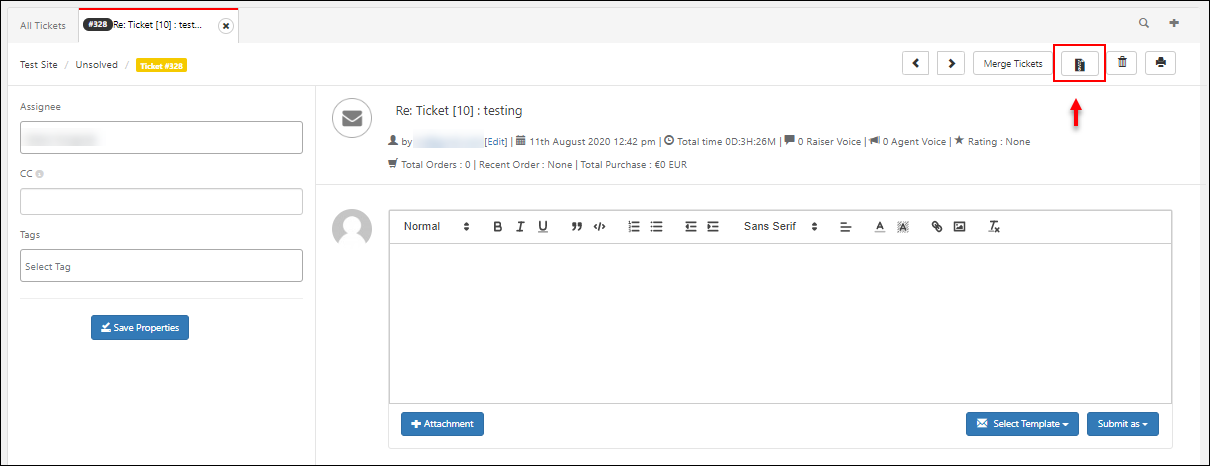
- Open a ticket that should be merged under. That is, other tickets will be merged into this ticket. Click on the Merge Ticket button placed on the top right corner, as shown in the screenshot below.

- A popup window will appear prompting you to enter ticket IDs of the tickets to be merged, as shown in the below screenshot.

Enter ticket IDs to be merged and click Verify.
- Once the tickets are verified, a preview will be displayed of how the tickets will be shown in the tickets dashboard. Click Confirm to continue. A sample screenshot is shown below.

Finally, the tickets will be merged and will be shown as a single ticket. The ticket IDs entered for merging will no longer be displayed in the TIckets dashboard.
Bulk Edit Tickets
Follow the below steps for bulk editing tickets:
- Tick the respective checkboxes of the tickets to be edited in the Tickets dashboard, as shown in the screenshot below.
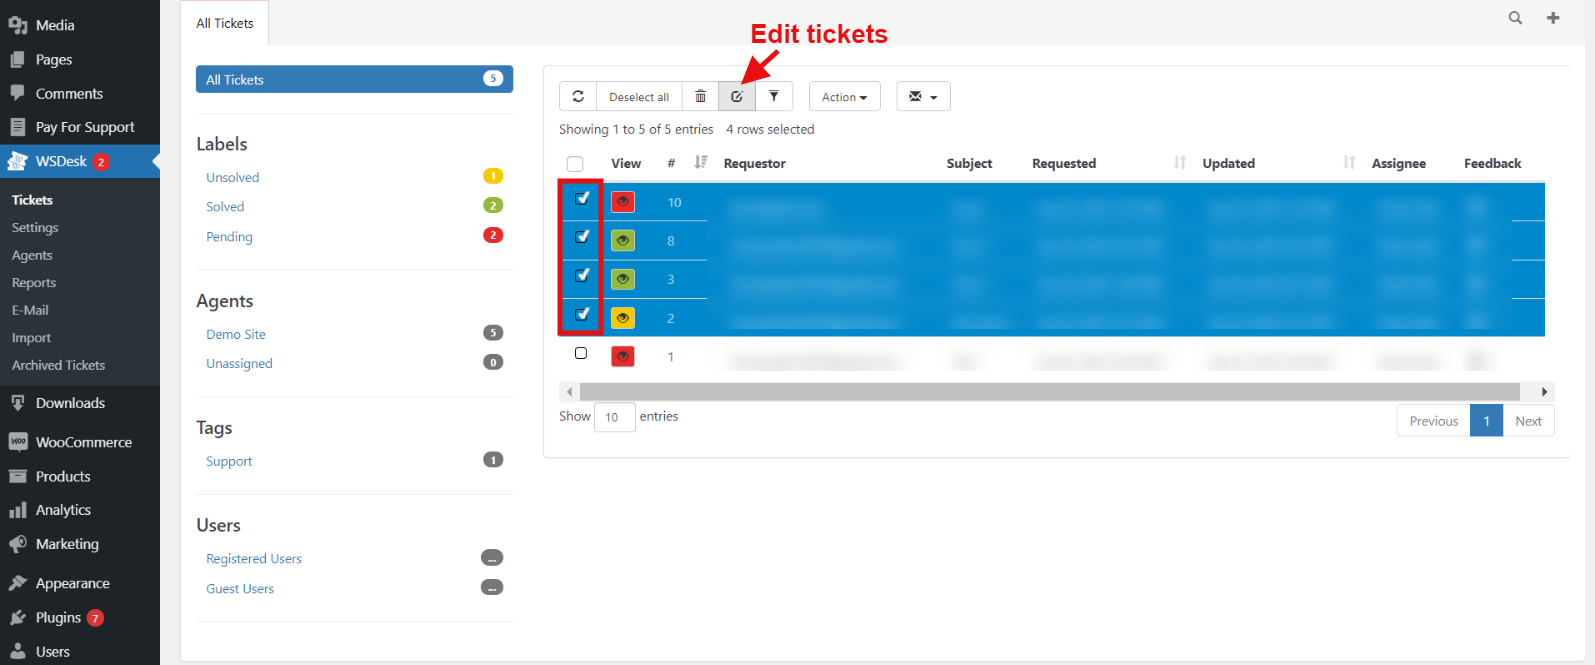 Click on the Edit Tickets icon placed on the top to proceed with editing the selected tickets.
- You can bulk edit/update ticket assignee, ticket labels, ticket tags, ticket subject, and reply, as shown in the screenshot below.
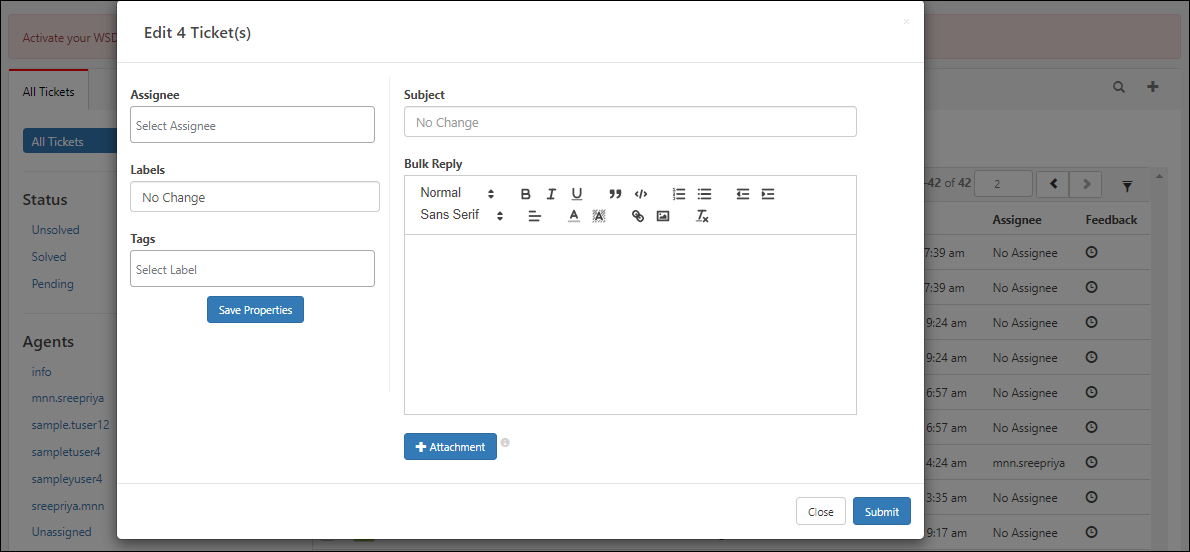
You can save properties such as Assignee, Labels, and Tags by choosing from the drop-down pick up lists accordingly.
Total Time Display on Tickets
Now you can view the Total Time elapsed after the creation of a ticket, on the detailed ticket view.
- For unsolved tickets, Total Time = The current time – The time when the ticket was created (in hours and mins).
- For solved tickets, Total Time = The Time when the ticket was solved – The time when the ticket was created (in hours and mins).

Quick Tip: The plugin provides deep links for all views and orders of the tickets.
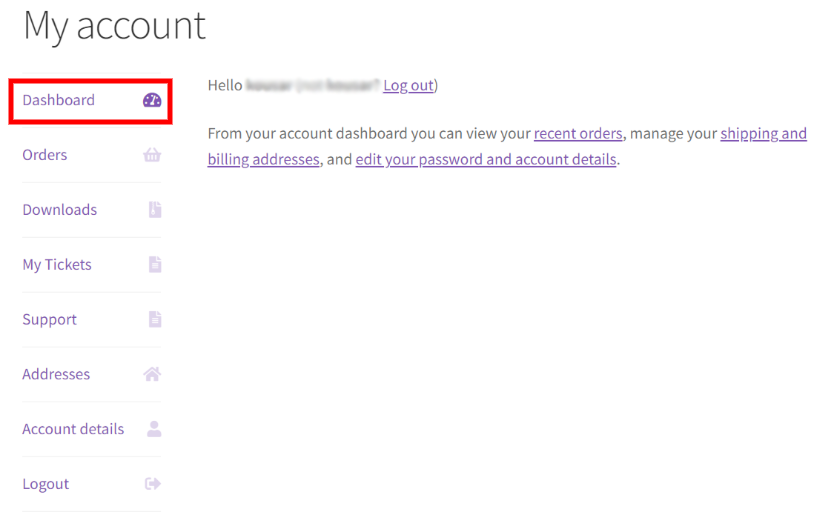
My Account Dashboard
On the front end of the store, the My Account Dashboard consists of all of the Order Details, Downloads, Existing Tickets, Support From, Addresses, and Account Details for users to raise support tickets, view recent orders, manage shipping and billing addresses, and edit password and account details.
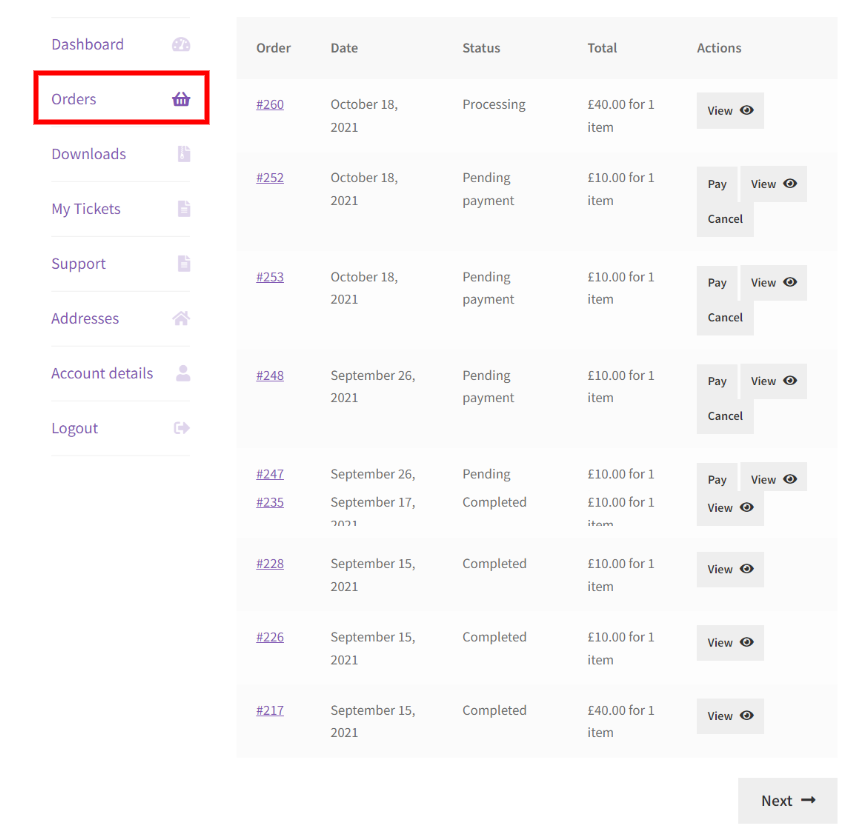
- Orders: Users can access all of their previous orders under the orders tab, along with the order information, order amount, status, and actions.
- Downloads: Users may find all of their previous downloads in the downloads tab if they have any.

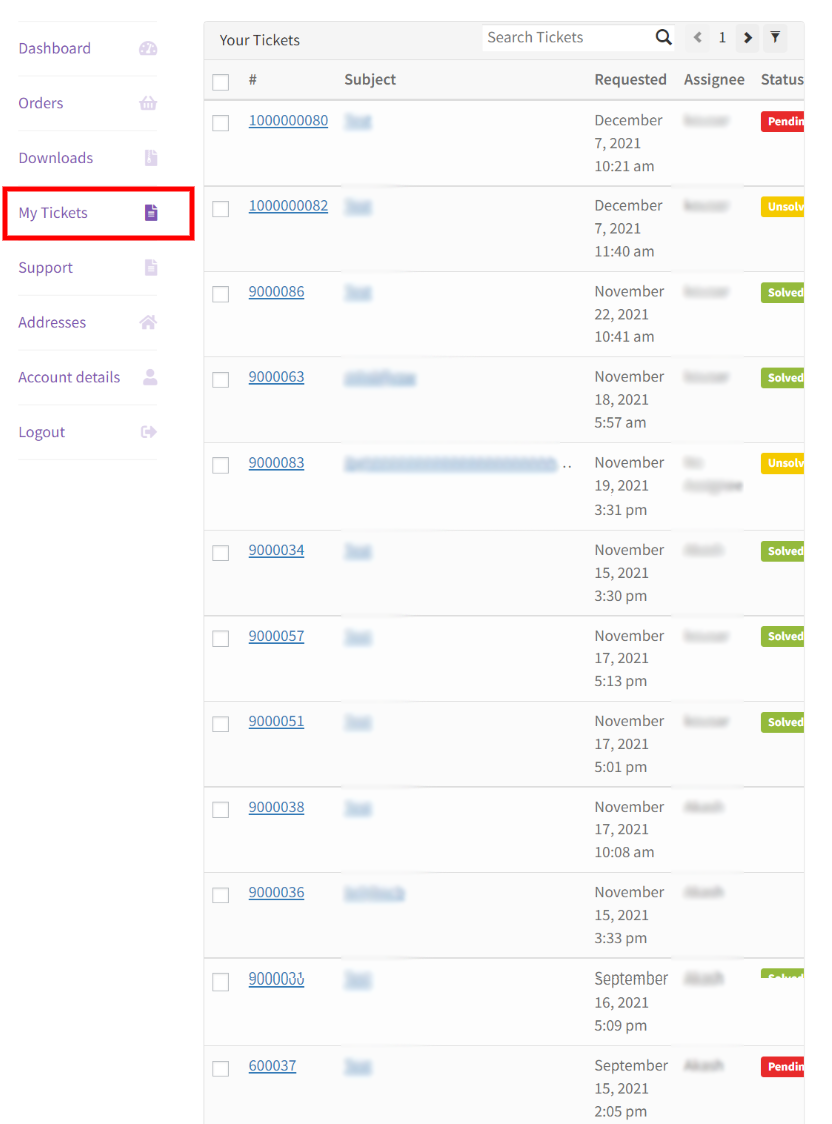
- My Tickets: Users may find all of their existing ticket details including ticket number, subject, issue date, assignee, and ticket status in the My Tickets tab.
- Support: From the support tab, users can create new support tickets and also check existing requests.

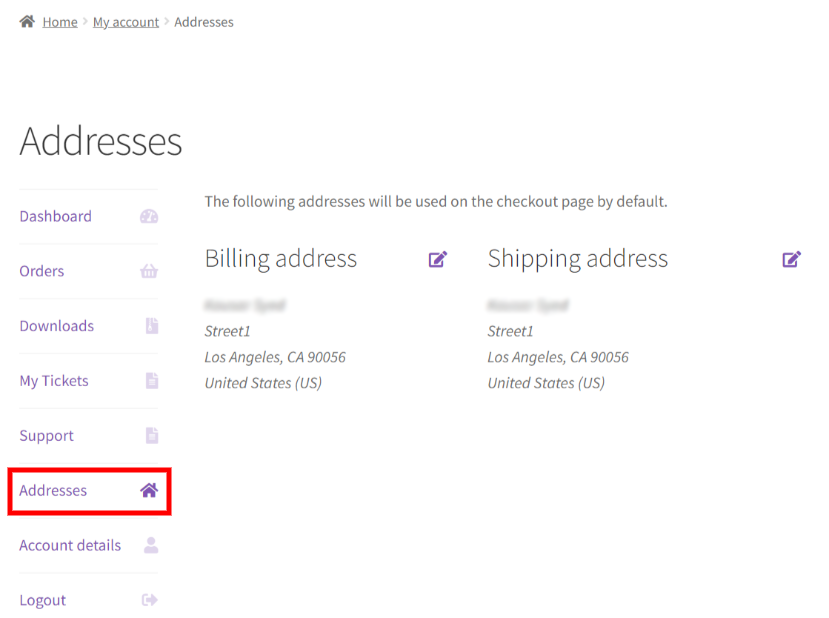
- Addresses: The Shipping and Billing Addresses of the user can be viewed and managed from this tab. By default, the provided addresses will be applied on the checkout page.
- Account Details: The user’s account details including their name, email address, and password can be viewed, managed, and edited from here.

Factory Reset setting
WSDesk provides a factory reset option using which you can delete all WSDesk settings and ticket data. This option will drop all the related tables from the database as well, provided the user has the DROP privilege for the database.
You can find the factory reset option under the WSDesk subsidiary settings in the installed plugin list, as shown in the screenshot below.

Add Agent Signature
You can add professional signatures to agents and supervisors using our WSDesk Agent Signature Add-On. The signature can be added in HTML format, which means, you can add external links and images as well. Once you have purchased the add-on, read the product documentation to configure the add-on.
Enable SMS Notifications
You can enable SMS notification for Ticket raisers, Agents, and Ticket assignee using our WSDesk SMS Notification Add-On. The SMS notifications can be sent for all WSDesk trigger actions like ticket creation, submission, update, a new ticket is assigned to an assignee, and so on. Once you have purchased the add-on, read the product documentation to understand all the features in detail.
Watch the Video Tutorial Here :
This should get you going!
If you want to add reCAPTCHA to your support ticket page for verifying your ticket raisers are humans, refer to this article – How to Add ReCAPTCHA in your Ticket Fields in WSDesk – ELEX WordPress Helpdesk & Customer Support Ticket System Plugin?
To explore more details about the plugin, go check out WSDesk – WordPress Helpdesk Plugin. Or check out the product documentation section for more related articles.
You can also check out other WooCommerce and WordPress plugins in ELEX.