In this article, we will discuss the steps involved in enabling live shipping rates and printing WooCommerce USPS Shipping labels. We will be using the ELEX Stamps.com Shipping Plugin with USPS Postage for WooCommerce for integrating WooCommerce USPS Shipping products and services.
Introduction:
Generating and printing USPS Shipping labels for your orders is an important step in the order fulfillment process. To print USPS shipping labels, you need to visit the USPS website, log into your account and enter the shipment details manually. Errors can creep up when you need to do this for multiple orders. Automating this process reduces errors in the shipping labels and lost or wrongly delivered packages.
Additionally, displaying USPS rates on the cart and checkout pages of your WooCommerce store would be a great way to deal with your shipping challenges. You will be able to reduce cart abandonment on your store as customers will be able to know the shipping charges clearly. In this article, we will demonstrate displaying USPS shipping rates on your WooCommerce store during checkout. The ELEX Stamps.com Shipping Plugin with USPS Postage for WooCommerce features the ability to print WooCommerce USPS shipping labels and enable live shipping rates on your store.
Prerequisites:
To generate and print USPS shipping labels, and access live USPS shipping rates, you need to integrate USPS services and products into WooCommerce first. This can be done by installing and activating the ELEX Stamps.com Shipping Plugin with USPS Postage for WooCommerce.
ELEX Stamps.com Shipping Plugin with USPS Postage for WooCommerce is a Stamps.com Approved Integration Partner. Apart from displaying live shipping rates and printing shipping labels, this plugin also helps you to:
- Offer discounts or add a markup on shipping rates, with Price adjustments.
- Pack items into custom boxes.
- Ensure packages with insurance amount.
- Track shipments.
- Generate bulk shipment.
- Configure USPS Flat Rate boxes, and much more!
A Stamps.com account is needed to use this plugin. It costs a small monthly fee apart from what you pay in shipping, postage, and label printing. Stamps.com helps in the integration of USPS shipping services and products into WooCommerce.
Integrating WooCommerce USPS Shipping:
Install and activate the plugin. You can then find the settings of the plugin by navigating to WooCommerce > Settings > Shipping > Stamps.com- USPS.
In the General Settings tab of your plugin, you need to enter your Stamps.com Login Username and Password. This connects the plugin with your Stamps.com account and all the shipments, postage and shipping label generation is charged to this account Additionally, you can toggle Debug Mode for debugging and testing purposes. 
Stamps.com – USPS Insurance:
The plugin can be used to purchase insurance for shipments through Stamps.com. Providing insurance coverage for your shipments especially for international shipments can come in handy and instills a level of trust in your customers. Insurance claims are usually processed in under 7 to 10 days. To opt for Stamps.com package insurance, tick the checkbox next to Insurance under the Common API settings of the General Settings tab.
Enabling WooCommerce USPS Shipping Rates:
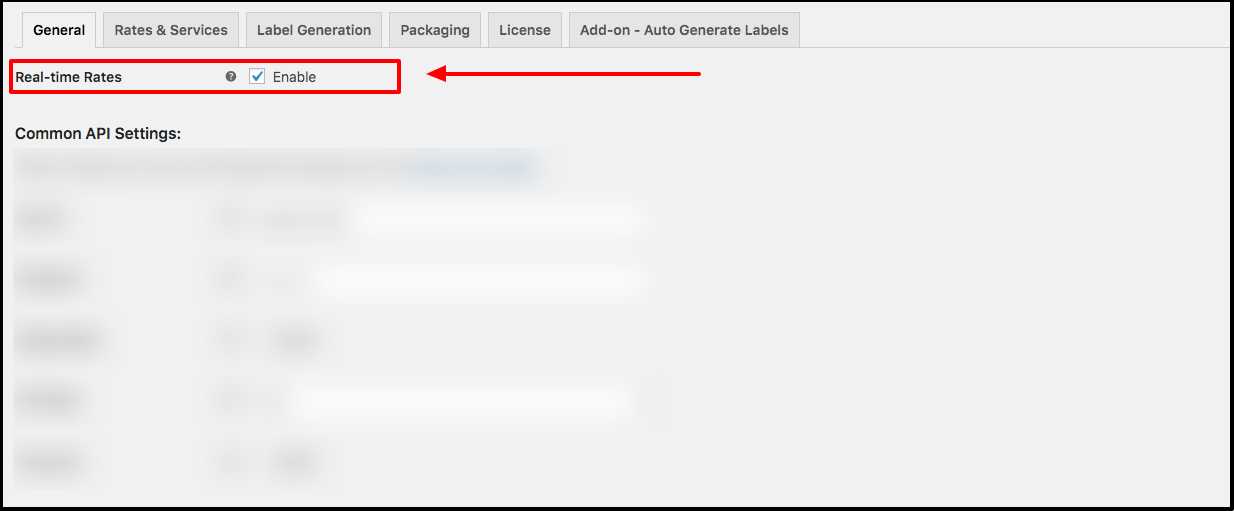
Enabling Live USPS Shipping rates on your WooCommerce site using the plugin is as simple as navigating to the General Settings tab of the plugin and ticking the Real-time Rates checkbox.
The ELEX Stamps.com Shipping Plugin with USPS Postage for WooCommerce will fetch live USPS shipping rates from Stamps.com USPS based on the origin and destination address and display them to your customers when they add products to their cart. This is extremely beneficial to customers as they will not have to leave your site to calculate the shipping rates. This reduces the chances of abandoned carts and will reflect in increased conversions and sales on your WooCommerce site.
Configuring USPS Shipping Rates:
Furthermore, the plugin lets you configure the USPS shipping rates returned from the USPS servers You can choose to enable or disable the displaying of Cheapest Rates. When enabled, the plugin will only display the USPS shipping service with the cheapest rate to customers. The Fallback rate is used by the plugin in the event Stamps.com USPS fails to return live shipping rates. This ensures customers are shown shipping rates regardless of whether USPS servers them.
Under the Rates and Services tab, you will find a list of all USPS shipping services that can be enabled on your WooCommerce site. You can enable whichever service by simply ticking the checkbox next to the service. Furthermore, you can also give a unique and descriptive name for the USPS services and this is used when displaying shipping options to your customers. The plugin also provides Price Adjustment fields, by which you can increment or decrement the price of the shipping services by a fixed amount or by a percentage.
Customers who visit your WooCommerce site and add items to their cart will see the enabled USPS shipping options accompanied with the Live USPS shipping rates. The plugin sends an API request to the Stamps.com USPS servers with information regarding the type of product being shipped, destination and origin zip codes, and the USPS service used to ship the product. The returned shipping rates are then displayed to the customer.
Configuring WooCommerce USPS Shipping Labels:
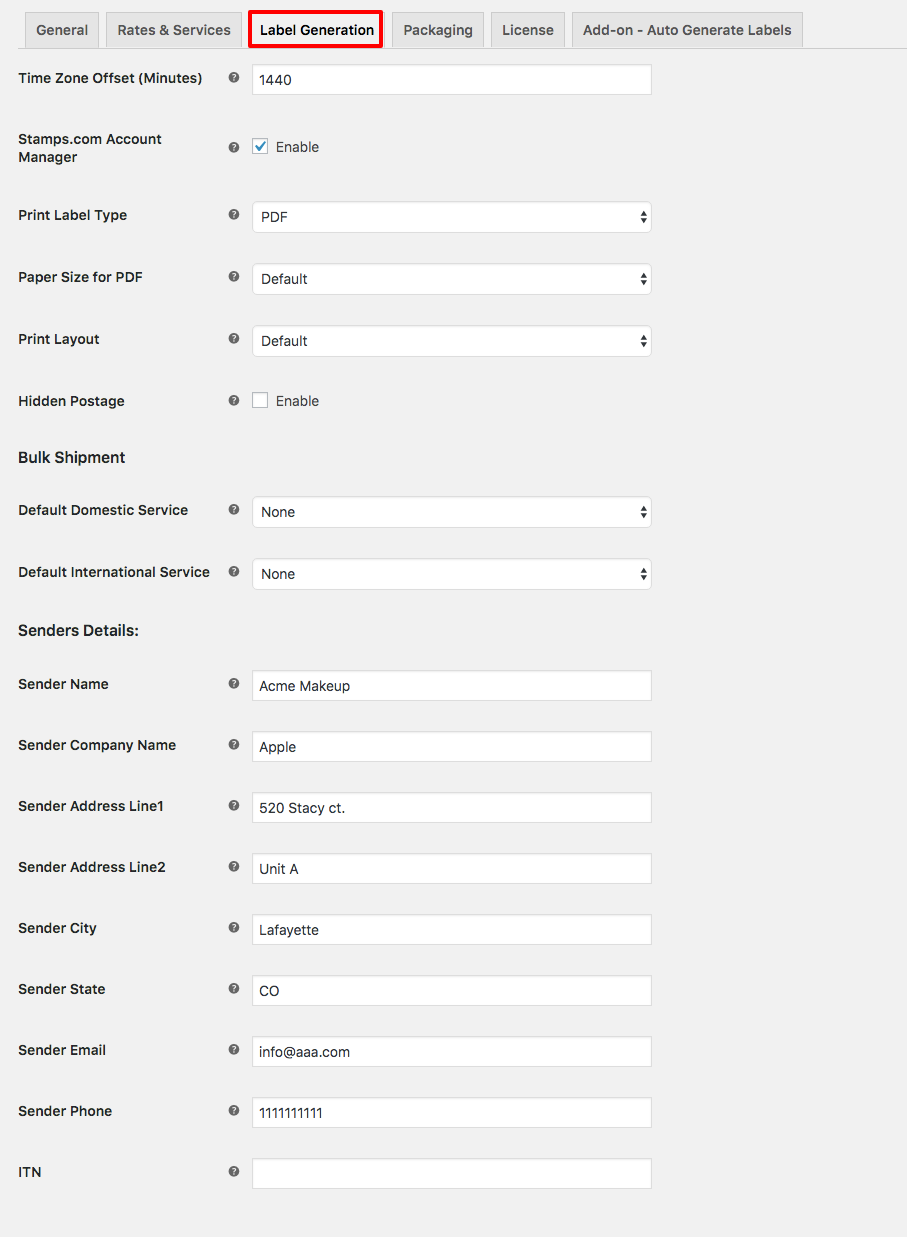
All the settings used to configure the generation and printing of WooCommerce USPS shipping labels can be found under the Label Generation tab of the plugin settings.
The plugin lets you set the format of the generated shipping labels, the paper size of the labels, and even the layout. You can use the Print Label Type, Paper Size for PDF and Print Layout fields in the Label Generation settings for this purpose.
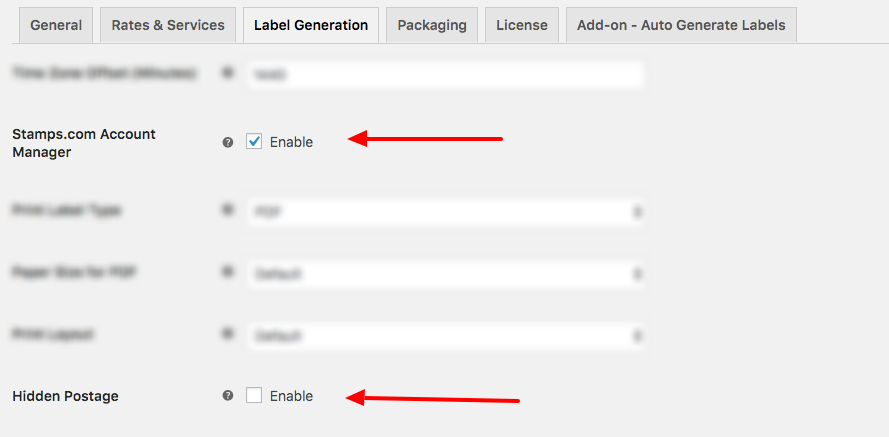
For WooCommerce store owners that wish to hide the shipping services and rates used to ship the products on the Shipping Labels, there is a Hidden Postage checkbox. Enabling it will exclude these details from being included in the generated labels.
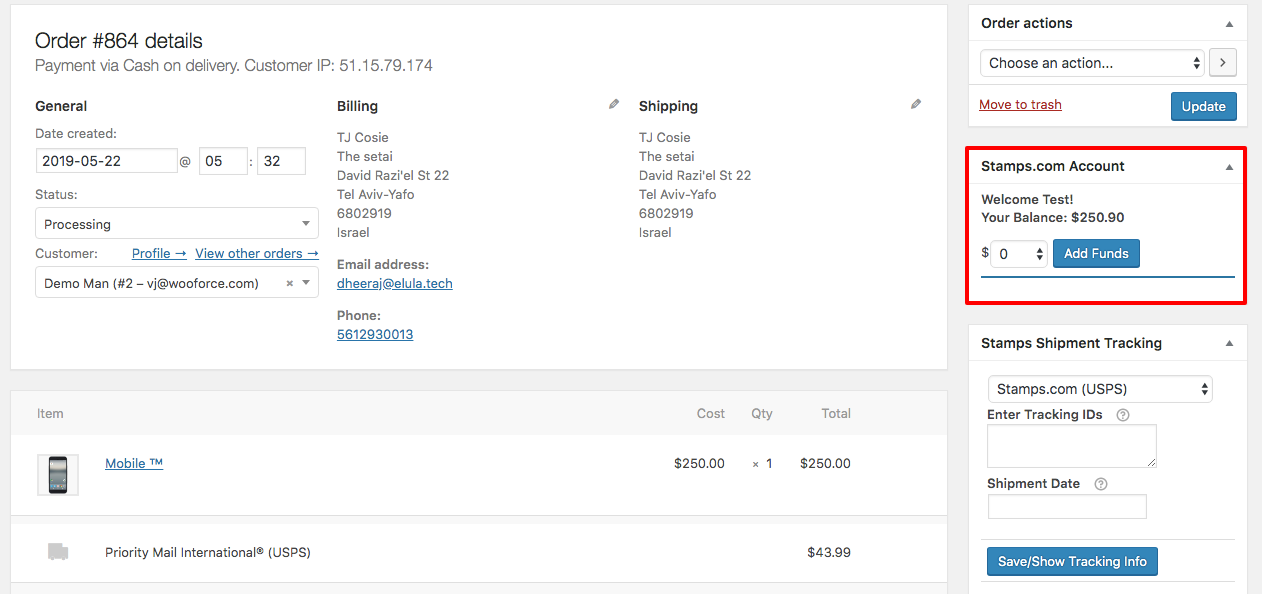
The plugin also features the ability to integrate Stamps.com account manager into your WooCommerce Orders page. Using this, you can monitor the balance of your Stamps.com account and even add funds straight from your WooCommerce Orders section.
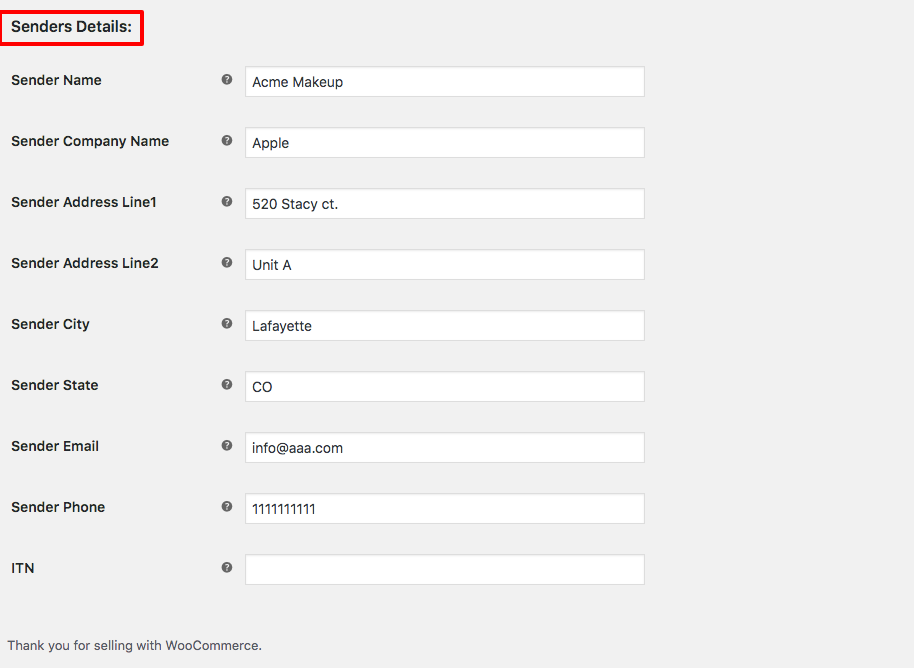
For the plugin to be able to generate shipping labels calculate USPS live shipping rates, it’s important to provide the Origin address. You can do so using the Senders Details section of the plugin where you need to enter the address of the sender in detail.
The plugin also features the ability to include International Transaction Number(ITN) in the generated shipping labels.
Using the plugin you can generate bulk shipments as well. From the WooCommerce Order page, you can select all the orders that you wish to generate packages and shipping labels for. Using the Bulk Shipment section you can choose which USPS service will be used for the bulk order action’s shipment and label creation.
To create consolidated PDFs containing shipping labels from multiple orders, you can use the ELEX WooCommerce Stamps.com USPS Bulk Label Printing Add-On. The addon also features a lot of useful functionalities that help in simplifying the process of bulk shipment creation and bulk label creation.
Printing USPS Shipping Labels:
To generate USPS shipping labels for orders, you need to access the Order page in WooCommerce. Here, you can access orders individually, edit billing, shipping addresses, add or edit customer notes and perform individual or bulk Order actions. Using the order actions you can email invoices to customers, resend order notifications and alter download permissions.
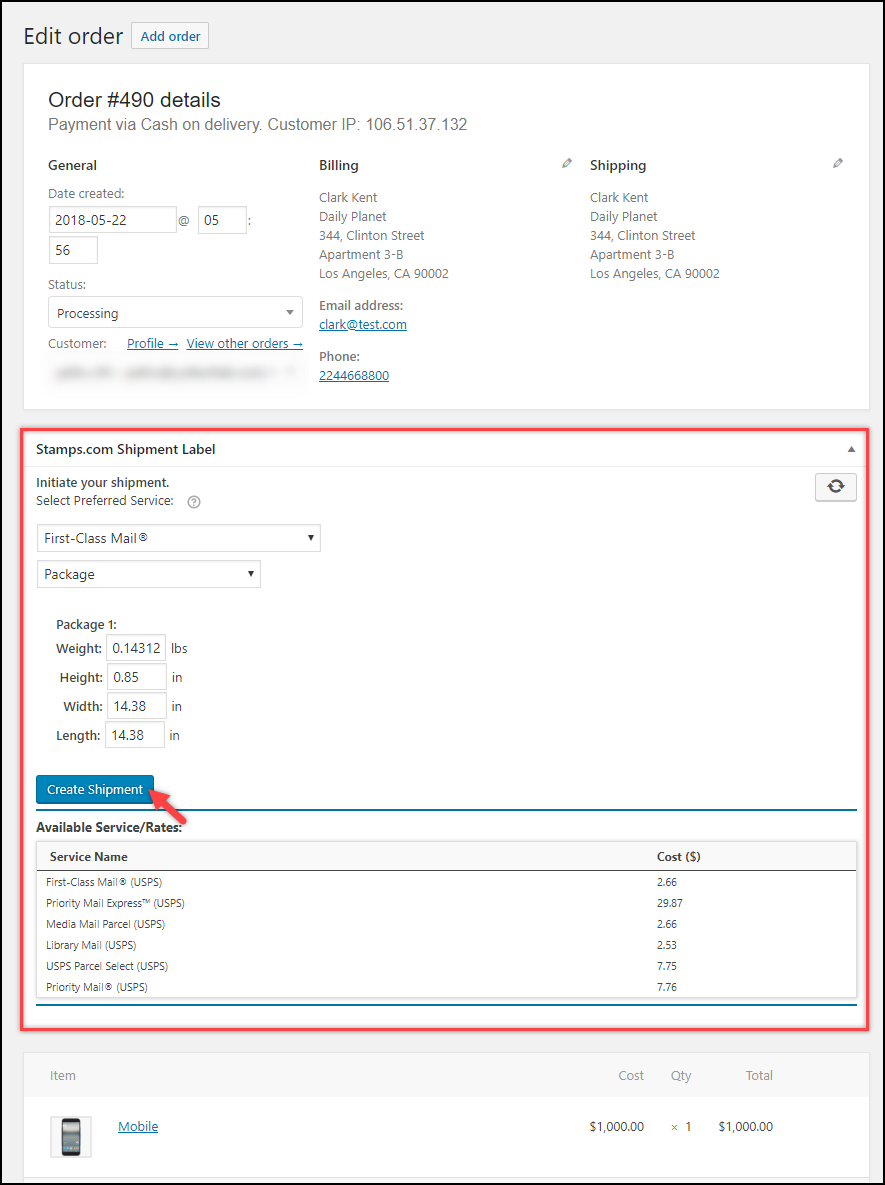
From the Order Admin page, navigate to the order that you wish to generate shipping labels for. Here you will find the Stamps.com Shipment Label section. To print USPS shipping labels for this order, a package has to be generated first. Click on the Generate Packages button. 
Order details are sent to both you and your customers once the shipment is created. The ELEX Stamps.com USPS Auto-Generate & Email Labels Add-On can be used to automatically mail tracking details and USPS shipping labels to customers based on the status of shipment.
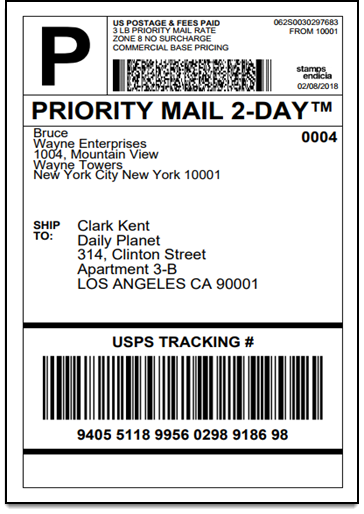
Click on the View Label button after generating the shipment and shipping label. This will download the generated shipping label onto your machine and you can proceed with printing the label. A sample USPS shipping label generated using the plugin looks like this:
Other Alternatives:
Apart from the ELEX Stamps.com Shipping Plugin with USPS Postage for WooCommerce, there are more plugins from ELEX that can be used to enable real-time rates and print USPS shipping labels. If you are an e-VS (electronic verification system) approved vendor, you need a USPS plugin that can handle the generation of USPS e-VS shipping labels along with enabling USPS real-time shipping rates. Electronic Verification System provides special shipping rates and services for customers that ship in high volume only. `The
ELEX WooCommerce USPS Shipping Plugin with Print Label features seamless integration of e-VS services and can print e-VS shipping labels and SCAN forms from Woocommerce itself. Visit the demo site to try out all the features of this plugin.
If you need the integration of multiple shipping carriers on your WooCommerce store, the ELEX EasyPost (FedEx, UPS & USPS) Shipping & Label Printing Plugin for WooCommerce helps integrate shipping services and products from not only USPS but FedEx and UPS as well. This plugin can be configured for printing shipping labels for USPS, FedEx, and UPS. Also, you can enable live shipping rates from all three shipping carriers. Visit the demo site to try out all the features of this plugin.
Conclusion:
Displaying USPS shipping rates to your customers right on your store page ensures customers don’t abandon their carts and visit other sites to calculate shipping. Also, printing shipping labels straight from WooCommerce helps you save time, money, effort and can help you increase the operational efficiency of your fulfillment process immensely. To that end, we have gone over the steps involved in enabling Live USPS shipping rates and printing USPS shipping labels using ELEX Stamps.com Shipping Plugin with USPS Postage for WooCommerce. Apart from this, the plugin can also be used to
- Adjust prices of WooCommerce USPS Shipping services.
- Ensure packages with insurance.
- Generate bulk shipments and more.
- Pack items into custom boxes.
- Enable Live Shipping Rates and Delivery Tracking.
- Generate Order Summary/Manifest
You can find more information about the plugin here.


