Do you want to make it easier for customers to get a quote or an estimate from your company? Including shipping calculator plugins on your website allows clients to make fast choices, which results in more business for you. Customers’ perceptions of your brand are heavily influenced by shipping. Customers obtain a high-quality shipping experience when everything comes together, from the quickness with which they receive a product to the cost of shipping. In this article, we will show you how to Calculate Shipping Cost with the help of a WooCommerce Shipping Calculator.
Shipment is a topic that makes many E-Commerce store owners anxious. The reason for this is because they have a lot of issues with shipping. There are numerous Shipping Plugins in WooCommerce that can help you close the transaction.
According to a BigCommerce poll, the top three criteria that influence whether or not customers shop are pricing (87 percent), delivery costs (80 percent), and discount offers (71 percent ). According to SmallBizTrends research, if shipping prices are excessively expensive, 28 percent of shoppers will abandon their shopping cart. It’s possible to lose a lot of money if you don’t show your consumers the shipping rates upfront, and it’s also possible to turn away potential customers by confusing them with shipping procedures. That’s why having a Shipping Calculator on your company’s website is so crucial.
What is a Shipping Calculator, and how does it work?
In layman’s terms, a shipping calculator allows you and your clients to calculate the cost of shipping their product depending on its weight, shipping service type, COD availability, measurements, and distance between pick-up and delivery destinations.
When it comes to businesses that require their customers to ship things regularly to their warehouse or office, a shipping calculator is a godsend to them. It is vital for helping your clients ship products to your business by evaluating various shipping options and pricing depending on package weight, volume, and distance.
Shipping Calculators are available from most major shipping companies, such as USPS, UPS, and FedEx. All of the top features of these shipping calculators have been merged in the ELEX WooCommerce Shipping Calculator, Purchase Shipping Label, and Tracking for Customers Plugin. With the help of this plugin, you and your customers may quickly calculate the precise shipping cost.
The following are some of the advantages of using a shipping calculator:
- Allow your consumers to see exactly how much shipping will cost before they place an order.
- Shipping costs can be calculated instantly.
- Print shipping labels and obtain tracking information.
- Costs of shipping are calculated based on the size and location of the package.
- Lots of options for predefined packaging.
- Custom Emails with Labels and Tracking Details can be automatically sent out.
- By avoiding having to contact your consumer back with a shipping cost or making them wait for a quote, you can reduce order friction.
- Cut back on employee workload and resources.
- Increase the accuracy of freight cost recovery.
- Avoid stifling sales by imposing exorbitant delivery fees on orders.
Using a WooCommerce Shipping Calculator to calculate shipping costs

The EasyPost shipping service is supported by the ELEX WooCommerce Shipping Calculator Plugin. When you sign up for an EasyPost account, you’ll be given an API key to input into the plugin. It currently supports FedEx, UPS, USPS, and Canada Post through EasyPost.
For instance, suppose you need to ship a product from New York to Los Angeles. To do so, you’ll need to choose a package depending on your product’s weight and dimensions, as well as the most cost-effective shipping service by comparing rates and expected arrival times. The shipping label must then be printed and the tracking information obtained. In a world without the internet, you’d have to go to the post office or shipping carrier’s office and have the parcel weighed and measured on the spot, then pay the shipping expenses.
With our shipping calculator plugin, you can determine the exact delivery expenses in just a few clicks without leaving the comfort of your house. You don’t even need to go to another third-party website. Let’s look at how to select a shipping service, print the label, and receive the tracking link using the Shipping Calculator Plugin using the example above.
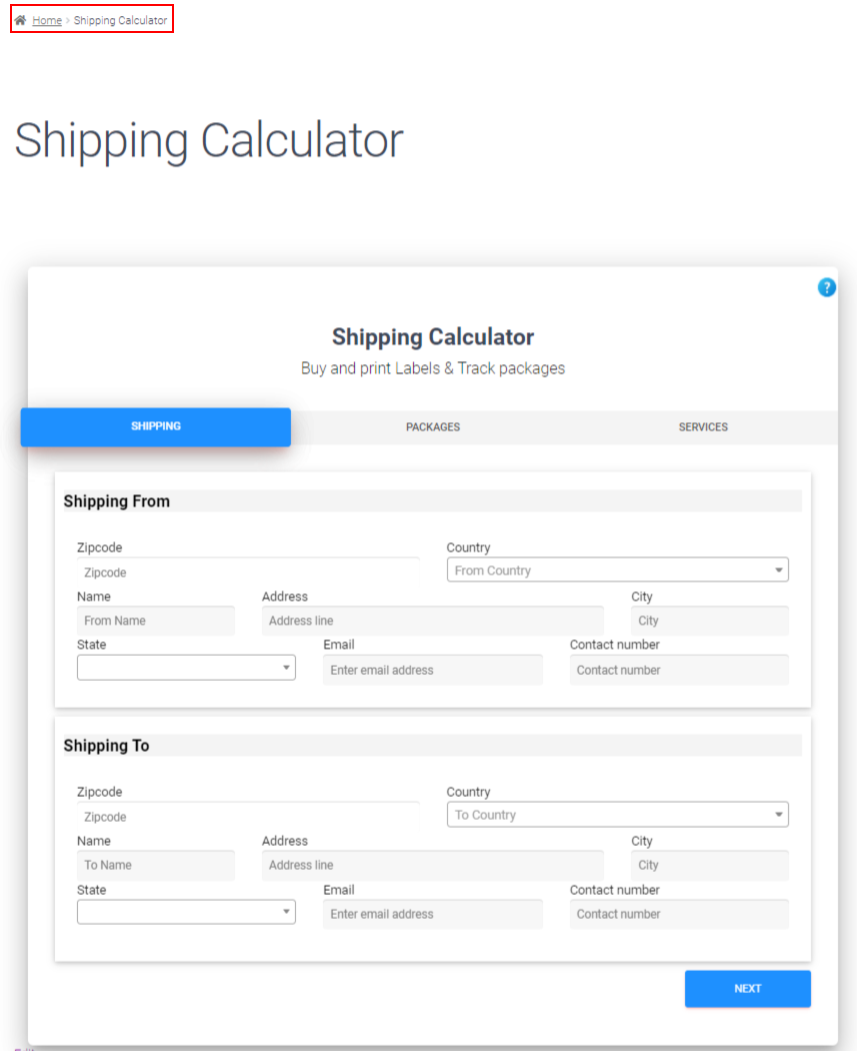
Go to your website’s Shipping Calculator page, and the SHIPPING tab will appear in a new window. (Follow the steps in the product documentation to learn how to configure the plugin from scratch.)


You can bulk-generate packages by putting the weight and dimensions of several products into a CSV file. If you wish to make a custom package, select Custom Packaging from the drop-down pickup list and enter the weight and measurement units.

Select Carrier Packaging from the drop-down menu and select the desired choice to use EasyPost’s carrier packaging. After selecting the desired package, you can enter the item’s weight according to the specifications. The weight and dimensions of each product should be entered individually into a CSV file if you wish to create multiple labels at once. You can obtain a sample CSV template by clicking the ‘sample template’ link. Fill up the template’s data, save it, and upload it by selecting a file from your device. Each item’s weight, height, length, and width can be entered individually. After that, save it and upload it.


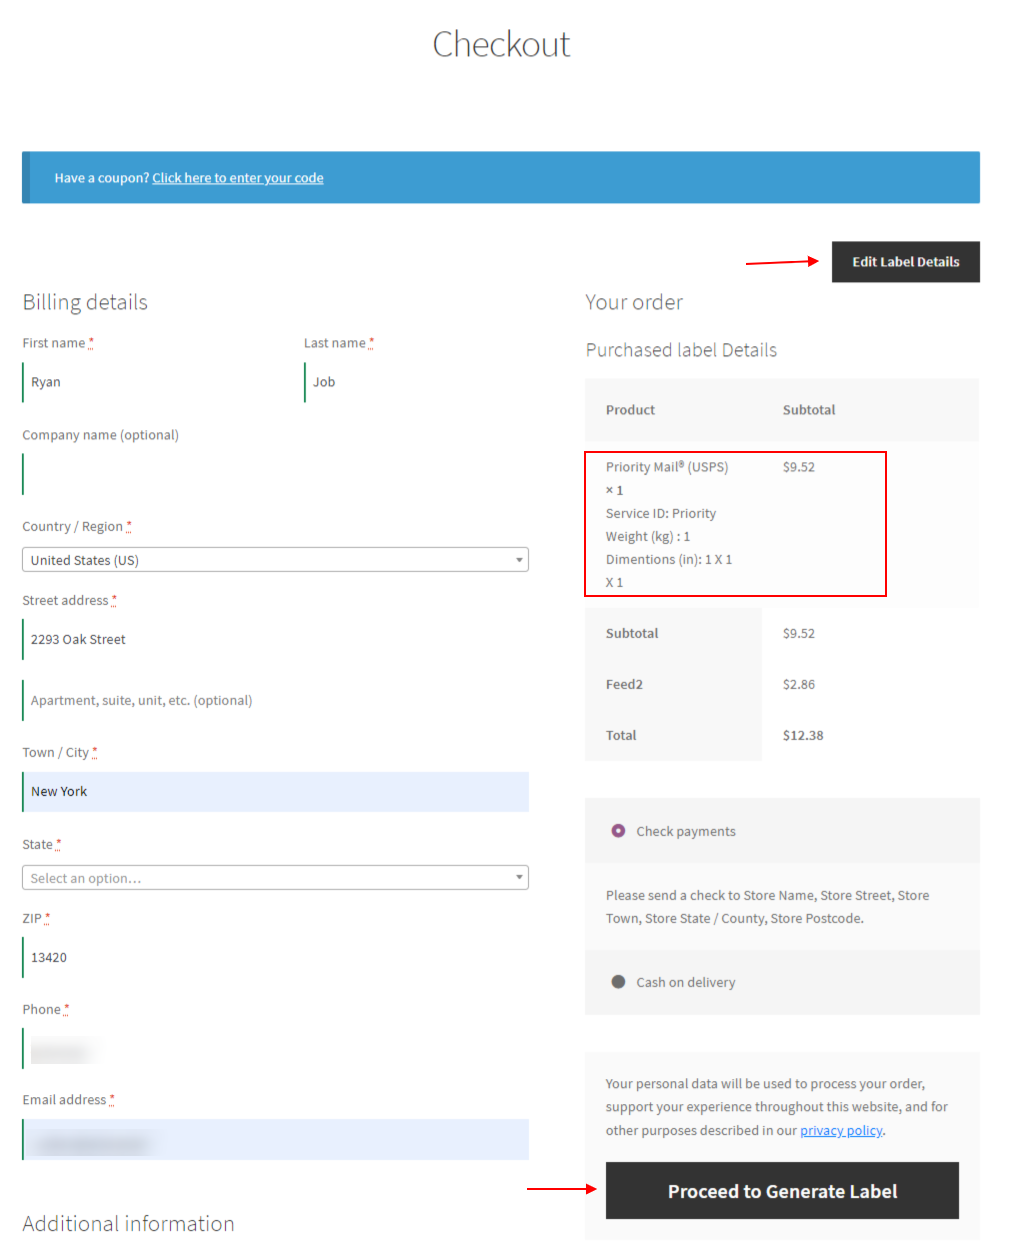
A new page will open up for you, directing you to the Checkout page. You can now place an order to have the labels printed and the tracking links emailed to you. A handling fee you specify in the Rates and Services settings will be added to the subtotal if you have selected one.

A new page with the custom text you selected for successful label generation will open if the label was successfully generated. You’ll find links to download labels and view tracking information at the bottom of the page. You will be redirected to a new page where you can download the shipping label after clicking the link to download the label. You’ll be redirected to the EasyPost tracking website after clicking the tracking link. The Label Generation Error Message will appear if the label generation fails.

The customer can navigate to My account > Orders to double-check the created label and tracking URL. They can see all of their orders and then click the view button to go to the individual order page, where they can print the label and get the tracking link.

Further reading
- How to add a Shipping Calculator on the Product Page of your WooCommerce Website?
- The Best WooCommerce Australia Post Shipping Calculator for your eCommerce Store
- Best WooCommerce Catalog Feed Plugins for Facebook


