A quote is usually a request for a price for the products to the store owner from a potential buyer. With an ideal Request a quote option, you can facilitate the customers to place a quote request on your store. In this article, we take a look at the step by step process to enable WooCommerce Request a Quote popup for your eCommerce store.
Let’s get to it in detail without much delay. If you are interested to know more about the plugin, you can always visit the product page.
WooCommerce Request a Quote Plugin
Here for ease of use, we make use of the freemium plugin ELEX WooCommerce Request a Quote plugin. The plugin’s free and premium versions have a plethora of features that make it an ideal one for your WooCommerce store. Here are a few features of the plugin for reference:
- Lets you easily place the Add to Quote option on your store as well as customize the same.
- Allows you to hide or show an Add to Cart option for your store.
- Easily create and customize forms to collect essential details from the customer.
- Excellent mapping of data fields to the existing WooCommerce product attributes which makes order processing quicker.
- Does support both simple and variable products.
- You can create a lightbox popup view for accepting the quotes. (explained here)
- Trigger email notifications to customers and store owners.
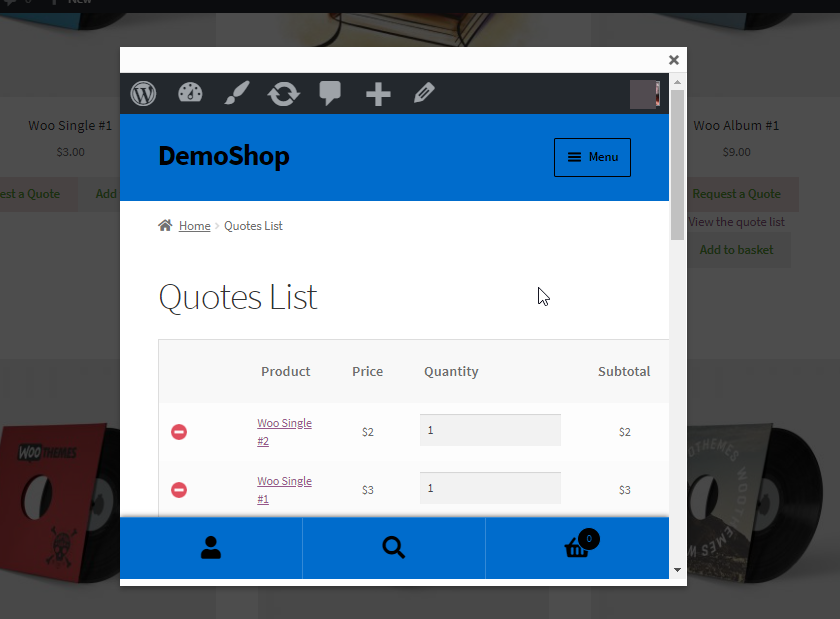
Now let us see how to easily enable the popup view option for your custom quote request form in your store. The popup view looks like as shown below:
Step by step guide to enable WooCommerce Request a Quote popup for your eCommerce store
To obtain a WooCommerce Request a Quote popup for your eCommerce store, firstly install and activate the plugin on your WooCommerce store. Once done, you can follow these steps to enable the Request a Quote option to successfully work on your store.
Step 1: Download and Install the plugin
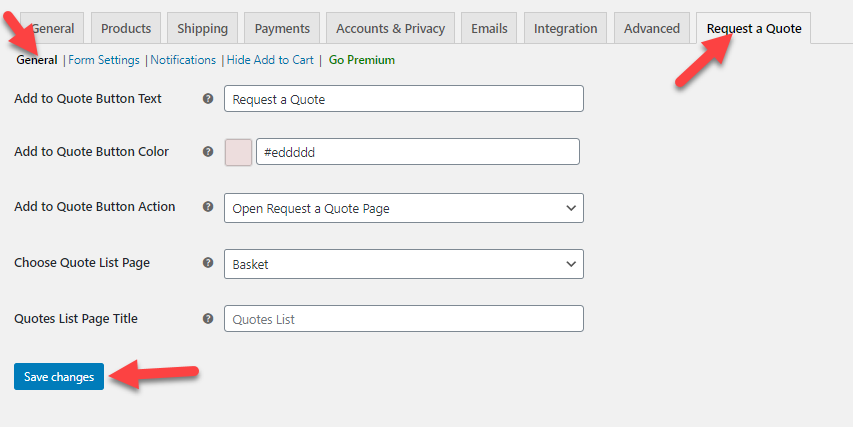
Once the plugin is installed and activated go to the Dashboard > Plugins > Installed Plugins > ELEX WooCommerce Request a Quote Plugin> Settings. The image below shows the settings of the plugin as shown in the image below:
As shown in the image above, there are mainly four settings to be done, they are:
- General Settings.
- Form Settings
- Notifications
- Hide Add to Cart.
Let’s get to know each setting in detail and gradually we will show you how to get a popup window to fetch the quote request from your customer.
Step 2: Enable the Add to Quote option and Customize in the General Settings
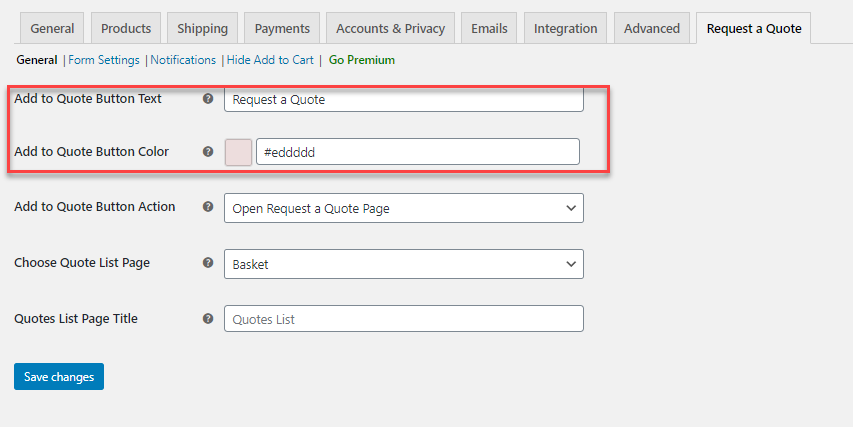
The general settings of the plugin will help you set the general behaviour of the plugin. This is where we decide where to place the quote request option and how it should look like in the front end. The setting will look like as shown below:
- Add to Quote Button Text: Here you need to provide a text that will appear on the button in the front end.
- Add to Quote Button Color: Here choose a colour for the “Request a Quote” button.
Step 3: Provide Add to Quote Button action
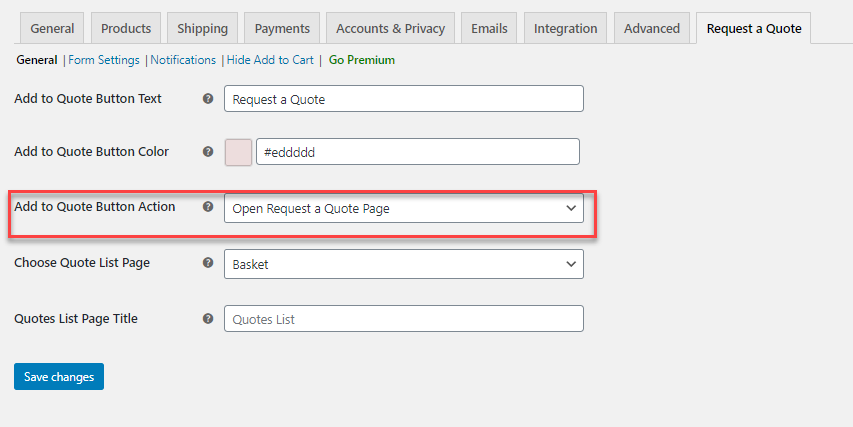
In the plugin General settings, you can set the action to be performed when the Add to Quote button is clicked. As you can see in the image below, you can choose an option from the same.
Add to Quote Button Action: Choose an action that follows when the “Request a Quote” button is clicked.
Here you have two options again:
1. Open Request a Quote Page: Upon choosing this option, whenever the customer clicks the “Add to Quote” button, the quote page will open up for customers to enter the product and their respective quantity for submitting the quote. When the customer clicks the button, a hypertext “Browse the list” will appear beside the “Add to Quote” button as shown in the image below:
When the customer clicks the hypertext, customers are taken to a Quote list page. The page contains the quotes to be submitted and a form to fill in the customer’s details. The customer is free to add numerous products on the quote list before submitting the quote request.
2. Open in a lightbox: This setting lets you open up the Quote list page as a popup window on your store. You can also set the dimensions of the popup window using the settings as shown in the image below:
Once the settings are saved, the pop-up window will look like as shown in the image below:
Here also you can enter the quantity, add products, and also fill the form to submit the quote request to the store admin.
Step 4: Choose a unique Quote listing page option
Choose the page you want to display the quotes. By default, we use the Quotes List page on the demo store as shown in the image below:
To create the page, you can make use of the short-code – “[elex_quote_request_list]” on your WordPress WooCommerce store.
Also, set the page title in the Quote List page Title option provided in the settings. By default, it is “Quote List Page”.
Once done, save the settings.
Now since you got to know how to easily enable WooCommerce Request a Quote popup for your eCommerce store, let us now set the form settings on the pop-up window to collect the quote requester details and the quote request data.
Step 5: Set up the Form Settings for submitting a quote request
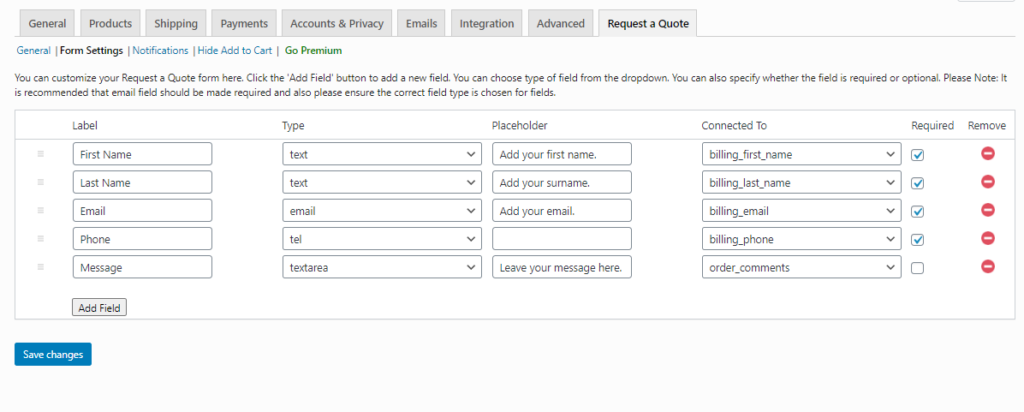
It is important to provide enough options for the customer to enter their requirements along with the quote request on the products. To do the same, we need to set up a form on the quote list page. Here the plugin has the following settings as shown in the image below to set up a simple form window.
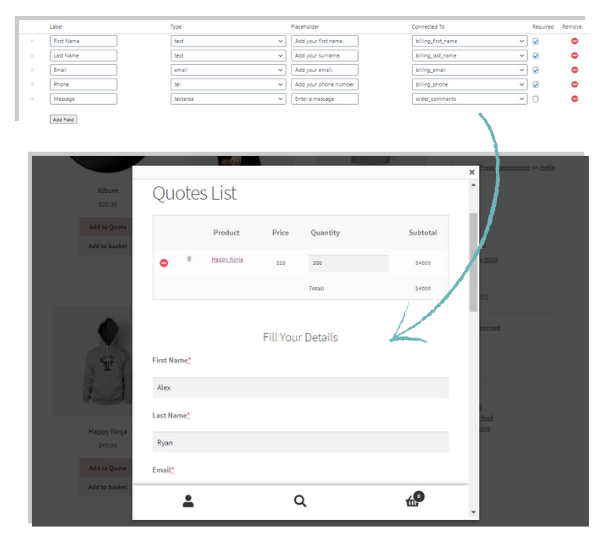
The required fields are also mapped with the corresponding variables of WooCommerce order fields, which makes the quote processing quite easy. You can enter the label, type of the field and a placeholder text etc., and then connect the values to the corresponding variables in the WooCommerce store. You can remove as well as add fields in the form without much hassle. Also, tick and enable the “Required” checkbox to make the fields mandatory so that you don’t miss out on any important data to be collected.
Once done, the form will look as shown in the below image:
Step 6: Enable Notifications to Store Admin
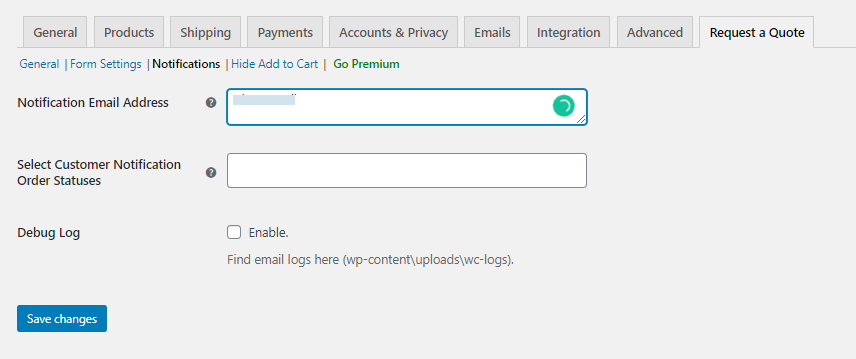
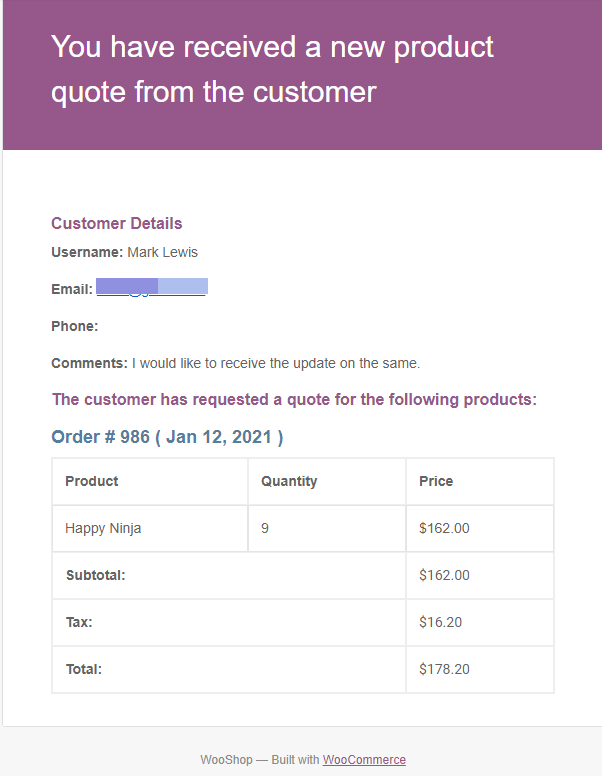
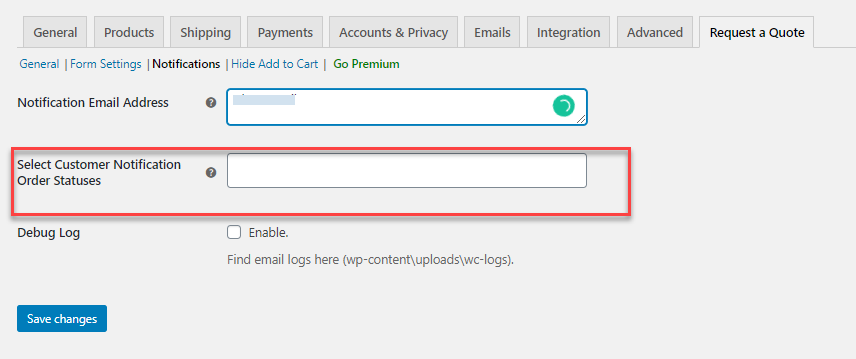
Every customer is important and hence it is important to ensure that as a store owner you don’t miss out on any quote requests. To ensure the same, you can enable admin notifications on the plugin. Here is how the notification settings will look like:
Here by default, the Notification Email Address is the store admin’s email address. Whenever a customer provides a quote request, the admin will get notified via email. You can also add multiple email addresses comma separated.
For example, whenever a customer places a quote request on your store, the store admin will receive an email notification as shown in the image below.
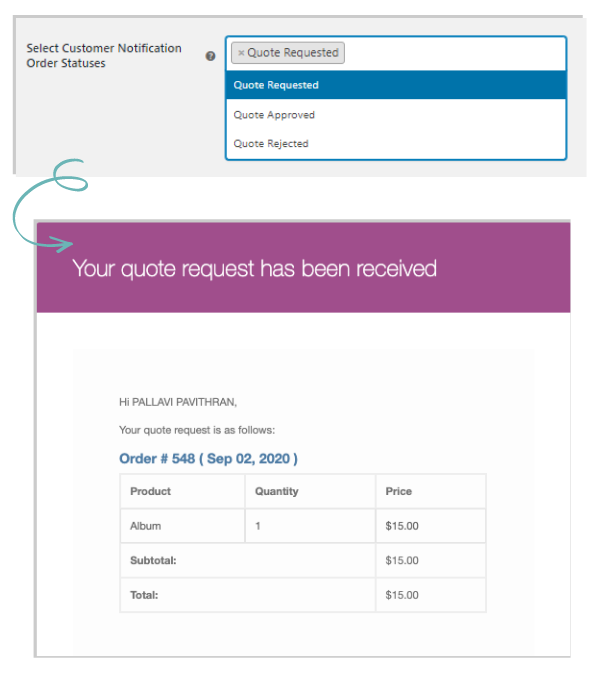
Step 7: Enable Notification to Customers
You can set the email notifications to your customer by choosing the order status from the Select Customer Notification Order Statuses. The order statuses are shown as in the image below:
Step 8: Enable Logs
To enable the logs, you just need to enable the Debug Log here. The logs can be found in the path provided alongside.
Step 9: Hide the Add to Cart
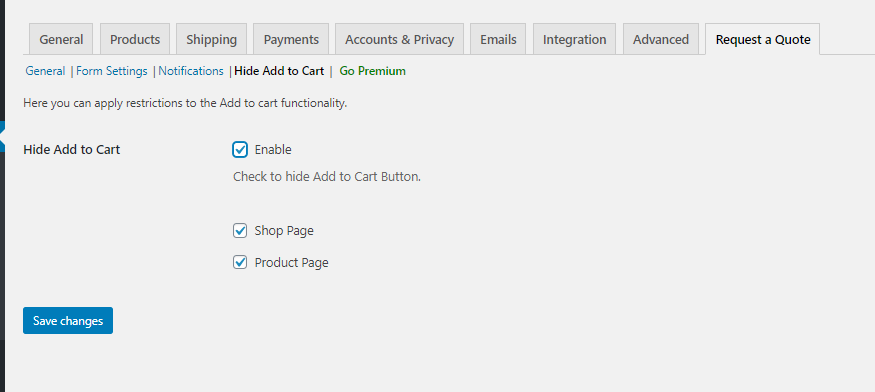
The final thing to do is to hide the Add to Cart option if you don’t intend to keep the same on the product page or the shop page. The settings look like as shown in the image below:
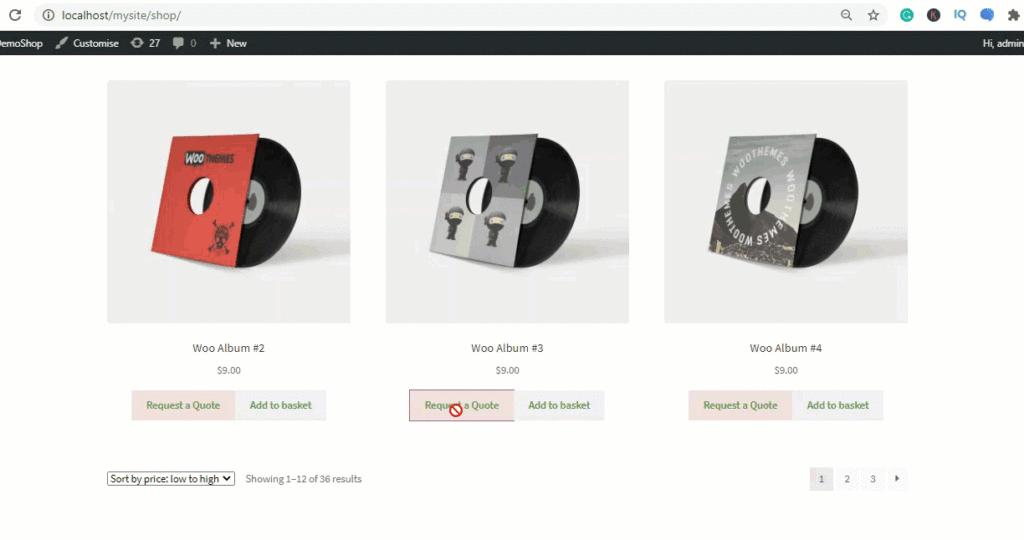
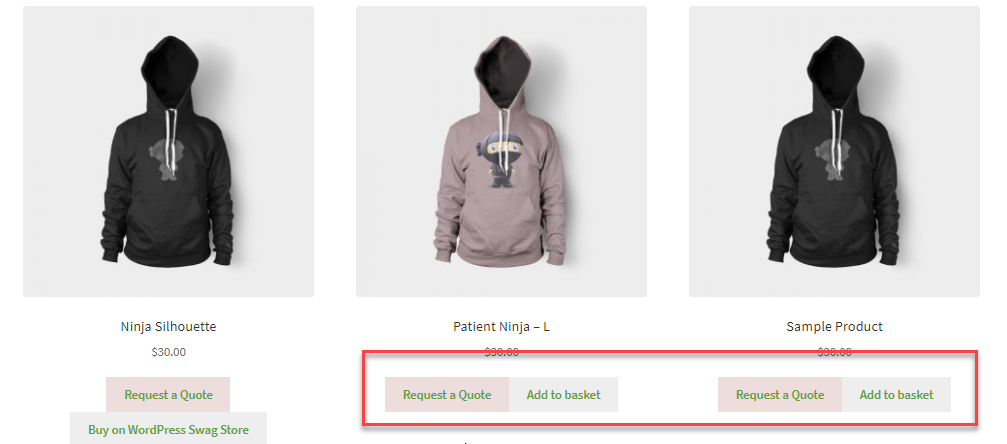
Once you enable the same settings as shown in the image above, the Add to Cart option can be hidden on the shop page as well as the product page. If you choose not to hide the Add to Cart button, you get both Add to Quote and Add to Cart together on the shop page as shown in the image below.
As said above,
Thus with these settings discussed above, you can enable WooCommerce Request a Quote popup for your eCommerce store.
Further Reading

