What can we help you with?
Box Packing: Demonstration with ELEX WooCommerce DHL Shipping Plugin with Print Label
In this article, we’ll discuss ‘Box Packing’ feature using ELEX WooCommerce DHL Shipping Plugin with Print Label. As you know that the legacy shipping options of WooCommerce are limited to some basic functionalities only, you can use them to show simple shipping rates based on shipping zones. These shipping rates remain static and you need to set multiple shipping zones for the different types of shipping methods like a flat rate, free shipping, and local pickup. You may need to add multiple shipping zones and add shipping methods for each of them.
Further, the shipping tab in WooCommerce has no mention of packing of shipments. Without an extension, you need to do the math for a better performing packing efficiency. A manual effort can lead to frequent mistakes and it can be time-consuming too. So you can use extensions that add more features to your shipping requirements. Shipping plugins at ELEX, help you show real-time shipping rates, attain a near-to-perfect packing estimation, print shipping labels, and track the packages automatically. Without any further ado let’s see more about box packing.
What is Box Packing?
Box packing is an improved packing option that maximizes the volume of packages. This is powered by an algorithm where the volume of products is used to fit the total volume of the packages. The algorithm works in such a way that the least amount of volume is left unpacked in the package. First, it fills a box based on the shipping dimension of the products until a minimum volume is left vacant and if the next unpacked object has a volume greater than the left volume, it is assigned the next box of same dimension or a bigger available box. We’ll simplify this with a sample example later in the article.
If you are looking for a packing process that considers the weight of the products, you should read about weight-based packing.
Enabling Box Packing
You can enable box packing through our integrations like USPS, Stamps.com, EasyPost which integrates USPS/FedEx/UPS, DHL, and Australia Post.
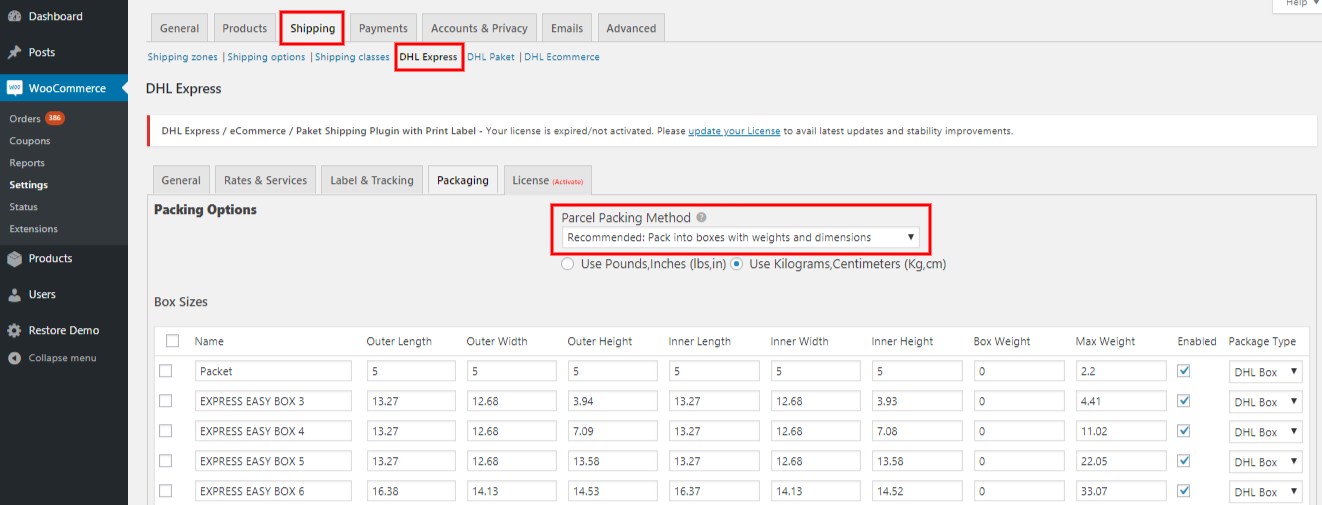
To enable box packing in each of the plugins, navigate to your Dashboard> WooCommerce> Settings> Shipping> “The Carrier”> Packing to reach the Shipping settings page.
In the packing section, the first option says ‘Packing Options’ and the options available are named ‘Parcel Packing Method‘. In simple words, the packing method is the way you pack the items. For instance, the first packing option available here is ‘Pack Items Individually’ which works on the algorithm where it packs each item in separate boxes. Similarly, ‘Pack into boxes with weight and dimensions’ is based on a logic where a default box or a box you create, is filled first. And if there is an unpacked item the second box will be considered. The screenshot below shows how you can enable box packing option with ELEX WooCommerce DHL Shipping Plugin with Print Label.
Available Box Types
When you start setting up box packing you get predefined default boxes to select from. Default boxes are not available with our USPS and EasyPost, and Australia Post shipping plugins. Stamps.com and DHL plugins contain default boxes which are physically available with these carriers. You can get these boxes from their respective sites. Or else you can add customized boxes in the ‘packing’ tab of the plugin settings. Let’s explore the box types available.
Default Boxes
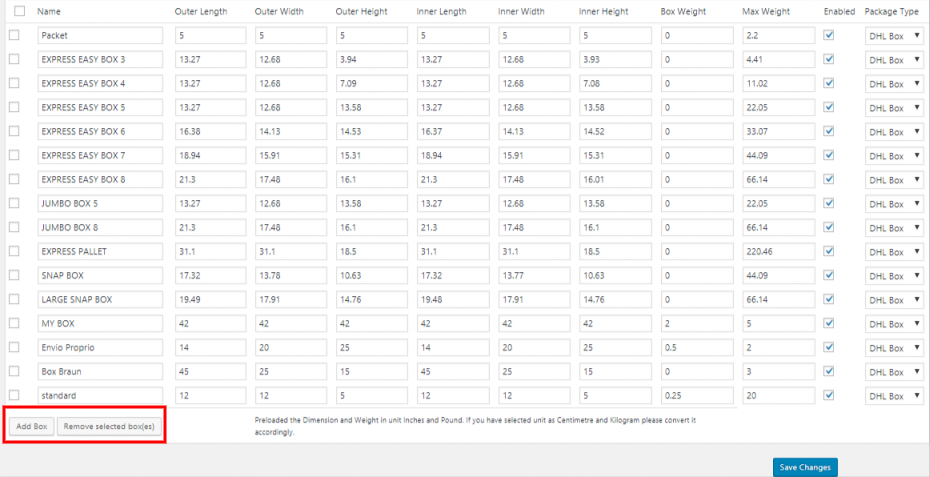
WooCommerce DHL shipping plugin comes with predefined boxes. You can check the boxes corresponding to these boxes to enable them. These boxes are standard size boxes by DHL and are designed to generalize the shipping rates based on the maximum weight a particular box can have. The dimensions are assigned in such a way that boxes can accommodate all types of objects. For instance EXPRESS EASY BOX 3 in the table of default boxes below, has an outer dimension of 13.27 x 12.68 x 3.94 cms. As per DHL, this box can carry a maximum weight of 4.4 kg. Surprisingly, EXPRESS EASY BOXES 4 and 5 are also of the same size but the maximum weight allowed in these boxes are 11.2 kg and 22.05 kg.
So it is easy to guess that, box 3 is for boxes which are large in size but are lighter in weights. Box 4 and box 5 are for items which are heavier and are of the same size as that of the items in box 3. In case of similar seized items, weight becomes the factor for the selection of the boxes. So if an object is dimensionally large enough to fit these three boxes, its weight will automatically assign the right box.
Custom Boxes
The default boxes are included for the convenience of users. These boxes are available with DHL and are widely used for shipping by DHL customers. These are also optimized for maximum packing volume. But there can be instances where you need to pack items in custom boxes. To make this possible, these plugins help you create custom boxes and select them as ‘Your Pack’. To add a new box, click on ‘Add Box’ to get the empty slot where you can enter the relevant data.

Here are a few points that you should take care of to execute these boxes properly while fetching real-time shipping rates.
- Name of the Box- Give a name that is easy to remember and is familiar to all your employees.
- Outer Dimensions-This is the dimension measured from outside of the box.
- Inner Dimensions- This is the dimension measured from inside of the box. The inner box dimension is used as the packing volume and the outer dimension is sent to EasyPost.
- The weight of the packing material- Since the combined weight of the box and the products inside are used at the time of shipping, enter a correct weight of the empty box. If you fail at entering a correct weight of the box, it will result in incorrect estimation of shipping rates and cost you more while shipping.
- Maximum Weight it can carry- Enter the maximum weight that can be put in a particular box.
Shipping Dimension of products
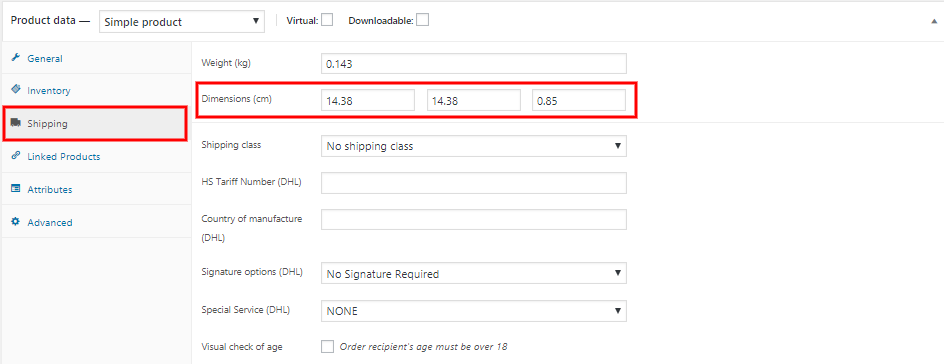
Product dimensions should not be confused with shipping dimensions. The weights and the dimensions of a product can be entirely different from its shipping dimensions. For instance, the product dimension of a smartphone can be 6.5”x 3.5″ x 1′ but the shipping dimension for the same will be somewhat similar to 8″ x 5″ x 4.5″. This is due to the fact that the smartphone comes with other accessories packed in the same box. Or consider a cylindrical glass jar. The product dimensions here can be 5″ x 3″ x 3″, but this dimension should not be your shipping dimension as fragile products need to be packed with some padding and protective materials. So the dimension which you get after the padding should be your shipping dimension.
The dimension you enter in the shipping tab of any particular product is the shipping dimension. And these shipping dimension is used by the shipping plugins to fill the inner volume of the default or the created boxes.
A Sample Case
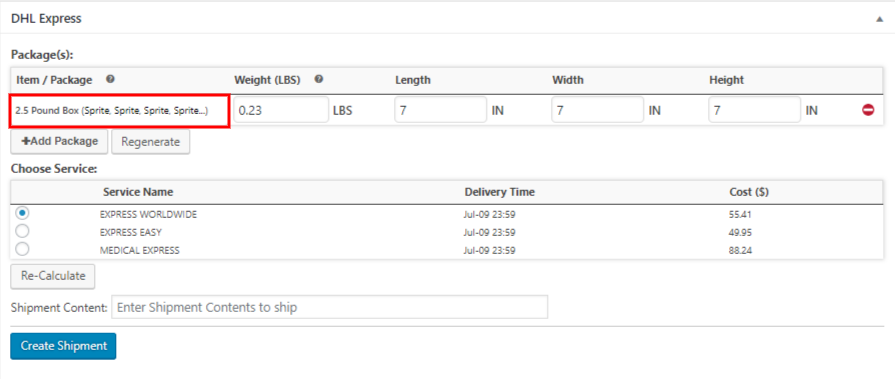
Now we’ll see a sample case and see the impact of different boxes selected and the respective shipping rates. Let a product, “Sprite”, of weight 0.6 pounds/can and dimensions 7″ x 3.5″ x 3.5″, be in the cart. This is the shipping dimension of the product. And we’ve created two boxes which have the different packing volume with inner dimensions of 7″ x 7″ x 7″ and 14″ x 7″x 7′. Mathematically, these boxes can have 4 and 8 of such “Sprite” cans respectively. Further, 2.5 POUND BOX can have a maximum of 2.5 pounds and 5 POUND BOX can have a maximum of 5 pounds. Now we’ll see the how the selection of boxes happens with the use of debug data.
But first here is the cart page with one item in it.
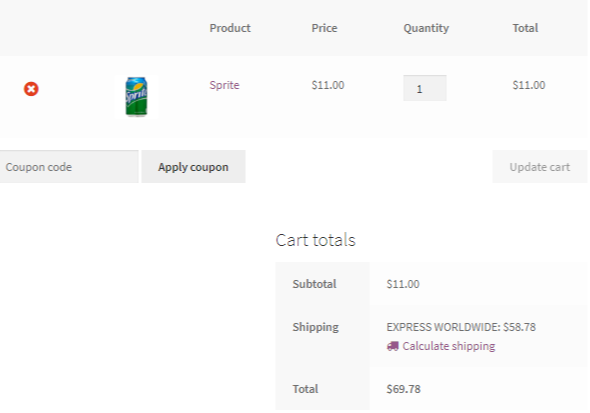
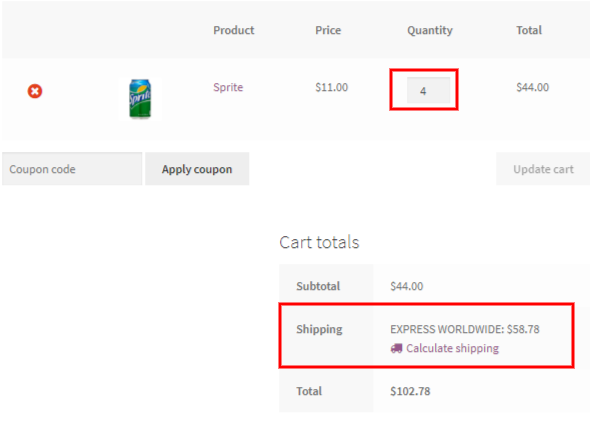
If we have up to 4 sprite cans in the cart only one box is selected.
The Edit Order Page
As soon as we add more than 4 sprite cans.
- Either a 2nd 2.5 Pond Box is chosen,
- Or the larger box is chosen.
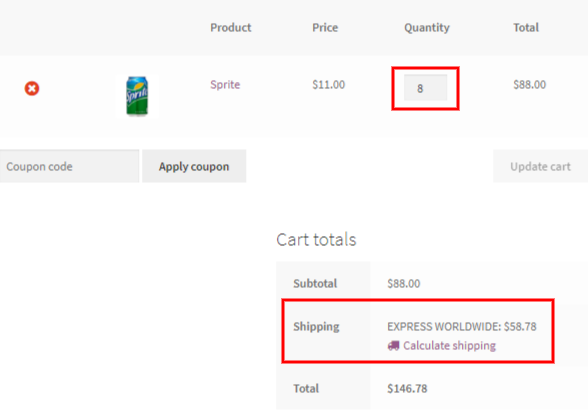
In our case, since the larger box is eligible to carry 8 such cans, it is chosen for packing all the eight cans. Also, the total weight of 8 cans sums up to be 4.8 pounds, which is less than its maximum capacity of 5 pounds. The debug log also shows that only one box is selected with a single ‘packed’ message.
Note: If you keep the maximum allowed weight of the 5 Pound Box less than 4.8 pounds, the plugin chooses two 2.5 Pound Boxes to pack the items.
The Edit Order Page
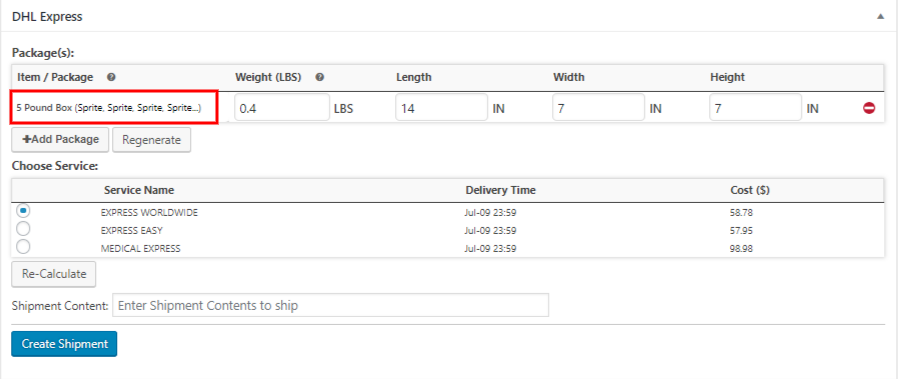
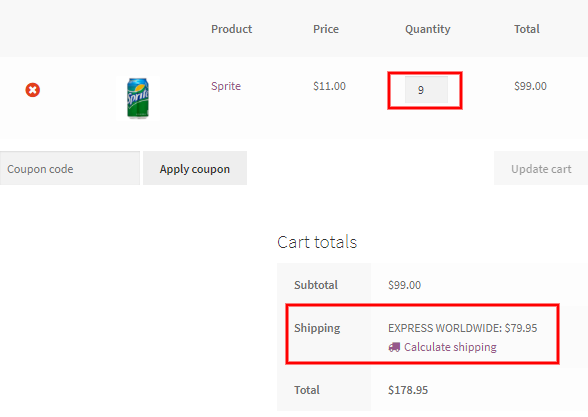
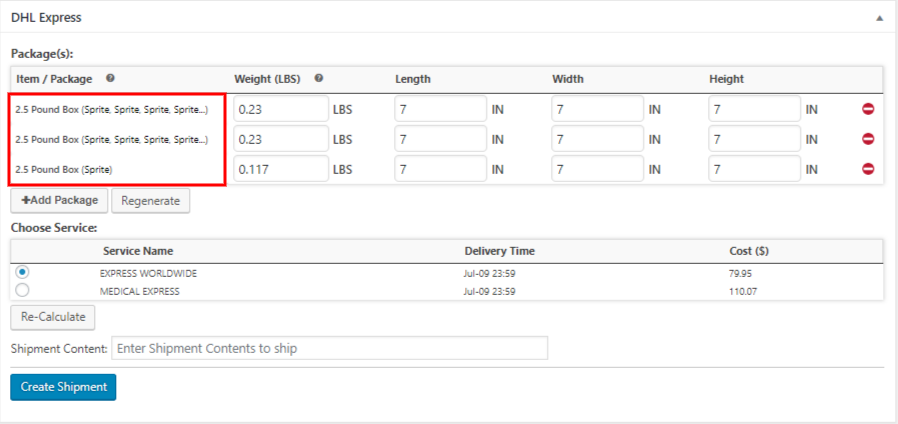
Finally, we’ll delete/disable the larger box and see the number of boxes selected to pack more than 4 (capacity of one small box) cans. With this, we can expect three small boxes to be used as the large box is not available.
The screenshot below shows the change in the shipping costs when the 9th can is added to the cart.
The Edit Order Page
How to Confirm Box Details
You can confirm the number and name the box used during each order at two places. First is the debug messages and the other is the edit order page. The edit order page shows the number and name of the boxes used.
Through Edit Order Page
Click on ‘Generate Package’ button in the Edit Order page to get the box in the screenshot below. You can go the order edit page by navigating to your Dasboard> WooCommerce> Orders> Order Number. Once you are on the edit order page you can find the ‘Generate Package’ button.

Through the Debug Messages
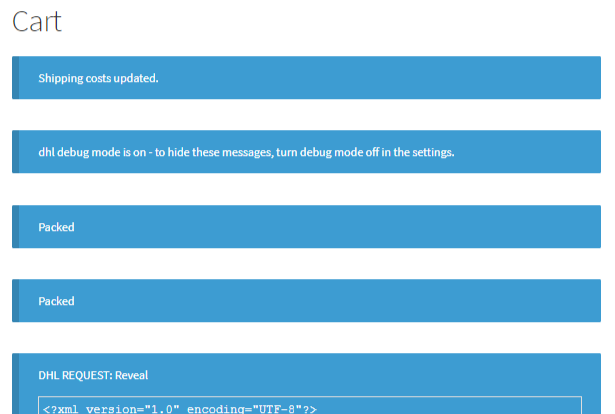
You can find out the number of boxes used in packing by the number of times the message of ‘Packed’ appears in the debug message. Every time a box is filled completely by its volume or weight, the plugins returns ‘packed’. In other plugins like USPS and Stamps.com, you get to see the name of the boxes used in the debug messages itself.
WooCommerce DHL Shipping Plugin for WooComemrce
- Cost $69.00
- Free Version
- Live Demo
- Documentation Page
- 30-Day Money Back Guarantee
- Subscription Renewal @20% Discount
Summary…
Box packing helps you economically by providing a correct estimate of the number of boxes the items in the order will use. In addition, this packing process reduces the number of boxes by effective volume based packing. In the case of Stamps.com, the stack first packing algorithm provides a refined form of box packing. Since the shipping dimensions and weight of the products become the basis of the shipping rates, you should put special attention towards them. I hope that you had a greater understanding of box packing through this article.
Visit the product page for more information. Or contact our Online Support for any technical issues or pre-sales queries. Happy Selling!
To explore more details about the plugins, go check out ELEX WooCommerce DHL Express / eCommerce / Paket Shipping Plugin with Print Label.
Read the article for setting up DHL Express understand the plugin, in detail. Or check out the product documentation section for more related articles.
You can also check out other WooCommerce and WordPress plugins in ELEX.

