In this article, we take a look at how we can add Authorize.net payment gateway in your WooCommerce store. Here we make use of the ELEX WooCommerce Authorize.net plugin to integrate.
Introduction
Providing the best-secured payment gateways for your eCommerce business is important to gain your customers. Offering online payments makes customers happier as compared to the other offline payment options prevailing in the market. And with the growing demand for online shopping, the need to offer robust solutions in terms of online payments has become quite indispensable and impending.
With the growing demand for online payments, now eCommerce businesses are looking for payment solutions that are fast, reliable, and secured. Another inevitable part is offering multiple payment methods and supporting multiple currencies. Hence before we take into consideration which payment gateways to be used, you need to understand which suits your business needs.
Authorize.net Payment Gateway

If you are on the lookout for payment plugins that are ideal for your WooCommerce store, you might find plenty of freemium plugins. Authorize.net is one of the popular choices after Stripe and PayPal. Authorize.net allows billing, eChecks, mobile payment, eCommerce checkout payments, etc. Using Authorize.net you can easily transfer payments on your WooCommerce store. Majorly Authorize.net payments work only if your store is located in Europe, the UK, the US, Australia, or Canada. It also accepts payments from major credit cards like JCB, Diner’s Club, Master Card, Visa , American Express, etc.
Why Authorize.net?
Here are some of the features that make Authorize.net an ideal choice :
- Advanced Fraud Detection.
- Supports Various Payment types.
- Allows recurring payments.
- Streamline easy checkout for existing customers using Customer information manager.
- PCI DSS Compliance.
- Easy to read reports.
Add Authorize.net Payment Gateway to WooCommerce
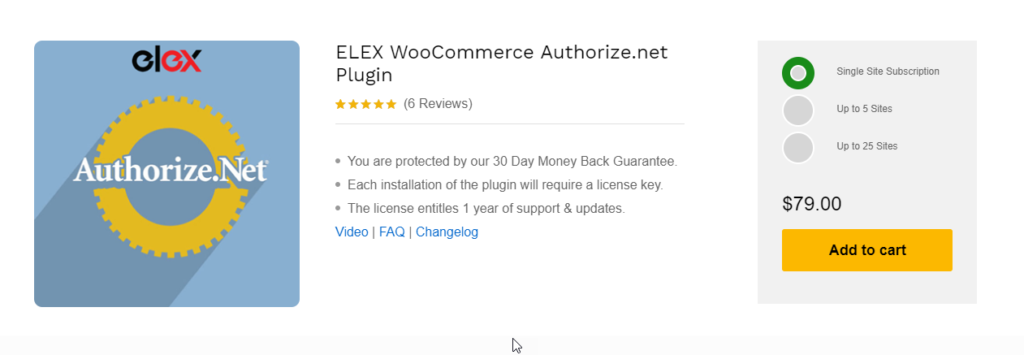
Here we make use of the ELEX WooCommerce Authorize.net plugin for showing how to add authorize.net on your WooCommerce store. The plugin is easy to integrate with WooCommerce and lets you use it with ease. Here are some of the features that make ELEX WooCommerce Authorize.net an ideal plugin for your WooCommerce store.
- Supports multiple payment methods using major credit and debit cards and eCheck payments.
- Lets you process full and partial funds.
- Also supports WooCommerce subscriptions.
- Perfectly Secured.
- It also provides an overview of transactions for better
- Excellent handy customizations
Now let us see how you can easily integrate the Authorize.net plugin to your WooCommerce store.
Step 1: Install the plugin on your WooCommerce store.
Firstly we need to download and install the plugin on your WooCommerce. On doing the same you can see that Authorize.net appears in the WooCommerce payments.
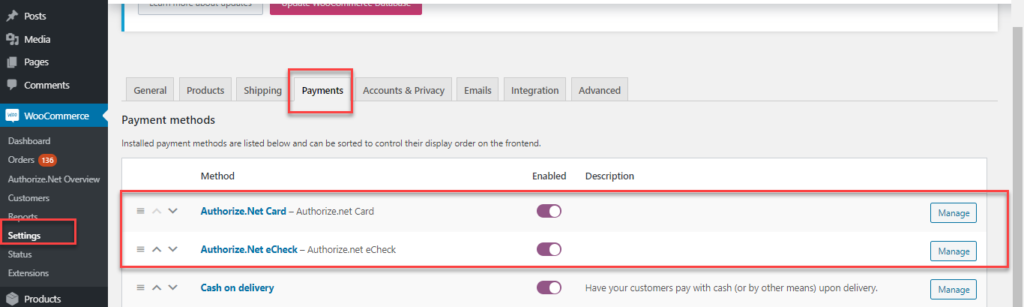
Here you need to enable the same and click on Manage. Here you can see two options with Authorize.net .
Authorize.net Card – to enable the Authorize.Net payment gateway so that payment gets accepted through cards on your online store.
Authorize.net eCheck- to enable payment options other than the card payment options. When you enable the Authorize.net eCheck to accept eCheck payments from customers having Checking, Business Checking, or Savings accounts.
Click on Manage to enable the settings.
Step 2: Setting Authorize.net Card for Your WooCommerce Store
When you click on the enable option for Authorize.net card, you get the following settings.
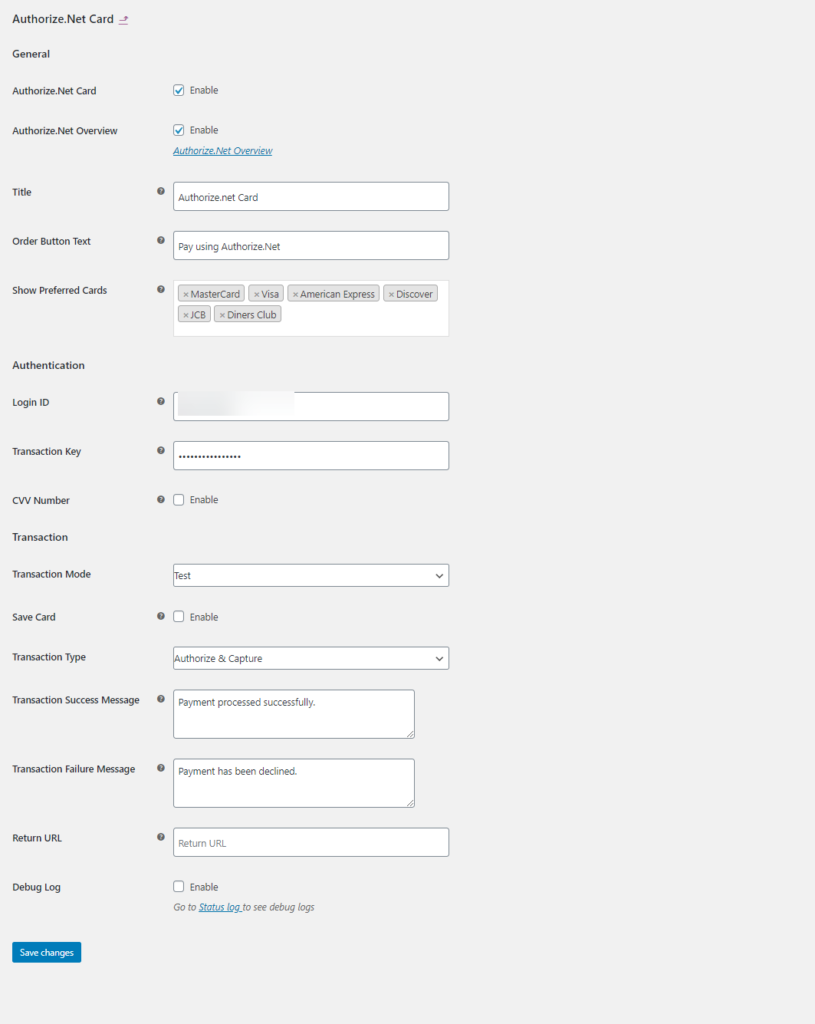
Here you can enable the Authorize.net card and authorize.net overview. The Authorize.net card options let you use a wide variety of payment options using cards that are facilitated by Authorize.net. The Authorize.net Overview, let you capture or refund the payment in a click. A refund can be partial or full as per the requirement. You can also see all the order details. You can also choose the preferred card in the preferred card option.
In the authentication settings, you need to enter the valid Authorize.net merchant account login id and transaction key as well as enable the CVV number. The login id can be easily obtained from the Authorize.net page. You can either obtain the live or test API keys to use. Upon login, Authorize.net provides a transaction id, which should be provided here. CVV or the Card Verification Value on your credit card is a 3 digit number on VISA® and MasterCard® credit cards. On your American Express® branded credit card, it is a 4 digit numeric code.
In the Transaction setting, you need to choose live or test mode. You can see there are two transaction types :
Authorize & Capture: Using this option, it allows the shop owner to get the payment immediately after the order is placed. Authorizing and Capturing of the payment happens automatically here.
Authorize only: This option needs the shop owner to authorize charges and then capture the payment. To capture the payment, the shop owner needs to navigate to an individual order page. Under Order Action box, Admin can capture the payment.
You can also provide the Transaction Success and failure messages and also track the errors occurring using the log option. Once the payment is successful, you can redirect the customer to a custom page instead of a WooCommerrce default payment successful page using the Redirect URL.
Once done, you can save the changes.
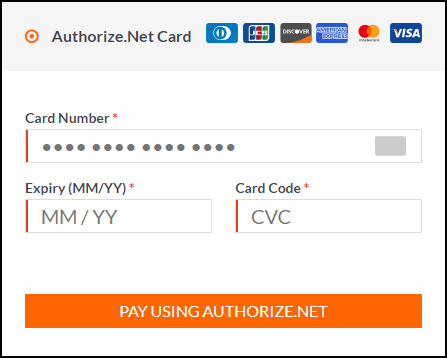
Checkout with Authorize.net Card payment
Now, when a customer places the order you can see the Authorize.net Card payment options in the checkout page.
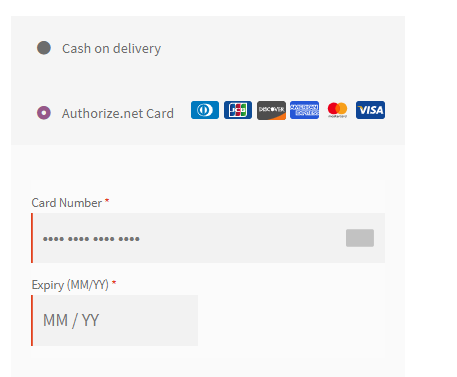
Here you need to choose the right card which you want to use for your transaction and then enter the card number and the expiry date, before proceeding for the checkout.
Step 3: Authorize.net eCheck Settings
Here we do the settings for Authorize.net Check. Upon clicking on Manage in WooCommerce>> Payments >>Authorize.net Check, you get the following screen.
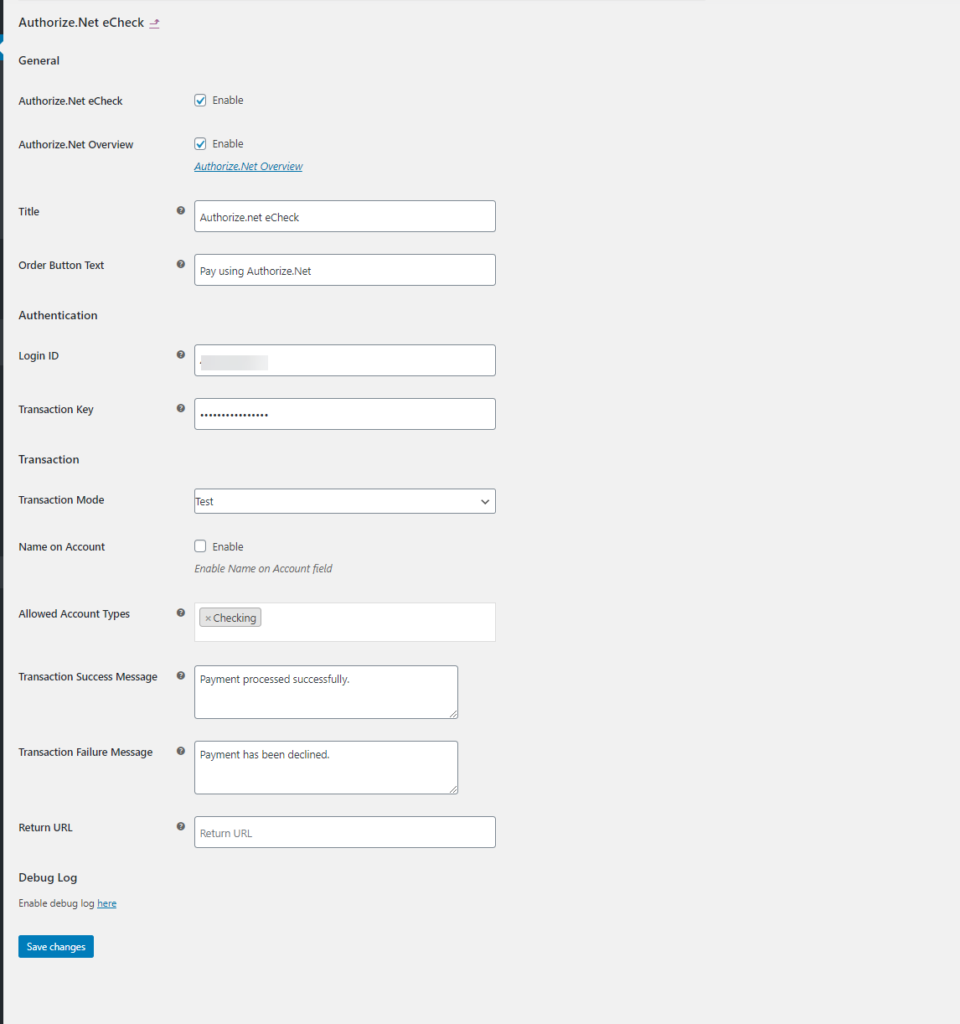
Here you can enable the Check option to enable the Authorize.Net payment gateway so that payment gets accepted through eChecks on your online store. Also, the Authorize.net Overview to enable Authorize.net Payment Overview. Next, we need to enter the authentication details obtained from Authorize.net. You can either enter the live or test mode API account details. You need to enter the login id and the transaction key.
Here you can see two modes – one is the test mode and the next is the live mode. Also, there are account types to be selected, you have majorly three account types –
Checking: It allows eCheck payment through a current account.
Business Checking: AIt allows eCheck payment through a business account that is used for business finance.
Saving: It allows eCheck payment through a savings account.
You can also provide transaction success and failure messages and also track the errors through log by enabling the same.
Upon saving the details on the checkout page you can see, the following:
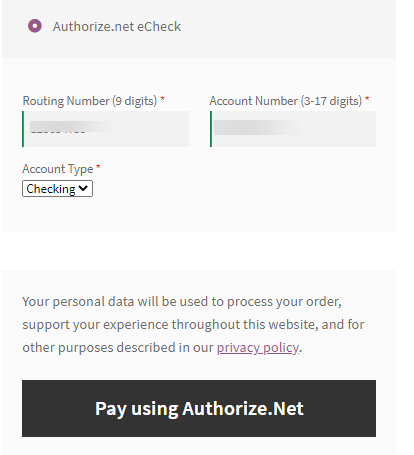
Here you can select Authorize.net eCheck as a payment option. And enter the 9-digit Routing Number. Then, enter the 17-digit account number. Choose the required account type from the Account Type dropdown list. Select and Click Pay using Authorize.Net(customized text) to the checkout.
Hence these are the steps that will help you add Authorize.net on your WooCommerce store. Now let us see how to capture and refund from the order page.
Capture and Refund Authorized payment from Order Page
When you go to the order page, you can see the option to process capture and refund.
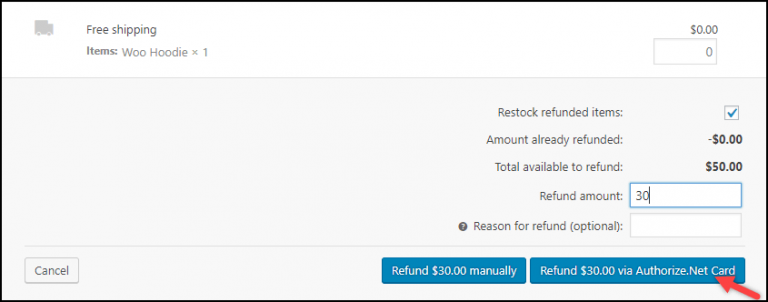
You can either process a full or partial refund for the order.
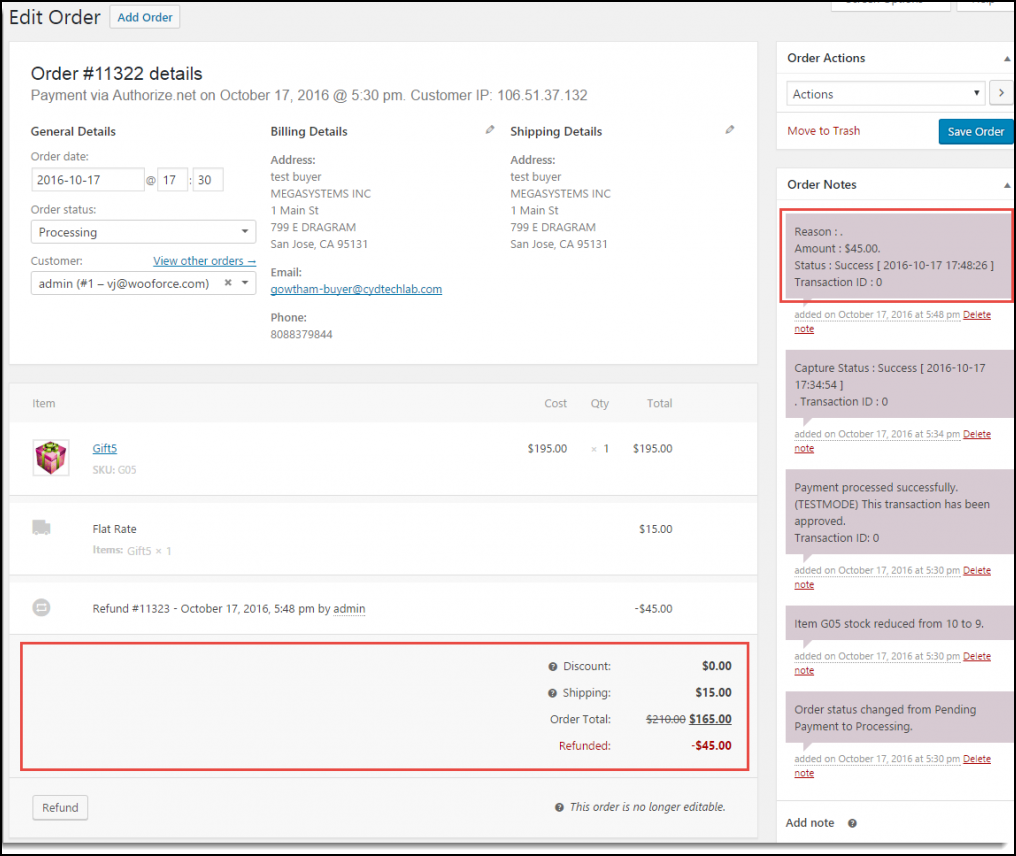
The refund statuses can be read from the status message on the corresponding order page. When you enable both Capture and Refund then you can do capture too.

Authorize.net Overview
In the authorize.net overview, you get to see the recent transactions and the data in the graphical format.
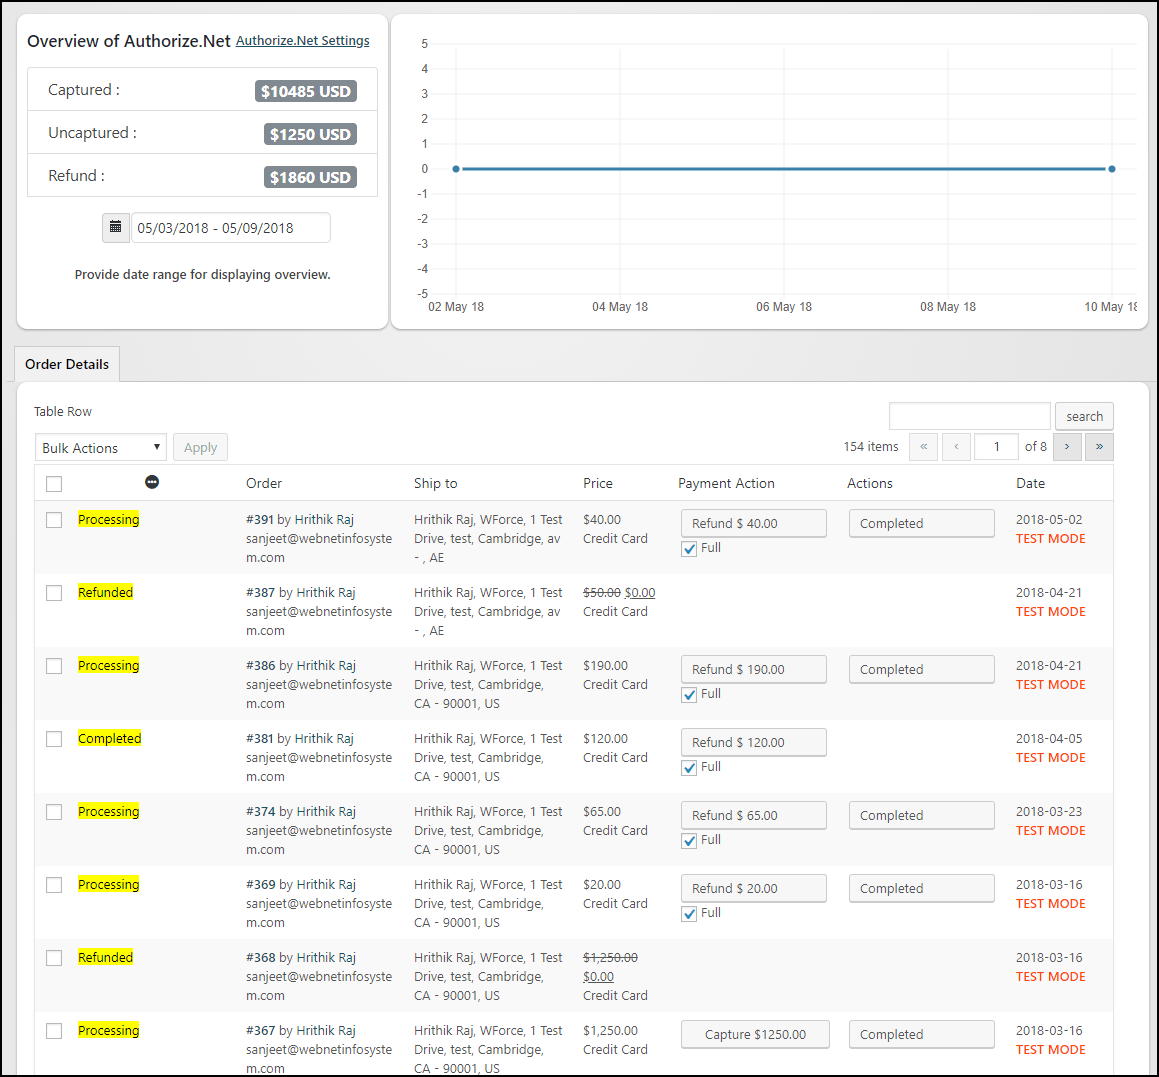
From the Overview page, you can also capture and also manage a refund.
To Wrap Up
This is how you can easily integrate Authorize.net on your WooCommerce store and use it easily to help your customers with quick and secure transactions.
Further Reading

