Introduction
Today’s world is looking for everything online. With this, the demand for online support systems is growing in every industry. With this small to big size, companies are choosing to charge for support services for offering services upon requests at any time at their convenience. It does seem to be one of the easiest ways to grab an opportunity for an expert to monetize his expertise and time spent on it as well as a business to gain the confidence of the customers.
Nothing which is freely available is given much importance. If you are actually providing free service support, then its time to think differently. Most of the customers approach in a very impatient style for any kind of service assistance. All these services, they prefer to be quick and precise and not just beat around the bushes. So in such cases, why not offer your assistance and charge for it. Every minute counts when you are into support services or any other kind of assistance providing services.
For example, you are an IT analyst and you provide assistance to anyone online. The clients need not even come to your space. But how are you going to charge for your online assistance? In such cases, you should be ideally tracking and tackling issues on a system and then track them efficiently providing the requisite amount of help needed. In order to streamline all your processes, you need a system in line also which can even assist you in managing your payments.
So, now as you have thought about it, it is time to go for it.
Let us see how we can implement the same in the business.
Getting Started on how to Charge for Support
If you are planning for a business support model, then you should have an intact plan on how you are going to go about it. For this, you need to first decide the business model. Like you can
- have a subscription-based model
- one or multiple tiers of support
- and decide on how you going to charge on the same.?
Once these are inline, you can start using them.
If you are planning for a subscription model, then you need to have various kinds of plans which might be useful for assistance. If you want to offer multiple tiers of assistance like simple, complex and much more, then it depends on how complex your service request can be. And deciding upon charges, you need to again analyze what each kind of support work will be required and how much can be charges for your expert deliverance.
If you are planning to handle all your support requests in a ticket like a system to get an organized way to respond and store the data, then for sure you need a solid plan on how you are about to do it.
WordPress offers several options regarding online ticket systems. If you consider non-SaaS based WordPress helpdesk support system, then WSDesk is one of the pioneering on in the market. WSDesk also offers a special add-on called Pay For Support Add-On for WSDesk WordPress Support Ticket System that will help you to start with pay for support.
Let us explore more about the same.
How to Set up Pay For Support with ELEX Pay For Support Add-on for WSDesk WordPress Support Helpdesk Plugin?
Firstly, for the premium Pay-For-Support Plugin to work, you need to have the ELEX WSDesk WordPress Support HelpDEsk plugin installed on your WordPress.
Once WSDesk is installed, you need to configure the add-on for Pay for Support. You can use any popular subscription plugin available on WooCommerce and then create a subscription plan for your support assistance. All you need to plan ahead how much you will charge for support session and how you are going to deduct the credits for your services.
Now assume that you are planning to offer your assistance to your customer for $500 for 5 sessions. Each session has 100 credit points, so after each session, 100 credit points are deducted from the customer. So in such a way, you can maintain a credit flow in your services.
Now, the question is how do you go about it.
This is when the Pay For Support Add-on comes handy.
How you can use Pay For Support Add-on and successfully implement Charge for Support?
To begin with, let us see, how we can set up Pay For Support Add-on for WSDesk Support Helpdesk Plugin.
Consider that you own a web page, maybe a WooCommerce one, which is a pioneer in Online Pharmacy industry. Now you want to provide certain services regarding medical consultation or even upon any queries that are dealing with medicines and prescriptions provided by the doctors.
How do plan to execute the same process, as you can see the number of queries arriving in a day is going to be high? Moreover, these plans have to be much more business revenue-oriented as well as helping the needy customers.
To solve the same, here we can include certain subscription plans or maybe coupons to help the customers. The support services can also be included as a virtual product like a discount, subscription or even a coupon on your WordPress WooCommerce store. Upon using it on the store, the virtual products can be purchased like a normal product and then applied to the customer profile. Hence that much credit, which amounts to the virtual product will be added to the customer as credit scores.
Case Study
Here, for example, let’s take that you have a subscription plan on your website for each extended medical assistance services.
Now for applying the rules, you need to identify a product on which you are going to apply credit rules. Here the product is any of the consultation plans, that we are going to charge for:
For example, let’s consider, we have three plans :
- One is a Full Plan – which is $500 / 10 days.
- The next one we have is a Simple Plan which is $800 for 15 days.
- The third one is Complex Plan which is $1000 for 30 days.
So, now we have the plans as subscription products in our store. These subscriptions can be either a fixed one or even a recurring one. Now, using the Pay for Support add-on, we need to create credit rules to get the credits applied. Once the add-on is installed, go to Pay For Support >> go to Credit Rules.

In the same way, you can create a rule for each subscription using the Product ID associated with it.
Firstly give a credit rule name, which helps to describe the rule. Then provide the product id, of the subscription plan on which the credit rule is applicable. Here we are going to consider credit rule on Full plan which costs $500.Next, we need to set the price. If the price of your product is $500, and you are planning to provide 10 credits for each $100, you can enter 100 in this text box. So if a user purchases the product of $500, then he or she will get 50 credits. Hence enter 10 as the credit points for every $100.And then create the rule.
Managing Credit Rules
Now you can see, that the credit rule is created. You can see the rule in the manage rules tab. Here you can review, edit and you can delete any rule if needed.

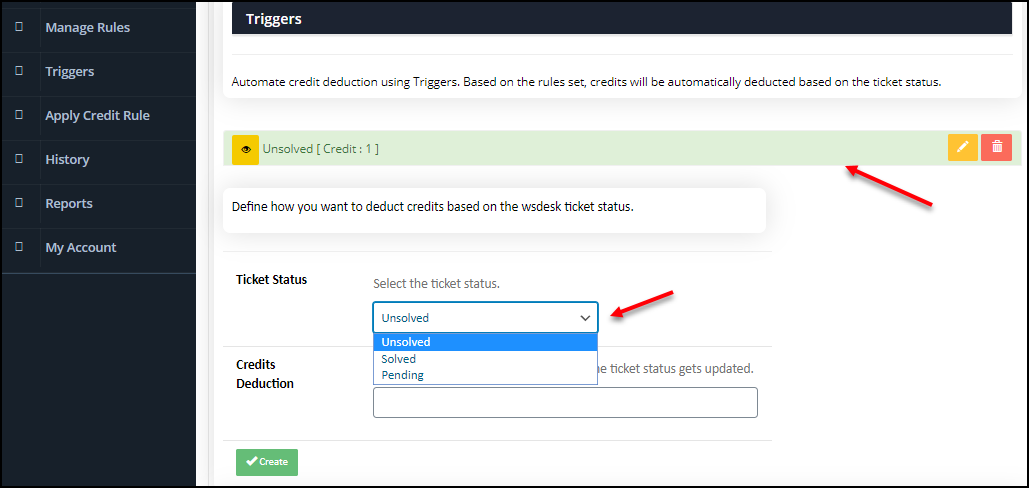
The next step is to set up triggers for deducting the credits when a user raises a ticket. For that choose “Triggers”.Here, you can associate your WSDesk ticket statuses to the credits. In this, you can see the statuses are Unsolved, Pending and Solved. So let us select Ticket Status as “UnSolved” then deduct 1 credit points. Similarly, you can add other triggers for other statuses too. If you want to edit the credit deduction and the ticket status, you can go to the edit option in the already created one and update it.
Now you can apply the credit rules to your users. You can simply select your user and select the credit rule you have created to be applied to him or her according to their subscription plan.

If you are already having a subscription plan in action, then you can add manually the data here.
Tracking History of Credit Transactions
If you want to track and view all the credit transactions on your site, you can go to the “History” tab. There you can see the date, user email ID, request (that is WSDesk ticket number), credit status, credits deducted from their account and the credit balance in their account. You can also download it for future reference.

If you log in as the user/agent on which the credit rule is applied, then you can see the credit points acquired by the user.
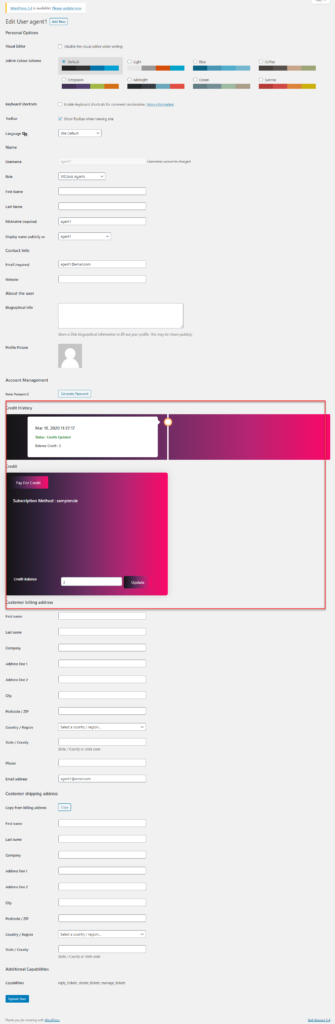
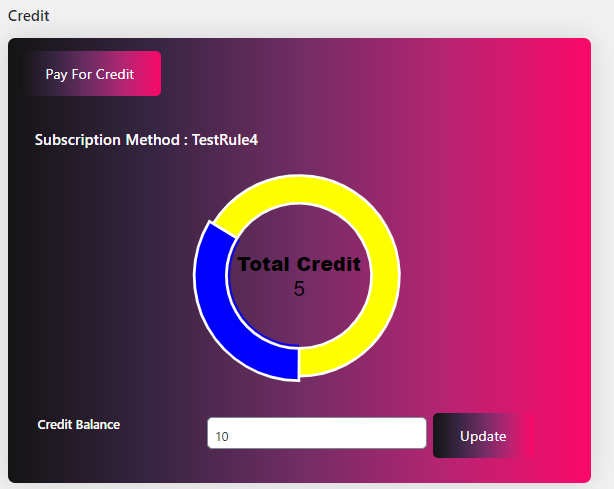
You can enter a company logo and even see the subscription method with the credit balance. Any purchase will show that much credit points on the user profile.

Then if you want to see the credit details in the WSDesk ticket page, you can go to the History tab and click the request number.
You will be redirected to the respective ticket page. You can see the credit details, credit balance and subscription plan in the tab.

Viewing Credit Balance on User Profile
If you want to see your users credit balance and the details, you can go to his or her user profile page on WordPress.
There you can see the subscription plan and credit balance. In addition to that, if you want to update the credit balance manually, you can update it there. This option comes handy when you already have a credit plan working and you want to make it available through Pay for support plugin.
Now suppose the user, requests for service, each time a ticket is arrived and processed, a credit point is deducted depending upon the status of the ticket.
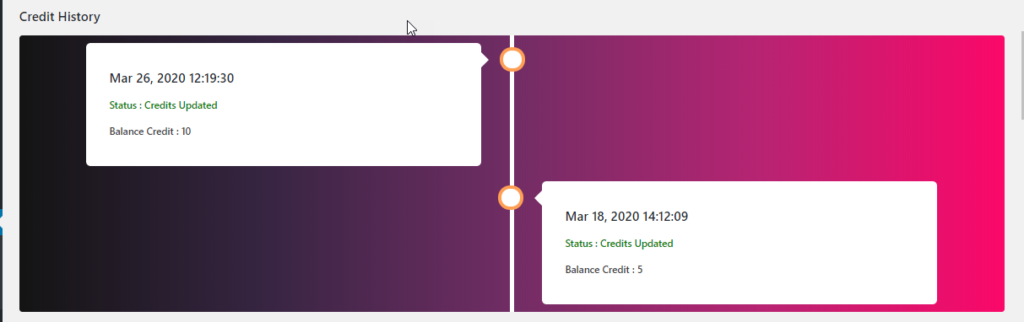
If you are keen to check back on how many requests can be sent across, then you can see in the credit timeline, which gives you an idea on how much points you will have in balance.
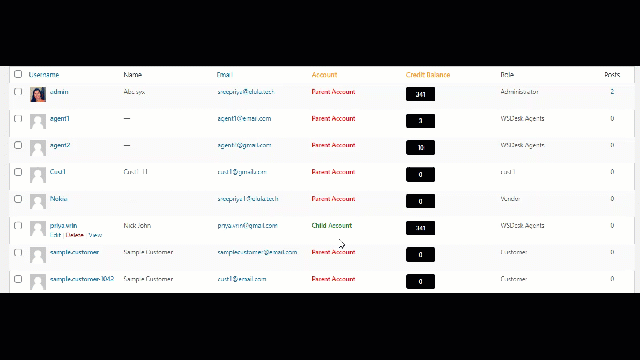
Site owners can get a highlight of the subscriptions and credit balance associated with all the user accounts in the WordPress Users dashboard. The data will give you the details on how much credit is deducted, what is the request number, the status of the ticket as well as the balance remaining.
In this way, you can keep a formatted method to keep track of your support or consultancy or even a subscription plan in the easiest way. You can also verify the history, wherein you can see all the information regarding tickets. You can click here and download the CSV file to keep a track of the information.

Managing Reports for Pay For Support
To analyze the performance, status of new requests, the status of agent requests, and status of new and unsolved requests, you can use reports. Reports are yet another way to analyse how the team performed. The reports tab gives you a complete dashboard with a comprehensive analysis of how the team has performed.

Let us see how a Store owner is accessing User Credit Details
Store owners can track and view a user’s credit details in the individual WordPress user profile page. In the WordPress Users dashboard, they can simply click on a user profile to open the page for viewing. An important point to note is that when you click on the Child Account link in the Users dashboard, it will redirect to the parent account’s profile page.
To Wrap up
So as you see, Pay For Support add-on for WSDesk simplifies your user management and also help you organize your pay for support monetization. Making use of an organized work-flow organizer can ease your process as well as help you manage your time efficiently.

