MyPost Business is Australia Post’s budget-friendly shipping service that mainly caters to small and medium businesses that are relatively new and do not have a consistent number of orders. There are no discounts offered by the major shipping carriers unless you send in bulk, which typically includes a predetermined minimum parcel quantity.
This explains why so many small companies use Australia Post MyPost Business. Purchasing and printing shipping labels via MyPost Business is a great option for small businesses, and the more you spend on shipping, the more discounts you avail. Everything you need to know about Australia Post MyPost Business will be covered in this article. Let’s begin straight away.
Let’s Understand Australia Post MyPost Business in Detail
MyPost Business is an easy-to-use and cost-effective option for companies that deliver less than 2,000 parcels annually. The primary benefit of opening a MyPost Business account is that you’ll receive shipping value-based discounts, which means you’ll save more as your delivery volume grows. MyPost Business accounts can be created without a credit check, there is no minimum package volume requirement, and it is free to do so. You can reduce the cost of domestic and international shipping by up to 40% and 35%, respectively.
Your shipping volume, which establishes your savings band, is calculated by adding up all packages you send. Every Saturday, MyPost Business determines your weekly volume based on the number of parcels you sent during the last 8 weeks or 12 months, whichever results in the most savings for you. When you are eligible for a higher savings band, they add it to your account, allowing you to ship at a reduced rate the next time.
You can access all of the website’s features after creating an account and logging in, including access to amount-based discounted rates, the ability to print, pack, send, and track packages, the ability to request pick-ups, access to 24-hour support, the ability to process bulk orders, the ability to send automated tracking updates, and much more.
By uploading a CSV file, you may process orders in bulk and take advantage of MyPost Business discounts both online and in-store. Ship more qualifying packages, and you’ll save more money. Your overall shipping spend value, which determines your savings band, is influenced by each eligible package you ship. The discounts you receive are divided into six bands.
Australia Post MyPost Business Rate Guide
MyPost Business has recently simplified and improved its methods of calculating your savings band. Until recently, your savings band was determined on the total number of eligible packages you send via MyPost Business. Now they have moved from a volume-based saving method to a spending-based shipping method. It indicates that the amount you’ve spent in MyPost Business, or your overall package shipping expenses, will be used to determine your savings band.
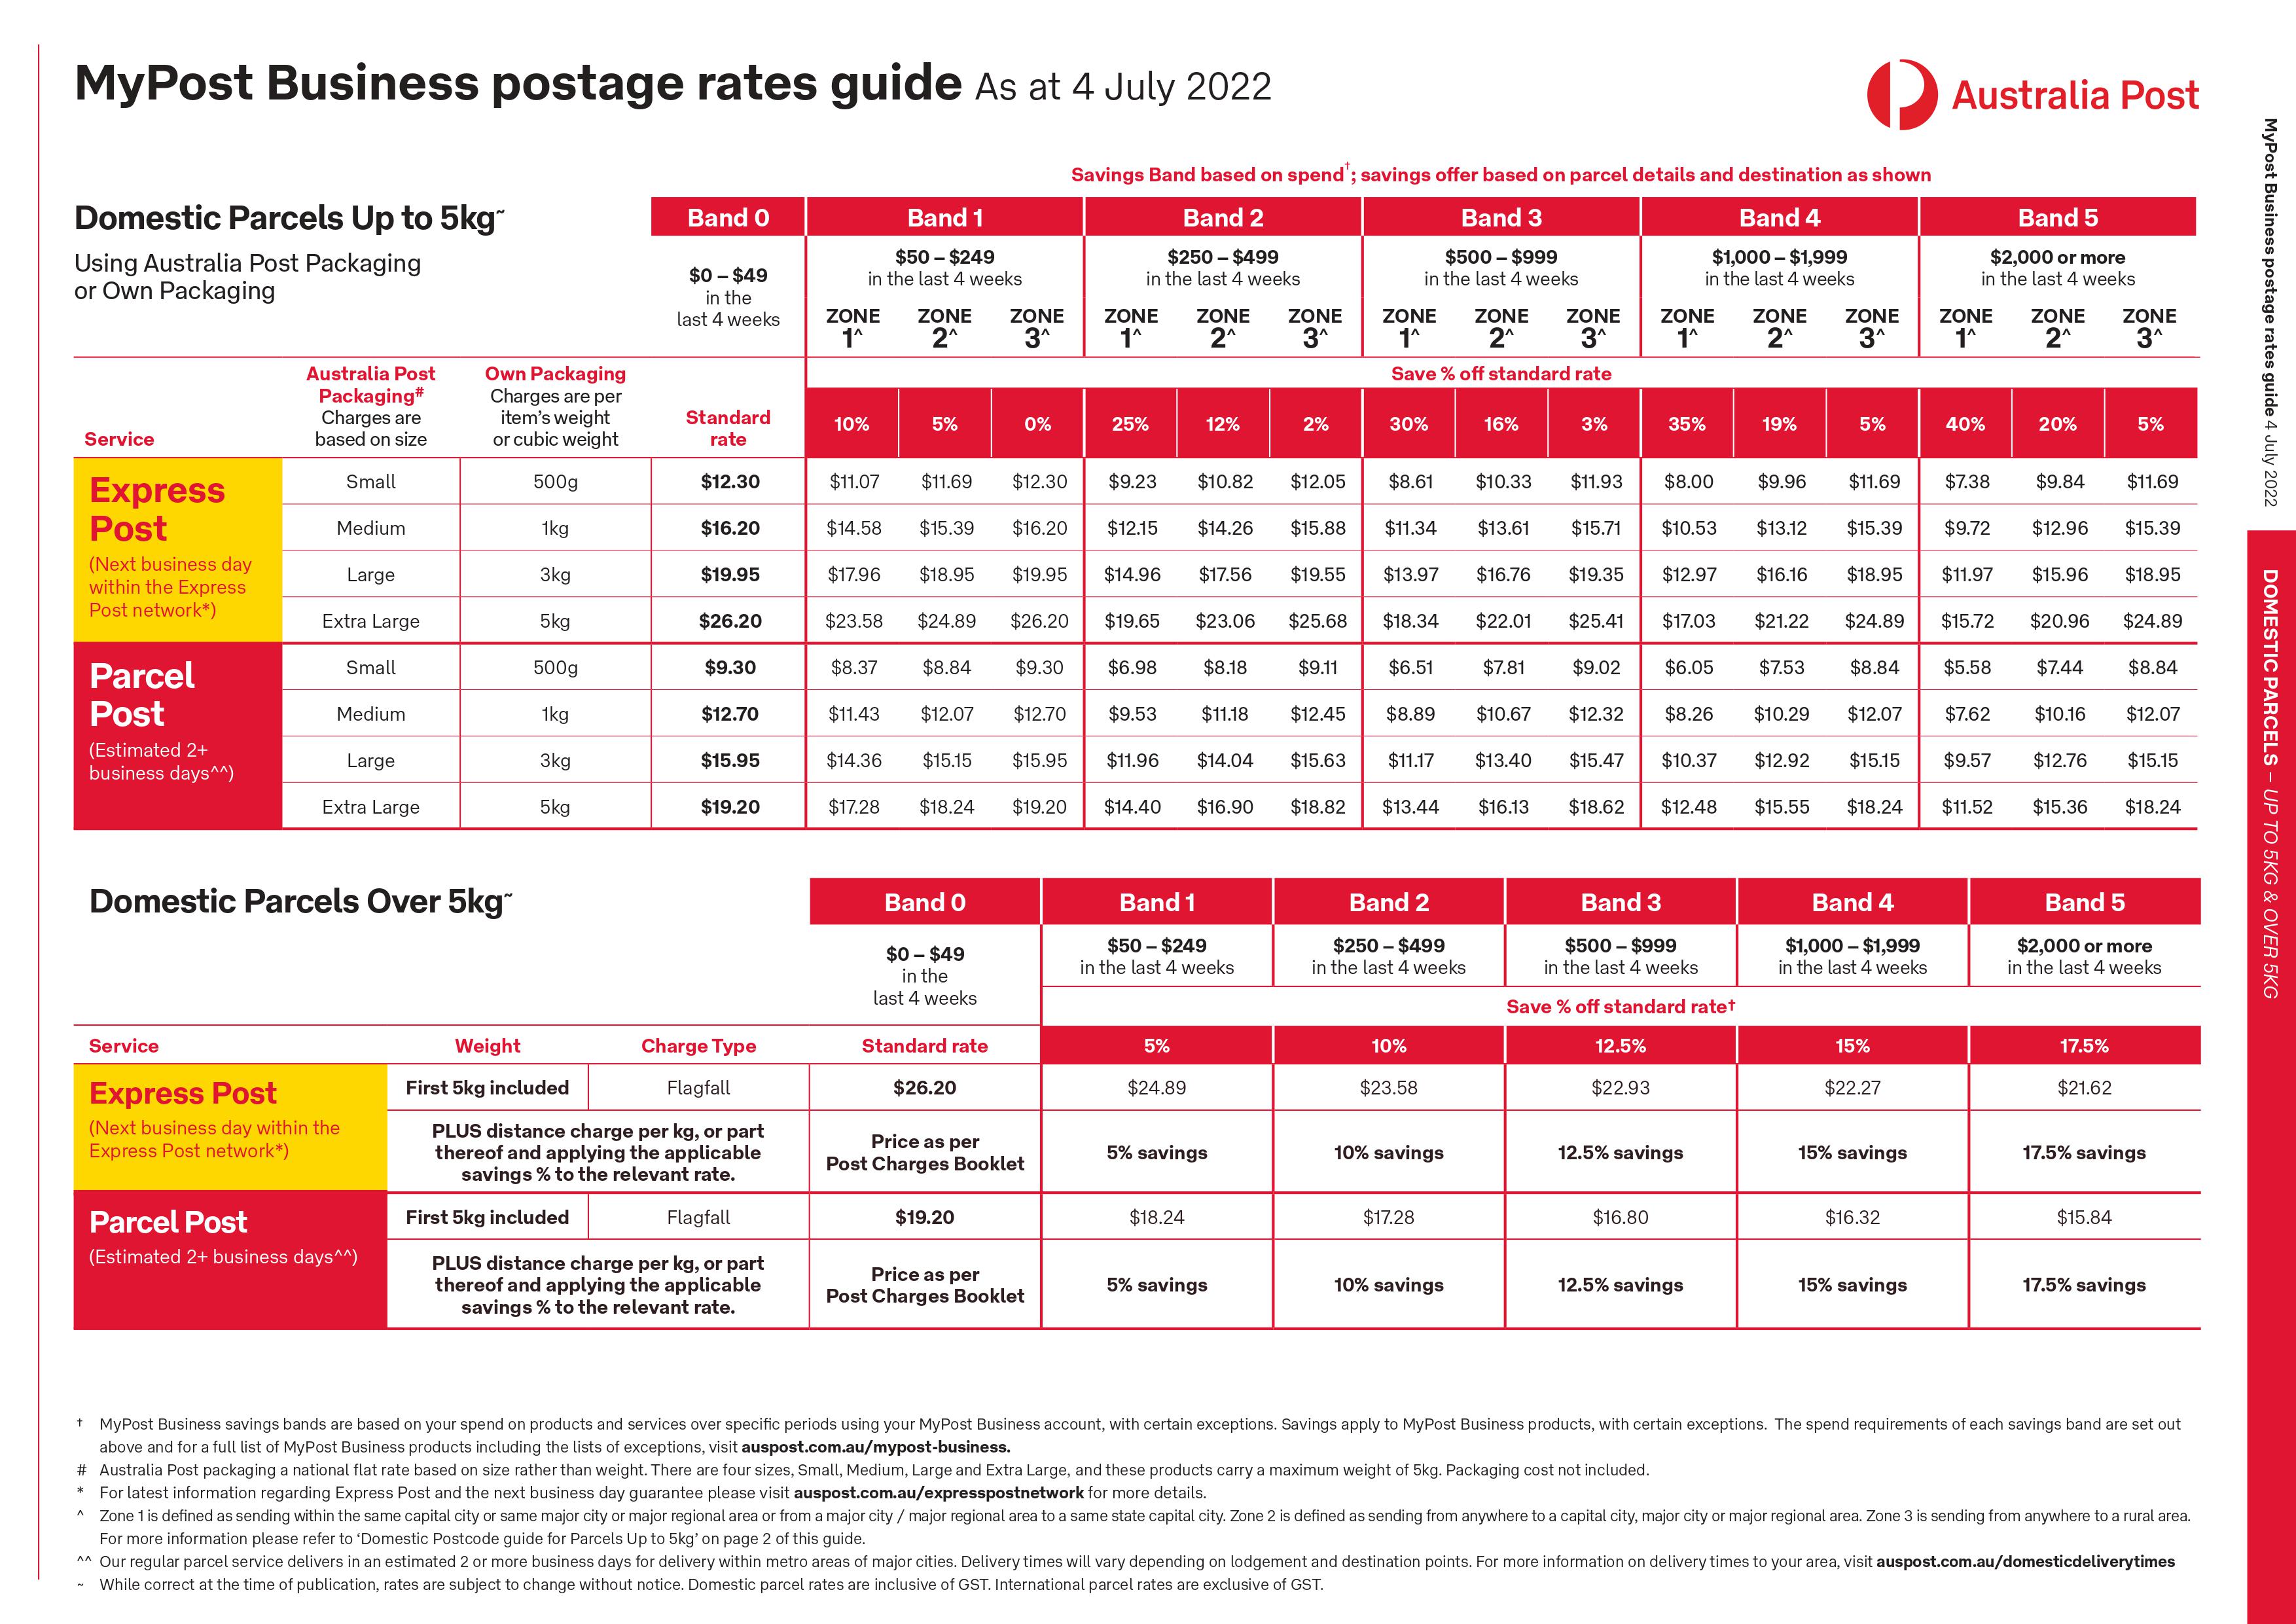
Shipping rates for domestic parcels up to 5kgs
- If your total spend is between $0 – $49 in the last 4 weeks, you will be in Band 0 and pay standard shipping rates.
- When your total spending in the previous four weeks is between $50 to $249, you fall into Band 1 and are eligible for savings of 10%, 5%, and 0% in shipping zones 1, 2, and 3, respectively.
- If your total spending in the previous four weeks is between $250 – $499, you fall into Band 2 and are eligible for savings of 25%, 12%, and 2% in shipping zones 1, 2, and 3, respectively.
- When your total spending in the previous four weeks is between $500 – $999, you fall into Band 3 and are eligible for savings of 30%, 16%, and 3% in shipping zones 1, 2, and 3, respectively.
- If your total spending in the previous four weeks is between $1,000 – $1,999, you fall into Band 4 and are eligible for savings of 35%, 19%, and 5% in shipping zones 1, 2, and 3, respectively.
- And if your total spending in the previous four weeks is $2,000 or more, you fall into Band 5 and are eligible for savings of 40%, 20%, and 5% in shipping zones 1, 2, and 3, respectively.
Shipping rates for domestic parcels over 5kgs
- If your total spend is between $0 – $49 in the last 4 weeks, you will be in Band 0 and pay shipping prices as per the post charges booklet.
- If your total spending over the previous four weeks was between $50 to $249, you fall under Band 1 and are qualified for a discount of 5%.
- In case your total spending over the previous four weeks was between $250 – $499, you fall under Band 2 and are qualified for a discount of 10%.
- If your total spending over the previous four weeks was between $500 – $999, you fall under Band 3 and are qualified for a discount of 12.5%.
- In case your total spending over the previous four weeks was between $1,000 – $1,999, you fall under Band 4 and are qualified for a discount of 15%.
- And finally, If your total spending over the previous four weeks was $2,000 or more, you fall under Band 5 and are qualified for a discount of 17.5%.
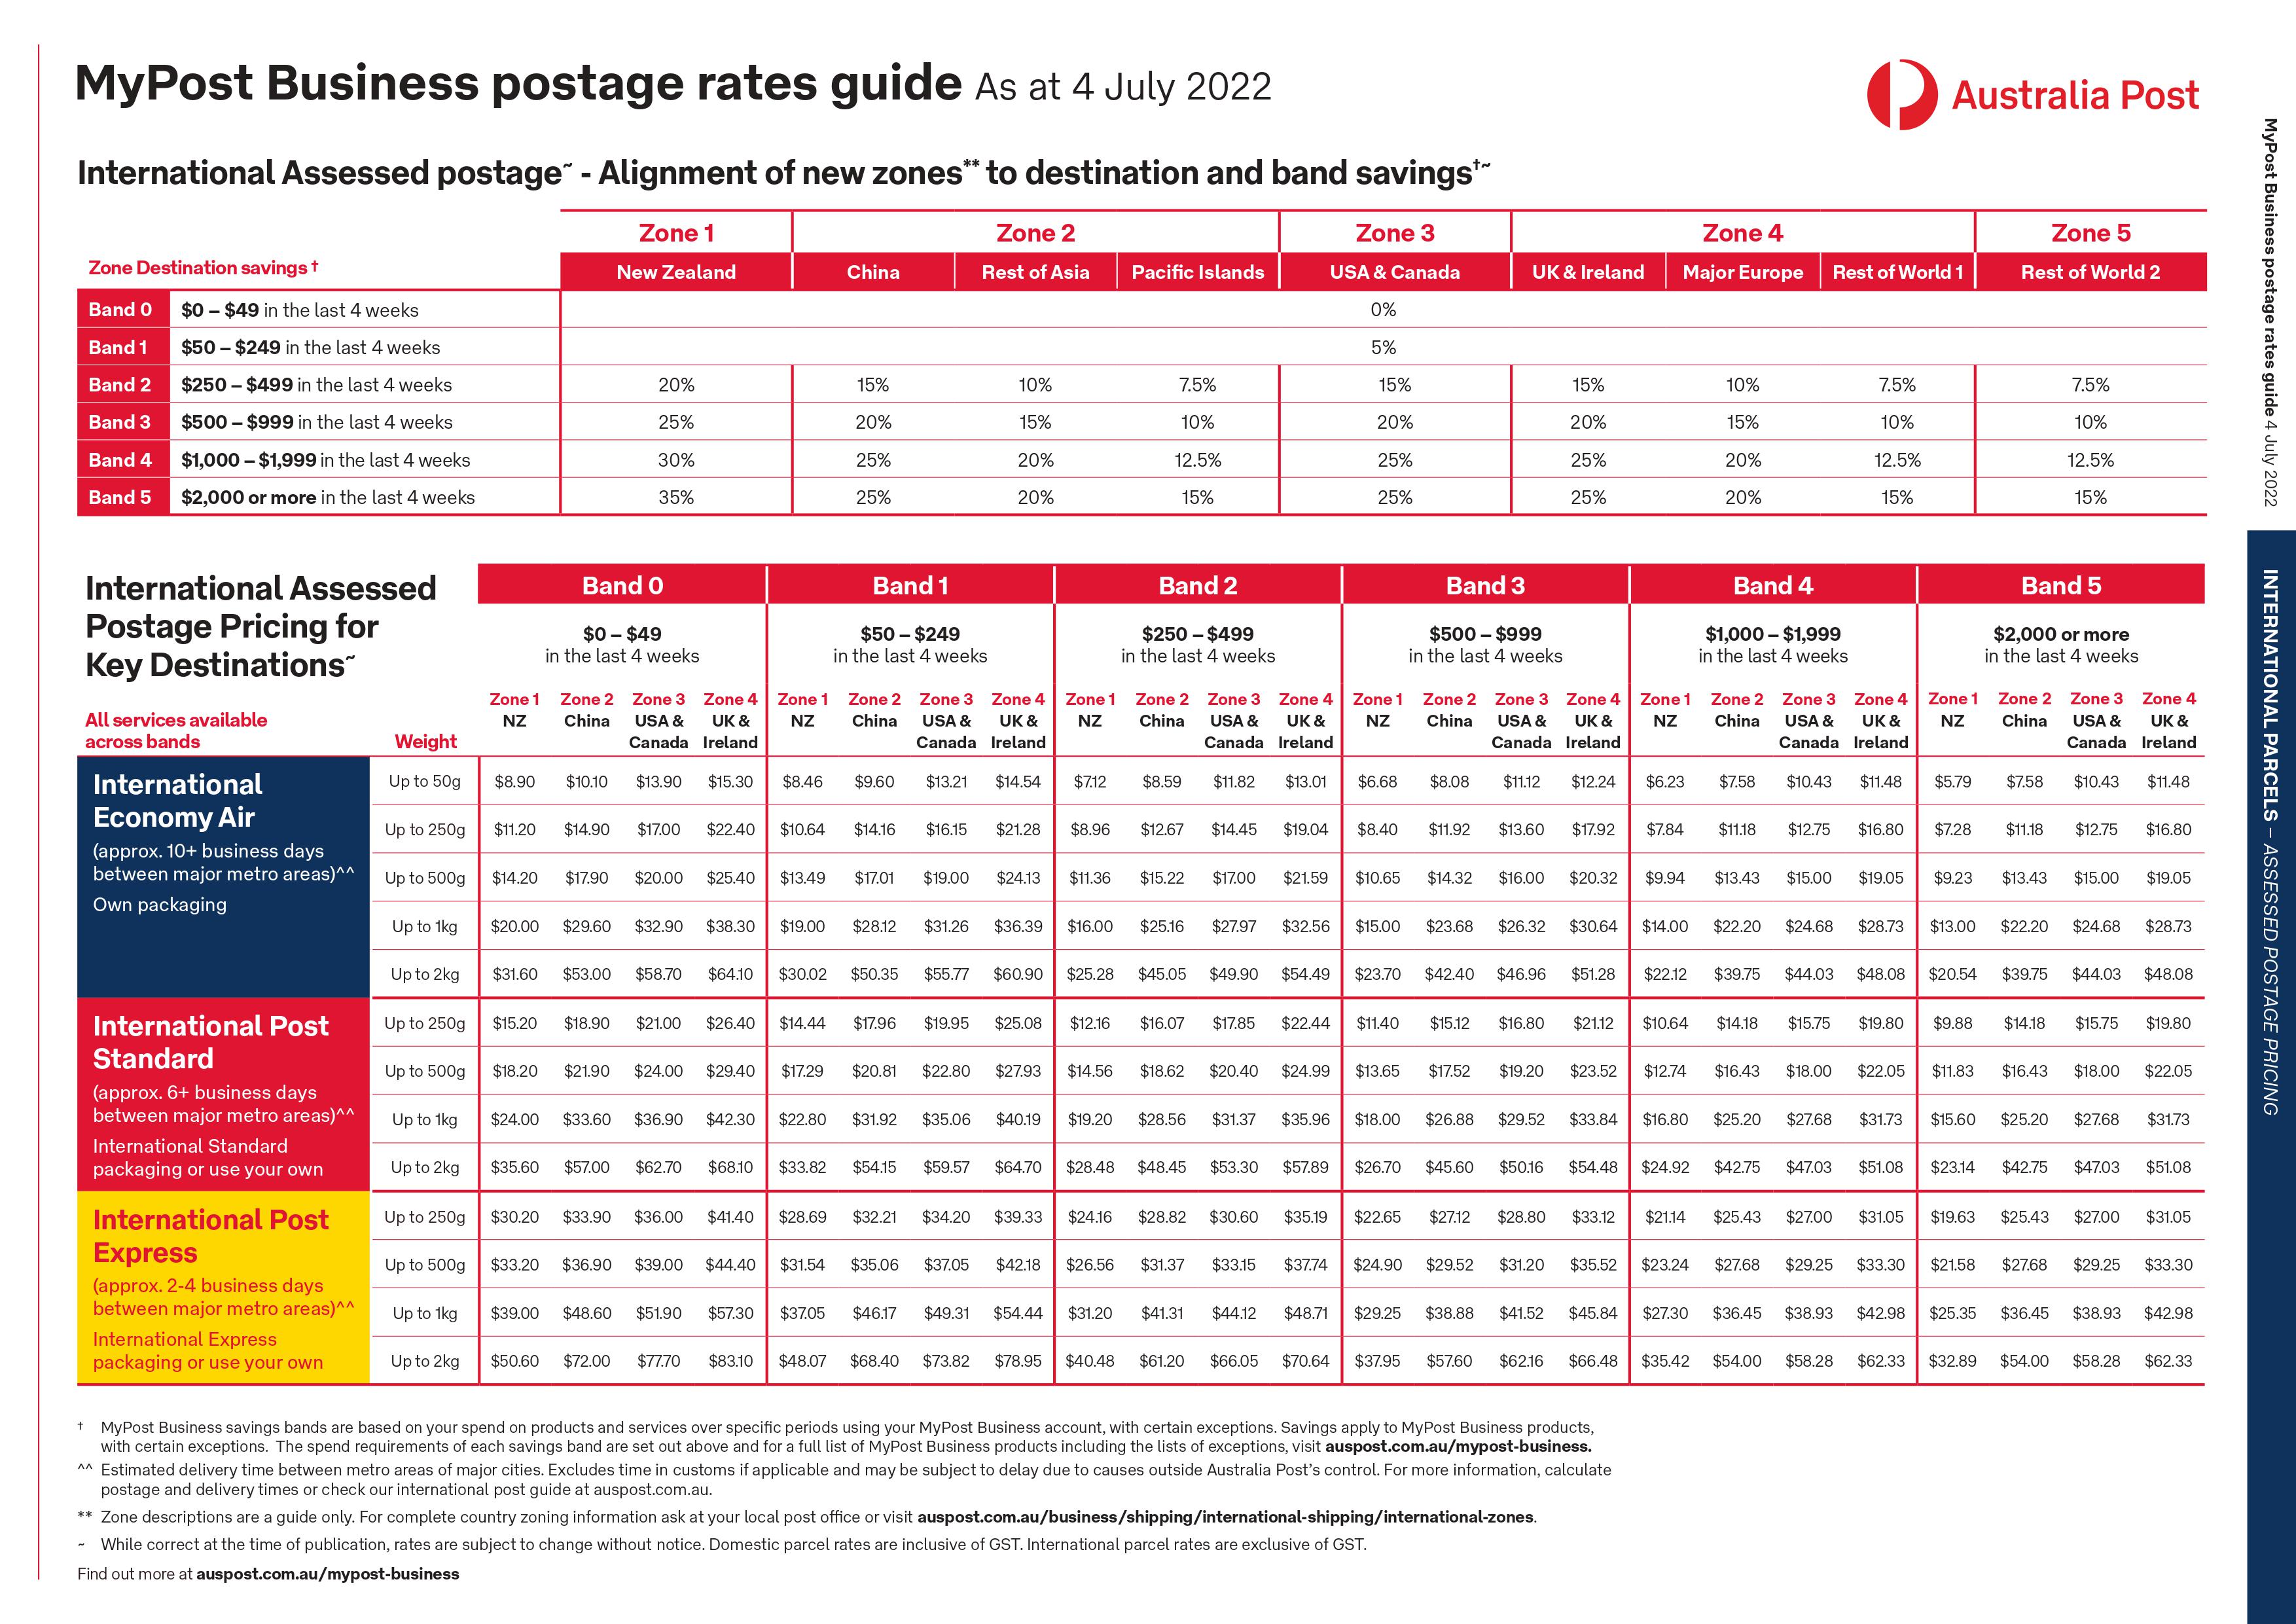
Shipping rates for international parcels
- If your total spend is between $0 – $49 in the last 4 weeks, you will be in Band 0 and pay standard shipping prices across all zones.
- In case your total spending over the previous four weeks was between $50 to $249, you fall under Band 1 and are qualified for a discount of 5% only for Zone 3 (USA & Canada) shipping.
- If your total spending over the previous four weeks was between $250 – $499, you fall under Band 2 and are qualified for a discount of up to 20%, depending on the shipping zone.
- In case your total spending over the previous four weeks was between $500 – $999, you fall under Band 3 and are qualified for a discount of up to 25%, depending on the shipping zone.
- If your total spending over the previous four weeks was between $1,000 – $1,999, you fall under Band 4 and are qualified for a discount of up to 30%, depending on the shipping zone.
- If your total spending over the previous four weeks was $2,000 or more, you fall under Band 5 and are qualified for a discount of up to 35%, depending on the shipping zone.
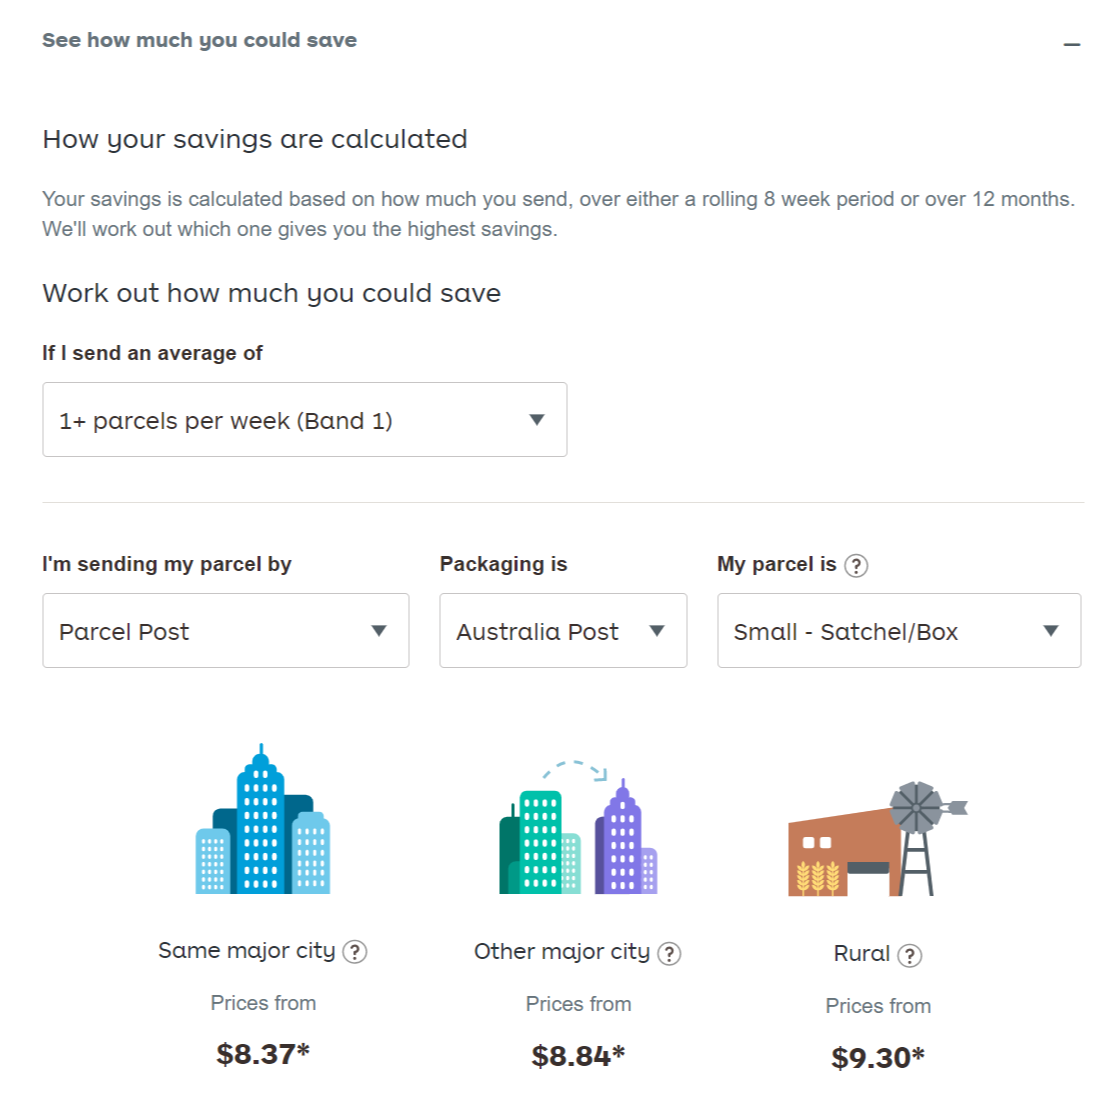
How to Calculate your Exact Savings and Shipping Cost
Australia Post MyPost Business WooCommerce Integration
You can use MyPost Business services by default both online and in-person at Australia Post offices. However, if you want to incorporate MyPost Business services directly into your WooCommerce store the ELEX WooCommerce Australia Post Shipping Plugin with Print Label & Tracking can be used to accomplish that.
It’s the quickest method to integrate Australia Post MyPost Business, eParcel, and StarTrack Courier with your WooCommerce store, as well as automate Australia Post shipping by showing shipping costs on the cart and checkout pages, tracking deliveries, and more. The time it takes to ship parcels is drastically decreased by this plugin because it eliminates the need to go to the Australia Post MyPost website or the post office and streamlines all of your shipping procedures from the admin panel of your website.
ELEX WooCommerce Australia Post Shipping Plugin’s Features
- Australia Post shipping rates are updated in real-time.
- Show expected delivery dates
- Spend amount-based discounts on shipping
- Printing and creation of shipping labels
- Options for box packaging
- Notifications and tracking of shipments
- Location-based service limitations
- Options for signatures and insurance
The plugin needs to be downloaded, set up, and activated before continuing. Then you must go into the settings. You can access the settings by going to:
Dashboard > WooCommerce > Shipping > Australia Post > MyPost Business
General settings
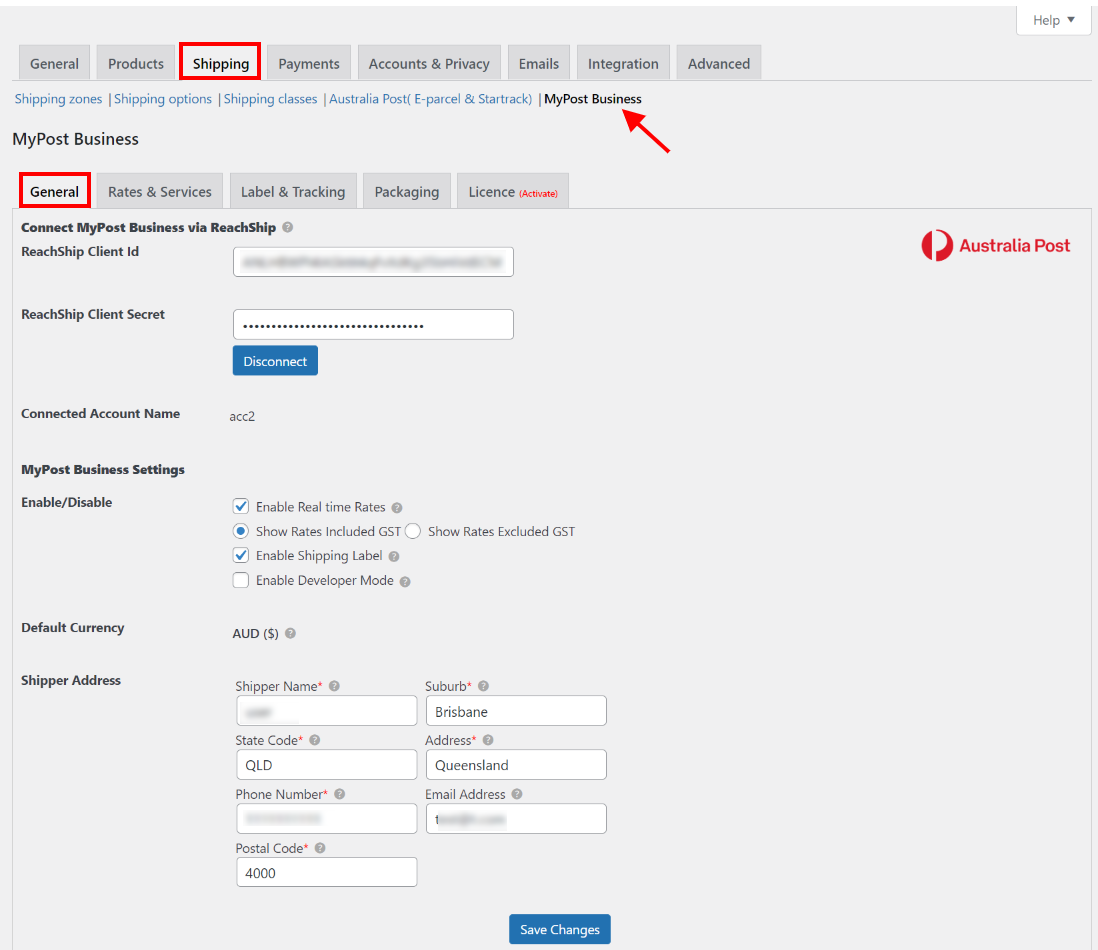
Read this article to know how to create a ReachShip account and obtain a client ID and secret.
Next, turn on Real-time Rates under MyPost Business settings to display real-time shipping costs when they are on the checkout and shopping cart pages. You can decide whether to show shipping costs that include or don’t include GST.
Activate Shipping Label to enable the option to create shipping labels with MyPost business from the order admin page. Leave it unchecked if you want to conceal the label creation button. Please keep in mind that you can only make shipping labels if the merchant token has been approved.
The plugin can be debugged by turning on Developer mode.
The currency settings in WooCommerce determine the default currency. Australian Dollars should be your default currency while using MyPost Business services.
Enter the shipper address details including name, contact information (such as a phone number and email address), and address information, such as the state, postal code, suburb, etc.
Click Save Changes to save the settings.
Rates and Services Settings
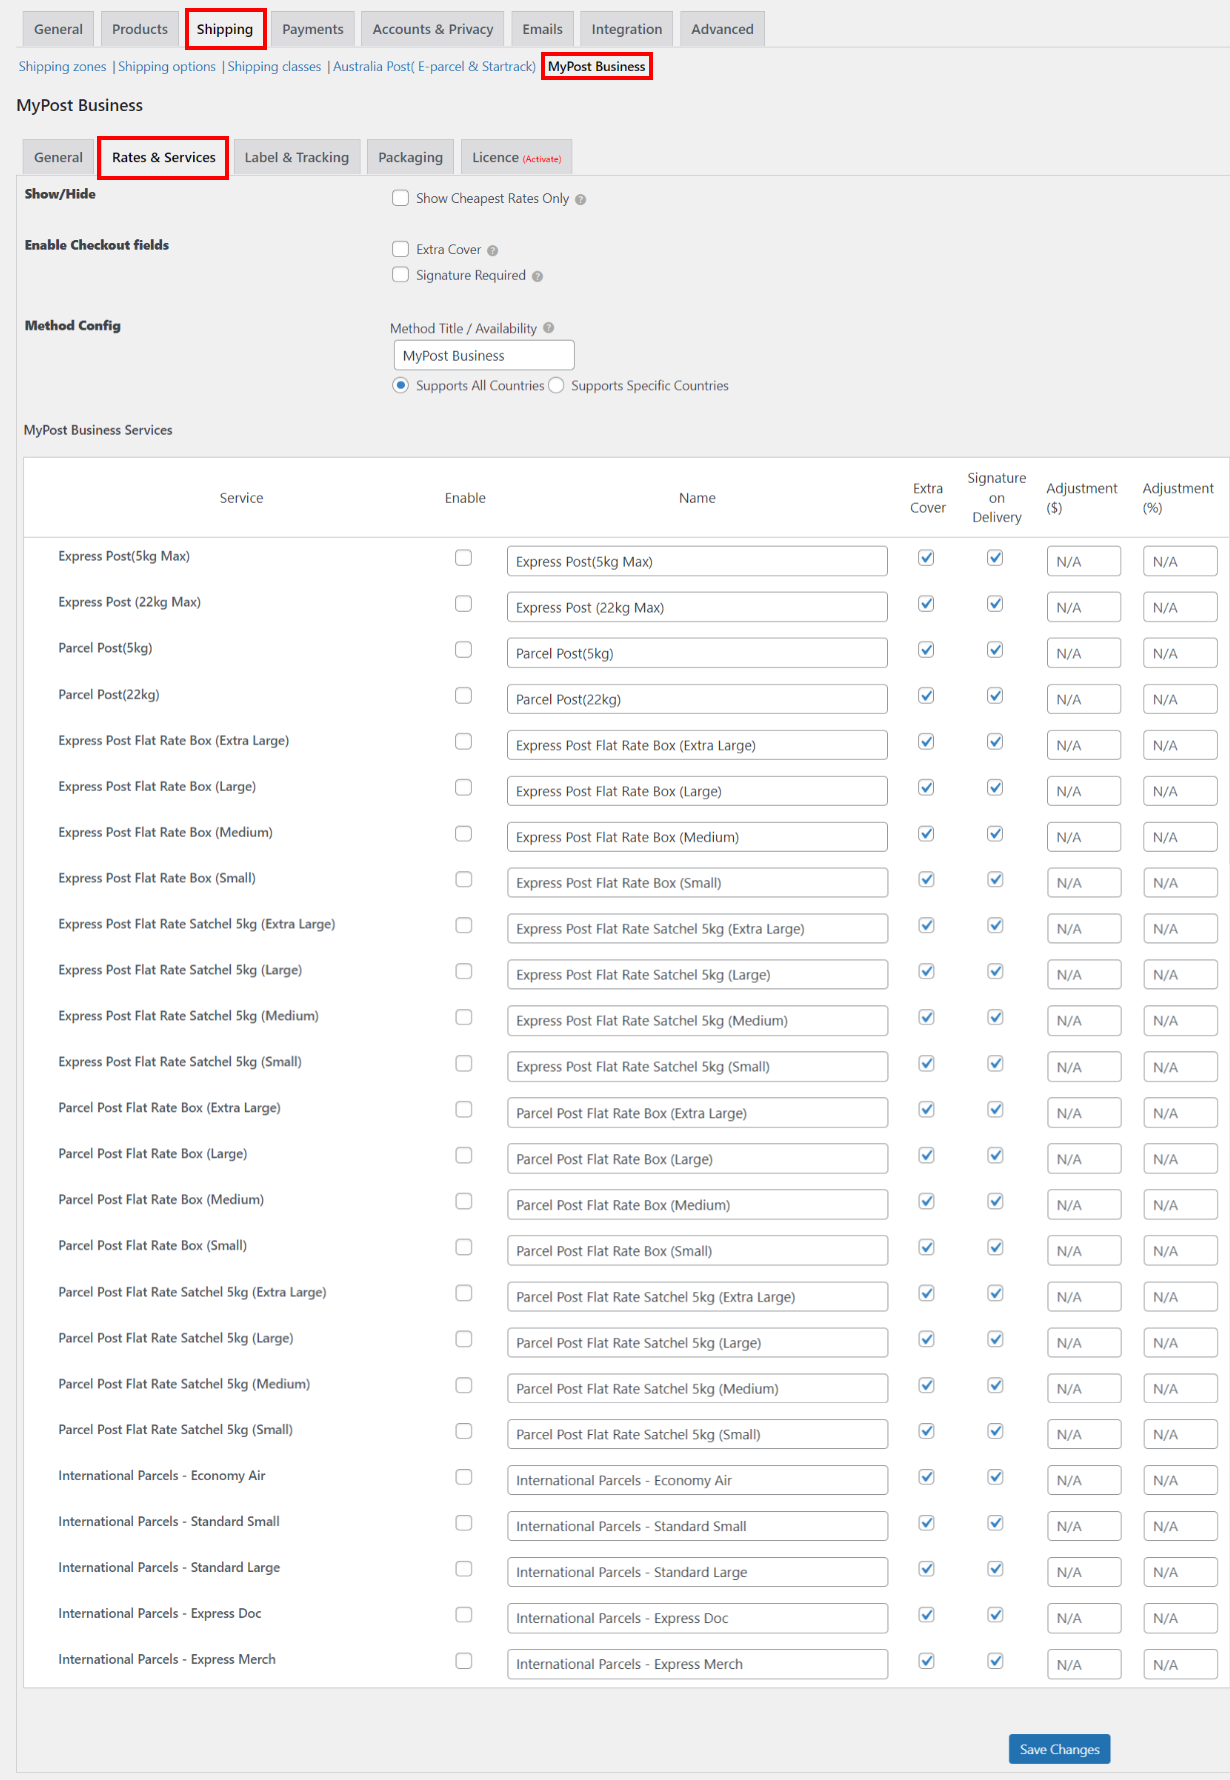
If you desire extra security when sending an item, you can enable the option to add Extra Cover. It protects you against loss or damage to your goods while it is in the care of Australia Post.
Turn on the option “Signature Required” to allow clients to choose Signature Required on Delivery as an additional layer of security. Method Config: If the MyPost live shipping rates are enabled, enter the method name that will show in the cart and checkout pages under the method title/availability text field. Additionally, you have the option of either making services available in all countries or just a selected few.
Label and Tracking Settings
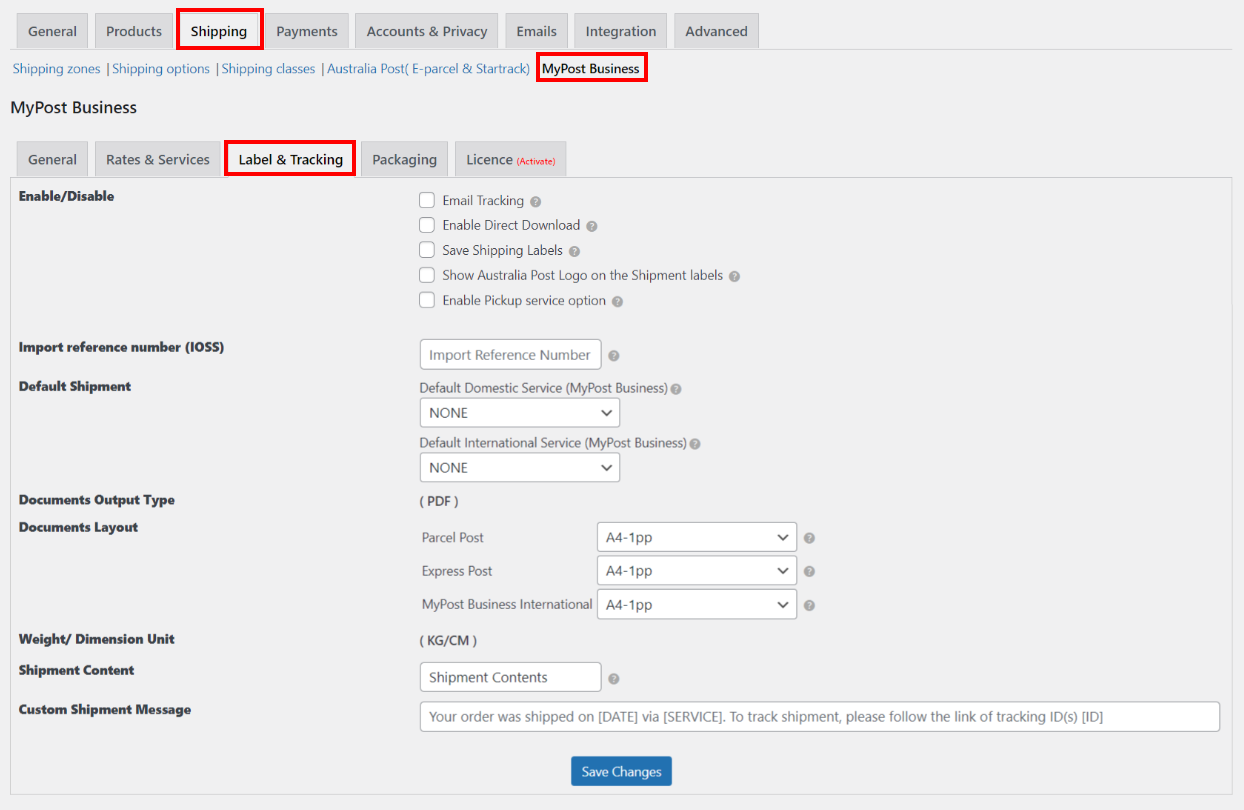
If you choose to enable Direct Download, the label will be downloaded directly rather than opened in a separate browser window.
When you enable the option to “Save Shipping Labels,” the created shipping label will be saved in your WordPress database in the wp-content folder.
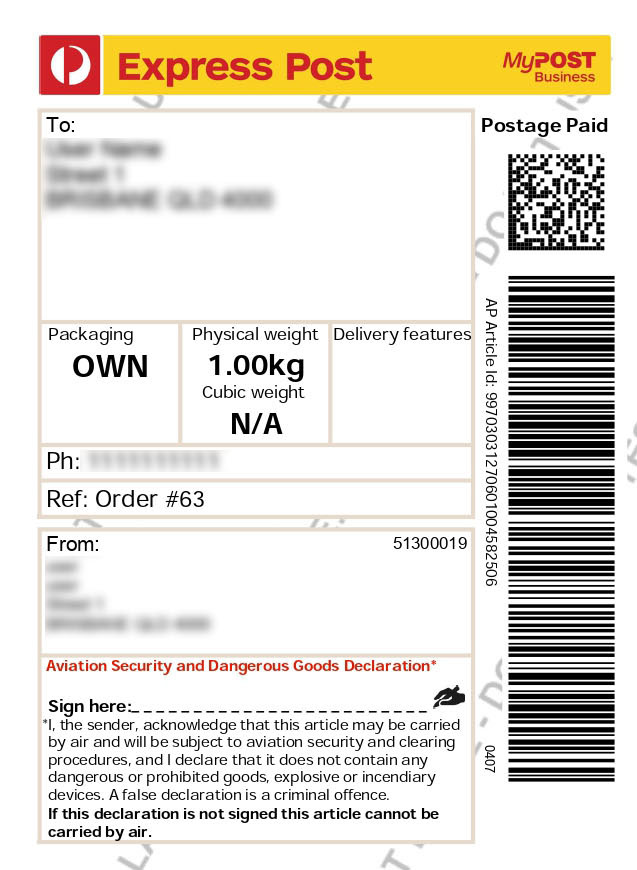
By turning on or off the Show Australia Post Logo on the Shipment labels option, you can decide whether or not to show the MyPost Business logo on the shipping labels.
The MyPost Business Pickup service option can be enabled here in order for it to be displayed on the MyPost Business Bulk Shipments Generation page.
In order to facilitate shipment to European nations, enter your IOSS tax registration number. The shipment documentation will include this number, which will be sent to customs. When checking out, if a MyPost Business service is not selected, the default shipment services will be used.
The PDF output format, which is the default selection for printing documents, is displayed under Documents Output Type. Select the desired document layout for the papers you’ll be printing the label on.
Weight/Dimension Unit displays the standard weight and dimension units, which are kilograms and centimeters, respectively. Australia Post uses default values for the weight and dimension parameters. The format and unit cannot be changed in the plugin settings.
You might choose to include a description of the shipment content which is usually required for security and customs checks, which will be included on all printed documentation. The plugin also enables you to personalize the custom shipment message that appears in your shipment tracking message.
When you’re finished customizing everything, click Save changes.
Packaging Settings
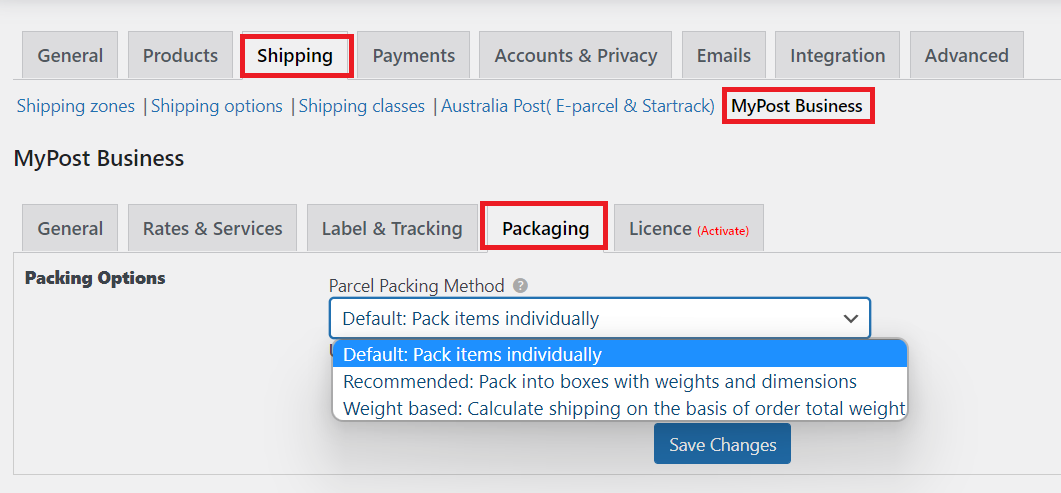
- Pack Items Individually
- Pack into boxes with weight and dimensions
- Weight Based
Choose your desired packaging method and click Save Changes.
Label Generation
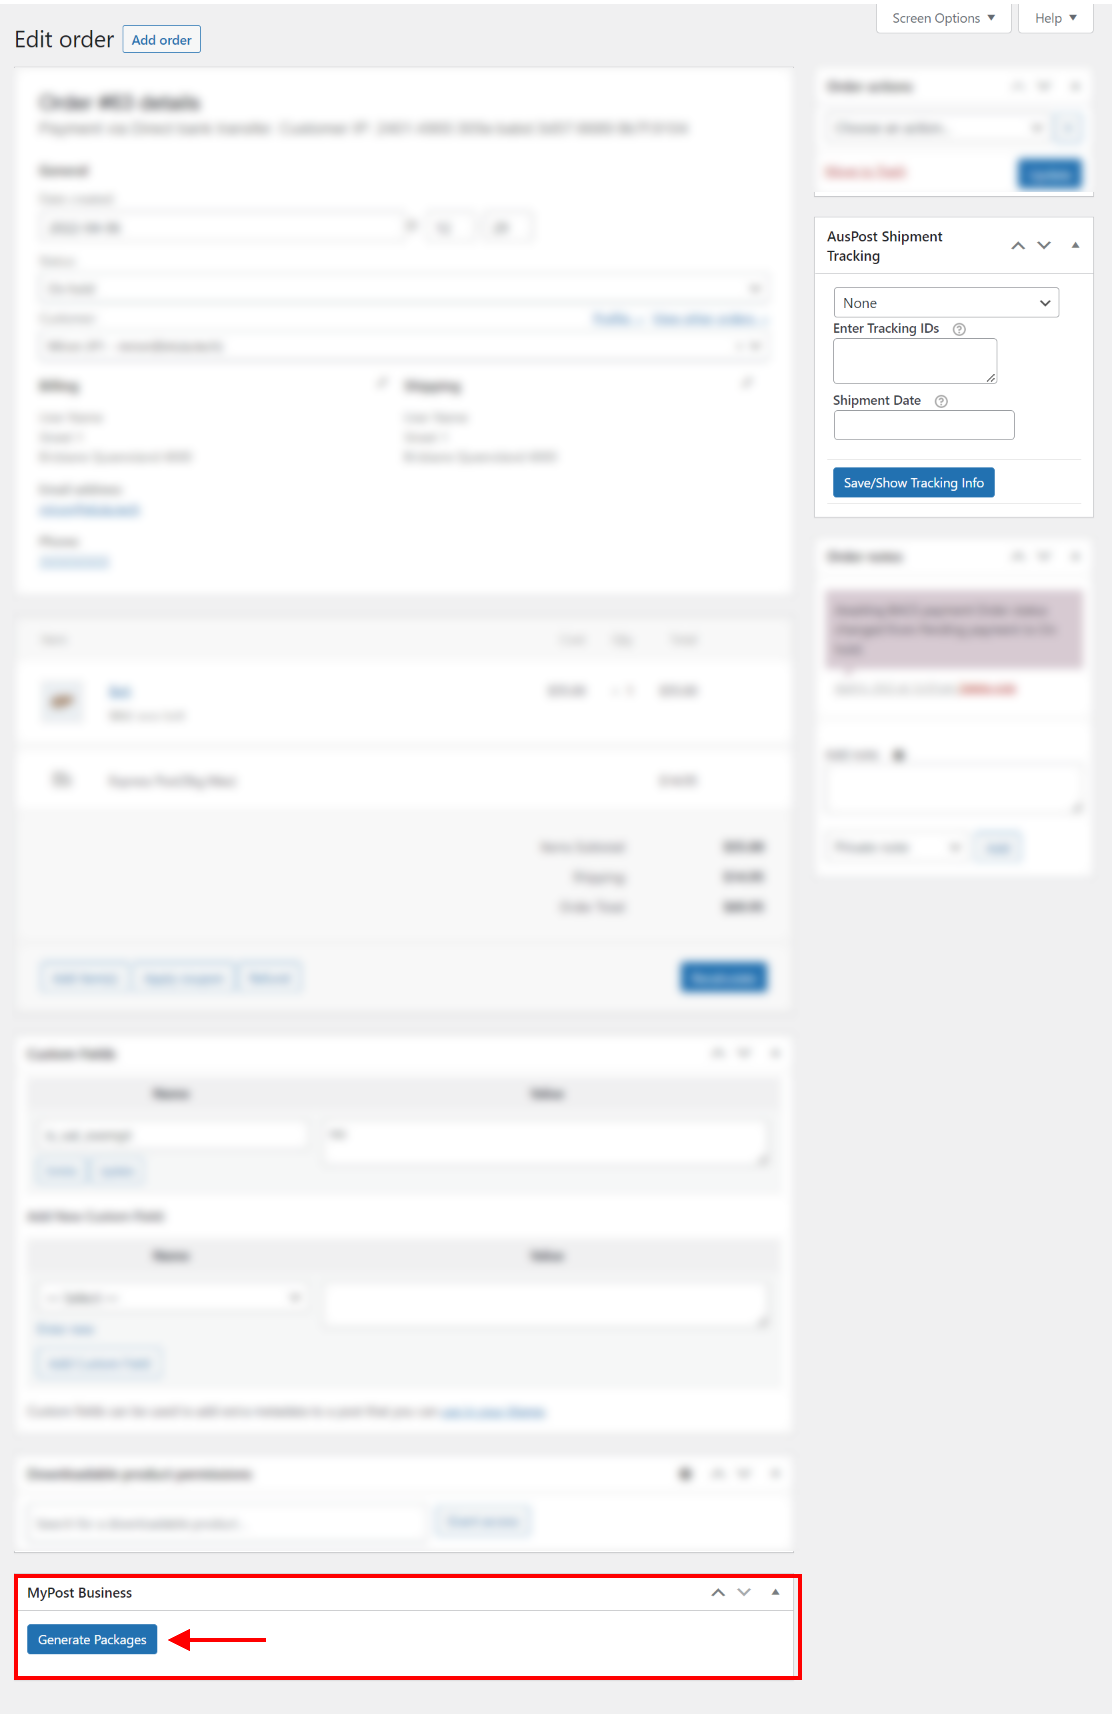
Open an order from WooCommerce orders to get the order details. Click Generate Packages, as shown in the screenshot below, to begin generating the order’s packages.
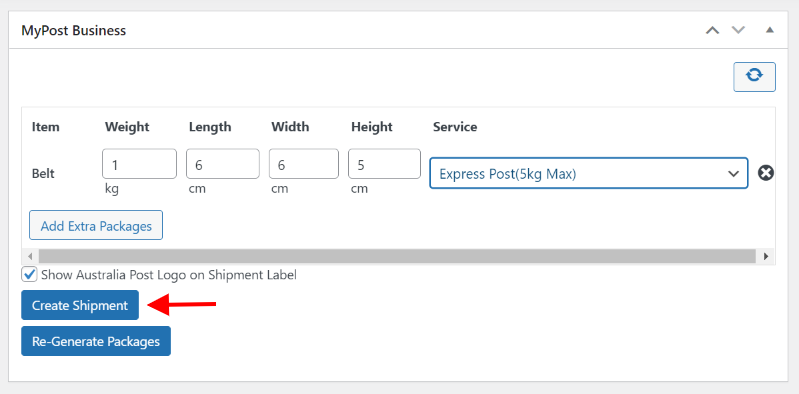
The shipping service ID and shipment number will then be generated, as shown in the screenshot below. Simply click create shipment order.


Tracking with MyPost Business
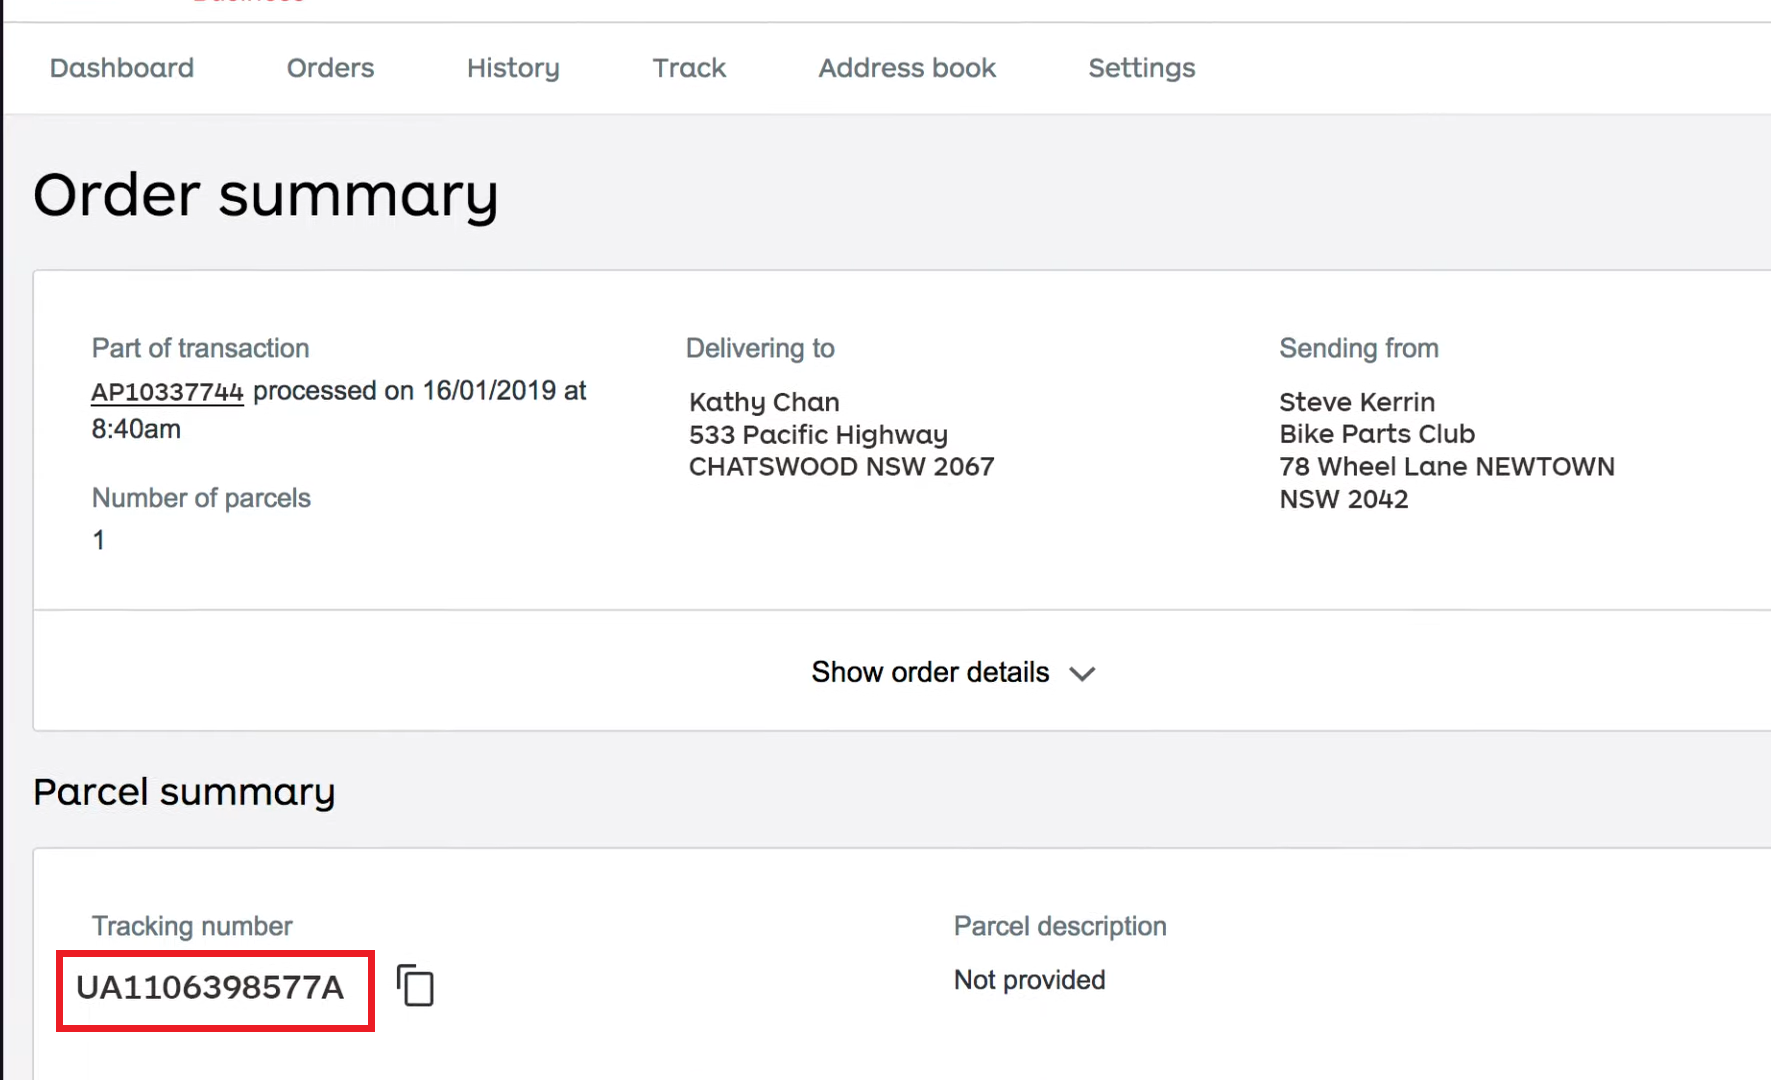
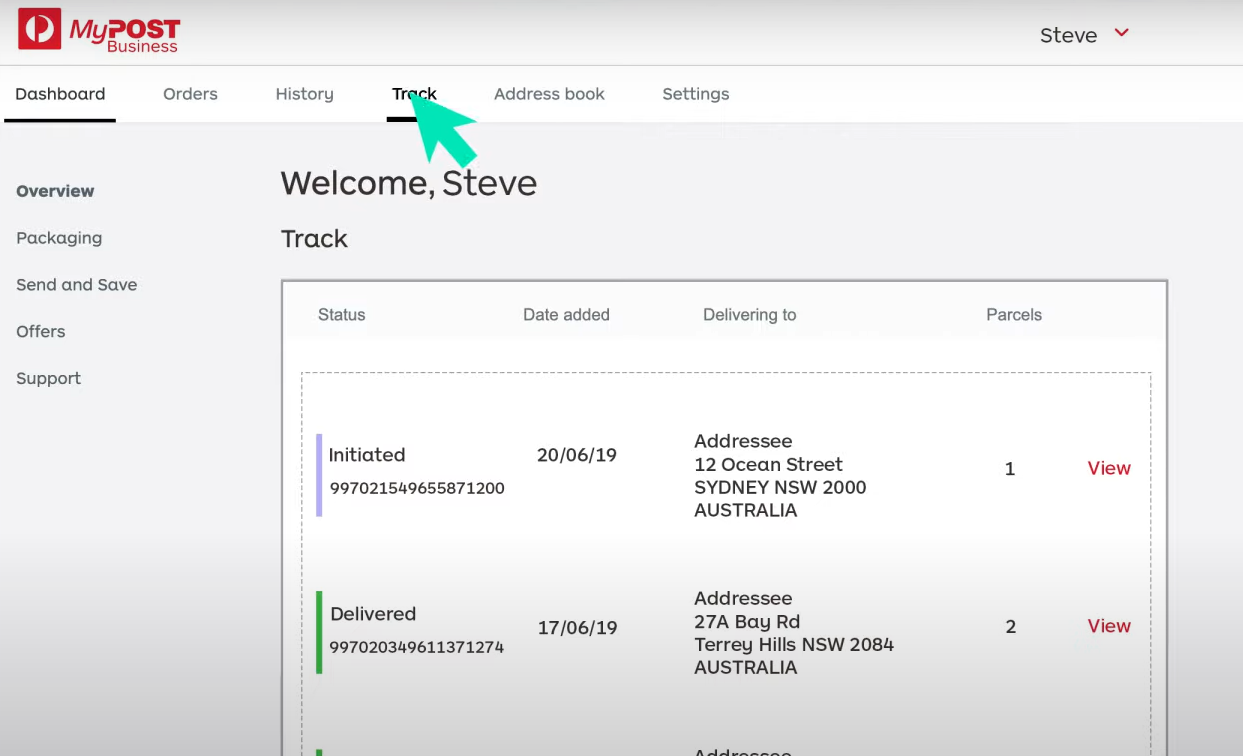
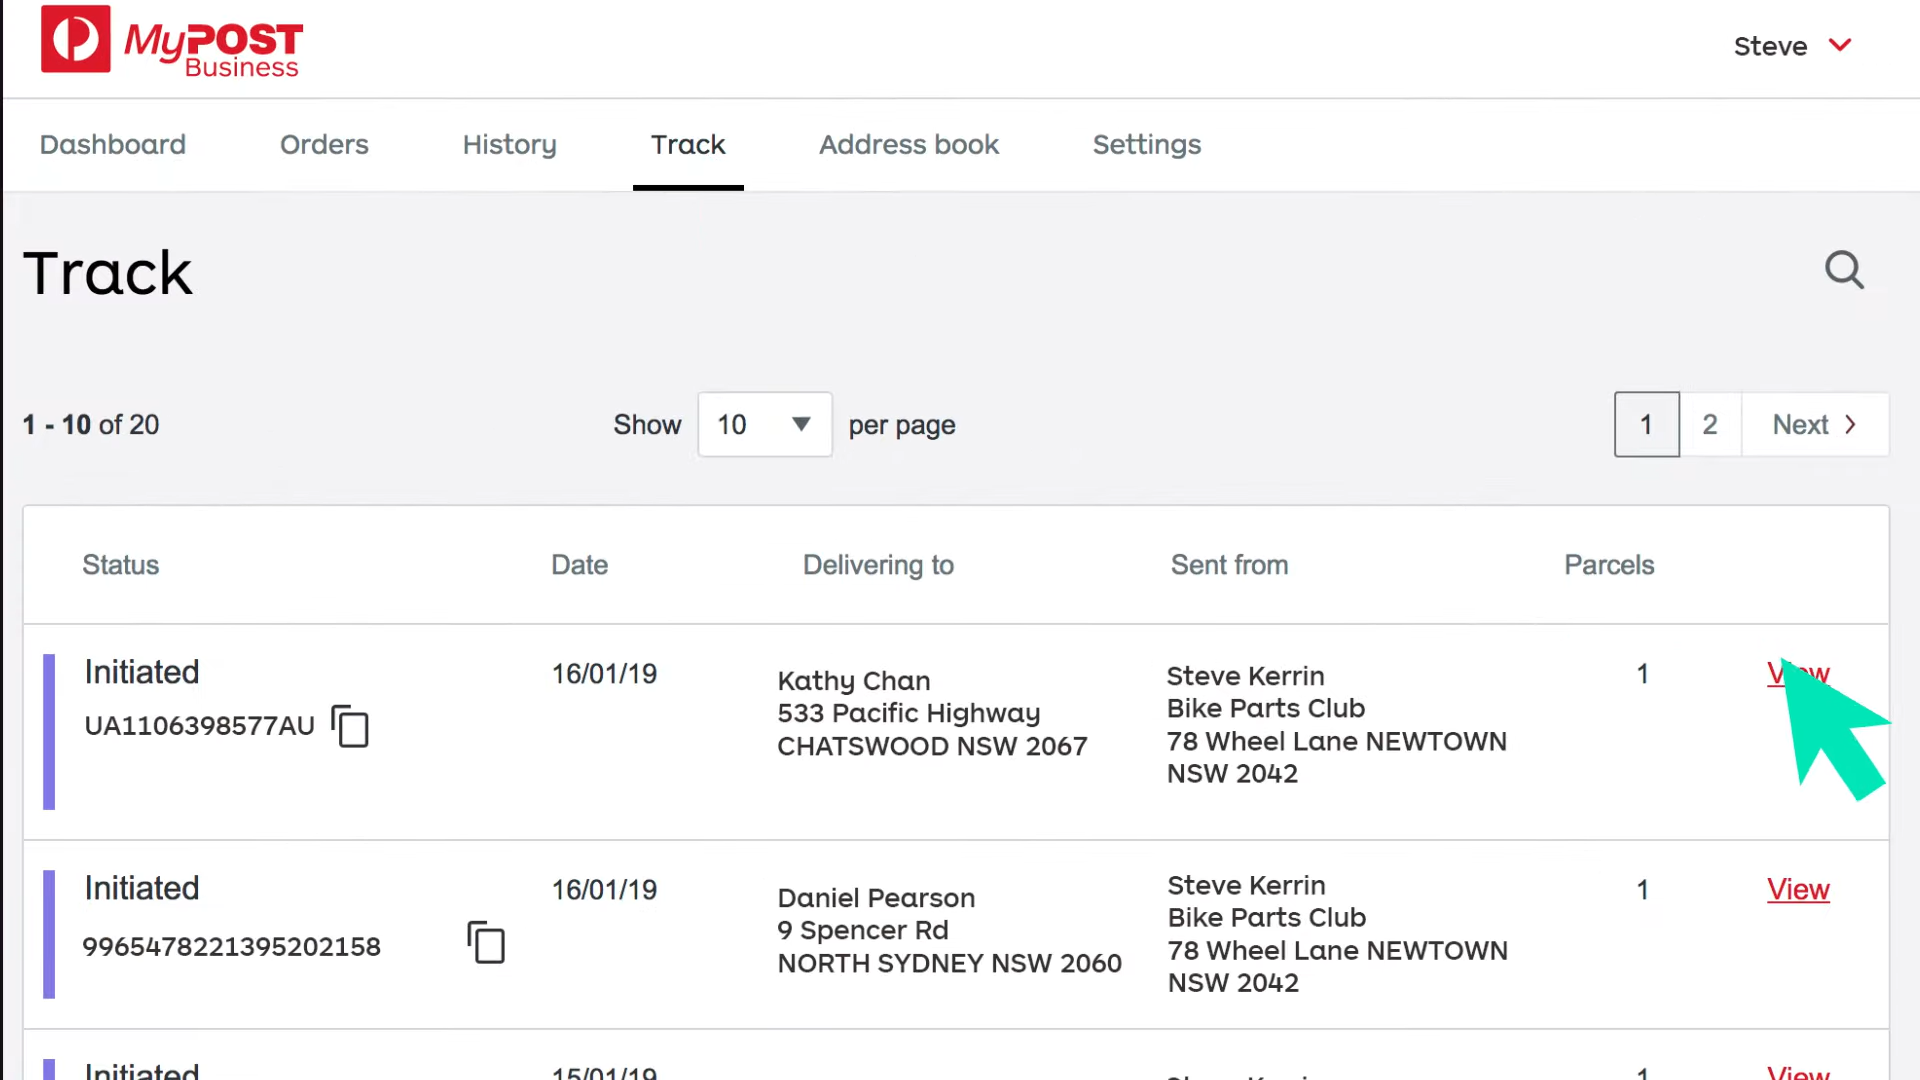
MyPost Business shipments may be tracked directly from the dashboard by clicking the ‘Track’ tab. In addition to order details like shipment status, date of creation, delivery location, number of parcels, and the choice to view order summary, you can locate all previous shipment order histories here.
To Conclude
We hope that this article has provided you with a deeper dive into all you need to know about Australia Post MyPost Business WooCommerce integration, as well as a comprehensive guide on rates, printing, and tracking. If you have any questions regarding the integration process or MyPost Business, please let us know in the comments section below.

