What can we help you with?
How to use WSDesk create ticket API with third-party forms and plugins?
This article explains WSDesk create ticket API integration process. It also consists testing of the API using Postman tool, demonstrations to create a support ticket using a simple HTML form and integration to third-party contact forms like Contact Form 7 and Gravity Forms.
Refer the product page to know about other features or the documentation for a detailed explanation of each feature.
What is WSDesk create ticket API?
This API will allow users to submit WSDesk supports tickets from websites built on any platform. Although WSDesk is built on WordPress, with this API, you will be able to create support tickets from any page on the web into WSDesk. The API also supports custom form plugins like Contact Form 7 and Gravity Forms.
WSDesk API Parameters
There are two mandatory parameters required for API integration. They are:
| attribute | type | description |
| action | string | WSDesk API name |
| api_key | alphanumeric | API key generated in WSDesk |
The WSDesk API name is wsdesk_api_create_ticket. This is the action that triggers the API call. Whereas, the api_key is the unique key found in the WSDesk general settings. In addition to this, you need to add the slugs of WSDesk ticket fields to capture the form values (we will discuss this process in later part of this article).
JSON Response Object
| status | message | description |
| success | “Support Request Received Successfully” | The request is sent effectively |
| error | “Authentication Error” | Occurs when API key is incorrect |
| “API not enabled” | Occurs when API key setting is not enabled in WSDesk |
If the API is not returning any of the above statuses, you can check for HTTP status codes like 200, 400, 404 and so on. These codes are usually returned by the server. If you are not receiving the required response, you can inspect the element by right-clicking on the page and viewing the error code. You can check this link for a better understanding of these status codes.
Using WSDesk create ticket API
You can use the WSDesk create ticket API in the following ways:
- Testing WSDesk create ticket API with Postman
- With simple HTML form
- With Contact Form 7
- With Gravity Forms
Testing WSDesk create ticket API with Postman
Postman is one of the popular environment used for API development, testing, designing, debugging and so on. Hence, I am using this tool to test the WSDesk create ticket API for this demonstration.
Here are the steps to test WSDesk API with Postman:
- The first step is to enable WSDesk API setting in WSDesk. Go to WSDesk > Settings > General tab, and scroll down to find the WSDesk API setting. Tick the Enable API checkbox to receive your WSDesk API key. Make a note of this API key and save changes.
The setting is as shown in the screenshot below.

- Next, move to the Ticket Fields section to create input fields for our support form. This step is crucial, as the ticket fields created in this step will only be used for raising the ticket in any environment.
For our demonstration, in addition to the default ticket fields, I have added an additional field for accepting attachment files as shown in the screenshot below.

Tip: You can refer to this section of the documentation to know how to create new ticket fields in WSDesk.
Now that we have configured WSDesk API settings, let us test in the Postman tool.
- Download and install Postman tool. Once it is installed successfully, you are shown a window as shown in the screenshot below.

Close this window for now as we do not need it at this time.
- Next, from the dropdown list located in the center part of the window, select POST request as shown in the below screenshot. This is because all requests have to be made using the POST method.

- In the URL field given right next to the above dropdown list, enter your website URL appended with /wp-json/wsdesk/v1/wsdesk_api_create_ticket.
A sample screenshot is shown below.
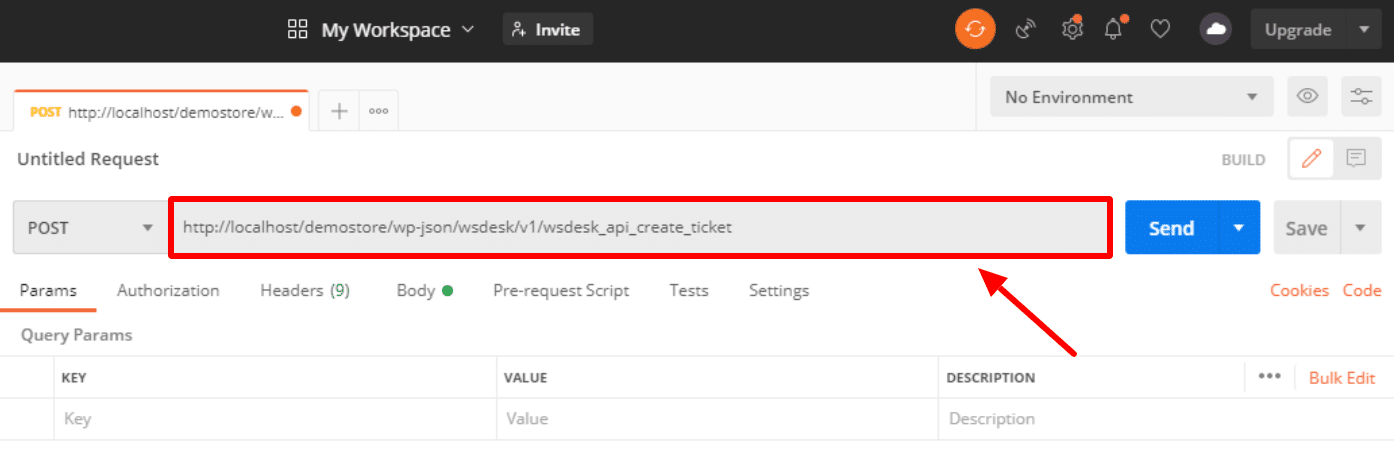
Replace http://localhost/demostore with your website URL before adding the remaining part of the URL.
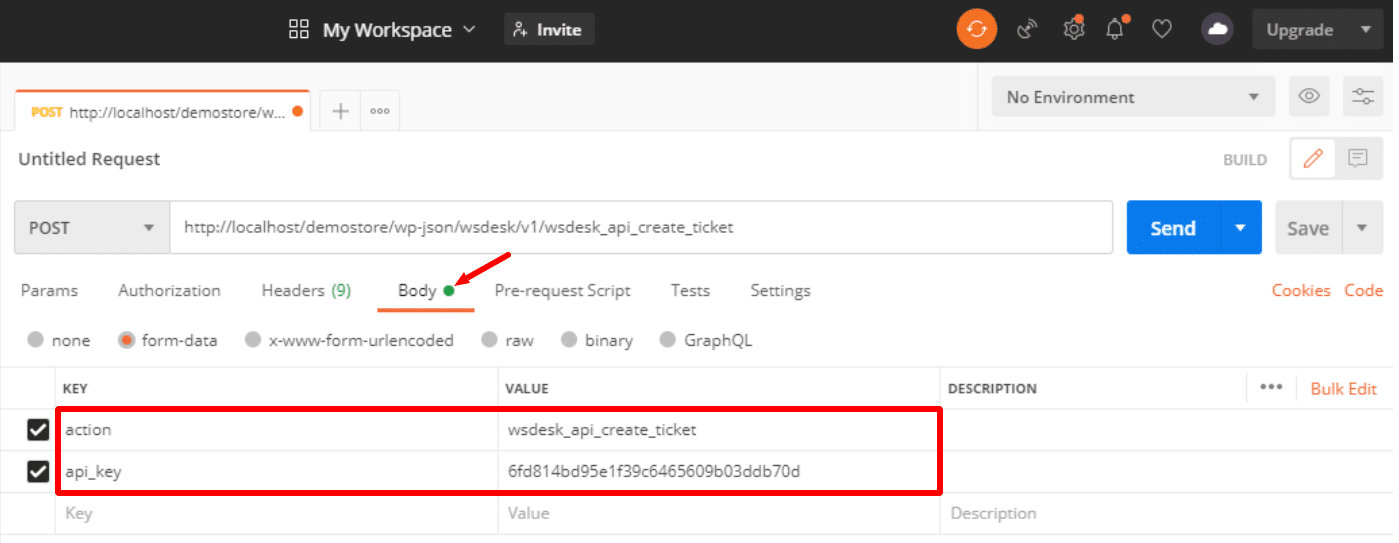
- In the next step, click on Body submenu to enter form data.
In the first row, enter the value action in the Key column and wsdesk_api_create_ticket in the Value column. Similarly, enter api_key in the first column and your respective WSDesk API in the second column as shown in the below screenshot.
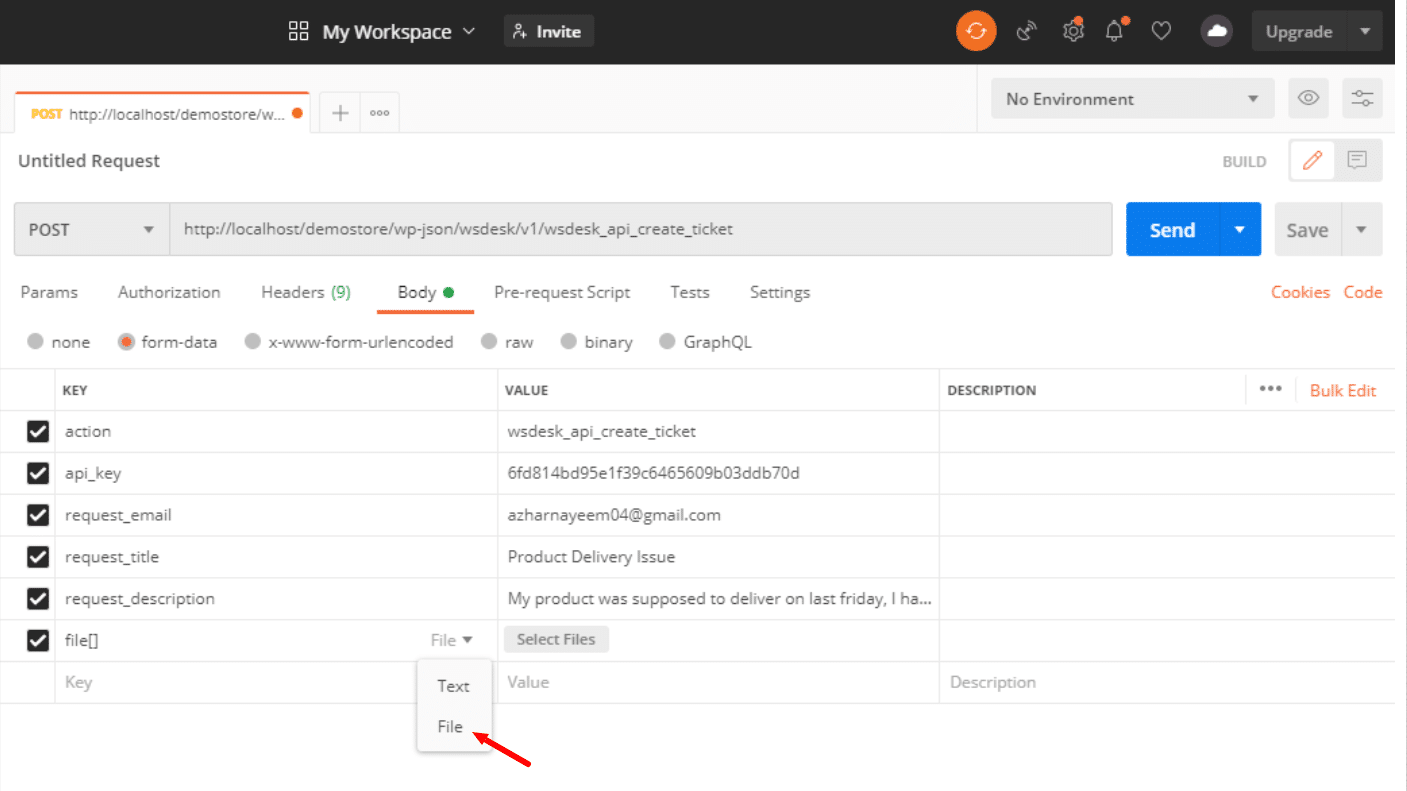
In the remaining rows, users can enter the keys/slugs of the input fields created in WSDesk. These fields may vary depending on the user.
Let us add the keys of four input fields which we created in WSDesk in the earlier part of this article. To get the slug of each ticket field, go back to WSDesk Ticket Field section and hover on a ticket field to view respective key as shown in the screenshot below.

Note down all the key values or copy them by doing a right click and inspecting each element. Further, to test the API, enter appropriate values for each key in the Value column.
An important point to remember is that there is no slug/key for attachment files. Hence, you need to enter its Key value as “file[]“. This key represents file array but takes only one attachment at a time. You can use multiple file[] keys for accepting multiple attachments. Additionally, change the input type to file from the given drop-down in the Key column.
- Finally, click on the Send button to send the request. If the request is successful, you will see the success message as shown in the below screenshot.

Move to WSDesk Tickets section to see the generated ticket. The following screenshot shows the generated ticket based on our above demonstration.

Now that we know the WSDesk create ticket API is working as expected, let us take a few examples to see how one can raise a ticket from any page.
Using WSDesk create ticket API with simple HTML form
For this example, I’ll create a simple HTML page and redirect it to a javascript function.
Open a text editor(like notepad++) and create an HTML file with the following code:
<html>
<head>
<script src="http://ajax.googleapis.com/ajax/libs/jquery/1.7.1/jquery.min.js" type="text/javascript"></script> <!-- Remove this code if you have already included jQuery-->
<script>
 $( document ).ready( function(){
 jQuery('.eh_crm_support_main').on('submit','form#eh_crm_ticket_form',function (e) { //CHANGE THE CLASS NAME AND FORM NAME ACCORDING TO YOUR FORM
 e.preventDefault(); // avoid to execute the actual submit of the form you may remove this code if you want the form to submit after the ticket is added.

 var btn = jQuery("#crm_form_submit"); //id of the submit button
 btn.prop("disabled","disabled");
 var fd = new FormData();
 fd.append('action','wsdesk_api_create_ticket'); //THIS MUST REMAIN SAME
 fd.append('api_key', '6fd814bd95e1f39c6465609b03ddb70d'); //This will vary from user to user. Find this in the general settings tab.
 fd.append('request_title', jQuery('#request_title').val()); //The index must be the same as the slug of the field that you noted down by inspecting element.
 fd.append('request_description', jQuery('#request_description').val());
 fd.append('request_email', jQuery('#request_email').val());
 if(jQuery("#ticket_attachment").length !=0 ) //code for attachments
 {
 var files=[];
 var file = jQuery("#ticket_attachment");
 jQuery.each(jQuery(file), function (i, obj) {
 jQuery.each(obj.files, function (j, file) {
 fd.append('file[' + j + ']', file);
 });
 });
 }
 jQuery.ajax({
 type: "POST",
 url: "http://localhost/demostore/wp-json/wsdesk/v1/wsdesk_api_create_ticket", //full URL of their wordpress site
 processData: false,
 contentType: false,
 data:fd, // serializes the form's elements.
 success: function (data)
 {
 btn.removeProp("disabled");
 response=JSON.parse(data);
 if(response.status=="success")
 {
 alert(response.message); //success code
 }
 else
 {
 alert(response.message); //fail code
 }

 },
 error: function (jqXHR, textStatus, errorThrown) {
 console.log(textStatus, errorThrown);
 }
 });
 });
 });
</script>

</head>
<body>
<div class="eh_crm_support_main">
 <form class="support_form" id="eh_crm_ticket_form" method="POST">
 <span>Email </span>*<input type="email" name="request_email" id="request_email" placeholder="Enter Email" required="">
 <br>
 <span>Subject </span>*<input type="text" name="request_title" id="request_title" placeholder="Enter Subject" required="">
 <br>
 <span>Description </span>*<input type="text" name="request_description" id="request_description" placeholder="Enter Description" required="">
 <br>
 <span>Attachment </span> <input type="file" name="ticket_attachment" id="ticket_attachment" multiple="">
 <br>
 <br>
 <button type="submit" id="crm_form_submit" class="btn btn-primary" data-loading-text="Submitting...">Submit Request</button>
 </form>
</div>

</body>
</html>
Note: Replace the api_key value in the javascript with your WSDesk API key, and the website URL with your complete site URL.
Once you have saved the file with the .html extension, open it in the browser to create a ticket.
Further, enter the form fields and click on the Submit Request button to submit the ticket. To see the response status, right-click on the page to inspect the elements and click on the Network tab to see the response message.
A sample screenshot is shown below.

The ticket will be generated in WSDesk as shown in the screenshot below.

Using WSDesk create ticket API with Contact Form 7
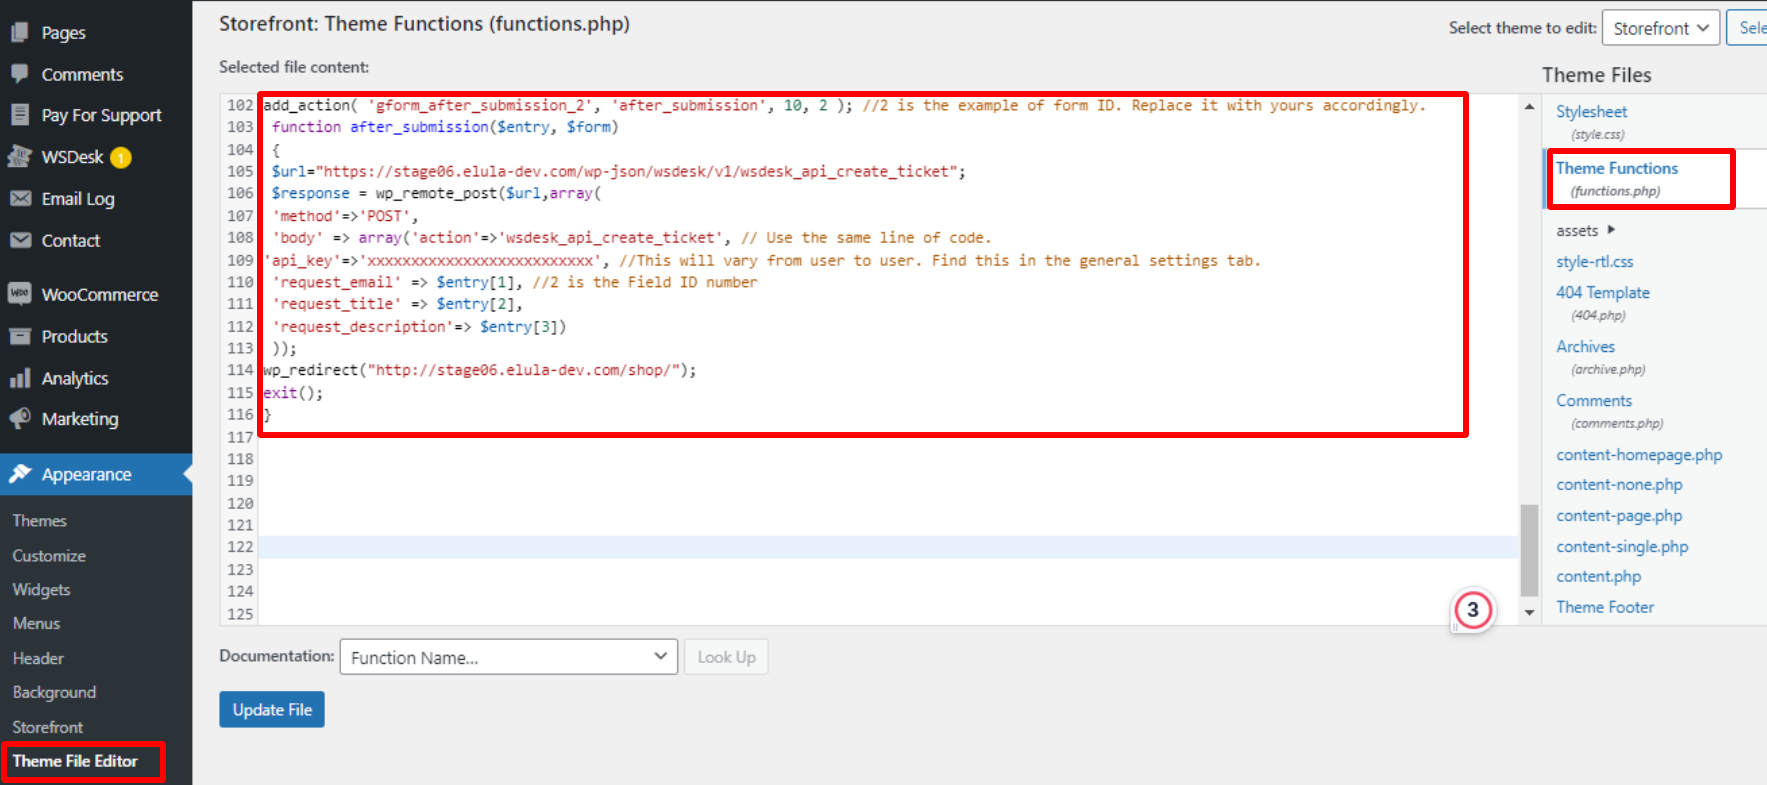
To integrate WSDesk with Contact Form 7, copy the following code and paste it into the Theme Functions(functions.php) file of your active website theme.
add_action( 'wpcf7_mail_sent', 'your_wpcf7_mail_sent_function' ); // Action to get posted data from the contact form 7. function your_wpcf7_mail_sent_function( $contact_form ) { $title = $contact_form->title; $submission = WPCF7_Submission::get_ instance(); if ( $submission ) { $posted_data = $submission->get_posted_data() ; if($contact_form->id!=85)//85 is Form ID. Replace it with your respective form ID { return; } $url="http://localhost/ demostore/wp-json/wsdesk/v1/wsdesk_api_create_ticket"; //Full URL of the admin-ajax file. $response = wp_remote_post($url,array( 'method'=>'POST', 'body' => array( 'action'=>'wsdesk_api_create_ ticket', 'api_key' => ' 7606eb3db86e989218cf0c644b5063 ba', 'request_title' => $posted_data['your-subject'], 'request_email' => $posted_data['your-email'], 'request_description'=>$ posted_data['your-message'] ) )); $response=json_decode($ response['body'],true); if($response['status']==' success') {} //code if success else {} //code if fails } }
Following is a screenshot of the ticket raised using Contact Form 7.

The below screenshot shows the ticket generated using Contact Form 7 in WSDesk.

The Contact Forms IDs can be found in the short-code of the respective forms, as shown in the screenshot below.

Note: Contact Form 7 does not support uploading of files to this filter. Hence, uploading attachment is not possible from Contact Form 7 to WSDesk. Replace the api_key and website URL($url value) to your respective values.
Create Ticket API with Gravity Forms Using WSDesk
You can integrate WSDesk plugin with Gravity Forms by pasting the following code into the Theme Functions(functions.php) file of your active website theme.
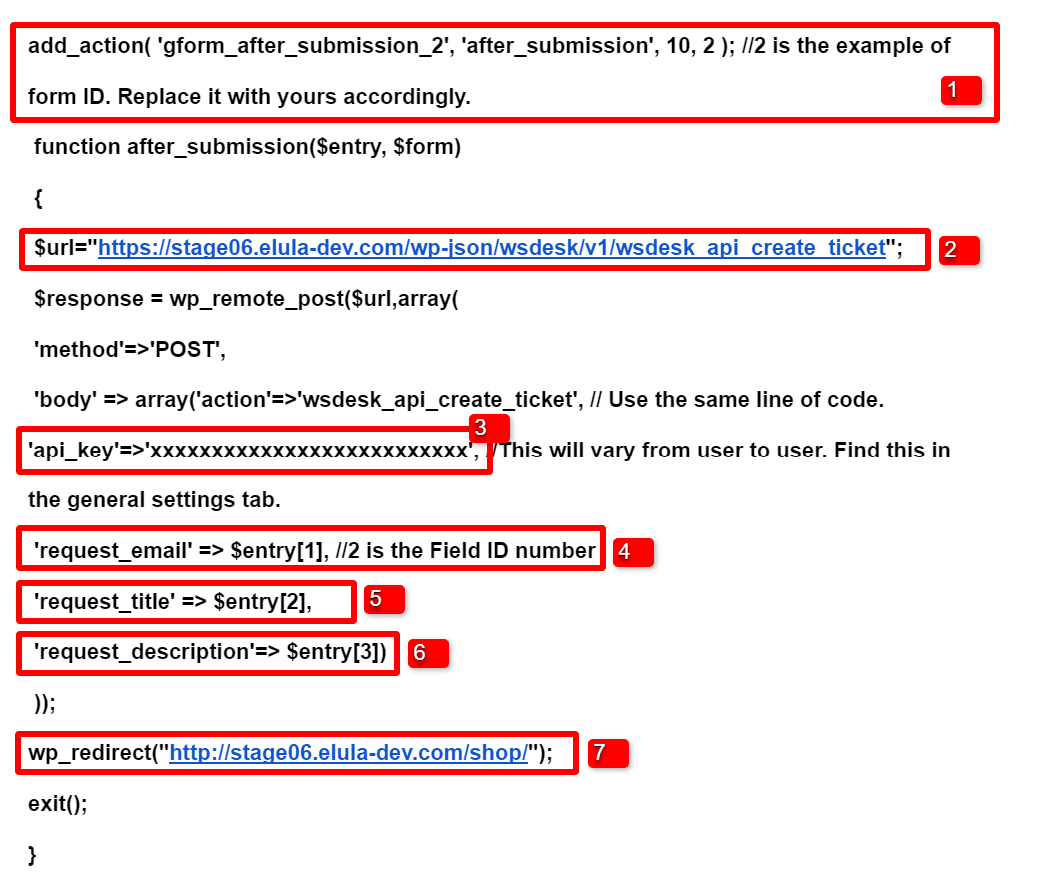
add_action( 'gform_after_submission_2', 'after_submission', 10, 2 ); //2 is the example of form ID. Replace it with yours accordingly.
function after_submission($entry, $form)
{
$url="https://stage06.elula-dev.com/wp-json/wsdesk/v1/wsdesk_api_create_ticket";
$response = wp_remote_post($url,array(
'method'=>'POST',
'body' => array('action'=>'wsdesk_api_create_ticket', // Use the same line of code.
'api_key'=>'xxxxxxxxxxxxxxxxxxxxxxxxxx', //This will vary from user to user. Find this in the general settings tab.
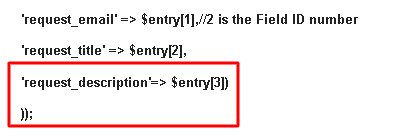
'request_email' => $entry[1], //2 is the Field ID number
'request_title' => $entry[2],
'request_description'=> $entry[3])
));
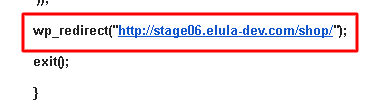
wp_redirect("http://stage06.elula-dev.com/shop/");
exit();
}
But there is some information that needs to be defined in the code snippet before implementation. This will help users easily create tickets through Gravity Forms. Hence, please follow the instructions for fetching the information and defining it correctly in the form as in the below screenshot.
1. Form ID
After installing the Gravity Forms plugin, the form page will be auto-created. You can find the Gravity Form ID on the WooCommerce pages.
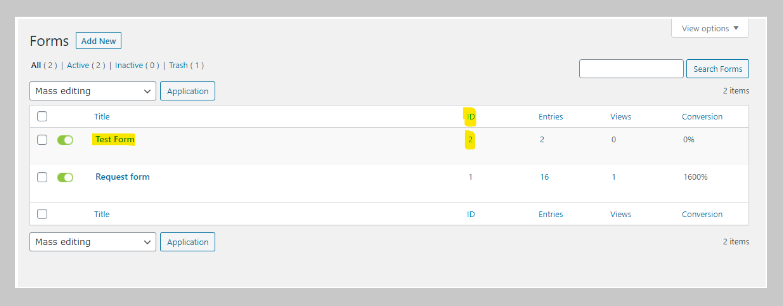
After copying the form ID from the gravity form, paste in the below code line of the code snippet.

2. URL
Mention your site URL and paste it in the code snippet, so that a support form can be created on your site.


3. WS Desk API key
Enable WSDesk API setting in WSDesk. Go to WSDesk > Settings > General tab, and scroll down to find the WSDesk API settings. Tick the Enable API checkbox to receive your WSDesk API key. Make a note of this API key and save changes.
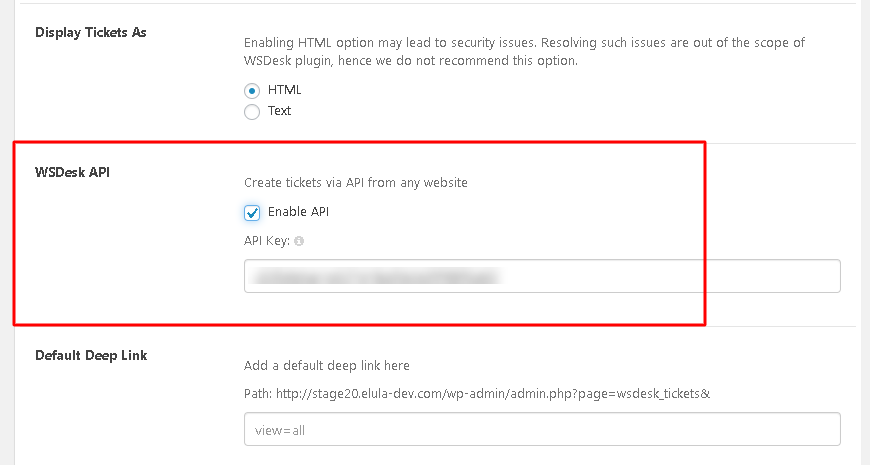
After fetching the WSDesk API from our plugin settings, paste the API key in the code snippet for linking WSDesk plugin with the third-party forms.

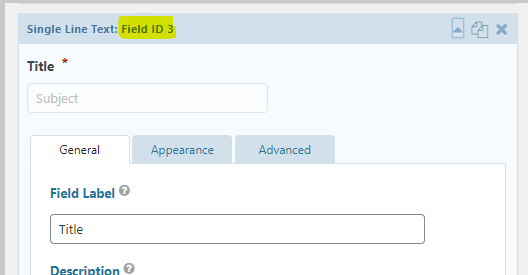
4. Request Email
If you want to show the fields in the ticket raising form as per your requirements, you have to mention the entry ID in the code snippet for fetching the information from the Gravity Form page from the backend of your site.

After fetching the field ID for the email option for Gravity Forms, paste the field ID in the code snippet. Hence, the email option can be created on the form.
![]()
5. Request Title
After fetching the field ID for the title option for Gravity Forms, paste the field ID in the code snippet as the title option can be created on the form.

6. Request Description
After fetching the field ID for the description option for Gravity Forms, paste the field ID in the code snippet as the description option can be created on the form.
7. Redirection URL
If you want to redirect the end users to a different page like Shop or Product page after submitting the ticket, mention the URL of that particular page of your site in the below code line of the code snippet. If you don’t want to redirect the end users to any other page, use the code snippet that is already defined in our Gravity Forms page document.
Note – You can easily create the additional fields in the Gravity Form plugin, and define in the code snippet for showing new fields in the ticket submission form.
After mentioning all the information in the code snippet, you can define the code in the theme functions on your site for implementing the changes. Hence, follow the below path.
If it is still not working, feel free to contact the support team. We will help you to troubleshoot any issue.
To explore more details about the plugins, go check out WSDesk – WordPress Helpdesk Plugin.
Read the product setting up article to understand the plugin, in detail. Or check out the product documentation section for more related articles.
You can also check out other WordPress and WooCommerce plugins in ELEX.