What can we help you with?
How to Send Products from a Different Country via ELEX EasyPost Shipping Method Plugin for WooCommerce
The article is a tutorial and guides you through the process of sending products from a different country. For instance, if your WooCommerce store is based in the US and you want to ship any product from Canada, you can do this using the ELEX EasyPost Shipping Method Plugin for WooCommerce. It has become possible with the introduction of the Sender Country field in the plugin. So this has to be the biggest reason you’ll switch to an EasyPost Account.
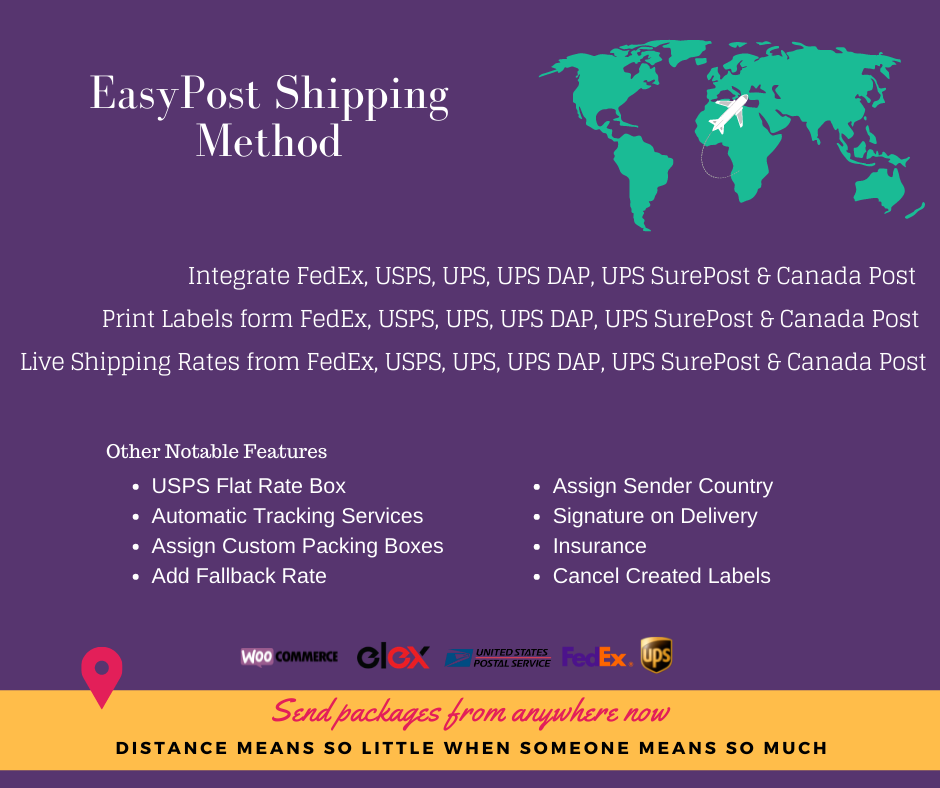
EasyPost is an advanced shipping integration that integrates around 100+ shipping services through one API. Inside of WooCommerce, EasyPost, and ELEX collaborated to come up with similar integration. As a result of this partnership, the ELEX EasyPost Shipping Method Plugin for WooCommerce came into being. The plugin integrates shipping giants like USPS, FedEx, and UPS to your WooCommerce store with a single API.
Setting Up Store Address in WooCommerce
The store address is the place where the online store is billed. You can also say that it decides the currency of the store. So if your store address is somewhere in the United Kingdom, your store currency will be Pound. If the store address is in India then the store currency will be India Rupees. So before you start setting up the store address for the ELEX EasyPost Shipping Method Plugin, there are very few requirements:
- EasyPost Shipping Method Plugin for WooCommerce- Purchase The Plugin.
- An EasyPost Account- With each EasyPost account users get a USPS accounts with discounted postage pricing.
- FedEx or UPS account or Both- You can Add an existing FedEx or UPS account to EasyPost
If you are reading this line, it is expected that you have the plugin installed and have the above-mentioned accounts. These will help you follow the tutorial completely. So once you are ready,
- Navigate to your WordPress dashboard.
- Click on WooCommerce in the dashboard to go to Settings.
- Finally, click on General.
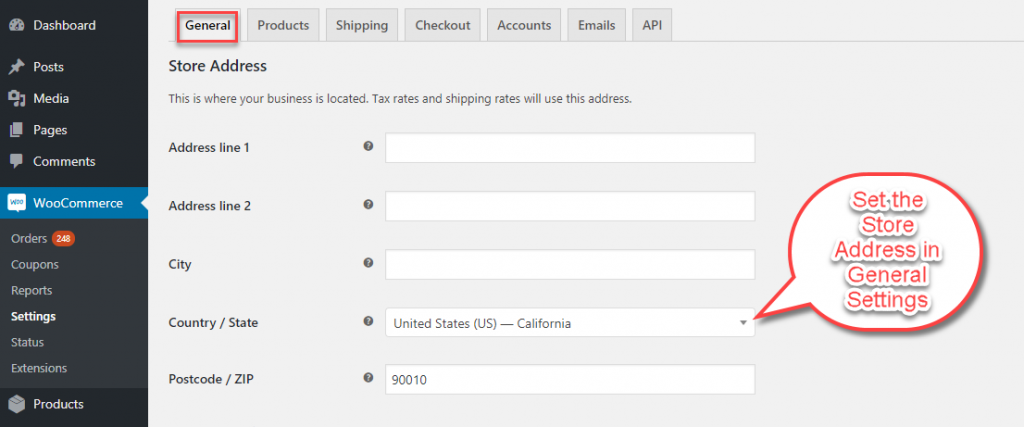
This will take you to the Store Address section(screenshot below). If your screen does not look like this, start from step one again. Once you are here, fill in the address details and select the country from the drop-down. This should be the same as the billing address in the payment methods or the shipping services for convenience. For instance, if have your billing address in the payment methods, FedEx, UPS, or USPS accounts in the US, then keep your store location the same as them. The general settings also have the store currency settings, keep the currency according to the store address. Finally, click on save changes to apply the changes made.
This helps in a better performance of all the integrations.
Setting Sender Location
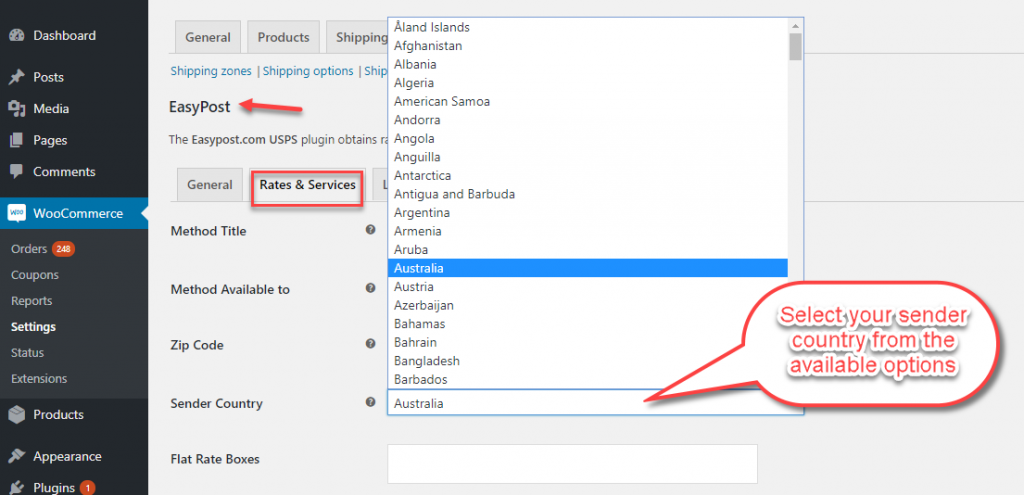
Now let’s shift our focus to the sender country. As discussed in the introduction paragraph, you can assign a different country from where the product will be shipped to the customer anywhere. The sender country field asks for a sender country in the plugin. You’ll find almost all the countries in the drop-down that appears. Sender country is the country from where you want to send the parcel. Let’s understand this with an example. Your store address is in the US and your warehouse is in Canada. This means you will need to send the product from Canada. In this scenario, you can choose Canada as the sender country.
With Canada as the sender country, the shipping services like FedEx and UPS will pick the parcel from your Canada address and deliver it from there. In this way, you are charged from the Canada location to the shipping destination. Billing of shipping charges takes place automatically. Your FedEx and UPS accounts are charged according to usage.
In the case of across the US delivery, you need to keep the sender country like the US and enter the Pincode of the sender location to be specific. You can also use the plugin in case you have the warehouse far away from your store address. Any Pincode near the warehouse will help you send parcels directly from the warehouse. You get a USPS account when you register for EasyPost and if you use USPS services your USPS account gets charged automatically.
One of the best things about EasyPost is you get access to discounted postage rates for USPS even if you ship 1 package. Also, your existing pricing plans with FedEx and UPS are carried forward to EasyPost.
Shipping Rates
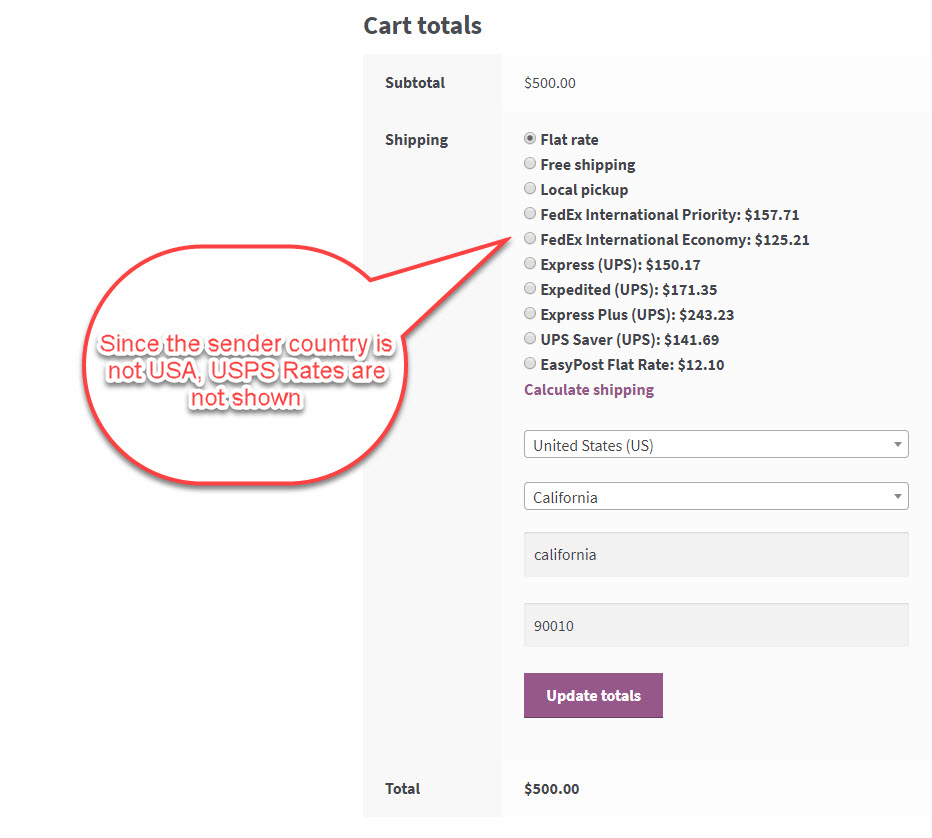
The Zip Code is taken as the point from which the shipping rates are calculated and on successful creation of packages, you can print labels. These labels are ready to use labels and you can paste the labels to send packages. In this case, we have Australia as the sender country.
So even if your store address is based in the US, the shipping rates are calculated as per Australia which is the sender location. The shipping destination is the US. Take a look at the cart page below. Get a hands-on experience with the Live Demo.
Generating Shipping Label
Printing of labels is followed by the generation of packages. You can create the packages on the order page by navigating to Dashboard> WooCommerce> Orders> #Order Number. Click on the specific order number to go the orders page.
The order page has information related to all the packages options available. Here you can choose the service you want to create the label. Or you can always go for the service selected by the customer in the cart or checkout. The first thing you’ve got to do here is scroll down to the bottom and click on ‘Create Package’. This creates packages for the items in the order. Now you the dialogue box, where you ‘create shipment’.
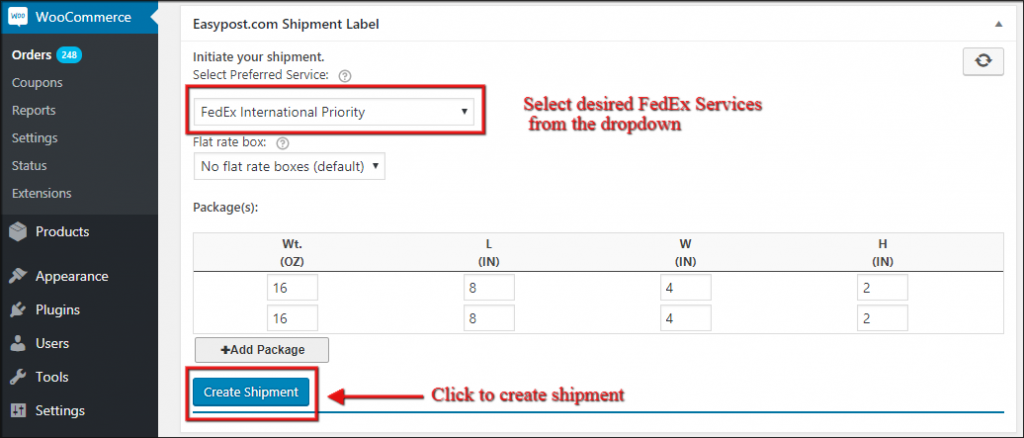
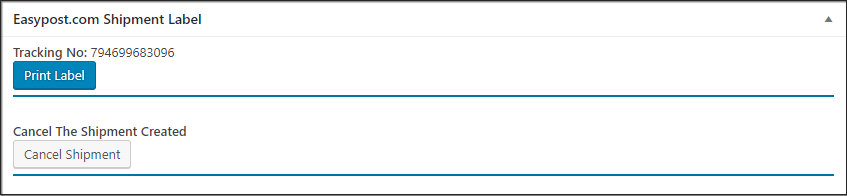
Printing Label– ‘Print Label’ option appears after you create the shipment. Creation of label also returns the tracking id. The tracking id is automatically sent to your customers with regular updates. Below is a sample FedEx label generated with EasyPost Shipping Method Plugin. And whenever you create any wrong shipment, you can cancel the shipment with a single click.
Breaking down the Label
Let’s see the different sections of the label created.
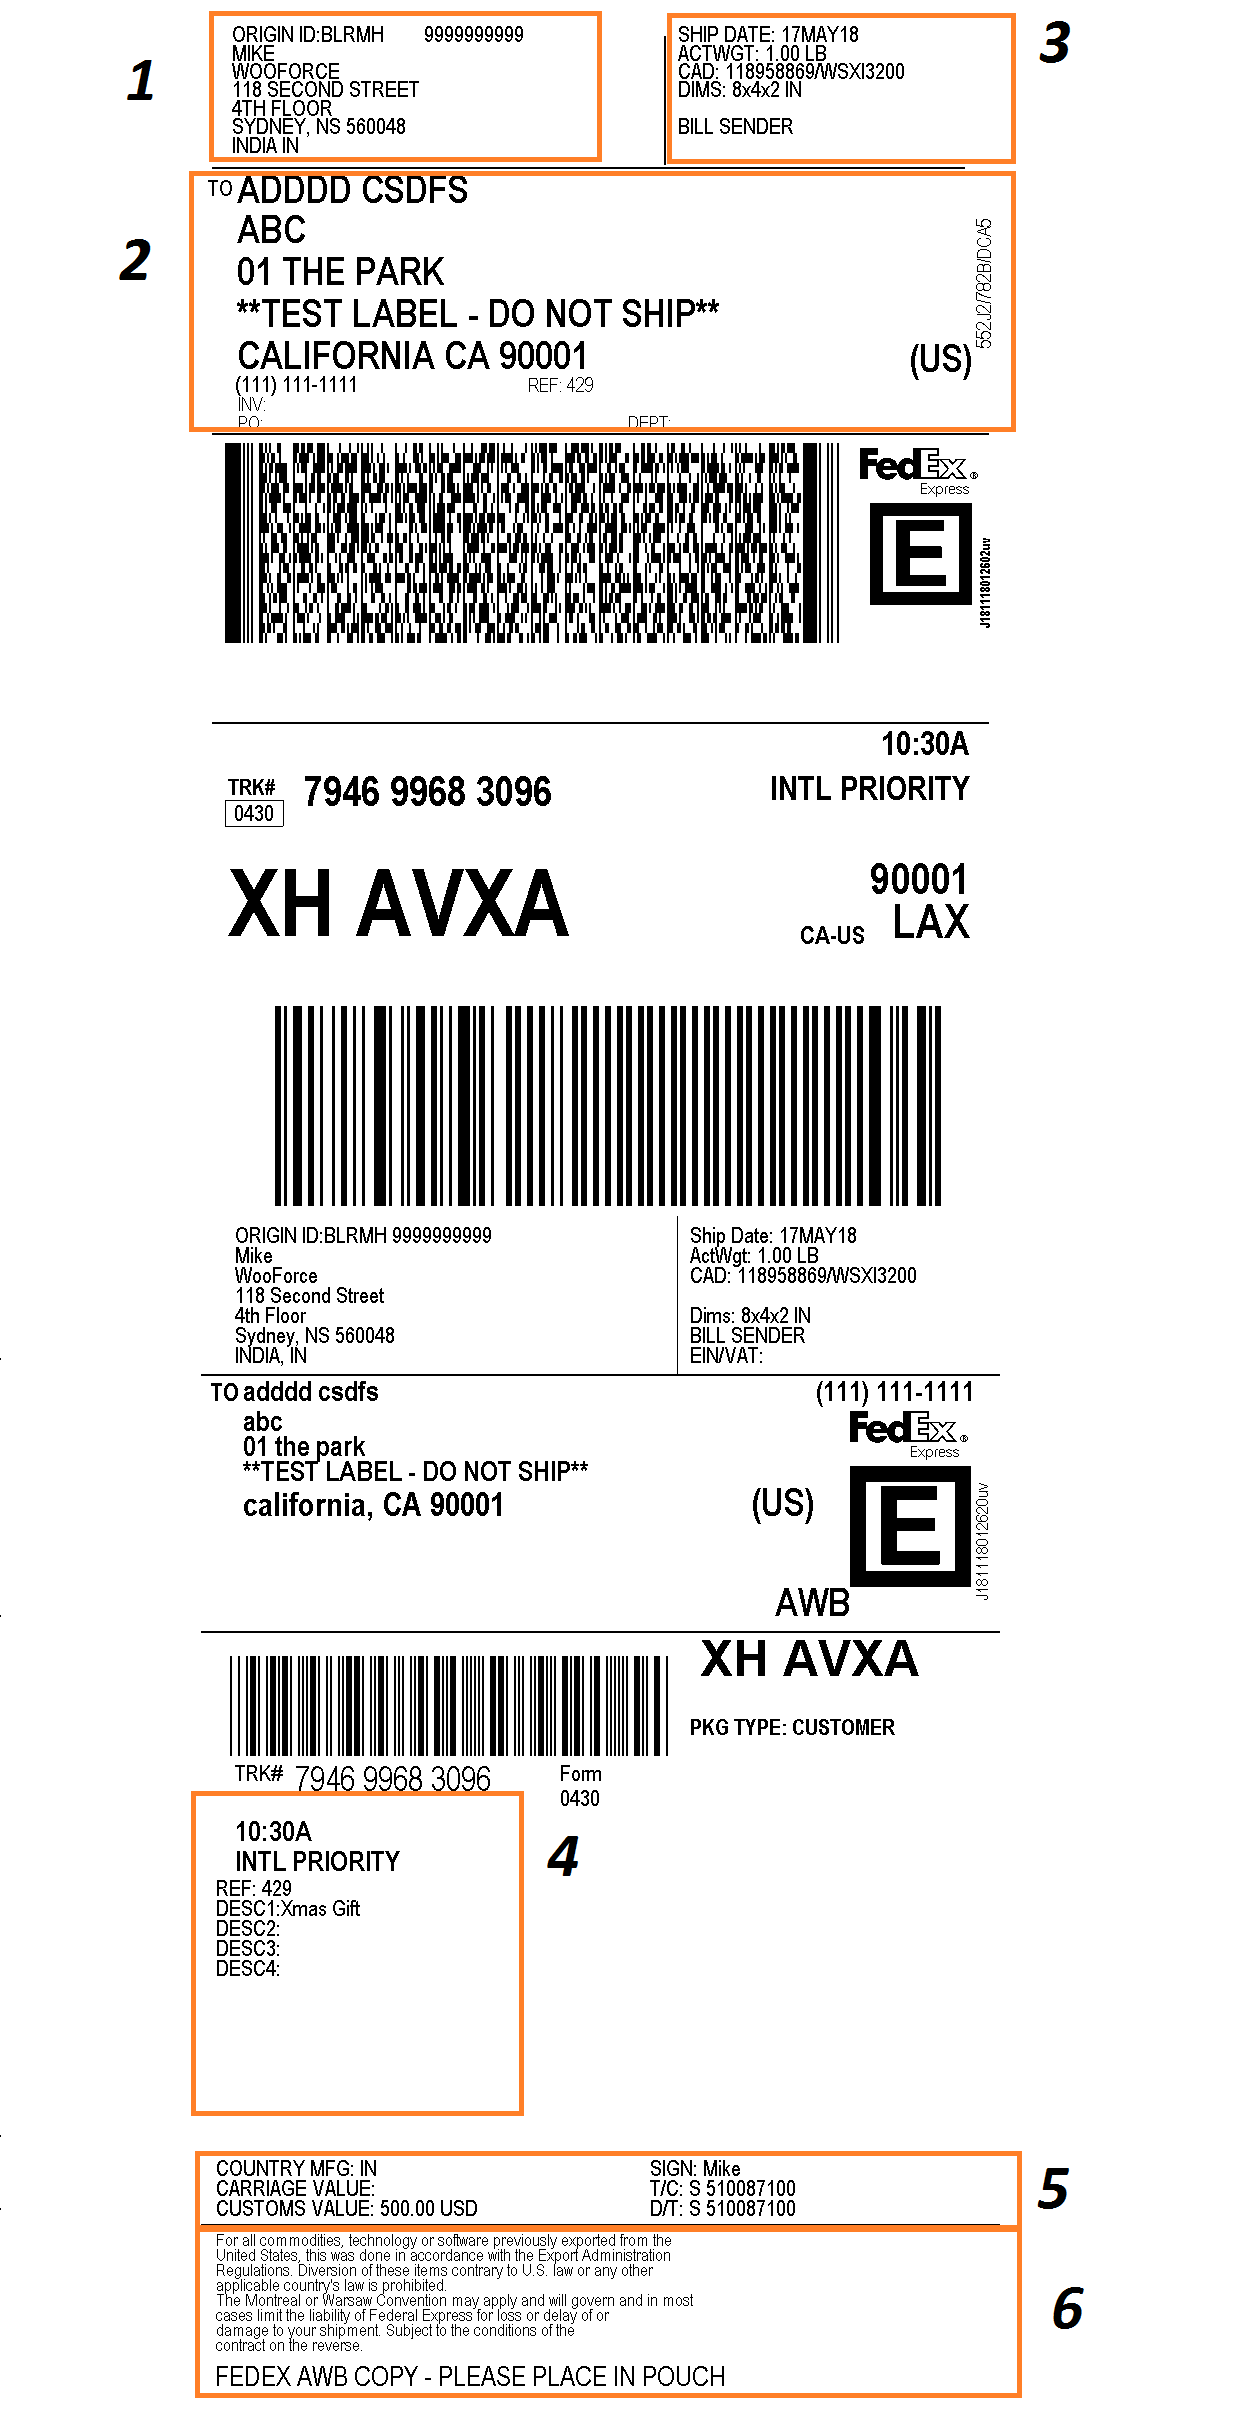
- Shows the sender location
- Shows the shipping destination
- Shows date of shipping and package details
- Shows package description
- Shows the country of manufacture, the value of carriage, and signature of issuing officer
- Shows Instructions by FedEx
EasyPost Shipping Method Plugin for WooCommerce

Closing Comments
EasyPost brings together the best shipping services. And now with the addition of the sender location field, you can choose the desired location as your sender address. Not just businesses, this feature is going to help individual customers as well. Since you can also choose the service, it depends on the user to use the cheaper service for shipping. I hope you can now create shipments and send the packages from the desired location with EasyPost and this article helps you do so. Happy Selling!
To explore more details about the plugins, go check out ELEX EasyPost Shipping Method Plugin for WooCommerce.
Read the article for setting up EasyPost to understand the plugin, in detail. Or check out the product documentation section for more related articles.
You can also check out other WooCommerce and WordPress plugins in ELEX.