Running a successful website, whether for business or personal use, often entails providing excellent customer support. As your website grows, the volume of inquiries, feedback, and support requests can become overwhelming. This is where a support ticketing system can be a game-changer.
A support ticketing system helps you organize and manage customer inquiries efficiently, ensuring that no request goes unnoticed or unanswered. In this article, we will walk you through the twelve steps to create a support ticketing system on your WordPress site, enabling you to enhance your user experience and streamline your customer support process.
Importance of a Support Ticketing System
A support ticketing system is not merely a tool; it is a strategic asset that can significantly enhance your website’s efficiency, user satisfaction, and overall success. In this section, we will explore the reasons why implementing a support ticketing system is crucial for your WordPress site.
Streamlined Communication
One of the primary advantages of a support ticketing system is its ability to streamline communication between users and support teams. Instead of relying on scattered emails, social media messages, or phone calls, users can submit their inquiries or issues through a centralized platform. This ensures that all support requests are recorded, organized, and easily accessible to your support staff.
Efficient Issue Tracking
A support ticketing system allows you to track issues and inquiries systematically. Each support request is assigned a unique ticket number, making it easy to monitor its progress from submission to resolution. This ensures that no request falls through the cracks, and you can maintain a record of all user interactions for future reference.
Prioritization and Categorization
Not all support requests are created equal. Some require immediate attention, while others can wait. With a support ticketing system, you can categorize and prioritize tickets based on their urgency and nature. This helps support teams to allocate resources effectively and address critical issues promptly.
Enhanced User Experience
A support ticketing system enhances the user experience by providing a structured and organized way for users to seek assistance. Users can easily submit their requests, provide relevant details, and receive updates on the status of their tickets. This transparency and professionalism improve user satisfaction and build trust.
Improved Response Time
With a support ticketing system in place, support teams can respond to user inquiries more efficiently. Tickets are routed to the appropriate personnel, eliminating the need for manual sorting or forwarding of emails. This results in quicker response times and faster issue resolution.
Knowledge Base Integration
Many support ticketing systems offer the option to integrate a knowledge base or FAQ section. This allows users to find answers to common questions and issues independently, reducing the number of support requests. When users do need assistance, they can access the ticketing system directly from the knowledge base, ensuring a seamless support experience.
Data Analytics and Reporting
Support ticketing systems often come with built-in analytics and reporting tools. These features allow you to gain insights into support trends, common issues, and the performance of your support team. Data-driven decision-making can lead to continuous improvements in your support processes.
Scalability
As your WordPress site grows, so will the volume of support requests. A support ticketing system is highly scalable, making it easy to accommodate an increasing number of users and inquiries without compromising the quality of support.
Accountability
Accountability is crucial in any support system. With a support ticketing system, you can track the actions taken by support agents, monitor response times, and ensure that all inquiries are handled professionally. This accountability contributes to a consistent and reliable support experience for users.
Customer Retention and Loyalty
Ultimately, the importance of a support ticketing system on your WordPress site is closely tied to customer retention and loyalty. When users receive timely and effective support, they are more likely to remain satisfied with your services and become loyal customers. A support ticketing system helps you nurture these valuable customer relationships.
WSDesk – The WordPress Help Desk Ticketing Plugin
WSDesk is the ultimate WordPress Help Desk Ticketing plugin that transforms how you manage customer inquiries. WSDesk seamlessly integrates with OpenAI ChatGPT to automate responses, ensuring grammatical accuracy and a professional tone. Bid farewell to juggling support across various channels.
The plugin consolidates customer queries in your WordPress dashboard, streamlining support processes, reducing response times, and enhancing customer satisfaction. It simplifies support with customizable forms, email notifications, agent assignments, and progress tracking.
The plugin boasts features like triggers, automation, email piping, bulk editing, unlimited agents, a built-in knowledge base, and more. Unlike cloud-based alternatives, WSDesk prioritizes data privacy by storing all information on your system.
Key Features of WSDesk
- Unlimited Tickets & Agents: No limits on ticket creation or agent profiles. Manage unlimited tickets and agent profiles at no additional cost.
- OpenAI ChatGPT Integration: Improve responses with AI-powered professionalism. OpenAI ChatGPT integration generates contextually relevant, grammatically correct, and business-tone auto-responses.
- Triggers & Automation: Automate actions based on conditions such as email notifications, ticket assignments, priority-based treatment, and scheduling future triggers.
- Email Integration: Import unread emails as tickets via IMAP, Outlook OAuth, or Google OAuth. Customers can reply directly to emails for seamless communication.
- Canned Responses & Rich Text: Save time with standard reply templates and rich text formatting options for agents.
- WooCommerce Integration: Retrieve order details in customer tickets for enhanced support and WooCommerce product integration.
- Comprehensive Reports: Access agent reports, date-wise ticket reports, satisfaction surveys, ticket resolution reports, and more for insightful analysis.
- Backup & Restore: Secure tickets and settings with easy XML backups and restores, useful for domain transfers.
Steps to Create a Support Ticketing System Using WSDesk
Follow these steps to set up a ticketing system on your WordPress site effortlessly:
Step 1: Install and Activate the WSDesk Plugin
- Navigate to the Settings dashboard of the WSDesk – WordPress Helpdesk Plugin.
- In the displayed settings, enter your API License Key and API License Email. Obtain your API License Key from the ELEXtensions My Account page. Additionally, enter the unique product ID provided upon purchasing the plugin from ELEXtensions.
- Click on the Activate WSDesk button.
Step 2: Configure the General Settings
Basic Settings
 Default Assignee: Set a default assignee for tickets, choosing from the list of created agents.
Default Status: Assign a default status for new tickets, selecting from default or user-created options.
Default Raiser Reply Status: Select the default status for replies from the ticket raiser.
Ticket Raisers: Specify which users can raise tickets – All, Registered Users, or Guest Users.
Agents Ticket Section: Allow agents to view other agents’ tickets in the Ticket dashboard.
Satisfaction Survey: Add custom hypertext for customer feedback in emails.
Auto Assign Tickets: Automatically assign unassigned tickets to the agent.
Auto Suggestion: Enable auto-suggestion for ticket raisers and agents based on title, content, and tags.
Custom Attachment Folder: Define a custom folder for attachments.
Maximum File Size of Attachments (MB): Limit the size of uploaded files.
Valid Attachment Extensions: Choose supported attachment extensions.
Create WordPress User: Redirect guest users to create a WordPress account after submitting a ticket.
Close Tickets: Allow users to close support requests from the front end.
Advanced Settings
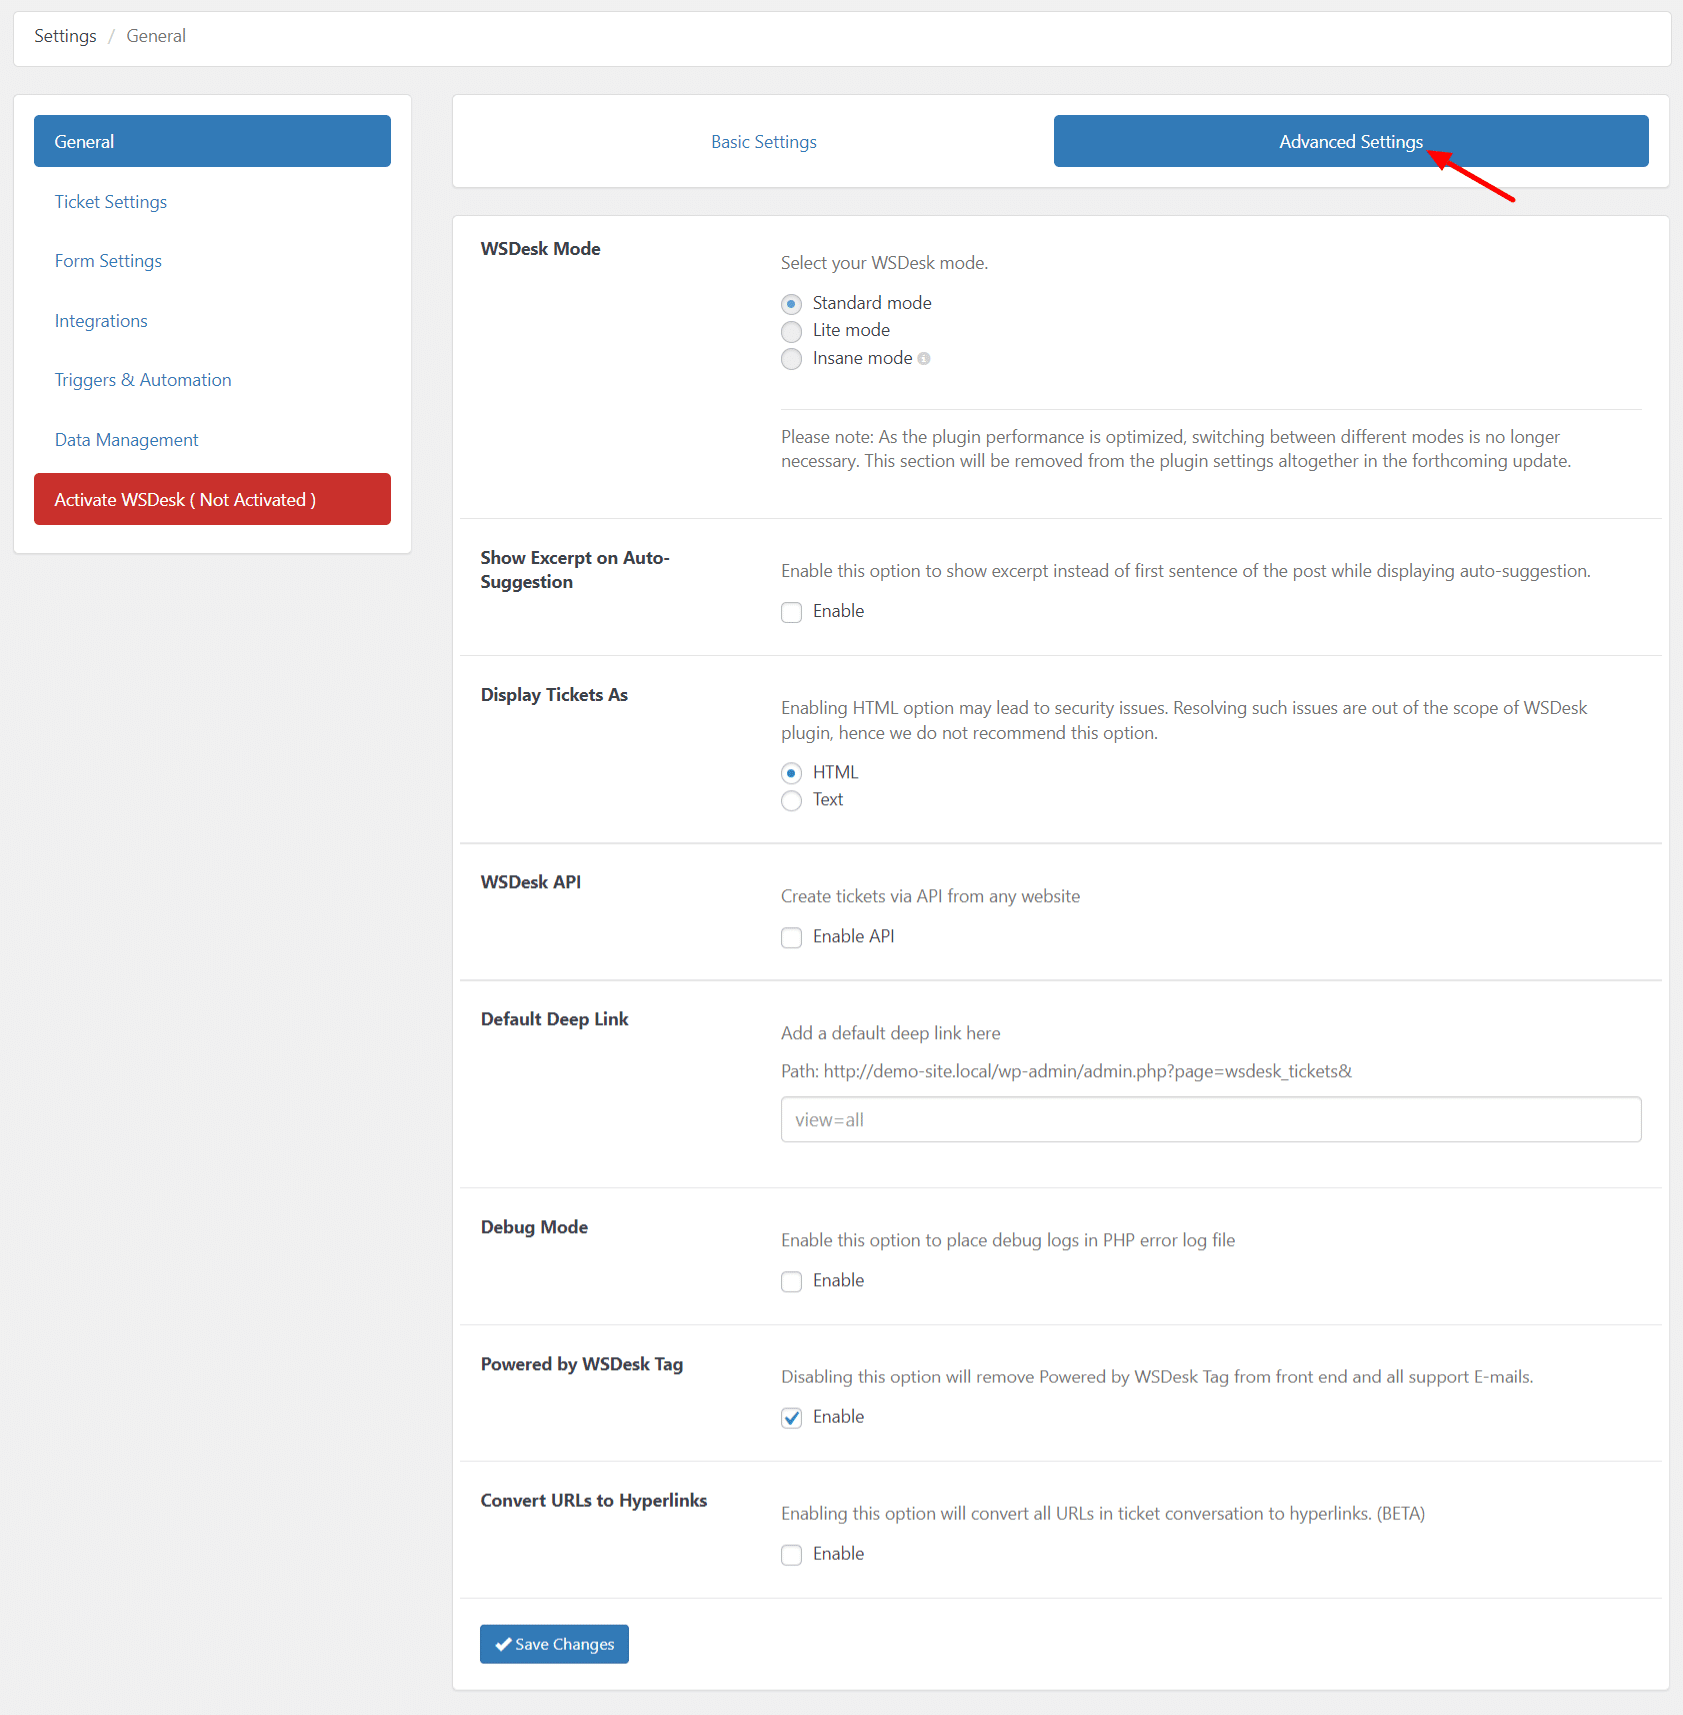
Show Excerpt on Auto-Suggestion: Display custom text instead of the first sentence in auto-suggestion results.
Display Ticket As: Choose HTML or Text format for viewing and replying to tickets.
WSDesk API: Enable to create WSDesk tickets from any website; includes a custom API key.
Default Deep Link: Set a default view on the main ticket dashboard using deep links.
Debug Mode: Enable to place database collation logs and email logs in the PHP error log file.
Powered by WSDesk Tag: Toggle to remove the “Powered by WSDesk” tag from the front-end and support emails.
Convert URLs to Hyperlinks: Enable to convert all URLs in ticket conversations to hyperlinks.
Click “Save Changes” to apply the settings.
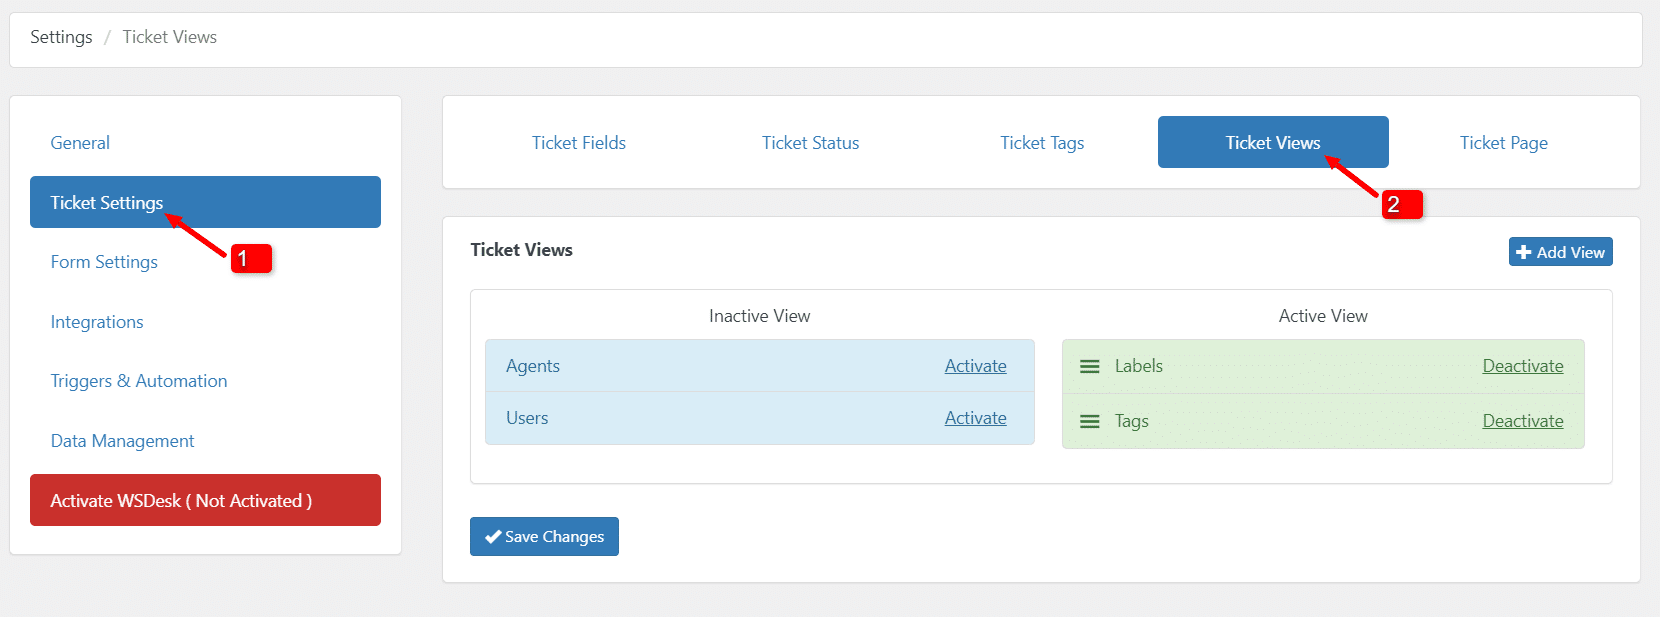
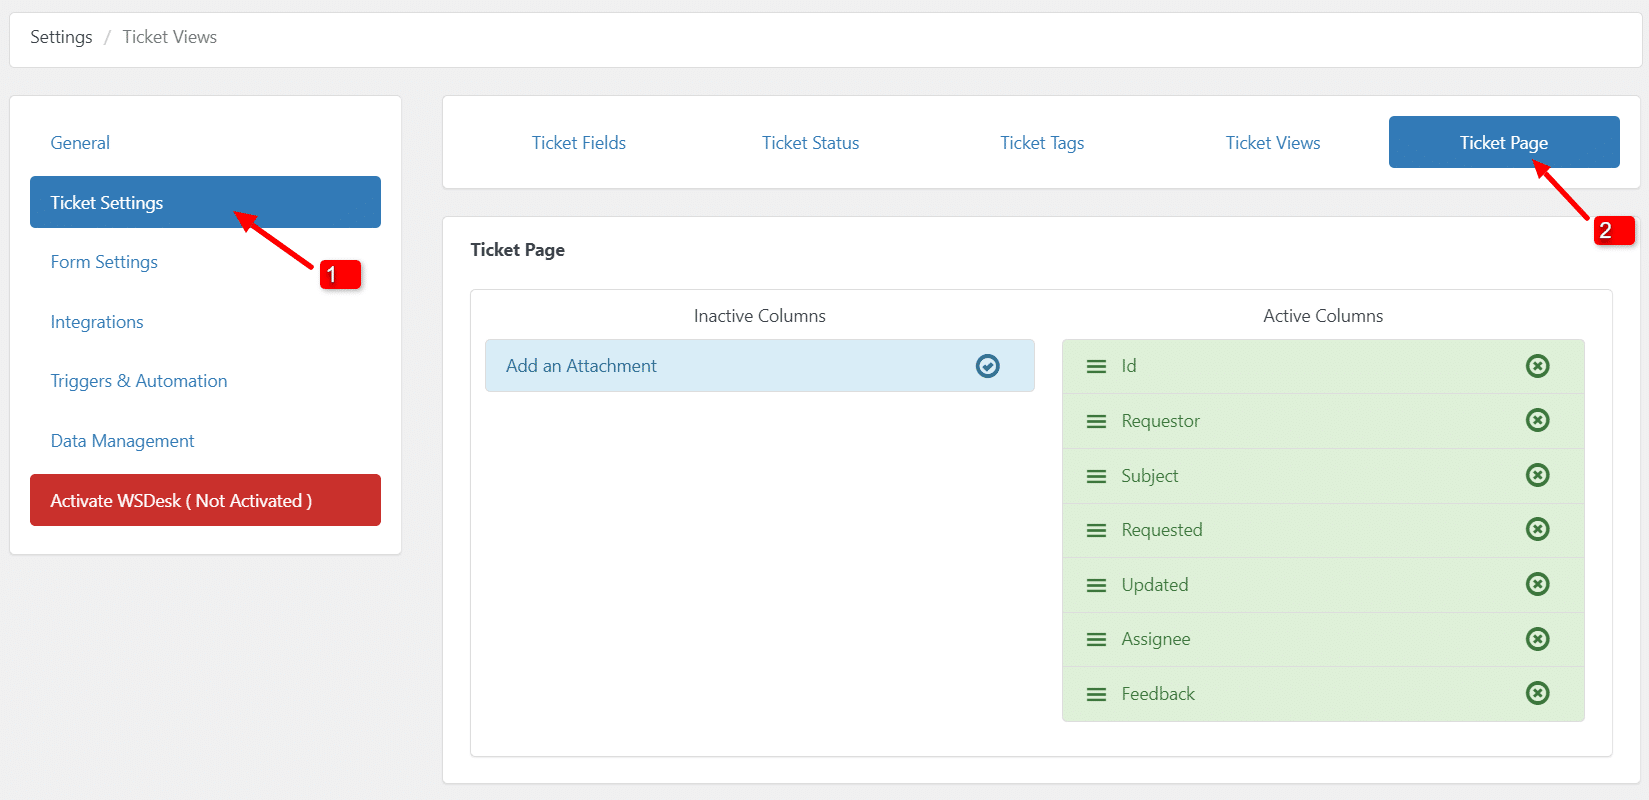
Step 3: Ticket Settings
The Ticket settings encompass all configurations related to tickets and are organized into five tabs: Ticket Fields, Ticket Status, Ticket Tags, Ticket Views, and Ticket Page.
Ticket Fields:
Define how input fields appear on the support form. Options include textbox, password, selection list, radio button, checkbox, and more. Add, edit, remove, and configure fields easily.
 Ticket Status:
Create distinctive statuses to track ticket progress. Assign unique colors and use them for efficient filtering. Add, edit, remove, and configure ticket statuses effortlessly.
 Ticket Tags:
Utilize tags for filtering tickets and assigning them to specific agents. Easily add, edit, remove, and configure tags related to products.
 Ticket Views:
Categorize tickets in a menu-like structure in the Tickets dashboard. Add, edit, remove, and configure ticket views based on conditions and user visibility.
 Ticket Page:
Adjust columns in the Tickets dashboard by enabling or disabling default fields or incorporating custom Ticket Fields. Tailor the view to your preferences.
 Step 4: Form Settings
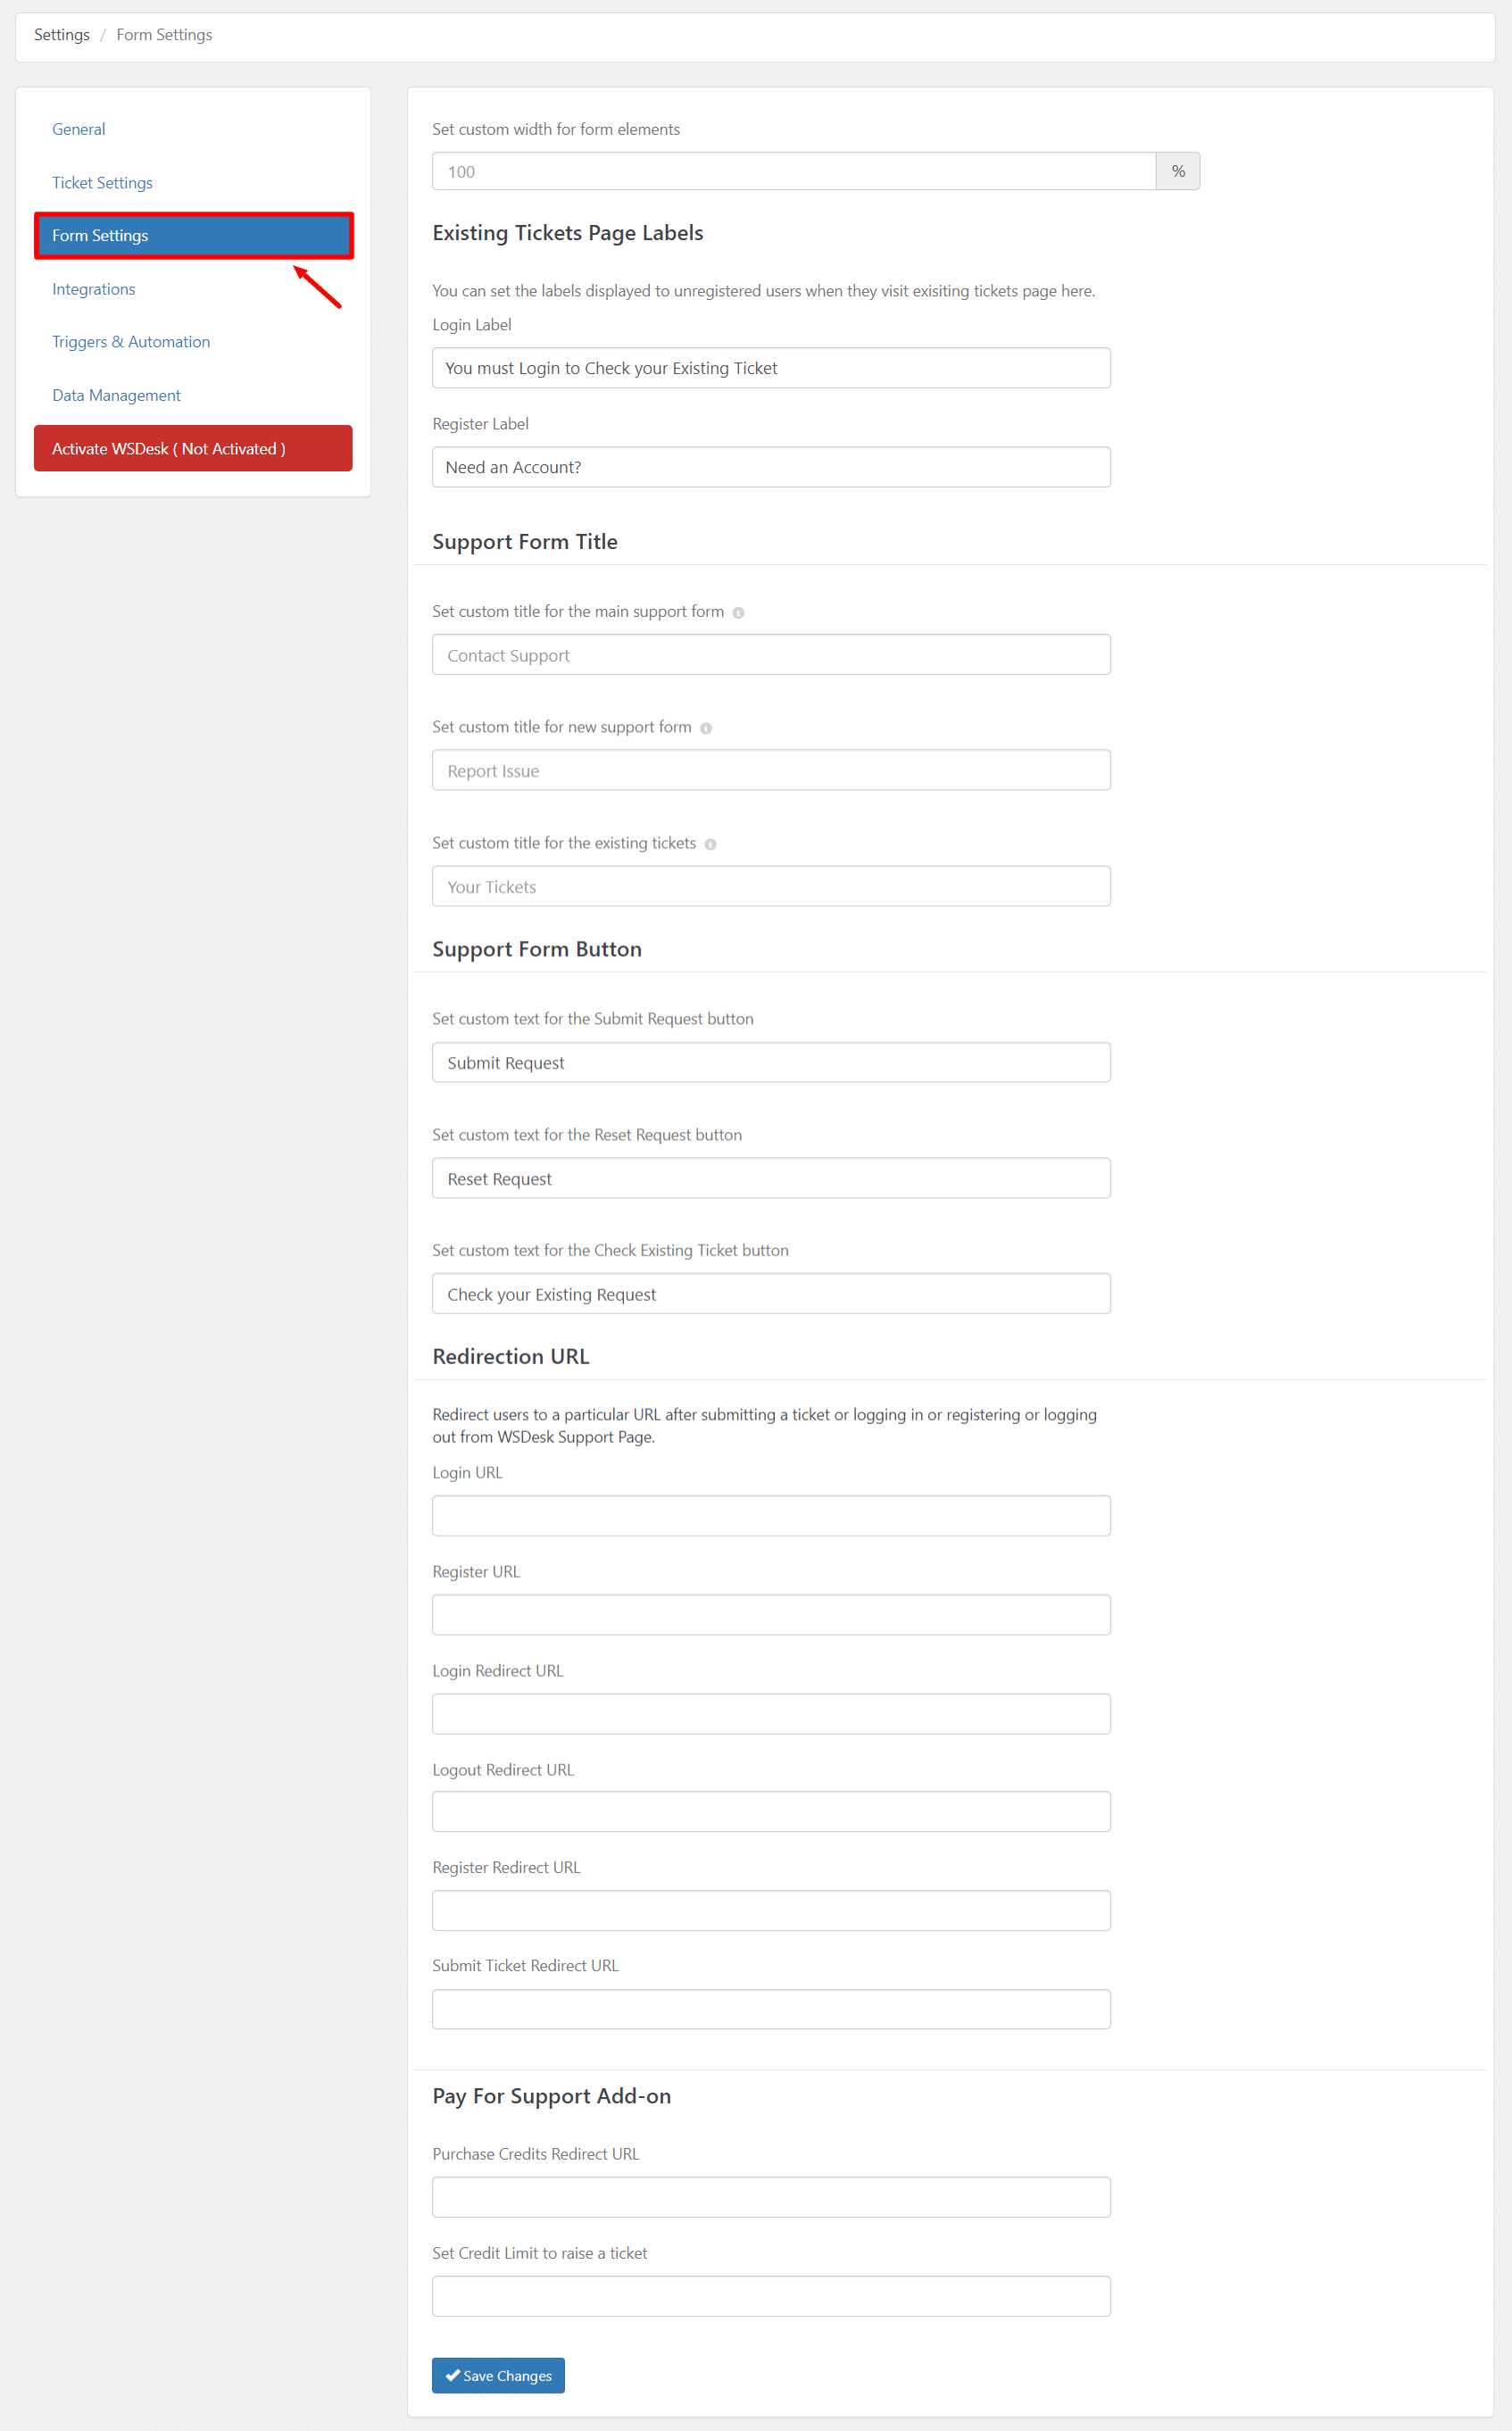 Form Width: Customize the width of input fields in your support form using percentage values.
Existing Tickets Page Labels: Define labels displayed to unregistered users visiting the existing tickets page.
Support Form Title: Personalize titles for different aspects of the support form.
Main Support Form Title: Set a custom title for your main support form.
New Support Form Title: Customize the title for new support forms.
Existing Support Form Title: Define a custom title for the existing ticket form.
Support Form Button: Customize text for Submit, Reset, and Existing Ticket buttons.
Submit Request Button Text: Customize the button’s text here.
Reset Request Button Text: Specify custom text for the Reset button.
Existing Ticket Button Text: Define custom text for the Existing Ticket button.
Redirect URLs: Redirect users to specific URLs for various actions on the WSDesk Support Page. Login, Register, Login Redirect, Logout Redirect, Register Redirect, and Submit Ticket. Redirect URLs: Set custom URLs for redirection based on user actions on the support page.
Pay For Support Add-on: If using the Pay For Support Add-On, configure settings related to purchasing credits for raising tickets.
Purchase Credits Redirect URL: Specify the URL for users to make credit purchases.
Set Credit Limit to Raise a Ticket: Define the minimum credit limit for users to raise a ticket.
Step 5: Integration Settings
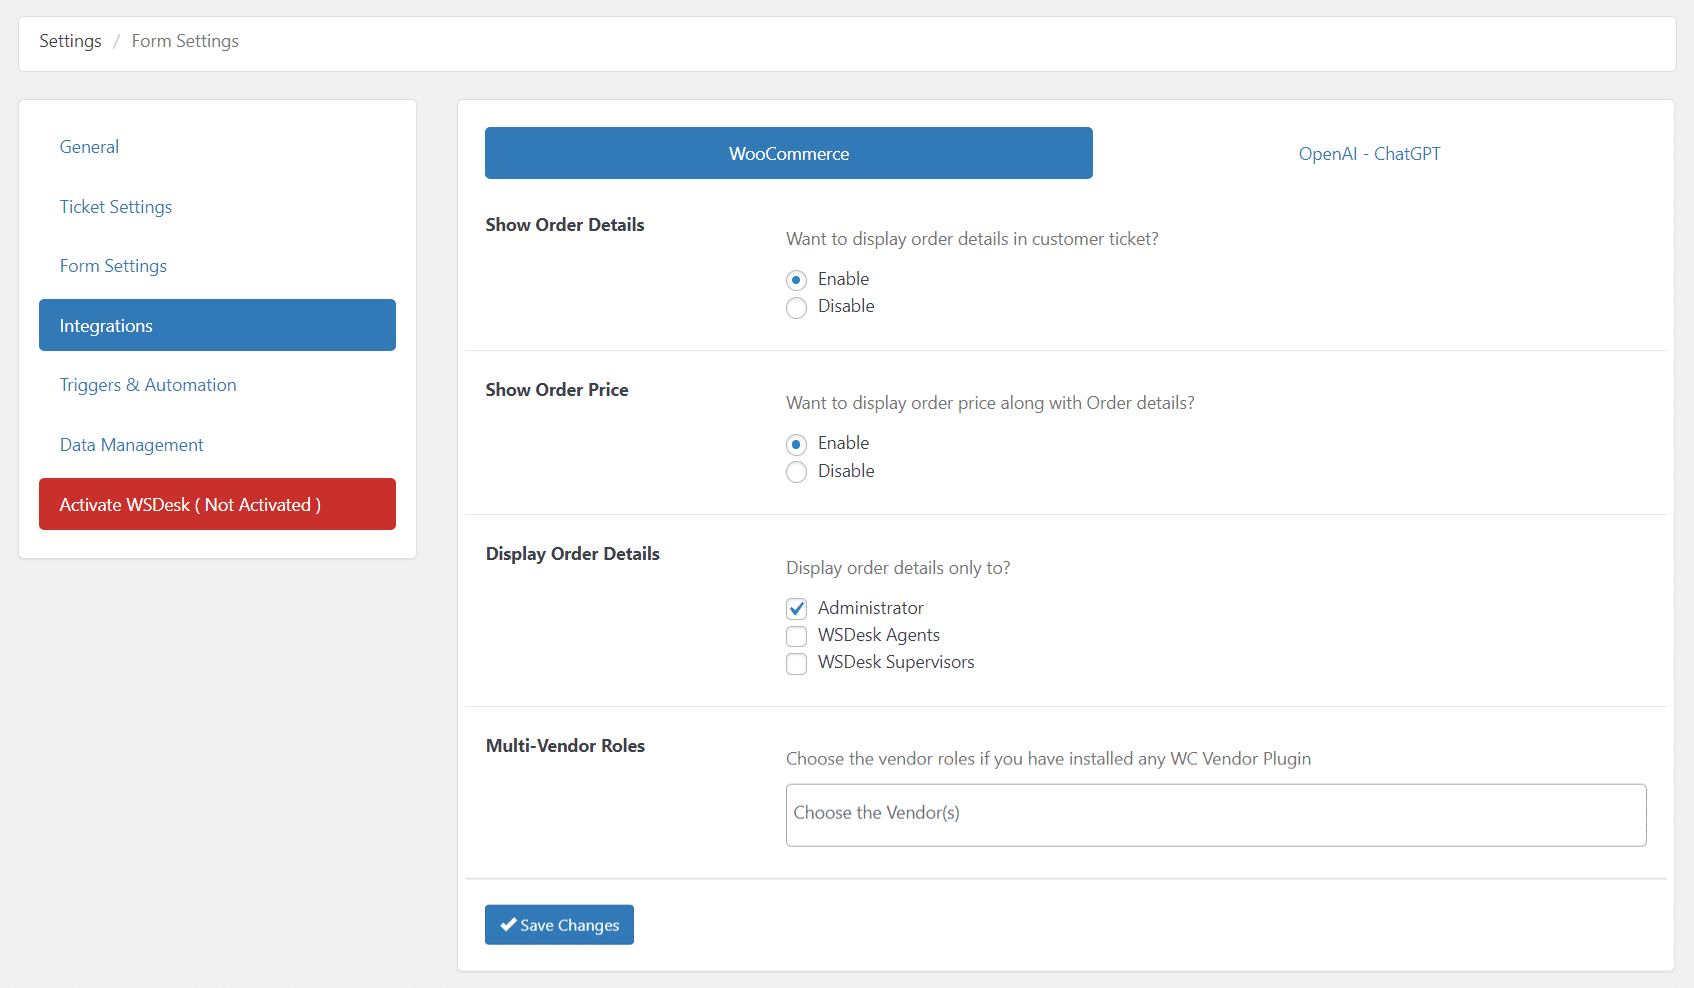 WooCommerce Integrations: Access WooCommerce integration settings in WSDesk Settings > Integrations. Enable options to display order details and order price in the customer ticket section. Authorize order detail viewing based on user roles, including multi-vendor roles if applicable. Navigate to WSDesk Settings > Ticket Fields and add a new field with WooCommerce-specific choices such as Products, Order ID, Categories, and Tags. Customize the field title, visibility, and restrictions. Customers can then select WooCommerce products, categories, or tags when creating a ticket.
 OpenAI ChatGPT Integration: Integrate WSDesk with OpenAI ChatGPT for automated, contextually relevant replies. Enable the integration, input your OpenAI ChatGPT API key, and adjust parameters like Max Tokens and Temperature for response length and randomness. Fine-tune the language model behavior using the Custom Config Value. Adjust Max Tokens and Temperature settings to control response length, creativity, and tone. Default values are 1000 tokens and 0.3 temperature.
Step 6: Triggers and Automation
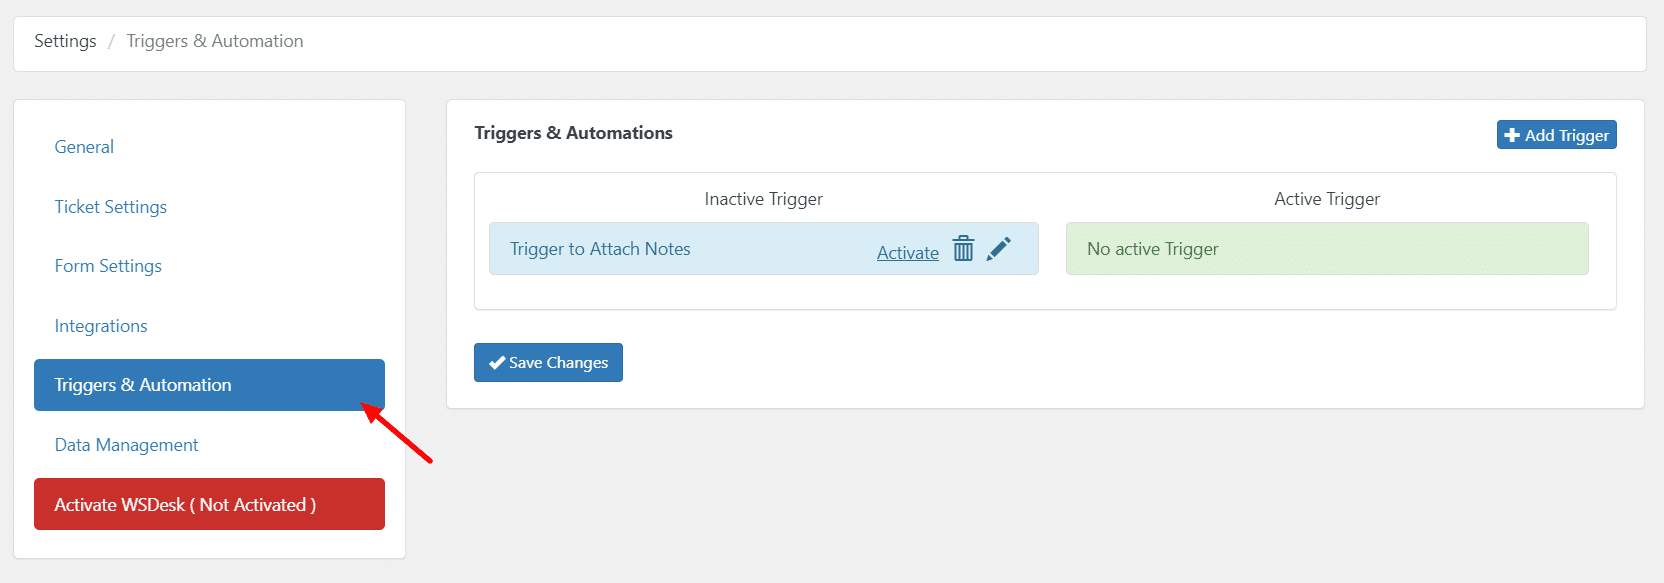 Automate responses with triggers. Create triggers based on various conditions, like ticket status, assignment, and source. Define trigger actions such as changing labels, assignees, or sending email notifications.
Step 7: Google Chat Integration
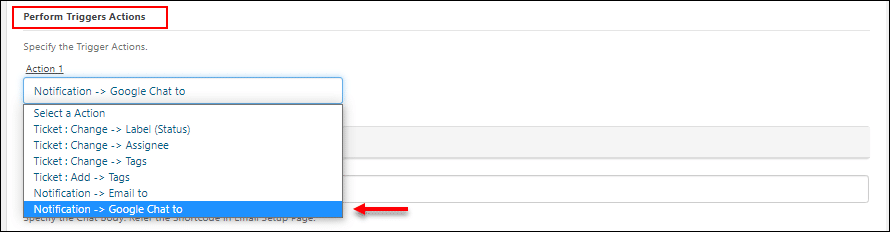 Trigger messages or notifications for agents using Google Chat. Set up a new trigger, select the Google Chat action, and configure webhooks for agents. Customize messages using shortcodes.
Step 8: Data Management
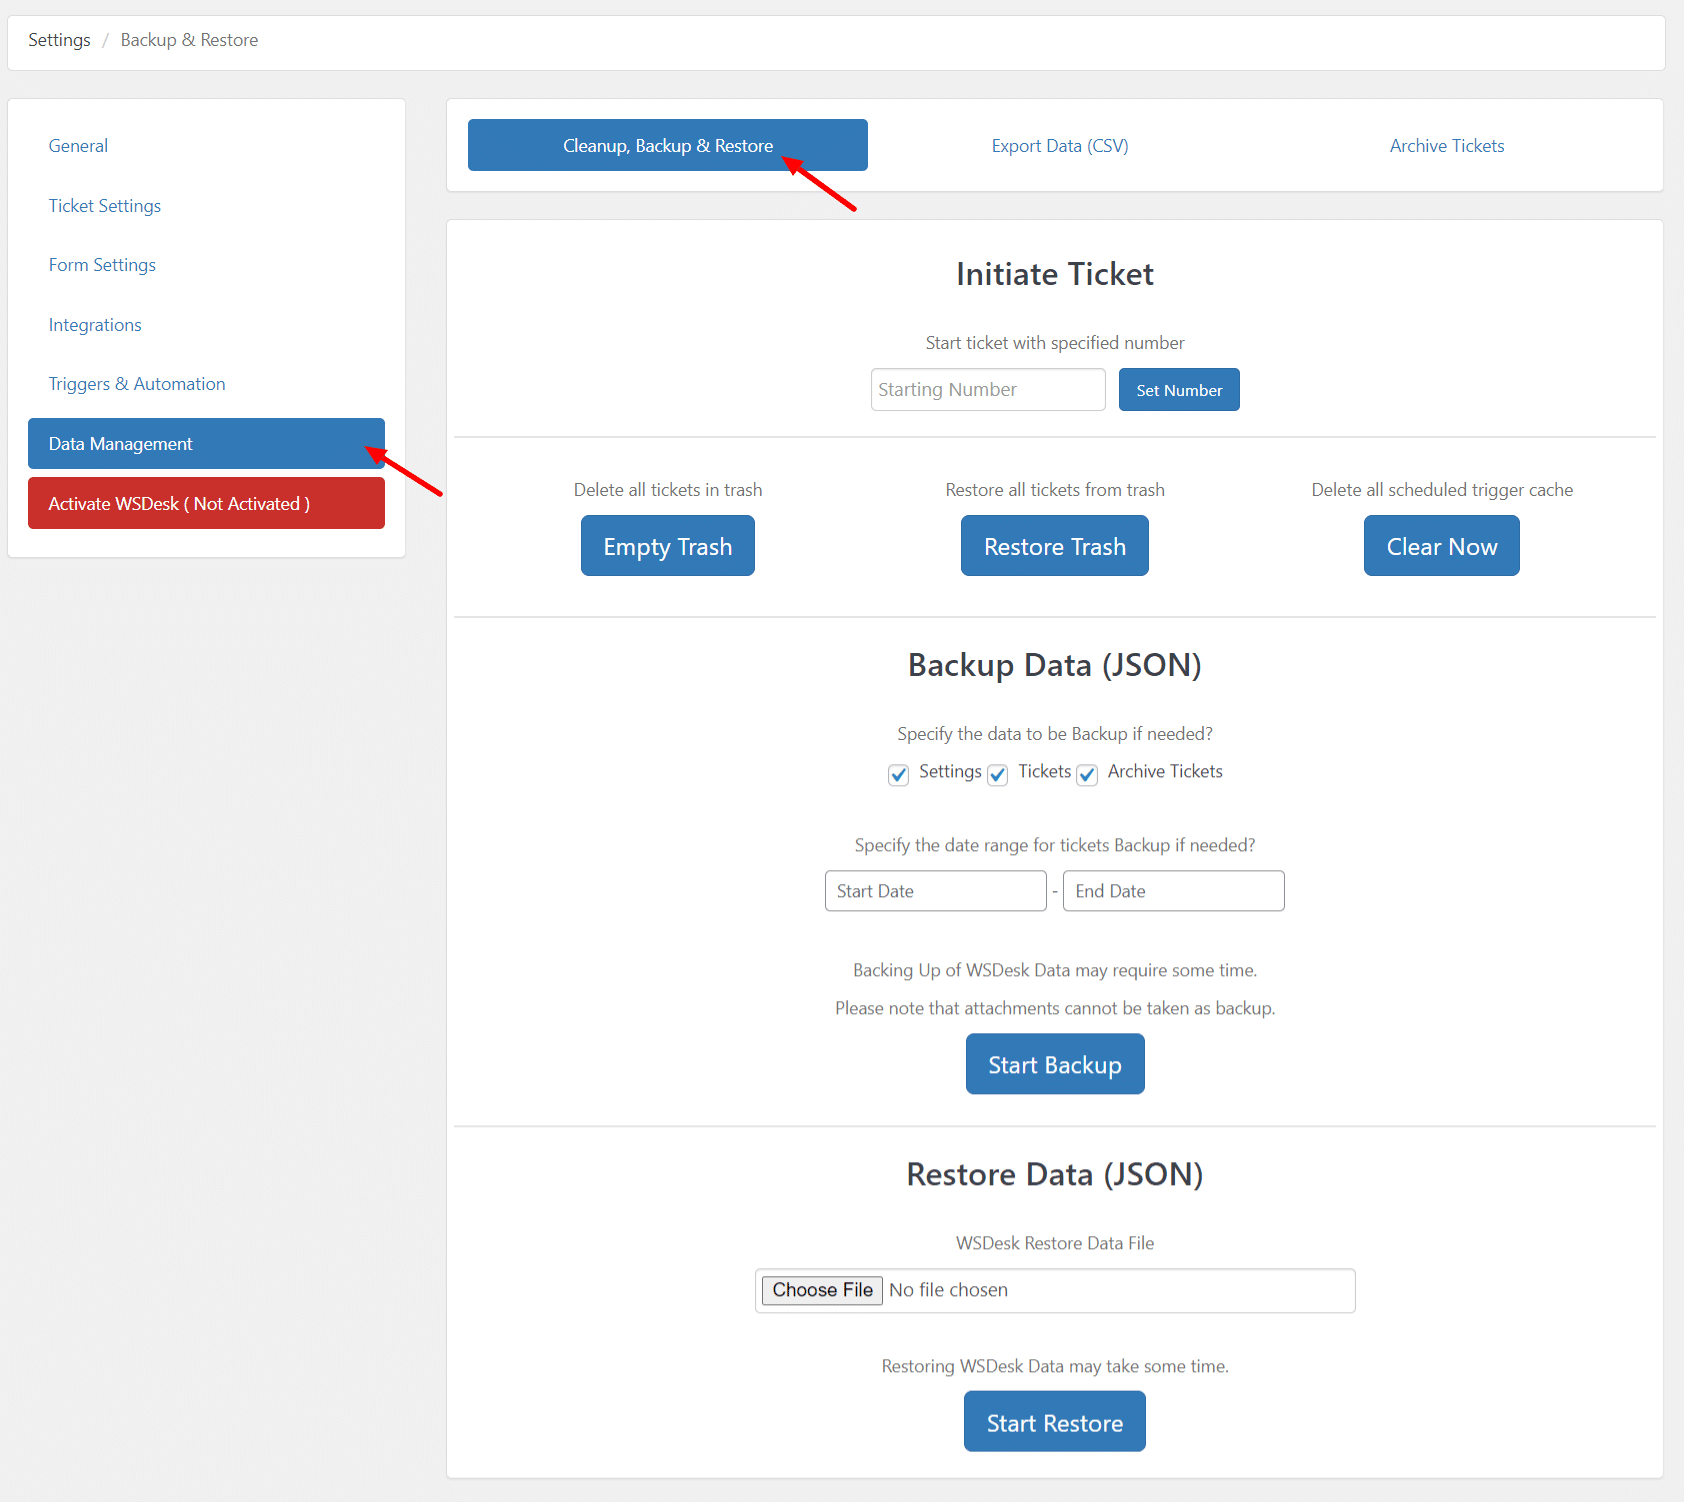 Manage WSDesk data with options for cleanup, backup, and restore. Export ticket data to CSV files and archive old tickets for efficient ticket dashboard navigation.
Step 9: Agent Configuration
 Manage agent profiles in the Agents dashboard. Add new agents or supervisors, assign user roles, WSDesk roles, and access rights. Associate agents with specific tags for streamlined ticket assignment.
Step 10: Reports
 Utilize the Reports dashboard to monitor WSDesk data. View statistics on average resolution time, replies per day, tickets per day, tickets per status, tickets per tag, and agent satisfaction scores.
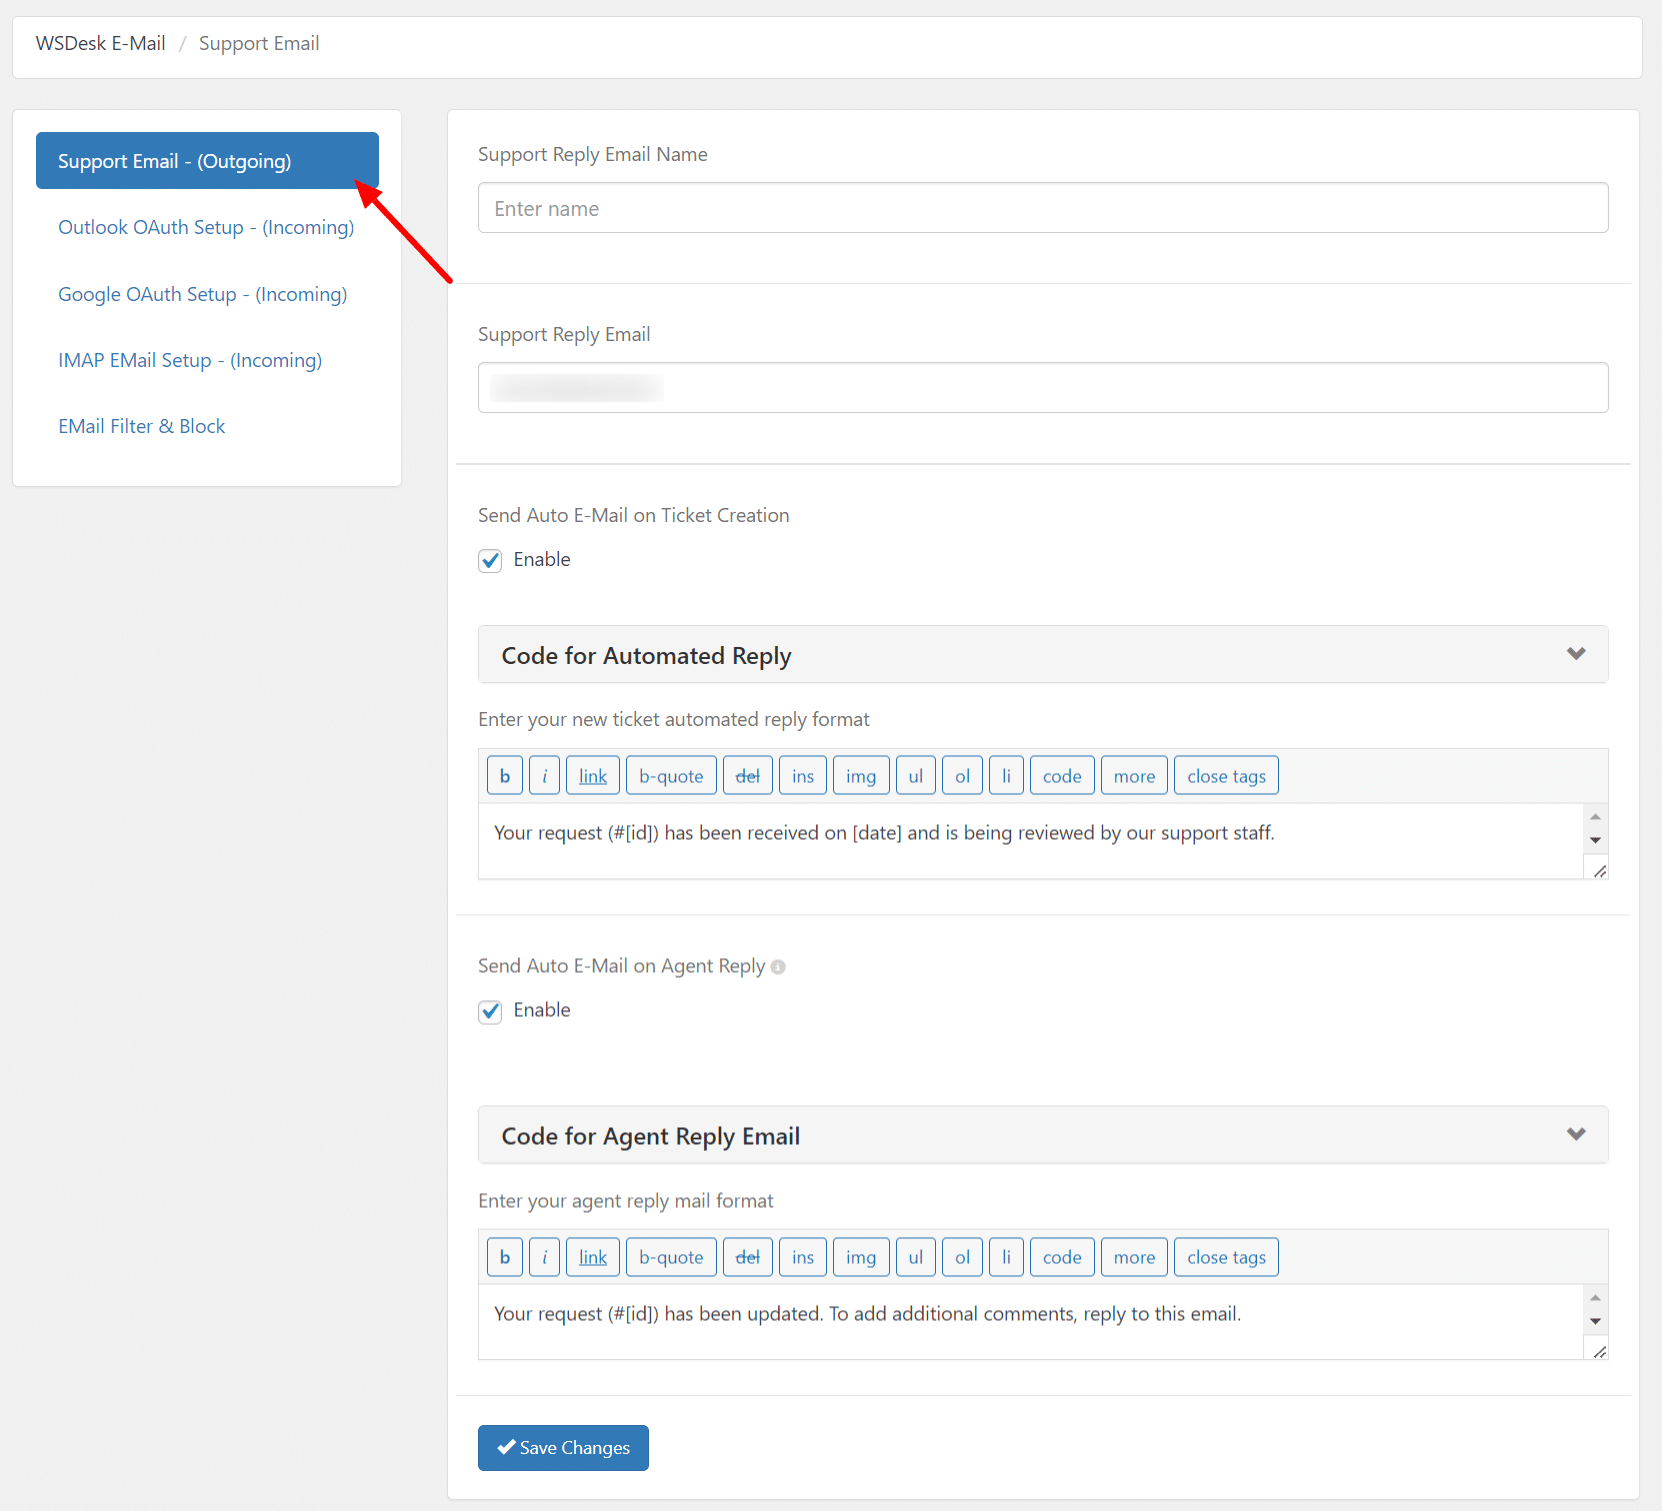
Step 11: Support Email
Configure your email address and compose automated and agent reply emails. Settings include Support Reply Name and Email, Automated Email Reply, and Agent Reply.
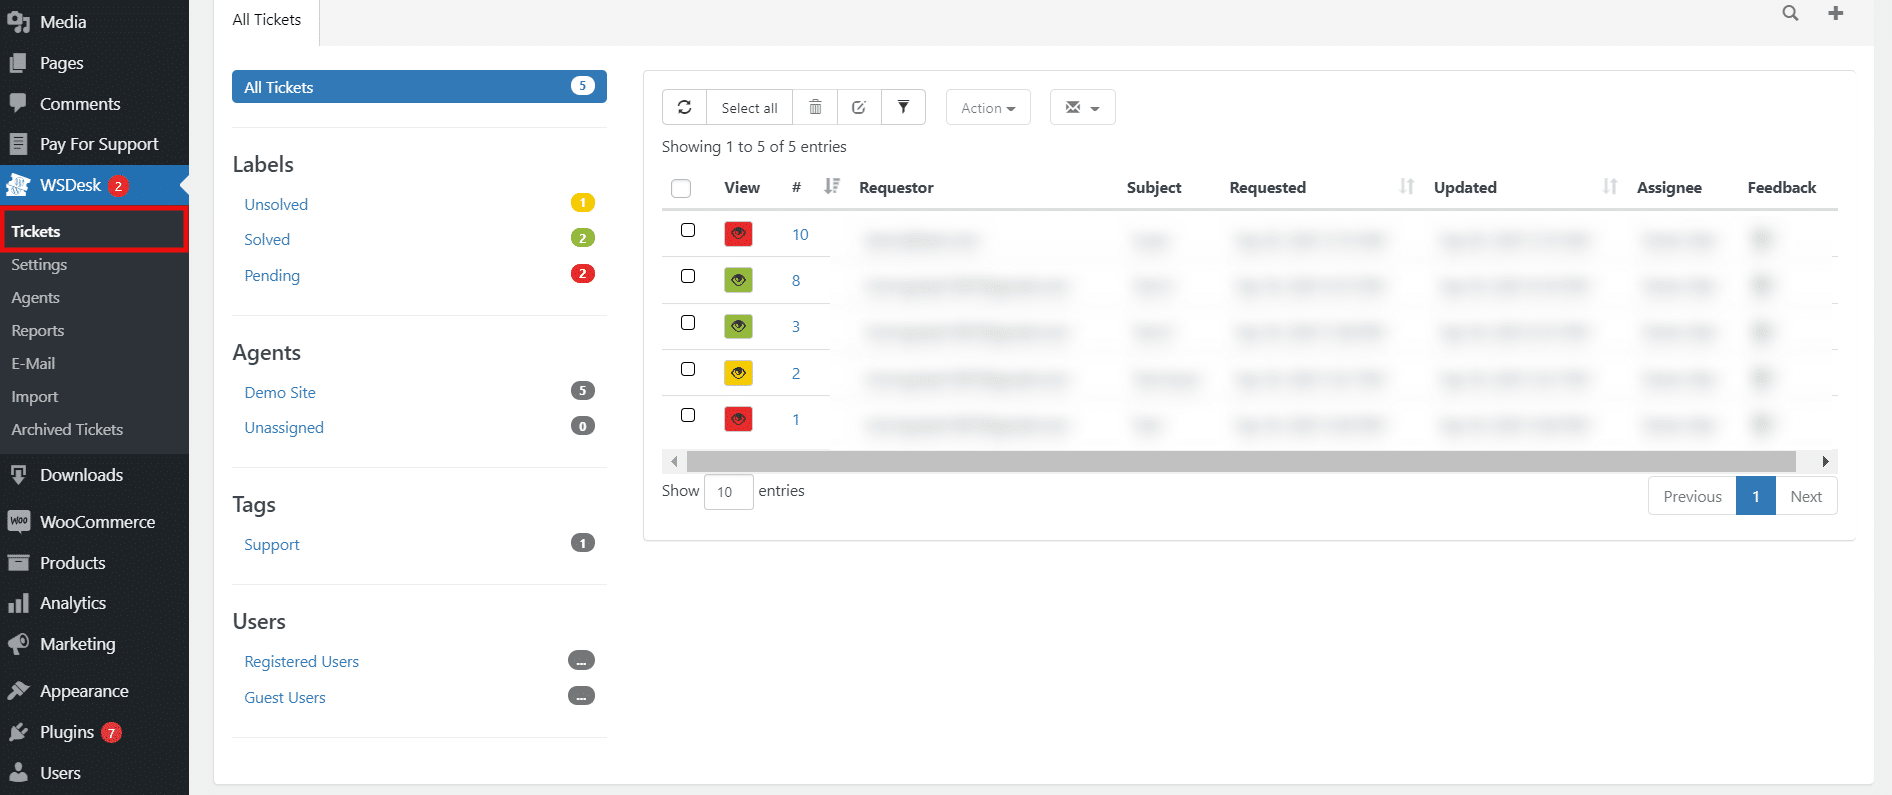
 Step 12: Tickets
View and manage all generated tickets. The dashboard displays ticket details, and users can view, refresh, and update ticket properties, as well as add new tickets.
 Reply Template (Canned Responses):
Create standardized message templates for quick responses. Templates can be selected or created, providing efficient responses to similar queries.
Merging Tickets:
Merge two or more tickets easily by entering ticket IDs. Merging combines tickets into a single entry, simplifying ticket management.
Bulk Edit Tickets:
Bulk edit selected tickets by updating properties such as assignee, labels, tags, subject, and reply.
Total Time Display on Tickets:
View the total time elapsed after ticket creation for both unsolved and solved tickets. This feature provides insights into ticket resolution times.
My Account Dashboard:
On the front end, the My Account Dashboard offers users access to order details, downloads, existing tickets, support forms, addresses, and account details.
 By following these steps, you can set up a support ticketing system on your WordPress site using the WSDesk plugin, which will help you streamline customer support and enhance the overall user experience. For detailed steps on how to set up the plugin, check out the documentation.
Wrapping Up
In conclusion, implementing a support ticketing system on your WordPress site is a strategic move that can significantly enhance your customer service and streamline issue resolution. The steps outlined in this guide provide a comprehensive roadmap for creating an effective and user-friendly support system.
By choosing the right plugin, configuring essential settings, and incorporating customization to align with your brand, you’re laying the foundation for a seamless customer support experience.
The benefits are manifold — from improved ticket organization and efficient query handling to enhanced user satisfaction. As customer expectations continue to rise, having a robust support system is crucial for retaining and attracting clients.
Additionally, the integration of automation and analytics ensures that your support processes remain not only responsive but also data-driven for continuous improvement.
With these 12 steps, you’re well on your way to transforming your WordPress site into a customer-centric hub for efficient support. If you have any questions regarding creating a ticketing system on your WordPress site, please let us know in the comments section below.

