What can we help you with?
How to Automate Ticket Assigning using WSDesk Triggers?
This article explores how one of our customers, who was tired of manually assigning tickets, found a way out using the automation mechanism in WSDesk.
Automating the ticket assigning process can clearly improve the scenario. However, achieving automation with a support ticket system can be quite tricky.
Let’s see how we did that.
Automation Using WSDesk Triggers
We, at WSdesk, have enabled automation through the innovative use of “triggers”.
Triggers initiate actions based on certain conditions that you specify.
In our case, the action was ticket assigning. But we needed to focus on two different conditions:
- Our customer needed some priority tickets to be handled by the Head of Support. These are product inquiries and refund requests.
- They also wanted to assign the rest of the tickets to Support Agents based on the Product Name. The team had product specialists who could handle those requests well.
Now let us see the process in detail.
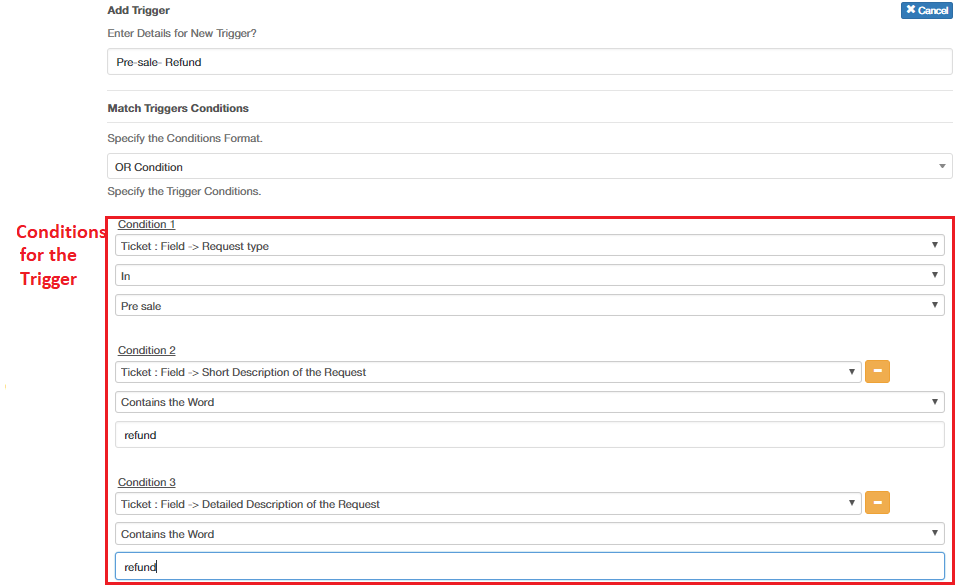
The “priority” Trigger
We named the first trigger as Pre-sale-Refund.
This was a priority trigger. It searched for the word “refund” in both Short and Detailed Description of the Request. It also checked if the request was under the request type, Pre-sale.
Since we had to make sure that this trigger activates when either the word “refund” or a request type “Pre-sale” matches the conditions, we decided to use OR condition format. As a result, if at least one of these conditions is true, the ticket would be automatically assigned to the Head of Support.
You can see the whole configuration in the screenshots below:

Let us see how we created the trigger based on Product Name.
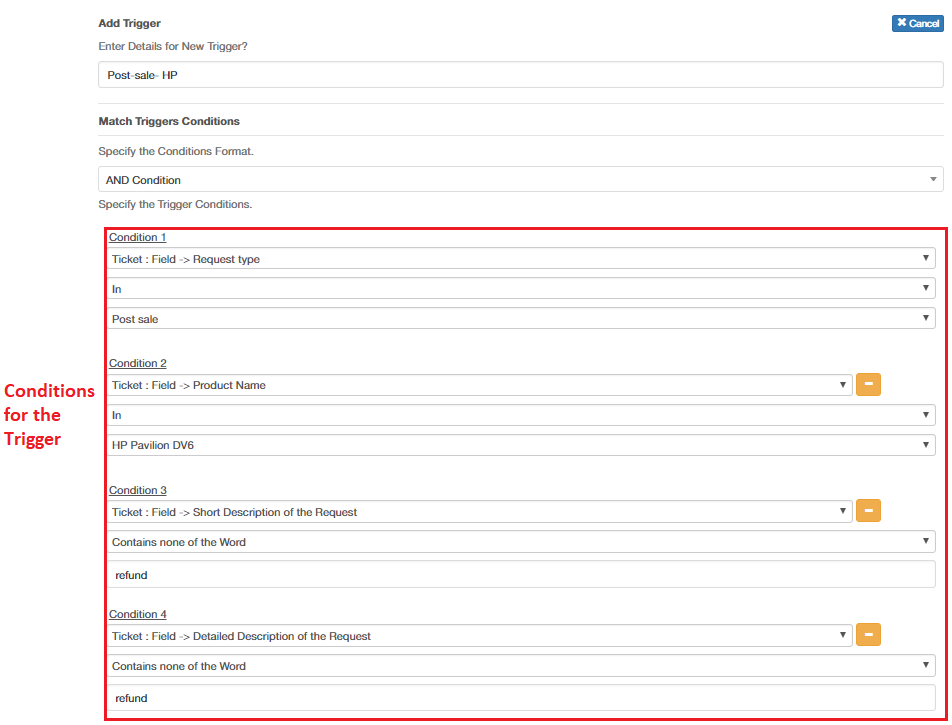
The “Product Name-based” Trigger
The second trigger was named Post-sale-Dell (Dell being the product name). It checked if the request type was Post-sale and the Product Name was Dell.
Now there is a tricky situation here.
There can be a ticket which meets both these conditions but can have the word “refund” in it.
To tackle this, we added another condition. According to that condition, this trigger would only activate if there is no “refund” word in either Short or Detailed Description.
With these many conditions, we had to make sure that the trigger activates only when every condition was true. For this, we had to use AND condition format. As a result, only after satisfying every condition, the ticket would be assigned to the Support Agent.
These screenshots will make the whole process clearer to you:

Similarly, we created two more triggers for other products and streamlined the whole ticket-assigning process for this customer.
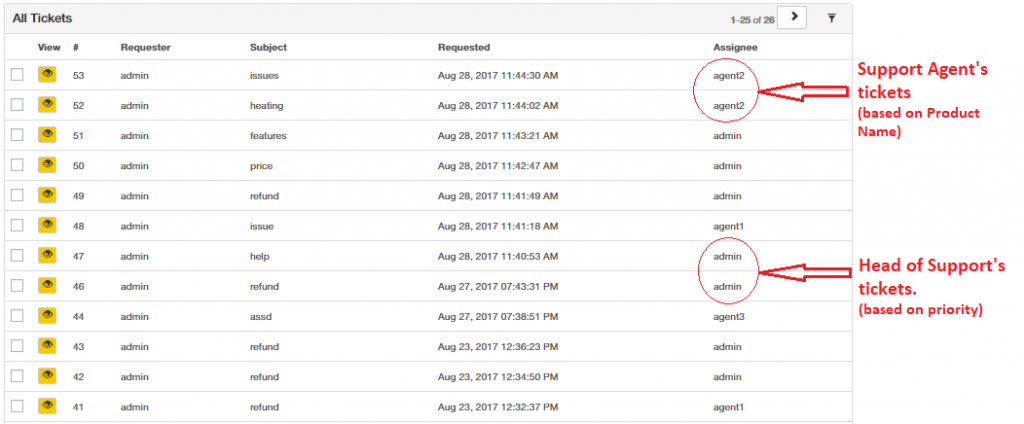
Automatic Ticket Assigning
So this is how we created triggers based on priority and products to automate the ticket-assigning using WSDesk Triggers.
But that’s not all!
These triggers can perform automation in an infinite number of ways. Based on your needs and use cases, you can easily modify or create new triggers. If you have a similar issue that you want to share with us, please comment below.
To explore more details about the plugins, go check out WSDesk – WordPress Helpdesk Plugin.
Read the product setting up article to understand the plugin, in detail. Or check out the product documentation section for more related articles.
You can also check out other WordPress and WooCommerce plugins in ELEX.