In this article, we walk you through a step by step guide to add Amazon pay payment gateway to your WooCommerce store easily. Here we make use of the ELEX WooCommerce Amazon Pay Plugin.
Introduction
Nowadays, with the increasing demand for online shopping, it has become quite important for store owners to provide a convenient way of shopping for their customers. One of the pivotal aspects customers look for in an online shipping platform is a safe and secure online payment method. The online payment gateway must be safe, secured, fast, and should avoid all errors during transactions.
Amazon Pay is one of the most beneficial, and the trusted way used for payments worldwide, by large enterprises to the most current startups. It can help you grow customer relationships and grow your business. Using Amazon Pay, your customers can easily make the payments on your store. Amazon pay mostly provides the users the option to make payments with their Amazon accounts on external sites in the most secure way.
Let us take a look at how we can include Amazon Pay payment gateway plugin on your WooCommerce store. Here we consider using the ELEX WooCommerce Amazon Pay payment gateway plugin for example.
Why ELEX WooCommerce Amazon Pay payment gateway plugin?

The plugin is robust and quite handy for use on the WooCommerce store. It is easy to integrate the same on the WooCommerce store. The plugin has a friendly user interface and easy to navigate too. Here are some of the features of the plugin:
- It helps to keep your customers on your store even after the checkout is done, rather than redirecting them into a third party web page. This increases the conversion rate.
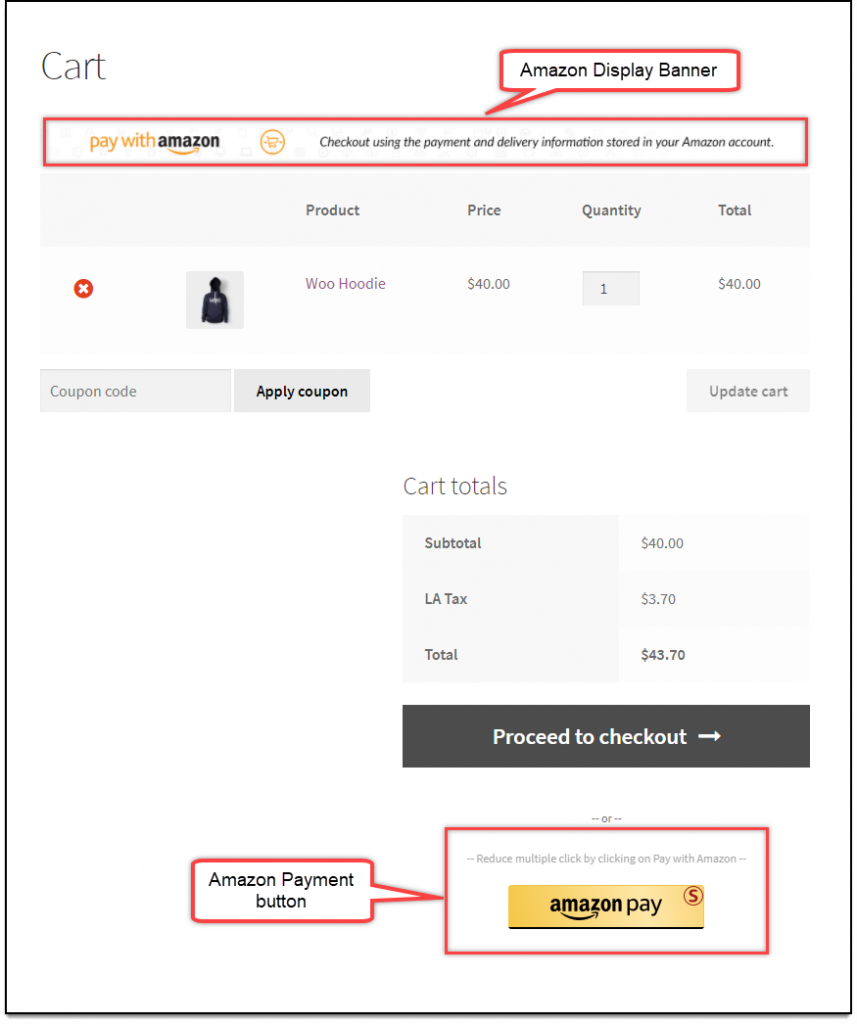
- Option to add a customized Amazon Pay checkout button on the cart page. It reduces the checkout time and helps in speeding up the transactions.
- Easy process of partial and full refunds in simple clicks.
- Supports recurring payments for subscription-based products.
- Provide an overview report of all transactions through Amazon Pay.
- Better security and essential customization features.
How to Add Amazon Pay Payment Gateway in WooCommerce?
Now let us take a look at how to add the Amazon payment gateway plugin to your WooCommerce store.
Step 1: Install and activate the plugin.
Firstly you install the plugin and then activate the same. Once done, you can see the Amazon Pay payment gateway listed in the WooCommerce payments ( WooCommerce>>Settings>>Payments). And then enable the same to make it appear in the WooCommerce checkout page.
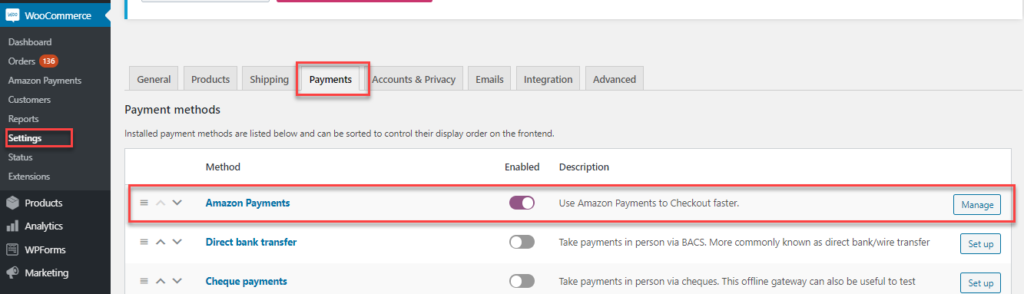
When you click on Manage, you get to the Amazon Pay settings page.
Step 2: Configure the Plugin Settings
In the settings page, you can configure the plugin the way you need to use it in your store.
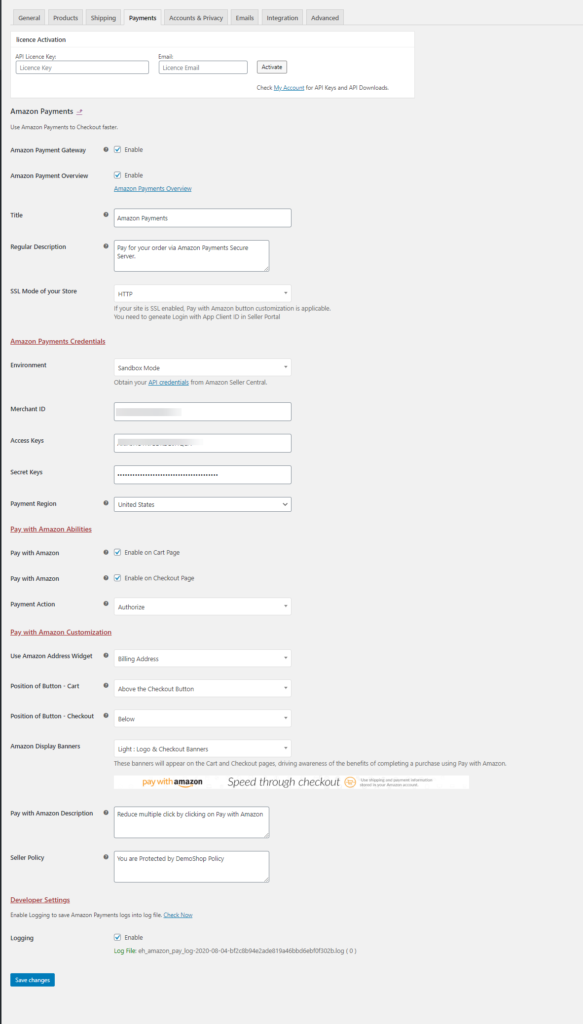
Here you enable the checkboxes for Amazon Payment gateway and the Amazon Payment Overview. On enabling the Amazon Payment Overview, you can see all the order or transaction data in the graphical and the list view in the Amazon Payment Overview page ( WooCommerce >> Amazon Payment).
You can also provide a custom title that will be visible on your Checkout page as well as a regular description. Here you need to choose the SSL(secure socket layer) mode that is used to encrypt the communication happening during the transaction. You have two options available:
HTTPS – With the secure mode, you can customize the color, size, and text of the payment button as well as store language as per your need.
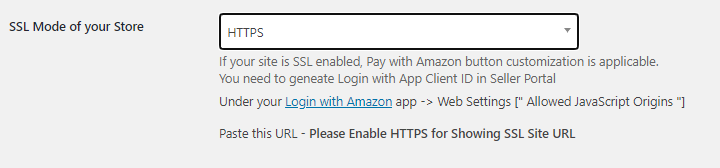
HTTP- Using this no specific customizations cannot be done.

Amazon Payment credentials are something you need to set essentially to get your Amazon Pay payment gateway to work for you. Here in this section, you can enter the merchant id, secret key, access key amazon client id, and client secret which can be obtained by creating an account with Amazon Pay.
Here you can choose the environment to work on. Basically we have two, Sandbox and Live mode.
Sandbox Mode is used to do test purchasing by using Amazon API. No real money transactions are involved in this mode. Remember, mostly this mode is used only for development purposes and customers should not have access to this mode.
Live mode is used for the actual purchase from your WooCommerce store.
Pay with Amazon Ability
The next one is the Pay with Amazon capability. Here we enable the Amazon Pay Payment gateway to be available on the cart and checkout page. You can enable or disable as per your need.

Also, you can choose the payment actions like Capture or Authorize.
When you choose Capture, the shop owner gets paid as soon as the order is placed. When you choose to Authorize, the shop owner needs to authorize charges, and then capture the payment.
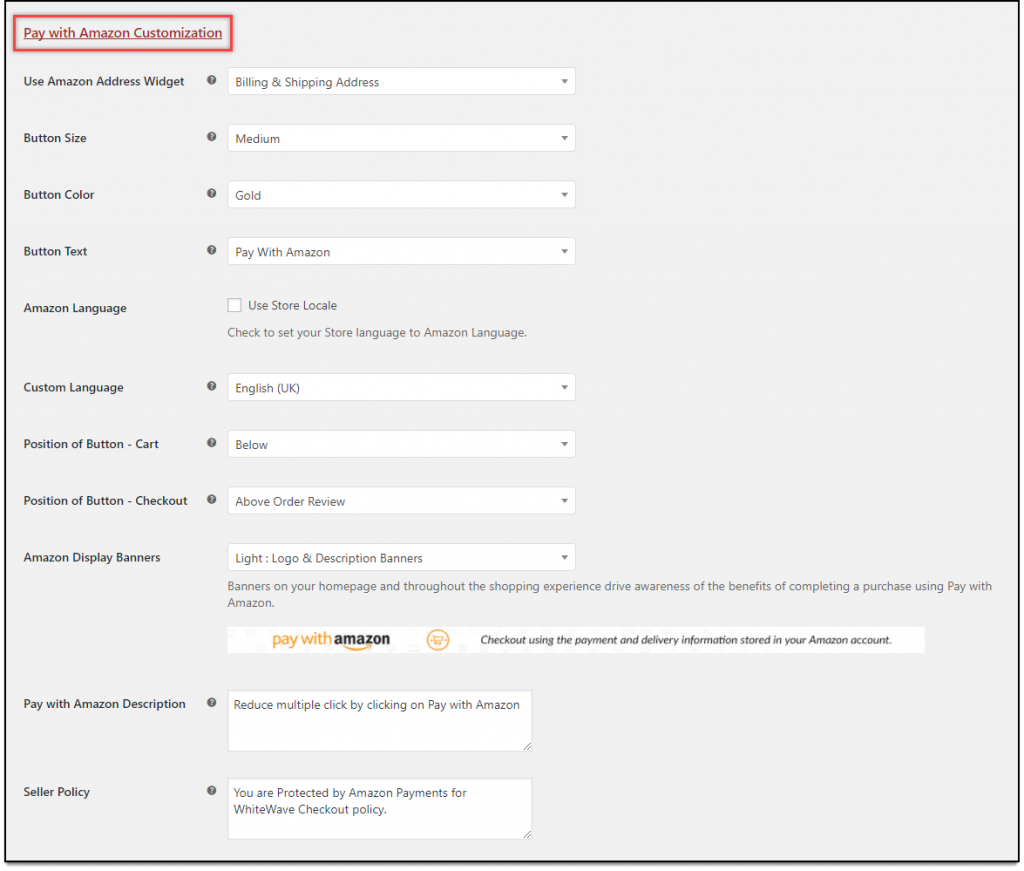
Next, we have a few customization settings that you can choose according to your WooCommerce store configuration like the button text, button size, button color, Amazon language, etc. You can also choose custom language by unticking the Store Locale to choose the desired one. Here you can choose the Amazon Pay payment gateway banner look and appearance and also the position.
Apart from these, you can enable the Use Amazon Address widget to fetch the billing and shipping address from the Amazon account which eases the process.
In the developer settings, enable the logging options to track the errors happening in the plugin as it will help to troubleshoot the issues.
Once done save the settings.
Step 3: Amazon Pay Payment gateway on WooCommerce Checkout page
When your customer places an order, you can find the Amazon Pay payment gateway appearing on the checkout page. You can also find the customizations done as per your preferences you made in the settings.
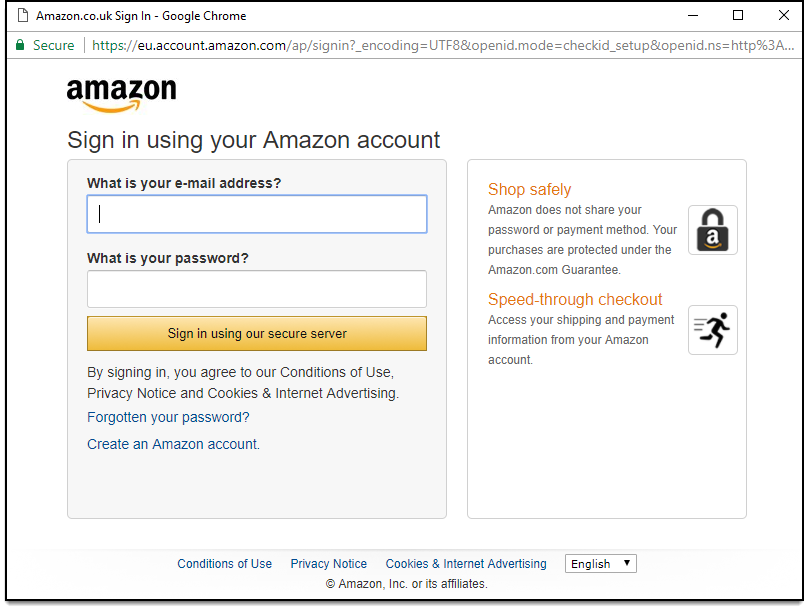
Once you click on the Amazon Pay button, you get another window, wherein you need to enter the Amazon Pay login credentials to log in.
Now you can move to the Checkout page. In the Checkout page, you can see that the shipping and billing address is fetched automatically.
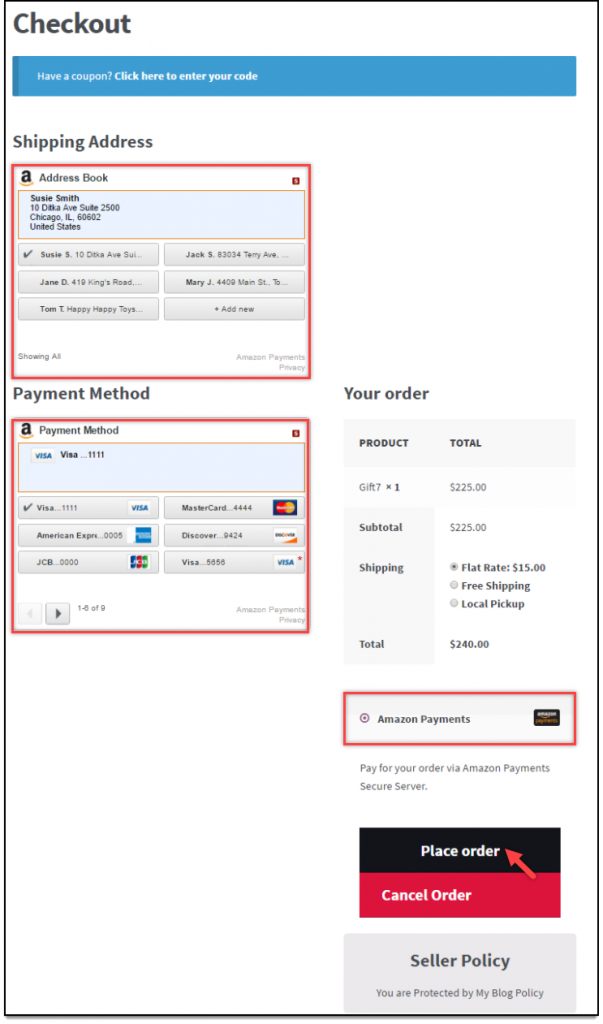
Here you can choose the Amazon Payment method and proceed to checkout.
Track the Payments using Amazon Pay Payment Overview page
To see the overview of all the Amazon Pay payments, you can go to Amazon Payments overview page (WooCommerce >> Amazon Payments).
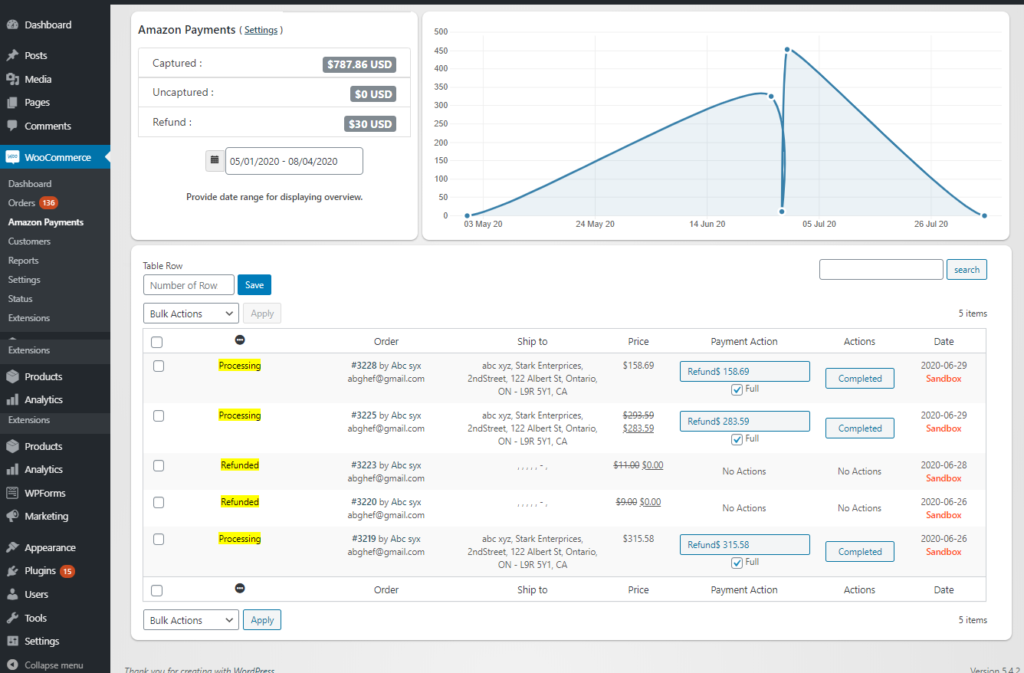
Here you can choose a date range or a specific date and then get to see the captured, uncaptured, and refunded payment details. You can also view the payments in a table row right below the graphical representation. You can also initiate a full and partial refund from here too.
How to initiate a refund or Capture for your payments made using Amazon Pay Payment gateway?
When you go to the Orders page, you can click on the individual order page and process the refund from there. Once initiated, you can see the corresponding messages on the Order page.
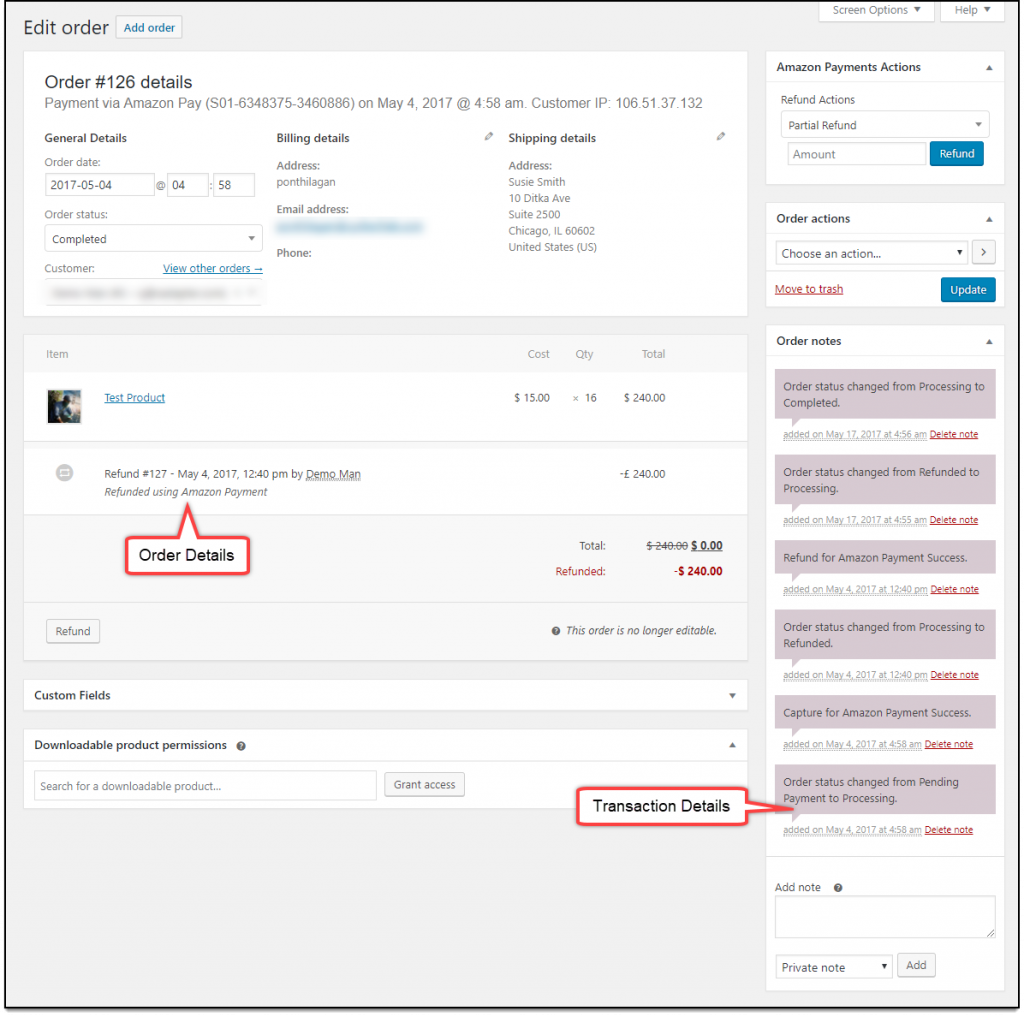
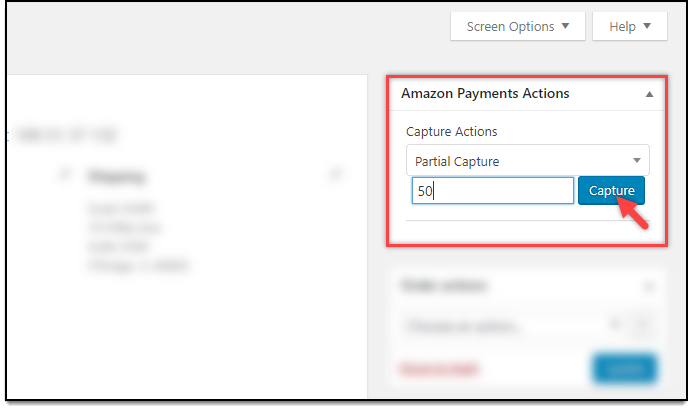
To capture the data on your Amazon Pay transactions, you can do that in the individual order page.

In the payment actions, you can choose either full or partial capture and enter the value.
Remember that the maximum amount you can refund to a buyer is 15% more than the previously charged amount (i.e captured), or a maximum of $75 more than the previously charged amount, whichever is smaller.
To Wrap Up
This is how you can easily integrate Amazon Pay payment gateway on your WooCommerce store and use it efficiently to track all your payments on your WooCommerce store.

