What can we help you with?
How to Auto-generate DHL Paket Shipping Labels & Email the Labels Automatically with ELEX WooCommerce DHL Paket Auto-Label Generation Add-On?
This article is a step-by-step tutorial to help you auto-generate and email DHL Paket Shipping labels with ELEX WooCommerce DHL Paket Auto-Label Generation Add-On. For more information on the plugin, refer to the product page.
This Add-On works only with ELEX WooCommerce DHL Shipping Plugin with Print Label & Tracking, which allows you to access real-time rates from DHL shipping service, print shipping labels, track shipments, and helps in packing items into boxes. Additionally, this plugin is capable of providing DHL Paket and DHL eCommerce services. Here, let us check how to generate DHL Paket labels and send them in an email to the admin and customers automatically.
DHL Paket
With the DHL Paket, you can send small and large parcels secure and fast within Germany. It delivers parcels within 1 – 2 business days and provides insurance coverage up to EUR 500 for loss or damage, which will be included in the price.
Overview
Some of the major highlights of this add-on include:
- Automatically generate Paket shipping labels: Once an order moves to the selected status, the add-on creates shipments and generates the Paket shipping labels for each package in the order.
- Trigger custom emails automatically: You can trigger custom automated emails to send the labels to the customer, shop owner, and entered custom email addresses.
- Send custom shipment failed notifications: You can send a custom email notification to the admin when the shipment fails.
Prerequisites
For auto-generating and emailing DHL Paket labels, you need the following:
- ELEX WooCommerce DHL Express / eCommerce / Paket Shipping Plugin with Print Label
- ELEX WooCommerce DHL Paket Auto-Label Generation Add-On
Getting started with ELEX WooCommerce DHL Paket Auto-Label Generation Add-On
Read an article to know how to complete the checkout process on ELEX. Also read how to download, install, activate ELEX plugins for more details.
The core label printing process is determined with the ELEX WooCommerce DHL Shipping Plugin settings and not the add-on settings. So first, you need to set up the ELEX WooCommerce DHL Express Shipping Plugin, and then proceed with auto-label generation.
To know how to set up ELEX WooCommerce DHL Express Shipping Plugin in your store, refer to an article: How to set up WooCommerce DHL Express in ELEX WooCommerce DHL Shipping Plugin with Print Label?
Now, let’s get down to the configuration process.
After installing and activating the plugin,
Go to Dashboard > Plugins > Installed Plugins > ELEX DHL Paket Auto-Generate & Email Labels Add-On > Settings OR
Go to WooCommerce > Settings > Shipping > DHL Paket
Navigate to the Automatic Label Generation part on the tab.
Check the screenshot:
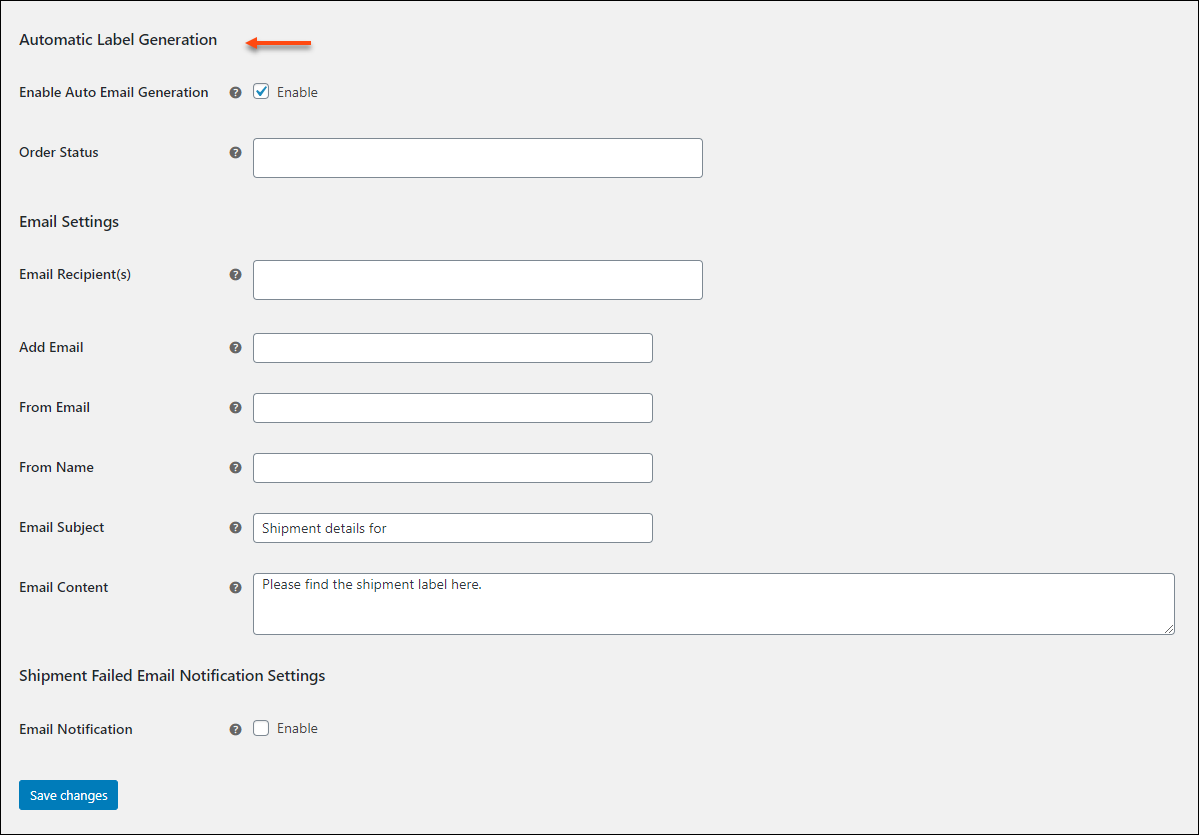
- Enable Auto Email Generation: This option will be enabled by default. It is to generate the DHL Paket shipping labels automatically. You can disable the option in accordance with the requirements.
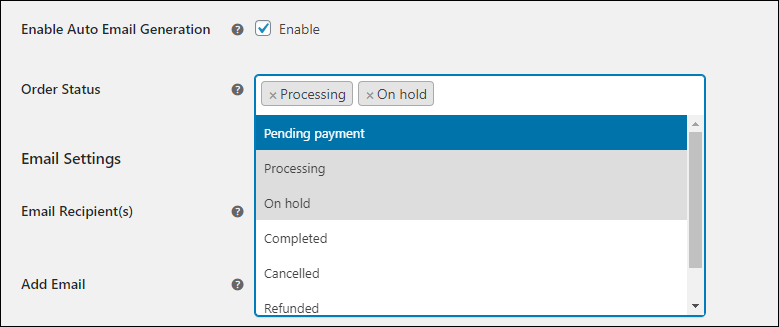
- Order Status: You can choose the WooCommerce order status(es) from the given drop-down pick-up list for which you want to auto-generate shipping labels when the order is in any of the given statuses. When the order is in the given status(es), the add-on will automatically create a shipment, and generates the shipping label(s), and sends it to the configured email recipients.
If any shipment has been already created and the specific order comes under one of the configured order statuses, the add-on will simply fetch the generated label URL and email it to the configured recipients.
Email Settings
Choose the recipients to whom you want to send the generated labels as emails and customize the email to be triggered.
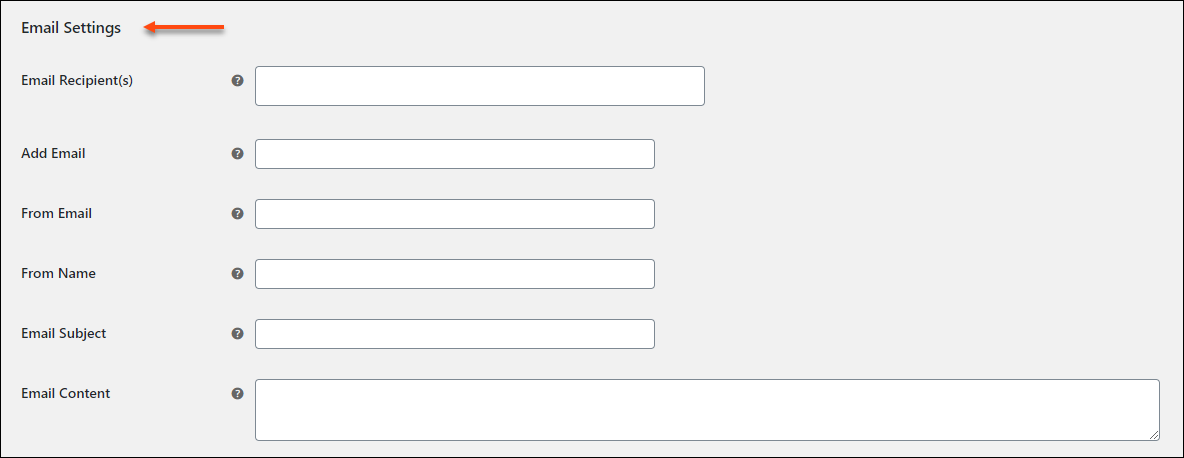
- Email Recipient(s): Choose the recipients from the drop-down list as you have 3 options available such as Customer, Shop owner, and Custom email.

- Add Email: If you have chosen Custom email to trigger an email to a custom email address, add that specific email address in this field. You can enter multiple email addresses separated by a comma.
- From Email: Enter the email ID from which you want to send the emails of the shipment label.
- From Name: Enter a name for the sender email address. You can enter your name or your organization’s name.
- Email Subject: Enter a subject for the sending email. Add the subject according to whom you are sending the email. It should be easily recognizable for the customers, owners as well as any email ID you have added. The respective order IDs will be appended to the subject automatically.
- Email Content: Enter the custom content to be sent along with the shipping label. Add relevant details here.
Shipment Failed Email Notification Settings
Sometimes the shipment might fail due to some reasons such as the shipping service selected by the customer might fail to return any rates, the customer selects a default shipping method, or third-party shipping service other than the ones offered by the ELEX WooCommerce DHL plugin.
In the above cases, the ELEX WooCommerce DHL Paket Auto-Label Generation Add-On will help you notify the failure of shipment creation, via email. So you can go to the respective order page, create the shipment, and generate the labels manually.
Check the below screenshot:
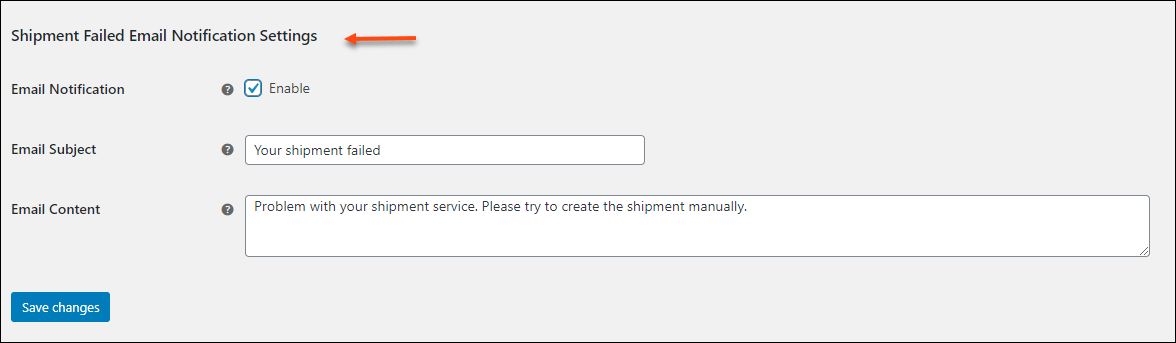
- Email Notification: Enable this option to activate an email notification when the shipment fails.
- Email Subject: Enter a custom subject line for the ‘shipment failed’ emails. The respective order ID will be appended to the subject line added here.
- Email Content: Enter content for shipment failure email notification.
Click Save Changes once you have configured all required fields.
Demonstration
Check an example:
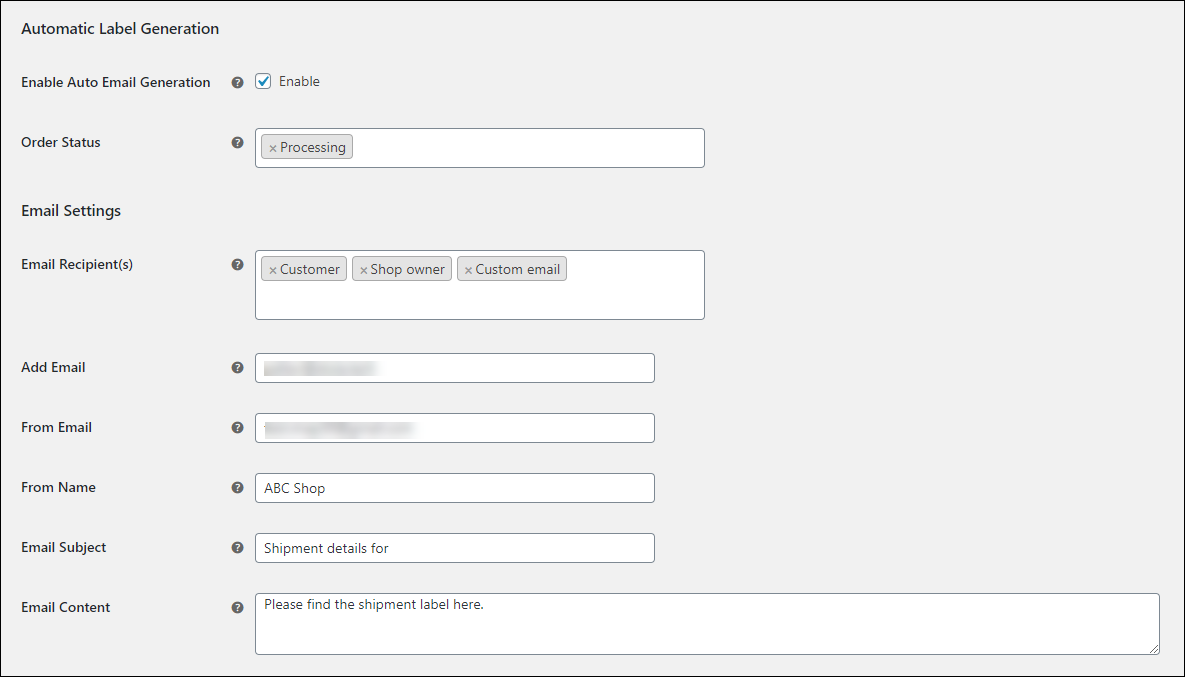
Here I have chosen Processing order status, and the email to be triggered to the customer, shop owner, and a custom email. And added the email addresses, name of the sender, subject, and content accordingly.
When a customer places an order, you can go to the respective order page. If the order is in the Processing status, the label will be generated automatically.
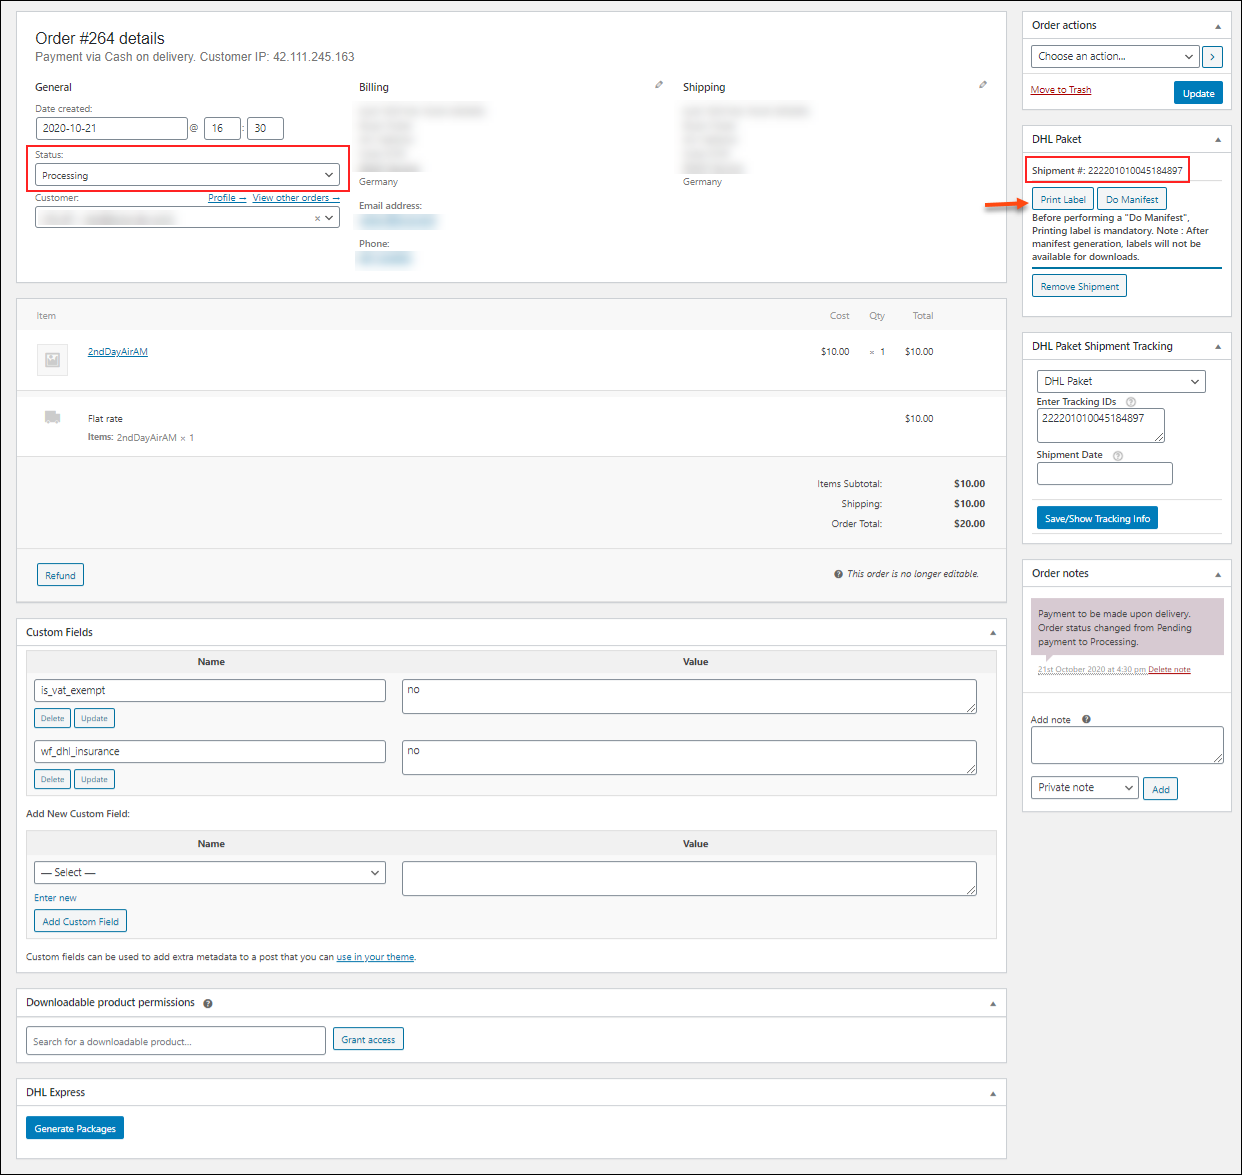
The shipment will be created and the label will be generated automatically. You can click the Print Label button to see and download the label. And the email will be triggered automatically to the entered recipients with the link to download the label. Check the example of the email received by the customer.
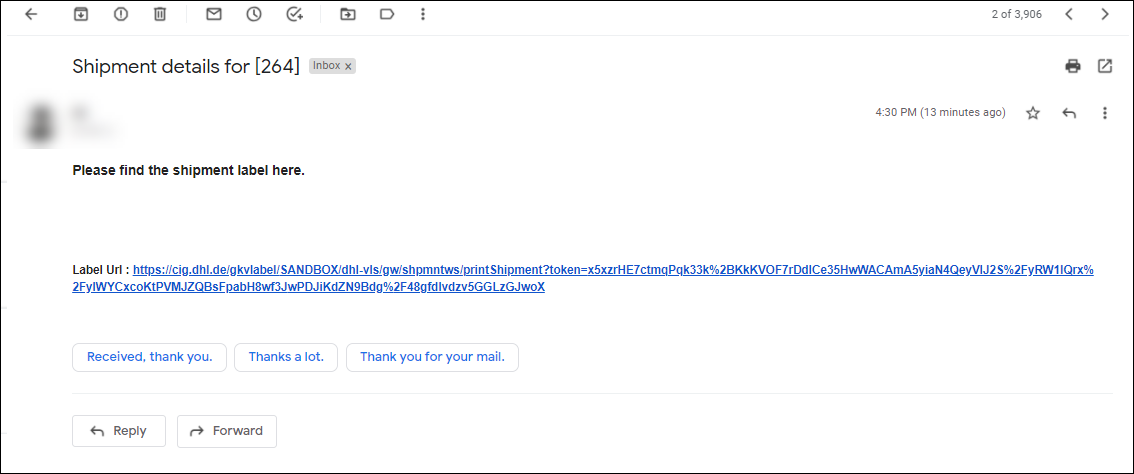
The customer can open the link and download accordingly.
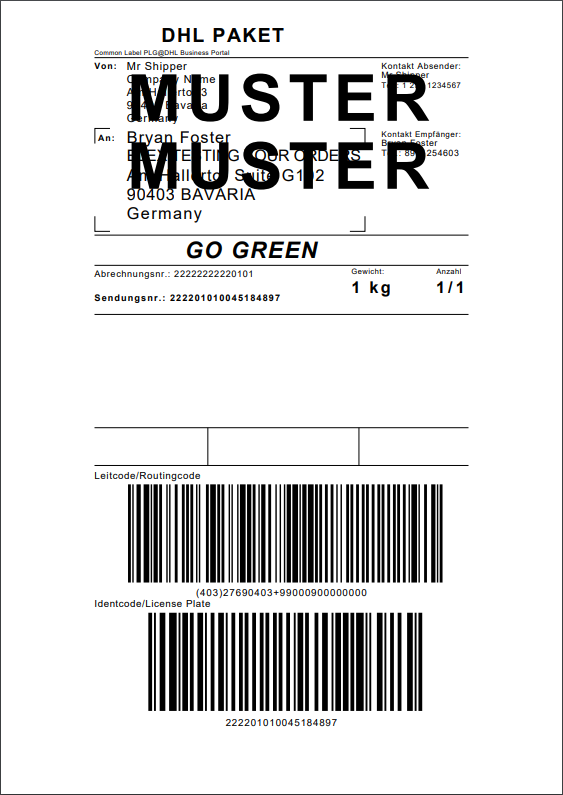
The label opened from the order page and mailed to the recipients will look as in the below screenshot:
To explore more details about the add-on, go check out ELEX WooCommerce DHL Paket Auto-Label Generation Add-On.
Or check out the parent product – ELEX WooCommerce DHL Express / eCommerce / Paket Shipping Plugin with Print Label and its documentation for a better understanding of the plugin.
You can also check out other WooCommerce and WordPress plugins in ELEX.