What can we help you with?
How to set up the ELEX WooCommerce Multi Vendor Plugin?
This article intends to provide detailed, step-by-step instructions to help you understand how to set up the ELEX WooCommerce Multi Vendor Plugin. This comprehensive solution empowers you to onboard vendors seamlessly, manage their products efficiently, and automate settlements effortlessly, fostering a vibrant multi vendor ecosystem that fuels growth and profitability. Refer to the product page to learn more about the plugin’s other various features.
Overview
Some of the major highlights of the plugin include:
- Effortless Vendor Onboarding: Simplify vendor onboarding with a customizable wizard for a personalized experience. Choose between instant access or approval processes for seamless vendor integration.
- Total Vendor Dashboard Control: Manage vendor access to the dashboard and enhance security by restricting access to products, orders, and coupons. Prioritize convenience and safety with tailored user experiences.
- Product Control at Your Fingertips: Empower vendors to manage products effortlessly through a user-friendly dashboard. From showcasing products to setting prices, vendors maintain dynamic catalogs with ease.
- Effortless Order Management: Seamlessly handle orders from the vendor dashboard with a quick overview of details. Vendors can efficiently track, process, and manage customer orders for streamlined fulfillment.
- Coupon Generation Simplified: Drive sales with built-in coupon generation on the vendor dashboard. Vendors create enticing discounts and promotions with just a few clicks.
- Shipping Management Made Easy: Provide vendors with dedicated shipping management features. Ensure accurate and timely delivery to customers with efficient shipping detail management.
- Insightful Payment and Settlement Overview: Empower vendors with comprehensive financial insights. From tracking commissions to understanding settlement history, transparency and trust are fostered.
- Enhanced Store and Product Visibility: Elevate the shopping experience by showcasing vendor details across the store and product pages. Customize storefront URLs for a unique online presence.
- Streamlined Product Approval and Management: Empower vendors with flexible product management options. Implement approval processes or allow direct product listing for efficient management.
- Flexible Commission and Charges: Tailor commission structures effortlessly to ensure fairness and flexibility. Choose shipping fee responsibility based on your business model.
- Efficient Settlement Options: Define settlement dates and statuses for efficient vendor payments. Manage financial transactions with accuracy and transparency.
- Simple Vendor Management: Simplify administrative tasks with bulk actions for vendor details and product status. Track vendor performance for thriving relationships.
- Comprehensive Payment Tracking Dashboard: Access a detailed dashboard for precise financial analysis. Monitor sales, orders, commissions, and refunds to make informed decisions effortlessly.
- Transparent Vendor Payments: Keep track of vendor payments and settlement statuses for transparent partnerships. Ensure timely payouts to foster trust and collaboration.
Getting started with the ELEX WooCommerce Multi Vendor Plugin
Read an article to learn how to complete the checkout process on ELEX. You can also read how to download, install, and activate ELEX plugins.
Once the plugin is installed and activated, you can navigate to plugin settings in two ways:
- Dashboard > WordPress Admin Panel > ELEX Multi Vendor (or)
- Dashboard > Plugins > Installed Plugins > ELEX Multi Vendor > Settings.
Now that we know what the plugin has to offer, and have installed the same, let’s get down to configure the plugin.
Onboarding
As soon as the plugin is installed and activated, you will be redirected to the setup onboarding page. Check out the screenshot:
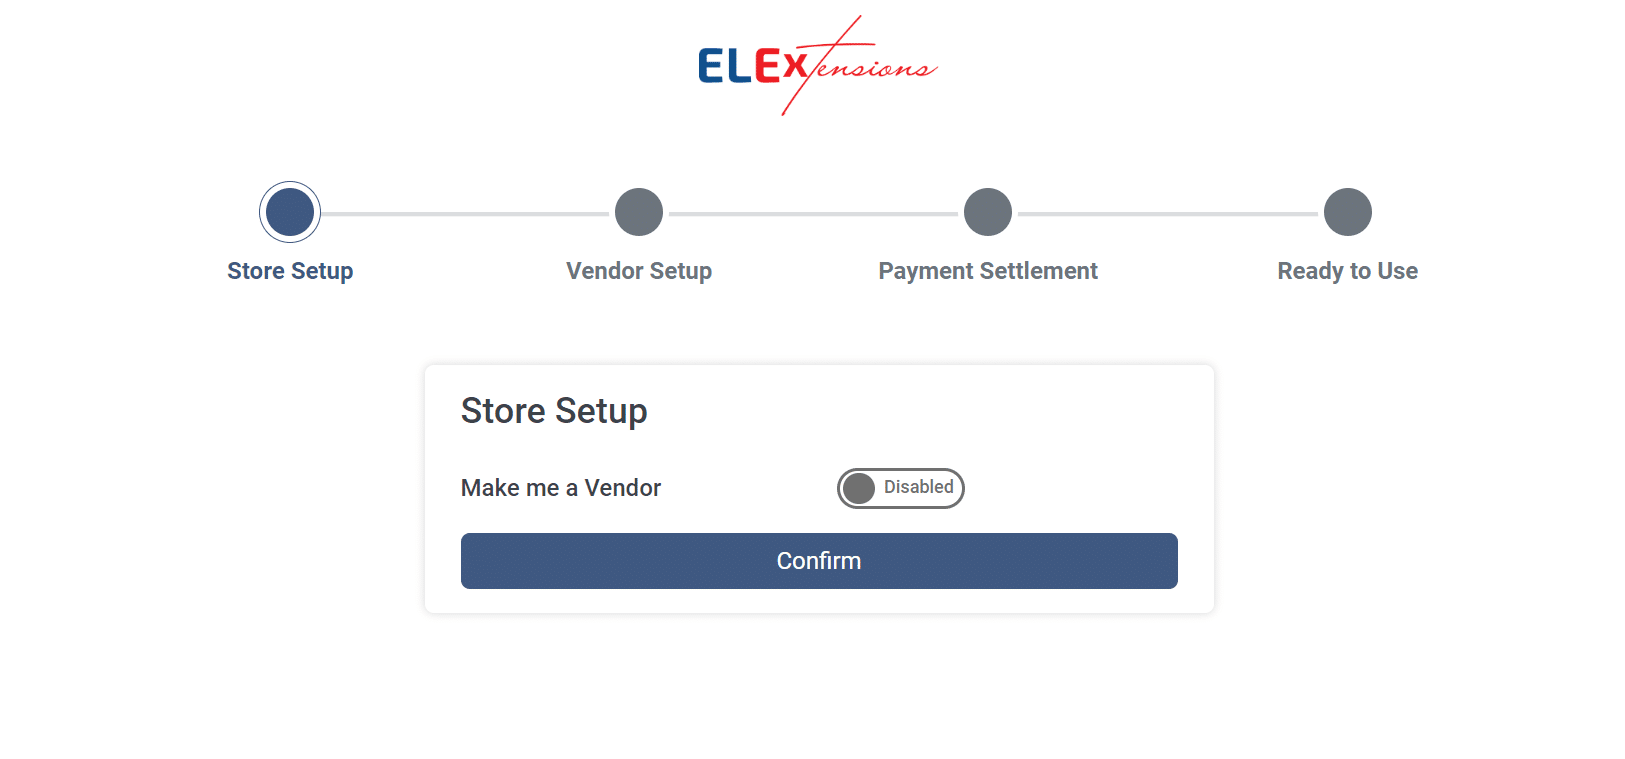
Store Setup
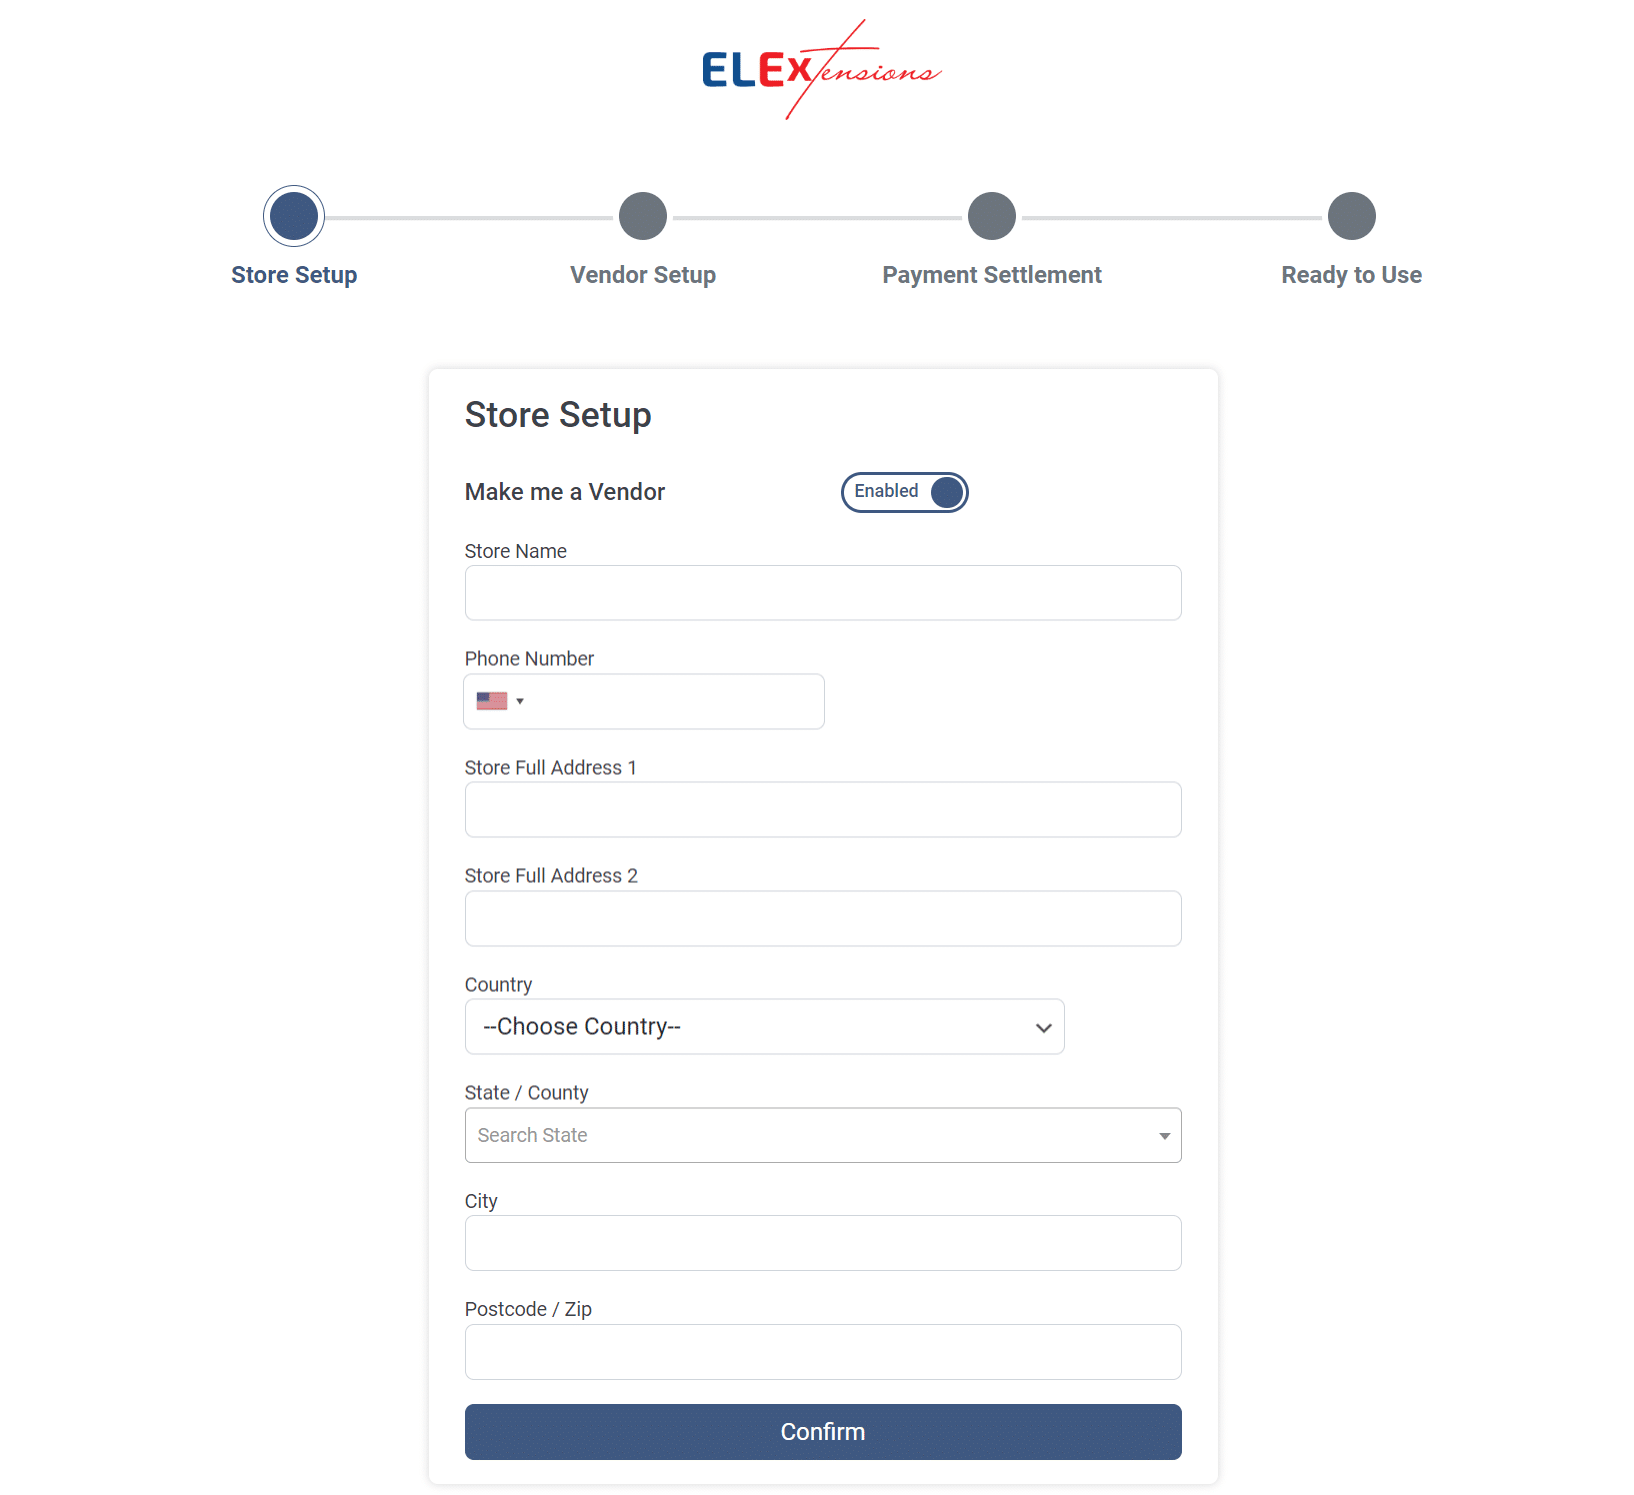
If you wish to enroll your own WooCommerce store as a vendor, you can enable the ‘Make me a Vendor’ button. Here you can enter your store details including the store name, phone number, store address, country, state, city, and postcode. Click confirm after entering the details. If you do not wish to add your store as a vendor, click confirm without enabling the ‘Make me a Vendor’ button.
Vendor Setup

- Approval Process for New Vendor Onboarding: Enable or disable the approval process for new vendor onboarding. When enabled, new vendors must go through an approval process before gaining access to your marketplace.
- Enable Vendors to Sell Products without Approval: Allow or restrict vendors from selling products without requiring prior approval. When enabled, vendors can list and sell products immediately without approval.
- Allow Vendor to Use WooCommerce Shipping Setup by Admin: Grant or restrict vendors the ability to use the shipping setup configured by the site admin in WooCommerce. When enabled, vendors utilize admin-defined shipping settings.
- Allow Vendors to Create Product Categories: Permit or restrict vendors from creating their own product categories. When enabled, vendors can organize their products into custom categories.
- Allow Vendors to Change Order Status: Grant or deny vendors the authority to change the status of customer orders. When enabled, vendors can update order statuses for efficient order management.
Payment Settlement
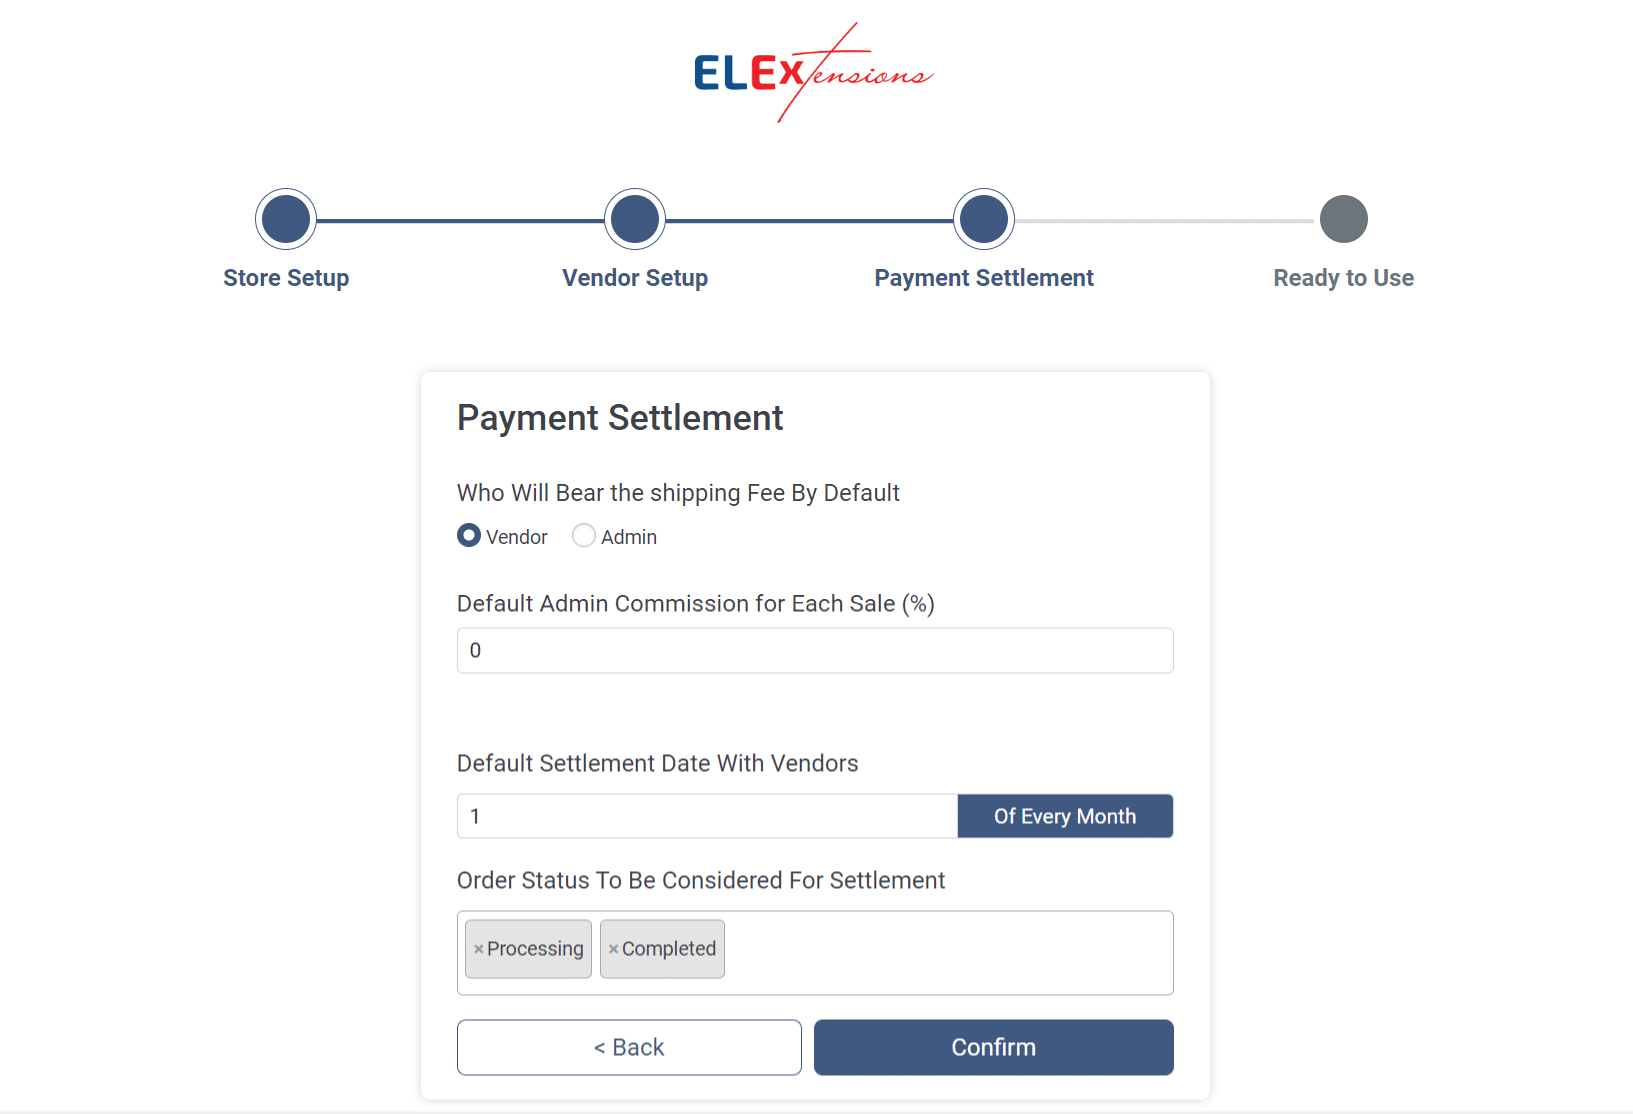
- Shipping Fee Responsibility: Select who bears the shipping fee by default for each sale. Choose between Vendor or Admin based on your business model.
- Default Admin Commission (%): Set the default commission percentage earned by the Admin for every sale. This value serves as the baseline for commission calculations.
- Default Settlement Date with Vendors: Define the default date for settlements with vendors. Payments will be processed on this date, promoting consistency in financial transactions. However, the payment will not be processed automatically. This is the day that the payment will typically be manually processed.
- Order Status for Settlement: Specify the order statuses to be considered for settlement with vendors. Choose the relevant statuses for accurate and transparent financial transactions.
Ready To Use
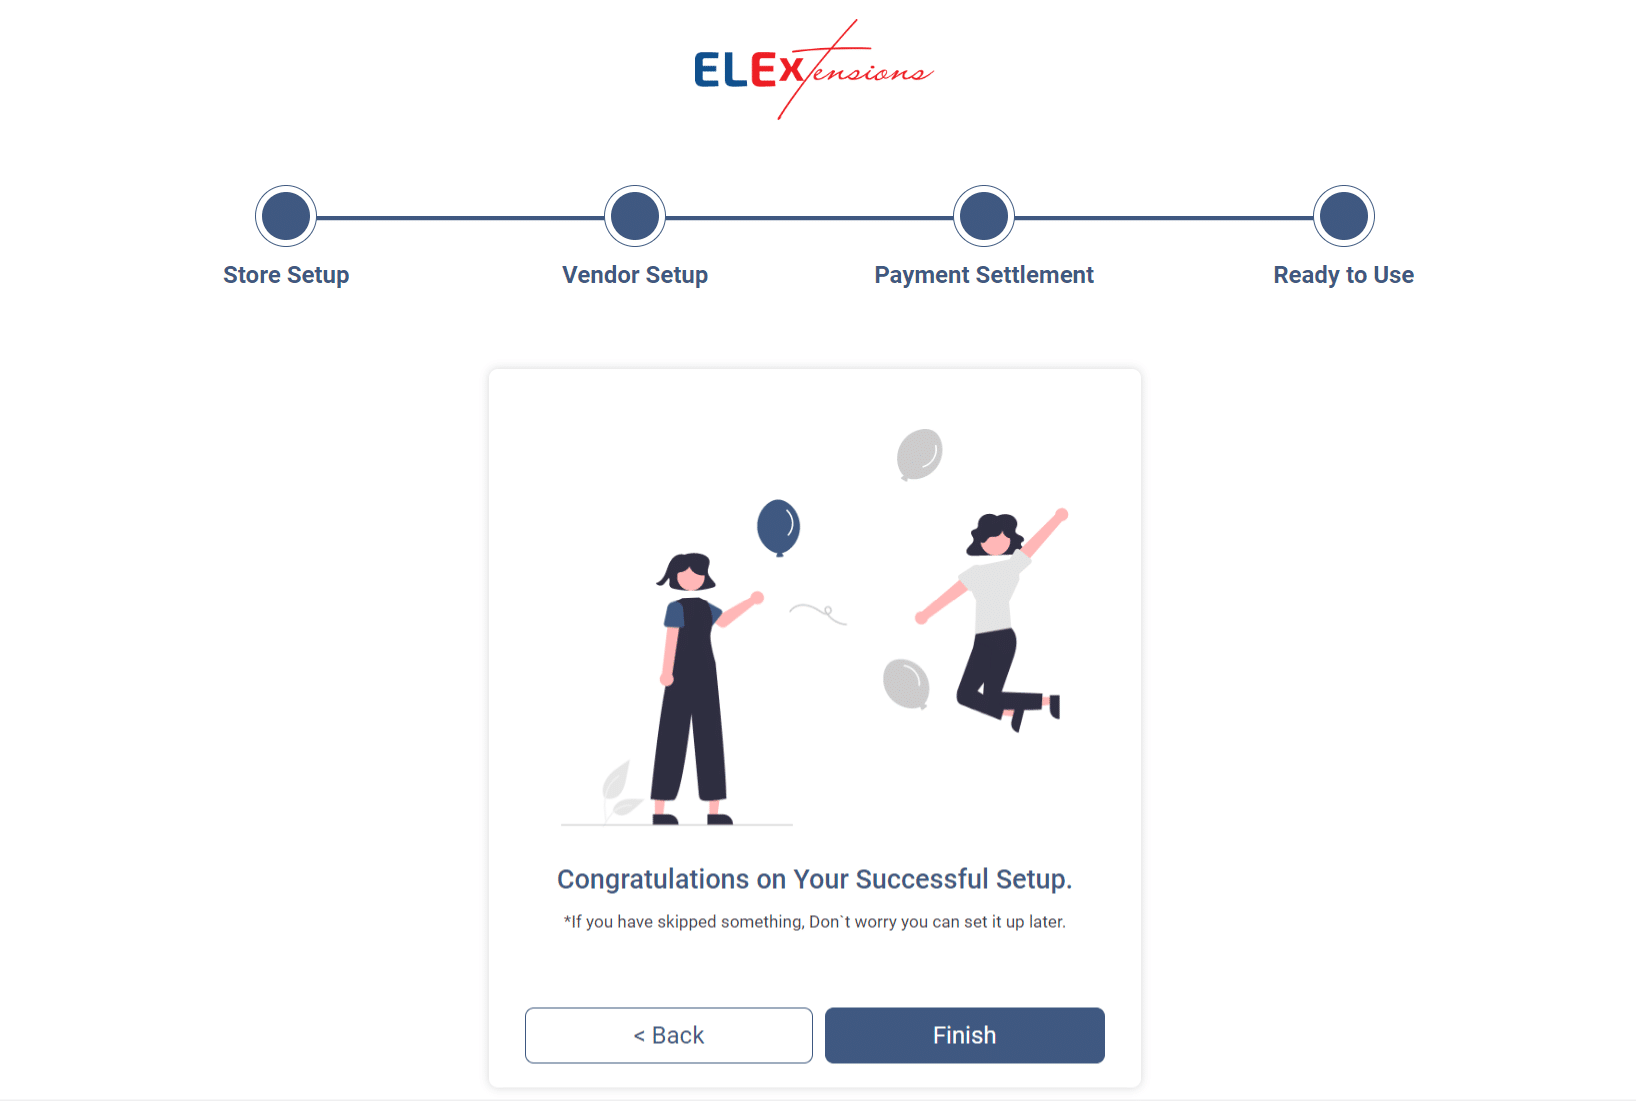
This brings us to the end of the onboarding page. Next, you can make further configurations and change the setup onboarding settings from the plugin settings page.
Plugin Settings
The main plugin settings are divided into four tabs general settings, vendor capability, commission & charges, and settlement.
General Settings
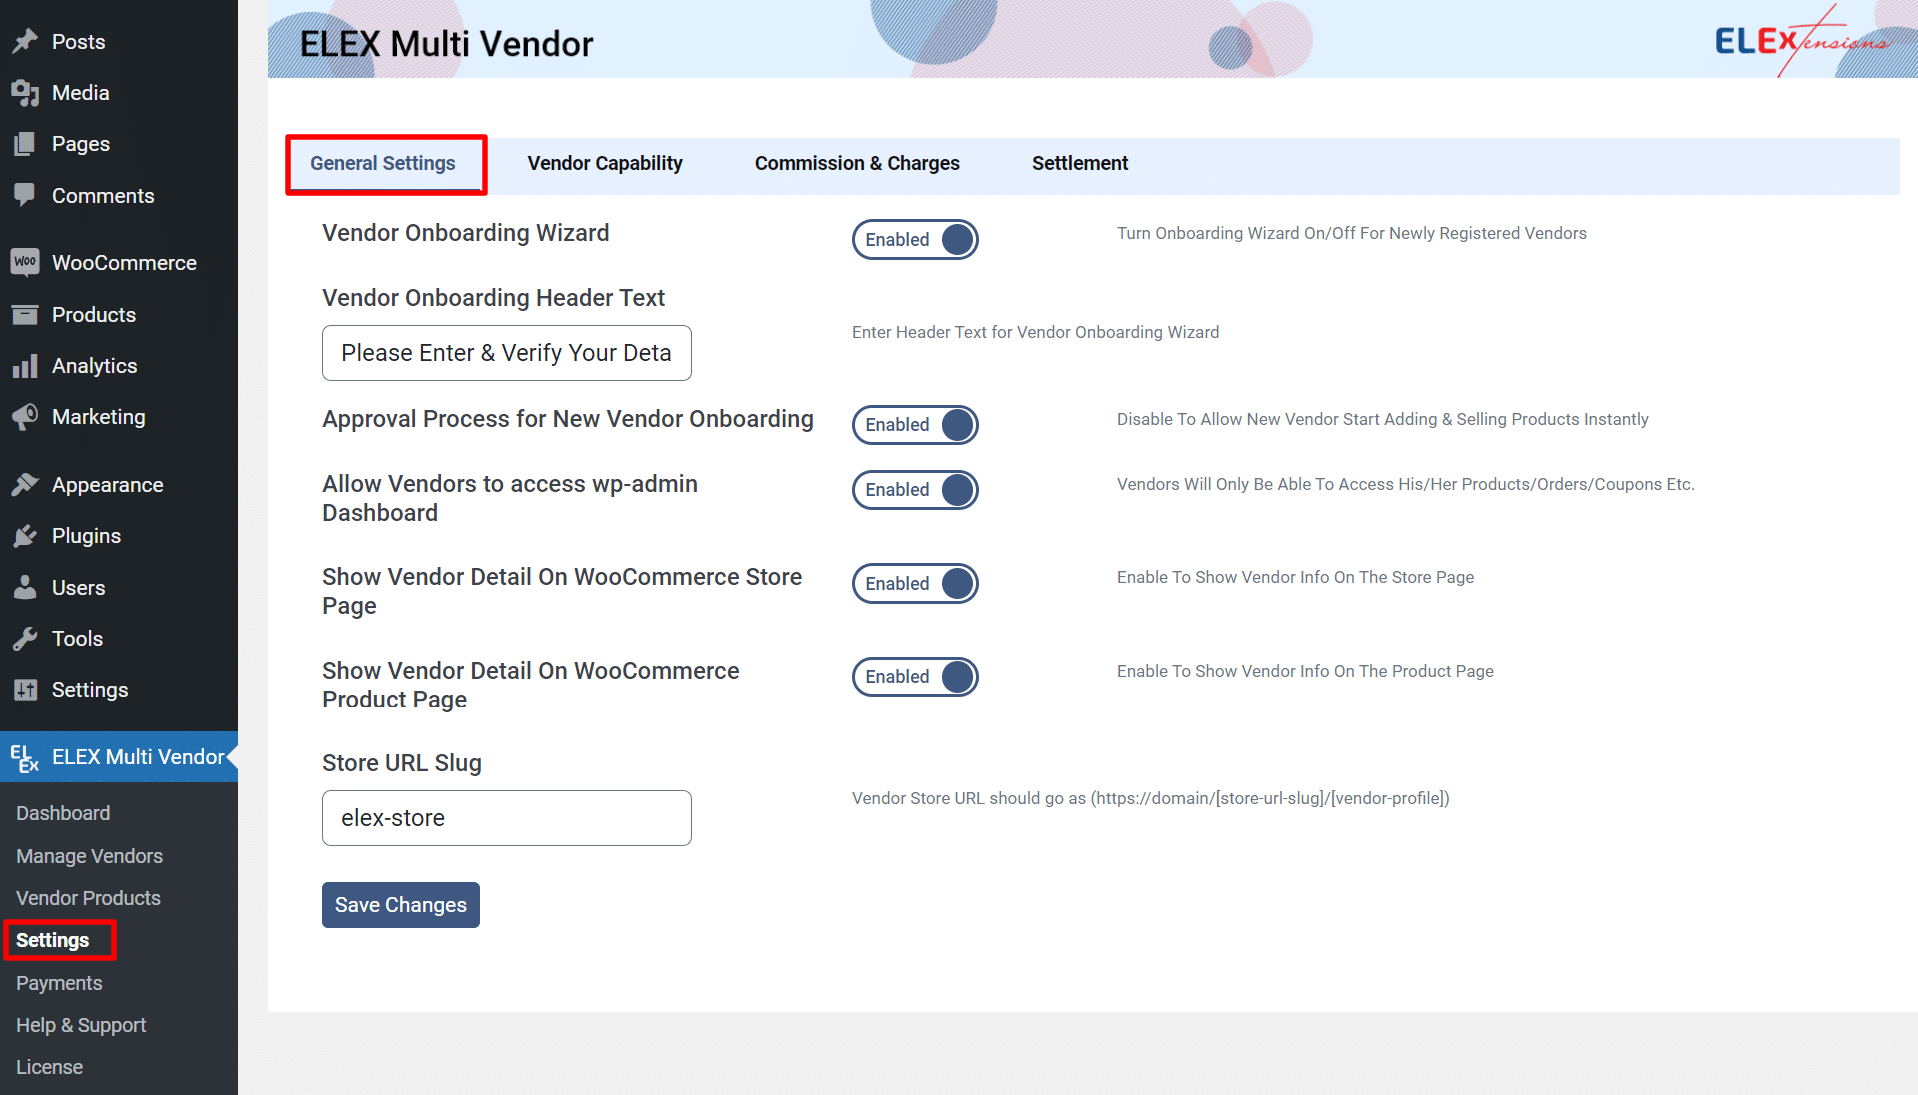
- Vendor Onboarding Wizard: Toggle to enable or disable the onboarding wizard for newly registered vendors. Choose whether vendors go through the onboarding process upon registration.
- Vendor Onboarding Header Text: Enter the text to be displayed as the header during the vendor onboarding process. Customize the messaging to provide clear instructions and a welcoming experience.
- Approval Process for New Vendor Onboarding: Enable this option to implement an approval process for new vendor onboarding. Choose to review and approve vendor registrations before they can start adding and selling products.
- Allow Vendors to Access wp-admin Dashboard: Grant or restrict access to the wp-admin dashboard for vendors. Choose to enhance security by limiting vendor access to their own products, orders, and coupons.
- Show Vendor Detail On WooCommerce Store Page: Toggle to enable the display of vendor details on the WooCommerce store page. Enhance the shopping experience by showcasing information about individual vendors.
- Show Vendor Detail On WooCommerce Product Page: Toggle to enable the display of vendor information on individual product pages. Provide customers with insights into the vendors behind the products they are browsing.
- Store URL Slug: Set the URL slug for vendor stores. Define a unique identifier for each vendor’s store, creating a branded and recognizable storefront appearance. The vendor store URL should go as (https://domain/[store-url-slug]/[vendor-profile]).
Vendor Capability
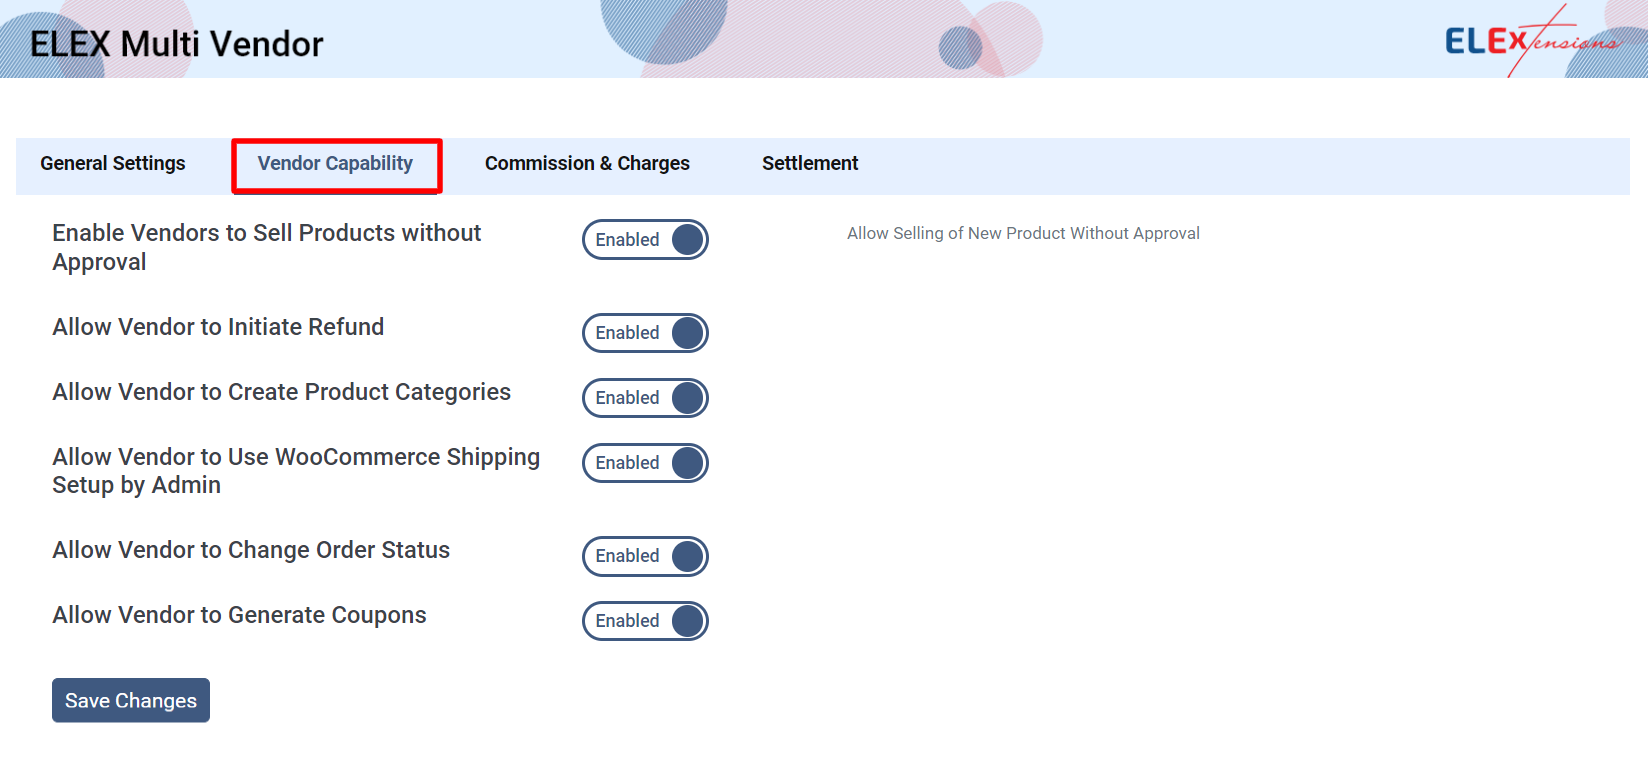
- Enable Vendors to Sell Products without Approval: Toggle to allow vendors to list and sell products without requiring prior approval. Streamline the product listing process for vendor convenience.
- Allow Vendor to Initiate Refund: Enable this option to grant vendors the ability to initiate refunds for orders. Enhance vendor autonomy in handling customer returns.
- Allow Vendor to Create Product Categories: Empower vendors to create and manage product categories. Enable this option for flexibility in organizing and presenting their product catalog.
- Allow Vendor to Use WooCommerce Shipping Setup by Admin: Grant vendors access to use the shipping setup configured by the admin. Ensure consistency and accuracy in shipping methods across the marketplace.
- Allow Vendor to Change Order Status: Toggle to allow vendors to independently change the order status. Enhance vendor control over the order fulfillment process.”
- Allow Vendor to Generate Coupons: Enable this feature to allow vendors to create and manage coupons. Boost sales and promotions with vendor-initiated discounts for customer engagement.
Commission & Charges
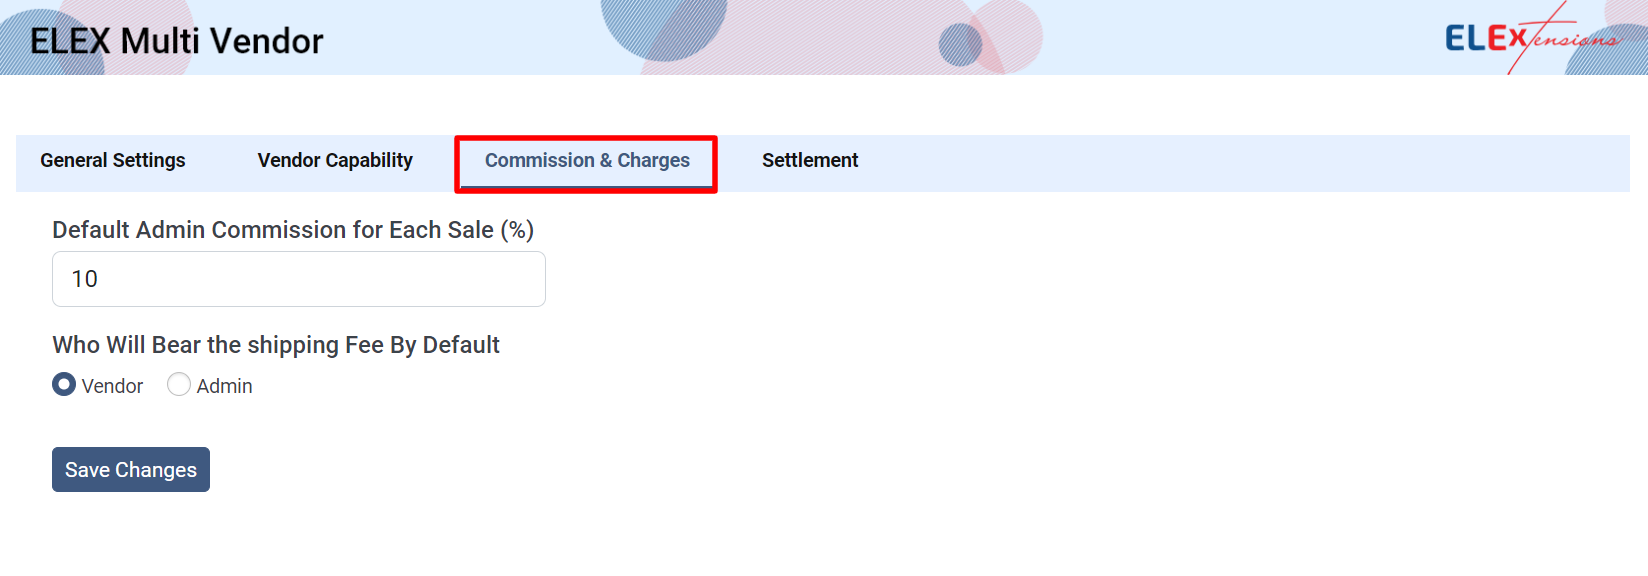
- Default Admin Commission for Each Sale (%): Set the default commission percentage that the admin will earn for each sale. This value serves as the baseline for commission calculations.
- Shipping Fee Responsibility: Specify who will bear the shipping fee by default for each sale. Choose between vendor or admin based on your preferred business model.
Settlement
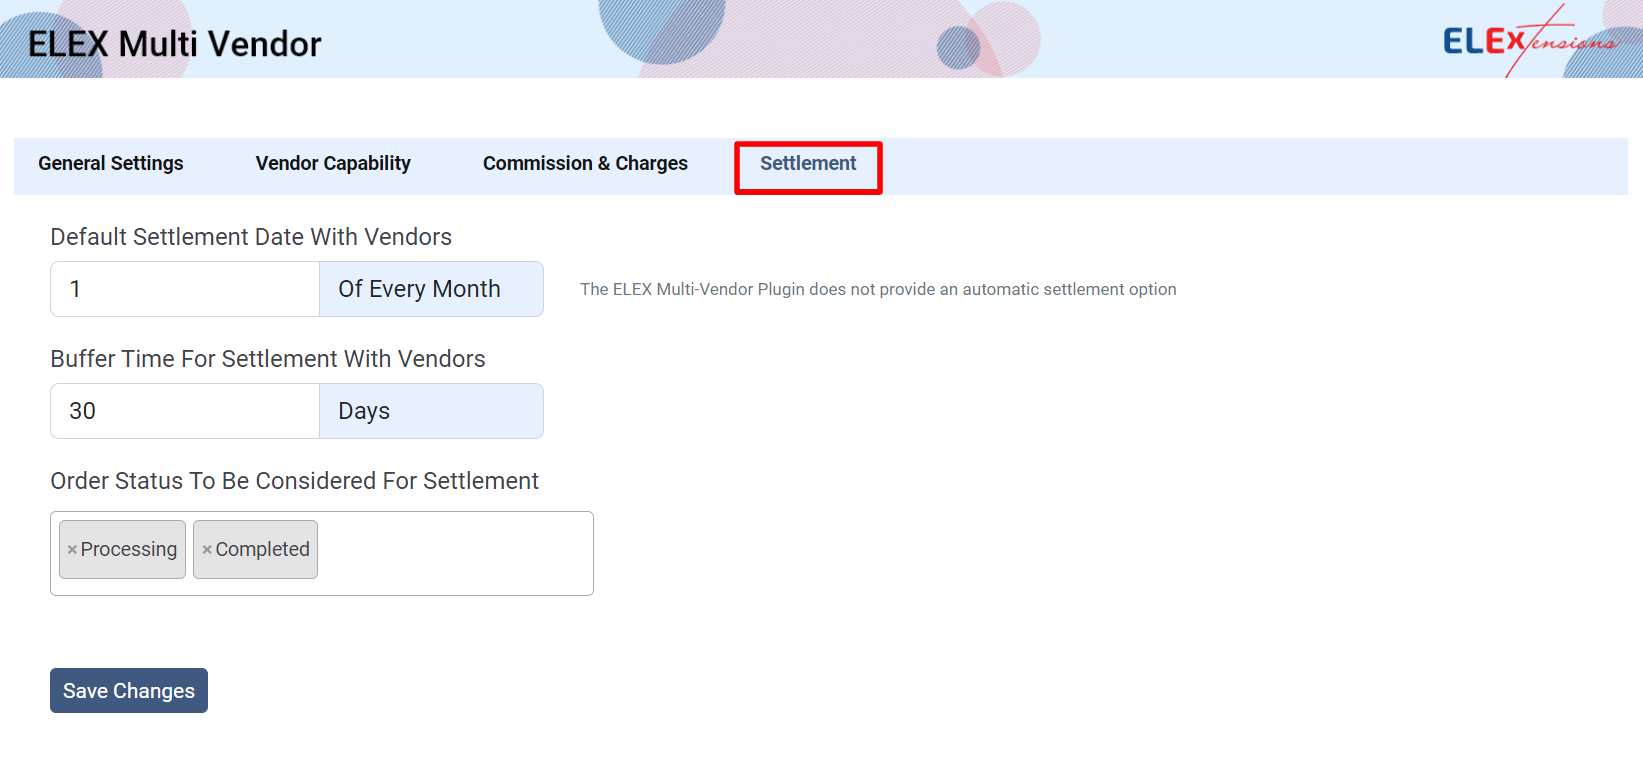
- Default Settlement Date with Vendors: Set the default date for financial settlements with vendors. Payments will be processed on this chosen date of every month, ensuring consistency in transaction handling.
- Buffer Time for Settlement with Vendors: Specify the buffer time, in days, for vendor settlements. This allows flexibility in processing payments and accommodating any delays or adjustments.
- Order Status for Settlement: Define the specific order statuses to be taken into account for settlements with vendors. Choose statuses that will reflect completed transactions for accurate financial reconciliation.
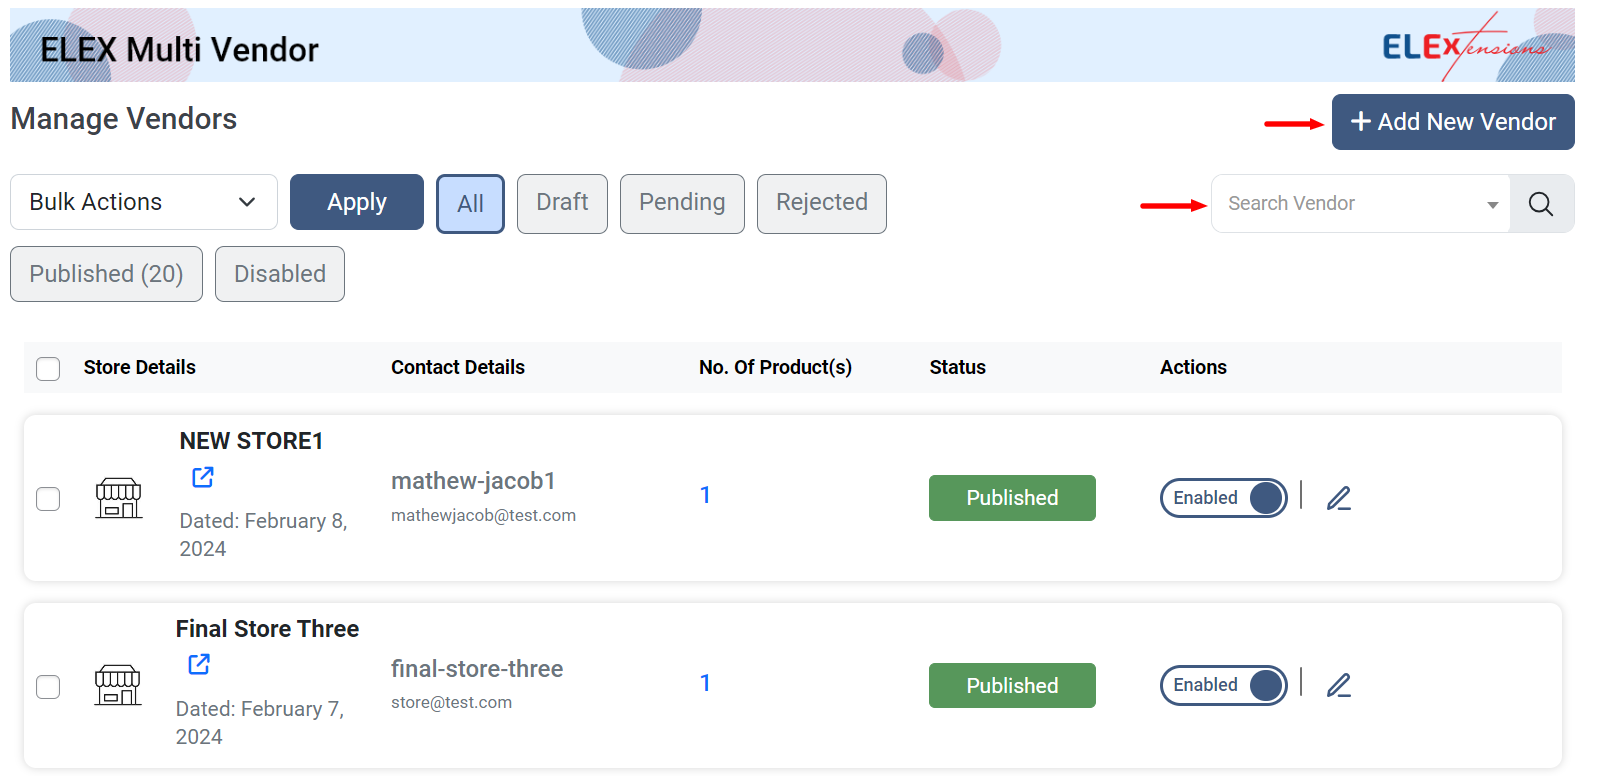
Manage Vendors
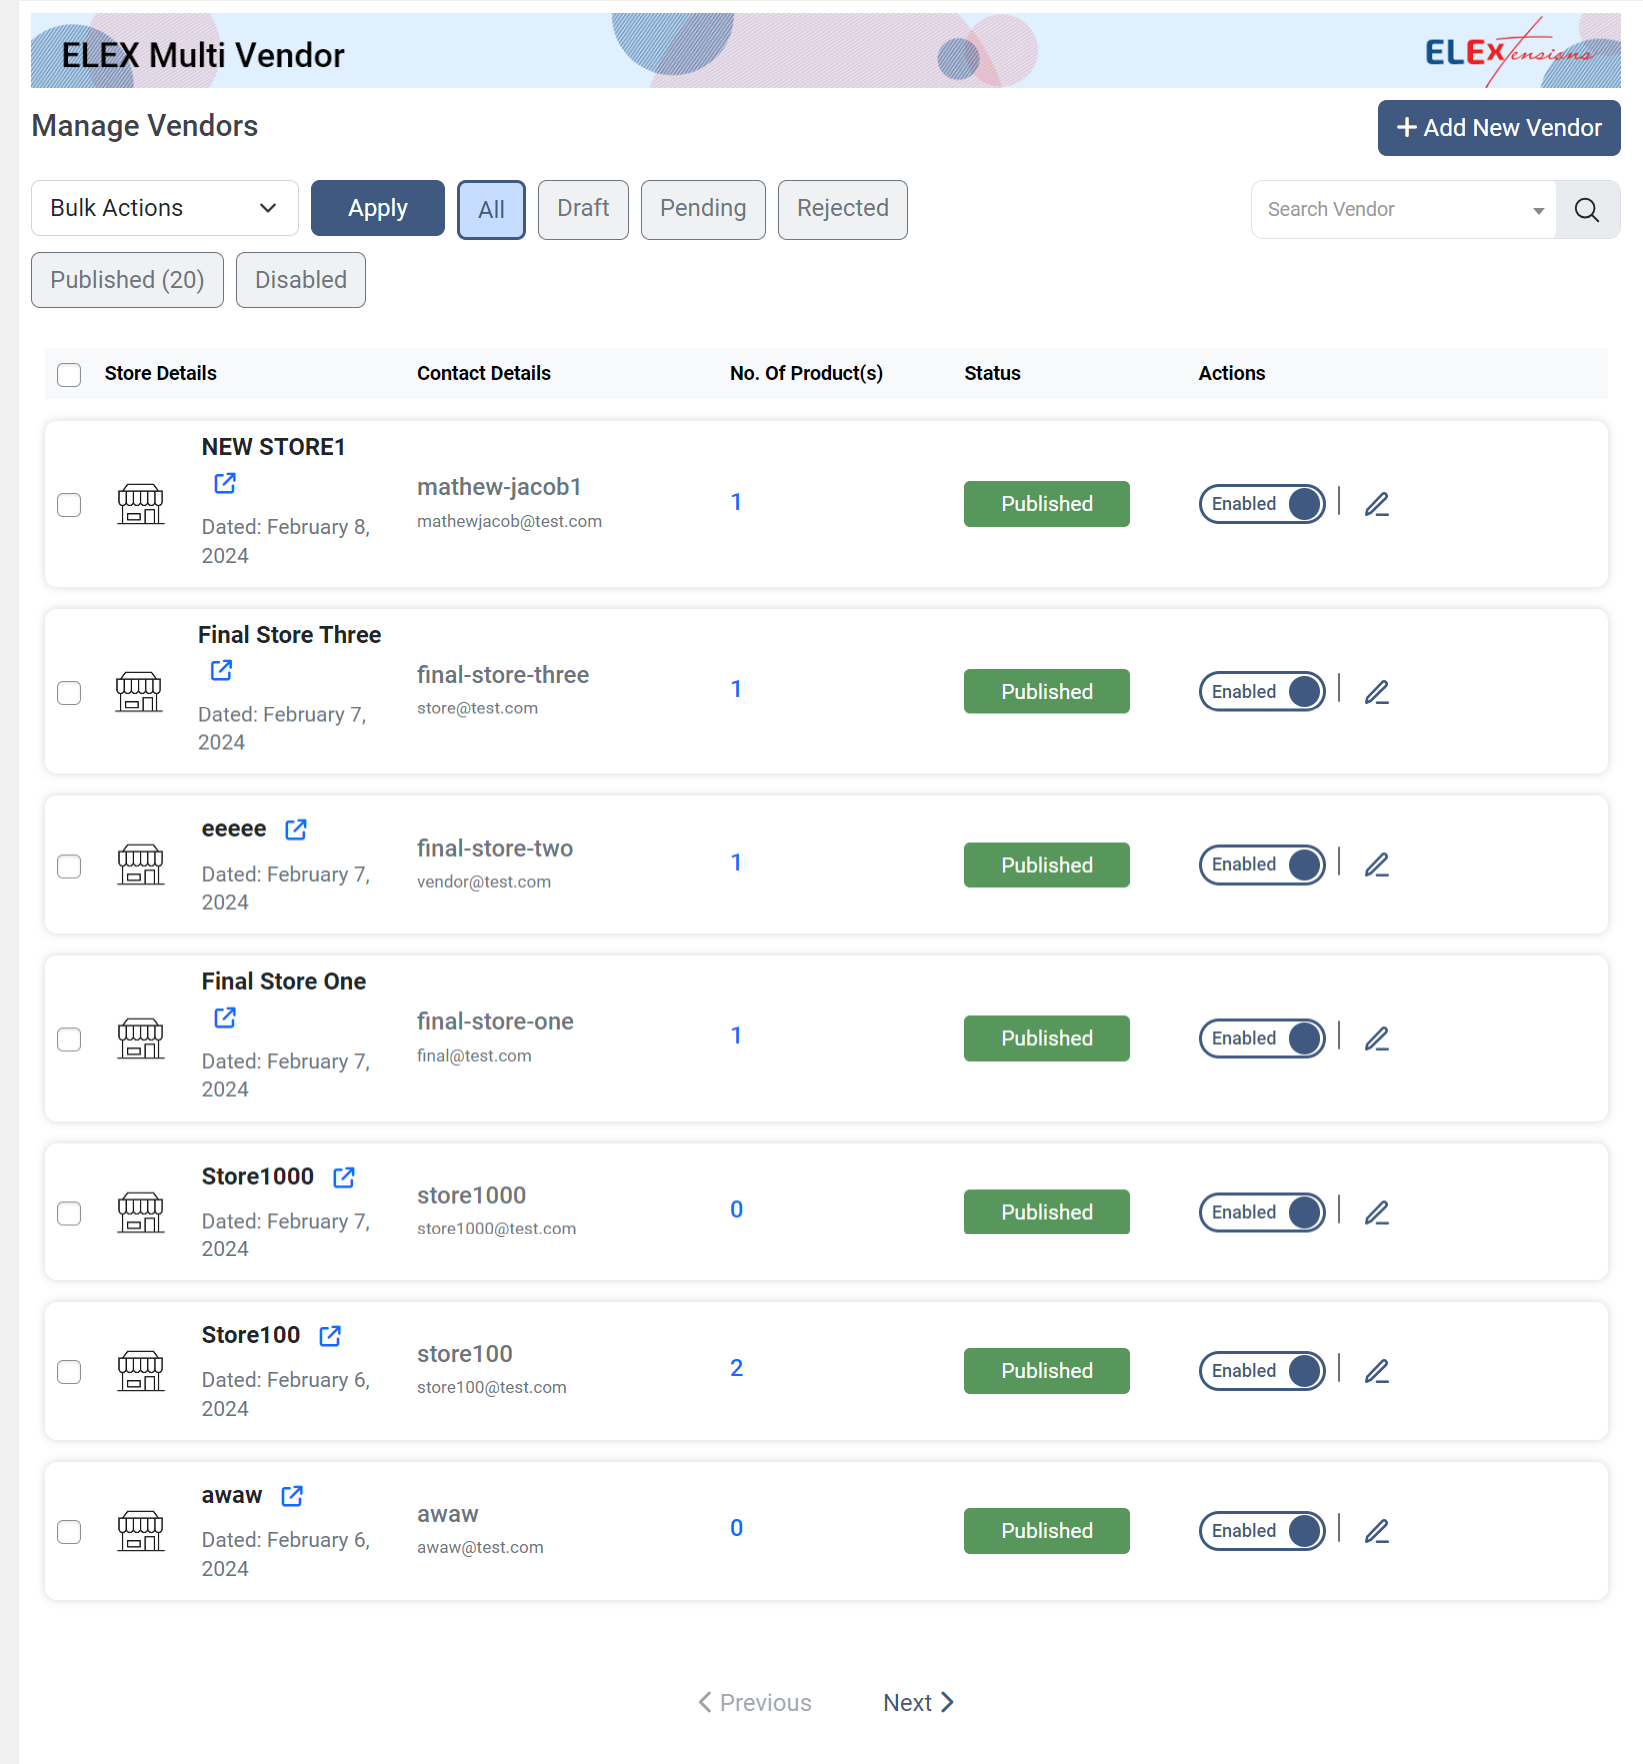
In the manage vendors settings, you can:
- View the store details. You can also open the store page in a new tab by clicking the redirect button.
- View the contact details including the name and email address of the vendor.
- View the number of products added by each vendor.
- Check the vendor status to see if they are published, drafted, pending, rejected, or disabled.
- Enable or disable any of the added vendors.
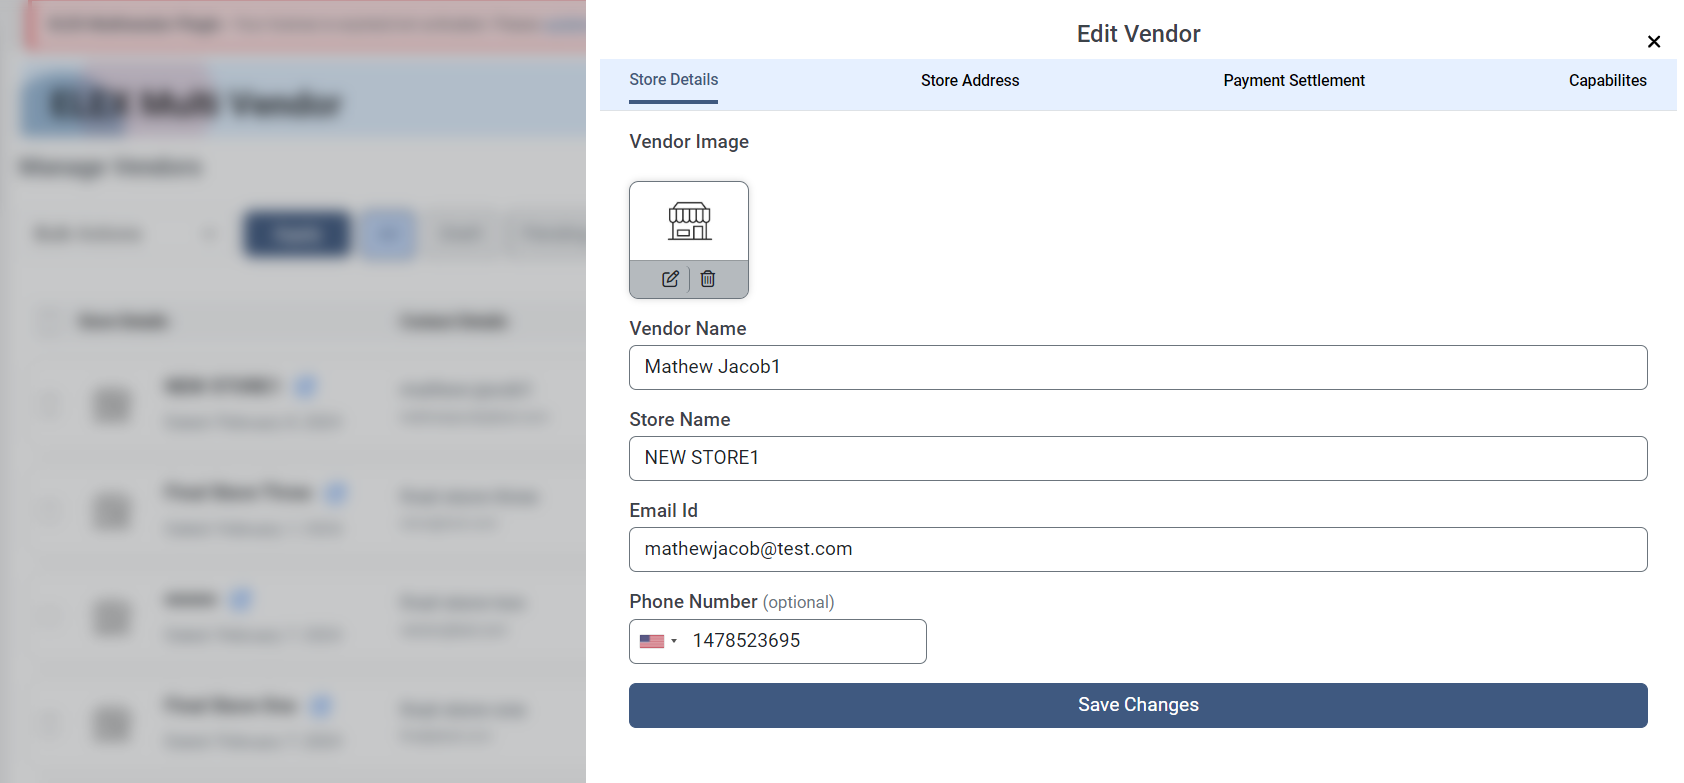
- Edit vendor store details including the vendor image, vendor name, store name, email address, and phone number.
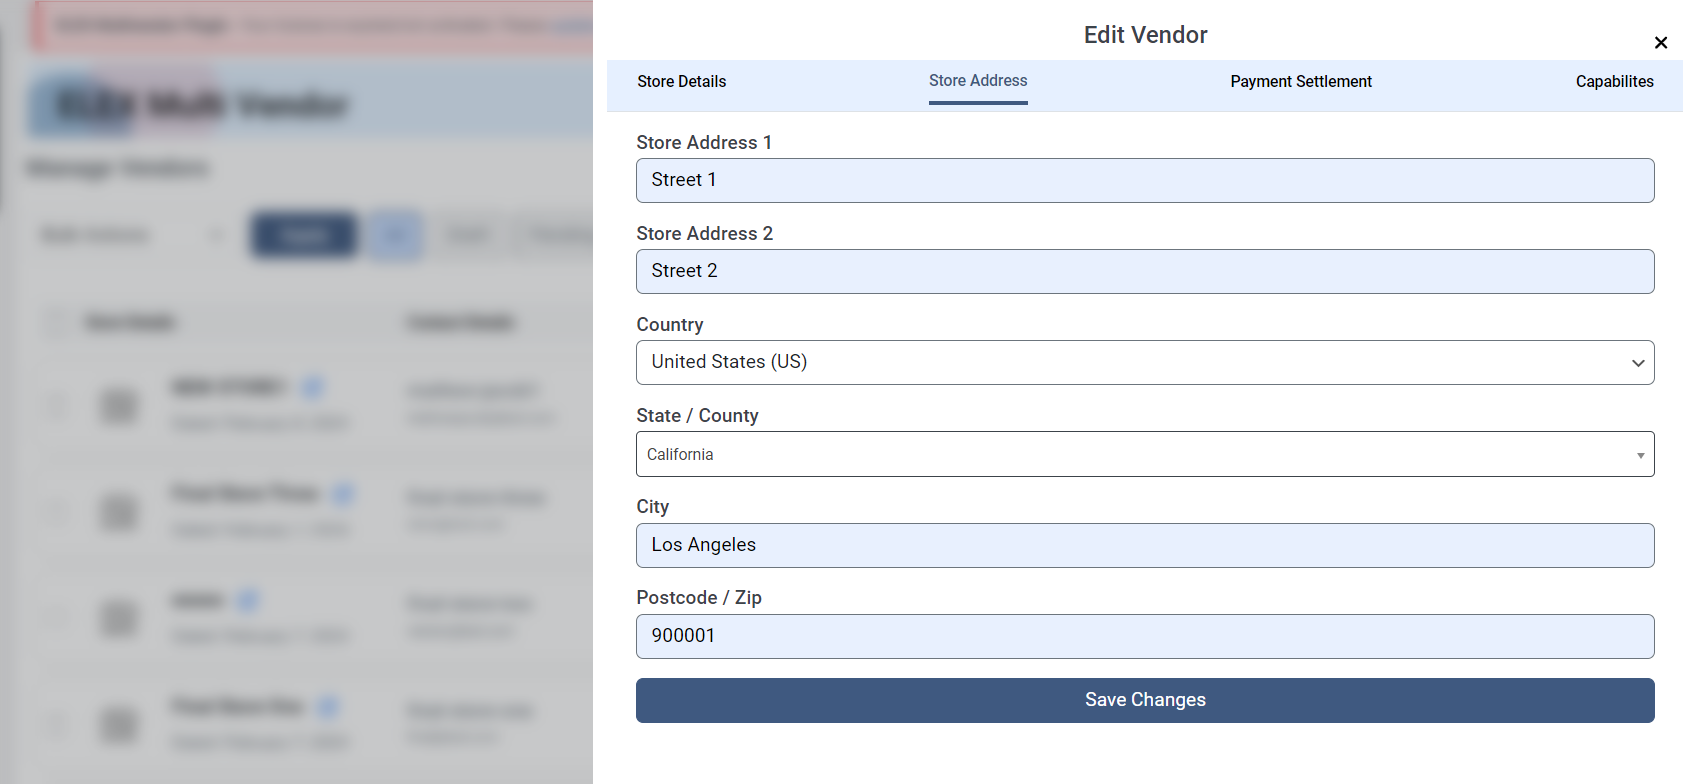
- Edit the store address
- Edit the Payment Status

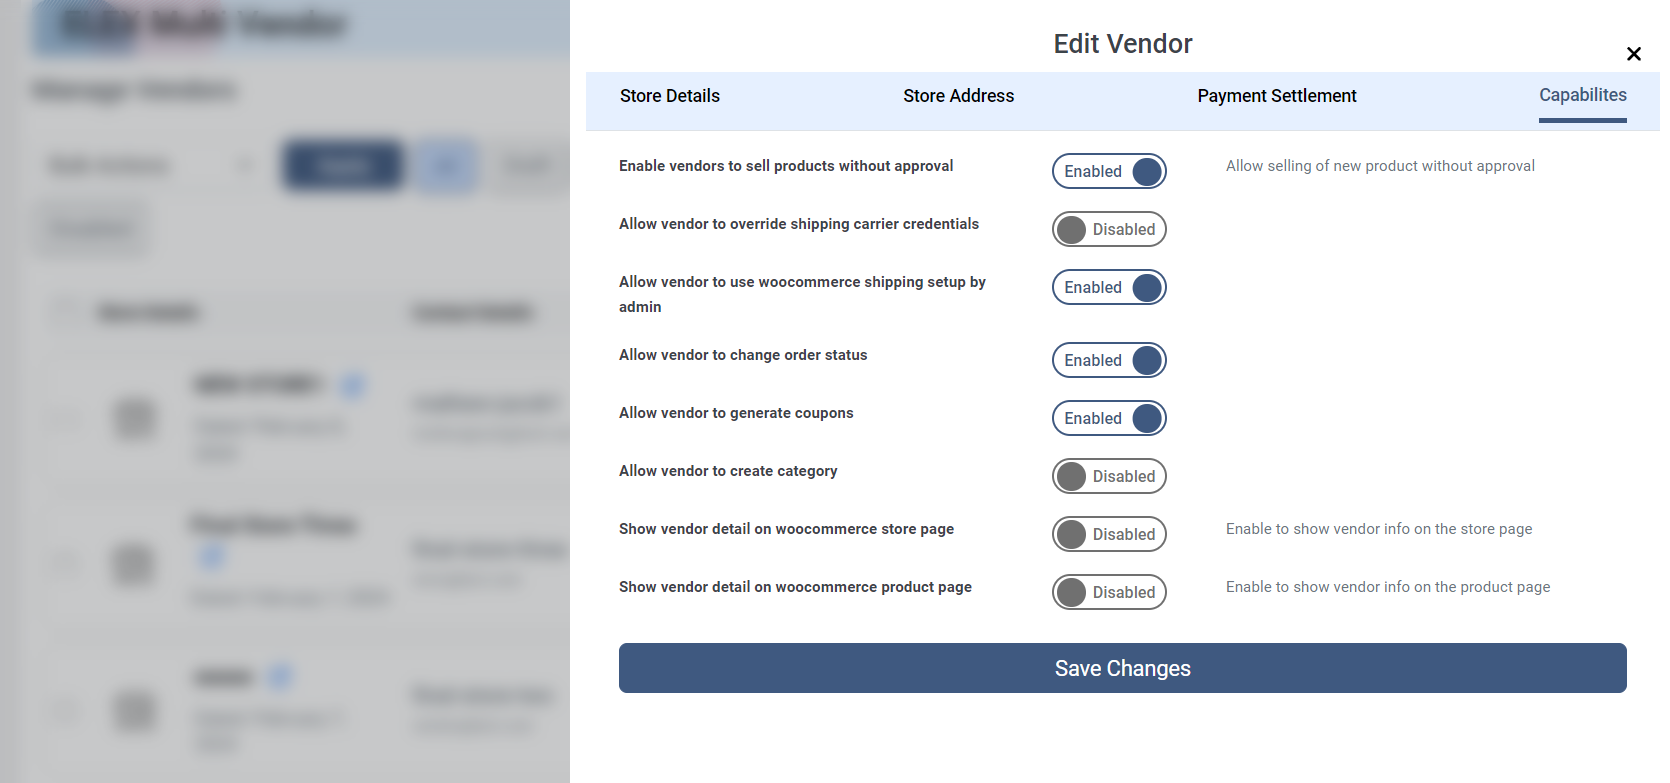
- Edit the vendor capabilities. The individual vendor will be given priority. Vendor capabilities are also accessible on a global level. However, if they want to adjust the capabilities of a specific vendor, they can do so from here, and specific settings will be given precedence.
- Bulk edit vendors by making them approved, rejected, or disabled.
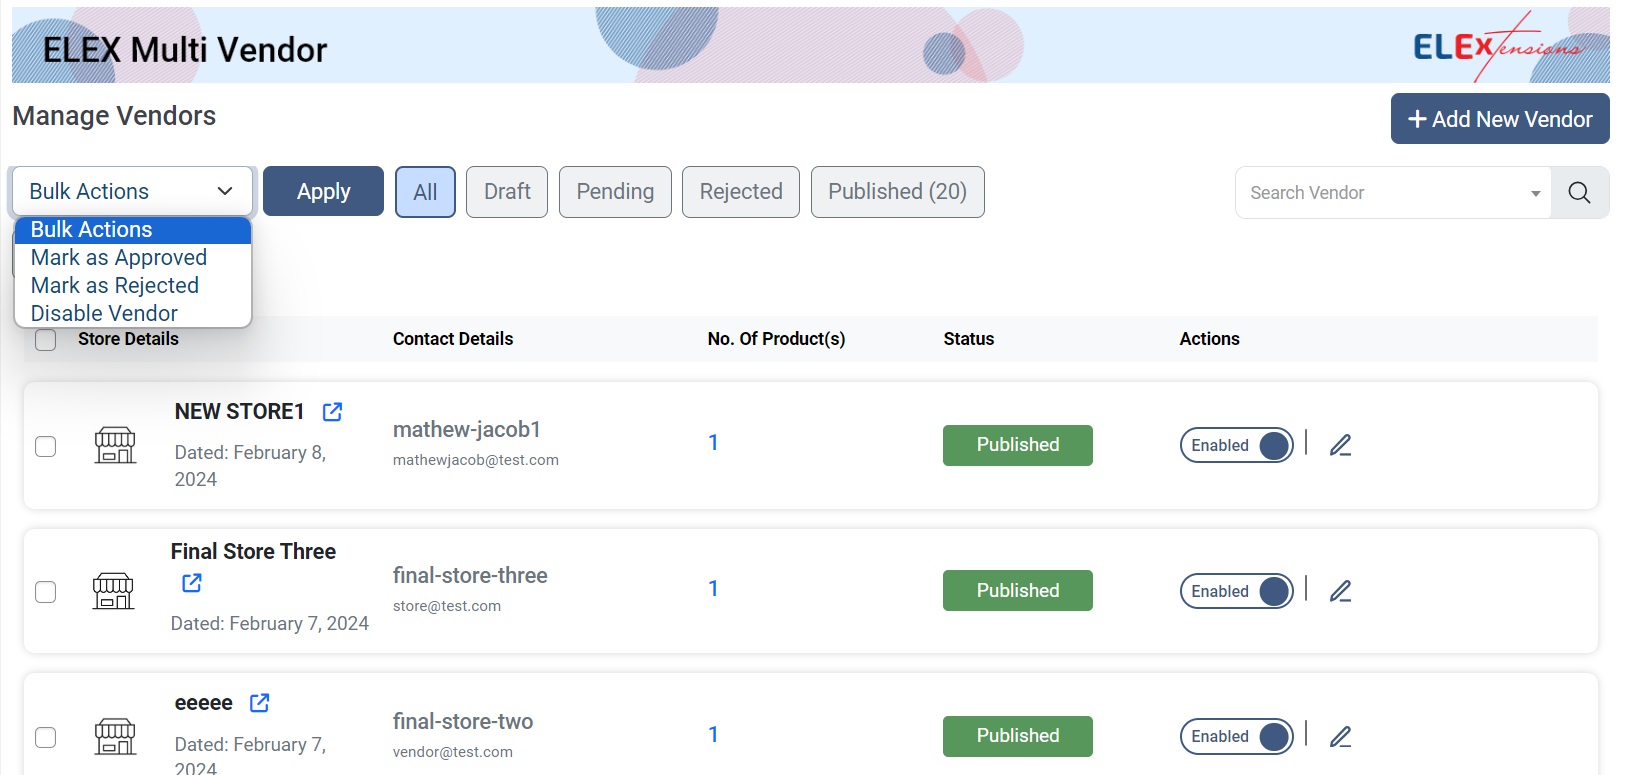
- You can also add new vendors from the manage vendors tab by clicking ‘Add New Vendor’.

- You can also search for specific vendors using the search filters.
Vendor Products
Here you can manage all the products added by each vendor:
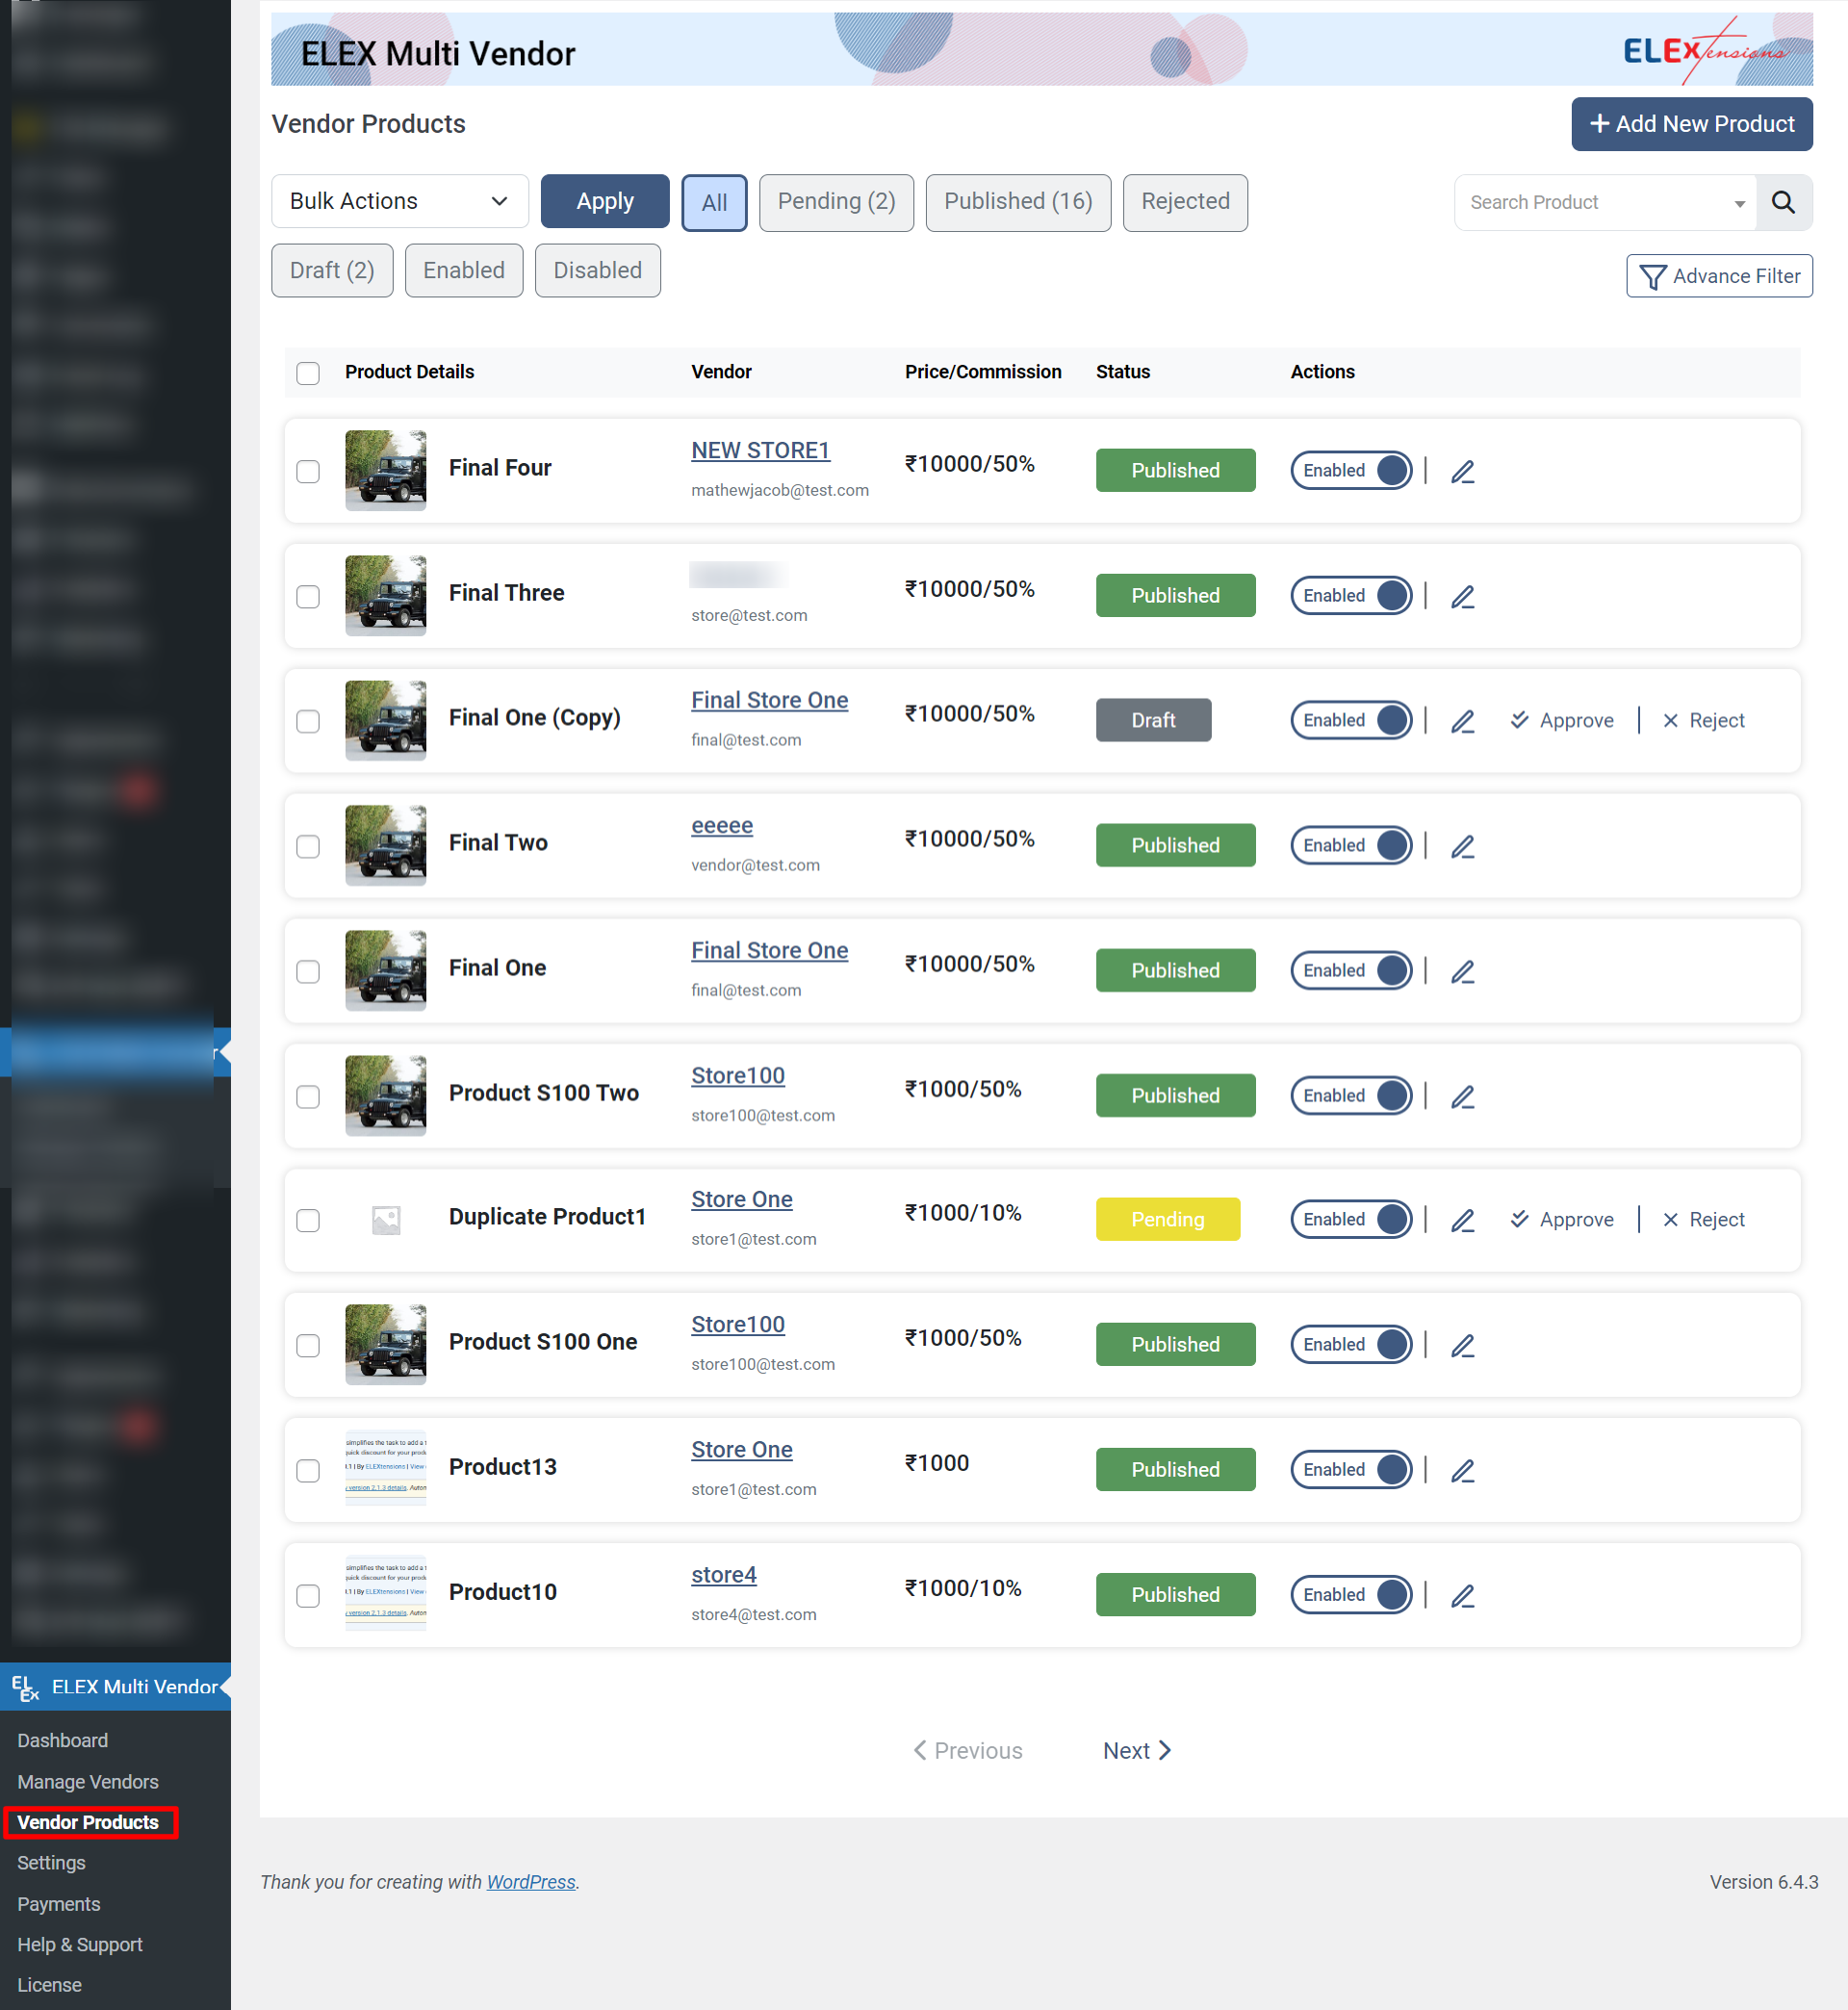
Bulk Actions: Perform actions such as mark as accepted, mark as rejected, mark as pending, enable visibility, and disable visibility on multiple products simultaneously using the Bulk Actions feature.
Search Products: Search for specific products.
Product Details: View detailed information about each product, including its name, price & commission, status, and other relevant details. The edit option enables you to redirect to the WooCommerce product page. You can also enable or disable and accept or reject draft and pending products.
Add new product: Click to add a new product to the list.
Advanced filters: Apply advanced filters to refine and narrow down the displayed products based on specific criteria such as product status, enabled/disabled, and vendor name.
Payments
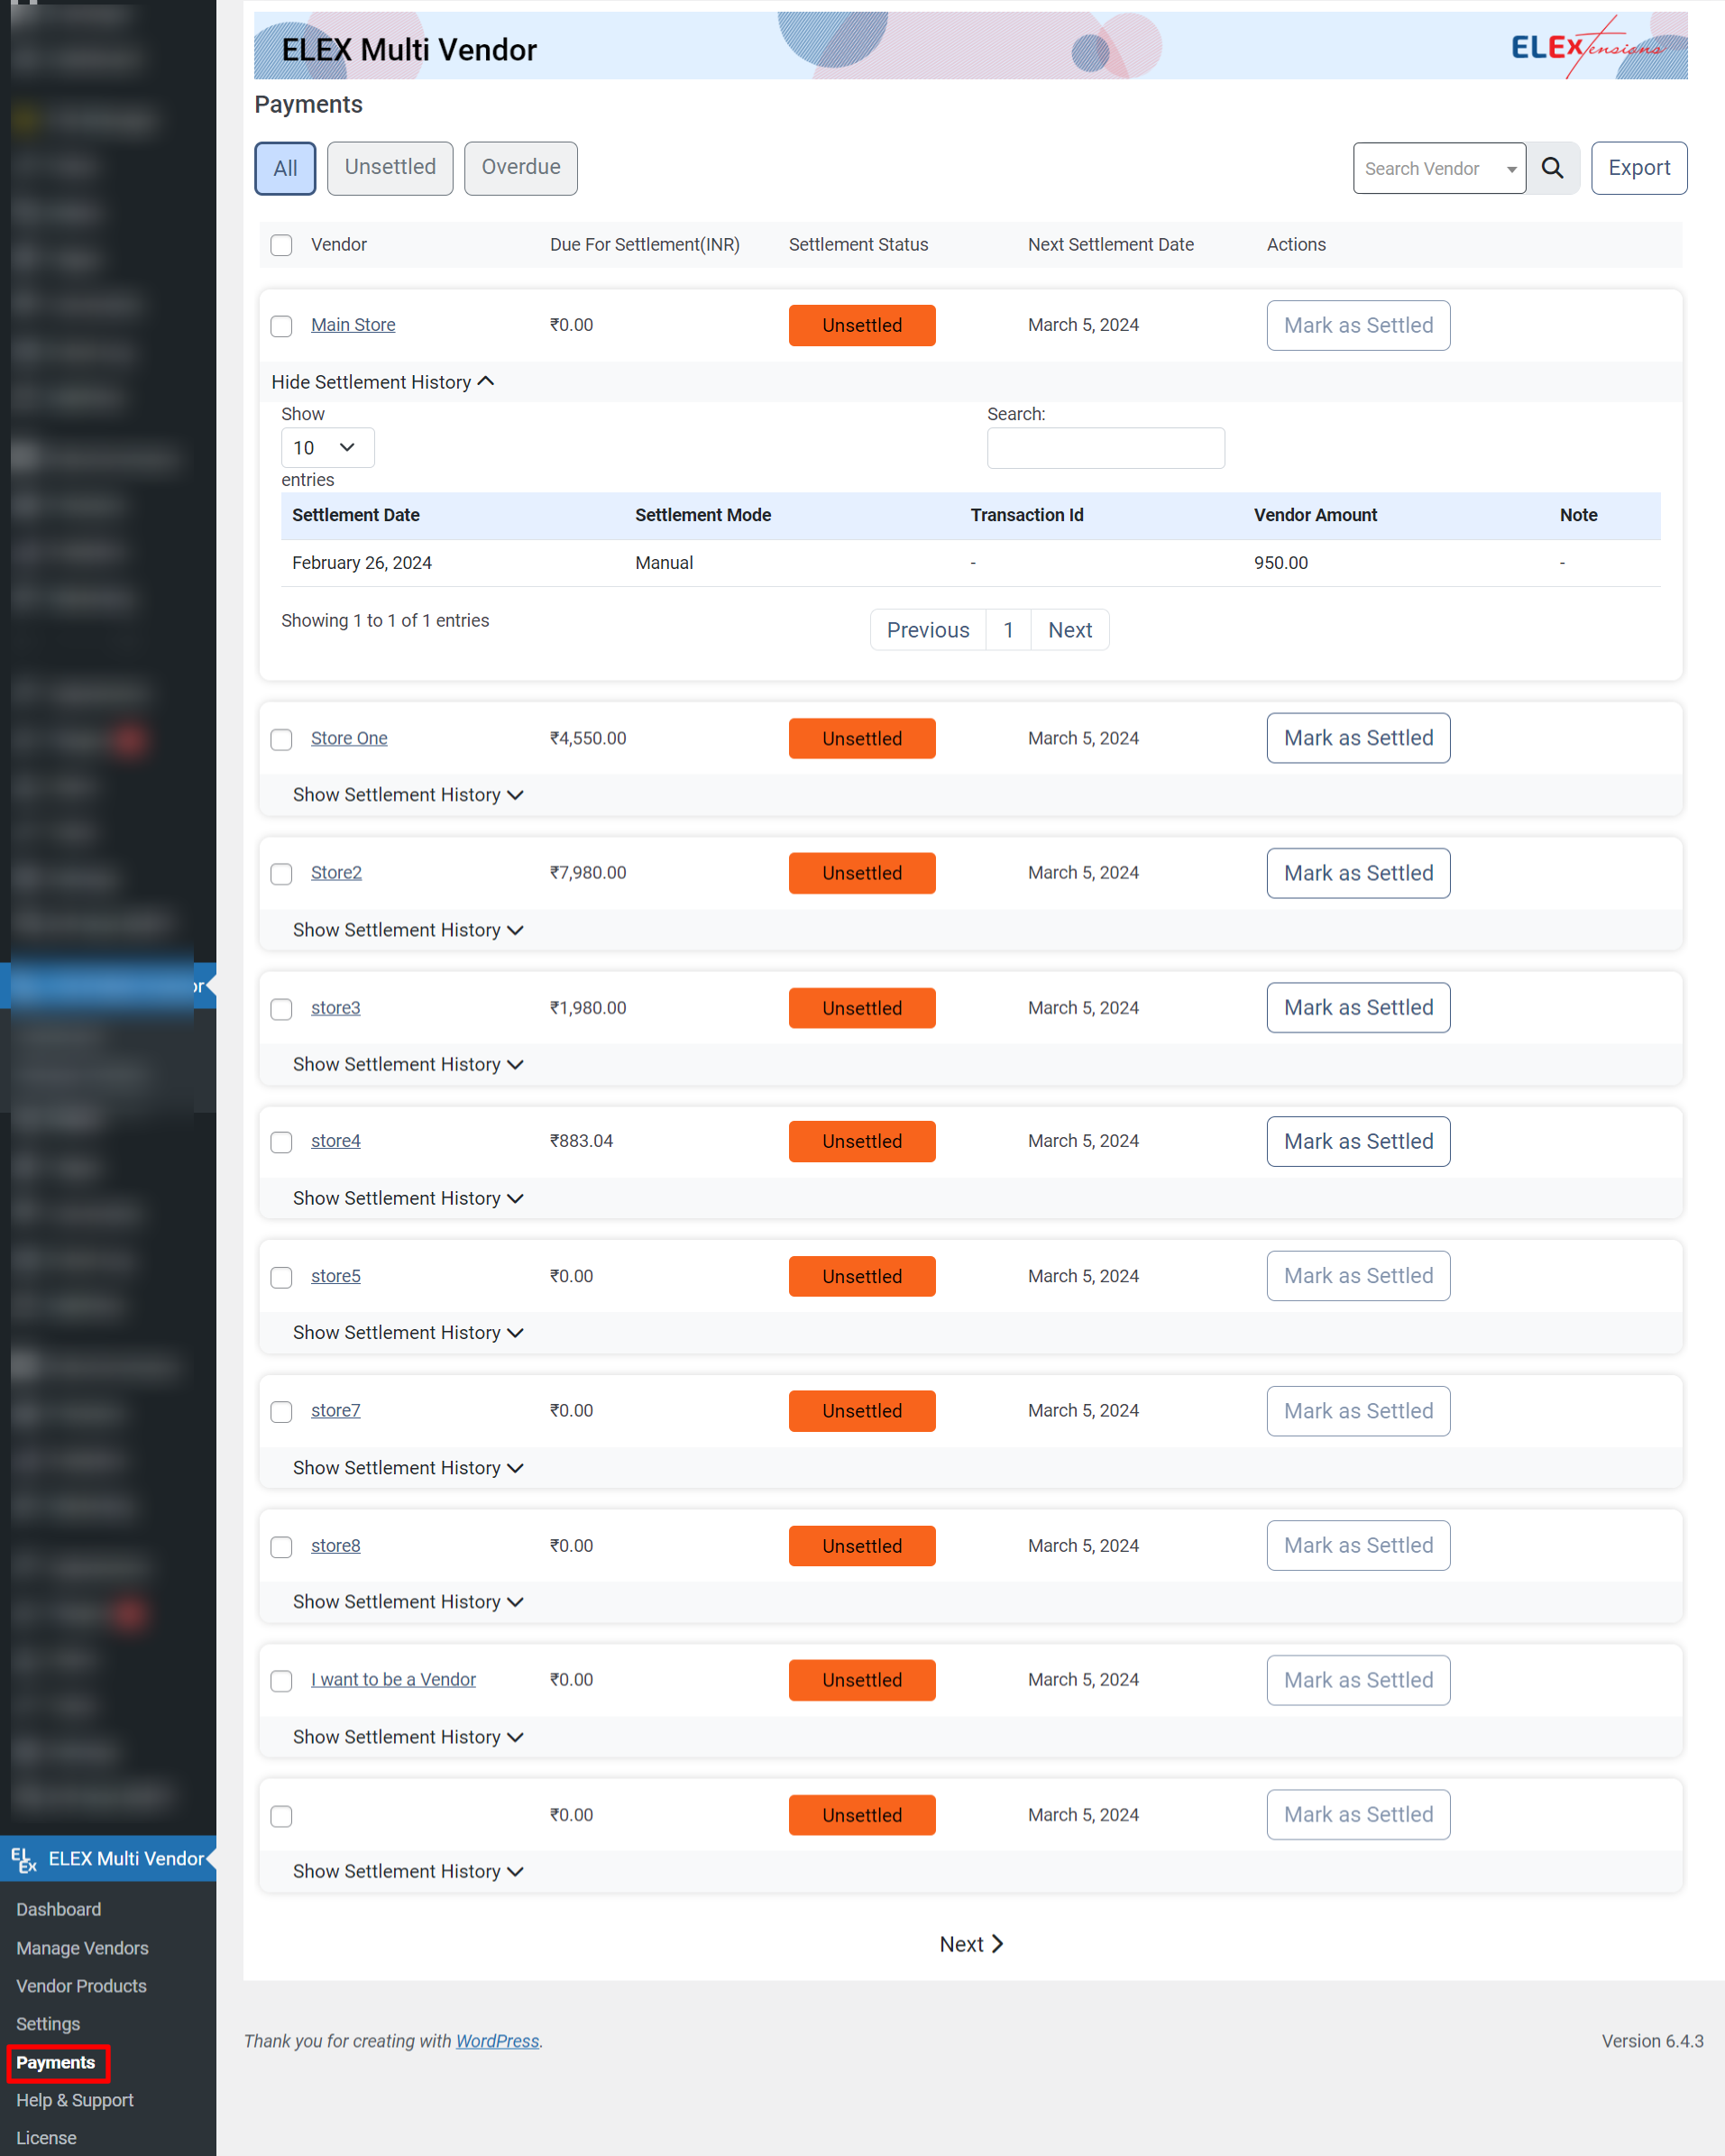
- Vendor: Identify the name or identifier of each vendor associated with their payments.
- Due For Settlement (INR): View the amount that is pending for settlement for each vendor.
- Settlement Status: Check the current status of the settlement, indicating whether it’s settled or unsettled.
- Next Settlement Date: Display the date on which the next settlement for the vendor is scheduled.
- Actions: Perform specific actions related to vendor payments, such as initiating settlements.
- Search Vendor: Search and filter the payments for specific vendors.
- Export: FIlter and export payment details for specific vendors and date ranges in CSV format.
Show Settlement History:
- Show: Adjust the number of entries displayed on the page. Choose from available options such as 10, 25, 50, or 100 entries.
- Search: Utilize the search functionality to quickly find specific information within the displayed entries.
- Settlement Date: Refers to the date on which a settlement transaction occurred.
- Settlement Mode: Indicates the mode or method used for the settlement transaction.
- Transaction Id: Displays a unique identifier associated with the settlement transaction
- Vendor Amount: Represents the amount associated with the settlement for a specific vendor.
- Note: Provide any additional notes or comments related to the settlement transaction.
Vendor Dashboard
The frontend vendor dashboard displays the main dashboard to track vendor analytics and also provides the other vendor dashboard options including products, orders, coupons, shipping, payments, reviews, settings, and the ability to log out.
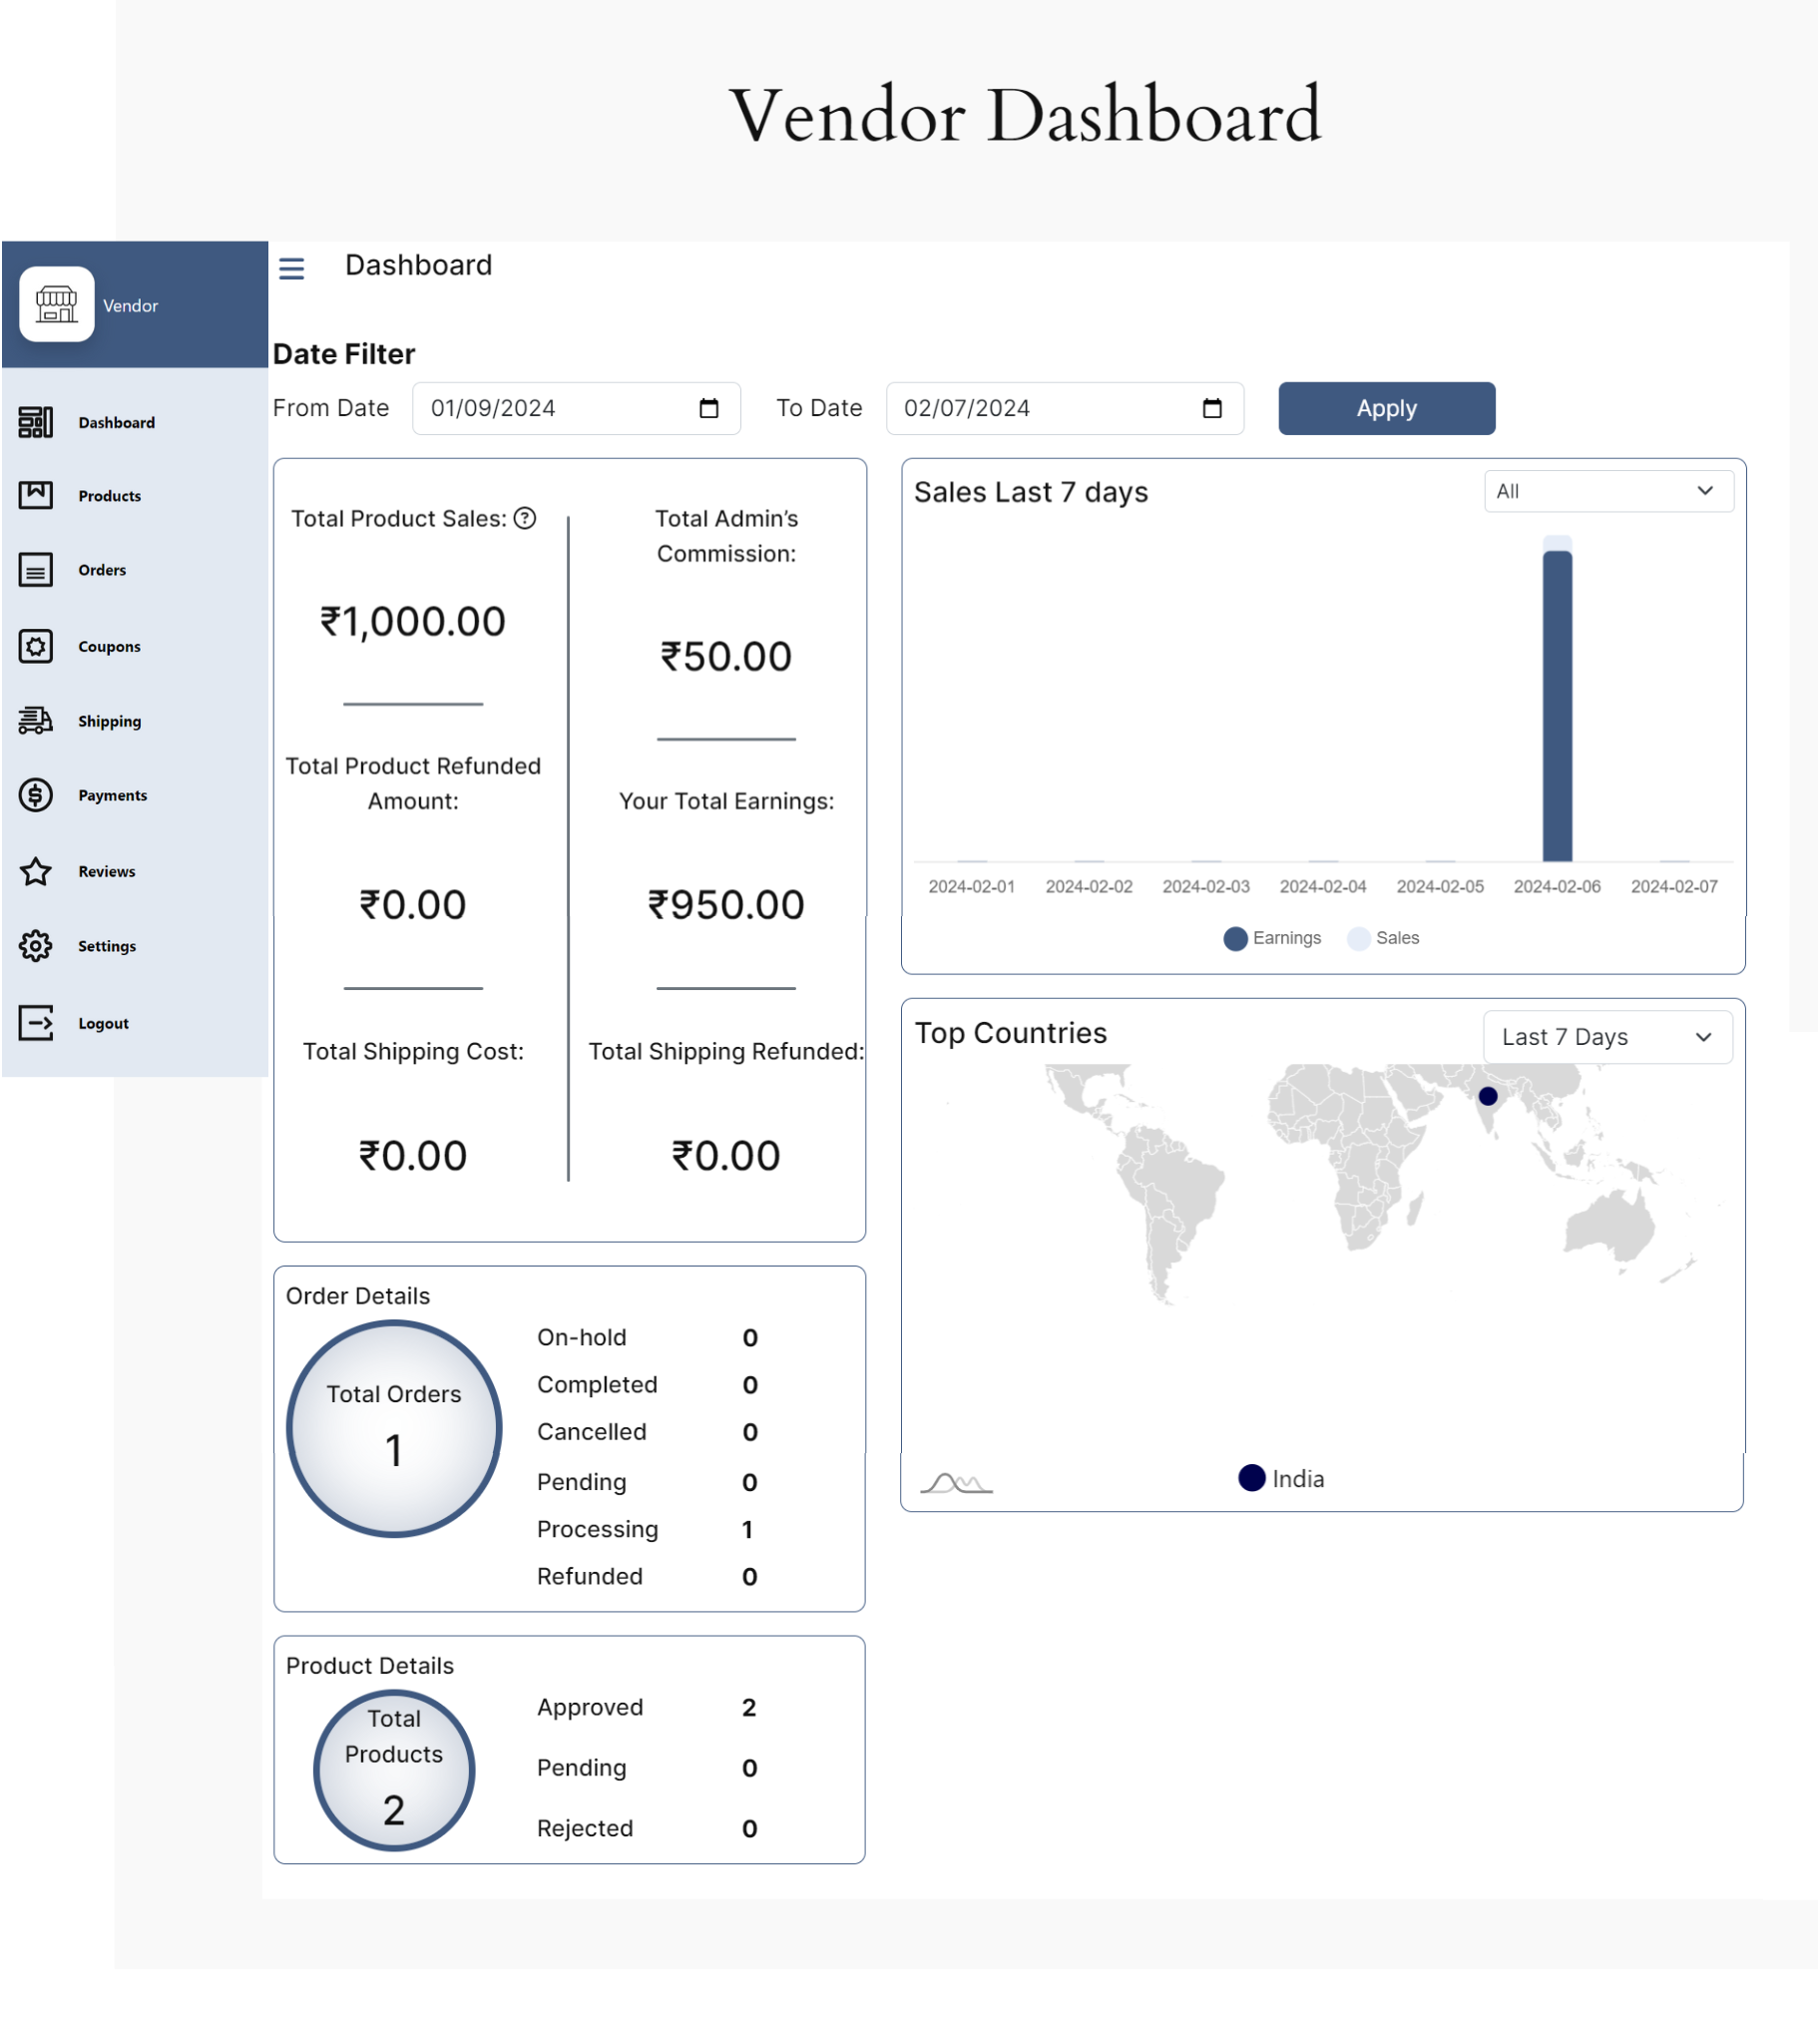
- Date Filter: Use the date filter to refine the displayed data within a specified time frame. Enter the “From Date” and “To Date” to customize the date range for the information.
- Total Product Sales: Represents the overall sales value for the selected date range.
- Total Admin’s Commission: Displays the total commission earned by the admin during the specified period.
- Total Product Refunded Amount: Indicates the total amount refunded for products within the selected date range.
- Your Total Earnings: Reflects the total earnings for the vendor or user within the specified time frame.
- Total Shipping Cost: This represents the overall cost associated with shipping for the given date range.
- Total Shipping Refunded: Displays the total amount refunded for shipping within the selected date range.
- Sales Last 7 days: Provides insights into earnings and sales specifically for the last 7 days.
- Top Countries: Offers information on top-performing countries based on sales for different time frames: last 7 days, last 30 days, and last year.
- Order Details: Provides a breakdown of order statuses, including On-hold, Completed, Cancelled, Pending, Processing, and Refunded.
- Total Orders: Represents the overall count of orders.
- Product Details: Offers a breakdown of product statuses, including Approved, Pending, and Rejected.
- Total Products: Represents the overall count of products.
Products
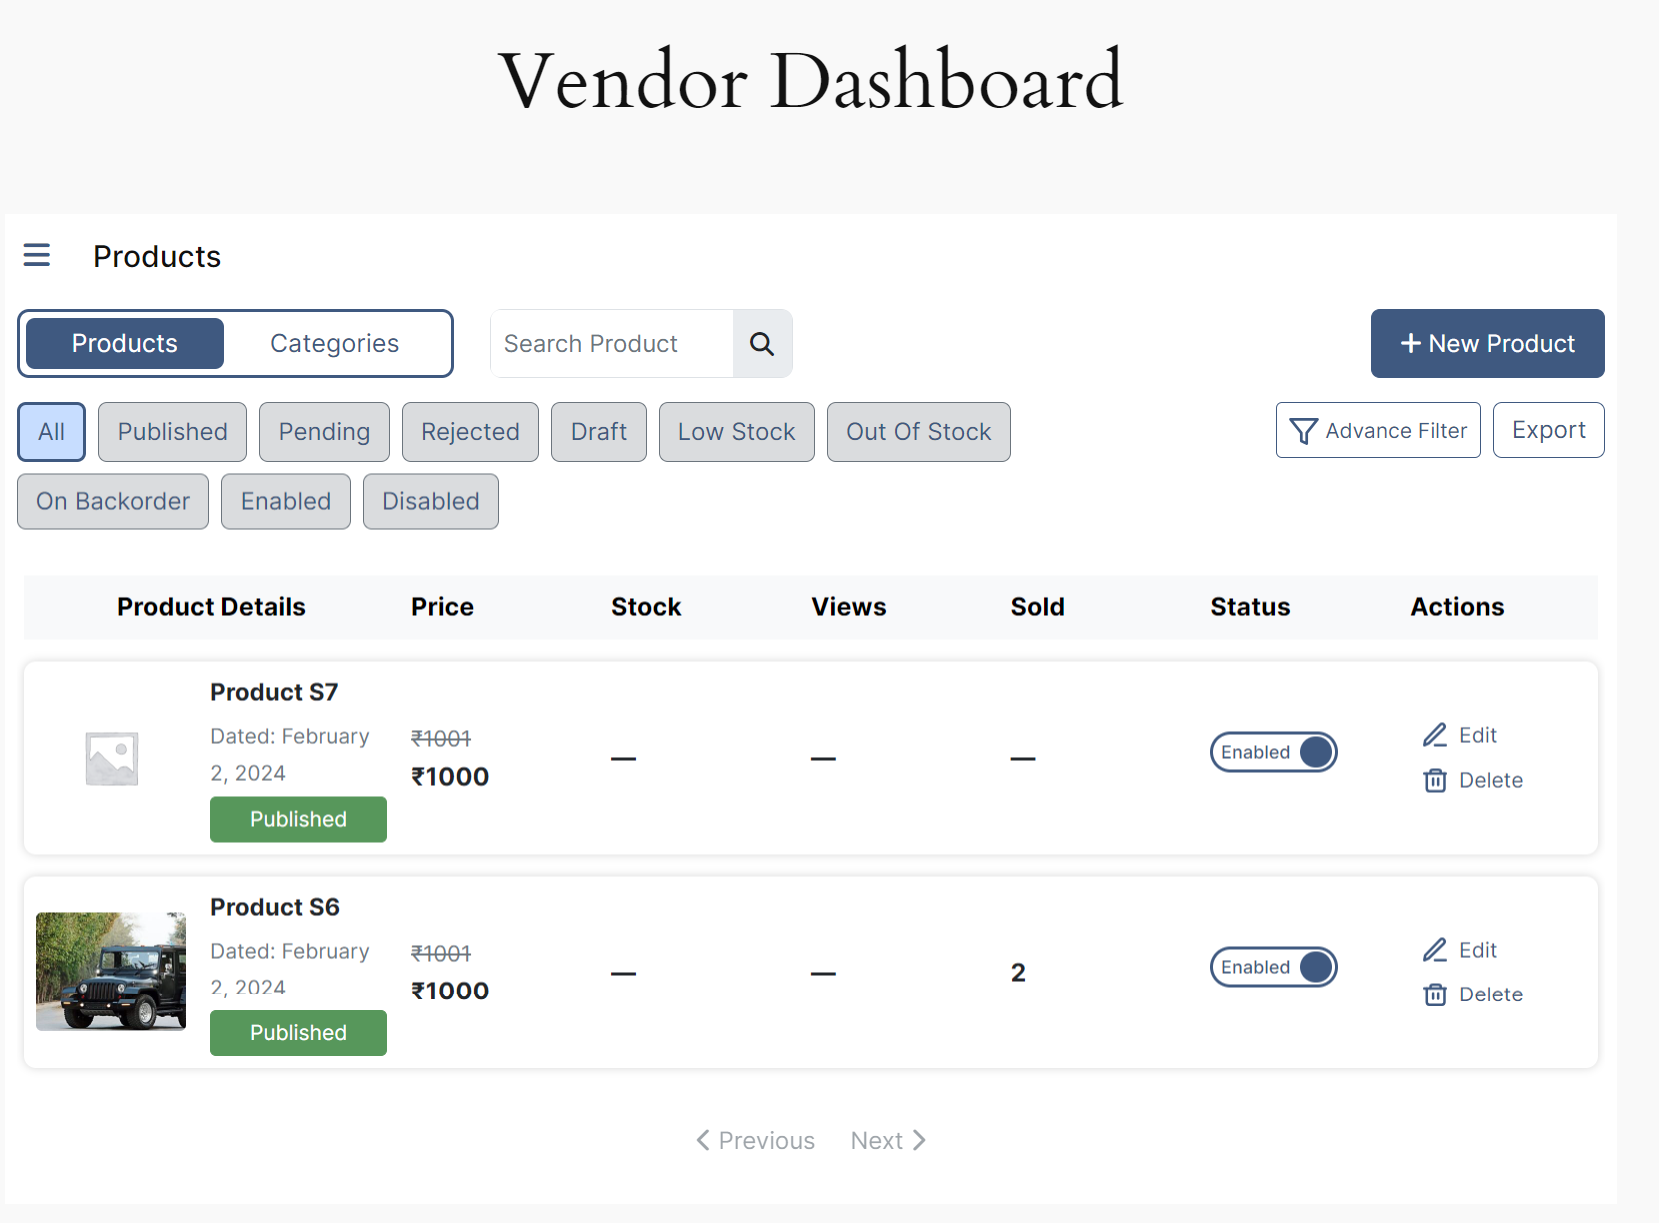
- Search Product: Search for specific products.
- Price: Indicates the listed price of the product.
- Stock: Represents the available stock quantity for the product.
- Views: Displays the number of times the product has been viewed.
- Sold: Indicates the quantity of the product that has been sold.
- Status: Reflects the current status of the product, and enables the vendor to enable or disable the product.
- Actions: Provides options to perform specific actions related to the product such as edit or delete.
- Add New Product: You can add a new product to the list.
- Advance Filter: Provides advanced filtering options such as product status, stock status, enabled, sort by, and order by.
- Export: This enables you to export product data as a CSV file for further analysis or use.
Creating a New Product
Click ‘New Product’ to create a new product from the vendor dashboard.
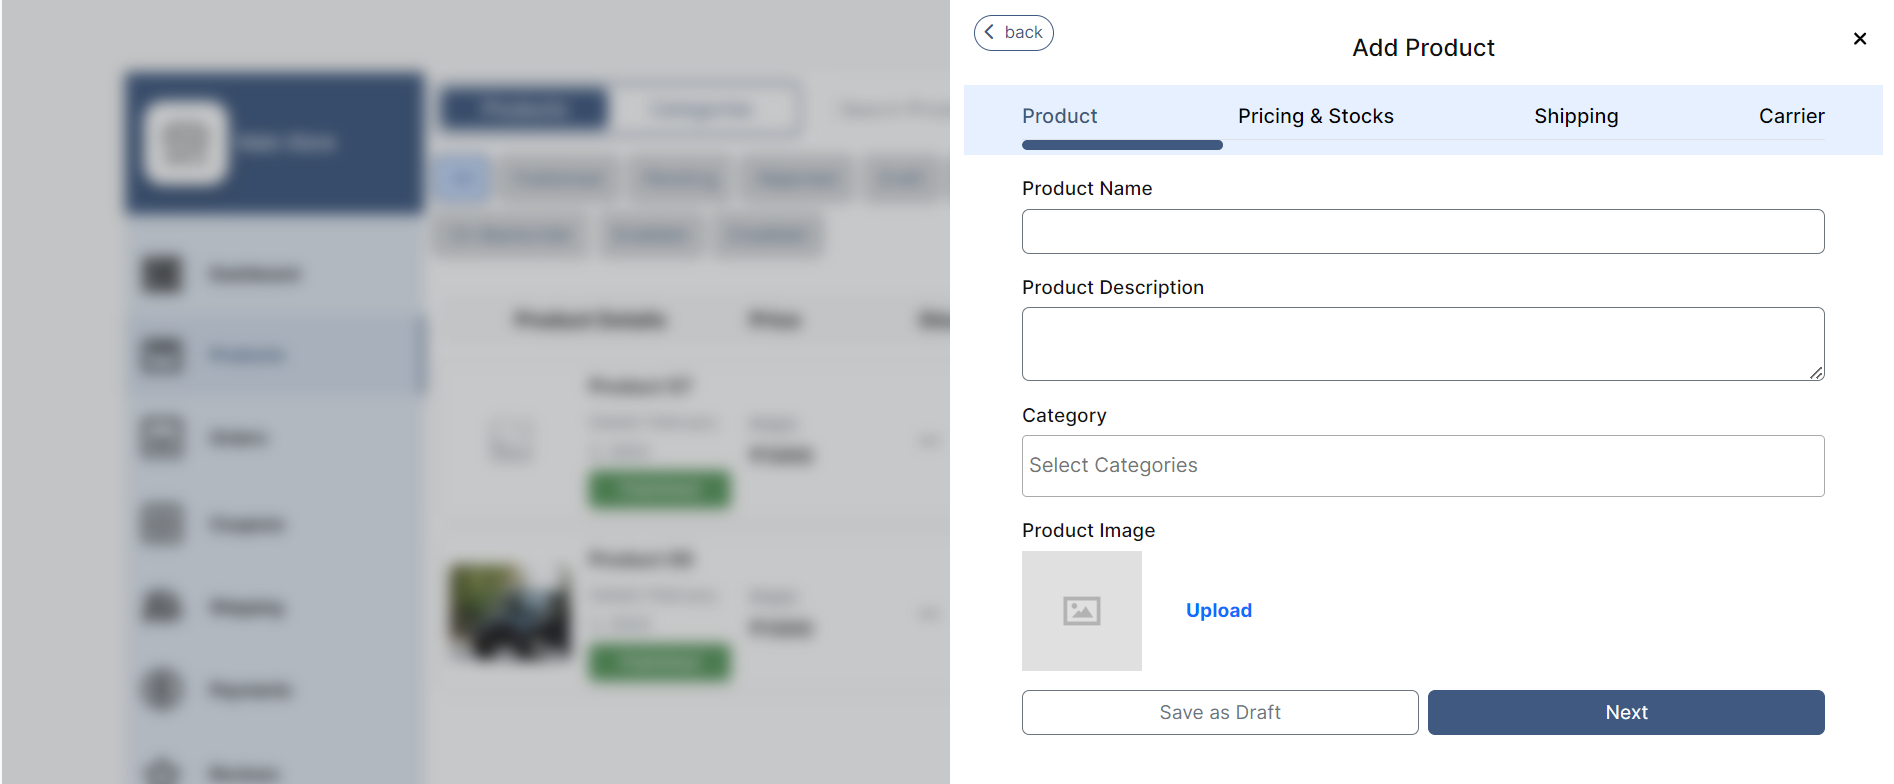
Product
- Product Name: Enter the name of your product.
- Product Description: Provide a detailed description of your product.
- Category: Select the appropriate category for your product.
- Product Image: Upload a high-quality image of your product.
- Save as Draft: Click to save your product information as a draft.
- Next: Move to the next step in the product creation process.
Pricing & Stocks
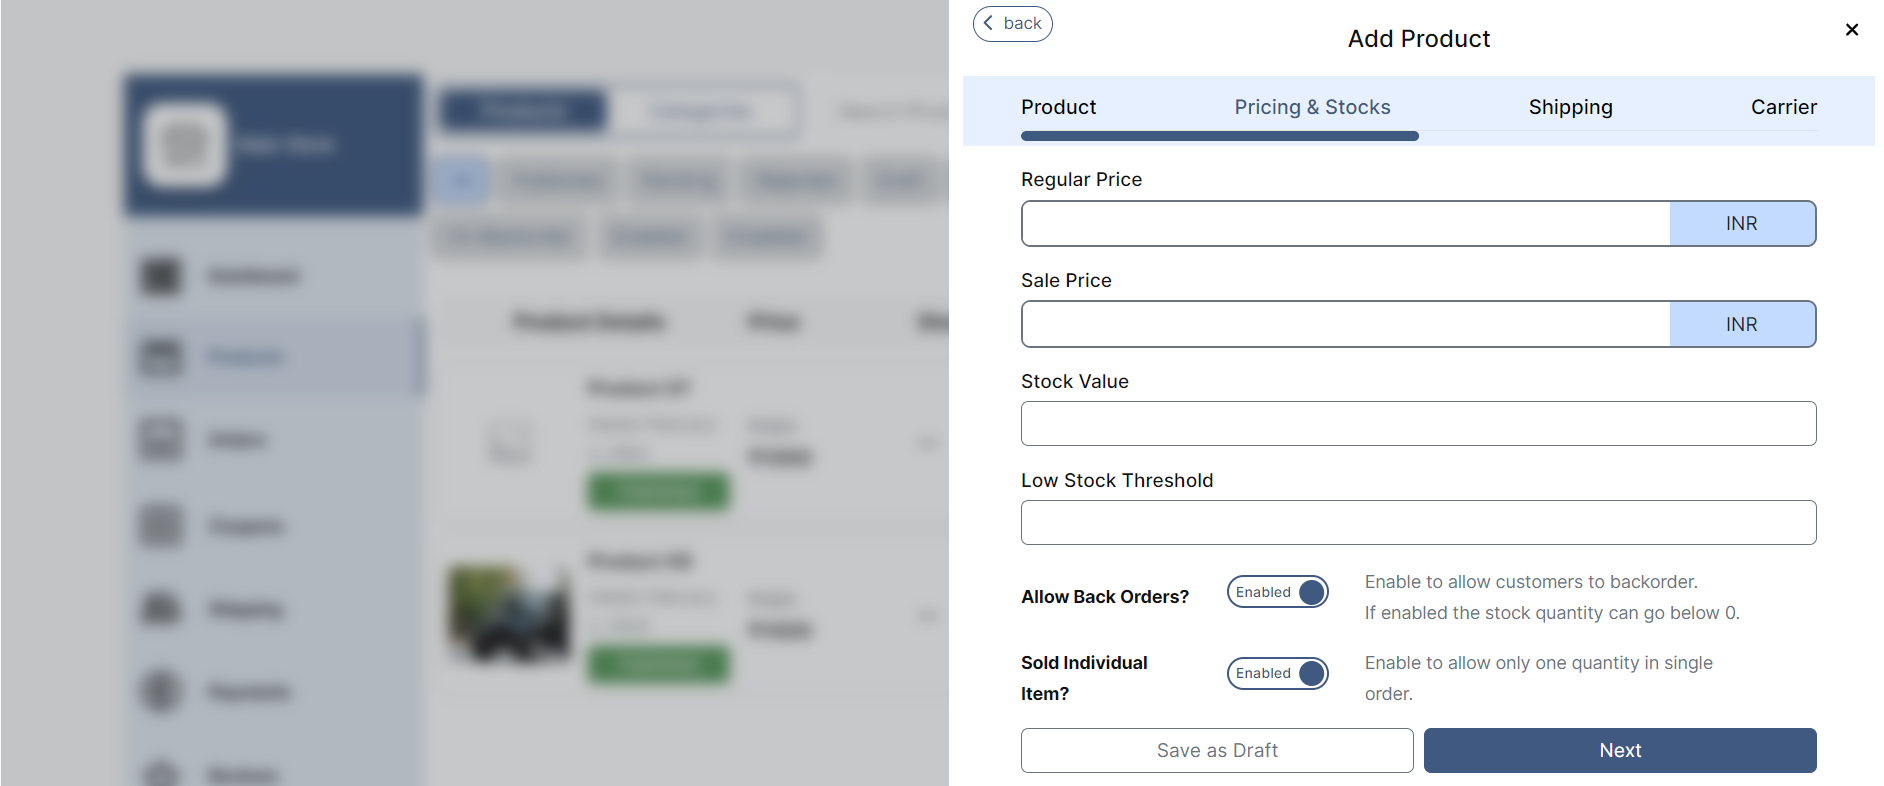
- Regular Price: Enter the standard price of the product before any discounts or promotions.
- Sale Price: If the product is on sale, specify the discounted price here. Leave blank if no sale is applicable.
- Stock Value: Set the current quantity of the product available in your inventory.
- Low Stock Threshold: Define how many products must remain on hand for products to be considered low stock.
- Allow Back Orders: Enable to allow customers to place orders even when the stock is depleted. If enabled, stock quantity can go below 0.
- Sold Individual Item: Enable to restrict customers from purchasing more than one quantity of this product in a single order.
Shipping
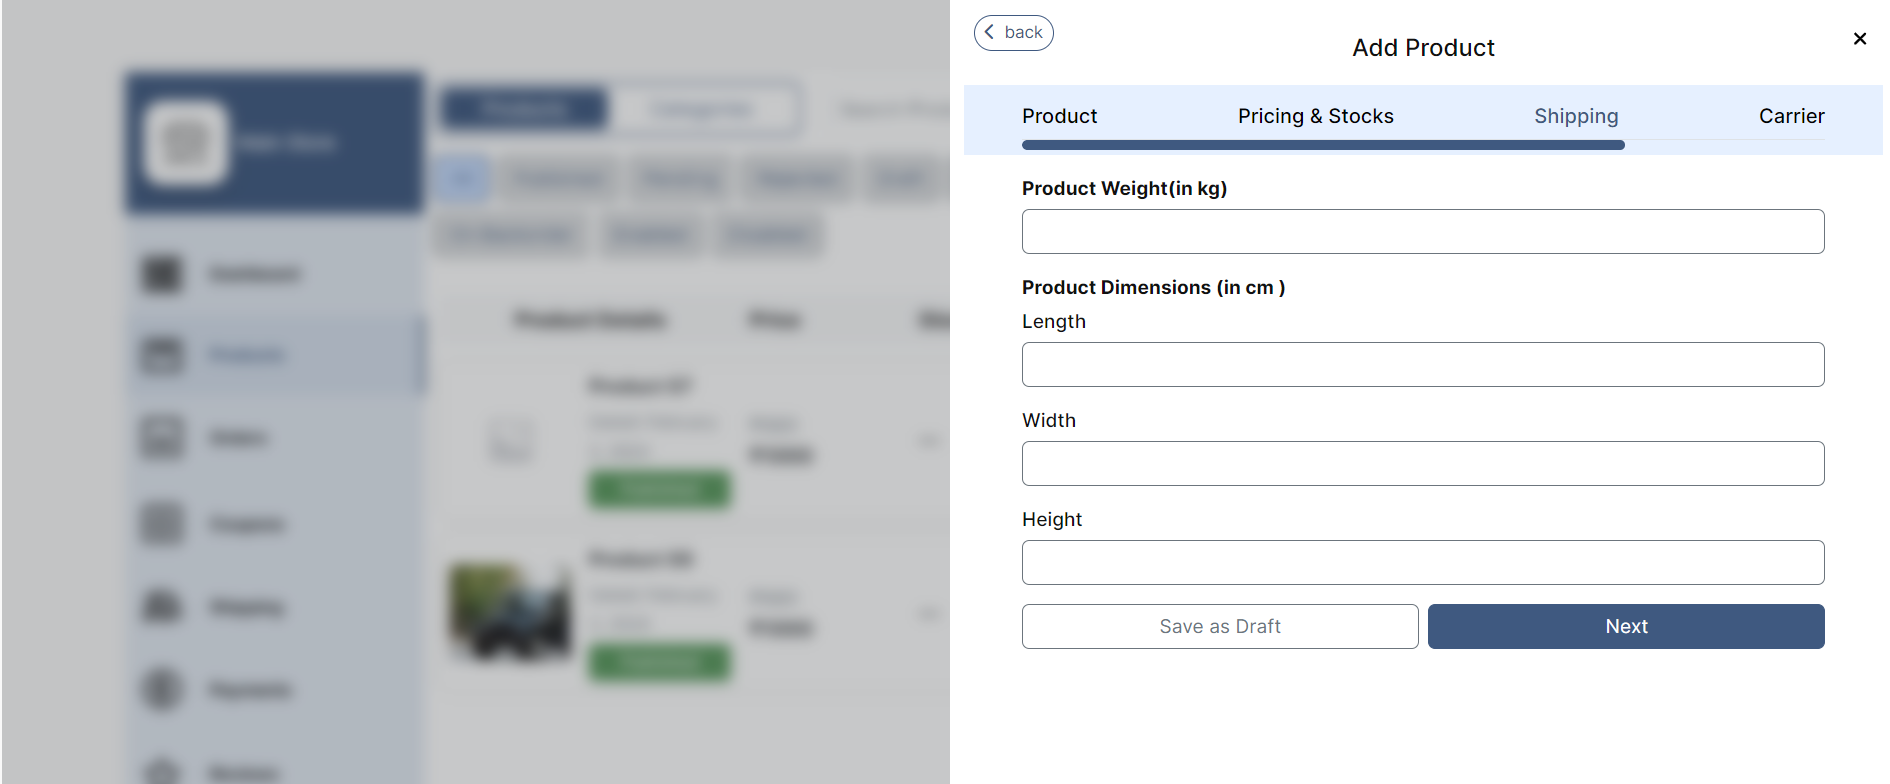
Product Weight (in kg): Enter the weight of the product in kilograms.
Product Dimensions (in cm): Provide the dimensions of the product in centimeters (length, width, and height).
Carrier
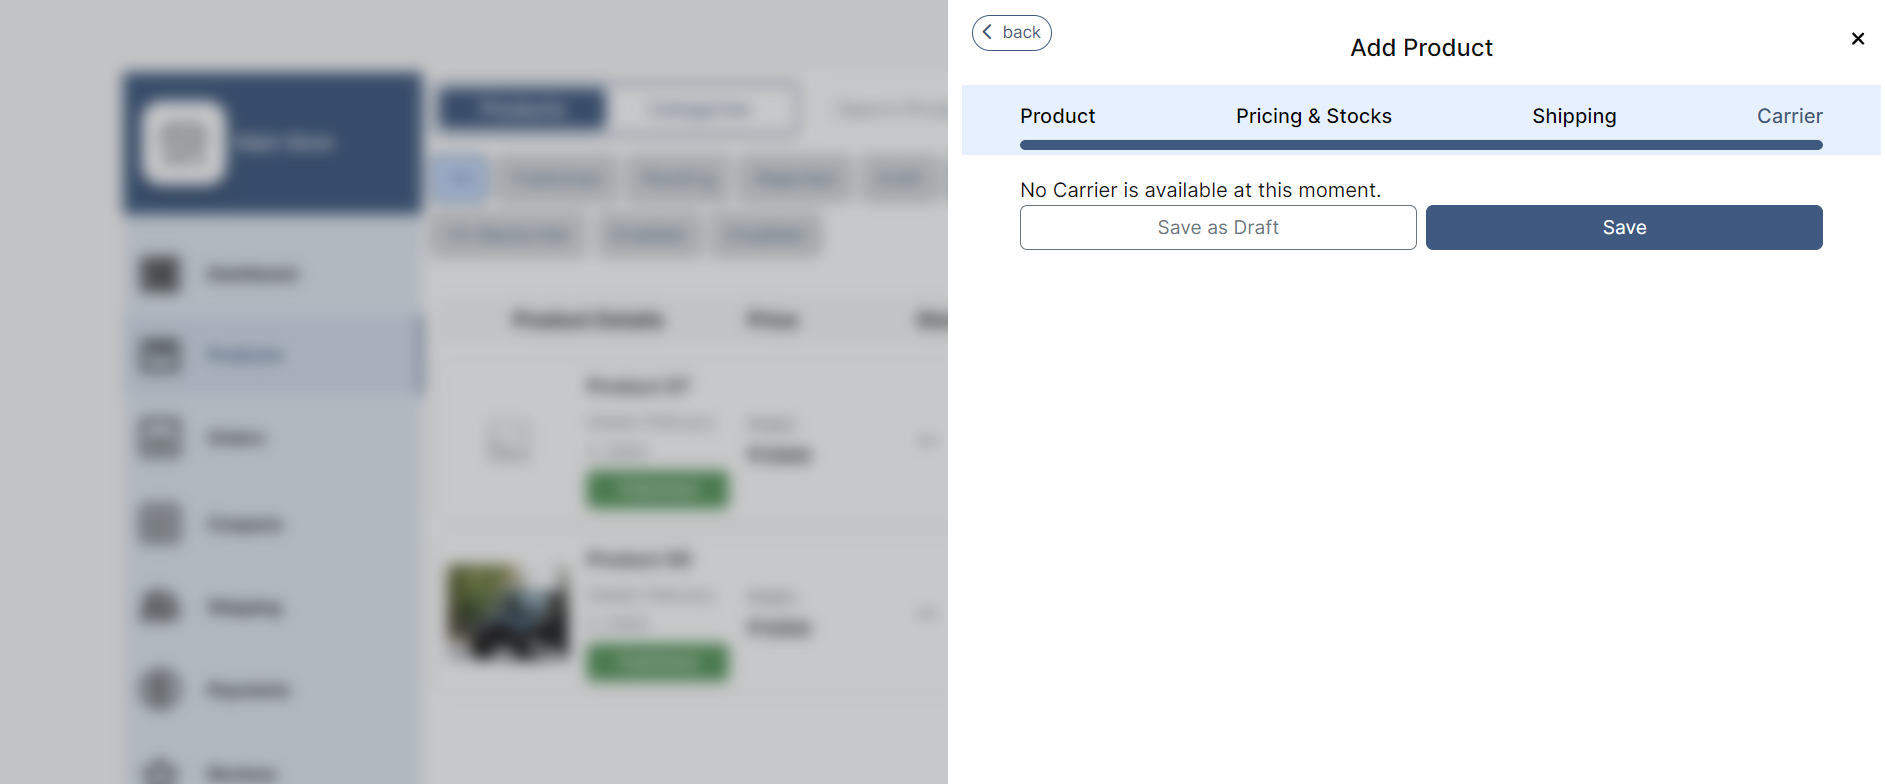
Choose between the available carriers and click Save.
Categories
You can search for specific product categories, see the number of items in that category, and take necessary actions.
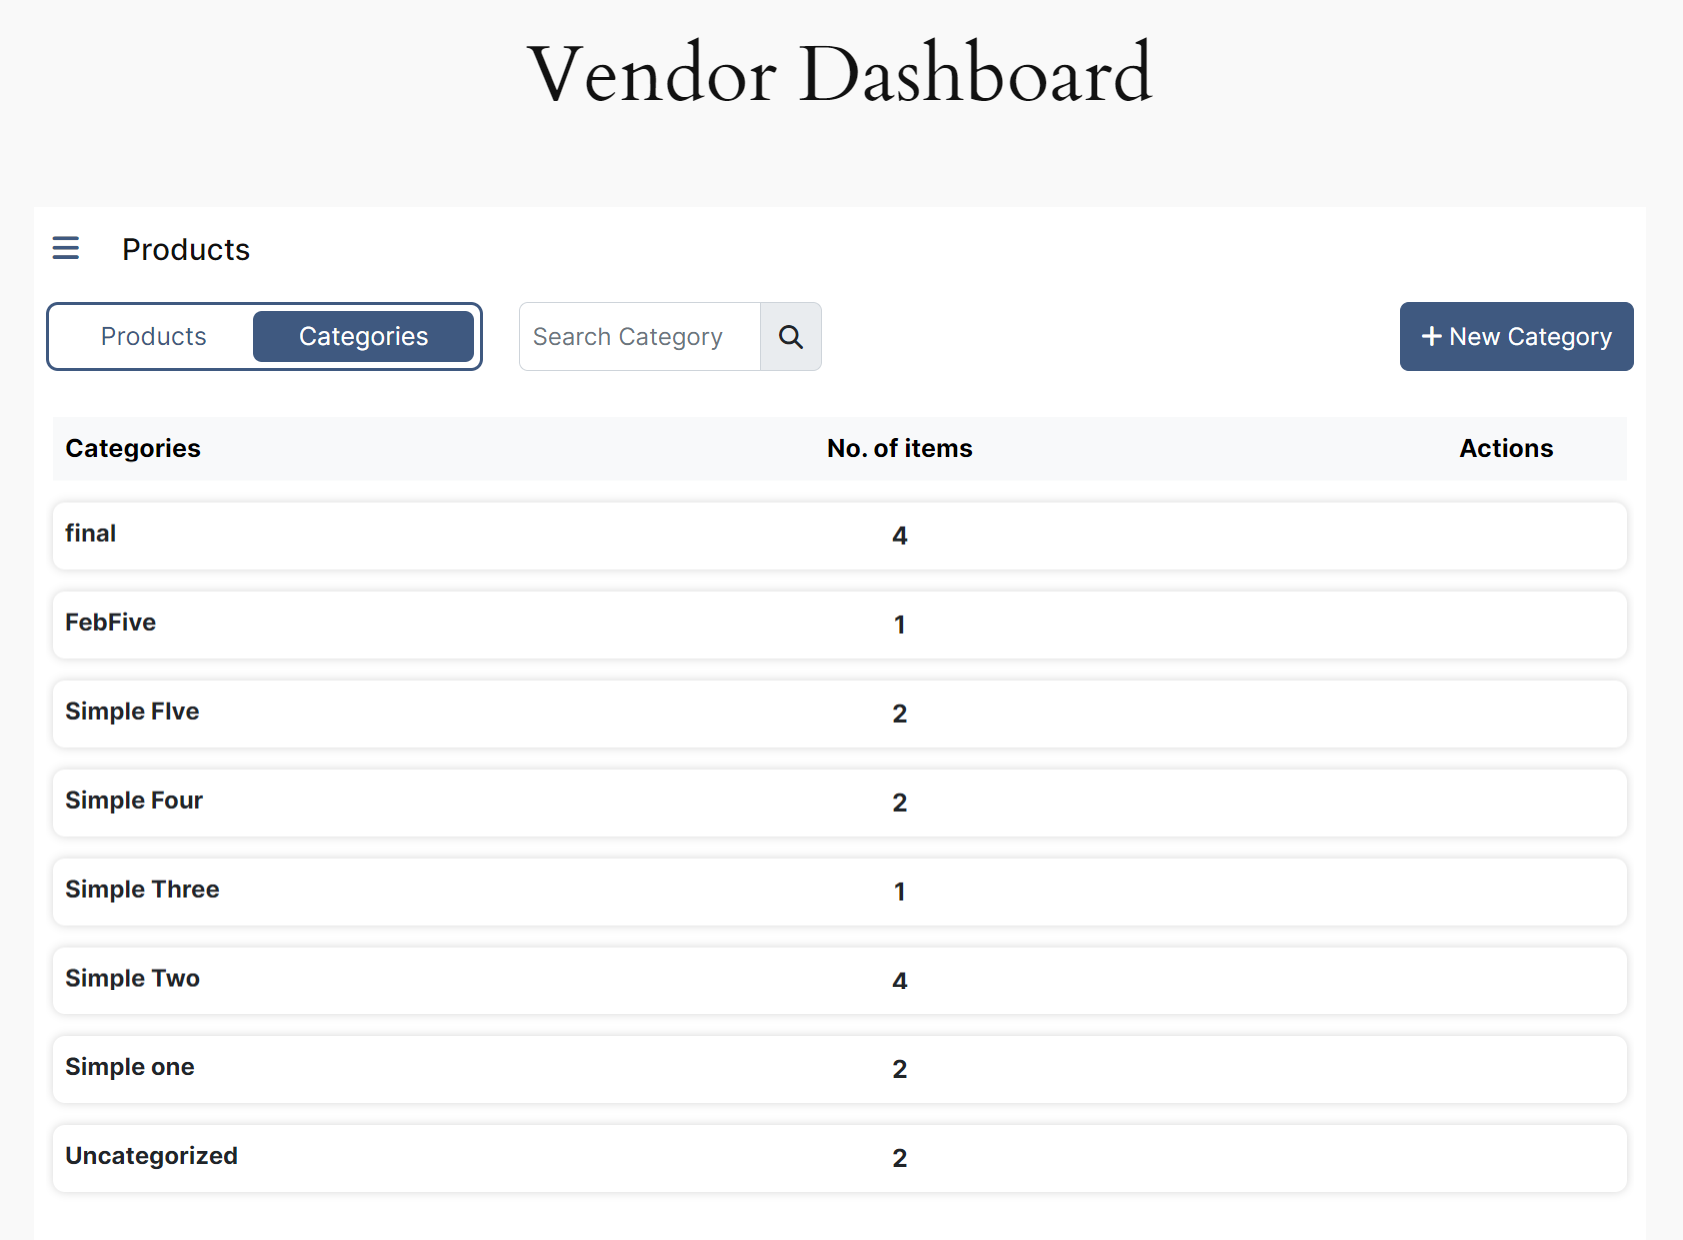
Click ‘Add Category’ to add a new product category.

Enter the category name, choose the parent category, and click Add Category.
Orders
Under this tab, you can search for specific order details, view order details, and export them.
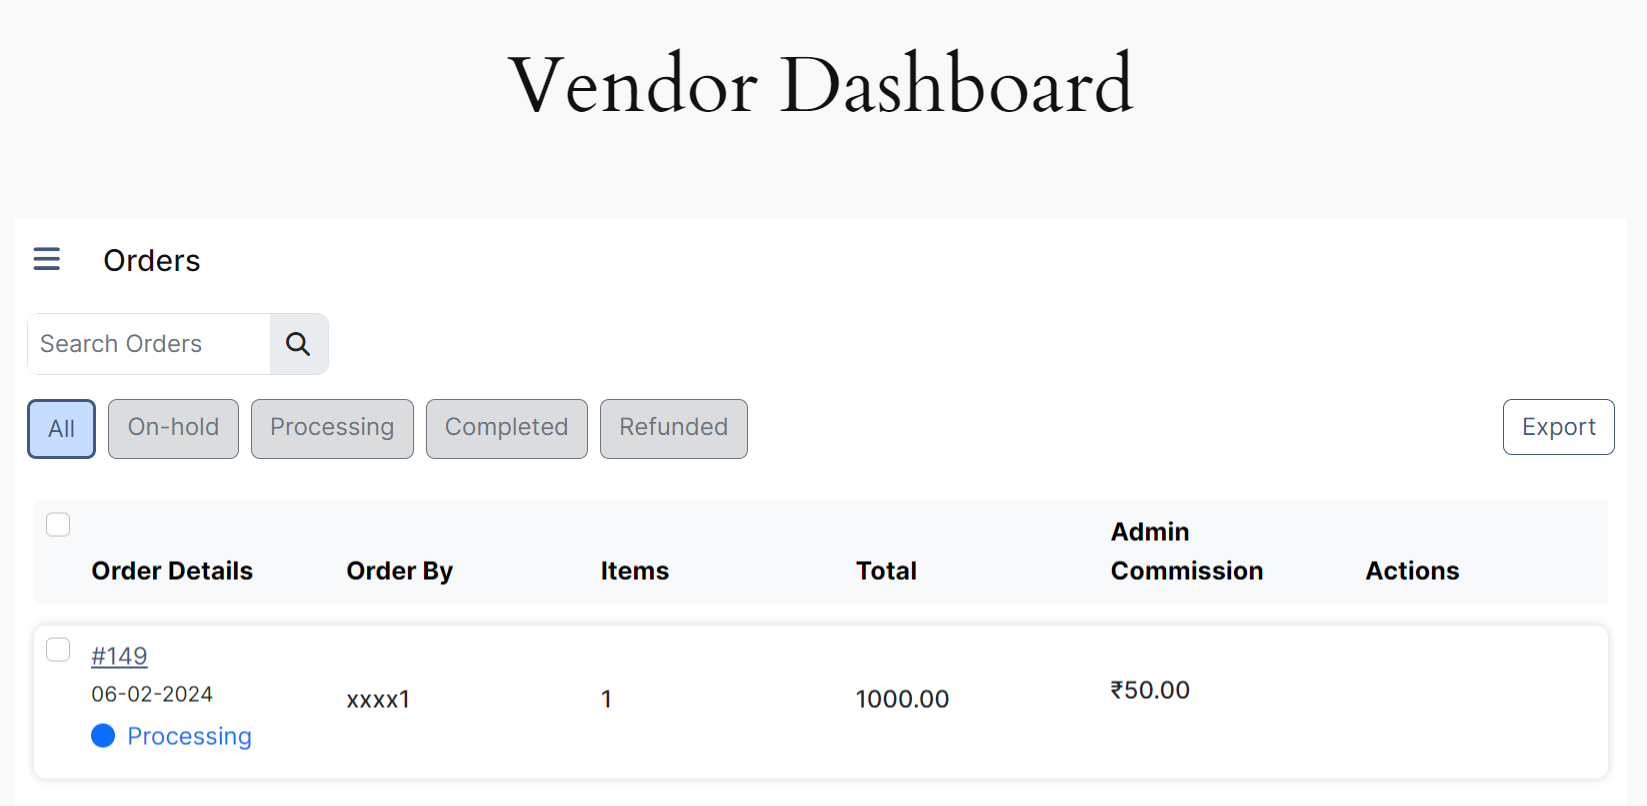
- Order Details: Order number and date along with the order status.
- Order By: View the customer name the order was placed by.
- Items: Represents the total number of items included in the order.
- Total: Displays the overall total amount of the order.
- Admin Commission: Indicates the commission amount earned by the admin for the order.
- Actions: Provides options to perform specific actions related to the order.
Coupons
This tab enables you to view coupon details and generate new coupons.
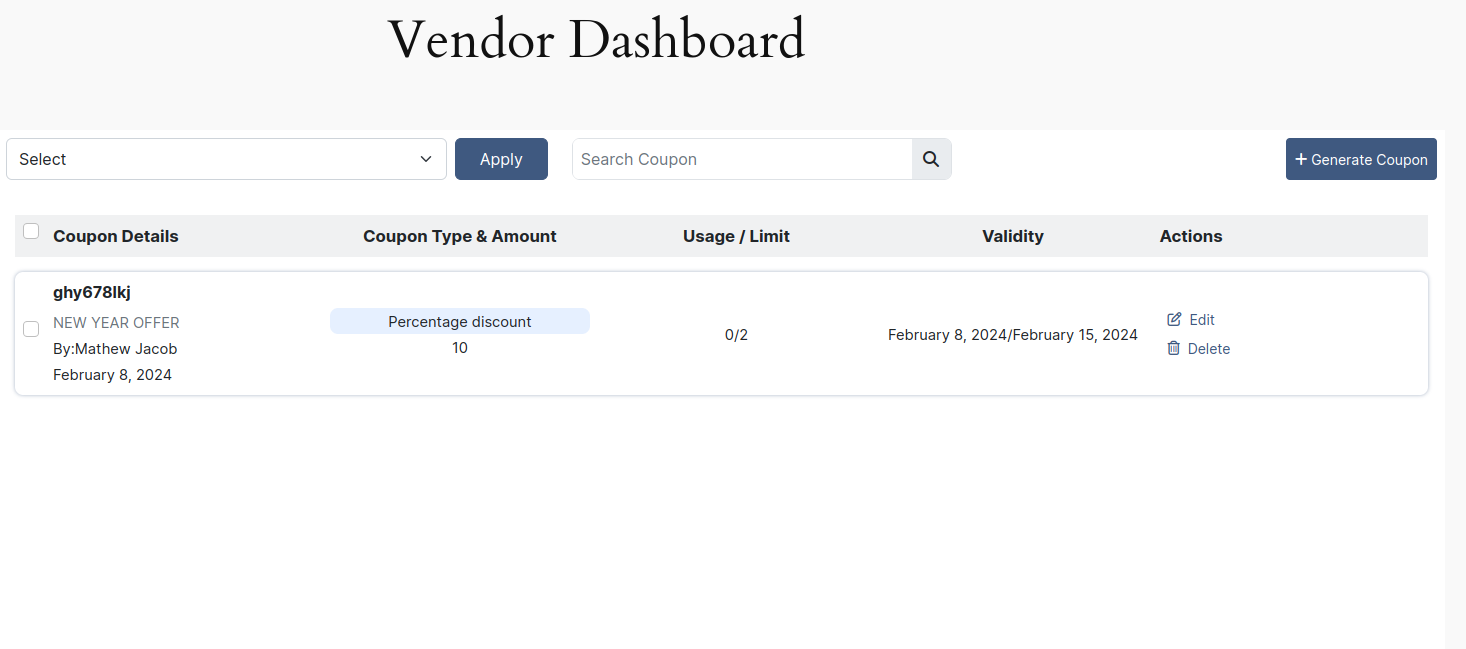
- Coupon Details: Provides information about the coupon, such as its name, who it was created by, and the date of creation.
- Coupon Type & Amount: Specifies the type of coupon (e.g., percentage or fixed amount) and the corresponding discount value.
- Usage / Limit: Shows the current usage of the coupon and any set limits on its usage.
- Validity: Displays the expiration or validity date of the coupon.
- Actions: Offers options to manage the coupon, including editing its details or deleting it.
Generate Coupons
Coupon Details
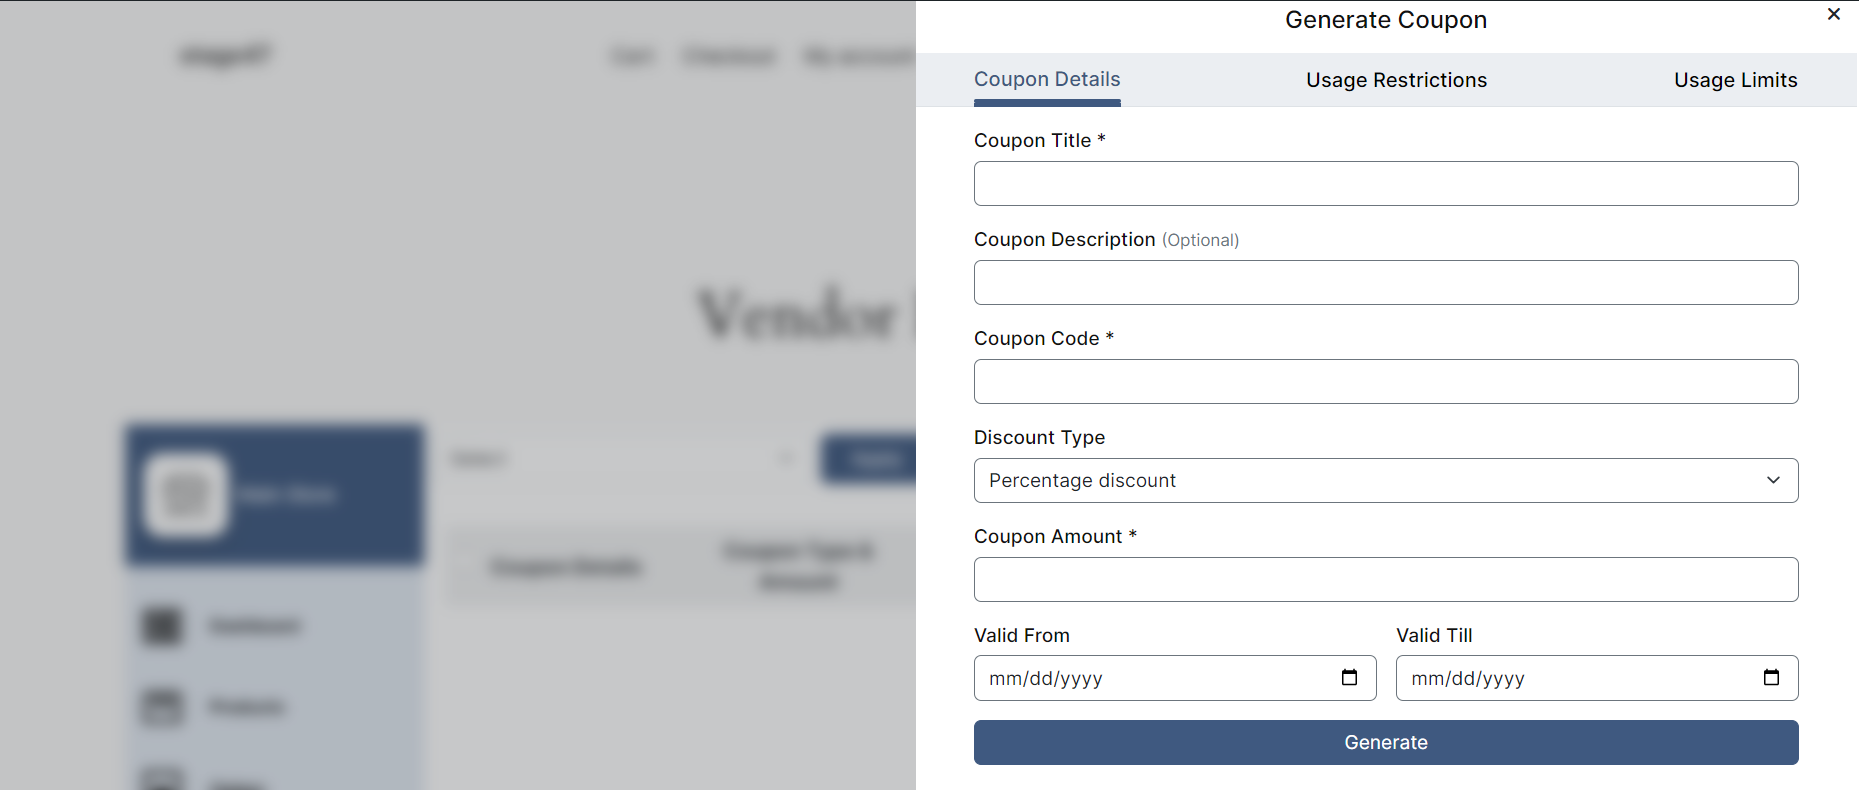
Coupon Title: Enter a title or name for your coupon. This is for internal reference and won’t be visible to customers.
Coupon Description: Provide a brief description of the coupon.
Coupon Code: Enter a unique code for your coupon.
Discount Type: Choose the type of discount you want to offer: Percentage discount or Fixed Price Discount.
Coupon Amount: Enter the discount amount.
Valid From: Set the start date from which the coupon will be valid.
Valid Till: Set the end date until the coupon is valid. After this date, the coupon will expire and cannot be used.
Usage Restrictions
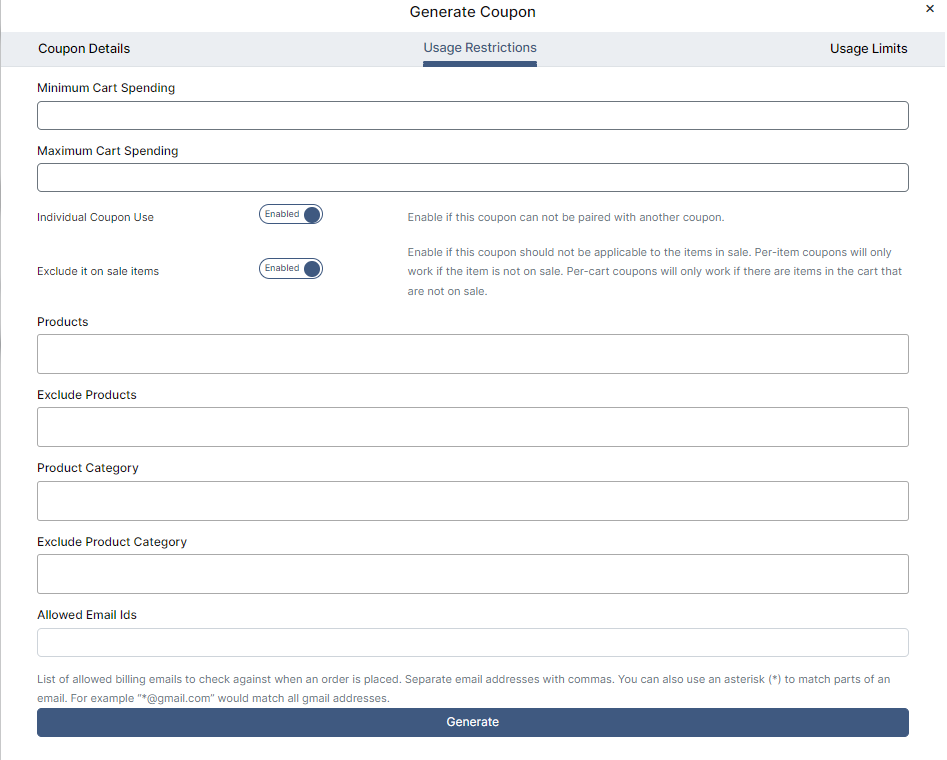
Minimum Cart Spending: Set the minimum amount customers must spend in their cart to activate this coupon.
Maximum Cart Spending: Specify the maximum cart total for this coupon to be valid.
Individual Coupon Use: Enable to restrict the use of this coupon in conjunction with other coupons.
Exclude on Sale Items: Activate this option if the coupon should not apply to items currently on sale. For per-item coupons, it only applies if the item is not discounted. For per-cart coupons, it works if there are non-sale items in the cart.
Products: Choose specific products to which this coupon should apply.
Exclude Products: Exclude certain products from being eligible for the coupon.
Product Category: Apply the coupon to all products in a specific category.
Exclude Product Category: Exclude products belonging to a particular category from being eligible for the coupon.
Allowed Email IDs: Limit coupon use to specific email addresses. Enter the allowed email IDs to ensure the coupon is redeemable only by specified users.
Usage Limits
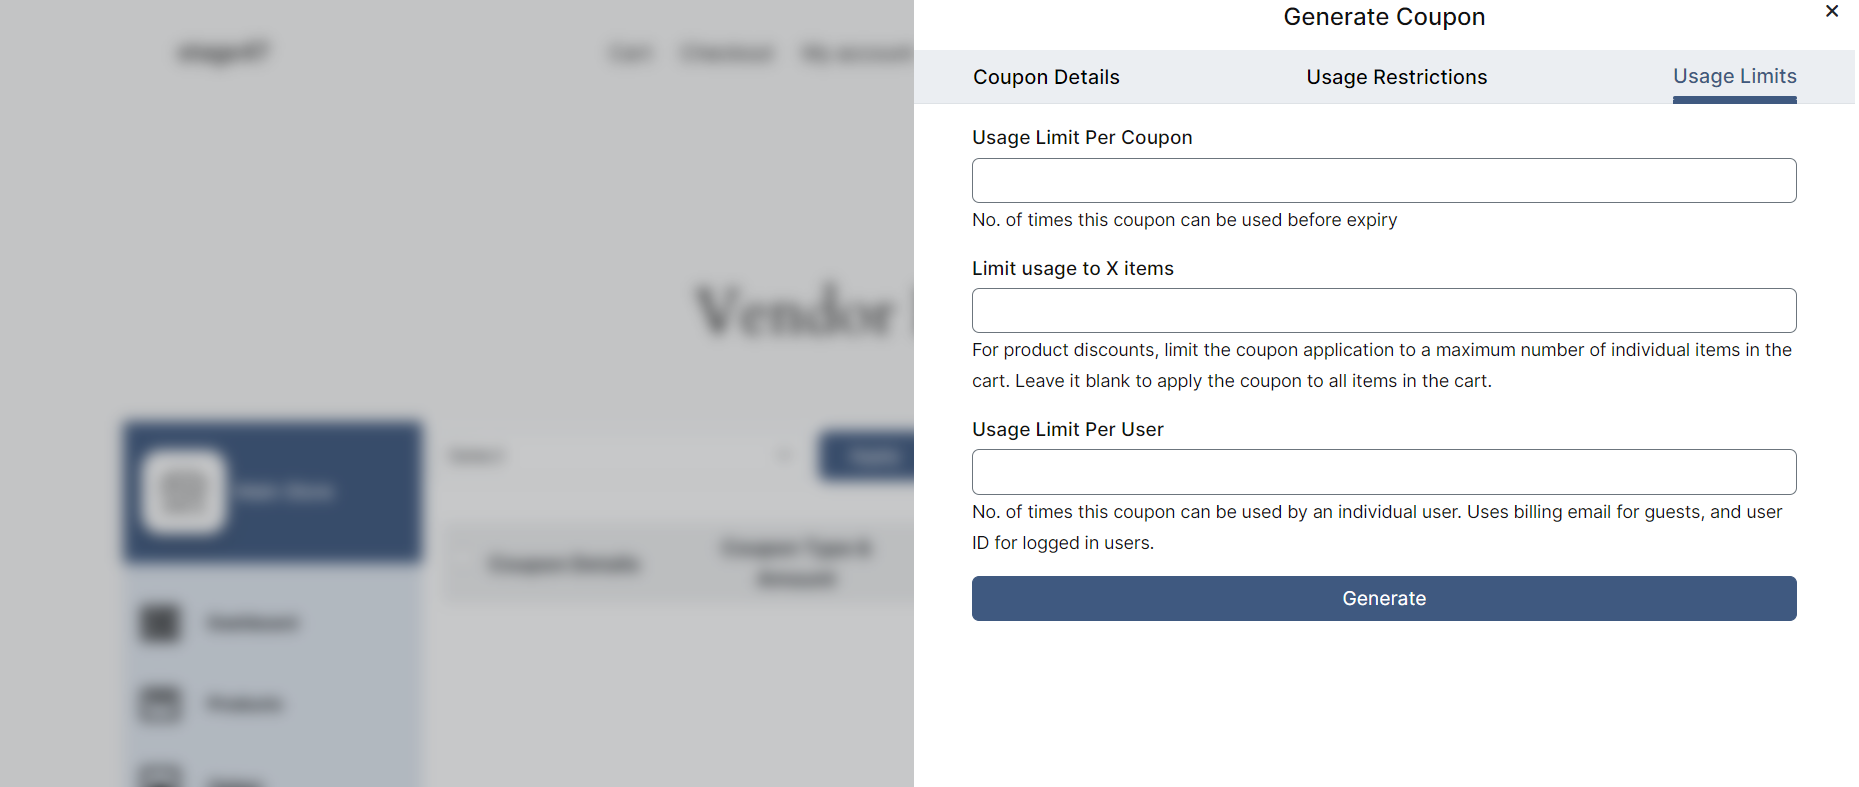
Usage Limit Per Coupon: Set the number of times this coupon can be used before its expiry date.
Limit usage to X items: For product discounts, restrict the coupon application to a maximum number of individual items in the cart. Leaving it blank applies the coupon to all items in the cart.
Usage Limit Per User: Set the maximum number of times this coupon can be used by an individual user. For guest users, it uses the billing email, while for logged-in users, it utilizes the user ID.
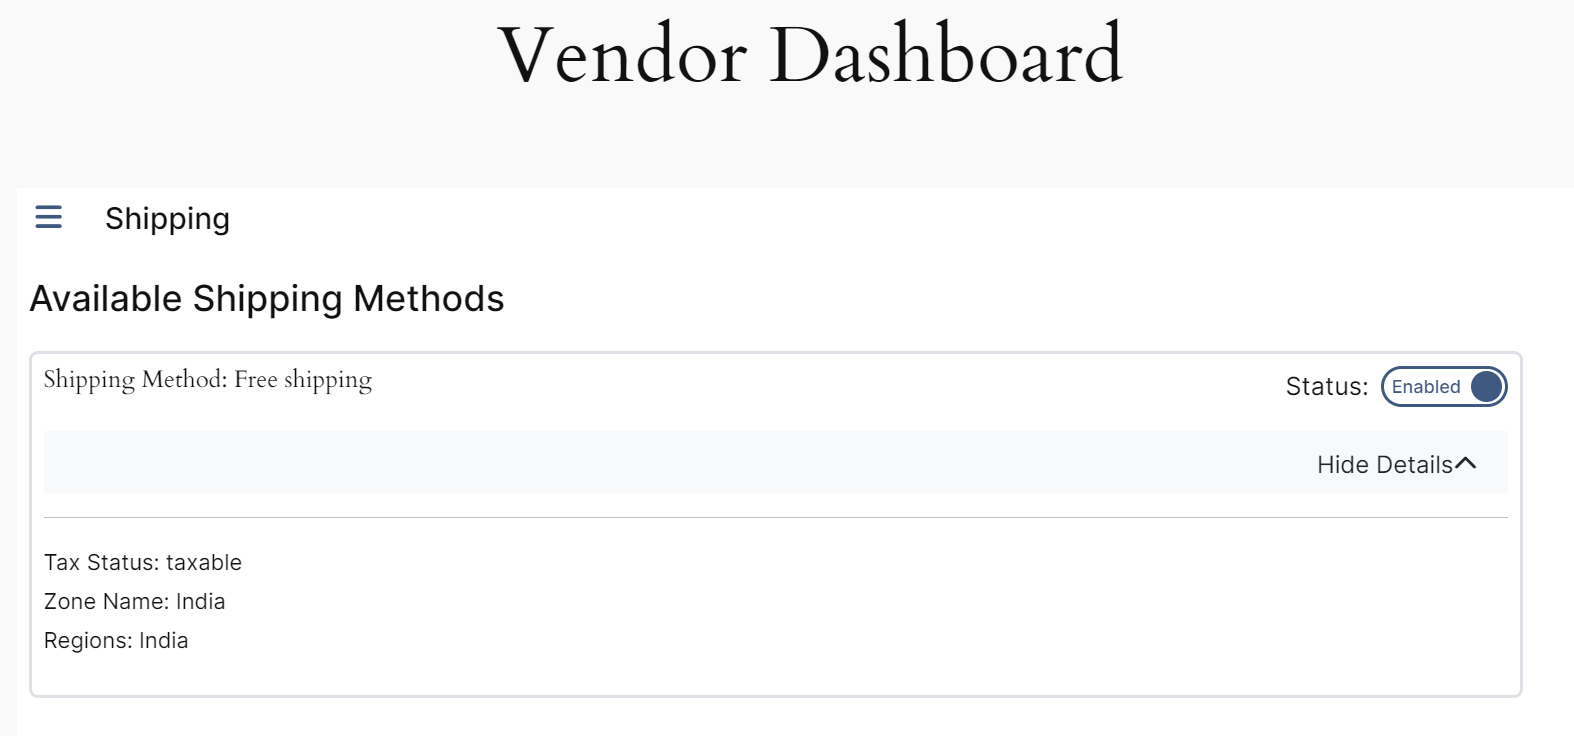
Shipping
Enable or disable the availability of shipping options. You can also view additional details including the tax status, zone name, and regions.
Payments
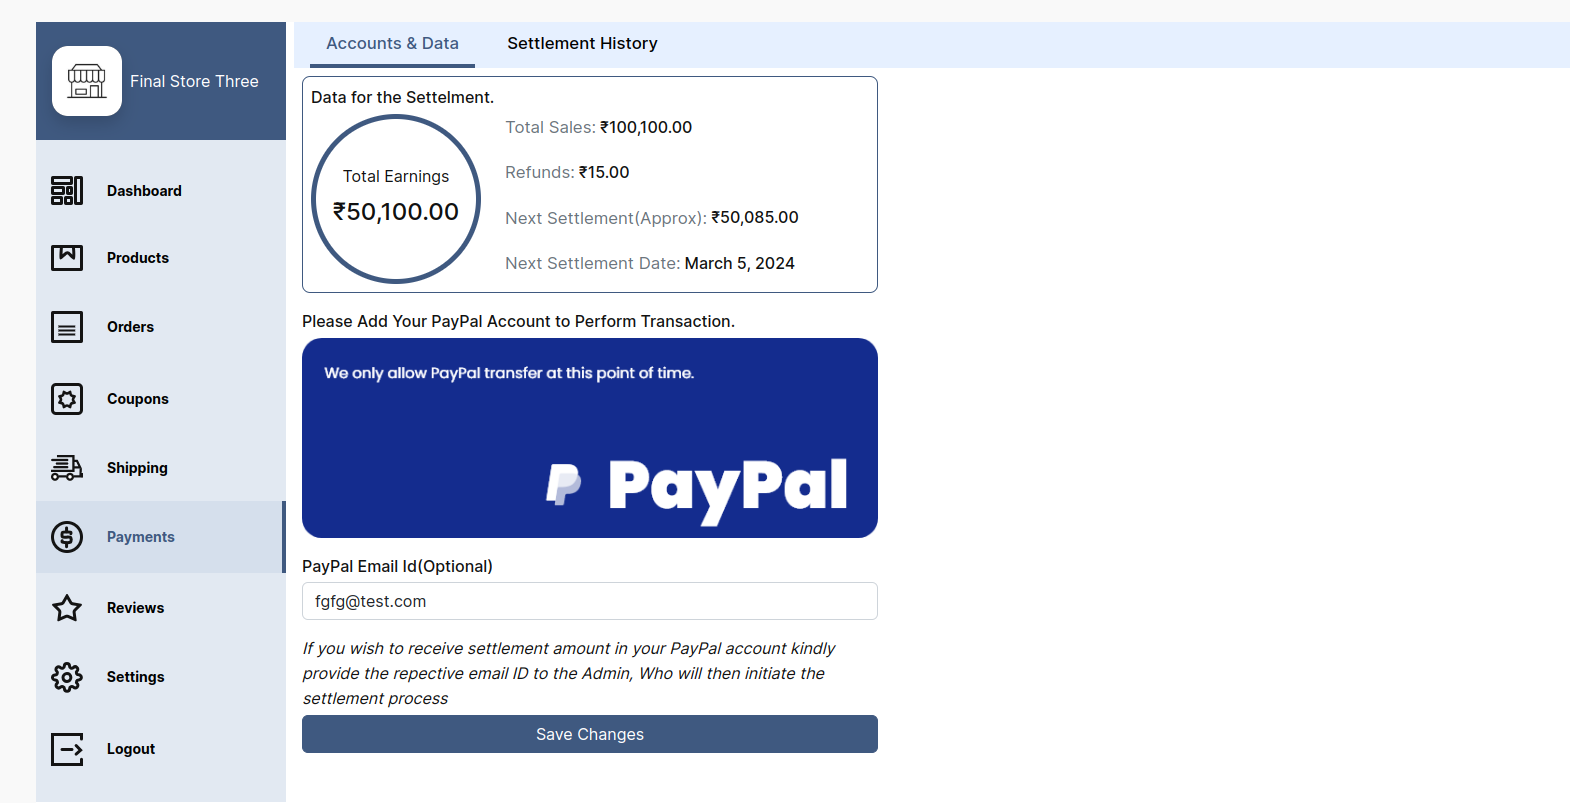
Accounts and Data
- Total Earnings: Represent the total earnings after deducting the admin commission.
- Total Sales: Indicates the cumulative amount of all sales made.
- Refunds: Represents the total amount refunded to customers.
- Next Settlement (Approx): It shows the next settlement amount after deducting refunds from total earnings.
- Next Settlement Date: Specifies the exact date when the next settlement is scheduled to occur.
- PayPal Email: If you would want the settlement payment to be deposited into your PayPal account, please give the administrator the correct email address. The administrator will then start the settlement procedure.
Settlement History
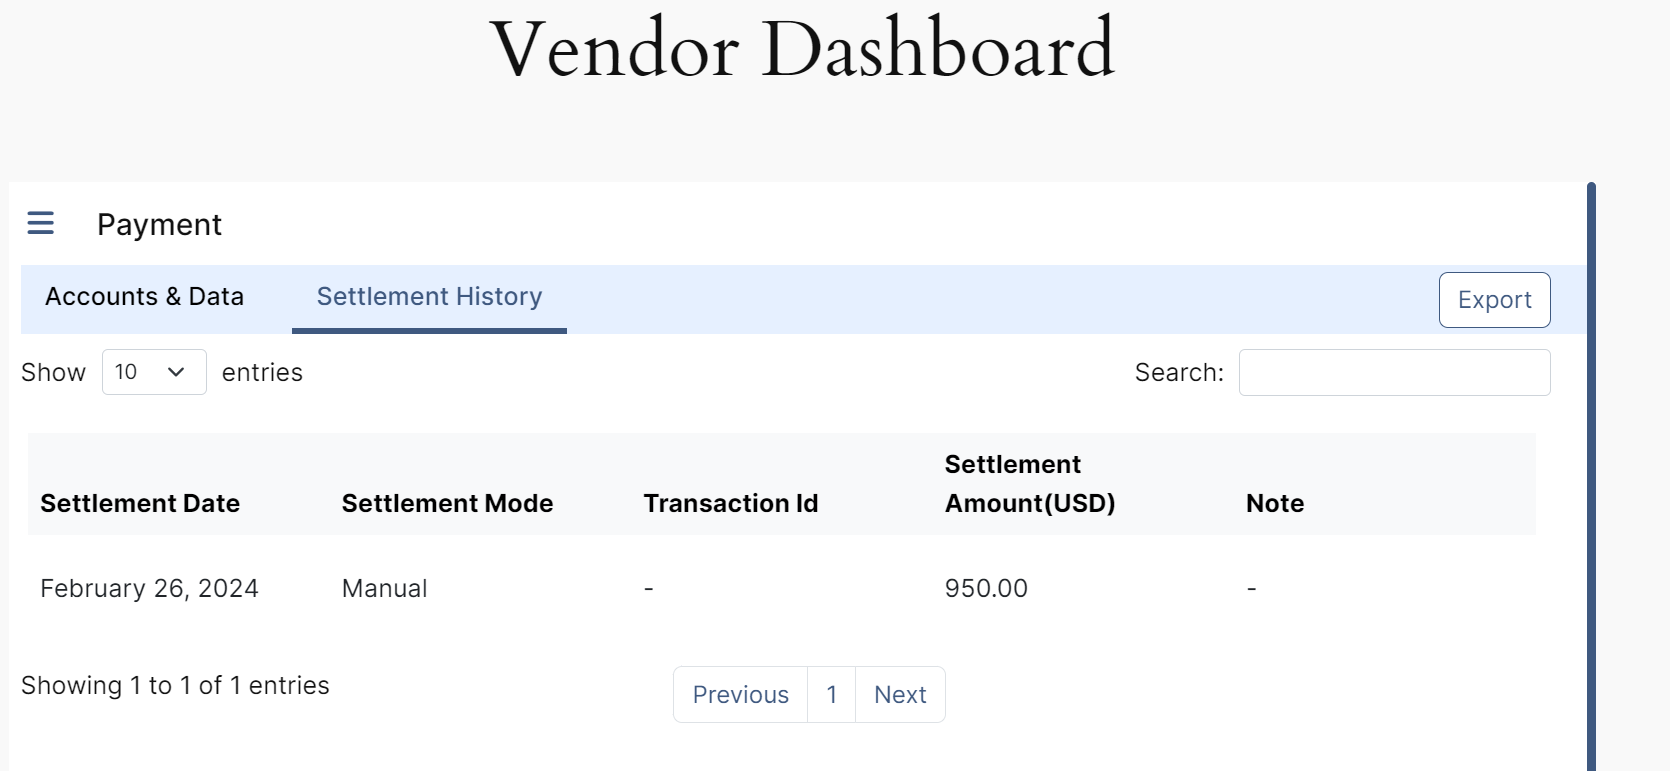
- Settlement Date: Represents the date on which the settlement was processed.
- Settlement Mode: Describes the method or mode through which the settlement was executed, e.g., Manual, Automatic, etc.
- Transaction Id: Displays a unique identifier assigned to the settlement transaction.
- Settlement Amount (USD): Reflects the total amount settled in US dollars for a particular transaction.
- Note: Provides additional information or notes associated with the settlement.
- Export: Allows you to export or download the settlement details, typically in a spreadsheet or CSV format, for further analysis or record-keeping.
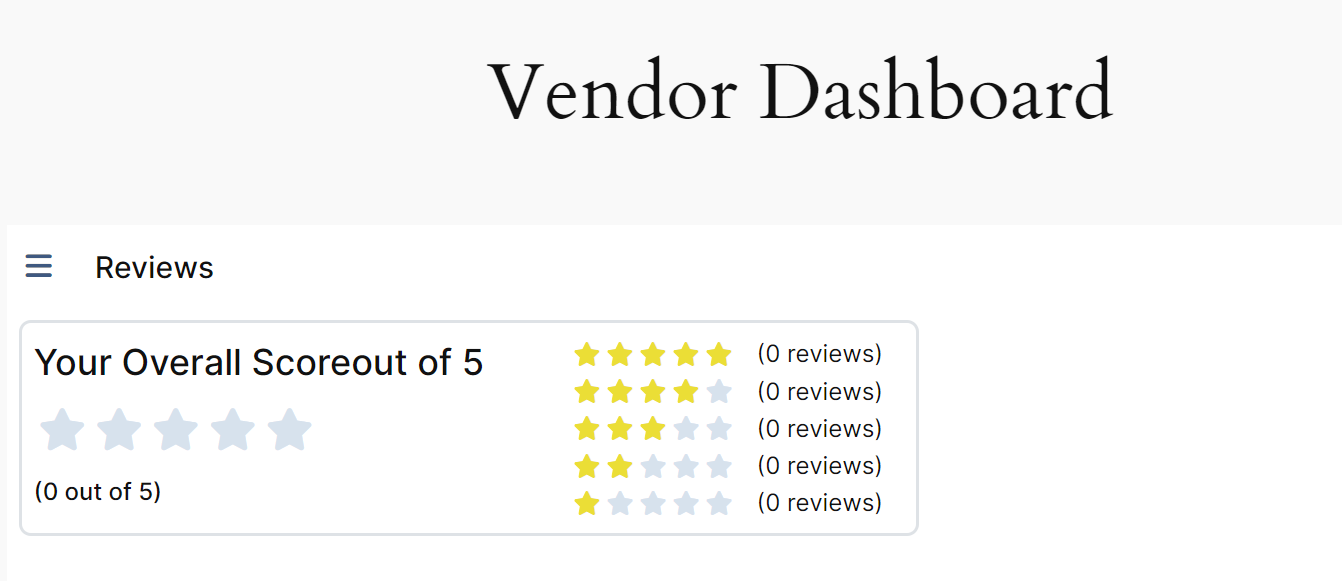
Reviews
Check the total reviews on your store.
Settings
Store Profile
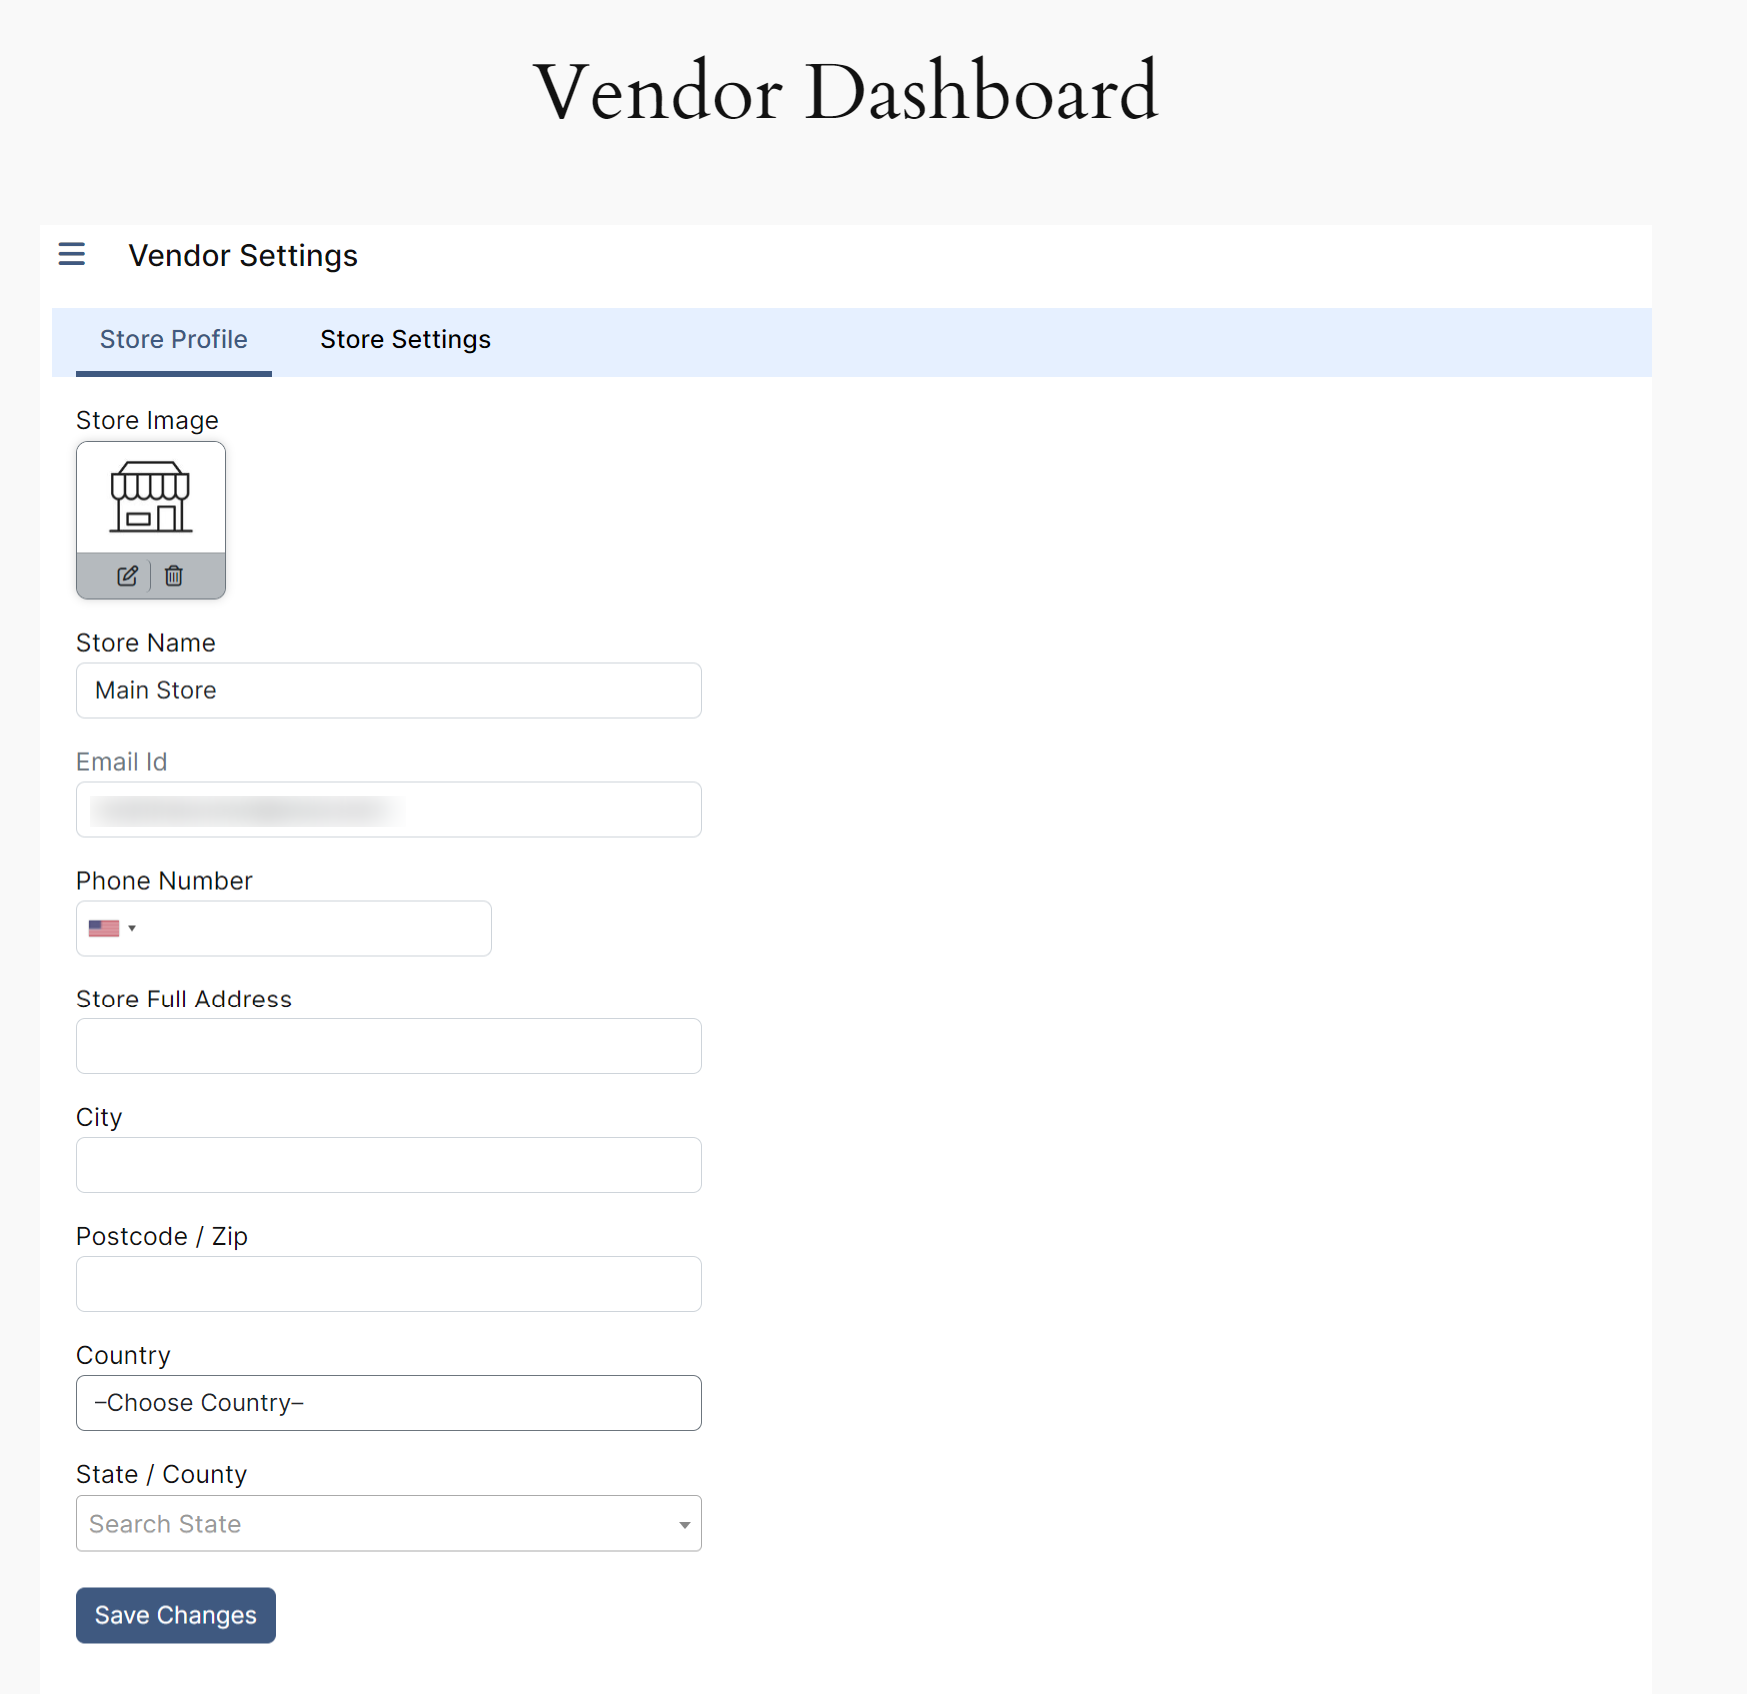
- Store Image: Upload an image representing your store. This image will be associated with your store and displayed as a visual identifier.
- Store Name: Enter the official name of your store. This name will be used to identify your store throughout the platform.
- Email Id: Provide the email address associated with your store. This email will be used for communication and order notifications.
- Phone Number: Enter the contact phone number for your store. This number can be used for customer inquiries and order-related communications.
- Store Full Address: Input the complete physical address of your store, including street address, suite or unit number, etc.
- City: Specify the city where your store is located.
- Postcode / Zip: Enter the postal code or ZIP code of your store’s location.
- Country: Choose the country where your store is situated.
- State / County: Specify the state or county in which your store is based.
Store Settings
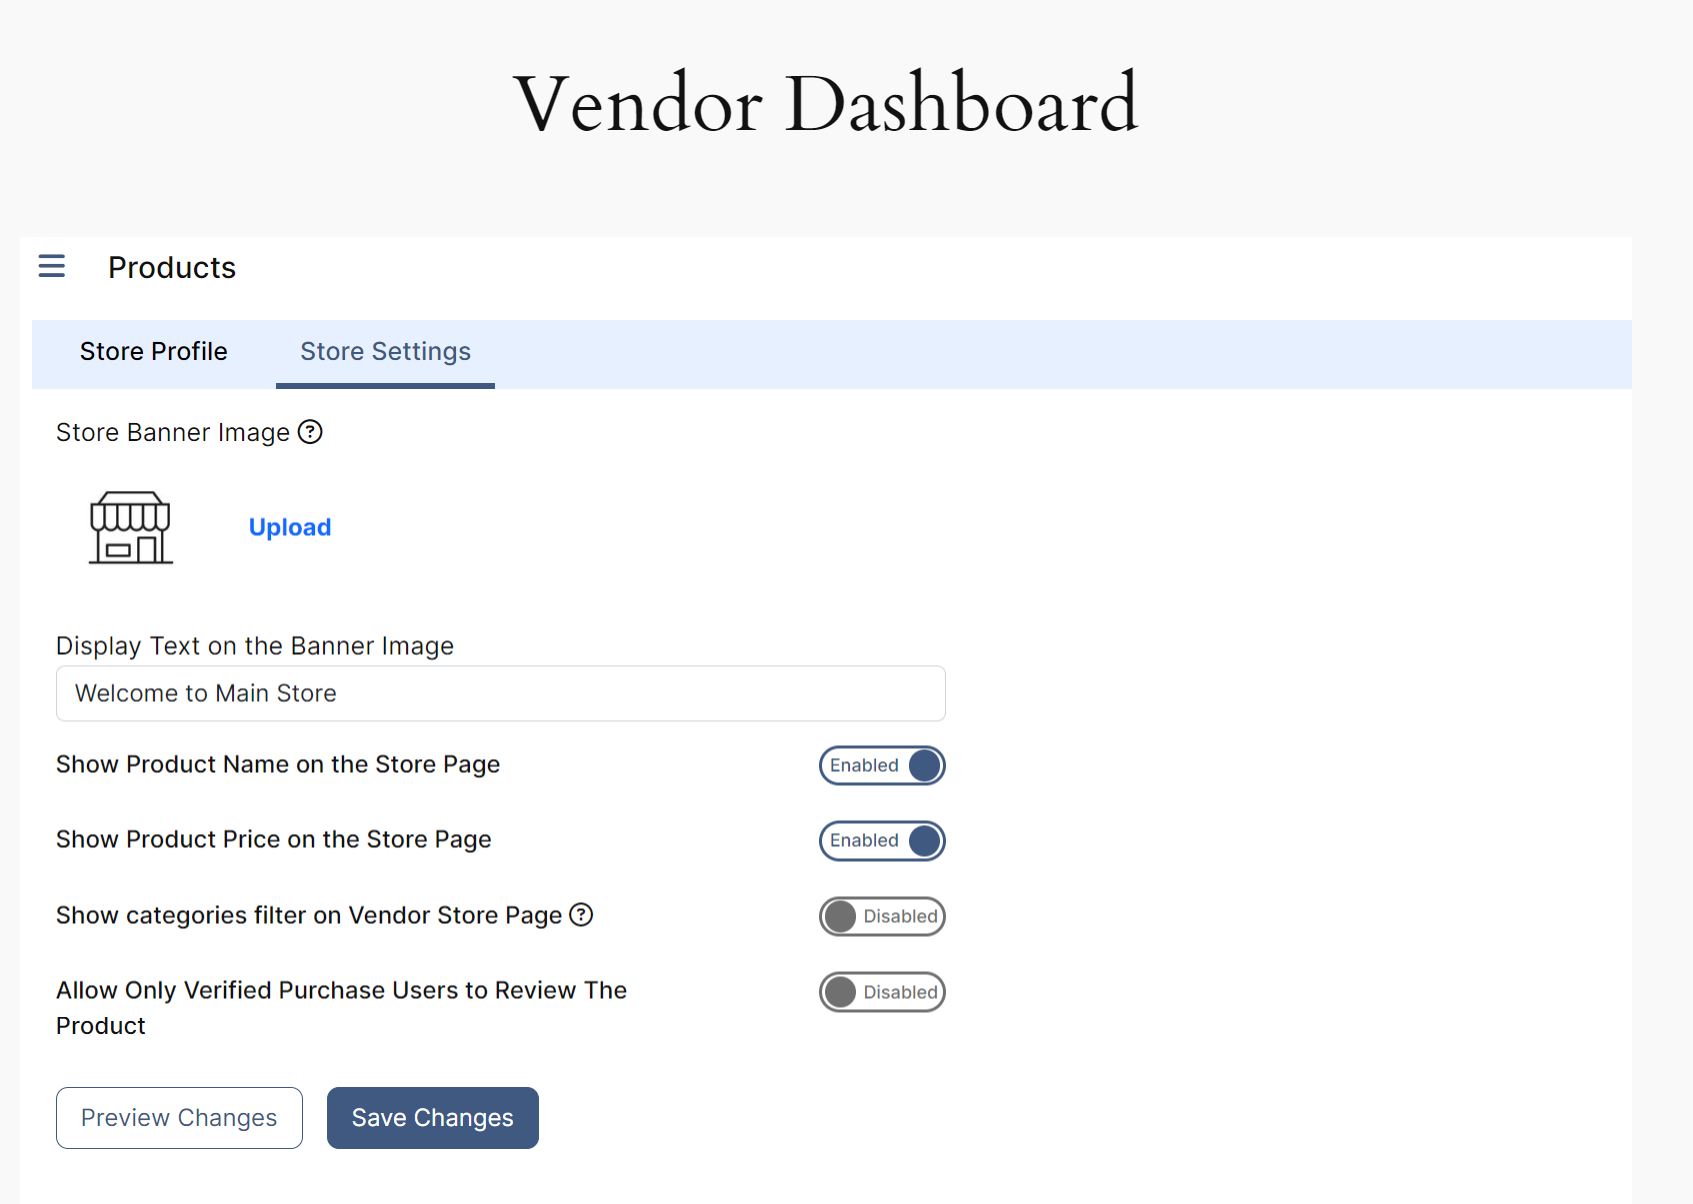
- Store Banner Image: Upload an image that will be displayed prominently at the top of your store page, creating a visually appealing storefront.
- Display Text on the Banner Image: Add text to be overlaid on the banner image, conveying a message, promotion, or any relevant information.
- Show Product Name on the Store Page: Enable this option to display the names of products directly on the store page for easy identification.
- Show Product Price on the Store Page: Activate this option to showcase the prices of products directly on the store page for quick reference.
- Show Categories Filter on Vendor Store Page: Allow visitors to filter products by categories, enhancing navigation and improving the shopping experience on the vendor store page.
- Allow Only Verified Purchase Users to Review The Product: Restrict product reviews to users who have made a verified purchase, ensuring that reviews come from genuine customers who have experienced the product.
To explore more details about the plugin, go check out ELEX WooCommerce Multi Vendor Plugin.
You can also check out other WooCommerce and WordPress plugins in ELEX.