Pricing is one of the most important aspects of any eCommerce store. It’s one of the most crucial considerations when buying a product or service. Aside from carefully examining your pricing strategy and tying it to your goals, it may be a good idea to keep prices hidden from your customers in some situations. For example, some firms may prefer to keep their wholesale and membership fees secret from retail customers. In order to obtain email addresses, some eCommerce sites hide costs.
Flexible pricing is one of a number of pricing systems that may be used to establish prices for goods and services. A final price is negotiable in the case of flexible pricing, which means that sellers and customers can debate prices to either decrease or raise it from the original price. However, in most situations, management uses it to mimic demand and raise or lower pricing to enhance profit or sales.
This pricing method allows merchants to charge various rates to different customers for the same product. Prices might change depending on whether a deal is reached through negotiation or the seller’s own opinion. A product’s pricing may also vary depending on where it is purchased.
This tutorial will show you how to install and use the WooCommerce Name Your Price plugin on your WordPress site.
A quick look at the plugin

Customers may name their own pricing for your WooCommerce items with the ELEX WooCommerce Name Your Price plugin. The plugin allows you a lot more choice when it comes to pricing your items. Customers who visit your WooCommerce store can recommend a price for your products. To avoid losing money, store owners may impose a minimum acceptable price by allowing consumers to choose their own price. This plugin is useful for market research and determining how much your customers are willing to pay for your products.
The following are some of the plugin’s key features:
- After (Suffix) and before (Prefix) the product price, add custom content.
- Quick Discounts can be added to the price of your goods.
- For specific goods, set prefixes, suffixes, and discounts.
- Show the minimum and maximum pricing ranges for variable items.
- Compatibility with ELEX Plugins is excellent.
Let’s look at how to set up the WooCommerce Name Your Price plugin for your WordPress site quickly and easily.
How to use the Plugin
Download the ELEX Name Your Price plugin for WordPress websites. To install the plugin, go to your WordPress Dashboard > Plugins > Add new > Upload Plugin > Install Now when the download is complete.

After the installation is complete, click Activate Plugin.

The plugin is now up and running. Let’s get started with the step-by-step procedure for setting it up.
Step 1: Go to the plugin dashboard
To utilize the plugin, navigate to WordPress Dashboard > WooCommerce > Settings > Name Your Price.
Step 2: Customize the settings to your preferences
You will be presented with a number of options as soon as you enter the plugin’s dashboard. Let’s take a closer look at each function. Enable Product Min Price to allow customers to choose a price at which they want to buy a product from your store while still making use of the plugin’s other features.

Set a Minimum Price: This is the lowest price at which you want customers to be able to purchase your goods. If necessary, you may also leave it blank.
Min Price Label: Enter a custom text that will appear next to the section where the buyer must enter the minimum price.
Min Price Description: Fill up the minimum price description area with a custom description that will be presented to buyers.
Hide Price: Another important feature is the Hide Price option. This option allows you to remove the price from the product page. Only the product’s minimum price and the ability to submit their ideal price for the product will be visible to the customer.
Once you’ve completed tweaking the settings to your desire, click Save Changes.
We’ve included some examples of how to use the plugin below…
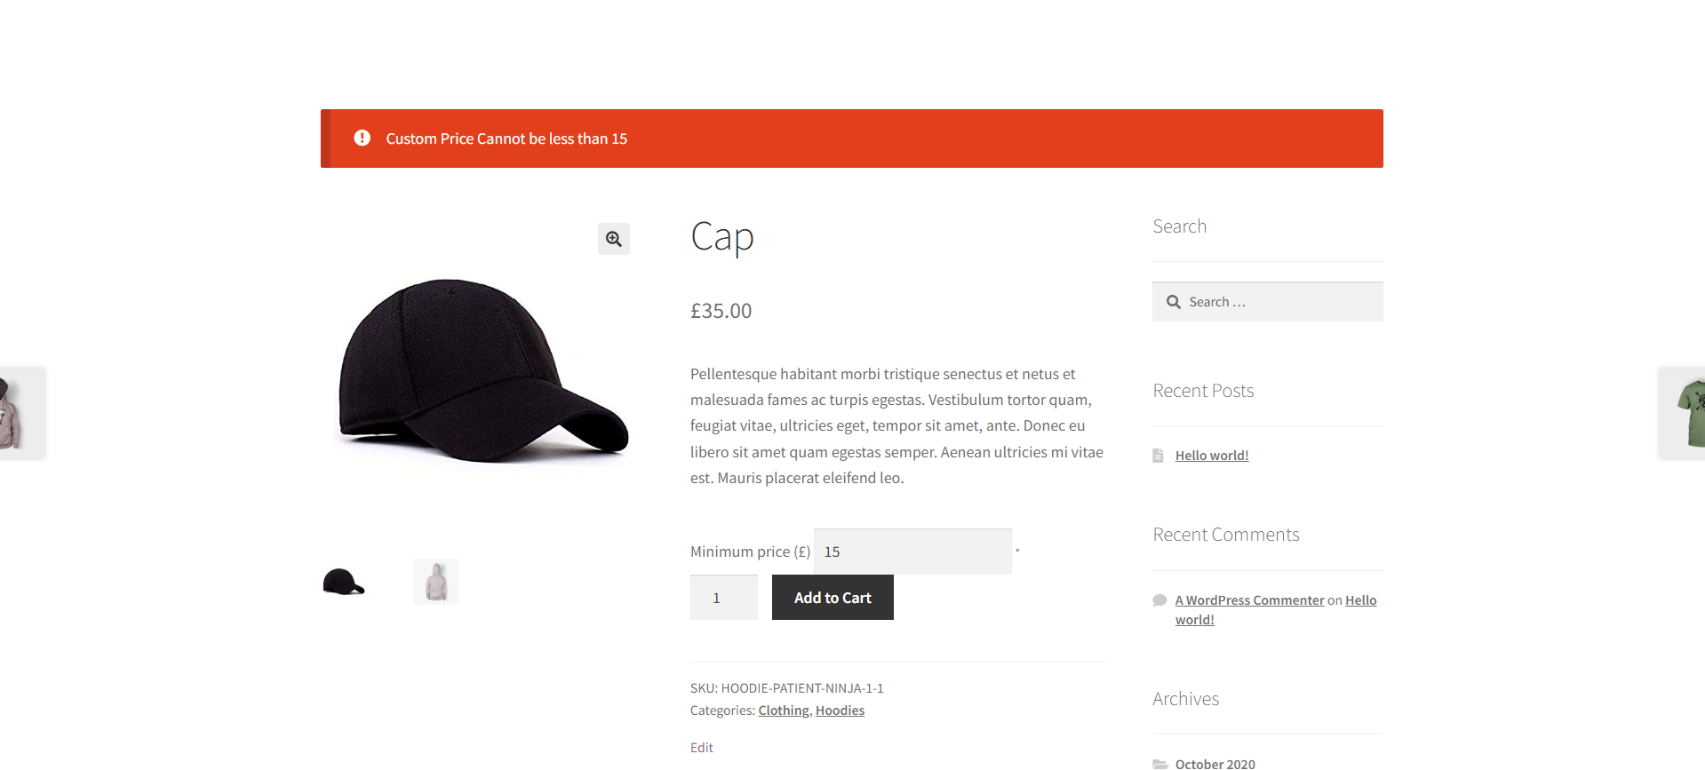
With the “hidden price” setting disabled, we activated the minimum price setting and set the minimum price to $15 on a cap of $35.00.

If the consumer inputs a price that is less than $15, a custom message will appear on the page that says “Custom pricing must be less than $15.”
Flexible pricing for individual products
After you enable the plugin, you may also determine the minimum price at the individual product level, based on your store’s needs. Following that, all items will be eligible for the global minimum price you set in the plugin dashboard. To do so, go to WordPress Dashboard > Products and choose a product for which you’d like to establish a minimum price.
By selecting Edit under the product and scrolling down to the product details metabox, you may get to the General tab. In the Name Your Price box, set the minimum price.

Flexible pricing for individual product variations
Follow the same procedures as before, but go to the Variations tab instead of the “General” tab for items with variations. Under the Name Your Price box, set the minimum price.

Conclusion
This tutorial has shown you how the WooCommerce Name Your Price plugin can help you manage flexible pricing on your WordPress site. By allowing your loyal customers to establish tailored pricing for the things they’re interested in, you’re putting your store’s income in their hands. It will not only excite your customers’ interest in making future purchases with you, but it will also improve their trust in you.

