Vendors are sellers who list and sell their products through your store. You can list their products in your store, or they can list by themselves if you have provided the login credentials to them. It will be a tiring task if you want to create Google Shopping ads for the products which are listed by a specific vendor or vendors manually. You need to finely sort the products based on the vendors and create a feed to submit to the Google Merchant Center.
In order to create a Google product feed for a specific vendor or vendors in a couple of clicks, you can use a Google product feed generator plugin. ELEX WooCommerce Google Shopping Plugin will help you to generate the feed based on specific vendors in your store with minimum clicks.
ELEX WooCommerce Google Shopping Plugin
This advanced plugin can be used to generate product feeds in XML, CSV, or TSV file formats with all relevant details demanded by Google Merchant Center to feature the products as Google Shopping ads. You can filter specific products and generate exclusive feeds for them. Also, it helps to reduce the rejection ratio by filtering the products with missing attributes, which are strictly demanded by Google Merchant Center. You can check the excluded products (both simple and variable) from the feed and the reason for the exclusion in a table. After fixing the issues, you can create the feed with all required products, which are ready to submit to the Merchant Center.
To know more about the features and specifications of this plugin, refer to its documentation.
Now, let us check how we can generate a product feed based on specific vendors in your store.
Generate Vendor Specific Google Shopping Feed Using ELEX WooCommerce Google Shopping Plugin
You can go through the following steps in this article to generate a feed with products listed by specific vendors. Before that, make sure your WooCommerce store is integrated with a Multi-vendor support plugin and WooCommerce Multi-Vendor Support for ELEX Shipping Plugins. The ELEX Google Shopping plugin integrates with the multi-vendor plugin you have integrated with your store to generate the feed of selected vendors.
To subscribe, install, and activate the plugin, refer to the product documentation mentioned before.
Step 1
After installation and activation, go to the Create Feed tab of the plugin.
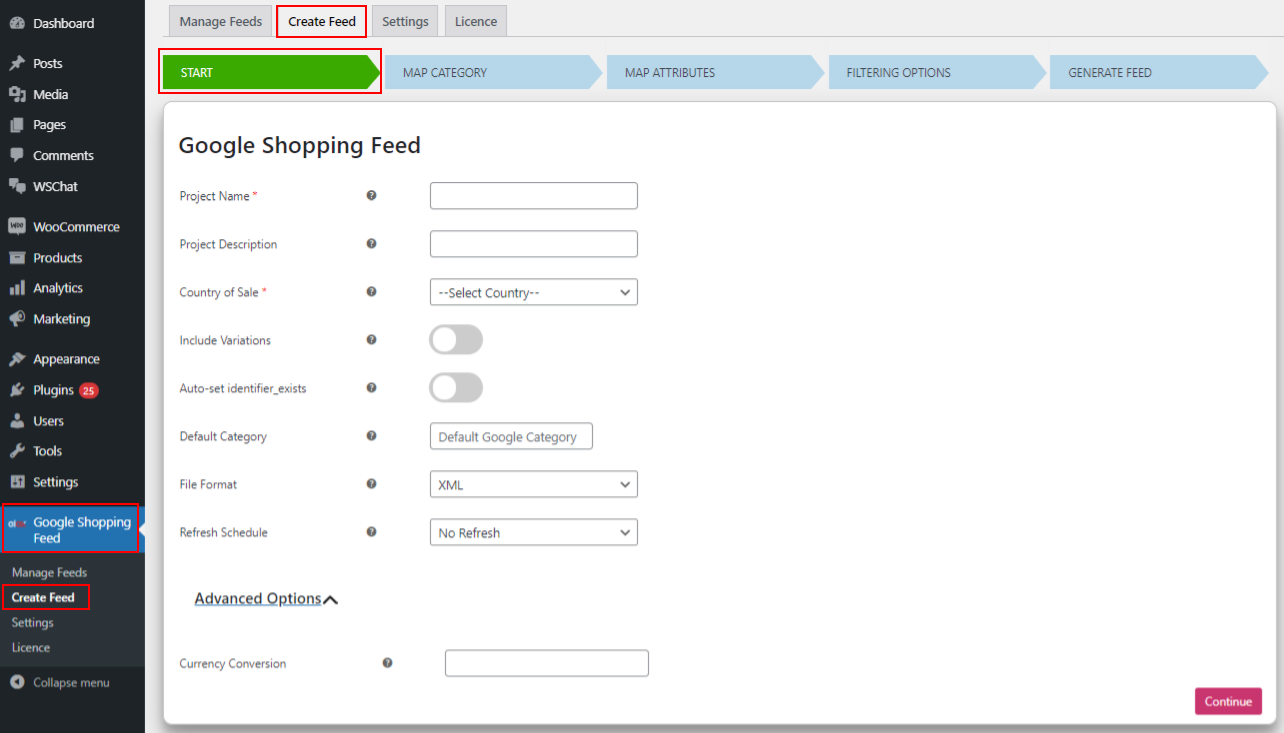
Here, you can enter the basic details of the feed you need to generate. Enter the project name and description for uniquely identifying a specific feed. Then, choose the country in which you need to target sales, include product variations, and enable the option to generate the feed with products that miss GTN, MPN, and brand. You can assign a default Google category to map all your product categories with that single Google category by default. Currently, the plugin supports XML, CSV, and TSV file formats, in which you can generate the feeds. You can choose a format as per your requirements. Using the Refresh Schedule option you can update the frequently updated product data on your store to the submitted feed into the Google Merchant Center. You can choose to refresh on a daily, weekly, or monthly basis.
If you are targeting to showcase your products in a location where they use different currencies, you can use the Currency Conversion option. The entered number will be multiplied by the actual price of the products in your store and added to the product feed.
After entering the required details, click Continue.
Step 2
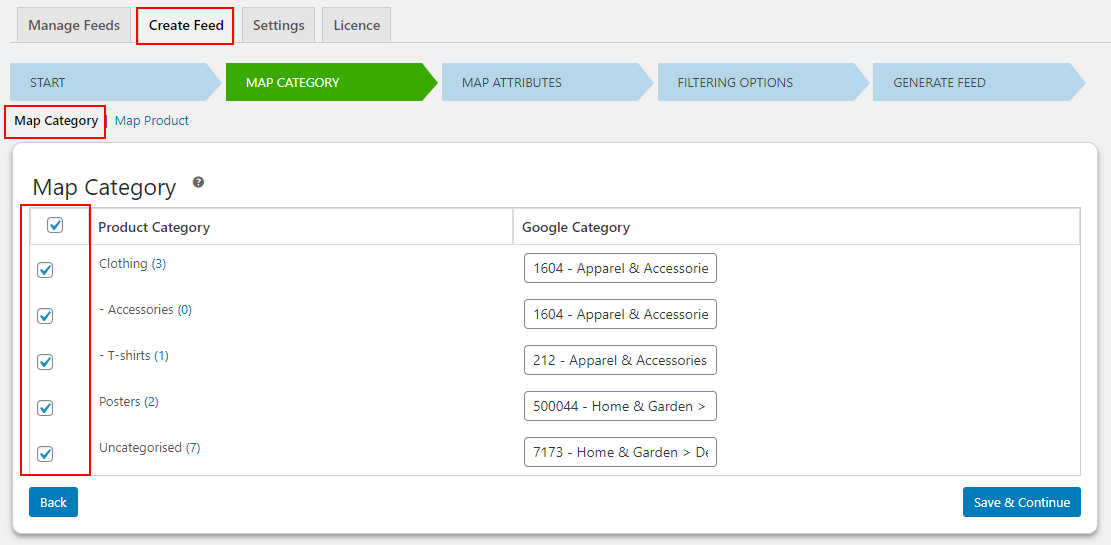
In this step, you can map your product categories with Google’s default product categories for making your products reach potential customers when they search for them with related keywords.
You can add the related Google categories on the corresponding field to your product categories.
If you need to map your individual products with specific Google product categories, you can go to the Map Product section.
After entering these details, proceed to the next step.
Step 3
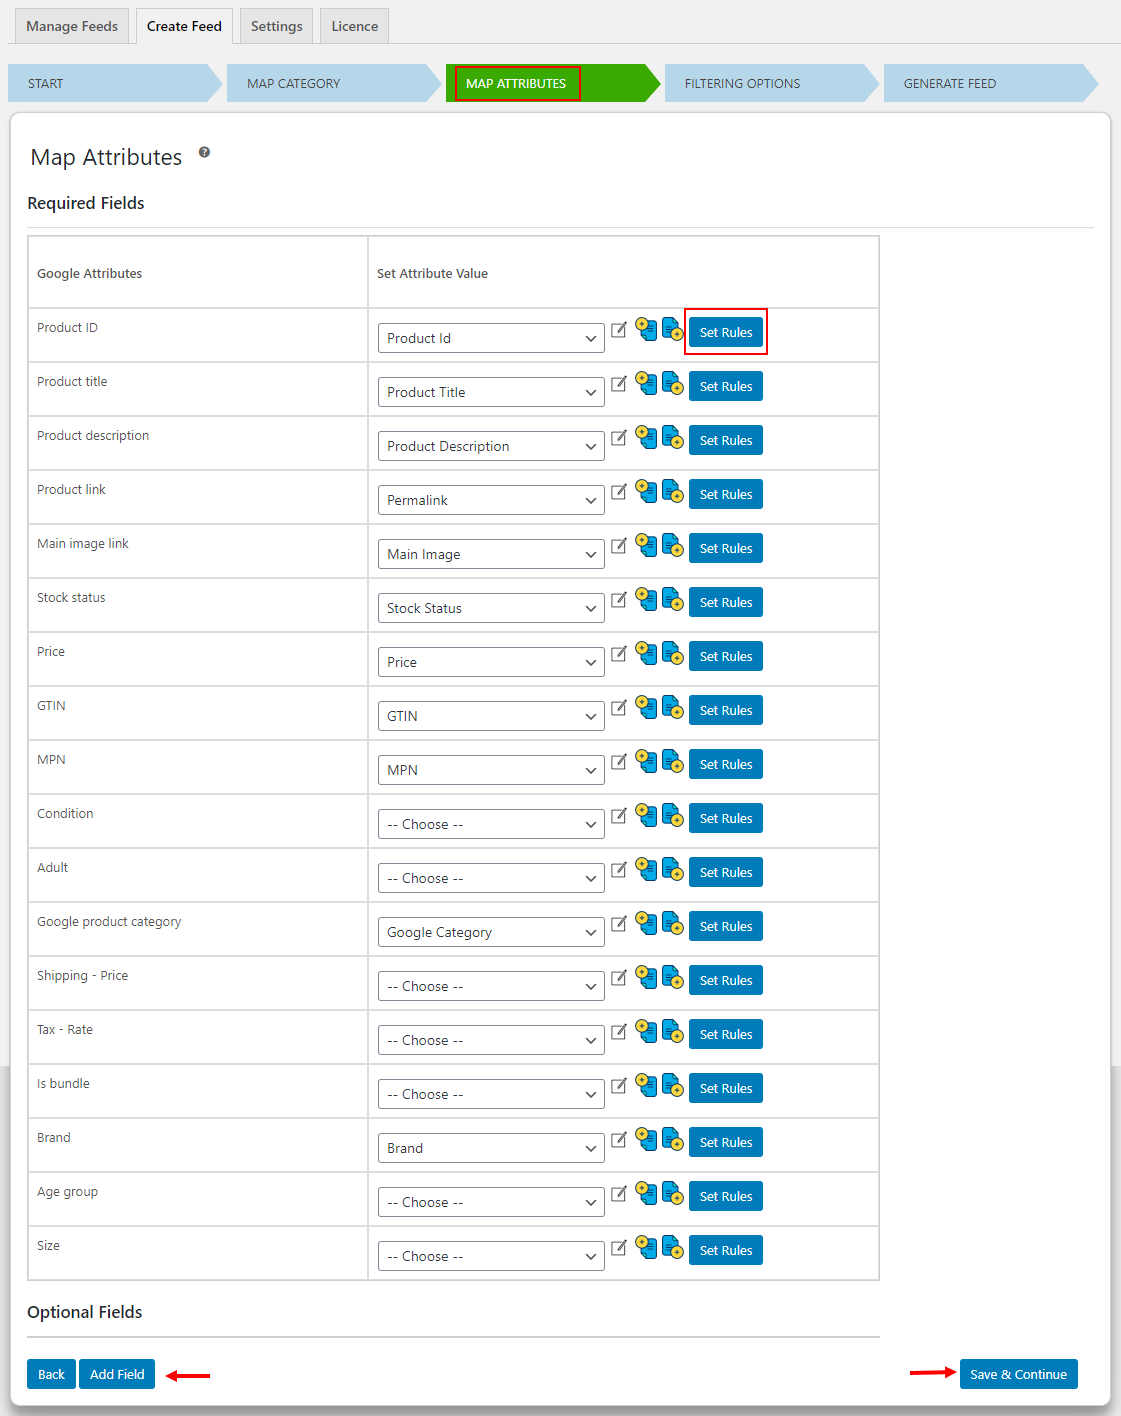
In this step, you can map your product attributes with Google’s default product attributes. You can choose the attributes with which the Google attributes must be mapped for a better ad listing. Also, you can add a custom attribute from your side and map it with a default Google attribute.
You can map your products using advanced options available in this plugin like mapping attributes by appending or pretending with other attributes and setting conditions and rules to map with a certain attribute. To know more about these advanced mapping methods, refer to the following article:
- How to Map a Product Attribute by Appending or Prepending with Another Attribute in Your Product Feed Using ELEX WooCommerce Google Shopping Plugin?
- How to Map your Product Attributes with Google Product Attributes Based on Specific Conditions Using ELEX WooCommerce Google Shopping Plugin?
After mapping the products accurately, proceed to the next step for filtering your products.
Step 4
You can filter the products that must be present in the product feed using the Filtering options in this plugin.
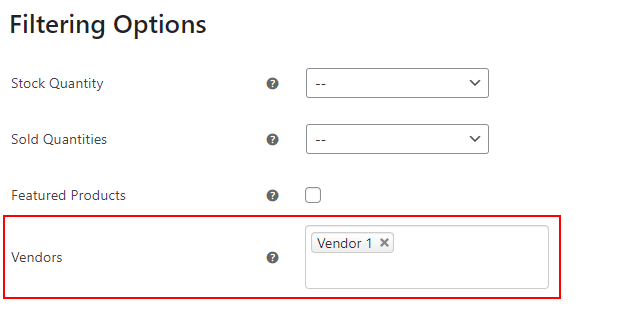
By default, there are 3 filtering options such as filter based on the stock, the sold quantities of the products, and filtering all featured products in your store. If you have activated a WooCommerce multi-vendor plugin in your store, you will get one more option in this tab to filter products based on vendors.
You can choose multiple vendors together for generating the feed with products listed by those vendors.
After configuring the required details, click to generate the feed.
If all products contain important attributes demanded by Google Merchant Center, you will get 2 options as in the above image – View Feed and Manage Feeds. If some products are missing any essential attributes, you will see one more button to view the excluded simple and product variations. Also, the missing attribute will be displayed along with the reason in a table. Using the information, you can rectify the issue and get the products back in the product feed.
If you click View Feed, you can view the generated feed in the file format which you have chosen in the first step.
If you click Manage Feeds, you will be redirected to the tab in which all your generated feeds are listed with details like their name, URL, created and modified date, and 8 buttons. The buttons are:
- Edit: For editing your feed by making changes from the dashboard.
- Copy: For creating a copy of the generated feed.
- Pause: For pausing the scheduled refresh.
- Regenerate: For manually refreshing the data on feed as and when required.
- Download: To download the feed in your local system.
- View: To view the feed in an XML, CSV, or TSV file format.
- Show Report: To view the overall performance report of the feed. This will show a graph of total included and exclude simple products as well as variations.
- Delete: For deleting the generated feed.
This is how you can generate and manage a feed of products listed by specific vendors.
Conclusion
Creating a product feed manually for the products listed by specific vendors is not an easy task. In order to create a vendor specific Google Shopping Feed accurately with fine detailing, you can use the ELEX WooCommerce Google Shopping Plugin.
Further Reading:
- How to Generate Google Shopping Feed for Only Featured Products on Your WooCommerce Store?
- How to Generate Google Shopping Feed Based on Stock Quantities and Sold Quantities?
- Complete Guide To Google Shopping To Generate Traffic And Drive Sales


