Configuring WooCommerce taxes for your business takes a great effort. Here in this article, we take a look at how to go about setting up WooCommerce Tax.
Introduction
Setting up taxes is one of the first steps you need to focus on while setting up your WooCommerce store. Taxes are complex and also differ a lot according to the business, the country, as well as products. Taxes are much complex to understand, and WooCommerce offers greater flexibility in terms of configuring taxes. Let us take a look at the possible ways to configure taxes in our WooCommerce store.
How to Enable Taxes on your WooCommerce store?
On your WooCommerce store, you can enable WooCommerce taxes on the settings page.

On doing this, you get a tax settings tab option, enabled in the settings wherein you can set the taxes in an effective way for your store.
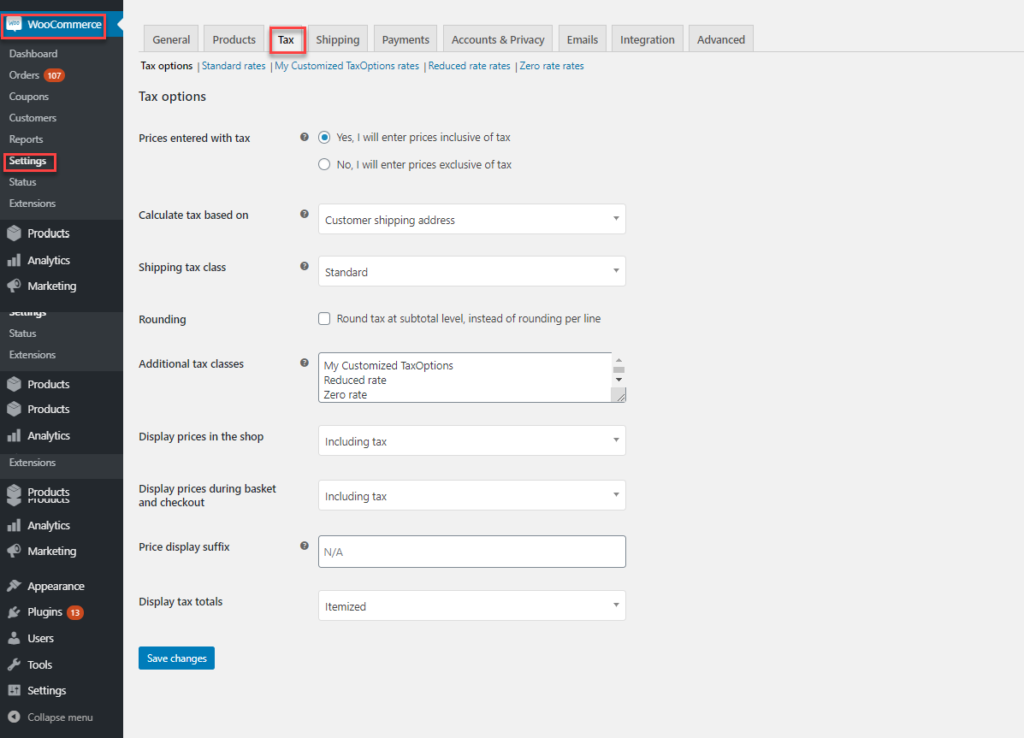
Here, you can set your tax options, which you want to set for your store. The tab gives you options to set various tax options for your store. Let us take a look at each tax option in detail to understand in a much better way.
Setting up WooCommerce Tax
When you are initially not enabling and setting up taxes, the store will not be displaying any data regarding taxes.
Once the WooCommerce tax option is enabled, you need to set the taxes for your store. To do so, you can first enable the tax option, upon which, you get a tab for entering Tax details for your store.
Once the tax option is enabled, you need to set the tax data for your store, which is displayed in your store for your customers.
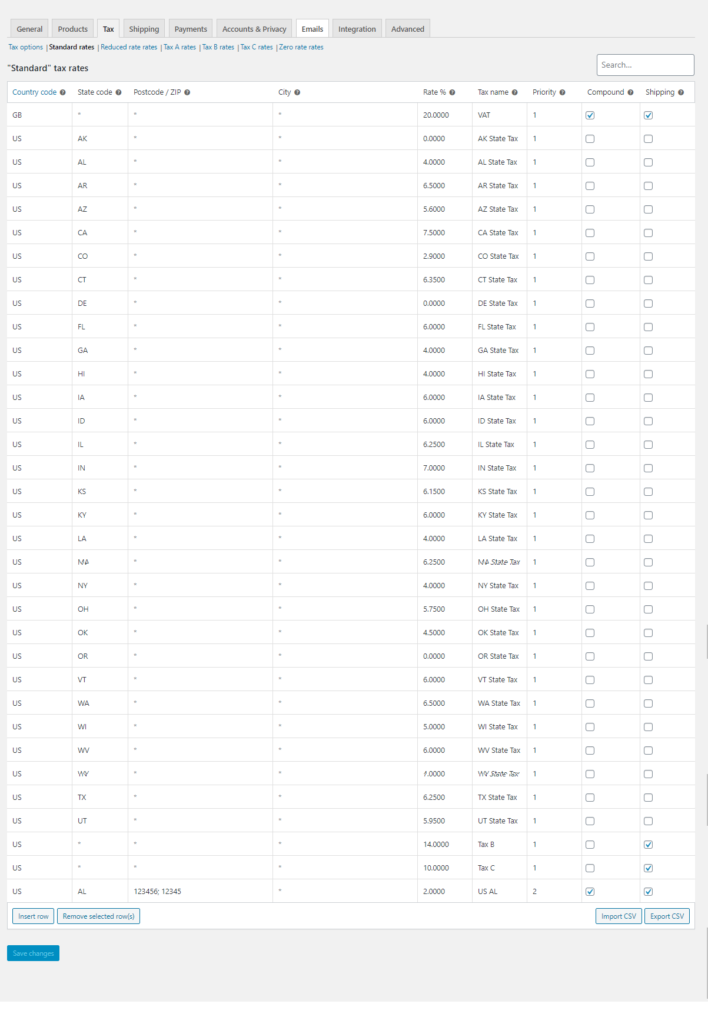
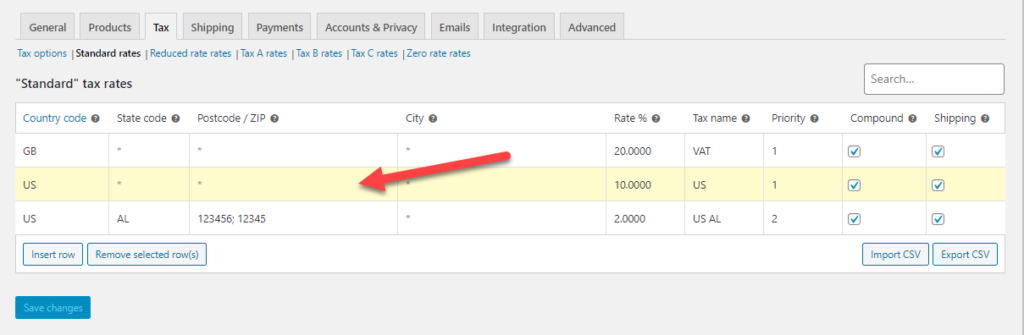
- Firstly you need to open Standard Rates.
- Enter the data in the fields – Country code – US (two-digit codes for countries), State code, Postcode/Zip, City, Rate%- for 10% you enter 10.000, the Tax name, Priority, Compound or Shipping. The fields can be left blank for State, Zipcode, City, etc, to choose all cities, states, and zip codes in the country by default.

- And then save the details.
- The codes entered will be displayed on the cart page, when the customer checks out.
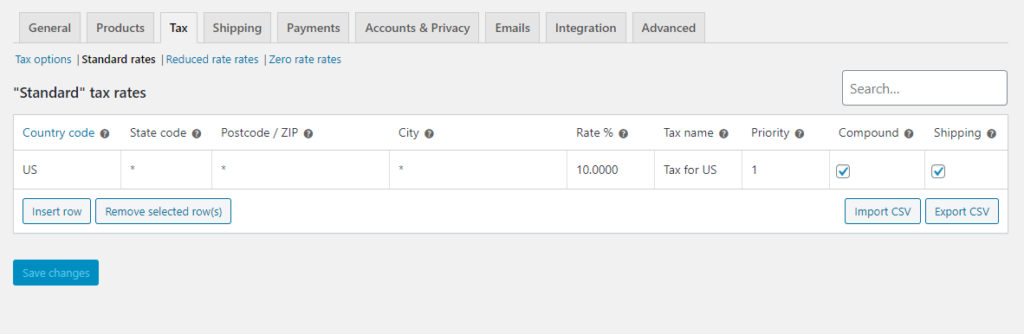
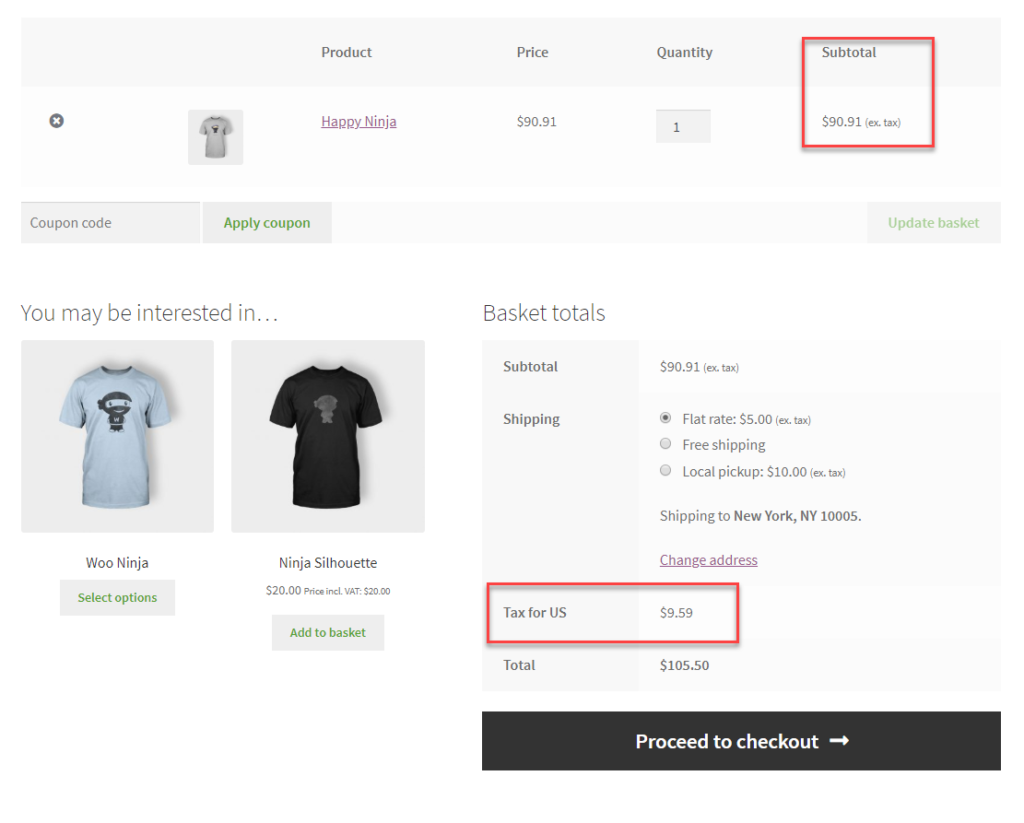
This is how the basic settings are done to set the taxes in your WooCommerce store.
Tax Options
The first option provided is about deciding whether you want to put the prices with tax or without. The option is given as a radio button, hence you can choose either one of those.
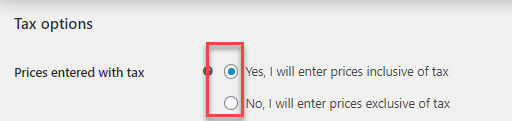
When you choose to enter prices inclusive of tax, then the product price will be inclusive of the taxes. So the prices will include the shop’s base tax rate. For example, if an item in the UK is sold at £11.11, wherein the prices are inclusive of 20% taxes. So a person in the UK would purchase the product at £11.11, whereas anyone from the US, will buy it at £9.31.
Here the tax calculation uses the formula for prices inclusive of tax
tax_amount = price - ( price / ( ( tax_rate_% / 100 ) + 1 ) )
Whereas if you choose the second option, then the prices of the products in the catalog will exclude the tax. In this case, you will need to calculate an additional price with the tax included while checkout. For example, considering the same above prices of the product, the prices in the store will not include the tax and will display as £9.31, but on check out the 20% tax will be included in the prices. Hence the customer will pay £11.11.
Here the tax calculation for prices exclusive of tax is :
tax_amount = price * ( tax_rate_% / 100 )
Calculate Tax based on an option
The next setting helps to decide on which address basis the tax needs to be calculated. 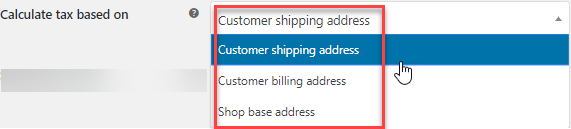
Here WooCommerce provides the following options to calculate tax :
- Based on Customer Shipping address – The taxes are calculated based on the customer’s shipping address.
- Based on Customer Billing address – The taxes are calculated on the billing address of the customer
- Based on Shop Base Address – The taxes are calculated on the shop base address. , so it depends on the store location.
Shipping tax class
In this section, the tax is completely obtained from the items shipped. Here are the major options available with WooCommerce :
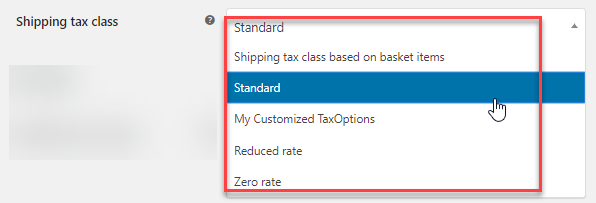
Here you can define Shipping Tax Class in your store. In most scenarios, the shipping tax class is mostly based on the items available in the cart. Hence, suppose if your customer adds a product that falls under a different tax rate other than the standard one, the tax for shipping will also be calculated at that same rate. Suppose, you are selling a reduced rate item, then you would use a reduced rate tax for the same. If that is not the case in your jurisdiction, you can select another tax class.
Suppose you have multiple tax rates in the order, then you can see that the shipping tax is applied as :
- If you are having a product with a Standard Tax rate, then it will be used the same and charged the standard rate – regardless of being low or high.
- And if you don’t have any products with a Standard Tax rate, then the highest rate defined in the Additional tax class will be used for calculating the shipping tax.
Hence if you don’t have the Standard Tax rate, then the highest defined in the Additional tax class will be used for calculating shipping tax. For example, if you have Standard rate settings as empty and you have three different additional tax classes – Tax-A, Tax -B, and Tax- C.

Note – You can just type into the Additional Tax class and then the tax class appears as different tabs in the TAX section.
![]()
Enter the rates for each tax class, and save them:
For tax class A 24%.

Tax class B, 14%.

And for Tax class C, it is 10%.

Once done, you get all these tax classes enabled and ready to be used.
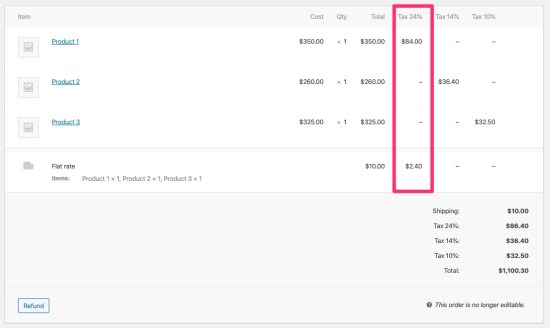
Here you can see that the highest prices are applied to the shipping and they are in the order.
Tax Rounding
Here, when you enable the option, the tax will be rounded at the subtotal level instead of rounding per line.

Additional Tax Classes
WooCommerce lets you add additional tax classes based on your requirement. Other than the standard rate, there are reduced rates and zero rates set up, we can create and add more additional customized options in the tax. All you need to do is enter one each per line.
The taxes added will appear as :
![]()
You can individually set the taxes for each additional class to suit the need.
You can enter the data as asked in the rows and add as many as needed. The following are the fields to be entered :
Country code
You need to specify a 2-digit country code. The code can be found in the ISO 3166-1 alpha-2 code for all the officially assigned countries. If you don’t want to specify a single country, you can leave it blank.
State code
Like the country code, you need to enter a two-digit abbreviation code for states example: AL, wherever it is applicable. You can leave it blank if you do not want to enter and apply to all states.
Postcode / Zip
Here we enter the zip/postcode for the tax region. You can enter multiple zip codes for a single region. When you are entering multiple zip codes, you can separate each with a semicolon. The field also allows wildcards and numeric ranges for postcodes.
For example, if you want to add all zip codes starting with 80, then you can add ‘80*’ to apply the tax rates to all. Similarly, you can provide a range like 80001…80009 to apply the tax rate to all zip codes that come within the specified range.
City
Here, you need to specify the city or the cities where the particular tax rate is applicable. If you want to add multiple cities, then you can add by using the semicolon as a separator. If you want to choose all regions then you can leave the field blank to apply the rate to all the cities under the country or the state.
Rate %
Here is where you specify the rate of applicable tax with 4 decimal places. For example, to set a tax rate of 30%, you have to enter 30.0000 or for a rate of 15.5%, enter 15.5000.
Name
You can enter a name for the tax rate. For example, Tax A, Tax B, VAT, etc. depending on your requirement to distinguish.
Priority
You can choose a priority for the tax rates provided here. Remember you can specify only one matching rate per priority. You need to set different priorities for the taxes in the same region.
Compound Taxes
To apply the taxes mentioned on top of all the other taxes, you can tick this checkbox. For example, if you have an additional tax on a certain jurisdiction along with the other regular sales tax. In this case, the compound option will apply taxes on top of all the other prior taxes.
Shipping
If you want this tax rate to apply to the shipping charges on your WooCommerce store, then you need to tick this checkbox. Upon checking this, the tax rate will be applied to the product price and the shipping charges on your store. When unchecked, the tax rate will be calculated based on the product price alone in your store.
Display Prices in Shop
In this option, we choose whether to display the prices in the shop by excluding or including tax. This helps to determine, whether to display prices in the shop with or without tax.

Display Prices During Cart and Checkout
In this, you can choose whether to display the prices including or excluding taxes in the cart and checkout pages. Once the address is filled the tax is populated. This feature works independently of the catalog prices.

Price Display Suffix
You can enter a text, that will say “prices include -” you can specify the tax percentage for informing the customers.

You can use two placeholders if you want to have text before or after the price. They are :
{price_including_tax}{price_excluding_tax}
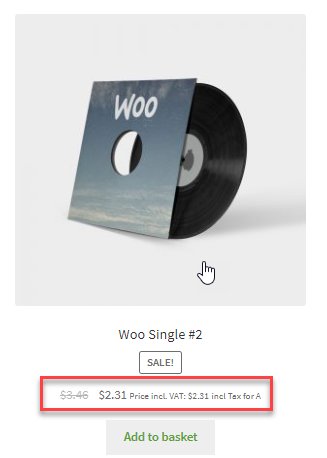
Like for example if you type in: “Price incl. VAT: {price_including_tax}” will display as:

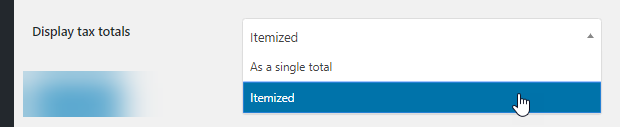
Display Tax Totals
This setting decides whether you want to display tax as a single total one or in an itemized way.
How to Import and Export WooCommerce Tax Rates?
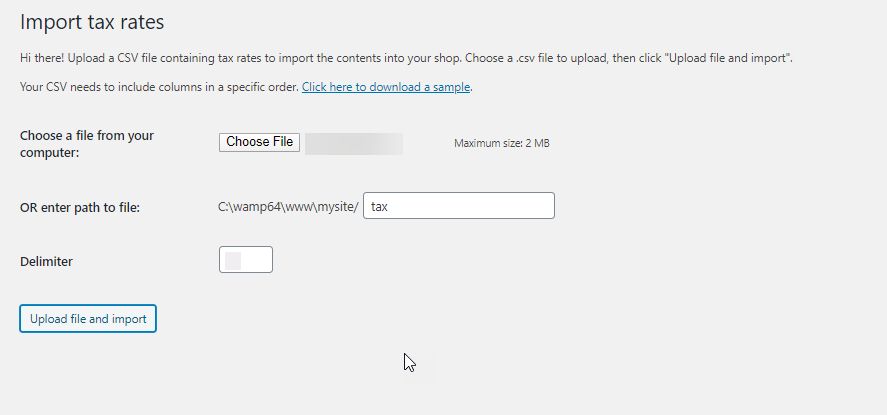
WooCommerce lets you import and export CSV files to and from your store.

If you are importing tax CSV files you require the following fields.
- country code
- state code
- postcodes
- cities
- rate
- tax name
- priority
- compound
- shipping
- tax class
These ten columns are a prerequisite. You can take a look at a sample WooCommerce tax CSV file and compare the fields. Leave the tax class empty, if you want to apply standard rates.
The imported rates appear in the Standard Rates :
Delete WooCommerce Tax Rates
When you have some errors in the tax rates and you don’t want to include those error-values in taxes, then you want to delete the same. Let us take a look at how you can do the same when you have one or more tax ranges defined for your store.
Follow these steps to delete the tax rates
- Firstly go to- WooCommerce > Settings > Tax > Your Tax Rates – Standard, Reduced Rate, Zero Rate depending on which one to be deleted.
- Then select the incorrect ones by clicking on them. They are highlighted in yellow.

- You can then click on Remove Selected Rows. This will delete the highlighted row.
- Then save the changes.
How to view WooCommerce Tax Reports?
You can quickly find the tax reports on your WooCommerce store from – > WooCommerce > Reports > Taxes > Taxes by Date > Year .
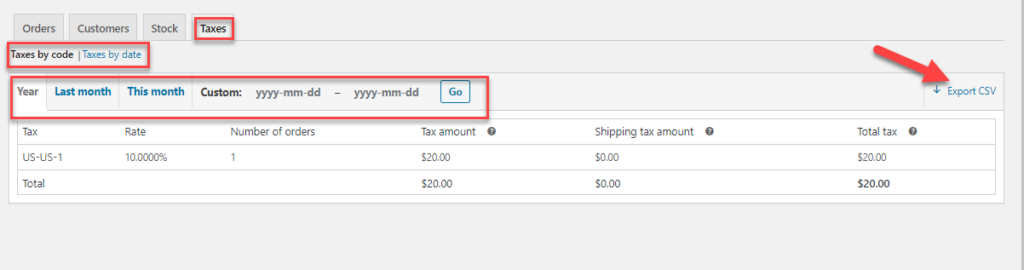
Here, you can see tax reports based on the code or the dated. The tax rates reports are easily listed using the filters like year, last month, and this month. You can also choose to display tax reports using the selected date range. It is easy to export the tax reports into a CSV file by clicking on Export CSV.
Configure Special WooCommerce Tax Setups
WooCommerce lets you configure special taxes based on certain parameters.
Tax based on Subtotal Amount
Using the below code, you can apply tax based on the order subtotal. Using this code snippet, you can specify which tax rate should apply when the subtotal is less than or equal to $100. You can modify the snippet as per your need.
add_filter( 'woocommerce_product_tax_class', 'big_apple_get_tax_class', 1, 2 );

function big_apple_get_tax_class( $tax_class, $product ) {
if ( WC()->cart->subtotal <= 100 )
$tax_class = 'Zero Rate';

return $tax_class;
Tax based on User Role
You can also specify a tax rate depending on the user role too. Use the below code snippet for the same :
<?php
/**
* Apply a different tax rate based on the user role.
*/
function wc_diff_rate_for_user( $tax_class, $product ) {
if ( is_user_logged_in() && current_user_can( 'customer' ) ) {
$tax_class = 'Zero Rate';
}

return $tax_class;
}
add_filter( 'woocommerce_product_tax_class', 'wc_diff_rate_for_user', 1, 2 );
Using the above code snippet you can apply tax to specific user role ‘customer’.
Configure WooCommerce Tax based on User roles using ELEX WooCommerce Catalog Mode, Wholesale & Role Based Pricing
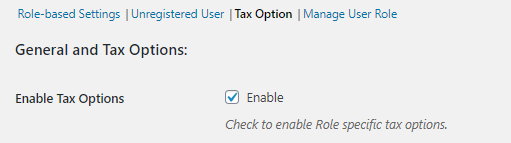
The ELEX WooCommerce Catalog Mode, Wholesale & Role Based Pricing plugin helps you to set up prices, taxes, etc. based on user role. The plugin also has a catalog mode, which helps to hide taxes and prices from the shop page and product pages. In the plugin settings, you can see how you can set tax class and tax type based on user roles, upon which each user will have a specific tax class applied to their products.
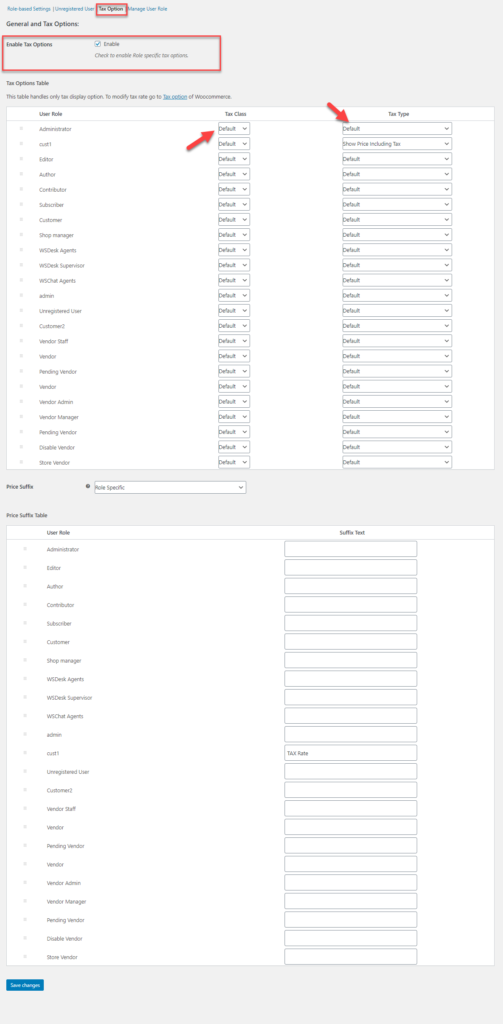
Here using the plugin, you can easily enable tax options for your WooCommerce store.
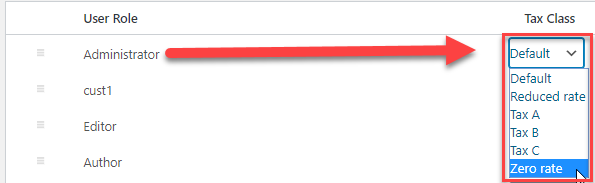
Once the option is enabled, you can also set the tax option for user-roles. Here based on the user roles defined for your WooCommerce store, you can set the Tax Class and Tax Type from your already define tax options in the WooCommerce store.
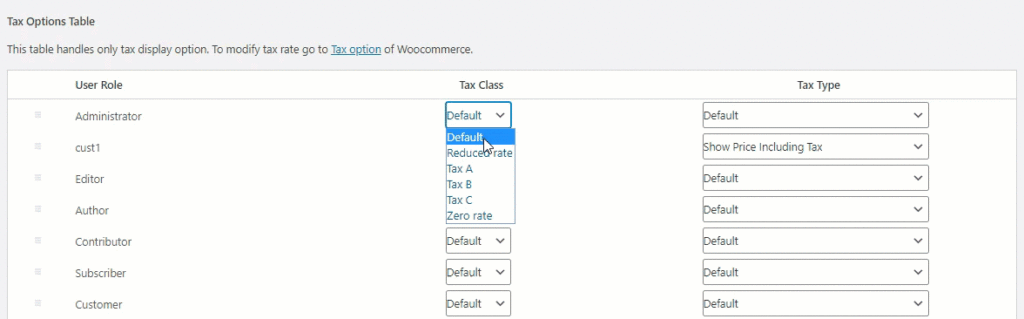
The tax class will have all the tax classes you have defined in the Tax options settings in WooCommerce settings.
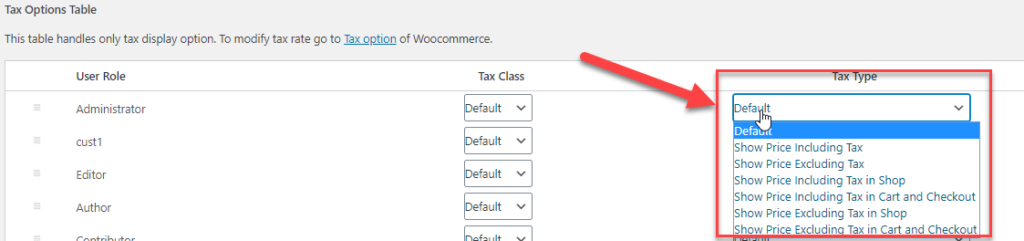
The Tax Type contains the following options to choose from: Default, Show price including Tax, Show price Excluding Tax, Show Price including Tax in Shop, Show Price Including Tax in Cart and Checkout, Show Price Excluding Tax in Shop m Show Price Excluding in Cart and Checkout. You can choose the relevant one depending on the user role. For Example, if you want to show the prices excluding tax on the shop page for a user-role, then you can set Tax type as Show price Excluding Tax in Shop for that particular user-role.
You can also add suffix text for the taxes that are displayed on your shop or cart page. For this, you can choose to show price suffix based on user roles or none or in general for all.

Once you set it as user-role -specific, you can also add specific suffix text to include.
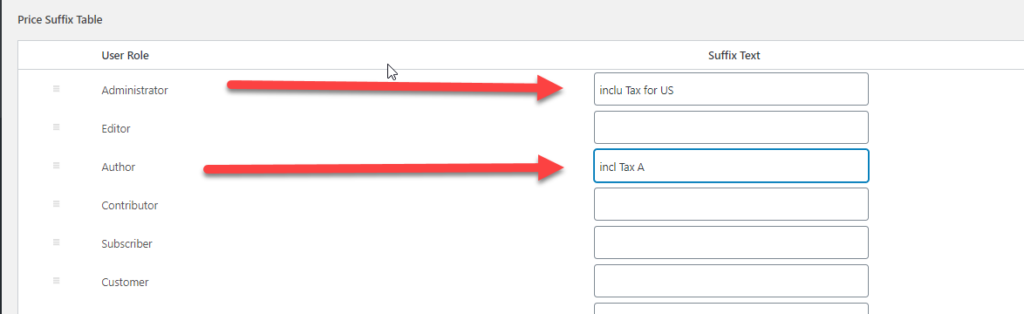 Upon doing this, the tax will have the suffix text you have provided for each user-role.
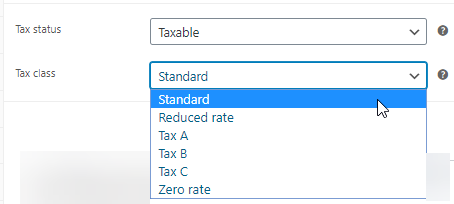
How to set WooCommerce Tax for individual Products?
WooCommerce lets you add Tax status and Tax class for individual products. All you need to do is, go to individual products and in the general settings, you can choose the tax status as Taxable, Shipping only, and none. Also, you can select the Tax class, which shows you the default Tax class set in your WooCommerce store.
How to set WooCommerce Tax options for products in Bulk?
Using the ELEX WooCommerce Advanced Bulk Edit Products, Prices & Attributes plugin, you can also update the tax class and tax status for all products in bulk, if required. In this way, if you want to apply any changes to all your products in your store, you can make use of the plugin, rather than going individually changing the tax settings.
Using the plugin, you can create a rule to edit the tax option and tax status easily for chosen or all products.

You can choose from the tax options settings and select for bulk edit.
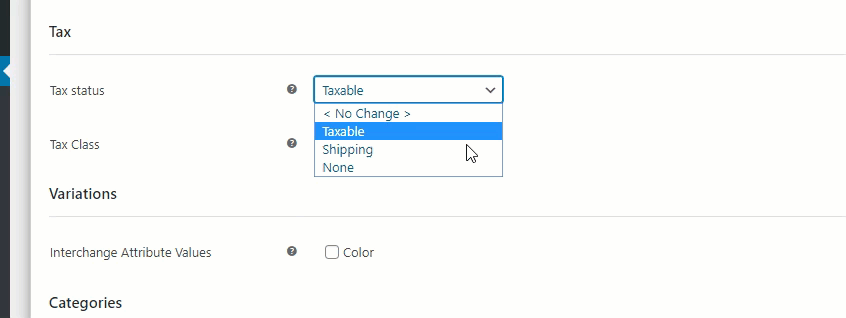
You can set the rule for bulk-edit and then set the change for all your products.
Including WooCommerce Tax in Shipping options
Taxes do play a vital role in shipping. In WooCommerce shipping, you can configure your taxes for your products in-store using certain methods recommended by WooCommerce. In the WooCommerce Tax options, you can set the tax options for shipping specifically.
When you choose the Shipping as ticked, then the taxes are applied while shipping is processed.
Enable WooCommerce tax for Flat-rate and Local Pick up Shipping Options
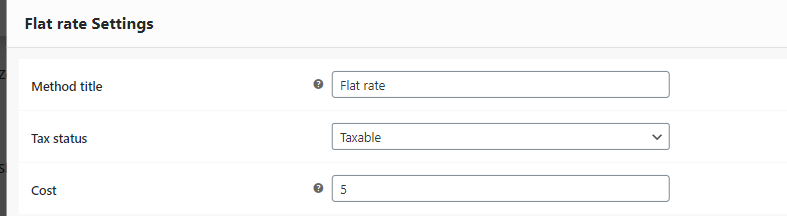
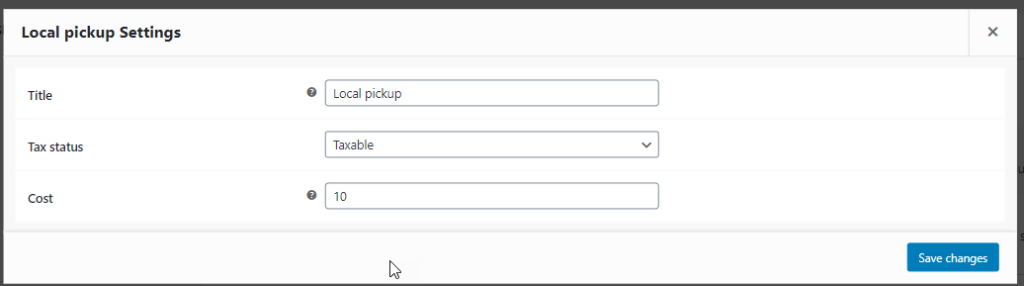
You can enable the tax settings for a normal flat-rate shipping option in WooCommerce.Once you choose a shipping region and set the flat-rate. You get the option to set the flat-rate is taxable or not.
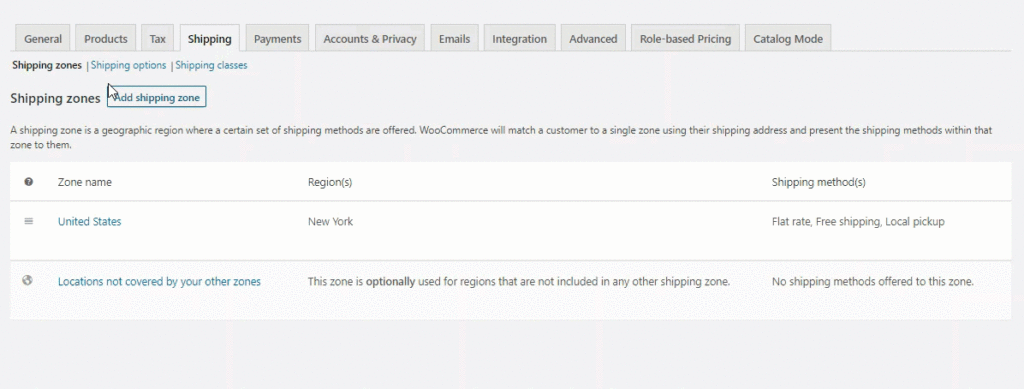
Here you can provide a cost to calculate the tax.
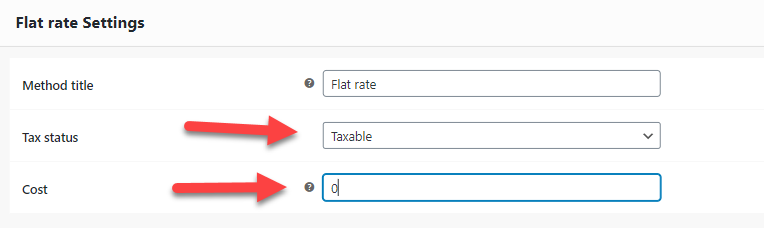
Now when you enable the taxable option for your flat-rate, you can see the tax displayed on your cart page. When you make it Taxable, WooCommerce will add the tax to your shipping.
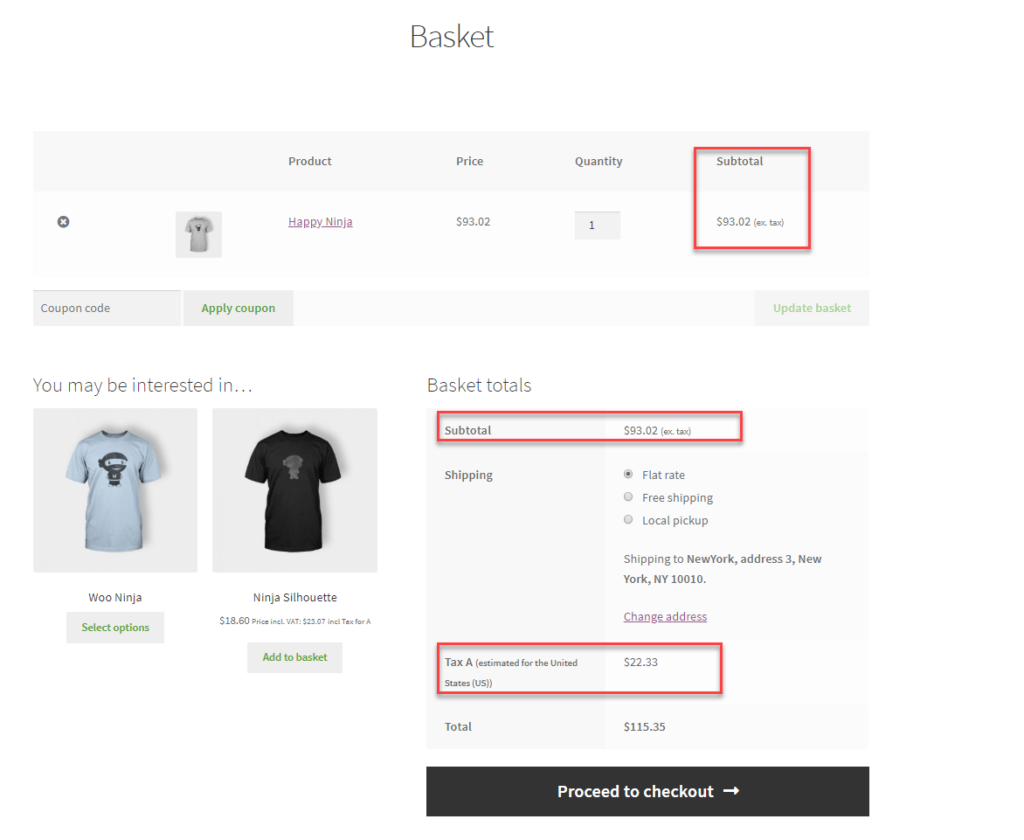
Here the tax option, we set in the Tax settings are included in the cart for shipping.
If you set the local pick and flat rate with a specific cost like this :
Setting local pick up :
After setting this up, when an order is processed with the tax options as set in the Tax settings in WooCommerce.
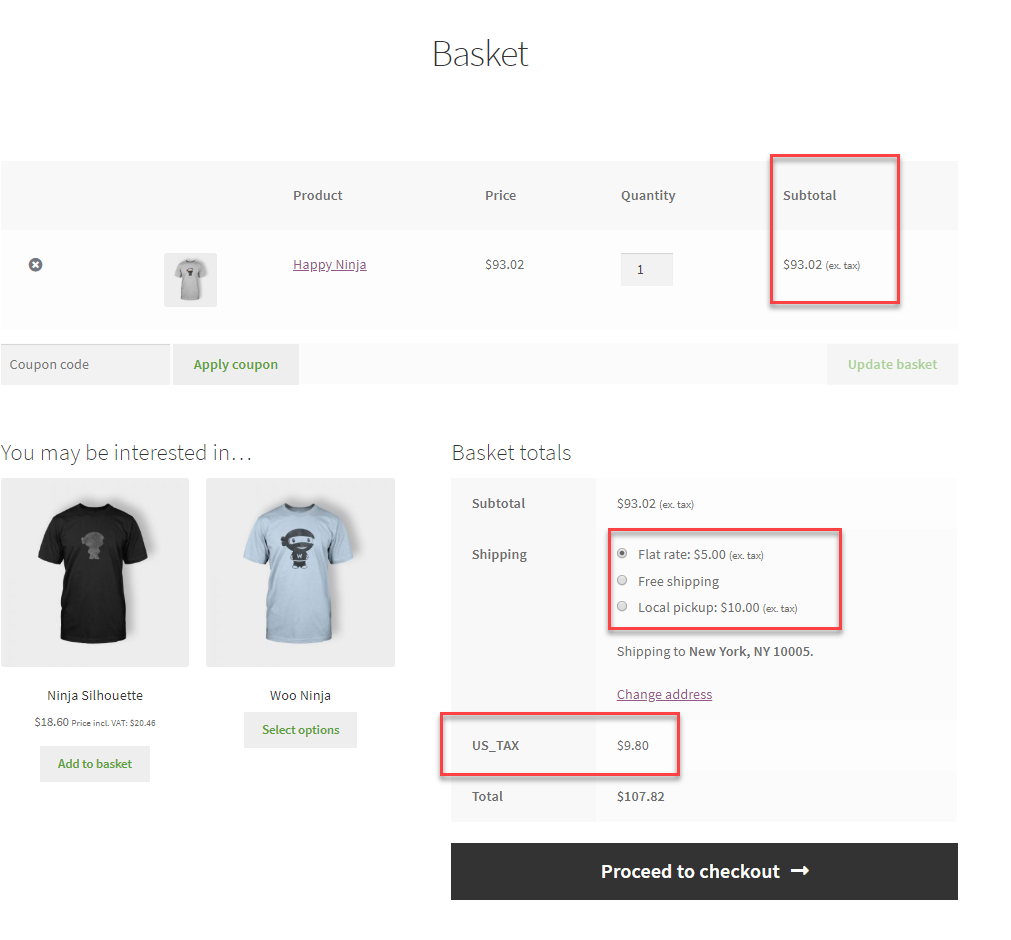
If you set the settings, in Tax options, not to apply taxes, then the prices will display without the tax details.
Setting WooCommerce Taxes Using External Shipping Plugins
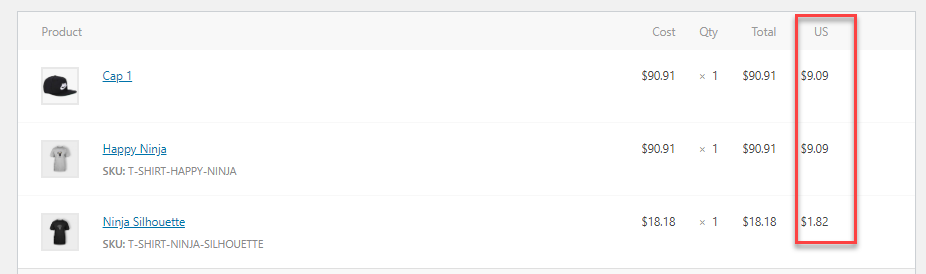
If you want to set up WooCommerce taxes using certain shipping plugins, then WooCommerce let you set the same. For example, let us consider the ELEX WooCommerce DHL Express / eCommerce / Paket Shipping Plugin with Print Label plugin. In the plugin, you can set the cart to display the price break-up list with taxes included in the shipping charges for the package. This will give a better idea to the customers, to know the exact beak down charges.
After installing the plugin, you can enable the option of “show breakdown charges” in the Rates and Services settings in the plugin.
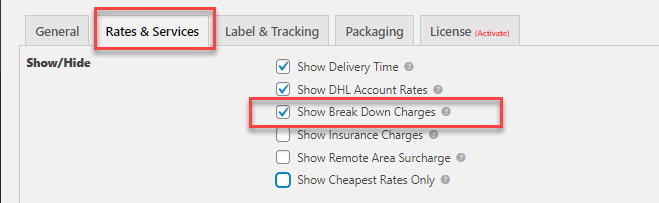
On doing so, you can see that the cart page will have the overall shipping options are displayed with breakdown charges. Also, you can charge an additional tax charge using the basic WooCommerce tax settings.

You can also configure the tax for various other external shipping plugins like :
- ELEX WooCommerce USPS Shipping Plugin with Print Label
- ELEX EasyPost Shipping Method Plugin for WooCommerce
- ELEX Stamps.com Shipping Plugin with USPS Postage for WooCommerce
- ELEX WooCommerce Australia Post Shipping Plugin with Print Label & Tracking
How to determine the actual Tax Rules for Setting up WooCommerce Tax?
Even though the above settings help to configure the WooCommerce tax settings, it is important to know how we come up with Tax rules for every WooCommerce store. Ideally, it is one of the major responsibilities as a store owner to set up the tax and other duties to be levied on the products. Since online shopping happens anywhere, it is essential to configure your store tax settings based on the various locations you deal with. To do it efficiently, you need to know the right charges. As a store owner, you need to be very vigilant in living charges on Tax for your products and shipping. It is important to have a better understanding of the same. Every country has unique Tax options, and as a store owner, you must be well aware of the same.
Let us take a look at a few countries regarding Tax rules :
United States
The US is undergoing a vast change, concerning digital products and online businesses. Though some states even design their threshold limits other than the basic threshold of annual sales exceeding $100,000 or with more than 200 separate transactions.
India
In India, most of the products are subjected to 18% GST. There are no special threshold for transactions when you come to selling in India,
There are so many countries that have introduced the digital tax this year, like Indonesia, Cameroon, Singapore, Malaysia, etc.
The unexpected problems arise at issuing Taxes
The major problem that arises when applying taxes is unexpected price fluctuations. If you provide unexpected charges at the end in the cart and checkout page, then there are chances of cart abandonment. To avoid this, you can ensure you post the price with the suffix that the prices are inclusive of taxes. In this way, you will not bombard your prices to the customers and they feel better while checkout.
Final Thoughts
As a store owner, it is important to understand all about the WooCommerce tax settings and even the tax rules that are followed across locations when you are into expanding your business.

