Shopping is really interesting and exciting for all age groups. Your products need to reach potential customers who are searching for it. Since there are many competitors, listing the products simply on your WooCommerce store will not captivate more customers to your store. There are some marketing techniques you have to do, at the same time, it should be visible and should catch the eyes of customers as soon as they search for it. The solution is, WooCommerce Google shopping!
List your WooCommerce Products on Google Shopping
Yes, Google is the first place where we search each and every product, even our doubts on nitty-gritty things! So the best place to showcase your product is on Google itself! When we search for some products, they will be shown on the first search result page on the top of the page with a title, link, and price. When you click on it, it will redirect to its product page of the WooCommerce store which sells the product.
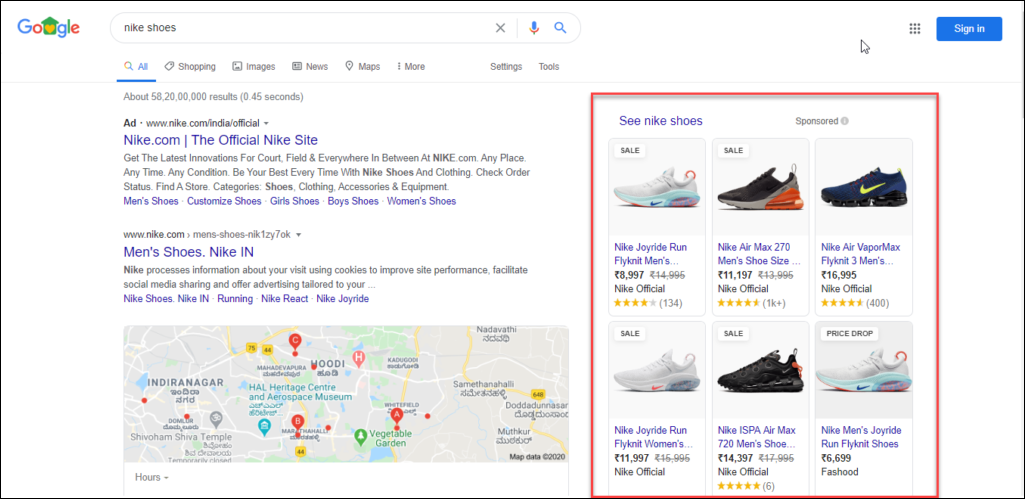
Or you can click on the ‘Shopping’ page itself to get the whole available product from different sellers on a page. There itself also you can click on the product, go to the online store, and buy the product. If you list your products on Google shopping, customers will easily reach you in a couple of clicks on Google.

Customers Prefer Google Shopping More than Surfing on Individual Stores?
Yes, because surfing the products on one site and checking the price, and going to another store and checking the product price and so on is a long process. Sometimes again checking it on another store for a different color?! It will make us tired. Finally, we end up ordering nothing! Hence, from the customers’ view, the best place is Google Shopping, where they can find the products listed by many WooCommerce stores, the price is visible, and the colors, etc. So the comparison is quite easy. Well, it makes shopping easy and interesting!
They can also filter the products by price, brand, style, department, condition, even your favorite seller, etc. So it will be so easy to pick the right product that satisfies all their requirements and is reasonable as well.
There are so many benefits you will get from this ‘Google Shopping listing’ of your products.
Benefits of Listing your Products on Google Shopping
As I have mentioned about the benefits customers get from purchasing from Google Shopping, shoppers are always there on Google Shopping. So it is the right place you can sell your products. Let us check the benefits from the view of a seller.
- The first thing we need to understand is, these are ads. That is, your products are getting advertised on this platform. If you offer the products at attractive prices, it will grab the attention of customers. So it is one of the best places to invest in your marketing.
- Unlike on your WooCommerce site, your products will be listed along with your competitors. Hence it is a neck to neck competition. The point is, if you attractively present your products with the best visual impact, customers will automatically grab your products over similar products from competitors.
- Sometimes, the shopper may be coming to the Google Shopping page after a long research, hence they can buy the already determined products in just one click. So the conversion rate will be higher.
- Ads always attract customers. There is no difference whether you are just ramped upon your business or you are an established seller. All sellers sell their products in the same way. So it is the best place to get more reach and popularity to your brand even if you are running a small scale business or it is a startup.
How does Google Shopping Display your Products to the Customers?
It works purely based on the product information you feed to Google. You can even create the feed with product information manually and submit to Google Merchant Center to host it. Google will fetch the information and display it on its SERP (Search Engine Result Page) and Shopping page. These details are displayed as ads with the help of Google Ads.
If your store contains a lot of products and it is inconvenient for you to create the feed by manually entering each and every property of the products, you can seek the help of a Google Shopping feed generating plugin. After generating the feed with a plugin, you can upload it to the Google Merchant Center. Then you can link with your Google Ads account and create shopping campaigns and Ad groups to reach the products to the customers. And finally, with the help of the Google Analytics account, you can analyze its reach and track the audience or valid leads to your WooCommerce business.
It is basically a step by step process. So let us begin from the set up of the Google Merchant account.
Step 1: Set up Google Merchant Center Account
Google Merchant Center connects the zillions of potential buyers to potential merchants. It provides a platform for online shoppers to discover, compare, and buy products from any merchants available to sell the required products they are searching for.
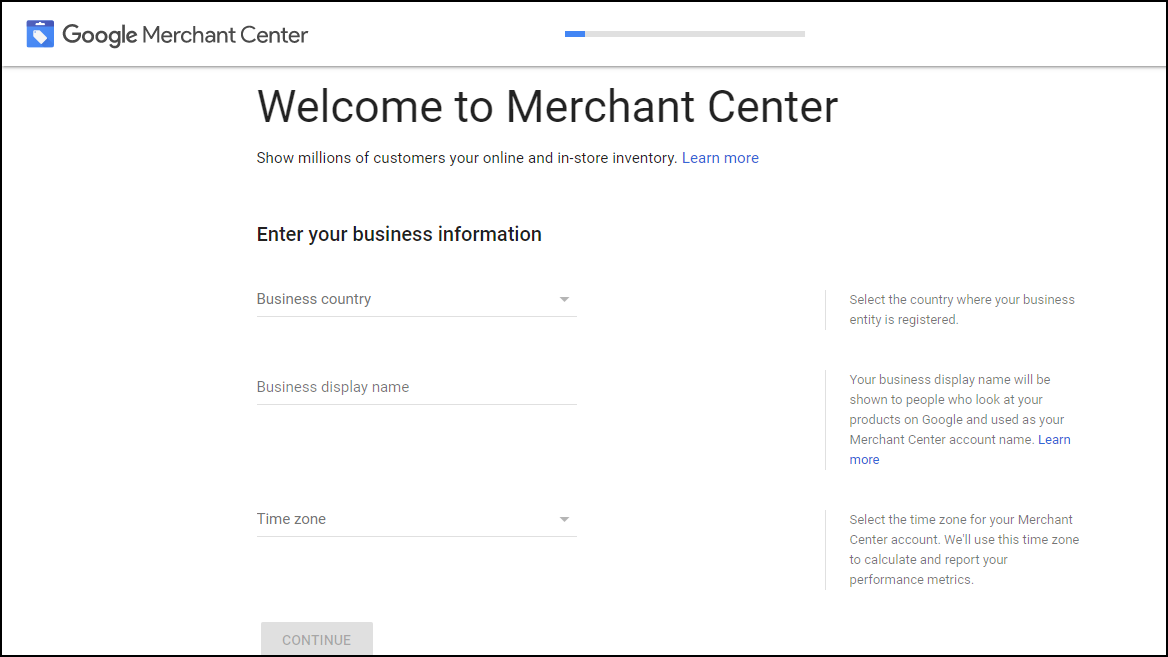
For creating a Google Merchant Center, you should have a Gmail or Google account. You all might have an account, even if you do not have one create an account in Google.
After creating an account, you can log in to the Google Merchant Center.
You can click on the Sign-in, and you will see the options to propel your WooCommerce products to Google Shopping.

After you log in to the Merchant Center account you can enter the required business details to get started such as:
- Business Country: Enter the region you want to target the potential customers for buying your products.
- Business display name: Enter the brand or your business name or your store name here.
- Time zone: Provide time zone for reporting and calculating your WooCommerce store’s performance.
Then read the terms and conditions and accept the conditions by enabling the checkbox.

The next step is optional. You can enable the checkboxes or skip them accordingly. That is, you may go for ‘Surfaces across Google’, where your products will display on the search results. Or you can choose ‘Shopping ads’, for creating paid advertisements to get reach to the customers.
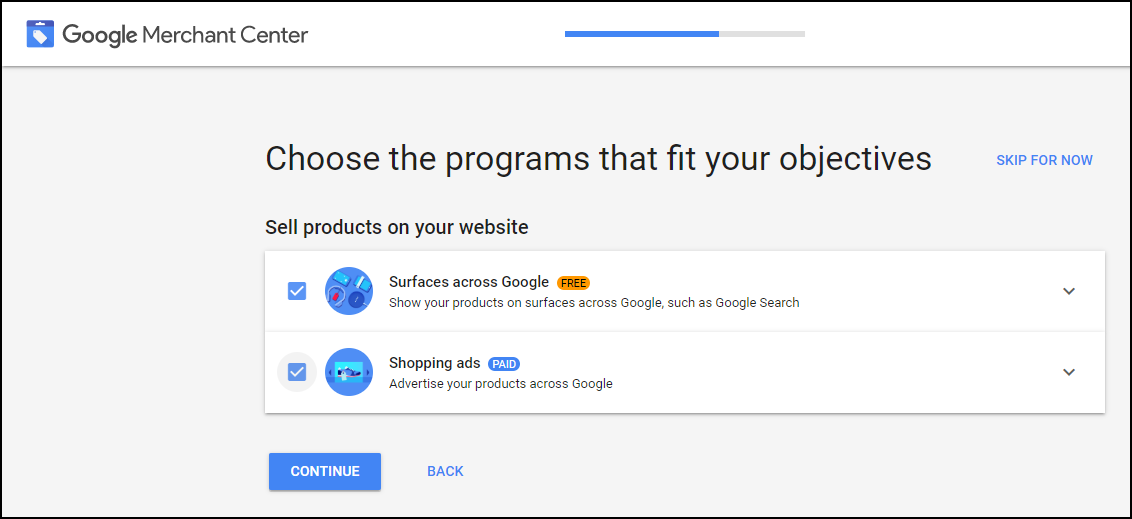
You can review the account details you have entered. Then you will get the account created.
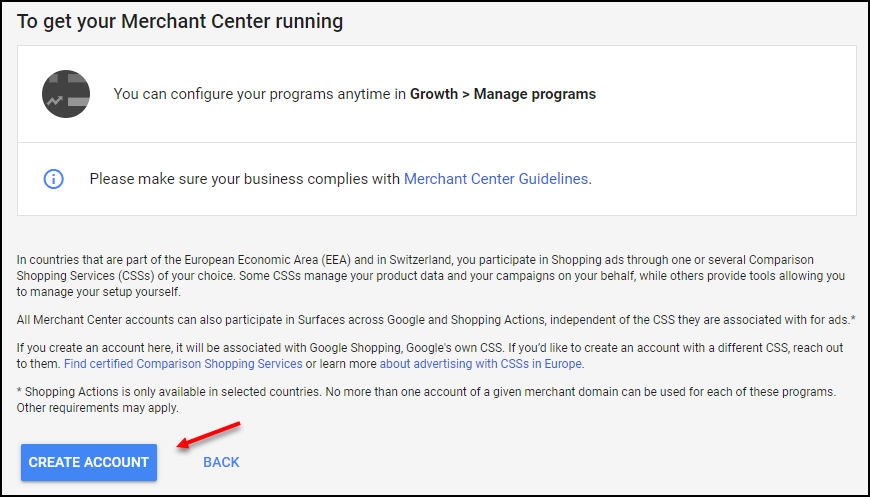
Click on Create Account and the Google Merchant Center account is created.
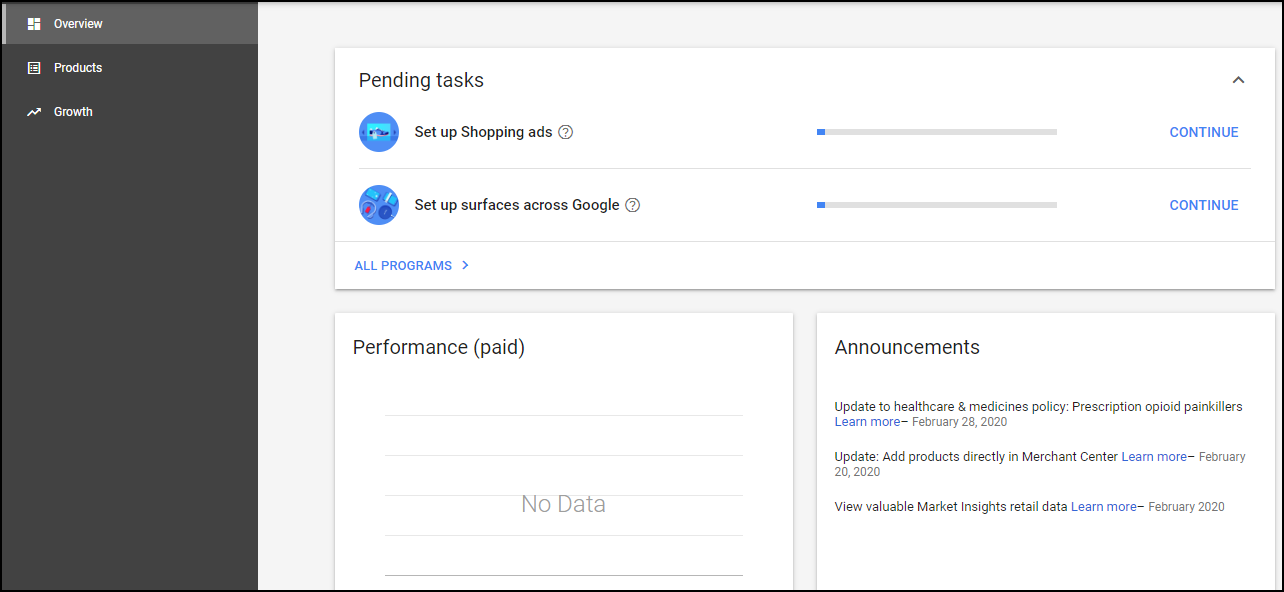
Well, that is all with the account creation. Google Merchant Center account is ready! So what is the next step?
Step 2: Create Google Product Feed
This is a vital part of Google Shopping ads as all the details you enter in the feed will be fetched by Google and displayed as ads to the customers. Google Merchant Center accepts the feed you are entering and it supplements that to Google with all the information regarding your products for displaying the ads.
Google Merchant Center provides a number of options to create the product feeds. There are primary feeds and supplemental feeds.
If it is primary feed, it should meet all the product data specifications and policies by Google Merchant Center. The primary feed can be used to set the data, product image, language, target country, etc. The supplement feed can be used for additional details and also connect to the primary feed data. In addition to that, a supplement feed can be used as supplementary information for multiple primary feeds.
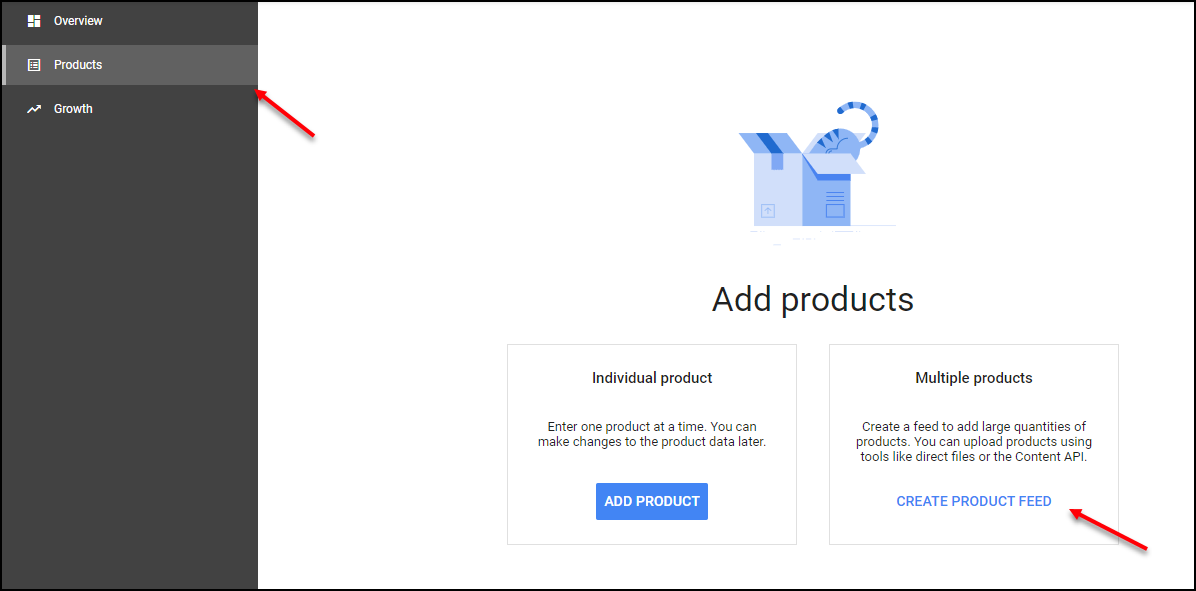
For creating the primary feed, go to Products > Feeds.
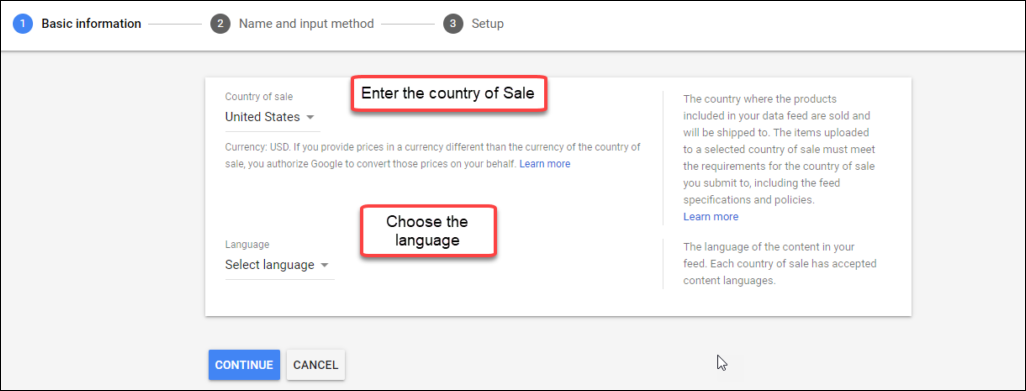
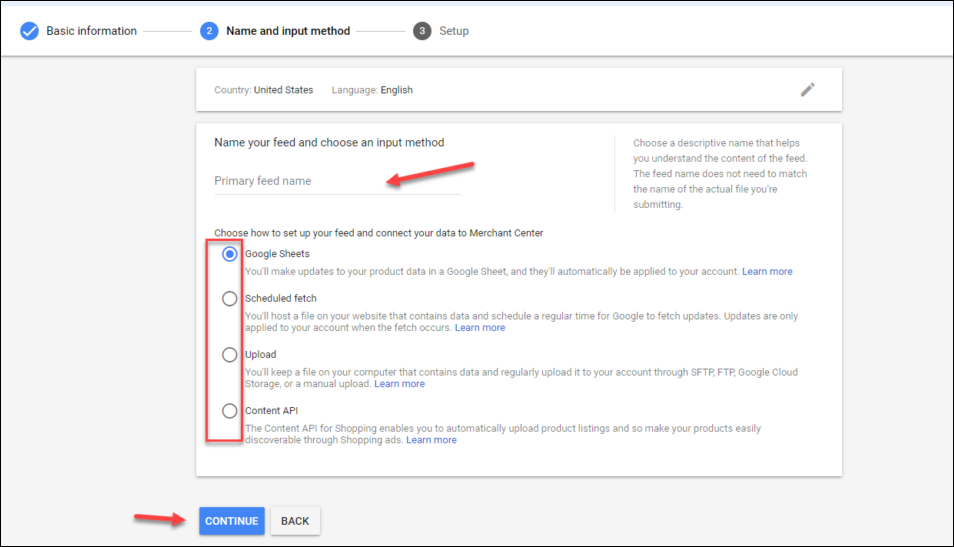
Click on Create product feed. You can enter the country of sale and the language on the tab. And also choose the destination for displaying the WooCommerce products to be displayed with the product feed information.
Next, choose how you are going to enter the feeds to Google Merchant Center accordingly. You need to enter the primary feed name for identifying the feed name uniquely and the method for uploading the feed to Merchant Center. The 4 options available are:
Google Sheet: With this option, you can add a new sheet or select an existing Google sheet provided by Google Merchant Center. The Google Merchant Account will automatically update the changes accordingly when you make changes in the sheet.
Schedule Fetch: This option will provide a URL of your product feed and the data taken from your WooCommerce store, according to the time you have specified.
Upload: You can upload the product information in a file of XML, TXT or other supported file format, which you have usually stored on your system. And also it will timely upload from your system using FTP, Google Cloud, etc.
Content API: The Content API for Shopping will help you to upload the product listings automatically and will also help your products to be easily discoverable for the customers through Google Shopping and Google Adwords.
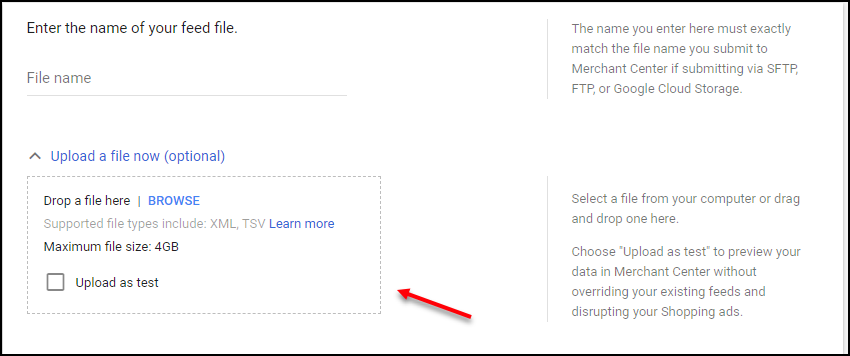
If you have chosen the Schedule Fetch option, you need to enter the following details such as file name, fetch frequency, time zone, and file URL. Then you have to make sure that the data on your website and the feed is being updated according to the regular refresh schedule. The file URL and the time zone is for the proper execution of the ads.
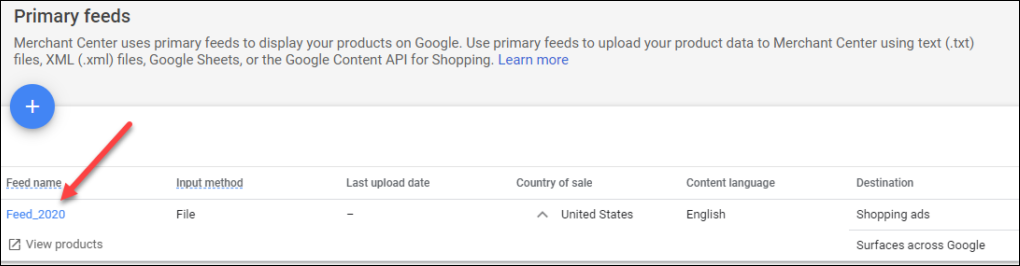
After clicking on the Create Feed, the feed will be listed in the primary feeds. Check the screenshot:
How to Create a Google Product Feed Manually?
If you have chosen Google Sheets, there are two ways to create a product feed such as you can either generate a new template from Google or upload a product feed you have created on a spreadsheet. Check the screenshot:
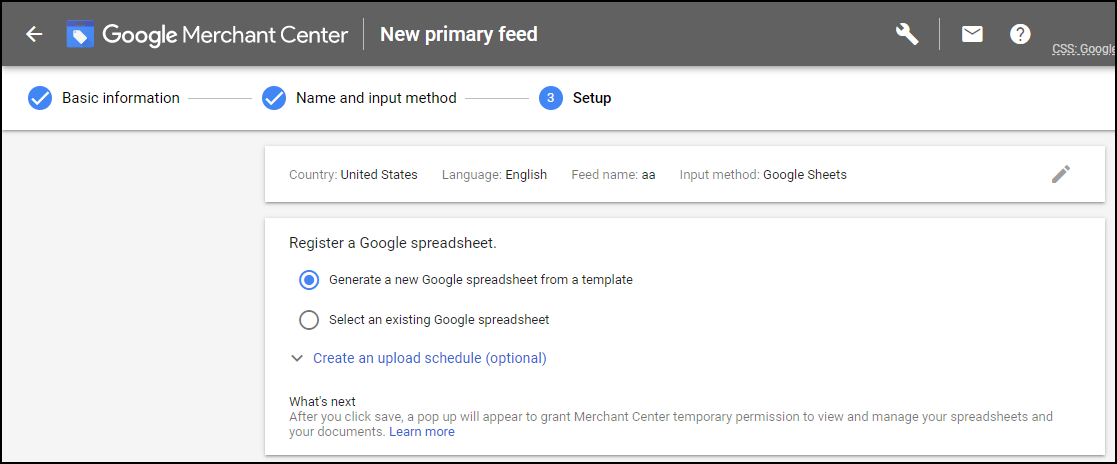
You can create a new product feed if your store wants to list a few products on Google Shopping. Hence, if you choose ‘Generate a new Google spreadsheet from a template‘, you can see the feed name you have already created. Click on the “Open” link under the label ‘Google Sheets’. Click on it and enter the required details of your products.

There you can see the feed name you have already created and an “Open” link under the Google Sheets. You can open it and add the product feed details there.

- id: Unique ID of your product or SKU of the product.
- title: Enter a product title with the specification that would match the query of the customers. Eg: “Nike Black Running Track Shoe for Women”.
- description: Provide a precise description of the product. Eg: “A pair of running black track shoes with upper comfy footbed…”.
- link: Enter the landing page URL on to which the customer should land while clicking on the “Visit site” link. Eg: https://www.amazon.com/
- condition: This option is only used when you sell reused or refurbished products. Eg: used, refurbished.
- price: Enter the product price at which you would like to sell it. Eg: $100
- availability: You can set the availability of your products to inform the customers whether your product is available or not. Eg: “In stock” or “Out of stock”
- image link: Enter the URL of the product image.
- gtin: Enter the global trade item number of products.
- mpn: Enter the manufacturer part number of the products.
- brand: Give the products’ brand name. Eg: “Nike”
- google product category: Enter the corresponding Google-defined product category of your product for mapping the products.
After entering the product details accurately, you can simply upload them to the Google Merchant Center. Check the screenshot:
How to create Google Product Feed with a Plugin?
It will be a tedious task to enter all the products and their details into a spreadsheet if there are 100+ products to be listed on Google Shopping. For making that task easy, without taking a long time, you can integrate a handy plugin to your WooCommerce store that will generate Google product feeds from your WooCommerce store in 2-3 clicks!
There are so many product feed generating plugins available with potential features like creating custom attributes, scheduling, and supporting multiple languages for product categories according to the location you are planning to target the audience, etc.
In this article, let us check how we can set up WooCommerce Google shopping with a top-notch plugin in the market – ELEX WooCommerce Google Shopping Plugin (Google Product Feed). Have a look at the steps to generate the feeds with this feature-rich plugin.
This plugin is basically a freemium plugin, thus you can choose its free or premium version. But if your store deals with a lot of variable products, and you require some advanced features, you can go for its premium version.
Create Product Feed Using ELEX WooCommerce Google Shopping Plugin
Install and activate the plugin in your WooCommerce dashboard. And then activate the plugin.
After the activation, go to “Create Feed”.
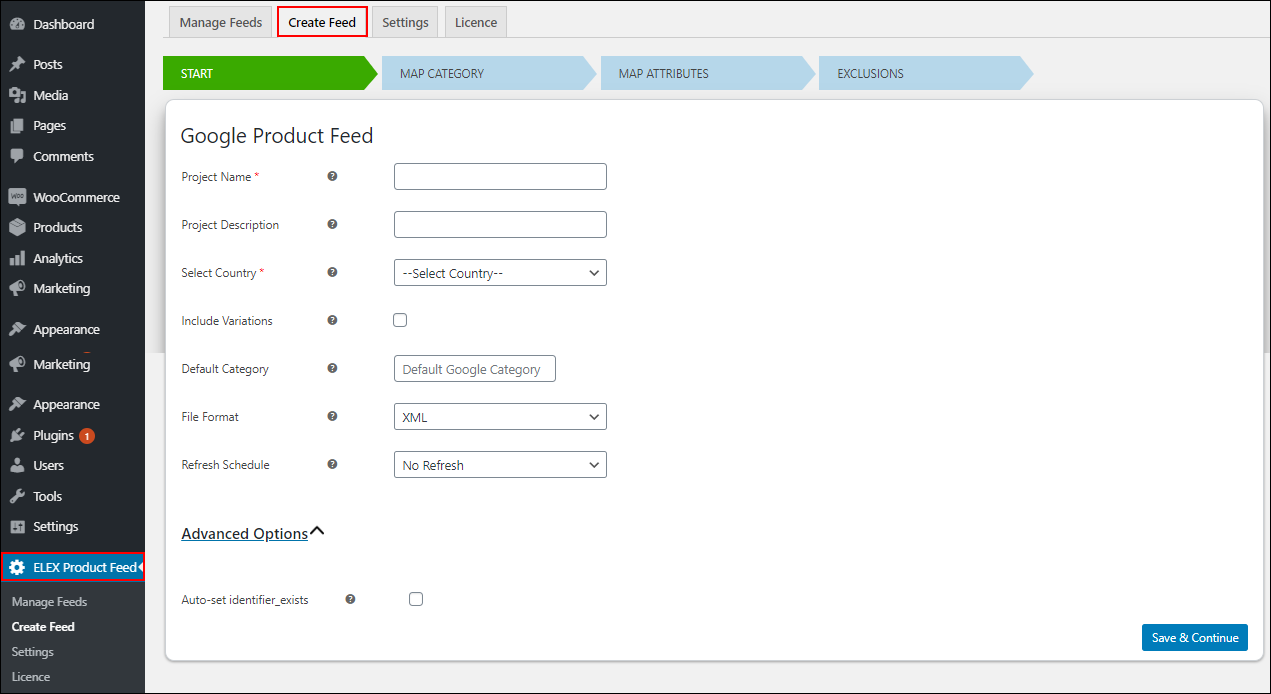
Add the following details:
- A unique project name for identifying the project specifically.
- The project description for your feed for defining the product feed. It is optional, you can leave it as blank. If you do not give a project description, the project name will be taken as the description.
- Choose a country for targeting potential customers in that location.
- Enable the “Include Variations” option, if you want to make ads of the variable products in your WooCommerce store.
- You can set the default Google category if needed because it can be modified later when you map the product category if required.
- Choose a feed file format such as XML/ CSV/ TSV.
- You can choose the refresh schedule if needed. And set the refresh schedule in a frequency such as daily, weekly, or monthly. If you choose Daily you can set a time for scheduling the refresh. If it is Weekly, you can set a specified time and on a specific day of the week for scheduling the refresh. And for Monthly, set a specified time and date for scheduling the refresh monthly.
- There are some advanced options you can set accordingly. If you have ticked the ‘Auto-set identifier exists’, it will let the product feeds work without any unique product identifiers like GTIN, MPN, and Brand, that needs to be uploaded to the Google Merchant Center.
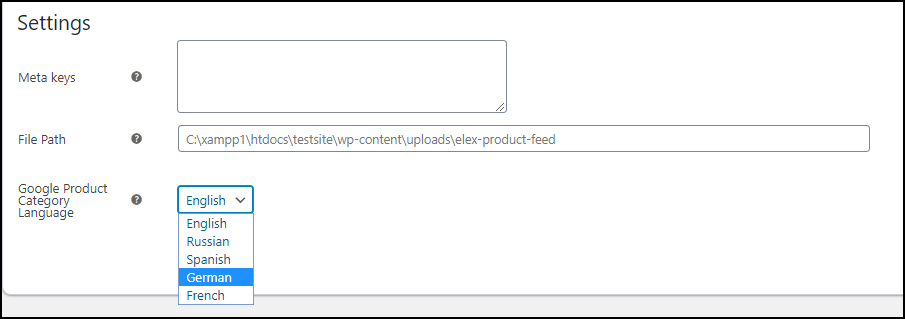
You have some additional options that can be set with this plugin. If you need to add any custom product attributes from your side and map to the default Google Product attribute, you can enter them as meta keys on the Settings tab. The custom keys will be shown in the product attribute mapping page, and you can map with the default Google attributes to it accordingly.
And provide the file path to store the product feeds you are going to generate with the plugin. In addition to that, it supports multilingual support based on the country you have chosen.
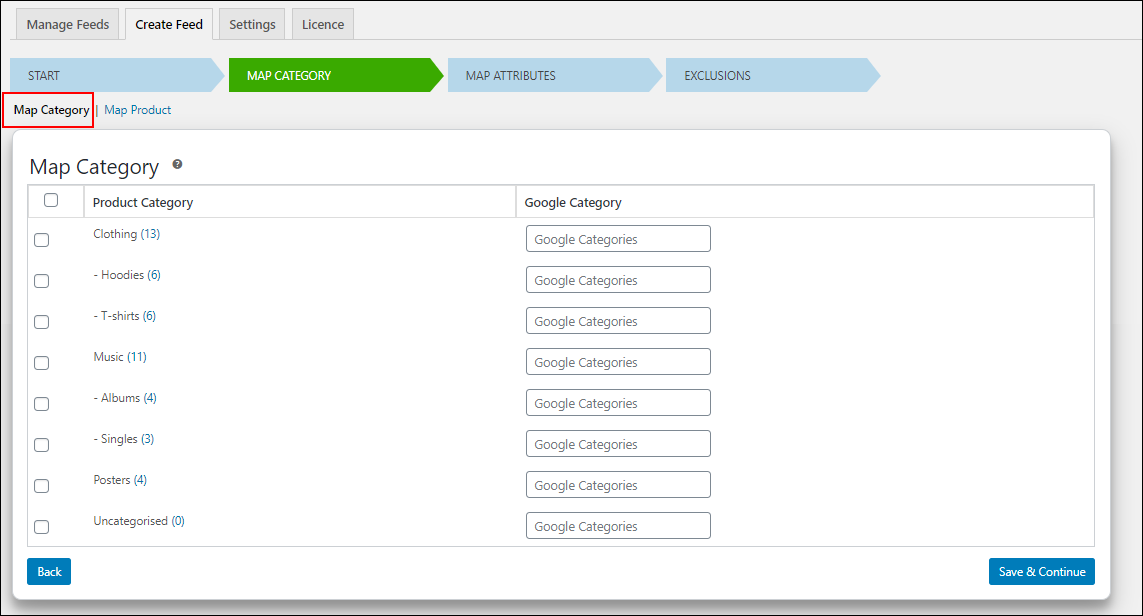
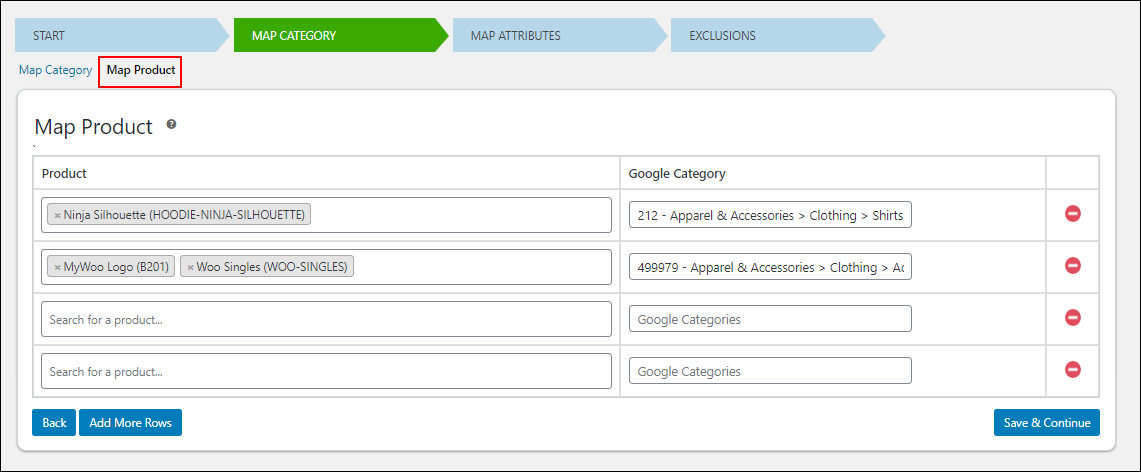
The next step is to map your product categories with Google’s product categories and map individual products with Google Categories.
This is the step to mention to Google, what your product category is about by mapping into the default categories listed by Google. Those categories by Google can be found on Google Taxonomy. If you have chosen default categories in the last step, all your categories will be mapped to the default categories. You can change them accordingly if needed. While you enter the Google product category for mapping with your product categories, automatically the products will be selected if you did not choose any default category.
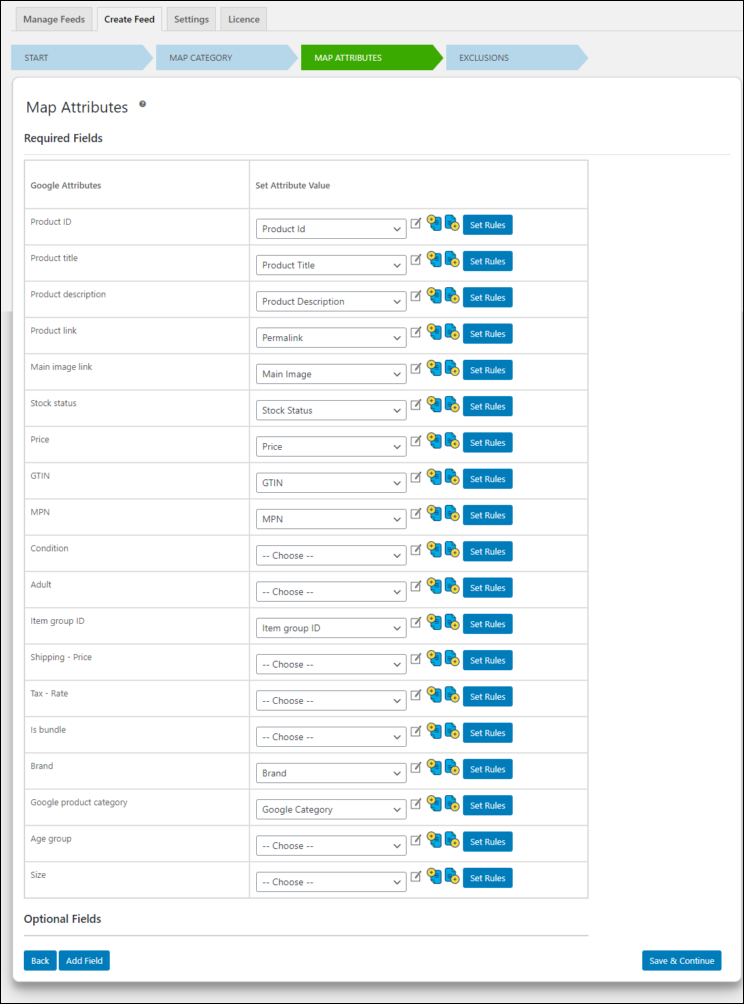
Next, you can choose the attributes to be mapped to the Google attributes by appending and prepending other attributes along with a specific attribute. Also, you can set conditions to map a particular product for mapping the attributes if only the condition satisfies.
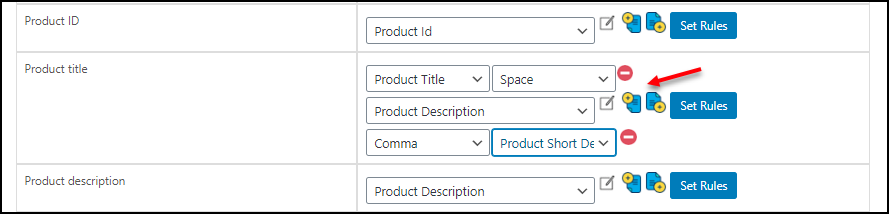
Appending and Prepending
Check the below example. It prepends the Product Title by space with the Product Description and appends the Product Short Description by a comma.
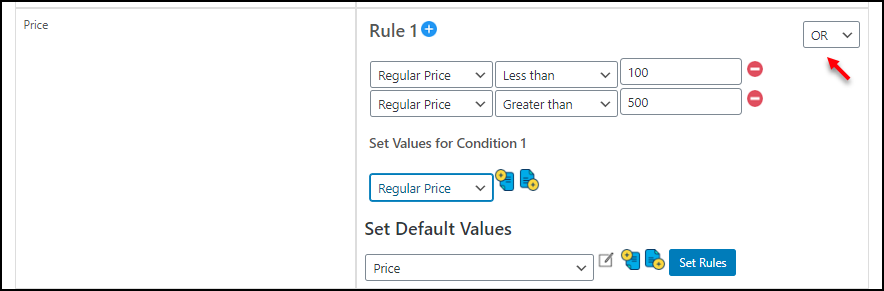
Setting Conditions
You can use the “Set Rules” option for setting conditions to map a product attribute with AND and OR operations. In the below screenshot, you can see the condition: if the regular price of a product is less than 100 or greater than 500, it should map to the Regular Price of the products. If both conditions are not satisfying, it should map to the Price of the product by default.
Check the screenshot:
 Click on “Save and Continue”.
Exclude products
You can exclude products from including it on the product feed if required. You can simply start typing the product name to be excluded, after tying 2-3 letters, it will come on the drop-down list. From where you can select them accordingly. Check the screenshot:

Click on the “Generate Feed”.
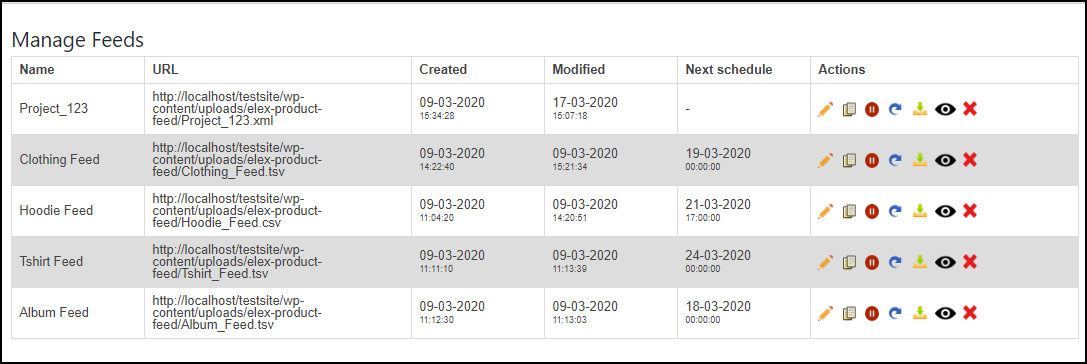
Then you can go to the “Manage Feeds” tab and download the feed you have created. This feed is used to upload to the Google Merchant Center.
You have 6 more options available here besides an option to download.
- Edit: If you need any edits on the feed you have created.
- Copy: Create a copy of the product feed.
- Pause Schedule: Pause the schedule from refresh if required.
- Regenerate Feed: Use this option for a quick refresh.
- View Feed: For a quick review, you can use this option.
- Delete: For deleting the feed.
It also displays the date it has created, modified, and its next schedule.
Step 3:Link your Google Merchant Center with Your Google AdWords Account
Uploading the downloaded feed to the Merchant Center account is not enough to get your products to get listed. A proper plan, focus, and target should be there to decide where and when it should be displayed to grab the attention of customers. For that, you have to link your Google Merchant Center to the Google Ads account. Google Ads is the main platform that displays and runs your products in the form of ads. Create an Ads account with the same email ID you have used to create the merchant center account.
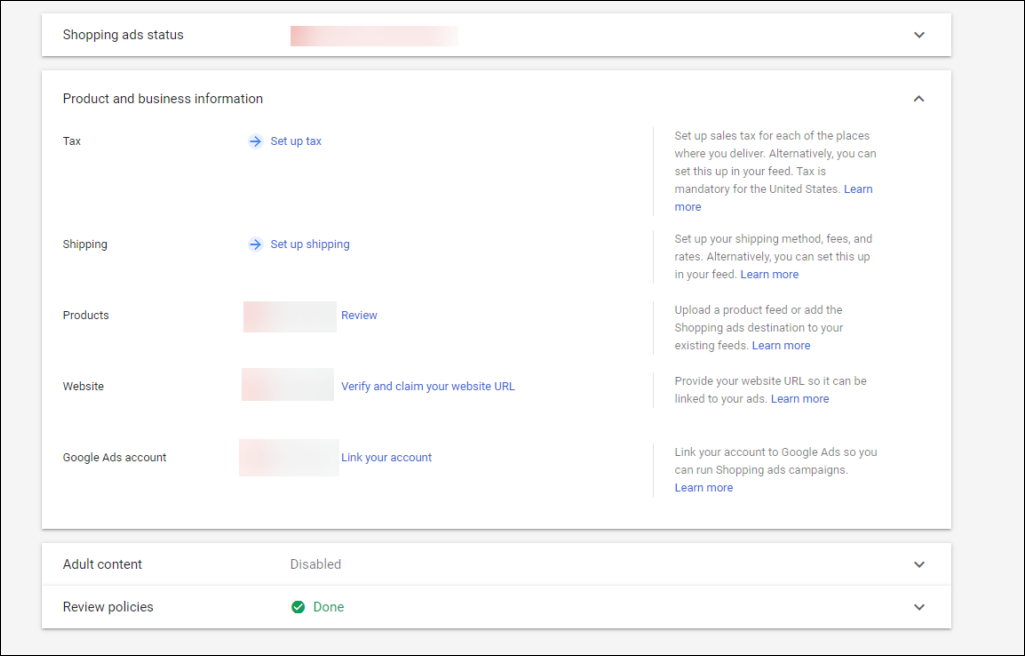
Verify your website URL. Use any of the Google Console platforms such as Google Google Analytics, Google Tag Manager, HTML Tag, HTML file upload for the verification. You will receive a confirmation mail after the verification. For claiming your website you have to give the URL of the merchant site. After that, you can link them to each other.
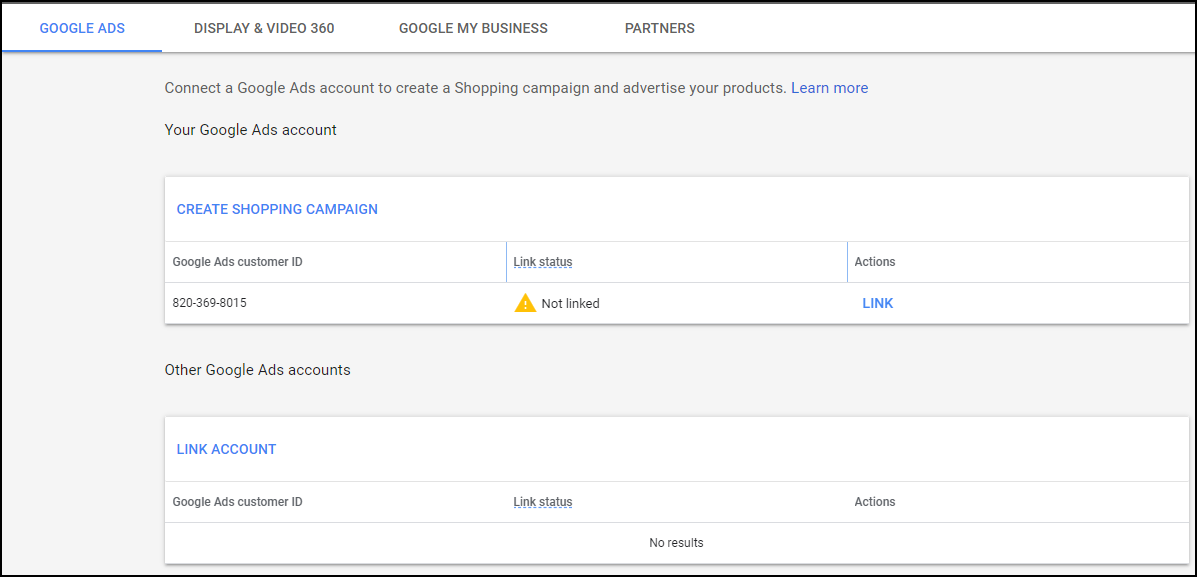
Click on ‘LINK’ and enter Google Ads customer ID which is available on your Google ads account.
Your Google Ads account will receive a confirmation to link the accounts. The status will be updated to the Google Merchant Center account.
After linking the accounts, you can create Google shopping campaigns in Google Ads. These ads will drive sales and conversion to your WooCommerce business if you display in the right location.
Create a new campaign on the Google Adwords account. For that, go to the campaign tab -> New Campaign.
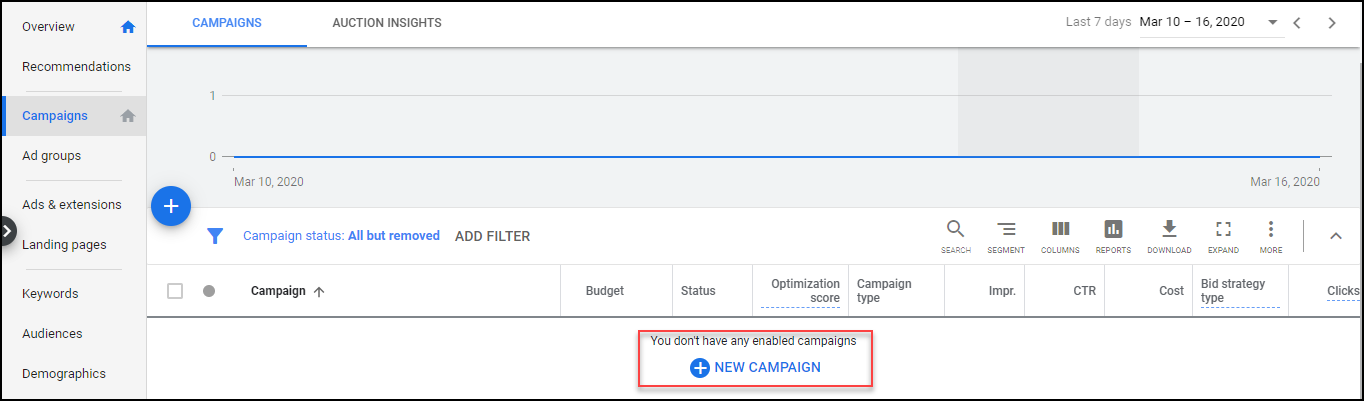
Choose the goals and create shopping campaigns. You can choose a goal from Sales, Leads, or Website Traffic.
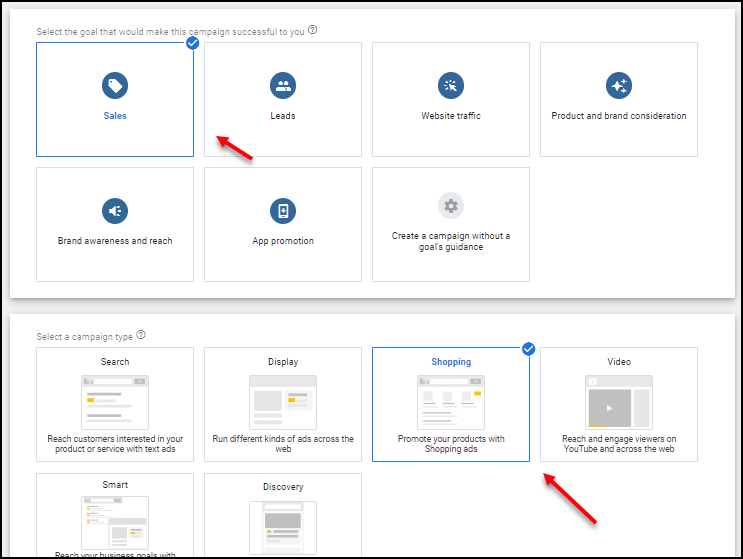
- Sales will help to get more sales through the ad campaigns you are going to create.
- Leads will configure your ad campaigns accordingly for more leads and convert clicks to sales if he or she has clicked on your product ad.
- Website Traffic will help you to reach potential customers and boost the traffic flow to your WooCommerce store for leveraging more sales.
Then choose the designation for them such as search, display, shopping, video, and discovery.
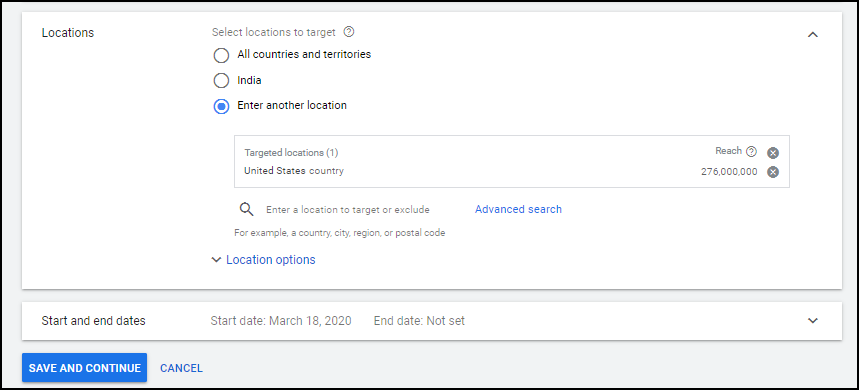
You need to enter the target location here. And bidding, budget, campaign priority, targeting, and locations accordingly. You can bid as well as specify the budget for your shopping ads based on your plan and requirements.
The next step is to create ad groups. You can decide what type of ads of your products to run.
There are 2 ad groups: Product Shopping and Showcase Shopping.
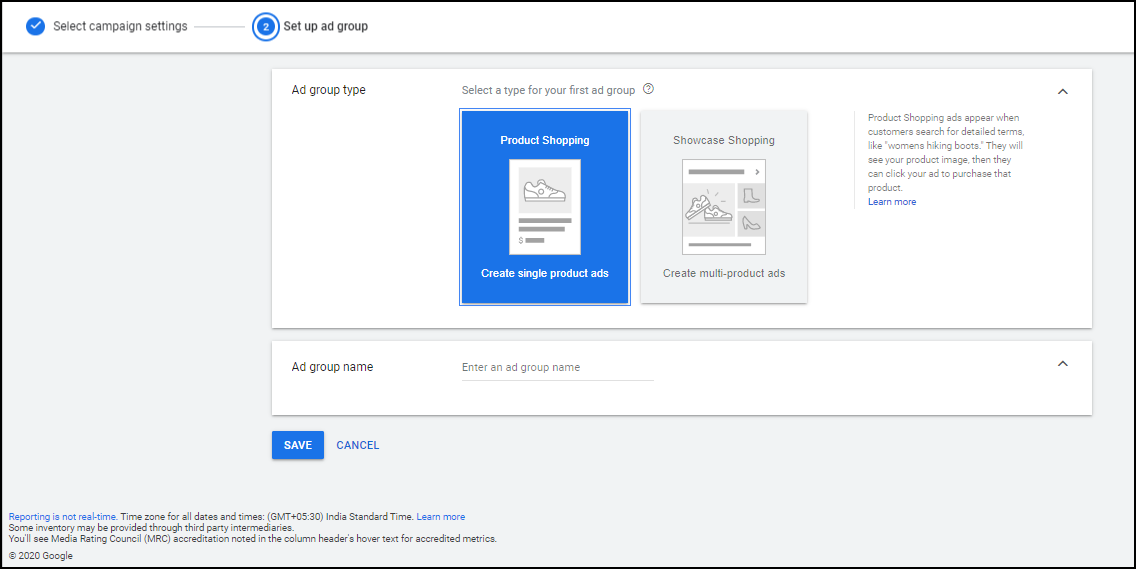
Product shopping: Used to advertise a single product.
Showcase shopping: Used for advertising multiple products for building your brand.
Once you have created and saved the ads, you can run and showcase your products to drive sales.
Step 4: Set Up Google Analytics
You need a Google Analytics account that needs to link with your WooCommerce site. You have to choose the category of your business, and a tracking ID will be generated. After activating the Analytics account, you can see all the data, reports, and traffic details of your ads as well as your website.
From these reports and its advanced analytics tabs, you can monitor the overall performance of your business and the impact of ads on the traffic and conversion rate. This will help you to do some changes to the ads and website such as where you need improvements for driving more sales.


