In this article, we take a look at the step by step guide to enable shipping insurance on your WooCommerce store using the ELEX Shipsurance Add-On for Shipping Plugins.
Introduction
Shipping is quite a crucial part of an eCommerce business. Handling the shipping of items and delivering it safely is important to reinstate the trust factor among the customers. What if the item is damaged, or lost or gets stolen? In such cases, insurance acts as a savior for the sender. Even though there are certain shipping carriers offering minimal shipping insurance, in certain cases, this does not go well. In order to ensure that the insurance you comply with offers 100% security to the loss or damage of your products, you need to choose shipping insurance that suits your need. To make sure that your shipping is in safe hands, you need to insure it with third party shipping insurance providers like Shipsurance.
Why Shipsurance?
Shipsurance is popular in providing full and partial coverage for shipments through various shipping careers. They also have quick and easy claim options as all their transactions are electronically dealt with. Moreover, Shipsurance offers quite reasonable rates which are cheaper and suitable for any shop owners to choose from. There are several benefits that make shipsurance an ideal option for shipping insurance on your store.
- Saves 90% of costs on shipping insurance.
- Quick and simple to process
- A streamlined process for claiming insurance.
- Organized reporting system, which makes communication easier.
- Offers inbound and outbound coverage.
- Supportive assistance.
- It offers insurance for small to big and large freights.
How to enable shipping insurance for your WooCommerce store?
In order to enable the shipping insurance, we use the ELEX Shipsurance Add-On for Shipping Plugins here. The plugin can be installed and used on your WooCommerce store. Here are the following steps to be performed for making it easy to use in your store.
Step 1: Installation and Initial Settings
Firstly install the plugin on your WooCommerce store. Upon installation, you can see shipsurance along with the WooCommerce menu list.

Moving to Shipsurance settings, you get the following fields, to be filled.

Upon enabling the checkbox you get to see the below-mentioned fields :

Here you need to provide the Shipsurance Email and Policy #. To obtain these, you need to register with Shipsurance. Once you register, you get a valid policy number for both Test mode and Live mode and you can enter the same here. The next one is the option to choose the API mode. Basically, there are two API modes – Test and Live mode. You can use the Test mode to set the plugin and then when you are actually shipping from your store, you can use the live mode. The next option to be set is the Declaration type. This determines the coverage type you want for your insurance. Here we can choose one of the three options.
Order Total amount – On choosing this, you get the complete coverage amount which includes the shipping cost on the checkout page.
Order Percentage Amount – Upon choosing this, you get a declaration percentage to be entered in the next field. Here you can declare the percentage of the amount that you want to get coverage.

Flat Rate – This is the third option. On choosing this, you can provide a fixed amount for coverage.

Cover Full value, when you enable this option, you get the full amount, percentage of the total amount, or the flat rate, which is not calculated based on the policies of Shipsurance. But for this, you need to get the approval from Shipsurance before enabling. Like for example when this is not enabled, you get the coverage amount as x%, (where x is set by Shipsurance) of 50% of the product value. Else, when you provide a 50% percent discount for a product worth $1000, then you get 50% of $1000 i.e $500 as coverage.
Step 2: Apply Shipsurance on Orders
After installation, when you place an order on the order page, you can see the shipsurance insured value on the order in the order processing page in WooCommerce (WooCommerce>> Orders).

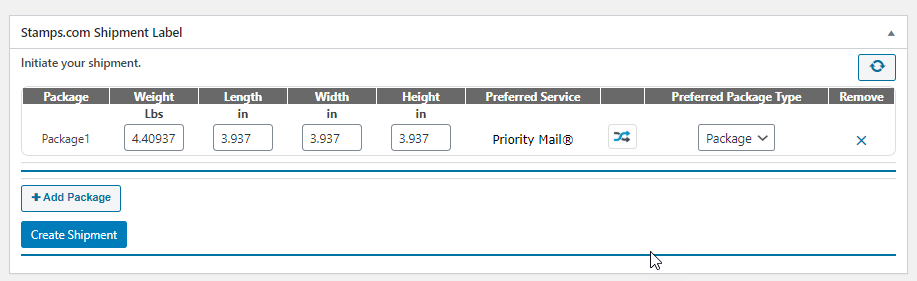
Now you can create the shipment for the order. Note that the value provided for Shipsurance is for full coverage value.
Step 3: Returns the Shipment Insurance Reference number from Shipsurance
Once you create the packages, you can create the shipment for the order. Here we make use of the shipping plugin, ELEX Stamps.com Shipping Plugin with USPS Postage for WooCommerce to integrate shipping on your WooCommerce store.
When the shipment is processed, you get the tracking id information and a Shipping insurance reference number from Shipsurance.

The Shipsurance reference number can be obtained from the individual order page. This unique number is used when you want to process an insurance claim.
You can also add the shipsurance, on third party shipping plugins using a code snippet. Here the plugin is compatible with ELEX Shipping Plugins.
To Wrap up,
Hence, these are the basic steps by step guide to enable shipping insurance on your WooCommerce store.
Further Reading:
- The Basics of Shipping Insurance
- How to Protect Your Packages with First Class Mail Insurance?
- How to Integrate WooCommerce Shipping Insurance plugin to your Online Store

