Sometimes when you are browsing through some products and stumble upon the one which you would buy within a heartbeat, but it turns out to be high-priced for you. You might wish for purchasing it at a price which is affordable for you. Do we have such an option to negotiate the price on a product? Well, you would be surprised to know that we do have an option for the same. Using a unique strategy called WooCommerce Name Your Price, you can easily actually name your own price for your products on your WooCommerce store.
The best part of this method is that you can easily negotiate upon a price or even the quantity. Let’s go ahead and know more about the same.
What is Name Your Price?
In Name Your Price, the seller lets the buyer purchase a product from them at a price decided by the customer. But again the transaction occurs only when the price is higher than or equal to the provided threshold price that is provided by the store owner. Here is how the transaction is done.
- Firstly, the store owner provides the threshold price for the product for which the store owner is accepting the price from the customer. The store owner can also opt to not to provide the threshold price.
- When the buyer places a price of their choice on the product, the store owner can either accept it or reject it.
- If the price provided by the customer is less than the threshold price provided, then the price is not accepted by the store owner and a prompt will be provided to enter a price that is higher than the threshold price.
- If the price is more than or equal to the threshold price mentioned, then the store owner processes the order at that given price.
It is said that the Name your price is often referred to as the reverse auction. In this method, the seller gets many potential buyers, but again the one who can afford to pay the price mentioned by the seller gets the auction.
Why Sellers prefer the Name Your Price Pricing strategy?
Even though Name Your Price is a strategy that is accepted by a lot many buyers, it might sound quite like a risky method for a seller. But again in the actual scenario, a seller can offer a threshold limit, which will help them obtain their profit percentage even when the price of the product is determined by the customer. Hence essentially they are not at a loss. Moreover, it is seen that using this method, customers are much happier and in a way, they return to the store expecting a better experience every time.
Again, yet another benefit that is seen is it becomes easy to get an estimate of the price the customers are ready to pay for your product. It helps to analyze the market easily. If you see websites like Priceline have created their business using this strategy and they are successful. They use this method to analyze how much their users are willing to pay to suit their needs. Moreover, you can win over customers easily using this strategy. If you are a newbie in the market and you want to analyze the price the customers are willing to pay for your product then, you can easily do it with the help of this method.
How you can include Name Your Price on your WooCommerce store?
If you want to improve your pricing strategy on your WooCommerce store, then make use of the ELEX WooCommerce Name Your Price Plugin, which is also free and lets you implement the Name Your Price option instantly.
Here are some of the popular features of the plugin that comes handy for you :
- Lets you offer products at a price chosen by the customer.
- Offer a limit or minimum threshold amount to avoid cost-free purchases.
- Hide the product price.
- Apply the settings globally or for individual products easily.
- Supports both Simple and Variable Products on your store.
How to set up Name Your Price on your WooCommerce store?
Here are some steps to install the plugin on your WooCommerce store.
Step 1: Download and install the plugin
Download the ELEX WooCommerce Name Your Price plugin from its product page or WordPress. Log into your WordPress WooCommerce store as an admin and install the plugin on your store.
Once the plugin is installed and activated, you can go to the Dashboard > Plugins > Installed Plugins > ELEX WooCommerce Name Your Price Plugin > Settings.
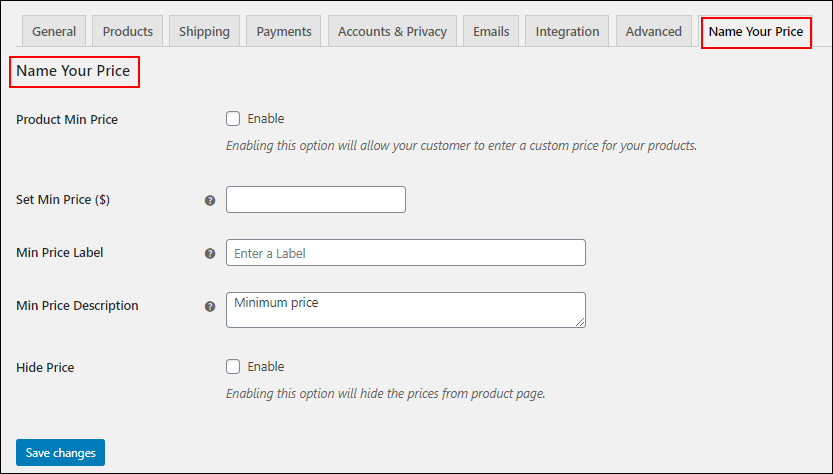
Step 2: Configure the plugin
The plugin interface looks like this :
- Product Min Price: Here you need to enable the option to allow customers to provide a price of their choice.
- Set Min Price: Here you can enter a minimum price at which you want to allow the customers to purchase the products. You can also leave it blank if you want to sell the product at any price your customer places.
- Min Price Label: Provide a custom text to be displayed beside the field to let the customers enter the minimum price.
- Min Price Description: Provide a custom description to display for the customers.
- Hide Price: Enable this option to hide the price of the products from its respective product pages.
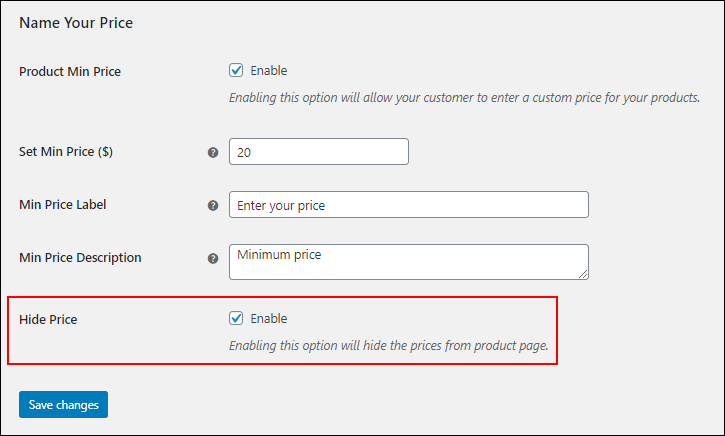
Step 3: Demonstration
Suppose your want to set the minimum price as $20 and you have enabled the option for Name Your Price, then the setting will look like this as given in the image below:

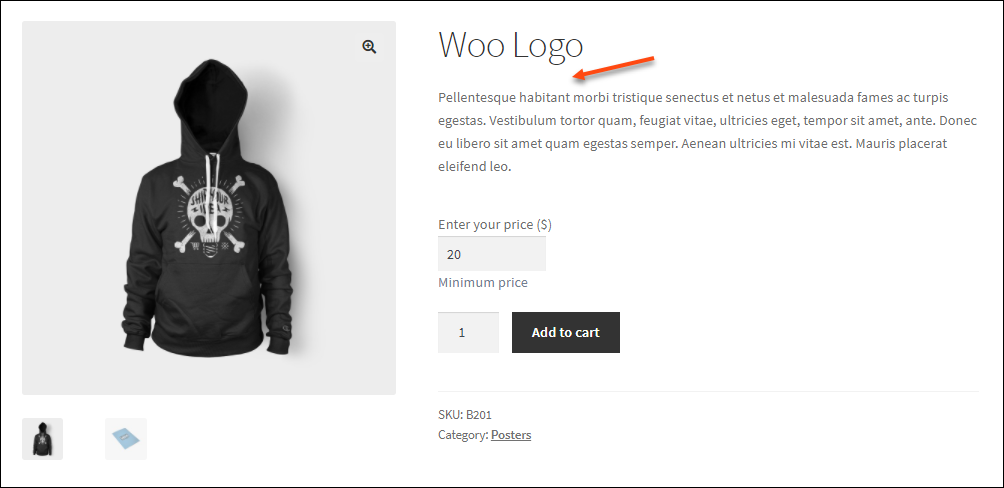
As per the settings, the change in the store product page will look like this as given in the image below :

While purchasing, the customer can enter a price as they desire in the text box available. If your customer proceeds without changing the amount, then the default price is taken into consideration while checkout. If you have set a threshold price limit and your customer has entered a value that is more than or equal to the threshold price you have set for example here $30, then that is taken as the price for the product.
If your customer enters a price below the threshold limit (here $20), like $15, then they will be prompted that the amount entered is below the threshold limit like given in the below image.
If you have not provided any limit price then, the product page will look like as given below.
Step 4: Hide Price for your products
The plugin lets you hide the price for products easily. All you need to do is, just enable the Hide Price option in the plugin as shown in the below screenshot.
Once done, the product page will not show the price.
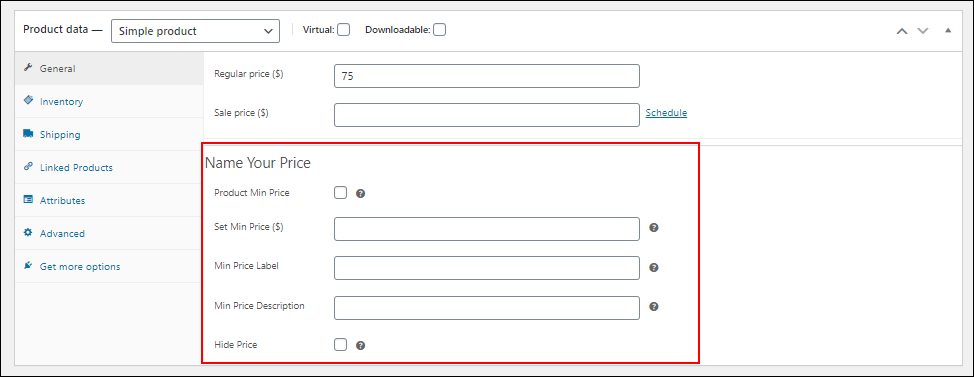
Step 5: Set up the minimum price at the product level.
If you do not want to set the minimum price at the shop level and rather do it at the individual product level, you can do it using the plugin. Once you install the plugin on your WooCommerce store, the plugin settings will be available for each product on your store for both simple and variable products.
In the simple product go to product page dashboard > General. Here you can see the settings as shown in the below screenshot.
In the case of variable products, you can set different minimum price, label, description, and hide price options separately for each. For this go to the individual product page dashboard > Variations. You can see the below settings on the product page.
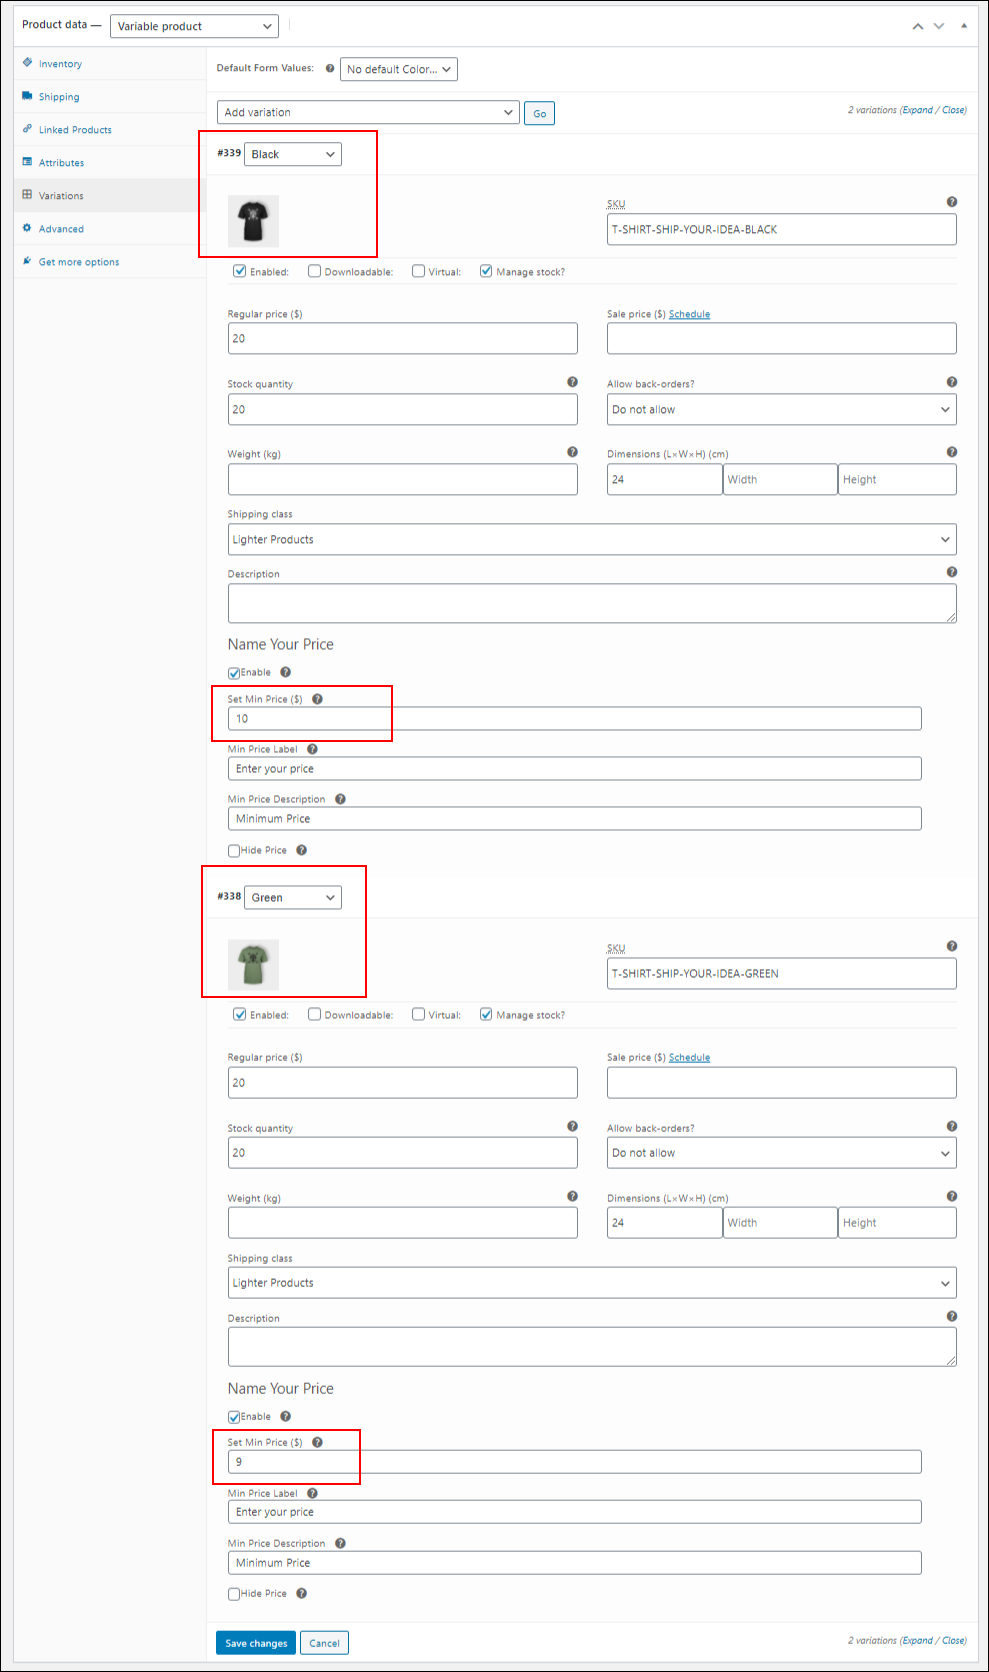
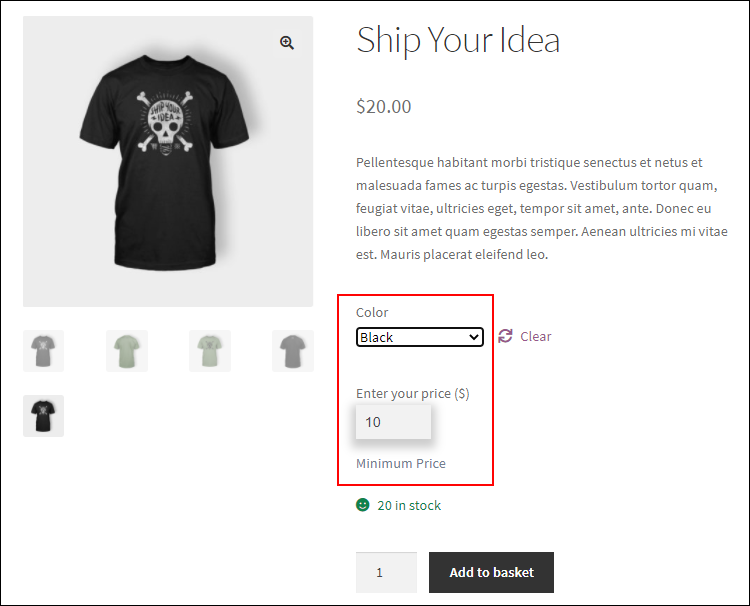
As per these settings, you can see that the product variations will display the minimum price as per the settings. Here the variation in black will show minimum price as $10 as shown in the screenshot below..
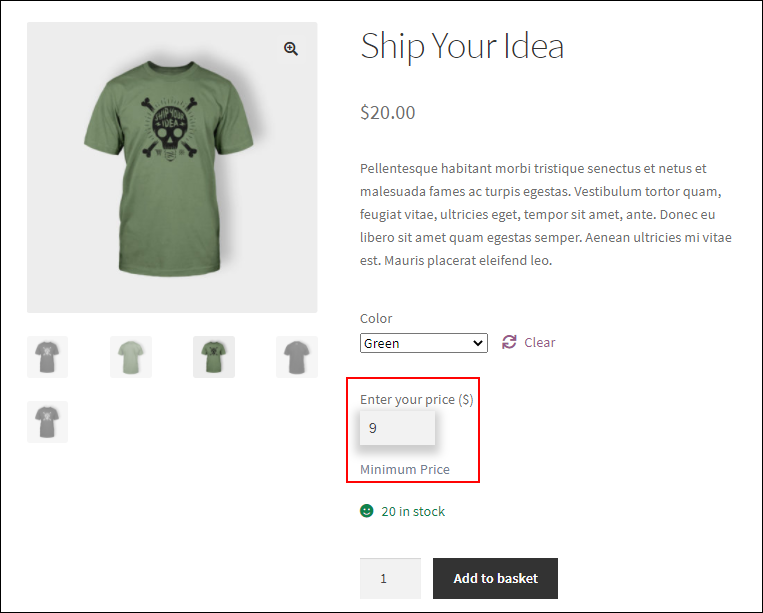
And the variation in green will show the product minimum price as $9 as shown in the below screenshot.
Bottom Line
Hence these are the steps to set up WooCommerce Name Your Price on your store. The plugin is quite simple, robust and free to install and use. Providing a perfect pricing strategy on your store is very important when you want to keep your customers happy and also look for profit. If you are looking for many more feasible pricing options to include on your store, you can look for other pricing plugins like,
- ELEX WooCommerce Dynamic Pricing and Discounts Plugin
- ELEX WooCommerce Catalog Mode, Wholesale & Role Based Pricing
These plugins also let you work around your pricing methods and run a successful store.

