In this article, we will go over the steps to set up DHL Express Live Shipping Rates for Indian WooCommerce store owners. Here we make use of the ELEX WooCommerce DHL Express / eCommerce / Paket Shipping Plugin with Print Label to integrate DHL shipping services into WooCommerce. Also, we make use of the ELEX WooCommerce DHL India Add-On to enable DHL Express for Indian WooCommerce store owners.
Introduction
Whenever shipping is considered, as a retailer you get to choose from a variety of options like USPS, DHL, UPS, FedEx etc. But then if you are looking for a cost-effective shipping option, DHL is ideal for international shipments. DHL also provides you shipping rates, which are the cheapest ones for affordable shipping. DHL is popular for its affordable services even in India. Now to avail the DHL services, the Indian WooCommerce store owners can make use of this DHL India Add-On for seamless shipping of packages across Indian locations.
Prerequisites:
1. ELEX WooCommerce DHL Express / eCommerce / Paket Shipping Plugin with Print Label
2. ELEX WooCommerce DHL India Add-On
3. DHL India credentials.
ELEX WooCommerce DHL Express / eCommerce / Paket Shipping Plugin with Print Label
Being an Official DHL Partner, the plugin lets you swiftly integrate DHL shipping with your WooCommerce store.
- It allows access to real-time rates from DHL Express services.
- Lets you Print WooCommerce DHL shipping and return labels.
- You can also Print Commercial invoices and Archive Air Waybills.
- You can easily track shipments, providing Estimated Shipping Dates on the cart page.
- Efficient packing algorithm to pack items into custom boxes.
- Configure the price of the services using the Price Adjustment fields for each service.
- Enable Shipping Insurance for your shipments
- Generate bulk shipments and much more features.
ELEX WooCommerce DHL India Add-On
Using the DHL India add-on plugin, whenever you create a shipment to an Indian address, you can easily proceed with the shipment processing without much hassles. The add-on works ideally for shipments with billing and shipping addresses from India. If either one of the addresses is not an Indian location, then the plugin will proceed with the ELEX DHL plugin. The plugin will simplify the process of shipping across locations in India.
Features include :
- Allows shipping your products to any Indian addresses even interior destinations seamlessly with the DHL India services.
- Process shipment for Indian addresses easily.
- Link GST details, Importer Exporter Code.
- Enjoy the benefits of Merchandise Exports from India Scheme (MEIS).
Setting up DHL Express Live Shipping Rates and Print Label for Indian WooCommerce store owners
- Firstly you install the ELEX DHL plugin on your WooCommerce store. You can learn more about installing and getting the DHL plugin activated for your WooCommerce store from the product documentation.
- Then, you can install the DHL India Add-on plugin to your store and activate the same.
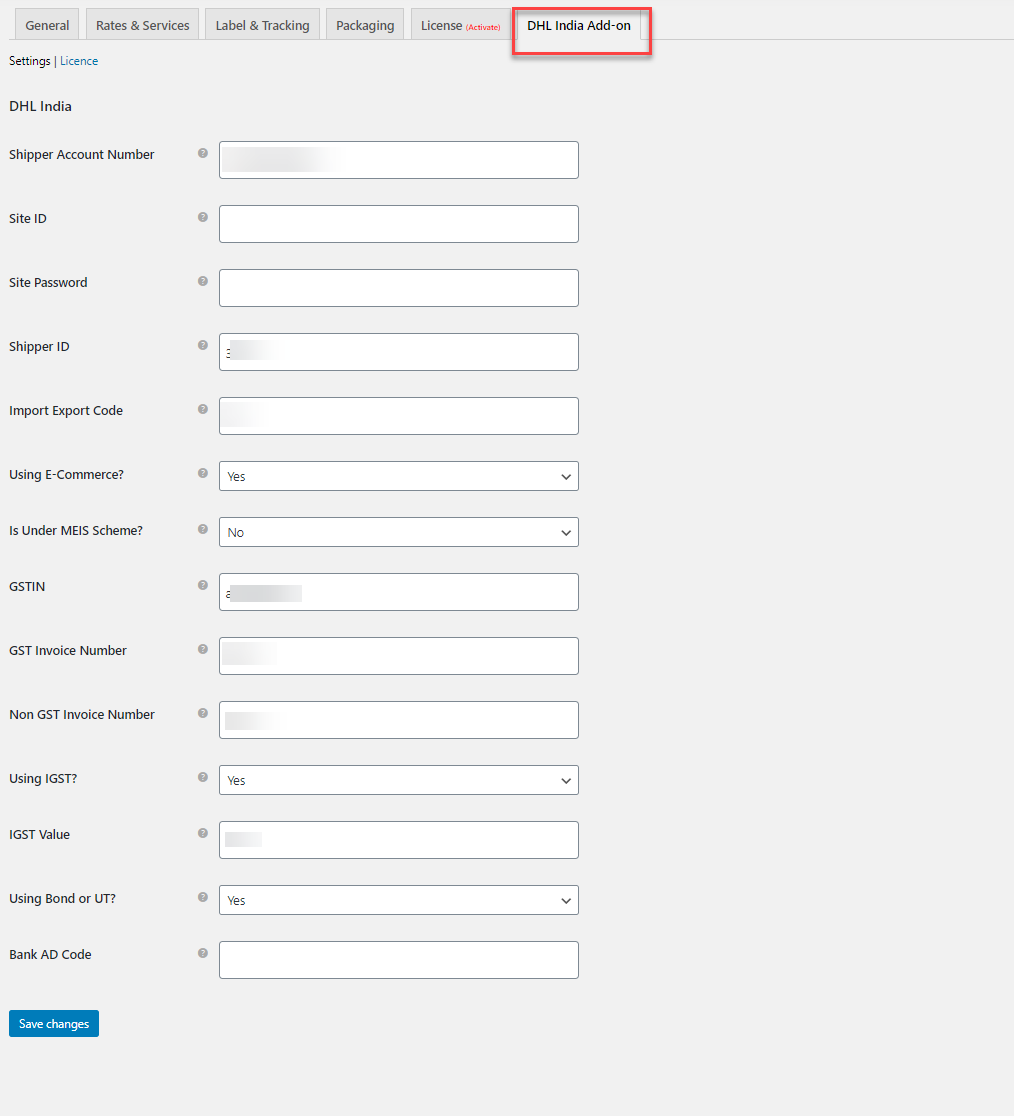
- Once done, you can go to the Settings in DHL India Add-on plugin from the Plugins section, wherein you will be given the plugin settings, to be done.
Here you need to enter the DHL India credentials like DHL Account Number, Site ID, and Site Password which can be obtained from the DHL India pre-sales department.
Shipper ID: Enter the unique shipper reference ID here. You can track the shipment using this ID.
Import Export Code: Enter Import Export Code (IEC), which is mandatory for importing goods into India as well as exporting goods outside of India. You can obtain it from DGFT website by applying for IEC.
Using E-Commerce?: Here choose ‘yes’ if you are using these DHL credentials for your e-commerce store. If not, then choose ‘not’.
Is Under MEIS Scheme?: Choose ‘yes’ or ‘no’ here.If your business is under Merchandise Exports from India Scheme (MEIS) under the Foreign Trade Policy of India (FTP 2015-20), you can choose yes else choose no.
GSTIN: Enter your 15 digit GSTIN (Goods and Services Tax Identification Number). To obtain it you need to register to the GST portal.
GST Invoice Number: Enter your GST invoice number here. Once you register and obtain the GST number, you need to issue the invoice and obtain the GST invoice number from it.
Non-GST Invoice Number: If you have not registered for GSTIN then enter the invoice number you have issued without mentioning the GSTIN and ARN (Application Reference Number) here.
Using IGST?: Choose yes or no depending on if you are using Integrated Goods and Services Tax (IGST).
IGST is the tax levied on all Inter-State supplies of goods and services. It is applicable to any supply of goods as well as services to import into India and export from India.
IGST Value: Enter IGST rate value, if you are using.
Using Bond or UT?: Choose ‘yes’, if not, choose ‘no’ depending on if you are using Bonds as well as Letter of Undertaking (UT).
Bonds: It is a legal agreement and collateral security, to secure due compliance with the rules and procedures under the Excise law of India.
LUT: Letter of Undertaking (LUT)- a document for exporters to file for exporting goods or services without having to pay taxes for the same.
Bank AD Code: Provide your 14 digit Authorised Dealer Code (AD Code) given by the bank when you have opened a current account for your business.
Once done, save the settings.
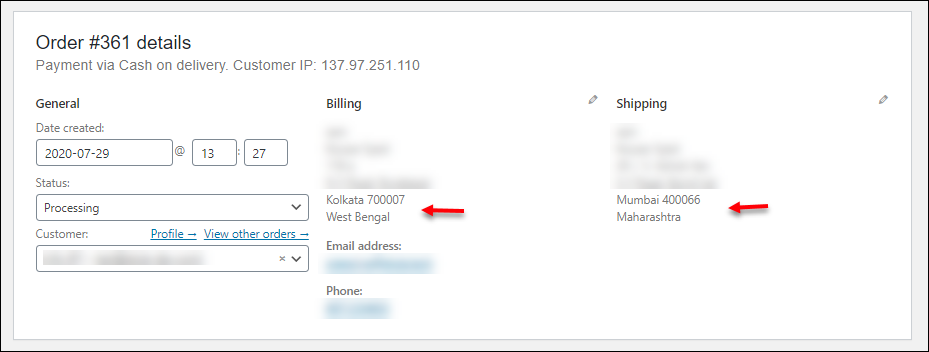
4. When you generate the order and enter the addresses from Indian locations, you can see the DHL rates corresponding to it appearing on the cart and checkout page successfully.
5. When the order is processed, you can see that the add-on facilitates the shipping with Indian addresses which benefits the Indian WooCommerce store owners while shipping.
6. Once done, you can generate the packages and then the shipment. Then you can generate the shipping label and affix the same.
To Wrap Up,
This is how Indian WooCommerce store owners can easily set up the DHL plugin on their WooCommerce store. You can also explore more about setting up the ELEX WooCommerce DHL Express / eCommerce / Paket Shipping Plugin with Print Label.


