Taxes in WooCommerce are one of the confusing sections and users often face difficulty in setting up correct taxes. And this gets more confusing if you wish to include shipping taxes in WooCommerce to the total on the cart/checkout page. With WooCommerce, you get to choose if you want to apply taxes on rates appearing on the cart/checkout pages. You choose you can apply taxes to either each product or the cart total. And finally, you get to choose if you want to have a tax on the shipping charges you offer on the cart/checkout pages.
Talking about taxes on shipping rates, you can have taxes enabled for:
- Flat Rate Shipping Method defined at Zone Levels
- The Local Pickup Shipping Method defined at Zone Levels
- And the shipping rates that are shown by our Shipping Plugins
To start with you’ll need to enable taxes in WooCommerce. Let’s see how to get a tax option on the cart and checkout pages of WooCommerce.
Enabling Taxes
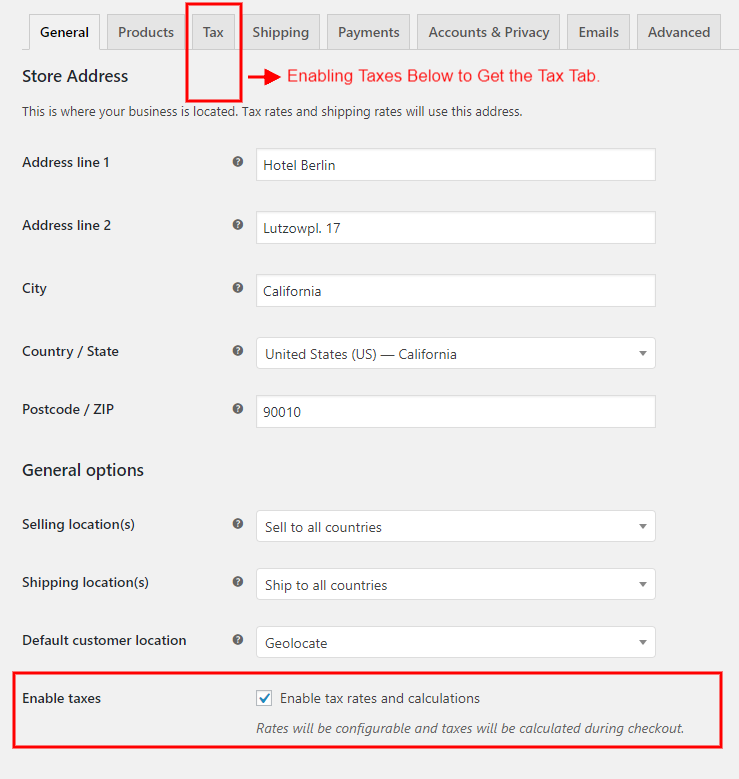
Before we move to different shipping methods and enabling taxes on them, we’ll see how you can enable the tax option. The tax tab is not available in the WooCommerce Settings by default. To get the Tax tab in here you need to enable ‘Tax Rates and Calculation’ in the General Settings of WooCommerce. So to enable tax options on the cart and checkout pages first navigate to Dashboard> WooCommerce> Settings> General and then check the box corresponding ‘Enable Taxes‘. Then save changes to get the tab. The screenshot below shows the Tax Tab and the ‘Enable Taxes’ option in the General Settings of WooCommerce.
Note: If you don’t enable this option no tax option appears on the cart/checkout pages. As a result, you’ll not be able to charge any type of ‘taxes’ to your customers. If you use our ELEX WooCommerce DHL Shipping Plugin with Print Label, you get an option to charge your customers with extra taxes.
Configuring Shipping Taxes in WooCommerce
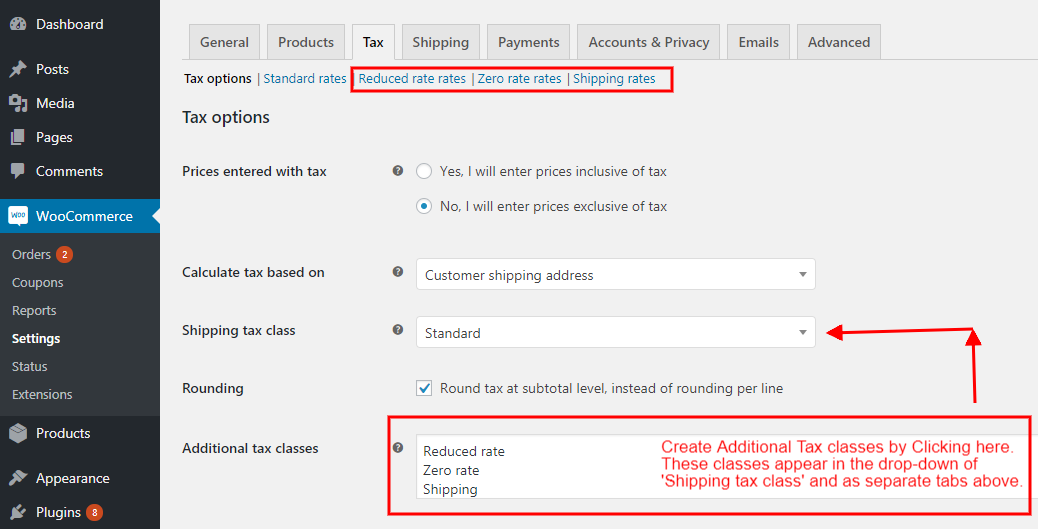
Make sure you enable the tax option and have the tax tab. This will help you understand the taxes in a better way. As I proceed I assumed that you have taxes tab enabled. The ‘Tax’ tab has options like Tax classes which can have multiple taxes defined based on the country name and more precisely based on the zipcodes. You can add additional tax classes here. As you can have multiple tax classes, you can select only one of the shipping class to apply. For instance, the image below shows ‘standard’ shipping class selected. Find more on how to configure WooCommerce tax settings?
Each tax class appears on the top of all settings in separate tabs. You can click on each of them to complete the configuration of the taxes respectively.
Tax Classes
Tax classes help you to assign and define a tax type. You can have different types of taxes in different tax classes. By default, you get a standard rate. To create a new tax class start with ‘Additional Tax Classes’. Here you can type a name for your new tax class. Let’s suppose you write ‘Shipping’ here. Now click on save changes. This adds Shipping tax class with the name Shipping rates, with rates being the default end name of all tax classes created.
With each of the tax class created you can:
- Add a location with Country Code, State Code, Zipcode, and City
- Add tax in % of the cart total or per item cost in the cart
- Give a custom name to the taxes
- Set priority of taxes, which is quite helpful in case of compound taxes.
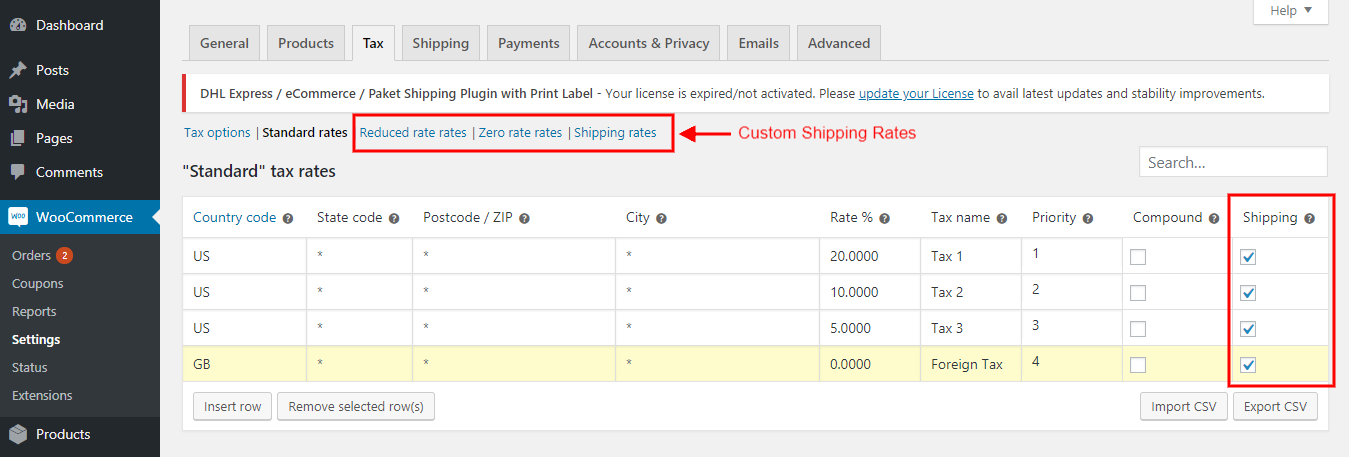
- Assign if it is ‘Compound’ or ‘Shipping’ Taxes
After the creation of the tax class, you need to select the particular tax class for ‘Shipping tax Class’. As you click on the drop-down button, you’ll get the names of all the tax class created by you. You can select the specific tax class that will define the location, name, amount and type of tax. The rules in the selected tax class will be applied to the shipping charges on the cart/checkout pages.
Compound Taxes apply on top of other taxes. Consider you have Tax 1 as 10%, Tax 2 as 10% and Tax 3 as 10%, and all three of them are compounded. Then a product of price $100 will have taxes equal to $33.1 i.e Tax 1 leads to $10 as tax making the price of the product $110. Tax 2 is applied to the revised price of $110, adding $11 to the total. So now the price becomes $121 and the application of Tax 3 adds another $12.1 to the total, making the final total to be $131.1.
Shipping needs to be checked for all the taxes you want to apply for shipping charges. For instance, if only Tax 1 is to be applied on the shipping rates, check the box for Tax 2 only.
These settings work for all types of shipping methods that show shipping rates. For instance, shipping plugins, flat rates, and local pickups.
Enabling Taxes for Flat Rate and Local Pickup
To enable taxes for any of the flat rates you assign you need to mark it as taxable. To do so:
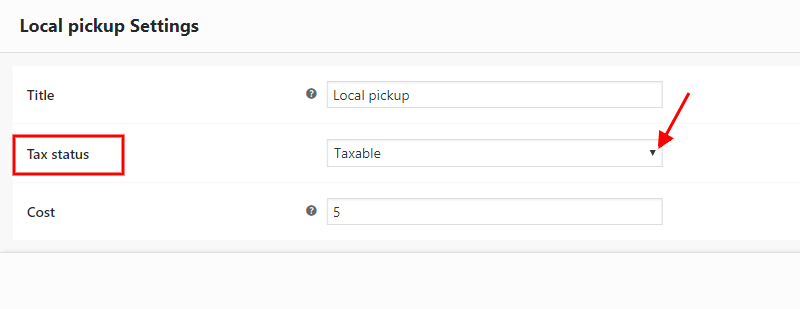
Navigate to Dashboard> WooCommerce> Settings> Shipping and then click on Shipping Zone to access the shipping method you assign for a zone. Click on ‘edit‘ option for the ‘Flat rate‘. You’ll find the following screen where you change the tax status to ‘Taxable’. If you don’t make it taxable, this flat rate will not be taxed under any condition.
Similarly, you need to enable taxes for all the flat rates defined in all categories to have taxes applied to them. Apart from the flat rate, you can follow the same procedure to enable taxes for the local pickup shipping method.
Managing Taxes with WooCommerce Core Shipping Methods
For a reminder, if you want Shipping Methods like Flat Rate and Local Pickup to be considered for taxes, you need to select the option of Taxable. This will enable the flat rates and Local Pickup shipping prices to be considered for shipping taxes. If you assign the methods as taxable, taxes will not be calculated for these shipping rates.
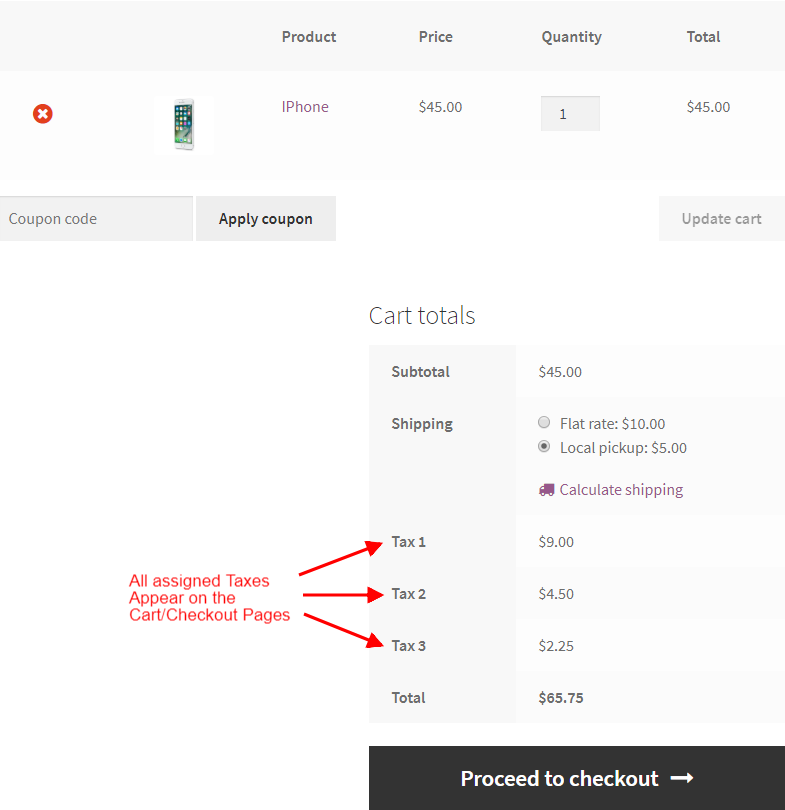
Now when we have the taxes of shipping set of all the shipping methods we can use, let’s move ahead and test the application of taxes on the shipping rates provided by these methods on the cart/checkout pages. First, we have the flat rate and the local pickup set. And we can see the three taxes on the cart page.
Tax 1 @ 20% is applied on $45 to give $9 as the tax. This means ‘shipping‘ is not enabled for Tax 1 in the tax class. Tax 2 @ 10% is applied only on the product price and not on the shipping rates. And finally, even Tax 3 @ 5% is also applied only of the product cost and not on the shipping charge of $5.
In case you don’t assign the tax to be applied on the shipping, it applies to the product cost only. If you tick the tax for shipping, it calculates the tax by adding the shipping rate to the product price. So in the above example, if you have shipping marked for the taxes, you’ll get taxes as $10, $5, and $2.50.
Applying Taxes on Shipping Cost By Shipping Plugins
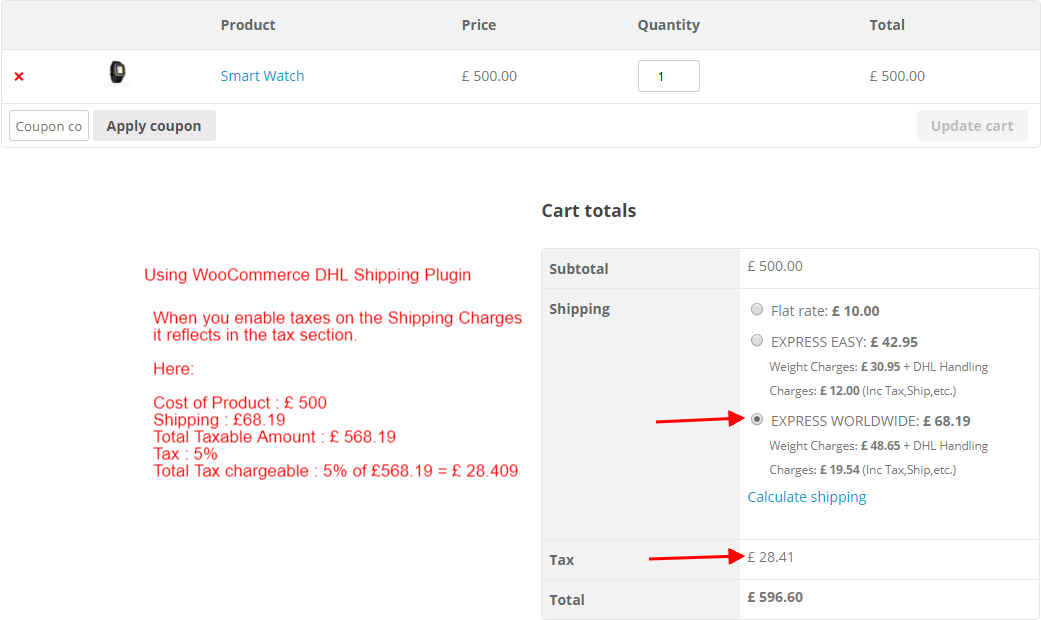
We’ll test the shipping taxes with one our most versatile shipping integration in ELEX WooCommerce DHL shipping plugin with Print Label. In this case, we have only one tax enabled and have selected it as “shipping” in the tax class. We’ve named it Tax for convenience. This is applying a tax of 5% on the cart total, which includes the product price and the shipping charges. The outcome in the cart is just what we expected. It shows £28.41 as the tax which is 5% of the cart total of £568.19.
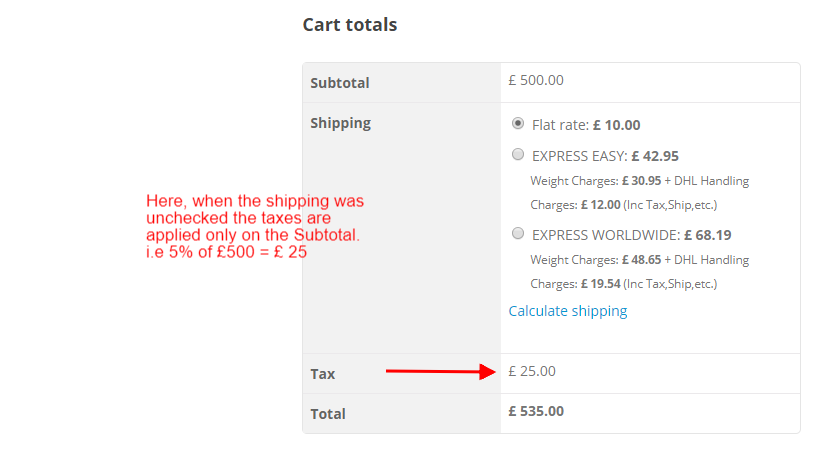
Now let uncheck the ‘shipping’ option form the tax class. So the expected outcome is a 5% normal tax applied to the product price and not on the cart total which includes the shipping rates. As you can see the returned value is £5, which is 5% of the product price of £500.
Not selecting any of the ‘compound’ or the ‘shipping’ options in the tax class does not mean that tax option is disabled. It just disables the actions of applying compound tax and tax on shipping price respectively. In case you want to disable the tax option entirely, go to General settings of WooCommerce and uncheck ‘enable taxes’.
Closing Comments…
Now that you have an idea of the shipping taxes in WooCommerce and how you can apply them correctly on the cart/checkout pages here is a list of all the shipping plugin available with us.
- ELEX WooCommerce USPS Shipping Plugin with Print Label
- ELEX EasyPost Shipping Method Plugin for WooCommerce
- ELEX Stamps.com Shipping Plugin with USPS Postage for WooCommerce
- ELEX WooCommerce Australia Post Shipping Plugin with Print Label & Tracking
- ELEX WooCommerce DHL Express / eCommerce / Paket Shipping Plugin with Print Label
You can visit the respective product pages and under the usability of the plugin. Your business is precious so we provide you with the updated live demo sites od all our premium plugins. This helps you understand the plugin and then have it installed on your WooCommerce store. You are also protected by our 30-day Money Back Guarantee.
You can visit our plugin section for more such useful plugins. In case you have queries on the taxes or any other shipping related issues you can leave a comment anytime. Or you can reach to our online support for the same. HAPPY SELLING!

