If you’re like the majority of business owners, you understand the importance of social media. You also understand how critical it is to get your product or service in front of potential clients. However, if you haven’t set up a Facebook & Instagram Catalog, you’re losing out on a useful tool that may help you reach more clients than ever before.
Consider creating a Facebook and Instagram Catalog as the key to unlocking your selling potential. It’s simple, and once completed, you can begin harnessing the power of these platforms to promote your items, create consumer connections, and even give incentives for purchases.
In this article, we’ll provide step-by-step instructions on how to set up your own Facebook & Instagram Catalog for your WooCommerce store in order to start reaching new customers and expanding your sales reach. So let’s get started!
What Is a Catalog and How Does It Work?

You’ve likely heard of catalogs before, but do you know exactly what they are and how to use them in your business? A catalog provides an easy way for potential customers to browse and purchase products from you on popular social media platforms like Facebook and Instagram. It’s essentially a digital shop window where clients can browse and buy without leaving the app.
The best part is that Facebook and Instagram have made creating a catalog so simple. All you need is a business page on either platform, some product information (pictures, pricing, descriptions, and so on), and the proper account settings. You may then create categories inside your catalog to help clients locate what they’re looking for. Finally, you’ll be able to sync your existing items from other sources, such as WooCommerce, and have your store up and running within minutes!
The Benefits of Creating a Catalog
Having a catalog of your products on Facebook & Instagram is extremely beneficial. It helps you to create an immersive shopping experience for customers, gives you more control over how your products are presented, and provides shoppers with a better understanding of what they’re buying. It also enables customers to purchase directly from your posts and ads across social media networks.
With a Facebook & Instagram catalog, you can:
- Easily showcase all of your products in one place.
- Manage product content and keep information up-to-date quickly.
- Track the performance of individual products with insights.
- Make it easy for customers to shop directly on Facebook & Instagram.
- Create ads that showcase your products (Dynamic Ads).
- Reach out to potential customers interested in products similar to yours.
All these benefits come from having a single source for all your product information, making your life easier when it comes to managing product information, and creating engaging social media content that drives sales.
Setting Up Your Facebook & Instagram Catalog
Are you ready to start selling on Facebook and Instagram? Setting up a catalog is your first step on the way to selling success. So, let us dive right into it!
Step 1: Create the Relevant Accounts
To get started setting up your catalog, you’ll first need to have a Facebook business page, an Instagram business profile, and an active Facebook ad account. If you don’t have these, it’s easy to set them up.
You may customize and manage all your Facebook and Instagram selling through the Commerce Manager ( We will utilize this in step 3)
Step 2: Set Up Your Catalog
Look no further than the ELEX WooCommerce Catalog Feed for Facebook & Instagram plugin to keep your WooCommerce store in sync with your Facebook & Instagram channels. This plugin allows you to generate an up-to-date catalog feed of your complete WooCommerce store and keep it updated in real-time on both Facebook and Instagram.

The best thing is that you can instantly market your items by creating unique advertising and campaigns on both platforms utilizing this catalog feed. Creating professional-looking product catalogs is simple with this plugin.
Here’s how you can use the free ELEX WooCommerce Catalog Feed for Facebook & Instagram plugin to your advantage.
- Install and activate the plugin
Installing and activating the plugin is as simple as installing and activating any other WordPress plugin. You may do so by downloading the plugin from the link above, then going to your WordPress site and following these steps:
WordPress Dashboard > ELEX Facebook Shopping Feed
- Modify the Plugin Settings
Under the Settings page, you may connect your business to the Facebook Marketplace and change the language used for Google Product Categories.

The Google Product Category Language can be changed from English to any other language depending on the demands of your business here. If you want your products to be discovered by people in that country, use the Google Product Category Taxonomy in that language.
After you click Connect FB, your Facebook and Instagram accounts will be linked to your business. Your Facebook store and WooCommerce have now been merged successfully.
- Customize the Plugin Features
Go to the Create Feed tab in the Start menu to begin customizing the plugin’s default settings.

You must choose an appropriate project name, provide a brief project description, and, most importantly, enable the Sync to Facebook feature.
Once you’ve enabled Facebook auto sync, you can specify a refresh schedule and time that will decide how frequently the selected catalog feed is updated. (on a daily, weekly, or monthly basis). This step must be completed in order to enable auto-sync for your feeds.
Furthermore, you may provide the country of sale, and product feed file format. Additionally, you may enable Include Variations if you wish to add product variations (sizes, colors, etc.) to the product feed.
Next, under Advanced Settings, you may select a default category, specify specific countries of sale, and configure currency conversion and currency code. (The Include Variations option is only available in the premium edition.)
Then, navigate to the Map Category tab to link product categories to the relevant Google categories.
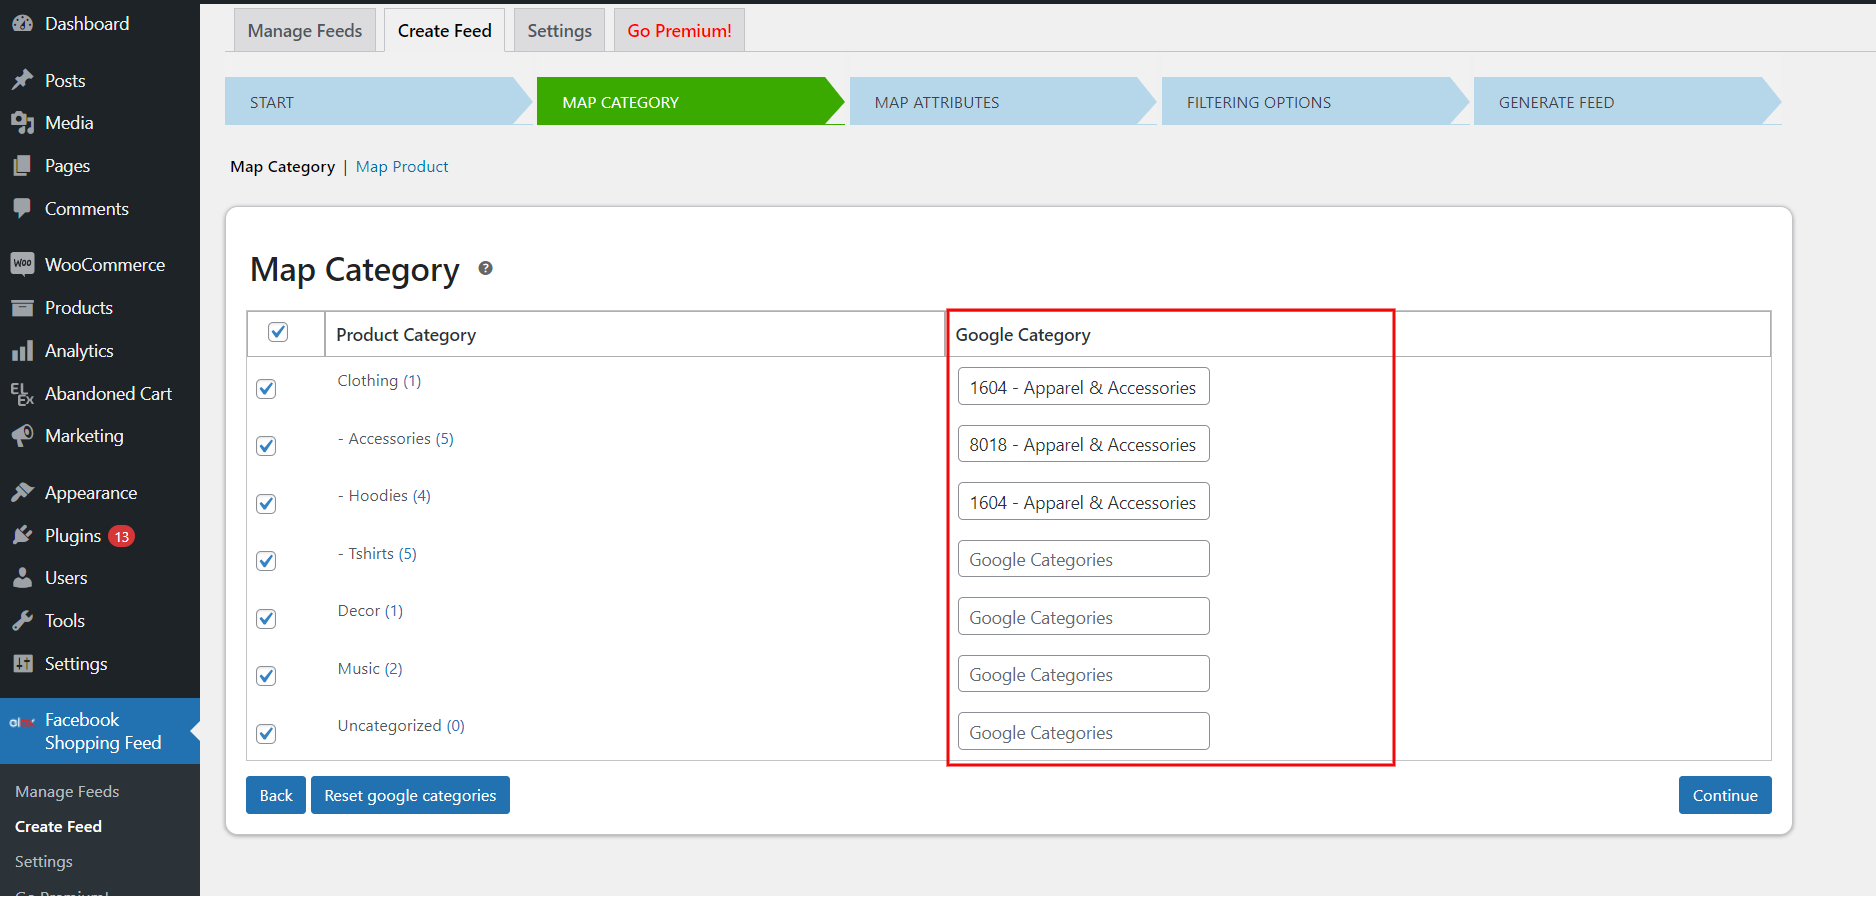
If you want your products to display when customers search for them in the Facebook or Instagram marketplace, you must connect them to Google’s default category. Begin typing the required category into the Google Categories textbox and select it from the list of auto-suggestions that appear.
If you don’t want to map whole product categories, you may map individual products by selecting the Map Product sub-tab under the Map Category tab. By inputting the product names, you may easily link them to the appropriate Google categories.

The next step is to map the product’s properties under the Map Attributes tab.
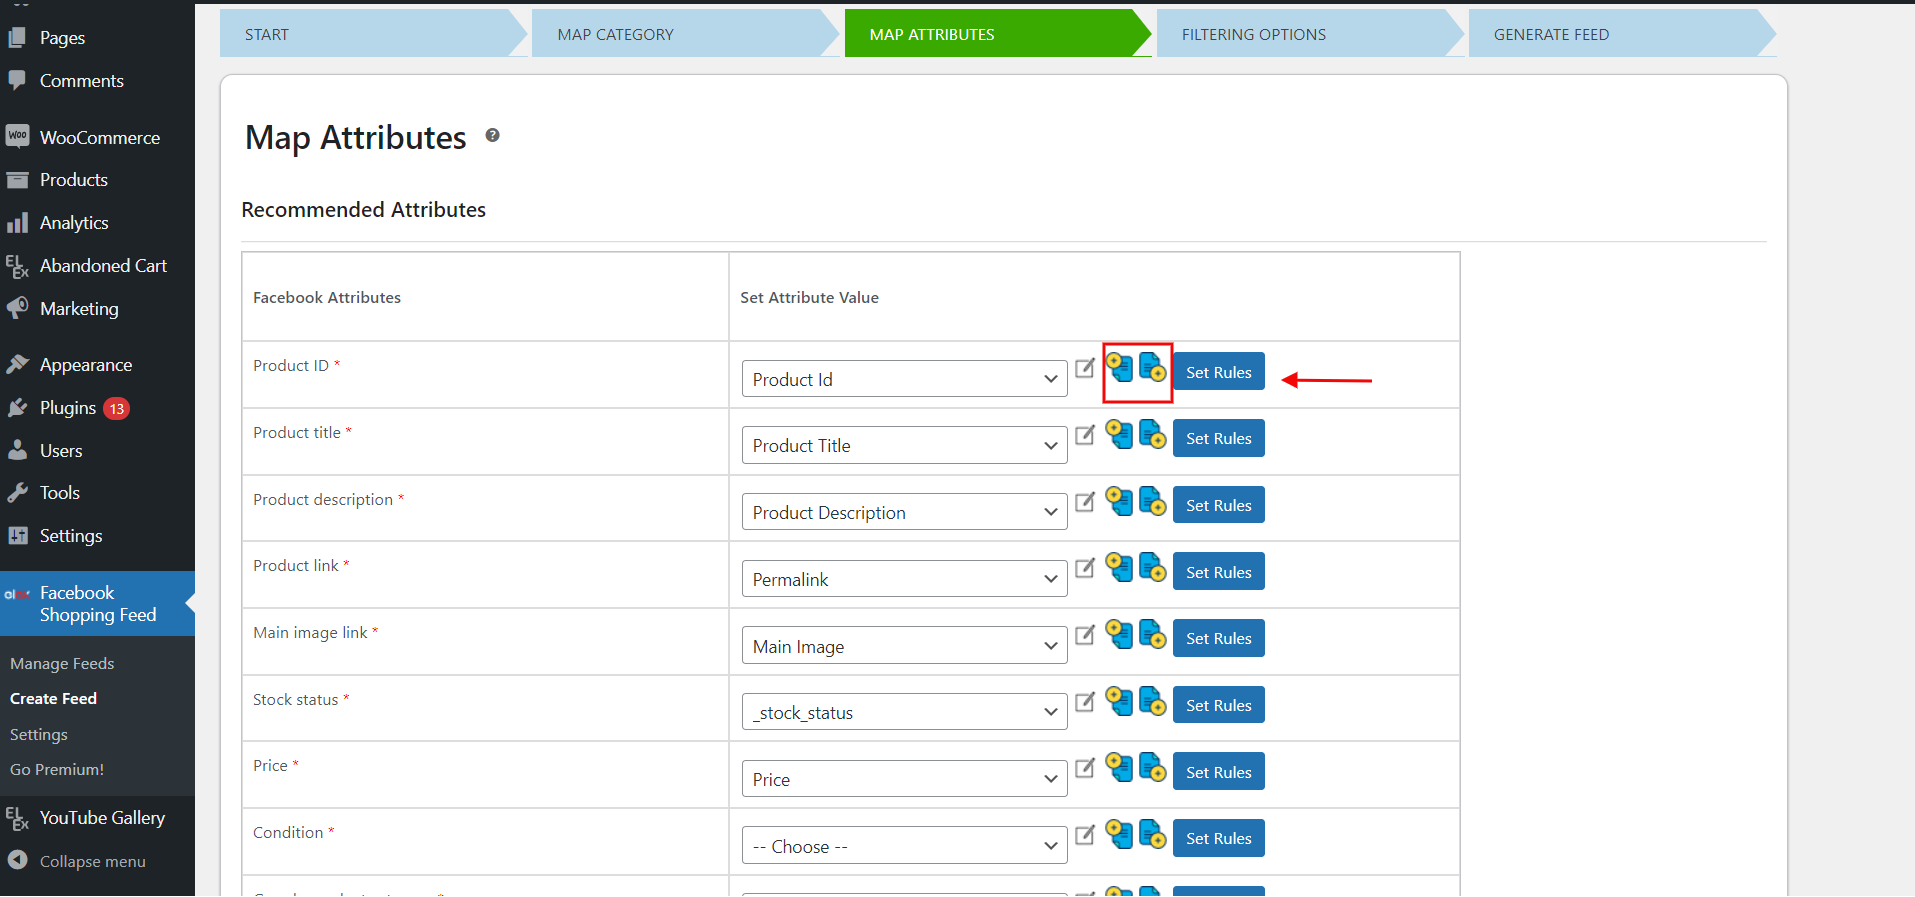
You may link your products’ attributes to the list of Facebook attributes. The plugin will map some of the essential features automatically. To acquire more exact results, you may manually modify them by adding or deleting data and establishing criteria.
Finally, click the Filtering Options tab.
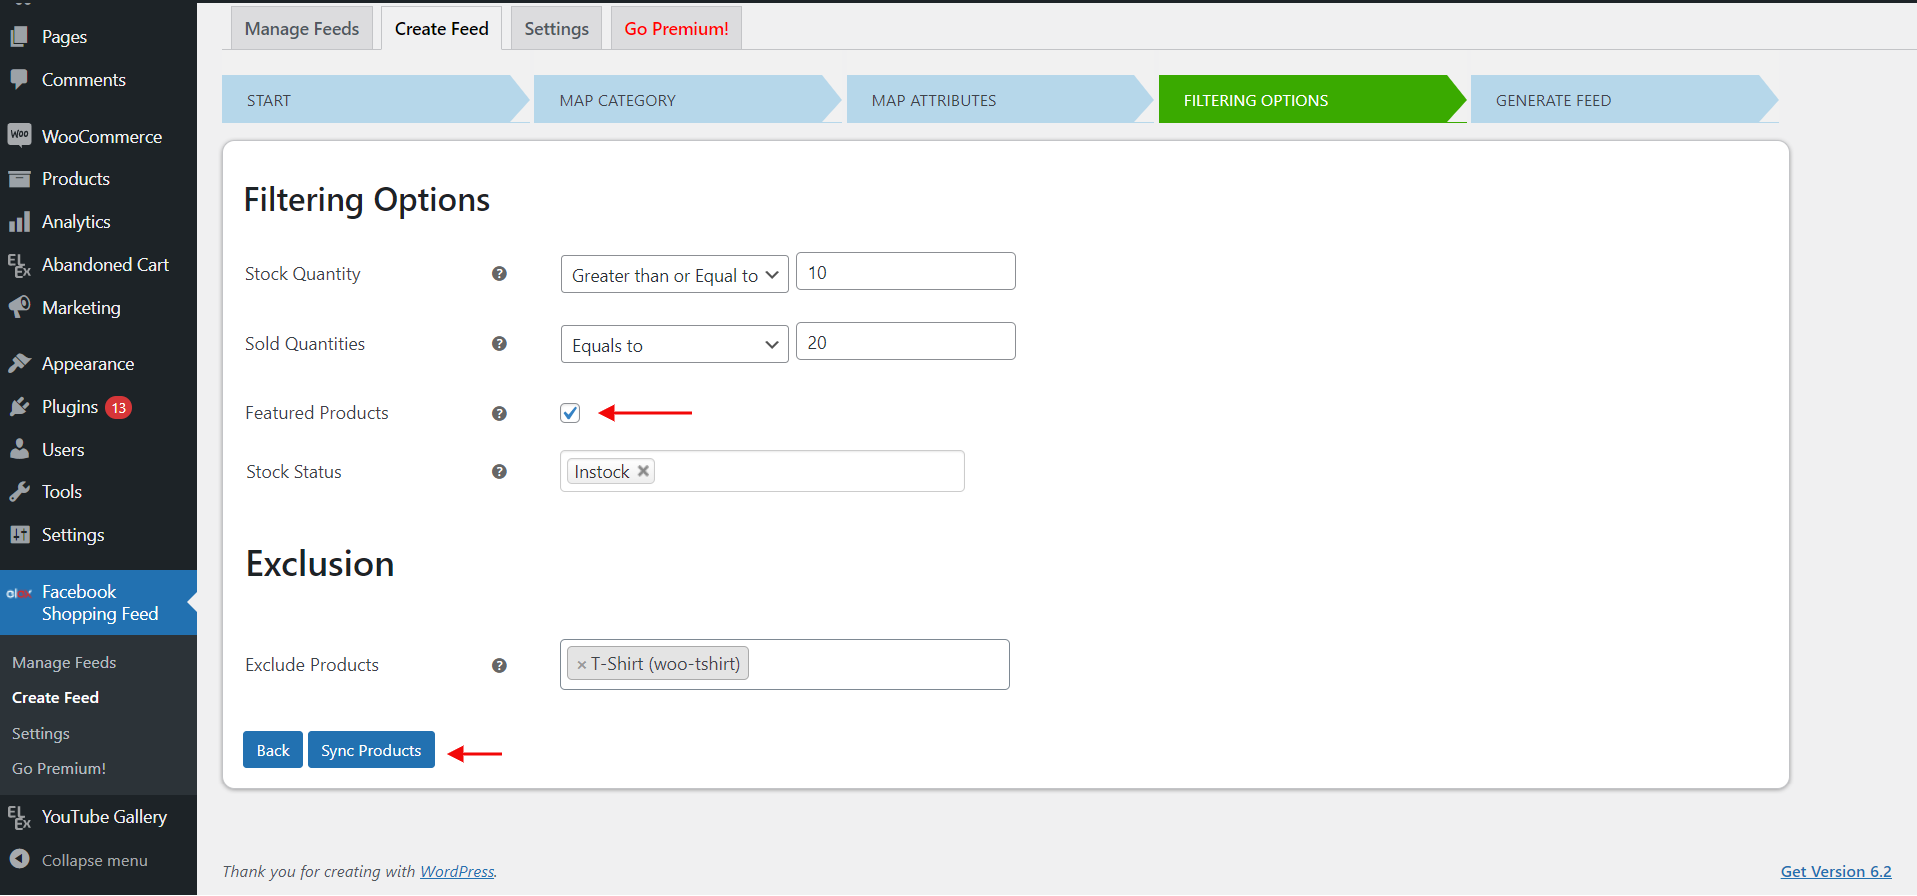
Filter out the stock and sold quantities of the products needed in your product feed on this page.
It is possible to establish feeds that only contain certain products by filtering items based on their Stock Quantity and Sold Quantity. It is also possible to create custom feeds with Featured Products while excluding particular products from the feed.
Once you’ve done configuring the parameters, click Sync Products. This will take you to the Generate Feed tab.

Step 3: Connect the Product Feed to Commerce Manager
Commerce Manager is a tool for managing your Facebook and Instagram catalogs and sales. The product feed file containing information on all of your product catalog entries must be uploaded to the Commerce Manager.

Log in to your Commerce Manager and click the Get Started button.
To begin creating your catalog, click Create A Catalog.

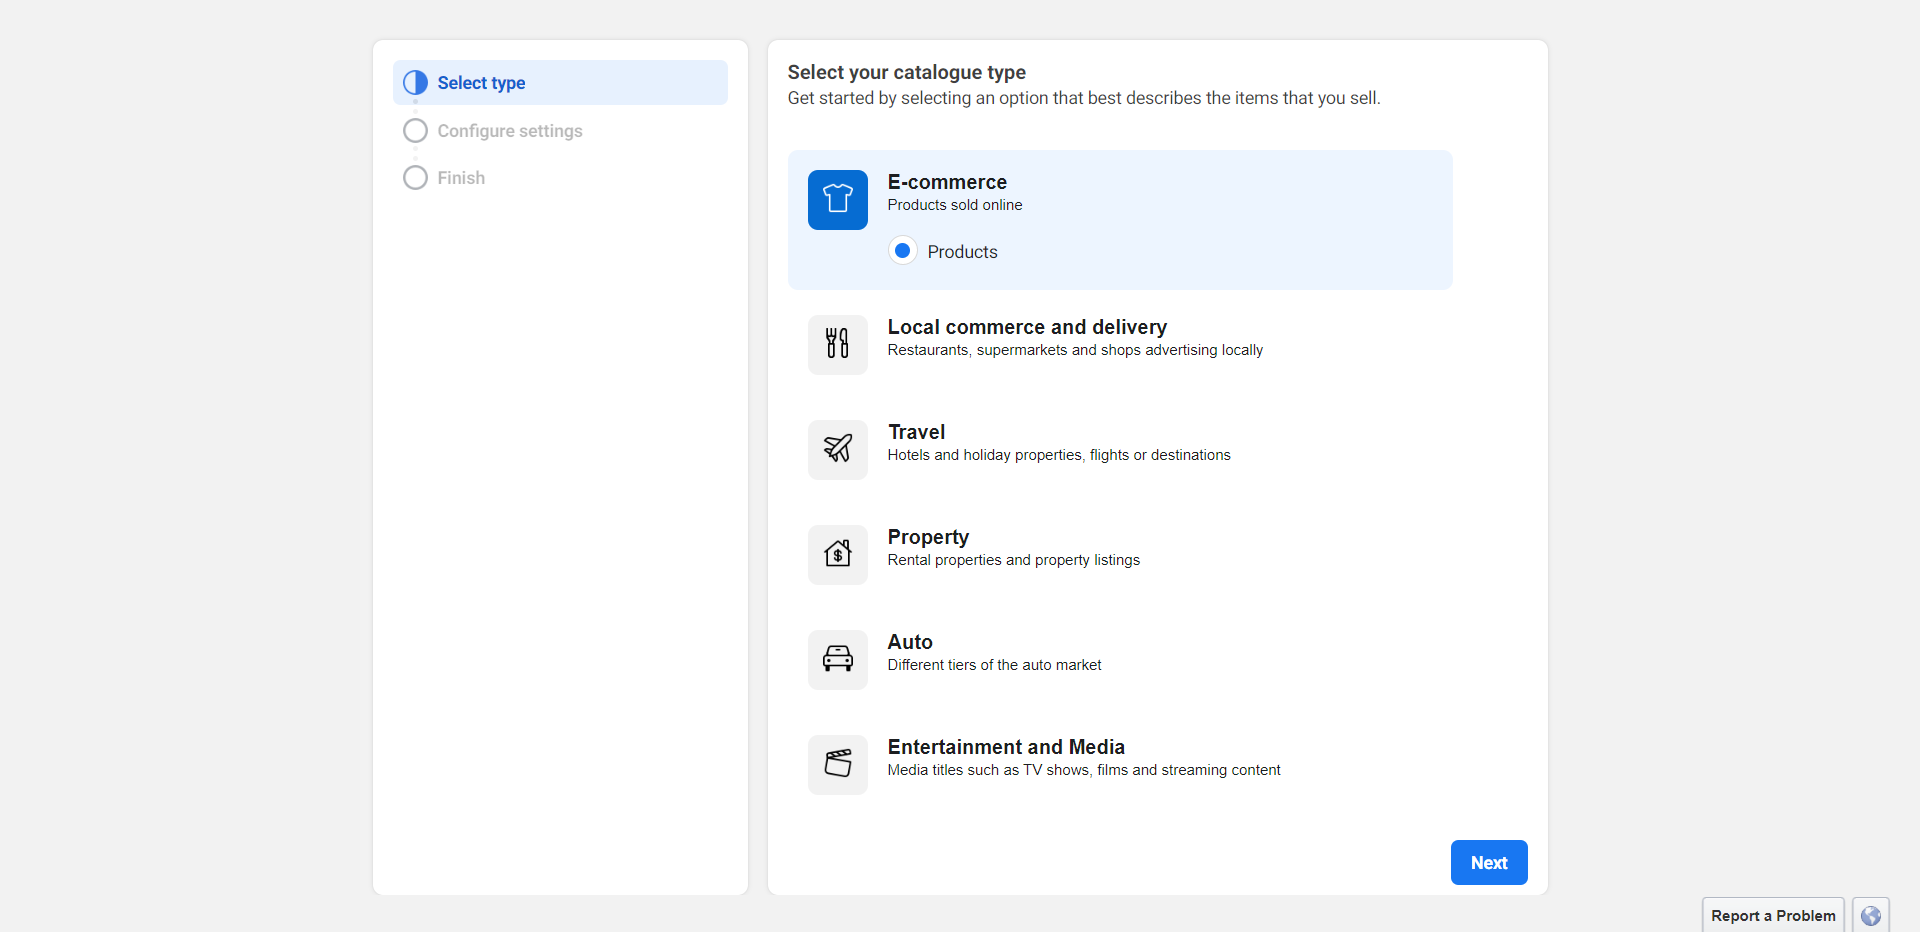
Select the catalog type. E-commerce is an excellent choice for businesses.
You may add product information by selecting Upload Product Info, entering a catalog name, and then clicking the Create button.

Click View Catalog to view the catalog. The Data Source option will appear on the left under the Catalogue tab.

Select Data Feed from the Add Items menu.
There are three ways to upload information about your products on Facebook and Instagram. In the following tab, you may pick between uploading from your PC, entering a URL, and using Google Sheets.
The procedure is complete once you click Upload after selecting your product feed file.
Once the product feed has been uploaded to your Commerce Manager, you must link your Instagram account to the Commerce Manager. This will sync the same catalog with Instagram automatically.
Step 4: Maintain Your Catalog
Finally, keep everything running smoothly by regularly maintaining your catalog with updates such as new product details or product changes. The plugin provides all the necessary features including auto-sync in order to keep catalogs up to date. Any updates made to your existing products in WooCommerce will reflect in your Facebook account.
Tips for Optimizing Your Catalog
When creating your Facebook and Instagram catalogs, it’s critical to follow some best practices. Here are some pointers to help you get the most out of your catalog and maximize your sales potential:
- Provide as much information as possible: When developing and adding goods to the catalog, make sure to provide as much information as possible about them. This contains any pertinent descriptions, photographs, videos, and other material. This will assist to guarantee that individuals seeing your items in the catalog have an optimal user experience.
- Select high-quality images: When picking images for each product, be sure to select high-quality images that showcase the product in its best light. Remember that this image will be posted across several social channels, so make it pop!
- Organize for easy navigation: One of the best aspects of the Facebook and Instagram catalogs is how simply buyers can traverse them. So make sure you order them in a way that allows someone to quickly and easily discover what they’re searching for.
By following these tips, you can ensure that your catalog is optimized correctly so that people can find what they’re looking for while browsing your store.
How to Manage Your Catalog
Now that you’ve created your catalog, how do you manage it?
Quality Control
It is critical to ensure that all of your items are correct and up to date. This is why it is critical to conduct frequent quality control tests. You should go through the list of items in your catalog with a program like Facebook Business Manager to ensure that all of the information is comprehensive and accurate.
Product Updates
Product updates might include everything from new product descriptions and photos to pricing modifications. Keep in mind that any changes to your catalog will be reflected in Facebook Ads, so having appropriate management systems in place is critical.
Testing Ads
When using campaigns on both platforms, ad testing is essential. Keep track of which of your advertisements are doing well and alter them accordingly; this will allow you to maximize your ad budget and get the most out of each ad. Remember to test numerous variants of each ad before releasing it; this will assist you in determining the perfect combination of text, graphics, and CTAs for optimal results.
Conclusion
Setting up a Facebook & Instagram Catalog is a great way to unlock your selling potential. By keeping both platforms in sync and up-to-date with fresh content and a clean, organized setup, you can easily show off all of your products in one spot.
The setup takes only minutes to complete and has step-by-step instructions so that you can get started quickly and easily. Additionally, the ELEX WooCommerce Catalog Feed for Facebook & Instagram plugin makes the process even easier.
We hope this post has helped you set up a Facebook and Instagram Catalog for your WooCommerce store.

