What can we help you with?
How to set up ELEX WooCommerce Australia Post Shipping Plugin with StarTrack Account?
In this article, I talk about setting up ELEX WooCommerce Australia Post Shipping Plugin with Print Label & Tracking using StarTrack account. For setting up the plugin with regular Australia Post eParcel account and other settings, read our main documentation. Refer the product page to know more about other various features of the plugin.
What is Australia Post StarTrack Courier?
StarTrack courier service is one of the modules of Australia Post shipping service. It caters only to domestic regions of Australia like CBD (Central Business District) of Melbourne and metropolitan areas of Australia’s major capital cities. If your store is located in Australia and you ship only within Australia, then StarTrack service can be suitable for you. Unlike Australia Post eParcel services, StarTrack does not have complexities for domestic shipping service. The services are relatively faster and unambiguous.

To use StarTrack service, you need to have an Australia Post contracted account. Based on your contracted account, the services may differ in the API you use to access the real-time rates. The Shipping labels and Order manifest for StarTrack account differ from the regular eParcel account. Other Australia Post services like Shipment tracking, Extra Cover (Insurance), and Signature option apply for both eParcel as well as StarTrack contracted accounts.
Setting up ELEX WooCommerce Australia Post Shipping Plugin with the StarTrack account
A complete, step-by-step explanation is already given in the main documentation of the plugin with the eParcel account. This article will discuss only specific settings that are affected by the StarTrack account in the plugin. For other plugin settings, follow the link given in respective instances.
You can access the ELEX WooCommerce Australia Post Shipping Plugin settings from WooCommerce > Shipping > Australia Post.
General settings
Go to WooCommerce > Shipping > Australia Post > General.
In this tab, you can enter your Australia Post API keys, StarTrack API Key(if you have a separate API Key for StarTrack), and StarTrack account credentials to access Australia Post and StarTrack real-time rates and services.
The complete settings are as shown in the screenshot below.

i) Account Details:
- API Key – Enter the API key that you have received from Australia Post after you have registered for an account. This API key is applicable for both contracted and non-contracted account.
- Contracted Account – To use contracted account rates, tick the respective checkbox. Further settings appear where you need to enter API password & Australia Post Account Number and choose either Live or Test mode of transaction.
- Enabling StarTrack – To enable StarTrack account, tick on the checkbox ‘I have a StarTrack Account’. Enter the respective StarTrack credentials and choose the mode of transaction.
- If you have a separate API Key for the StarTrack account, you can enable the option and enter your StarTrack API Key.
Quick note: The API Keys for StarTrack and regular Australia Post eParcel account can be same, but the API Password and Account Number will be different. Hence, make sure you use the right credentials.
ii) Enable/Disable settings:
- Enable Real-time Rates – Tick this checkbox to access StarTrack real-time rates on your WooCommerce store.
- Enable Shipping Label (Contracted) – Tick this checkbox if you want to create a shipment, generate and print shipping labels for your orders. If this setting is unchecked, you can still access real-time rates, but will not be able to create shipments for your orders.
- Enable Developer Mode – If you are having trouble getting real-time rates, creating shipments, or configuring any settings of the plugin, you can tick this checkbox and trace issues using log. You can see information about debugging at the top of the cart and checkout pages. After enabling debug mode, add a product to cart. Go to cart or checkout page to see the debugging information.
iii) Default Currency: This shows you the default currency of Australia Post.
iv) Shipper Address: Enter shipper name, address (the address from where the items will be shipped), contact number and email address in the respective text-fields.
Click Save Changes once you have configured all settings.
Rates & Services
Go to WooCommerce > Shipping > Australia Post > Rates & Services.
This tab contains settings for configuring Australia Post StarTrack services and how they will be displayed on the front-end of your store.
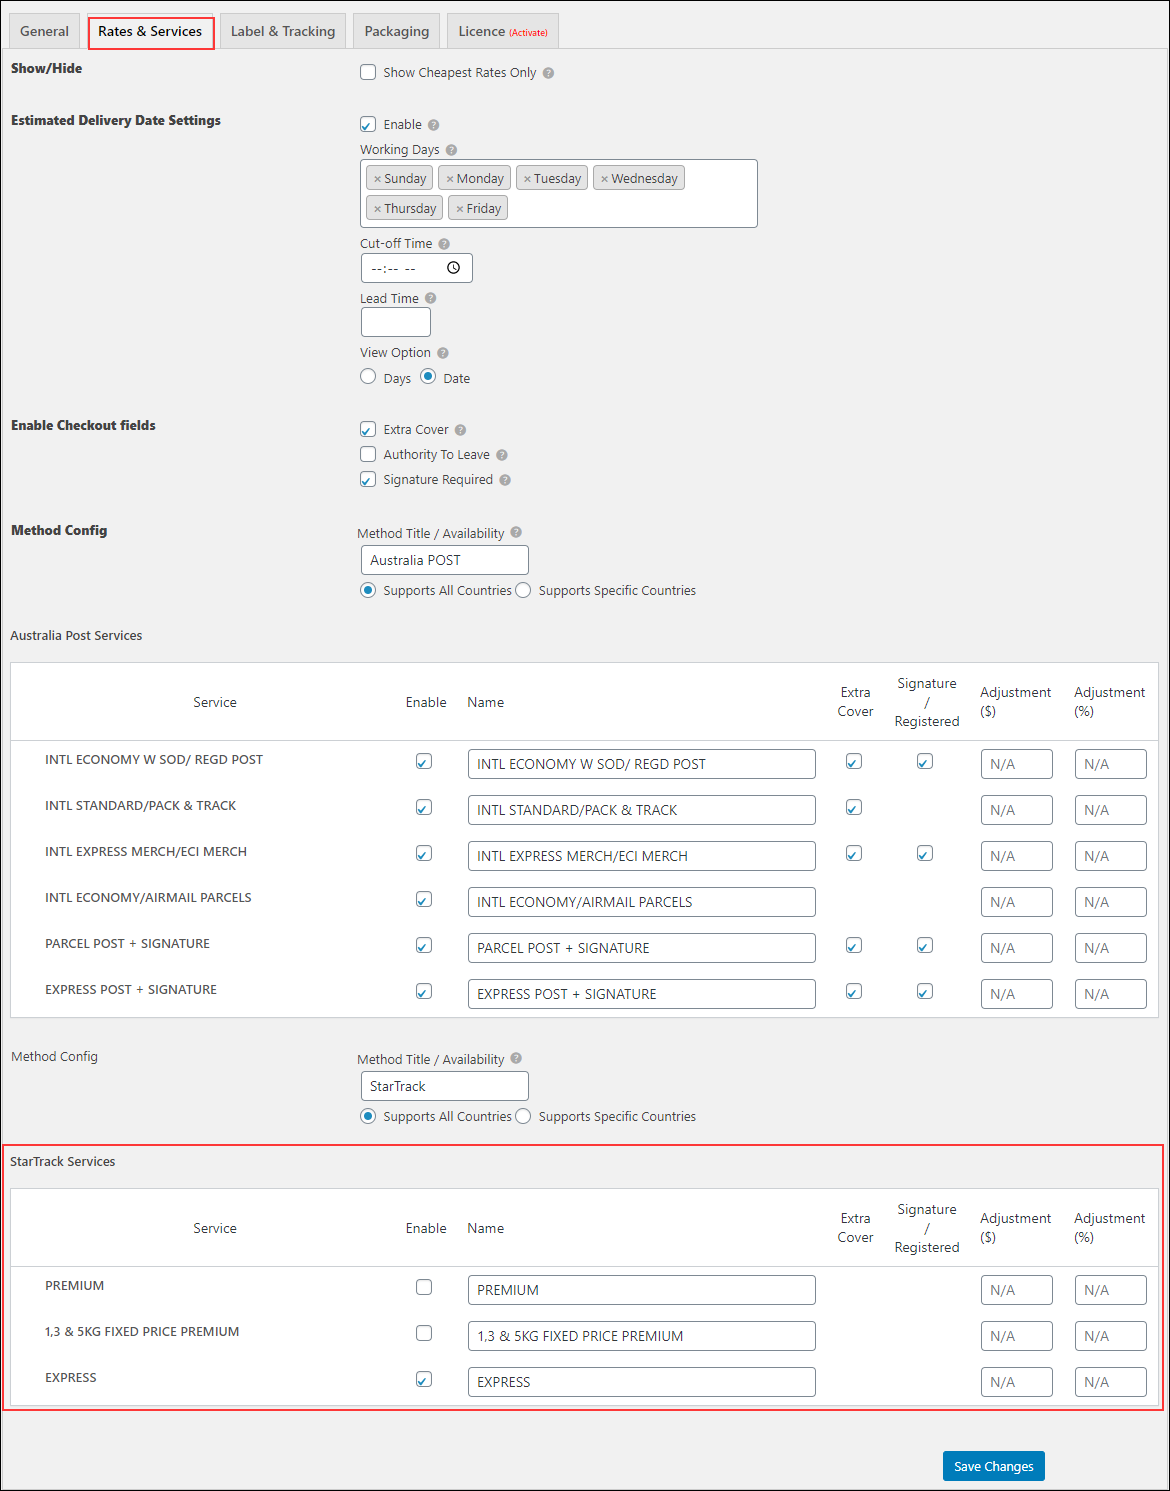
i) Show Cheapest Rates Only: This option shows services only with the cheapest quote from the enabled Australia Post StarTrack services in the Services section (discussed in the later part of this article).
ii) Estimated Delivery Date Settings- Enable the checkbox to show the estimated delivery date for the chosen services.
- Working Days: You can select your working days from the drop-down menu for calculating the estimated delivery date, as shipments only happen on working days.
- Cut-off Time: Provide a cut off time here. The orders placed after the cut-off time will be shipped on the next working day.
- Lead Time: If you need more days to initiate the shipment due to some reasons, you can add the required number of days here. Lead time will be added to the number of days calculated with the working days and cut-off time. The total days will be taken to calculate the estimated delivery date.
- View Option: You can either choose Days or Date to display the estimated delivery date to the customers. If you choose Days, it will display the total number of days required to deliver the order. If you choose the Date, it will display the exact date of delivery.
iii) Enable Checkout fields: These options will be available to the customers on the checkout page.
- Extra Cover – This setting is used to add insurance amount to the product. Once a customer enables this option on the checkout page, $2 will be charged per $100 of total product amount.
For example, if three products of $30 each are bought, then the extra cover amount will be $2. Hence the total amount will be $92 ($30×3+$2). If a customer adds one more product of the amount, then the extra cover amount will be $4. Hence the total amount will be $124 ($120+$4). - Authority to Leave – Once this option is checked by the customers, the package can be left at the door.
- Signature Required – When enabled by the customer, the package delivery person must take a signature of the person accepting the package. An amount of $2.95 is charged for this type of service.
iv) Method Config:
- Method Title – Enter a custom method title for Australia Post shipping method. This method title will be displayed on the cart and checkout pages.
- Method Availability – This field allows you to select countries, for which Australia Post shipping method will be available.
There are two options:- Supports All Countries: Choose this option if you offer Australia Post shipping method to all over the world. This option is selected, by default.
- Supports Specific Countries: Provides option to select desired countries. The Australia Post shipping method will be available only in selected countries.
v) StarTrack Services: Based on your Australia Post StarTrack account, the services will be dynamically shown to you in this table. The services may differ from one account to another.
For our demo account, we are getting the following services:
- PREMIUM
- 1,3 & 5KG FIXED PRICE PREMIUM
- EXPRESS
You can enable desired StarTrack services, give a custom service name, add Extra Cover (insurance amount), and set price adjustments. You can read the Price adjustments use-cases explained in the main documentation.
Quick Note: The Extra Cover option in the Checkout field (for the customers) will override any Extra Cover setting defined in the Services tab.
Click Save Changes to save the settings.
Label & Tracking
The label and tracking settings for the StarTrack account are as shown below.
![]()
i) Enable/Disable settings:
- Email Tracking – Tick this checkbox to send shipment tracking information to your customers via email.
- Enable Direct Download: Tick this checkbox to configure a single click download for labels, instead of following the traditional document printing procedure.
- Save Shipping Labels – Enable the same to save the shipping label generated, to the wp-content folder. These labels can be fetched anytime in the future when required.
- Show Australia Post Logo on the Shipment labels: Enable this setting to show the Australia Post logo on the shipment labels.
ii) Customer Address Type:
- Normal Delivery Address – For customers with general house address. This option is the default for StarTrack courier service.
- Australia Post Parcel Locker – For customers who opt for parcel locker facility.
- Australia Post Parcel Collection location – For customers who choose the desired Australia Post pickup location to collect their parcel.
iii) Bulk Shipment: Choose the default domestic and international service for bulk generation of domestic and international shipment label respectively. This label generation is processed in WooCommerce Orders page. If there are no shipping services defined for an order, the default services defined in these settings will be taken into consideration.
For the StarTrack account, the services are dynamically updated based on your Startrack account. For our demo account, we are able to access the following services for bulk shipment:
- PREMIUM
- 1,3 & 5KG FIXED PRICE PREMIUM
- EXPRESS
iv) Documents Output Type: Shows the default output format for printing documents, that is PDF.
v) Documents Layout: Choose from the following desired layouts for printing the StarTrack label.
- A4-1pp
- A4-2pp
- A4-1pp Landscape
- A4-2pp Landscape
- A6-1pp
vi) Weight/Dimension Unit: Shows the default weight and dimension unit, that is KG/CM.
vii) Shipment Content: You can provide a description of the shipping contents. This description will be printed on all the printed documents and is usually required for security checks and customs.
viii) Custom Shipment Message: The plugin provides flexibility to customize shipment tracking message. This message will appear in the email, WooCommerce Admin order page, and Customer’s Orders section (under the My-Account page).
You can use placeholders to fill the details of the shipment, automatically. You can frame the message by including tags [DATE], [SERVICE] and [ID]. Details of these tags are given below.
| Tag | Description |
|---|---|
| [DATE] | Shipment date will be replaced in the order page tracking section. |
| [SERVICE] | Selected shipping service will be replaced in the order page tracking section. |
| [ID] | Tracking code will be replaced in order page tracking section. |
Let us look at how shipment tracking messages can be framed:
- Default message: When all fields are filled in the Shipment Tracking section on individual order admin page, the shipment tracking message appears as given below –
Your order was shipped on 2018-01-01 via Australia Post. To track the shipment, please follow the link of tracking IDs EN428785455IN, EN428785456IN.
Note: The link on shipment IDs leads to the live tracking details on their website.
- No Shipment IDs: In this case, the default message will be displayed as shown below –
Your order was shipped on 2018-01-01 via Australia Post.
- No Dates: If you have not mentioned [DATE] tag, the message is shown as –
Your order was shipped via Australia Post. To track the shipment, please follow the link of shipment IDs EN428785455IN, EN428785456IN.
- No Tracking IDs and Date: Admin can even proceed with only selecting shipping service, and ignoring tracking ID field and date field. The message is as given below –
Your order was shipped via Australia Post Service.
ix) Dangerous Goods (StarTrack): Enable this option if you are sending dangerous goods using StarTrack.
Once all settings are configured, save changes.
Parcel Packaging
Real-time rates are calculated based on product dimensions and weight, and the best-fitted box rates are returned from Australia Post. This rates will depend on the method used for packing the parcel.
Our ELEX WooCommerce Australia Post Shipping plugin offers three types of parcel packing methods:
- Individual Packing
- Pack into boxes with weight and dimensions
- Order Total Weight
A complete, step-by-step explanation about these parcel packaging options is given in the Parcel Packaging section of the main documentation.
Demonstrations
Once you have configured all the settings, go to your front-end of the store to test the settings.
Accessing StarTrack real-time rates and services on the WooCommerce cart page:
After a product is added to the cart, the plugin will calculate the estimated shipping rate and will display them as shown in the screenshot below.

How to print StarTrack shipping labels?
Printing StarTrack shipping labels is very much similar to printing eParcel shipping labels. You can follow the same step-by-step demonstration given in the main documentation.
A sample StarTrack shipping label is shown below.

How to generate StarTrack order summary/manifest?
This procedure is similar to that for Australia Post eParcel account. You can follow the same step-by-step demonstration explained in the main documentation of the plugin.
A StarTrack Order Manifest consists of two documents; Driver Copy and Sender Copy.
A sample StarTrack Order Manifest Driver Copy is shown below.

A sample Sender Copy of StarTrack Order Manifest is shown below.

How to generate Australia Post StarTrack shipping labels in bulk?
To generate StarTrack shipping labels in bulk, you would need our ELEX WooCommerce Australia Post Bulk Label Printing Add-On. Once you have purchased this add-on, you can read how to bulk print Australia Post shipping labels to set up the add-on.
How to configure WooCommerce Australia Post StarTrack shipment tracking?
The steps to configure shipment tracking is same as for an eParcel account. Follow the step-by-step demonstration explained in the main documentation for tracking shipment orders.
To explore more details about the plugins, go check out ELEX WooCommerce Australia Post Shipping Plugin with Print Label & Tracking.
Read the product setting up article to understand the plugin, in detail. Or check out the product documentation section for more related articles.
You can also check out other WooCommerce and WordPress plugins in ELEX.