What can we help you with?
How to Set Up WSChat – ELEX WordPress Live Chat Plugin?
This article is the step-by-step tutorial to set up WSChat – ELEX WordPress Live Chat Plugin. Check out the plugin’s product page for more details.
With the help of WSChat — the ELEX WordPress Live Chat Plugin, you can easily integrate a chatbot into your site, allowing visitors to ask questions and get answers in real time. The quality of support that you give your customers is a major factor in whether or not they decide to purchase from your store. Customers will often come to you for guidance right before making a major purchase or in an urgent situation when they need immediate assistance.
Live chat gives them a better chance of getting a prompt answer than email or social media, therefore they prefer using it in these situations. This plugin is the most efficient means of instant connection, and because all conversations are recorded in the same chat thread, agents may simply respond to, initiate, help, and resume a conversation at any time.
Overview
Here are some of the WSChat plugin’s key features:
- Add a Live Chat Widget: A live chat widget can be added to your company’s website to facilitate instant conversations with visitors.
- Attach and Send Files from the Chatbox: To enhance their support experience, both customers and agents can attach and send files.
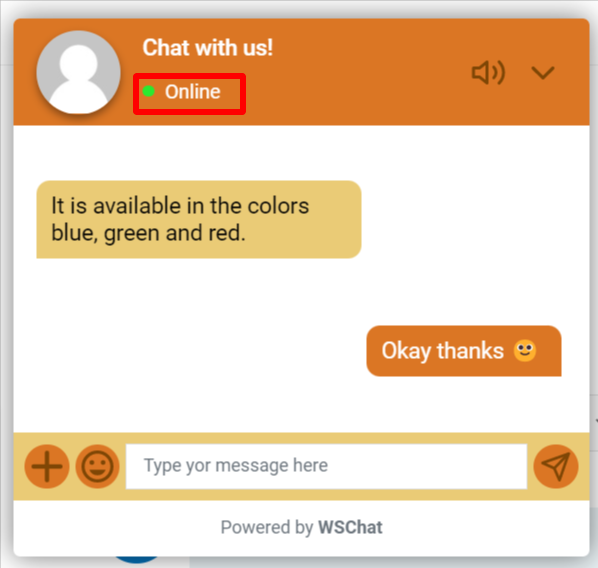
- Enable or Disable Live Chat: Displaying your availability on the chat widget header will let your customers know whether you are online or offline, enabling them to communicate with you in the most appropriate manner.
- Proactive Chat Initiation: Using this plugin, you can see who is now visiting your site and start a conversation with them in real time. This provides you with the opportunity to assist them with their issues in advance and is an effective strategy for dealing with pre-sales questions.
- Add a Pre-Chat Form: Present pre-chat forms to engage with users even while you’re not online and collect data from guests who haven’t signed up for an account.
- Restricted Chatbot Pages: You can prevent the chatbot from appearing on specific pages of your website by including the URL of those pages on an exclusion list. If you do this, the chatbot will not show up on those pages.
- Chat Tags: Create tags for important chats so that support staff may quickly identify them in the tags tab and refer to them as necessary.
- Auto Reply Messages: In order to ensure that you never miss a customer’s inquiry, set up an automatic reply message to let them know that you are currently unavailable but will respond as soon as possible.
- Unlimited Chat History: The user-friendly chat dashboard gives you access to the full conversation that you’ve had with each and every one of your potential customers.
- Real-Time Visitor Tracking: In the Active Visitors dashboard, you can see both registered and unregistered users who are currently accessing your website. Keep an eye on data like where your visitors are coming from, what they’re looking at, what kind of system they’re using, how long they’re staying on your site, and whether or not they’ve made use of your live chat feature.
- Agent Alerts: Set up audio notifications for agents whenever they receive a new customer communication. This will help staff members respond promptly to customer messages.
- Header Options for Chat Widget: Chat headers have a “mute” option by default. Attachments, a video recorder, and the ability to email chat history and chat ratings are additional chat box capabilities.
- Integration with ChatGPT: Using ChatGPT AI, the WSChat can ensure that your live chat responses are professional by generating intelligent and appropriate auto-responses, checking for spelling errors before replying to customers’ queries, and transforming the response text into a business tone.
- Integrating with Pusher: The Pusher WebSocket is a third-party server that enables you to have multiple clients in conversation at once.
- Dialogflow-Google Chatbot AI Integration: Use AI and NLP in customer conversations to solve problems quickly even while you’re offline. WSChat’s seamless integration with Dialogflow means you can quickly and easily configure the training words and responses for your customer’s inquiries.
- Fun Emojis: Emojis are a great way to liven up a conversation with a client and show off your brand’s personality.
You get all of these features—and a lot more besides—rolled into one convenient package to make it easier for you to communicate clearly and effectively with your customers.
The WSChat ELEX WordPress Live Chat Plugin: A Quick Start Guide
This guide will walk you through everything you need to know about completing the ELEX checkout process. Additionally, you can learn about downloading, setting up, and activating ELEX plugins by reading this article.
There are two paths to the plugin’s configuration page after installation and activation:
Navigate to Plugins > Installed Plugins > ELEX WordPress Live Chat (WSChat) Premium > Settings from your WordPress Dashboard.
OR
WordPress Dashboard Sidebar > WSChat > Settings.

The plugin is divided into seven pages including Live Chat, Tags, Chat History, Live Visitors, Agents, Settings, and License. We will walk you through each of these pages after configuring the settings.
Settings
The settings page is divided into six tabs: General Settings, Restrictions, Customization Settings, Email Settings, Integrations, and Agent Settings. It is time to configure the plugin settings now that we have a better understanding of what it is capable of doing.
General Settings

Live Chat: A live chatbox will be displayed on your website once you enable the live chat button.

Tags: Enable this button to be able to tag important conversations so support staff can easily find them in the tags tab and refer to them.
Default Tag Color: The created conversation tags will be marked in the set color.

Communication Protocol
Pusher: Pusher WebSocket provides a platform for developers to build and deploy messaging, notification, and real-time chat features on their applications. It works by establishing an ongoing connection between the server and the client, allowing messages to be sent and received in real time. Using WebSocket technology, the platform enables real-time, continuous exchange of information between the server and the client, with a variety of libraries and SDKs for various programming languages and platforms. WSChat’s integration with Pusher ensures the simplicity, scalability, and reliability of your live chat capabilities.
To create a free Pusher account, click here. Costs associated with the WebSocket service will apply.
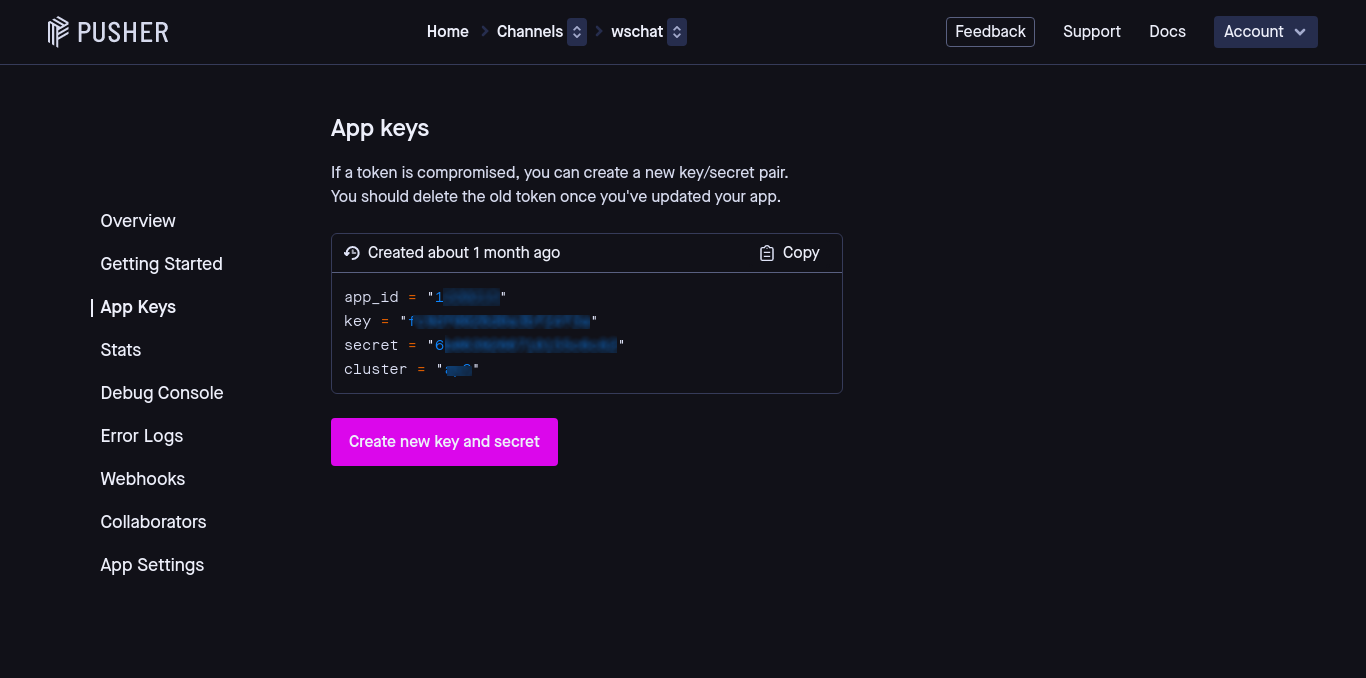
Enter your App ID, Key, Secret, and Cluster, which you will obtain after creating your Pusher account.

HTTP: HTTP forms the basis for facilitating communication between online stores and their customers. WSChat is designed to provide seamless communication between users and our web server. Use HTTP if you do not intend to use external servers for Customer-Agent communication. It is not recommended for slower servers, as there is a possibility of losing chat if a large number of support agents are dealing with live chats in bulk.
For optimal performance in managing high volumes of live chat communications, we recommend using Pusher. While HTTP can suffice for smaller volumes, Pusher is the ideal solution for eCommerce businesses dealing with bulk data communications.

Pre Chat Form

Status: Enable the pre-chat form to be displayed on the conversation widget by activating this setting.
Pre-Chat Form Label: You can display a custom label for the pre-chat form which will be provided for your website visitors to fill in.
Only For Offline Mode: By default, if the pre-chat form is enabled, whenever a customer clicks on the live chat chatbox, they will be prompted to fill in the pre-chat form. If you only want the pre-chat form to be filled out when your live chat support is offline, you can enable the Only For Offline Mode button.

Form Fields
Here you can add as many custom fields for your pre-chat form as needed. The default fields include name and email.

Field Type: Choose the valid data types that you want to allow in the new custom field.
Text – Enables only a single line of text to be entered
Textarea – Enables multiple line input from the user
E-mail – For accepting additional email addresses
Number – Will accept numeric values as input
Checkbox – Checkboxes enable the user to select from a fixed number of options.
Radio button – Enable the user to select specifically one item from a selection of several predefined options
Dropdown – A dropdown is a selection of options that can be chosen by selecting the down arrow. Only one of the items on the list can be chosen.
Field Name: Enter a suitable name for the custom field.
Mandatory for End User: Enabling this option will mark the custom field as mandatory and the form cannot be submitted without filling out this field.
After all the settings are configured, click Add Field to add the custom field to your pre-chat form.
Form Preview
The form preview displays a list of all the default and custom fields created for your pre-chat form. Here you can view the field name, type, enable or disable the field and reorder the fields to move them up or down the form.

Restrictions
By default, the WSChat widget will be displayed on all the pages of your website but if you wish to restrict it from being displayed on specific pages, IP addresses, or email addresses, you can set it up here.

Inclusion list: Add the URLs of the website pages where you wish to display the chat widget.
Exclusion list: Add the URLs of the website pages where you wish to exclude the chat widget.
Exclusion list of IP addresses: Add the IP addresses in which you wish to exclude the chat widget.
Exclusion list of Email Addresses: Add the email addresses for which you wish to exclude the chat widget.
Note: Mention the URLs, IP Addresses, and email addresses in a new line as shown in the screenshot.
Upon configuring the restrictions as needed, click Save Changes.
Customization Settings
In this tab, you can customize the widget text, color, font, auto-reply message, header text, alert tone, and a lot more.

Widget Online Text: Enter a custom message that will be displayed to your customers when they click the chatbox and an agent is available.
Widget Offline Text: Set a custom text that will be shown to your customers upon clicking on the chatbox, when your agents are not available.
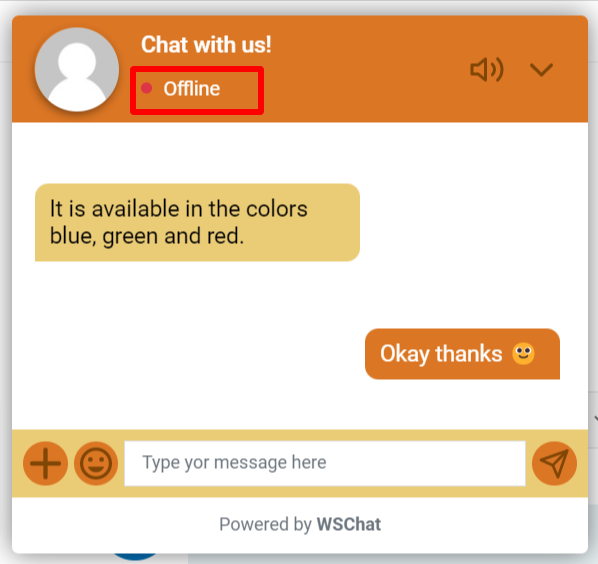
Auto Reply Message: Set a custom message that will be sent automatically to your customers when they send you a message while the widget is offline.

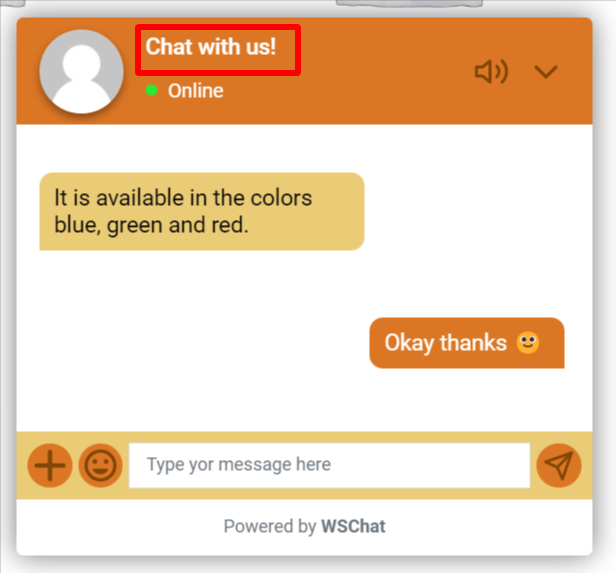
Header Text: You can customize the header text shown at the top of the chatbox.
Alert Tone: Set an alert tone for the agents when a new message from a customer arrives.

Widget Font: Select a suitable font that matches the branding of your business. The fonts you can use are auto, sans-serif, monospace, fantasy, Roboto, and cursive. The site’s default font is used if no other font is specified.

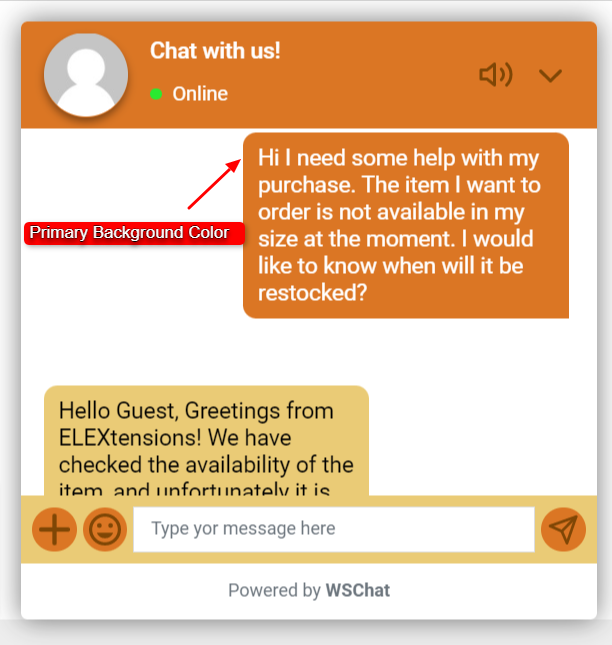
Primary Background Color: Choose the desired primary background color that is to be shown on the background of your chats.
Primary Text Color: Choose the desired primary text color that will determine the color of your texts.

Secondary Background Color: Select the background color of the secondary chat.

Secondary Text Color: Choose your preferred text color for secondary conversations.

Icon Color: Decide which color you want your conversation box’s icons to be.

Info Text Color: Select the color in which you want the info text to be displayed.

Email Settings
WSChat enables you to send a feedback form and an email transcript of the chat to the customer once the chat ends.
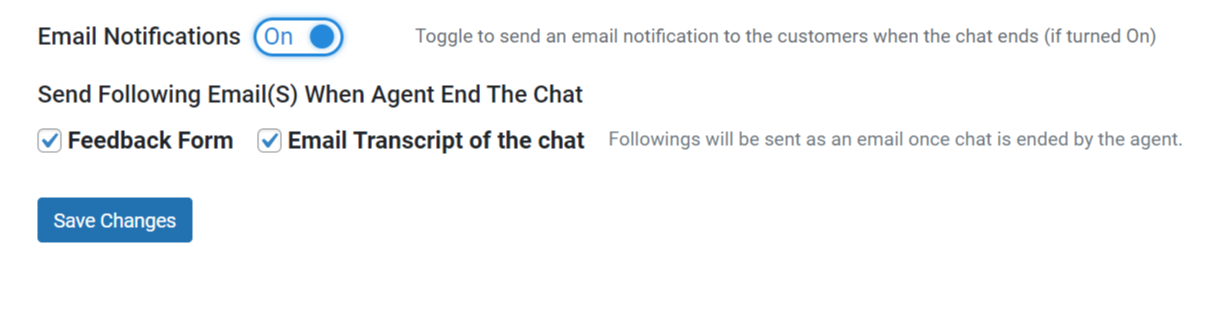
Email Notifications: If toggled on, customers are notified via email when the chat conversation ends.
Feedback Form: A Feedback Form will be sent as an email once the chat is ended by the agent.
Email Transcript of the chat: An Email Transcript of the chat will be sent as an email once the chat is ended by the agent.
After making your selections, make sure you click Save Changes.
Integrations
This tab allows you to integrate Google Dialogflow, WSDesk, and ChatGPT with your WSChat chat widget.

Google Dialogflow
Google’s Dialogflow is a popular platform for building conversational AI interfaces, commonly known as chatbots. Integrating a chatbot with Dialogflow allows businesses and organizations to provide automated, personalized customer service to customers.
For instructions on how to configure Dialogflow, refer to this document.
Once your Dialogflow account has been created, enter the Google Project ID and the Google Project JSON key file content, and select the agent language.
After making your selections, make sure you click Save Changes.
WSDesk Integration
WSDesk is a customer support plugin for WordPress that includes a help center and ticket management system. If the same customer service representatives are handling the website’s help center and live chats, that’s one less thing for them to figure out.
To integrate WSDesk – ELEX WordPress Helpdesk & Customer Support Ticket System with WSChat, you will need to download and install, and setup the plugin.
Once the WSDesk plugin is installed and configured, simply turn on the WSDesk integration option on the integrations tab of the WSChat plugin. Doing so will automatically integrate WSDesk with your WSChat plugin.

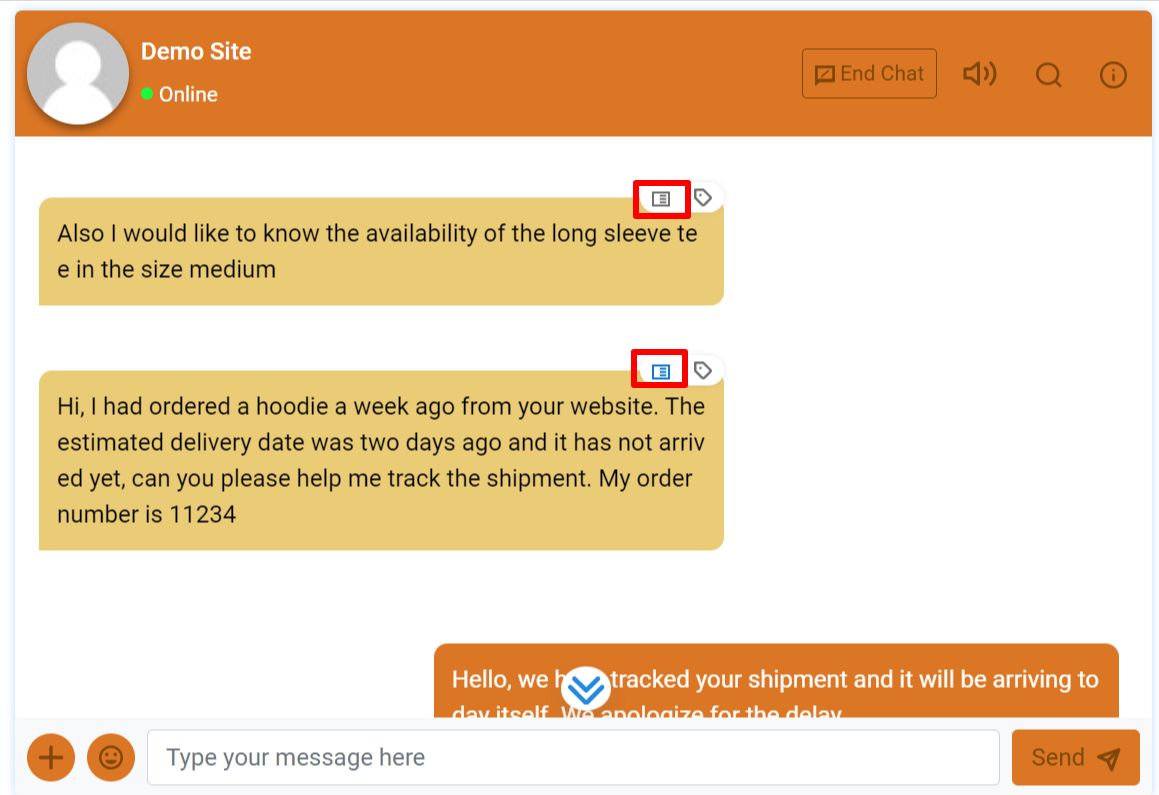
Upon integration, you can easily convert your WSChat conversations into tickets from the live chat page.
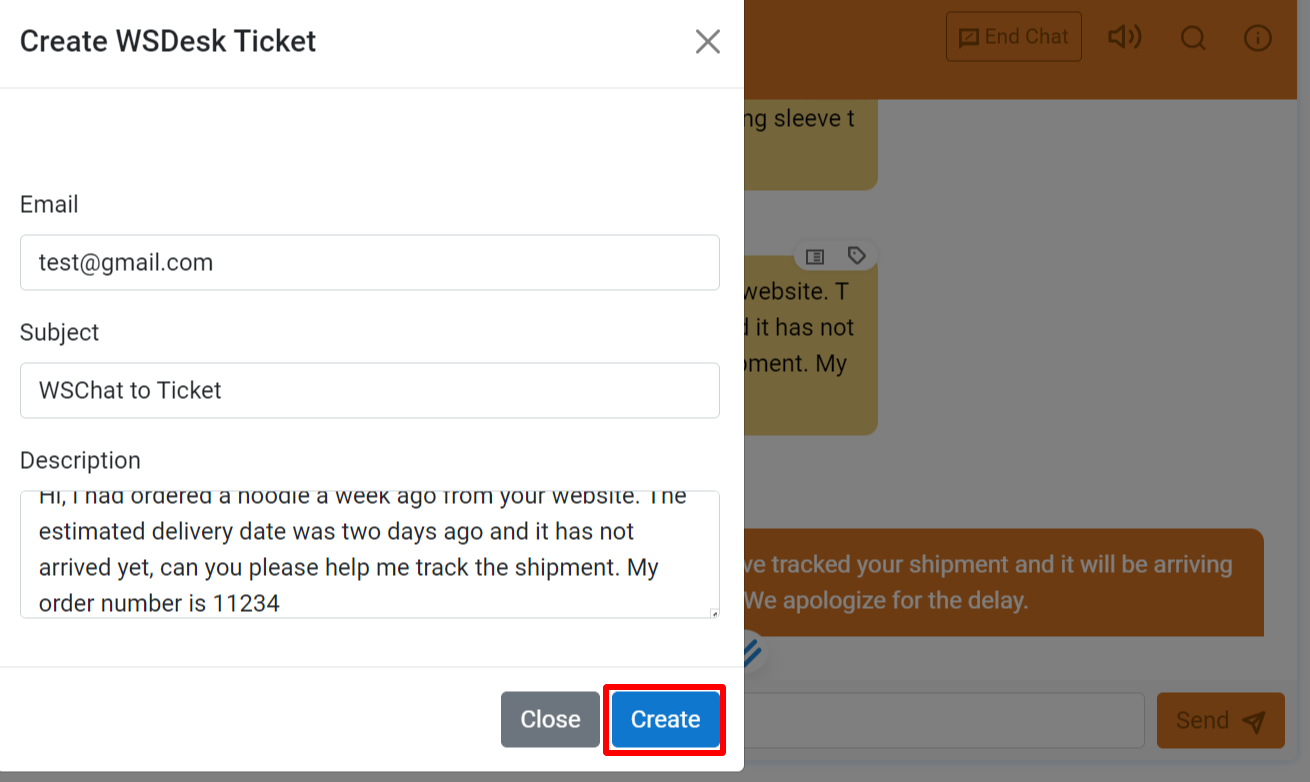
In the Create WSDesk Ticket pop-up window enter the appropriate subject and description for the ticket.

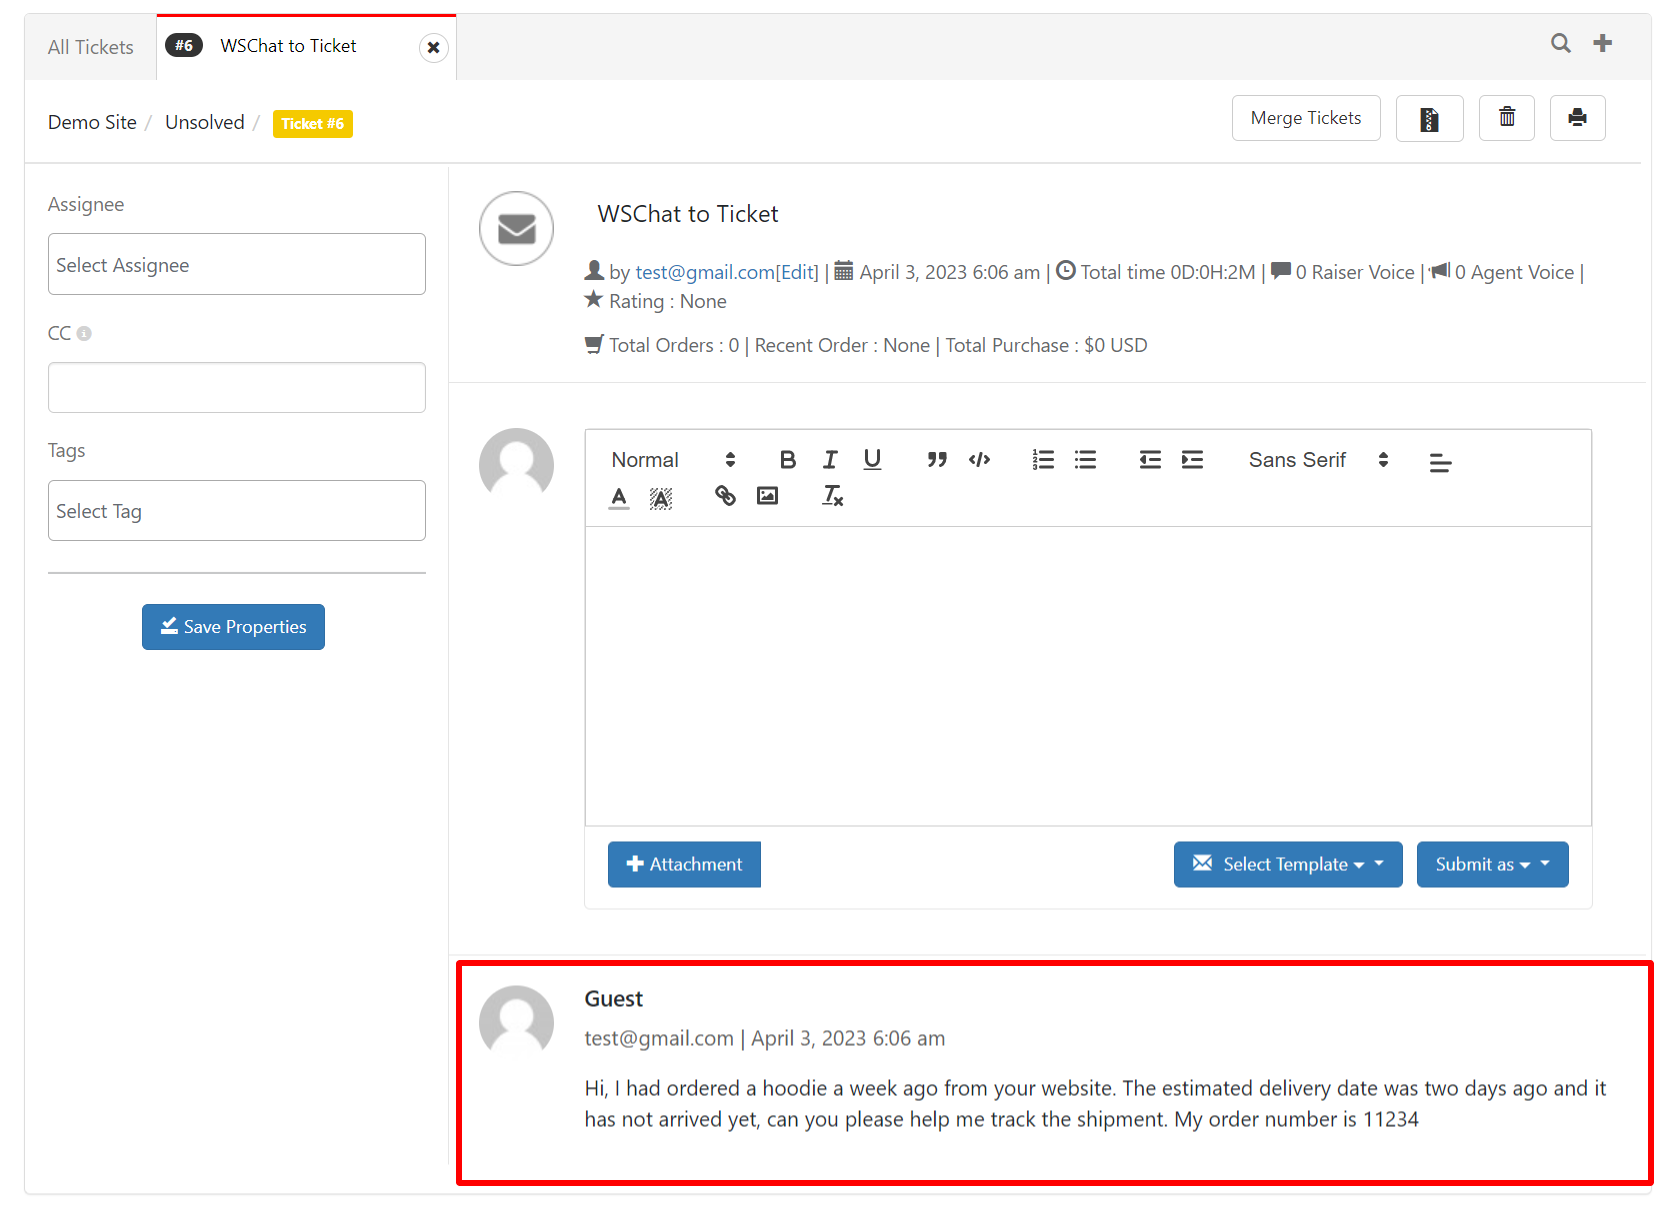
Once the ticket is created it can be managed and tracked from the WSDesk plugin.


ChatGPT Integration
Experience the future of customer support with ChatGPT, the groundbreaking integration that combines the power of ChatGPT AI with the WSChat plugin. Elevate your customer interactions to new heights by seamlessly integrating AI-generated responses into your live chat platform, conducting spell checks, and converting text into a business tone.
With ChatGPT, you’ll unlock a range of benefits that enhance customer satisfaction, streamline support processes, and empower your team.
To integrate ChatGPT, turn on the toggle button to enable the integration and enter your ChatGPT API key. Click here to generate your API Key with ChatGPT if you do not already have one. To know more about the OpenAI API key generation in detail, check out this article.
Next, enable Custom Config Values to customize the length and randomness of the generated replies. Fine-tune your settings with custom configuration values to personalize your experience.
Max_tokens: Set the maximum number of tokens generated in a text sequence, controlling the length of your AI-generated content.
Temperature: Adjust the temperature to influence the creativity of the AI model. Lower values yield focused and deterministic output, while higher values introduce randomness and diversity. Find your desired balance for optimal results.

Click Save Changes.
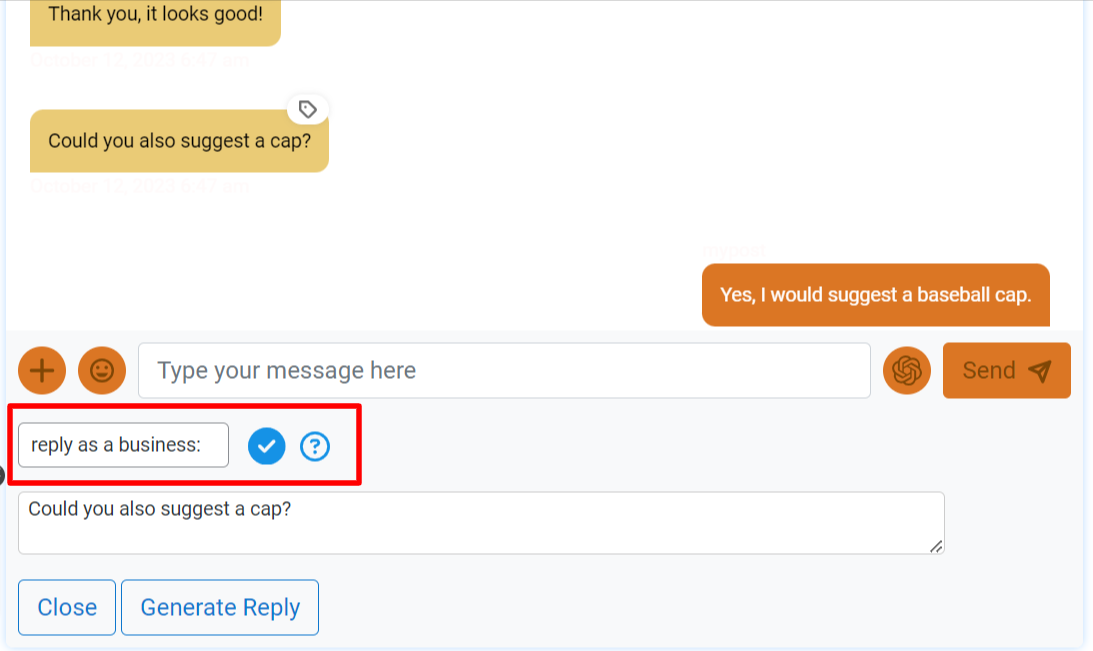
Upon integration, you can easily reply to your WSChat conversations with AI-generated responses. Check out the screenshot.
You can also add more details to the prompt to generate better responses. The default setting is “reply as a chatbot”. You can choose any custom prompt for example “reply as a business” or “reply as a customer support agent”.
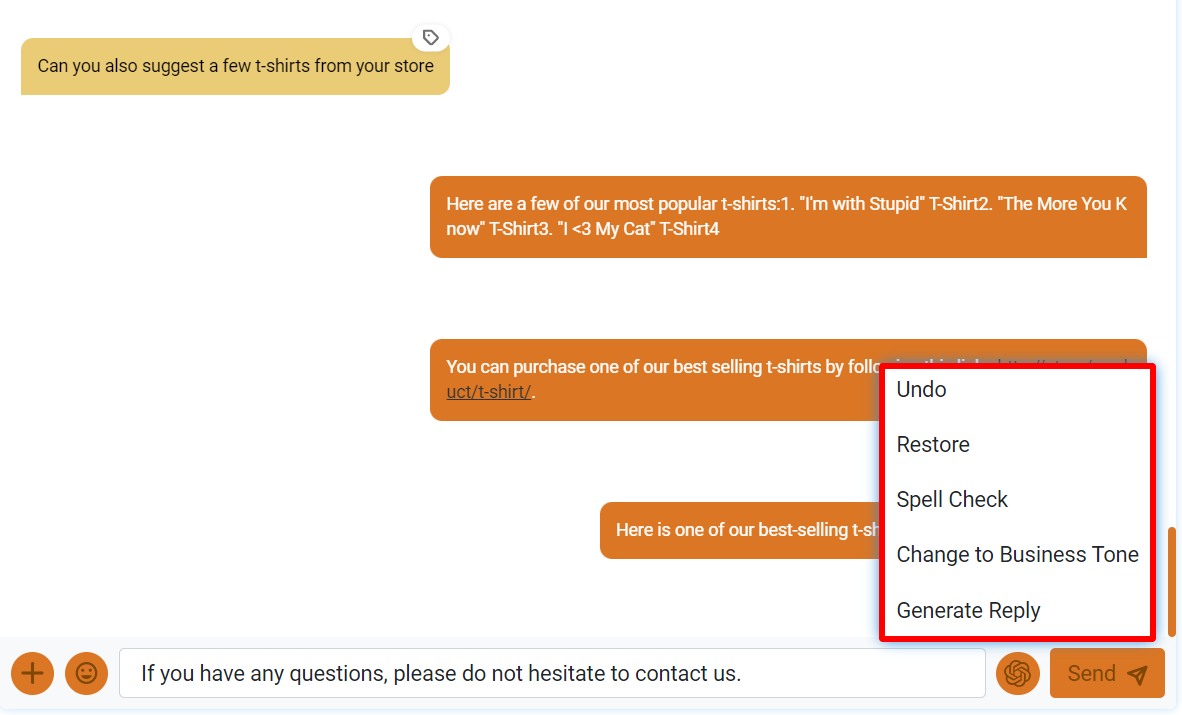
The integration also enables you to check for grammatical errors and change the text to a business tone. Check out the screenshot.

Undo: Reverts the last change.
Restore: Restores the original content.
Spell Check: Checks for spelling errors in the text.
Change To Business Tone: Transforms the text into a professional and formal tone suitable for business communication.
Generate Reply: Automatically generates a suggested AI-generated response based on the input, that can be used as a starting point for your message.
Agent Settings
This tab enables you to create, manage, and configure your business’s customer service agent roles and capabilities.
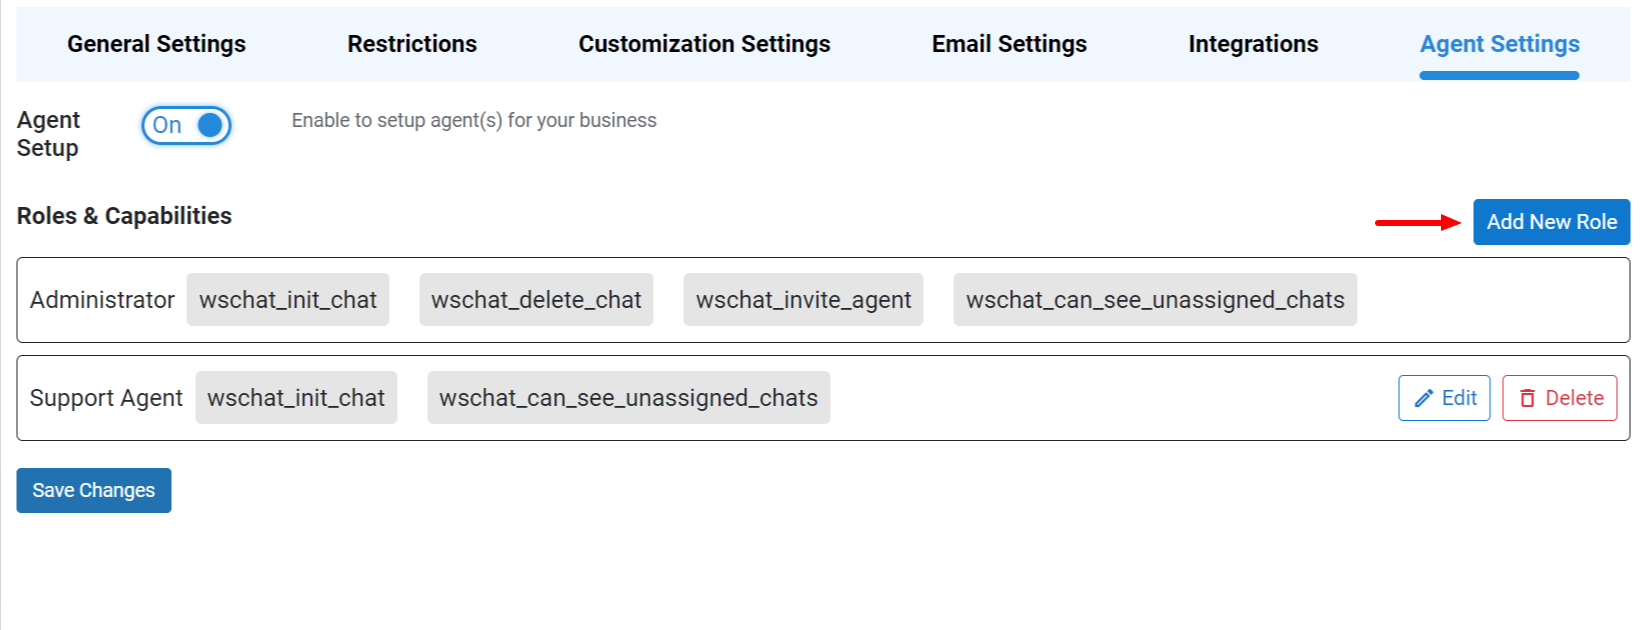
Agent Setup: Enable this option to set up customized agent profiles with different roles and capabilities. The administrator is the default agent role available which cannot be deleted and includes all of the available capabilities:
- Wschat_init_chat – Enables the agent profile with the assigned user role proactively initiating a live chat with customers from the live visitors’ page.
- Wschat_delete_chat – Enables the agent profile with the assigned user role to delete chats from the chat history page.
- Wschat_invite_agent – Enables the agent profile with the assigned user role to add the agent profile from the agents page.
- Wschat_can_see_unassigned_chats – This enables the agent profile with the assigned user role to view unassigned chats from the live chat page.
To create a custom agent role with selected capabilities, click Add New Role.

In the Add New Role pop-up window, enter a suitable name for the role, select the capabilities you want to assign to the role, and click Submit. This will add the newly created role which can then be edited or deleted from the Agents Settings page.

Now that the settings are configured, let’s move on to the other pages: Live Chat, Tags, Chat History, Live Visitors, Agents, and License.
Live Chat Backend Demonstration
To check out the setup options, let’s head over to the website.

We will demonstrate with an example.
In this case, the customer wants to know when he can expect to receive the products he purchased.

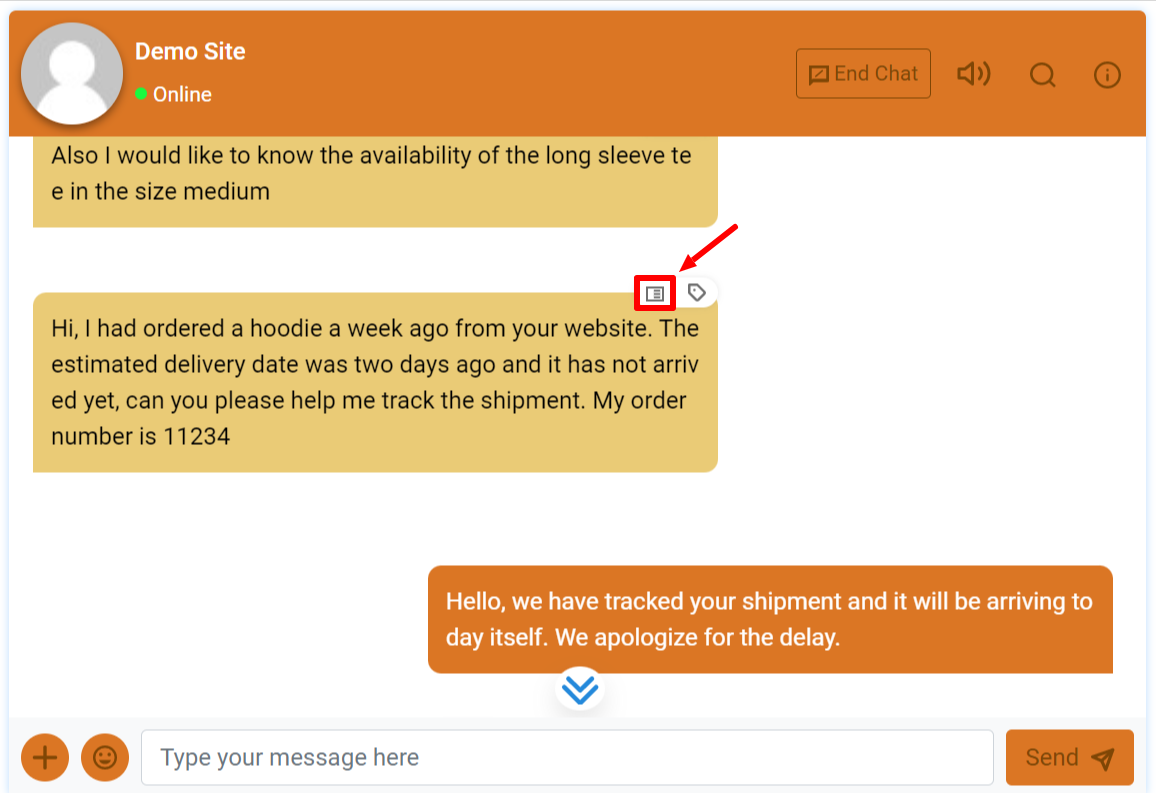
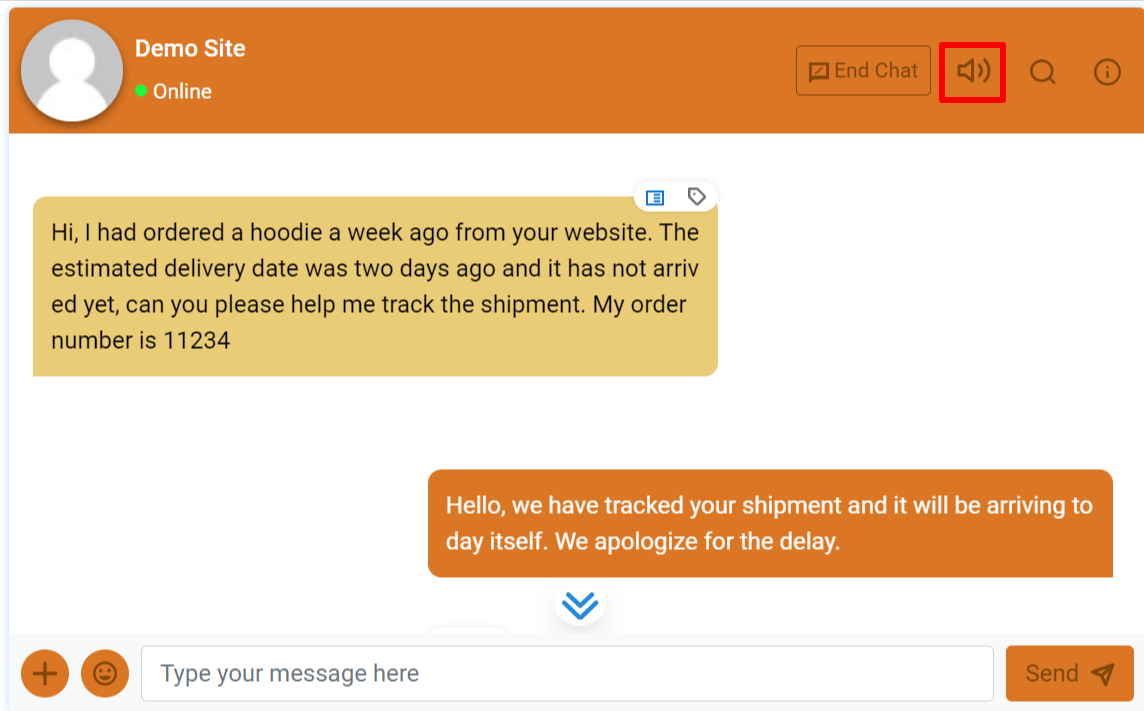
This is what the chat looks like from the agent’s side; they can communicate with customers right from the live chat box. To view Live Chat, navigate to the WordPress Dashboard > WSChat > Live Chat.

Agents can send files, email transcripts, and video messages by clicking the paperclip icon, and all of their past conversations with each customer are saved for future reference.

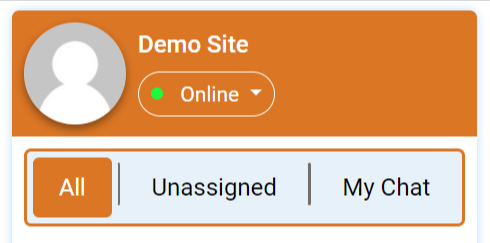
Here the support agent can also set their online or offline availability between online, offline, and busy.

If a customer sends a message while the live chat widget is offline, the predefined automated response will be sent.

The various kind of chats include:
- All: Both assigned and unassigned chats
- Unassigned: The unassigned chats are only shown to agent roles with the wschat_can_see_unassigned_chats capability.
- My Chats: These include the chats taken by the assigned support agent.
Search Users: When you are handling multiple chats simultaneously, the search option can come in handy to search for a particular chat.

End Chat: The support agent can end a chat from the live chat box.

Toggle Alert: The agent notification sound can be toggled off if needed.
Search Chats: The search button on the live chat box can be used to search for older chats.

Search Products and Docs: The support agent can send links to products and documentation right from the chat box without having to navigate to the front end of your website.

Tags: Important conversations can be tagged from the live chatbox for future reference. These can be later searched for and managed from the Tags page.

WSDesk Integration: If you have integrated WSDesk into your WSChat plugin from WSChat Settings > Integrations > WSDesk, you can easily convert your chats into trackable tickets. Once the chat is marked as a ticket, the WSDesk integration button will redirect you to the created WSDesk ticket.
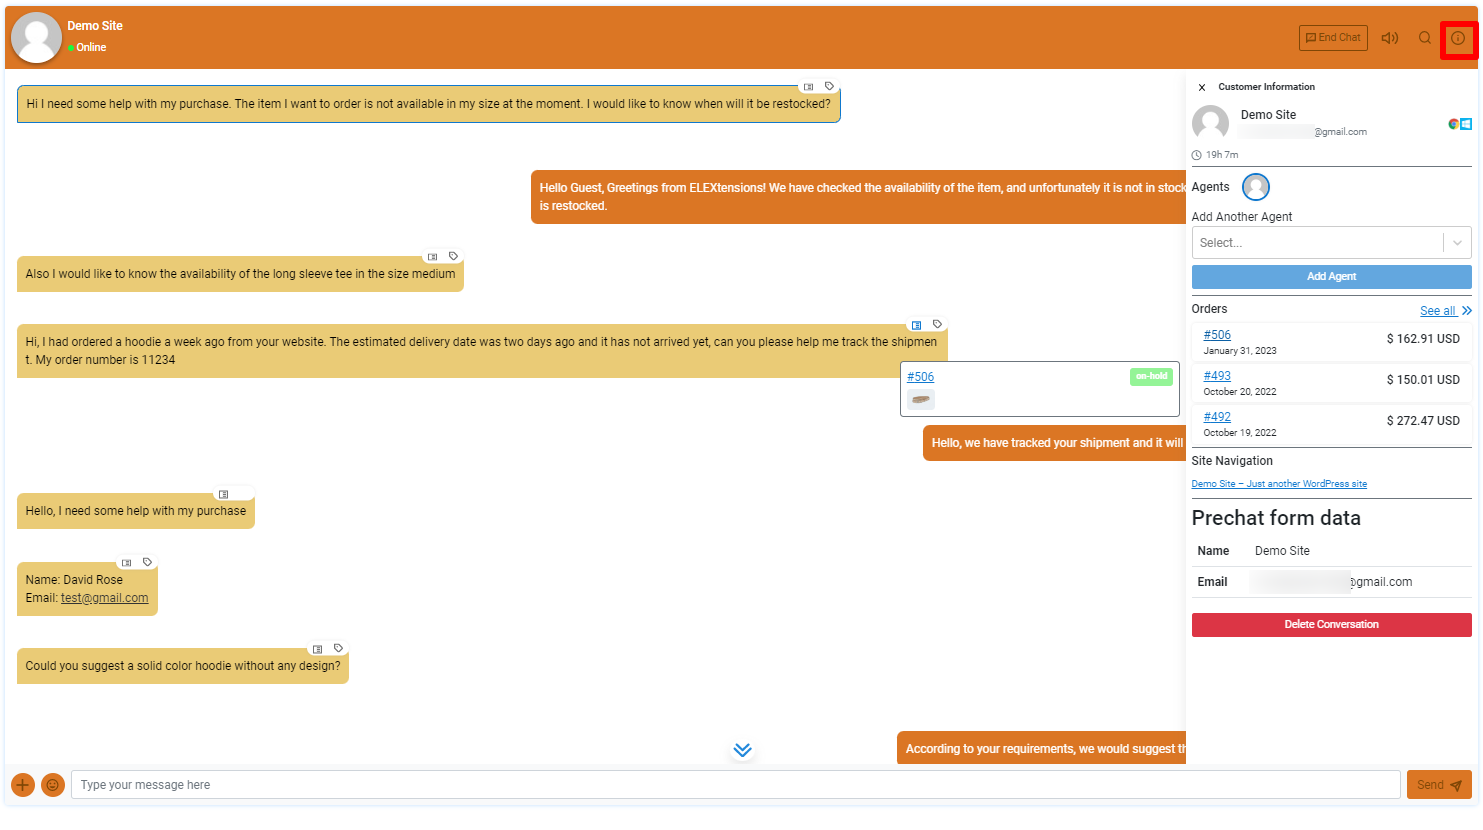
Customer Info:
- Customer information such as the name, email address, operating system, and web browser can be viewed.
- The assigned agents can be viewed and deassigned from the chat and other agents can be assigned to the chat based on your requirements.

- All the orders previously placed by the customer can be viewed and upon clicking on the order number, you will be redirected to the WooCommerce orders page for that particular order.
- You can check the customer’s website navigation from the site navigation section which displays the currently viewed page of the customer.
- The pre-chat form data will include the data derived from the pre-chat form on your chat box. This will also include any custom field you have created for the pre-chat form.
Tags
The tags that you have created from the live chat can be viewed and managed here. This way the tagged conversations can be easily filtered, searched, untagged, changed, edited, and deleted from here.

Chat History
The chat history page displays the entire history of live chat conversations that have been initiated by the website visitor or the support agent.

The user’s name, operating system, web browser, and chat end date, can be viewed and the chat can be viewed or deleted from the actions section. The search field can be used to search for a specific chat.
Live Visitors
The live visitors on your website can be monitored from here and your support agents can proactively start a conversation from here.

User: The name of the registered user or guest visitor.
From: The location they are visiting your website from.
Current Page: The page they are currently browsing.
System Info: The operating system and web browser they are using to browse the website.
Up Time: The amount of time they have spent navigating the website.
Action: Proactively start the chat by clicking Start Chat.
Agents
Here, you can view, create, edit, and delete the agent profiles for your website’s support agents.

Agent Name: The name of the created agent profile.
Email: The email address of the created agent profile.
Role: The role of the agent can be chosen from the roles created in the agent settings tab in the main plugin settings.
Action: The custom agent profiles (Administrator profiles cannot be deleted as they are default profiles) can be edited and deleted from here.
Add Agent
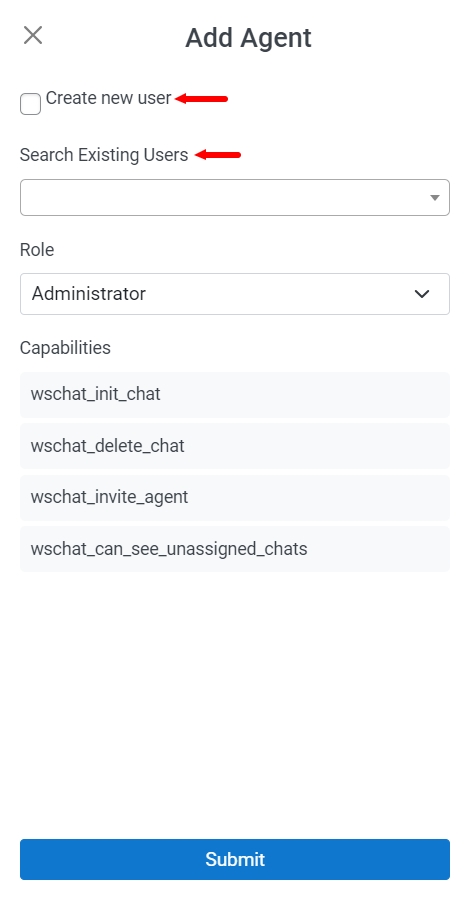
There are two methods by which you can add agents: Search existing users and create a new user profile.
You can either search for existing user profiles created on WordPress, assign the role, and check out the corresponding capabilities that will be added based on the role. Upon clicking Submit, the WSChat agent role will be assigned to the user and added to the agent list.
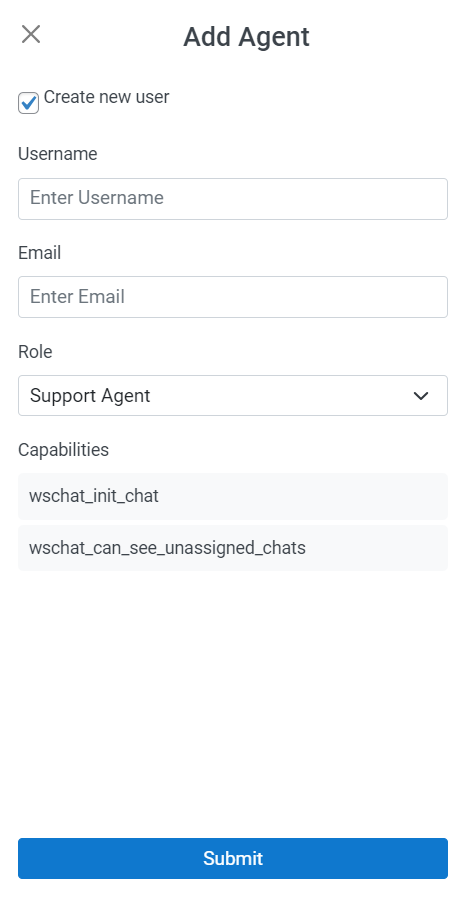
OR
You can enable the create new user checkbox. Upon doing so you will be able to add new user profiles as you go by adding a username, and email address, and assigning the role which will also determine the capabilities. Click submit to save the newly added user profile as an agent.
This is how WSChat – the ELEX WordPress Live Chat Plugin allows you to easily communicate with your customers. You will now be able to add a highly powerful live chat feature to your website.
Check out WSChat – ELEX WordPress Live Chat Plugin for more information on the plugin.
You can also check out the rest of ELEX‘s powerful WordPress and WooCommerce based plugins.