What can we help you with?
How to Set up WooCommerce USPS Shipping Methods Extension? (with Video)
Do you want your customers to checkout using USPS shipping methods in your WooCommerce store? Are you looking for ways to integrate USPS into your WooCommerce shop?
In this article, we will understand how to set up a WooCommerce USPS shipping methods extension. We can access USPS real-time easily using ELEX WooCommerce USPS Shipping Plugin with Shipment Tracking & Print Label. With this plugin, you can also print e-VS shipping labels and track shipments.
How to Set up WooCommerce USPS Shipping Methods Extension?
Prerequisites:
You can access the ELEX USPS plugin settings in two ways:
- Plugins > Installed Plugins > ELEX USPS WooCommerce Shipping > Settings.
- WooCommerce > Settings > Shipping > USPS.
Follow the below steps.
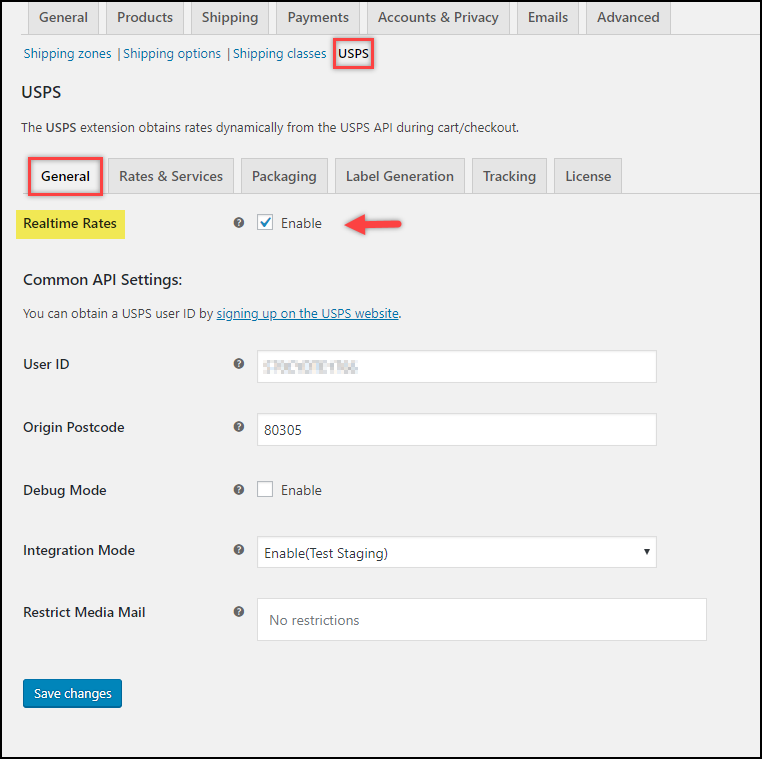
1. Enabling USPS Real-time rates
In the General tab of the plugin settings, enable the Real-time Rates setting. Only when this setting is enabled, you will be able to access USPS rates and services in your store. You will also need to provide USPS User ID that you have received after registering for a USPS account.
Sample settings are shown in the below screenshot.
To configure other settings, read the General settings section of the product documentation.
2. Configuring Rates and Services
Move to the Rates & Services tab to configure USPS shipping methods, USPS flat rates, fallback rate, price adjustments, among other settings.

- Method Title: You can define a custom title for the shipping method. This title will be shown with the respective shipping service in the checkout.
- Method Availability: Select the countries where you want to offer USPS shipping services. You can select one or more countries. If you do not have any restrictions, select the All Countries option.
- Show Rates: Choose how the rates have to be shown in the cart. You can choose to show rates whenever they are available or choose to display only when customers enter their destination postal code on the cart page.
- Shipping Rates: Allows you to choose the type of shipping rates you want to offer.
There are two types –- Use Click-N-Ship Rates: If this option is selected, then shipping rates are the same as what you get while printing postage online using Click-N-Ship for specific services. Online rates are discounted prices.
- Use OFFLINE Rates: If this option is selected, then shipping rates are normal post office rates.
Note: Online rates are lesser than offline rates.
Estimated Delivery Date Settings
You can choose to show estimated delivery dates for packages to your customers. This information will be shown in both the cart and checkout pages. Enable this setting to reveal further settings.
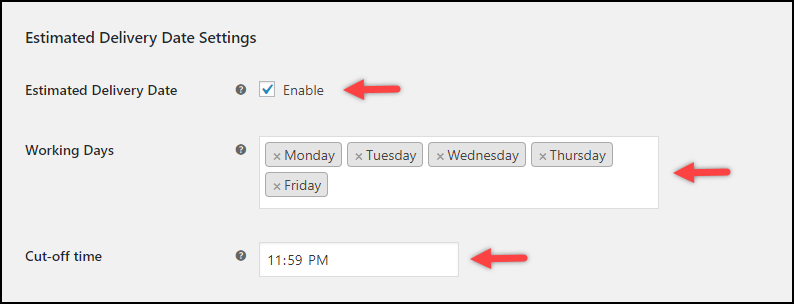
To calculate the estimated delivery date, you need to select the desired working days and cut-off time. An additional day is added for orders placed after the cut-off time.
Rates API Settings
The below settings determine the rates you offer to your customers.
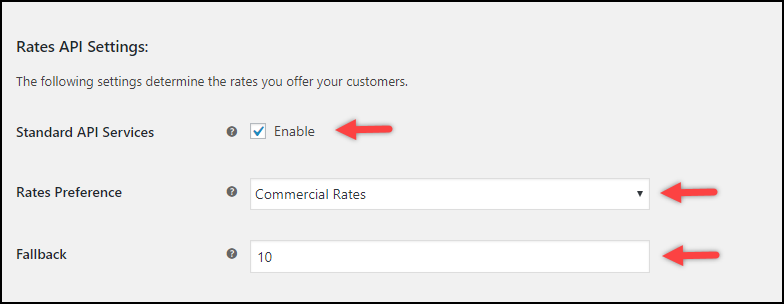
Enable the Standard API Services to enable non-flat rate services. In the Rates Preference setting, select the type of rates you want to return – Retail Rates or Commercial Rates (FYI, the commercial rates are usually higher than retail rates). In the Fallback setting, you can specify a fallback shipping rate that is applied when the plugin fails to return any rates from USPS, due to some technical issues.
Flat Rate
The plugin supports a list of USPS Priority and Express Flat rate services. You can choose to enable either Priority Flat Rate Service, Express Flat Rate Service or both.
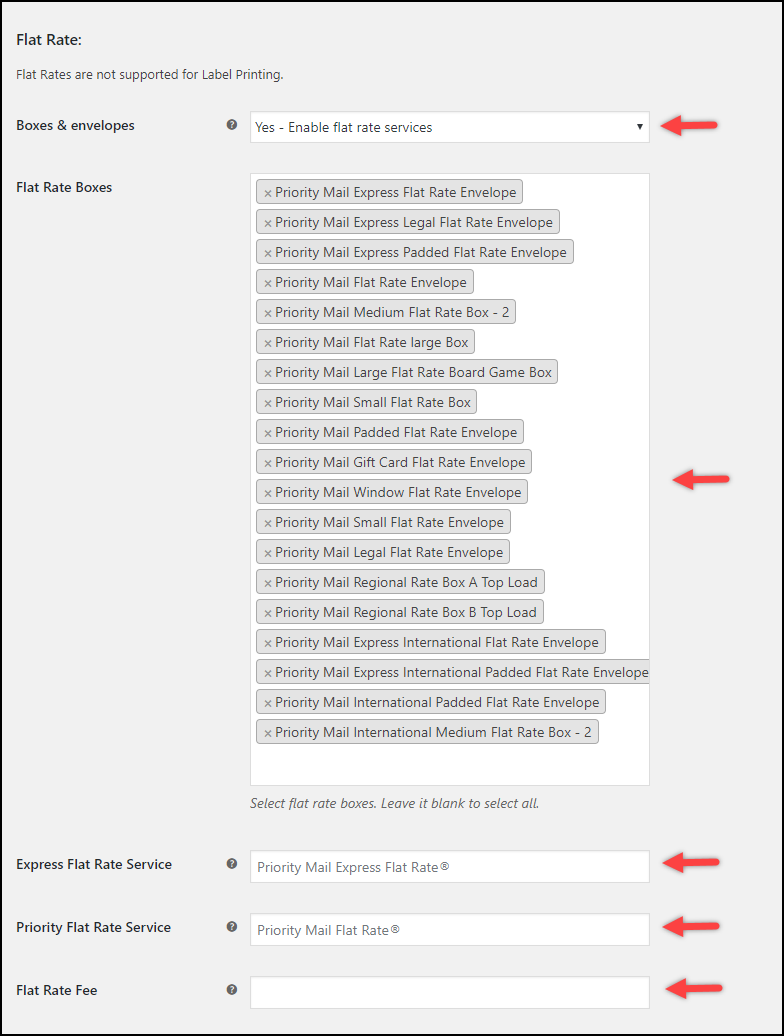
Next, in the Flat Rate Boxes setting, you can choose the desired flat rate boxes. You can also provide custom names for both the Flat rate services.
In the Flat Rate Fee setting, you can include additional charges for the flat rate. If you enter a negative amount value, then that entered amount gets subtracted from the flat shipping rate. This amount is per-box excluding tax.
Offer rates and Services
In the Offer Rates setting, you can choose to offer all returned rates from USPS or offer the cheapest rate only.
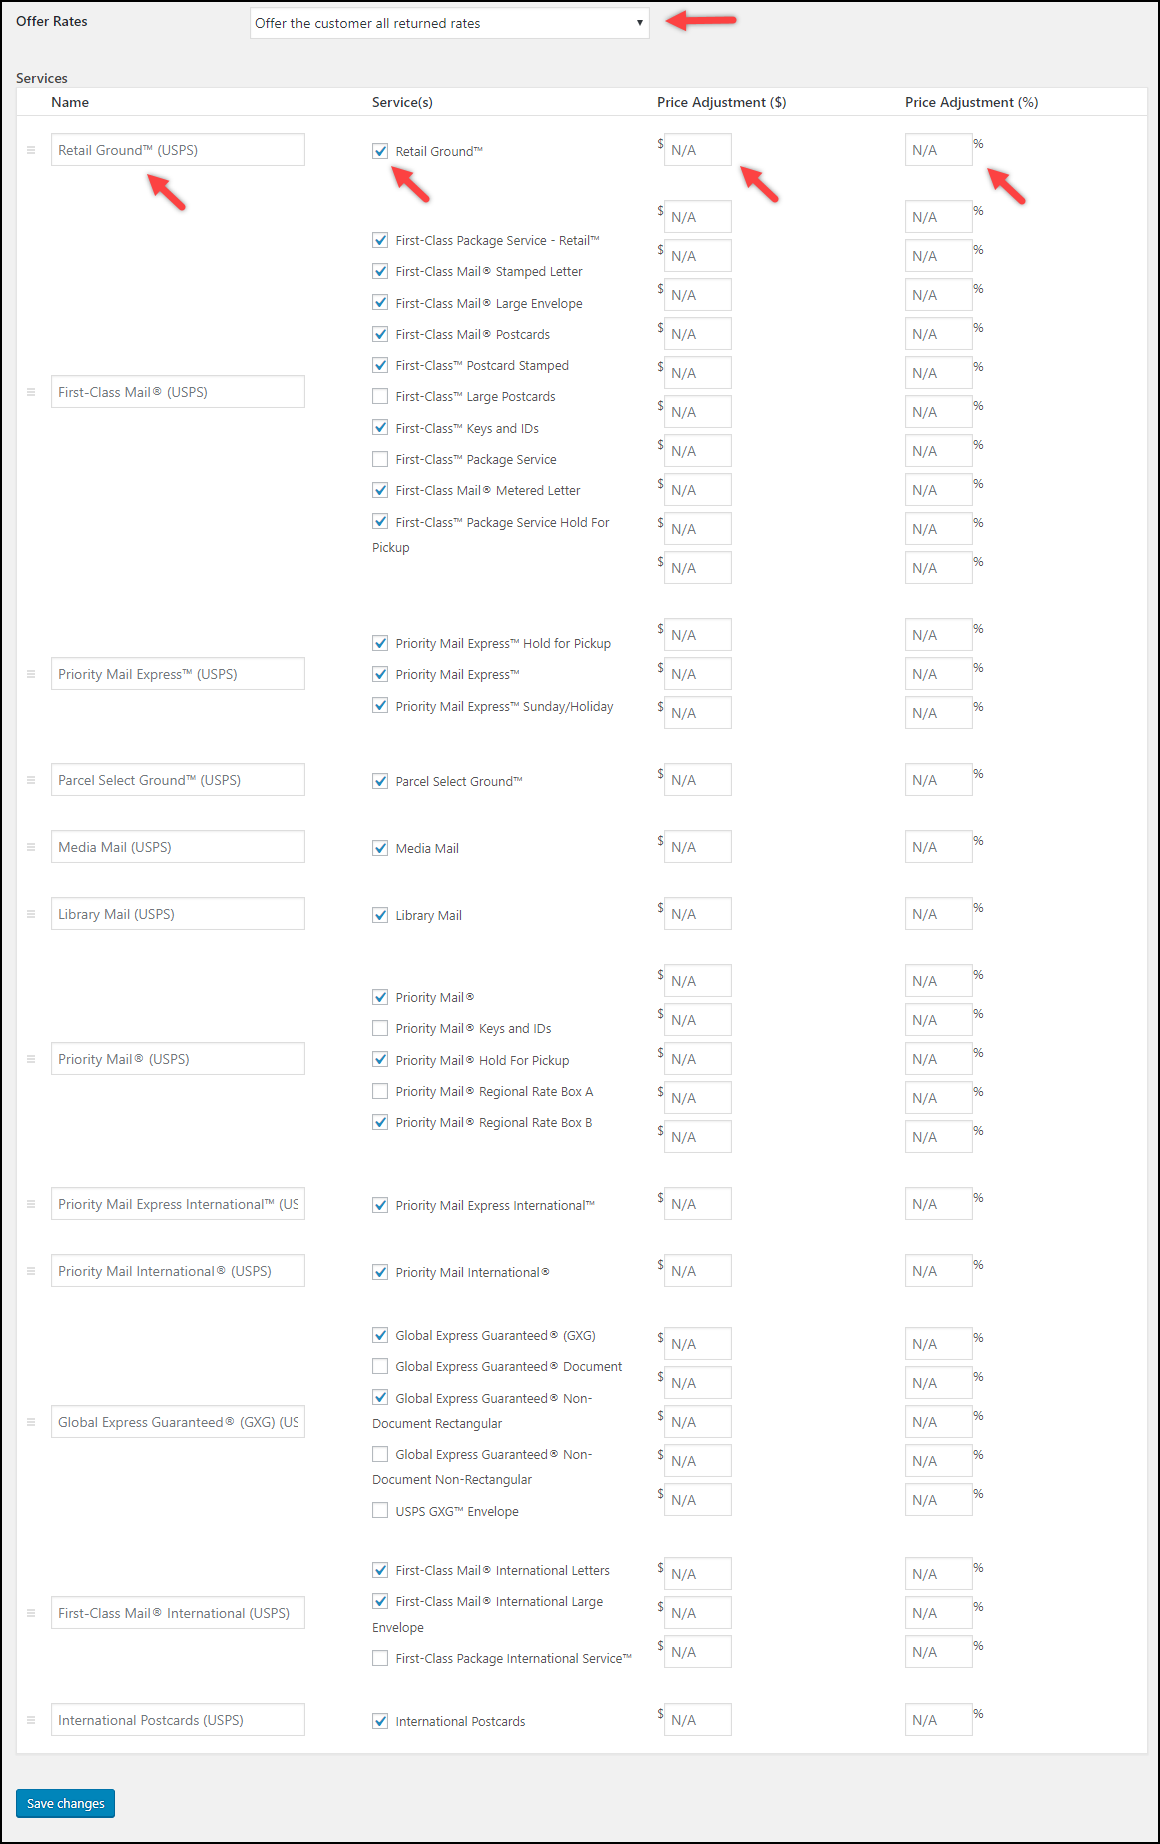
The Services table lists all the USPS services that can be accessed and displayed on the cart and checkout pages. In the first column, you can choose to provide custom shipping method names. In the second column, you can choose to enable or disable the desired shipping services. And in the third and fourth columns, you can adjust prices in terms of amount or a percentage value. If you wish to offer a shipping service at a discounted rate, you can enter a negative value (like -10). To add a markup, just enter a positive integer value.
Click on the Save Changes button once you have configured all the settings.
3. Configuring Parcel Packaging
Click on the Packaging tab to configure packaging methods.
The plugin provides four parcel packaging methods:
1. Pack Items Individually: In this option, each item in the cart is packed separately. Total shipping cost is calculated by adding shipping cost for each item.
2. Pack into boxes with weight and dimensions: With this method, you can create your own box dimensions. You need to provide details like Box name, outer and inner box dimensions, maximum weight, and Letter information. You can add as many boxes as you want.

3. Weight-based: In this option, items with a maximum of 12 inches in length, width, or height are grouped together for packaging. The total weight of these grouped items is passed to the USPS API to get the real-time rates. But Items that are larger than 12 inches in length, width, or height are packed individually.
4. Weight-based(improved): Enter the maximum weight limit for packages. In this option, the weight of all the cart items is summed up and items are packed with maximum weight limit in the box(es) and passed to API to get rates. In addition to this, you can specify the process of packing, that is, you can pack heavier items first, pack lighter items first or pack items purely divided by weight.
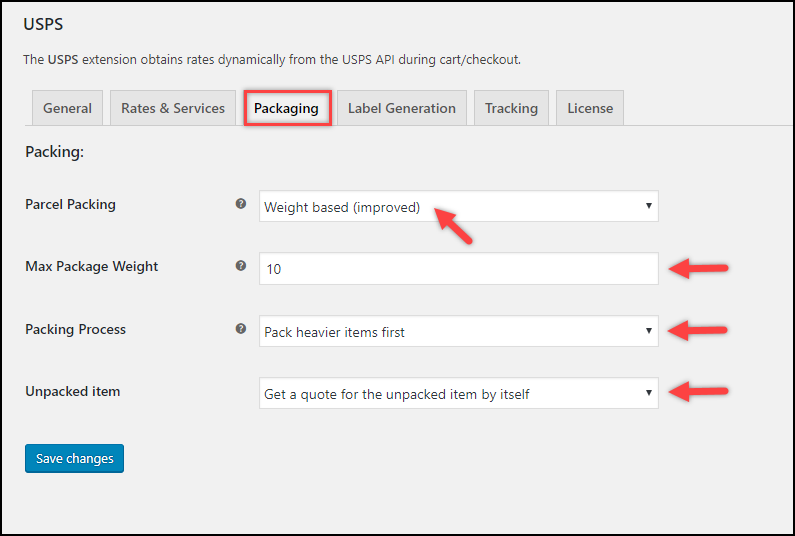
Unpacked Items
There is a possibility that an item(s) may remain unpacked because the available box(es) cannot accommodate it. It is also possible that item size/shape is not regular so it cannot be clubbed together with other items.
To take care of such unpacked items, use one of the options as given below:
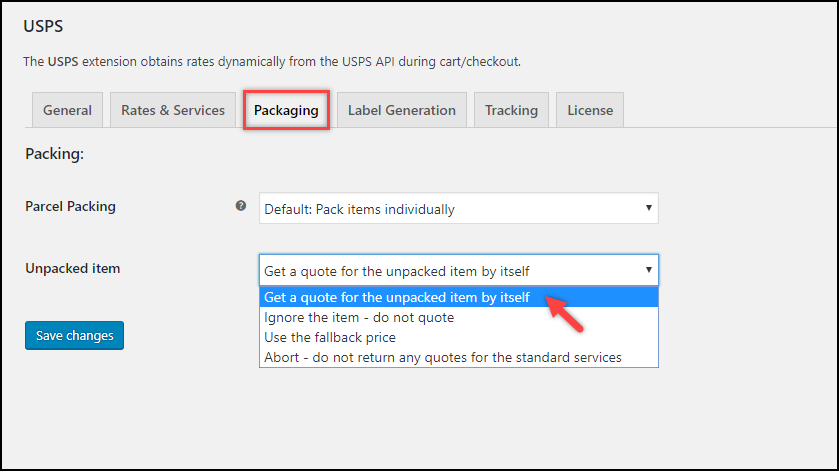
- Get a quote for the unpacked item by itself: This option gets the shipping rate individually for each unpacked item.
- Ignore the item – do not quote: This option neglects the unpacked item. But you get the quotes for the packed items.
- Use the Fallback Price: This option uses the Fallback price which is mentioned in the Rate Option Settings.
- Abort – do not return any quotes for the standard services: This option does not give any quotes. You do not even get the quotes that are returned according to the customized Box Dimension.
Lastly, click on the Save Changes button.
To see settings in action, move to the front-end of the store.
When a customer adds a product to the cart and enters the destination address, the plugin calculates the rates and displays to the customers as shown in the screenshot below.

Once an order is placed, you will be proceeding with the shipment creation. The USPS services will also be shown during the shipment creation. The ELEX USPS plugin allows store owners to select different shipping services for different packages, as shown in the screenshot below.

Hence, in this way, you can set up WooCommerce USPS shipping methods extension, using ELEX WooCommerce USPS Shipping Plugin.
To explore more details about the plugins, go check out ELEX WooCommerce USPS Shipping Plugin with Print Label.
Read the product documentation to understand the plugin, in detail. Or check out the knowledge base section for more related articles.
You can also check out other WooCommerce and WordPress plugins in ELEX.
