What can we help you with?
How to set up WooCommerce Multi-Vendor Add-On for ELEX Shipping Plugins?
This article explains the step-by-step tutorial to set up WooCommerce Multi-Vendor Add-On for ELEX Shipping Plugins. For more information on the plugin, refer to the product page.
The WooCommerce Multi-Vendor Add-On for ELEX Shipping Plugins makes your multi-vendor environment effortless for accessing real-time rates and printing shipping labels. The add-on allows store owners to show real-time rates separately for each vendor, and also allows you to generate shipping labels. This type of setup is mostly useful in WooCommerce Dropshipping scenarios.
This add-on works only with ELEX shipping carrier plugins like DHL, USPS, Stamps.com, EasyPost, and Australia Post, but currently supports only ELEX EasyPost WooCommerce FedEx, UPS & USPS Plugin, ELEX WooCommerce DHL Shipping Plugin, ELEX Stamps.com Shipping Plugin with USPS Postage for WooCommerce, and ELEX WooCommerce Australia Post Shipping Plugin with Print Label & Tracking. We are working on the multi-vendor support for other ELEX WooCommerce Shipping plugins too. It is compatible with WooCommerce Product Vendors, Dokan Multi-Vendor Plugin, and WC Vendors.
You can also watch the below video tutorial.
Overview
Some of the major highlights of this add-on include:
- Show separate real-time rates based on Vendors: The add-on allows you to split the real-time rates section into the cart and checkout pages multiple times and show them separately for each vendor whose products are added to the cart.
- Show consolidated real-time rates for all Vendors: Add all the real-time rates for all vendors and show them in corresponding shipping service.
- Allow separate API key for Vendors: Vendors can provide their own shipping carrier API key for accessing their own rates and services.
- Email labels to Vendors: Vendors will receive respective shipping labels when the shipments are created by the store admin in the WooCommerce orders dashboard.
Prerequisites
For setting up WooCommerce Multi-vendor for ELEX Shipping Plugins, you need the following:
-
- Any ELEX shipping plugin that offers real-time rates and label printing. Currently, this add-on is supported by ELEX WooCommerce EasyPost Shipping Plugin, ELEX WooCommerce DHL Shipping Plugin, ELEX Stamps.com Shipping Plugin with USPS Postage for WooCommerce, and ELEX WooCommerce Australia Post Shipping Plugin with Print Label & Tracking.
- Any compatible WooCommerce multi-vendor plugin like WooCommerce Product Vendors, Dokan Multi-Vendor Plugin, or WC Vendors.
- WooCommerce Multi-Vendor Add-On for ELEX Shipping Plugins
Getting started with WooCommerce Multi-Vendor Add-On for ELEX Shipping Plugins
Read an article to know how to complete the checkout process on ELEX. You can also read how to download, install, activate ELEX plugins.
Now that we have explored the features of the add-on, and have installed it, let’s get down to configure it.
Go to WooCommerce > Multi-Vendor Add-On.
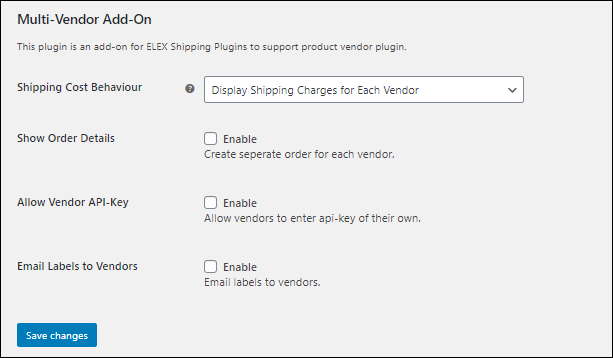
The add-on consists of the following settings:
- Shipping Cost Behaviour: To show shipping rates on the cart page, the plugin provides the following options –
- Display Consolidated Shipping Charges: Sums up the amount of all the items from the vendors and shipping cost of each item. The total cost will be shown to the customer. However, the item will be picked and sent from respective vendors. The delivery date may differ depending on the vendor.
- Display Shipping Charges for Each Vendor: Separates the items according to each vendor, and shows the total cost of shipping vendor-wise. The rates are calculated from the vendor’s address to the customer’s shipping address.
- Show Order Details: Enable this option for showing order details separately for the associated vendors.
If you enable this option, you can choose the user roles to restrict vendors with those user roles from the capabilities of admin. They can only access and see their orders and details associated with their products.
- Allow Vendor API-Key: You can choose to accept shipping carrier API keys from the respective vendor. If this setting is unchecked, the store owner has to enter the shipping carrier API key in the Rates and Services of the plugin.
For setting up the vendor API-Key, go to your WooCommerce dashboard > Users > All Users > Choose the Vendor > Edit > ELEXtensions Multi-Vendor Add-On Settings.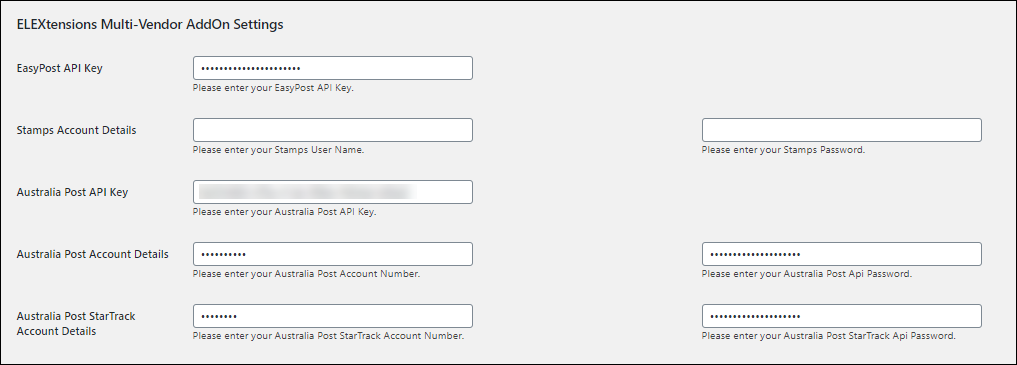
If your WooCommerce store uses ELEX EasyPost (FedEx, UPS, Canada Post & USPS) Shipping & Label Printing Plugin for WooCommerce, then you only need to enter the EasyPost API Key.
If you are using ELEX Stamps.com Shipping Plugin with USPS Postage for WooCommerce, you need to enter your Stamps username and password.
When it comes to ELEX WooCommerce Australia Post Shipping Plugin with Print Label & Tracking, you need to enter the Australia Post API Key, account number, password, StarTrack account number, and its password. And you need to enable the multi-vendor option from the plugin dashboard. To install and configure ELEX WooCommerce Australia Post Shipping Plugin, check out the article: How to set up ELEX WooCommerce Australia Post Shipping Plugin with Print Label & Tracking?
Then go to your WooCommerce dashboard > Plugins > Installed Plugins > ELEX WooCommerce Australia Post Shipping Plugin > Settings.
Enable the Multi-vendor option.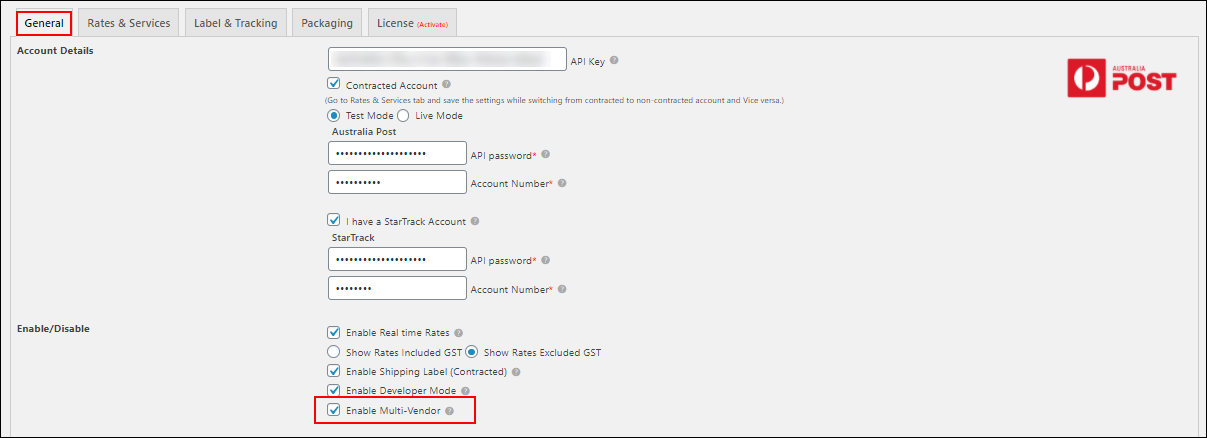
If you are using DHL shipping services using ELEX WooCommerce DHL Express / eCommerce / Paket Shipping Plugin with Print Label plugin, the options to allow vendor API – Key and emailing the labels to the vendor will not be available for it. But the vendors can see the generated shipment labels on their Dokan dashboard.
- Email Labels to Vendors: Enable this setting to email a copy fo the shipping label(s) to vendors. When shipments are created by the store administrator, the vendors will receive the shipping labels of their respective packages via email.
Click Save changes after selecting the desired option.
Install the desired WooCommerce multi-vendor plugin, create the required vendors, and assign them to WordPress users.
Demonstration
For demonstration purposes, let us use our ELEX WooCommerce EasyPost Shipping Plugin.
Let us consider we have two products from two different vendors that are added to the cart.
Case 1: Display Consolidated Shipping Charges
The add-on sums the shipping rates for corresponding shipping methods and displays them as one.

Case 2: Display Shipping Charges for Each Vendor
The add-on shows a separate set of services for each vendor. The customers can select desired services for each item.

Below is a screenshot showing two labels from the same order with two different shipper address. The shipper address is the vendor address taken from their respective WordPress profiles.

Hence, in this way, you can improve your multi-vendor setup for your customers, with our WooCommerce Multi-Vendor Support for ELEX Shipping Plugins.
To explore more details about the plugin, go check out WooCommerce Multi-Vendor Add-On for ELEX Shipping Plugins.
You can also check out other WooCommerce and WordPress plugins in ELEX.