What can we help you with?
How to Set Up ELEX WooCommerce USPS Shipping Plugin with Print Label? (with Video)
This article intends to provide detailed, step-by-step instructions that’ll help you understand, how to set up ELEX WooCommerce USPS Shipping Plugin with Print Label. Refer to the product page to know more about other various features of the plugin.
The United States Postal Service (USPS; also known as the Post Office, U.S. Mail, or Postal Service) is an independent agency of the United States federal government responsible for providing postal service in the United States, including its insular areas and associated states. It is one of the few government agencies explicitly authorized by the United States Constitution.
Our ELEX WooCommerce USPS Shipping Plugin with Print Label provides easy, seamless integration of WooCommerce with United States Postal Services. In addition to accessing real-time shipping rates, the plugin also provides shipping label generation, shipment tracking, and box packing facilities.
Watch the video on Youtube on how to set up WooCommerce USPS shipping plugin with Shipment tracking and print label.
Overview
Some of the major highlights of the plugin include:
- Real-time shipping rates: Based on the shipping destination address, product weights, and dimensions, the plugin fetches real-time rates from USPS.
- Printing shipping label: You can print shipping labels from order pages in the back-end of your WooCommerce store.
- Shipment Tracking: The tracking number returned from USPS while generating the label will be added to order notes and sent as part of the order completion email. Shipments can be tracked by customers as well as shop owners.
- Box Packing: You can select the desired box packing method. This will also affect the shipping rates displayed on your cart/checkout page.
All these features (and many more!) are bundled into one solution to serve your WooCommerce-USPS shipping integration needs for your online store.
Getting started with WooCommerce USPS Shipping Plugin with Print Label
Read an article to know how to complete the checkout process on ELEX. You can also read how to download, install, activate ELEX plugins.
Once the plugin is installed and activated, you can navigate to plugin settings in two ways:
- Dashboard > WooCommerce > Shipping >USPS (or)
- Dashboard > Plugins > Installed Plugins > USPS WooCommerce Shipping > Settings.
Now that we know what the plugin has to offer, and have installed the same, let’s get down to configure the plugin.
General Settings
The general settings are as shown below.
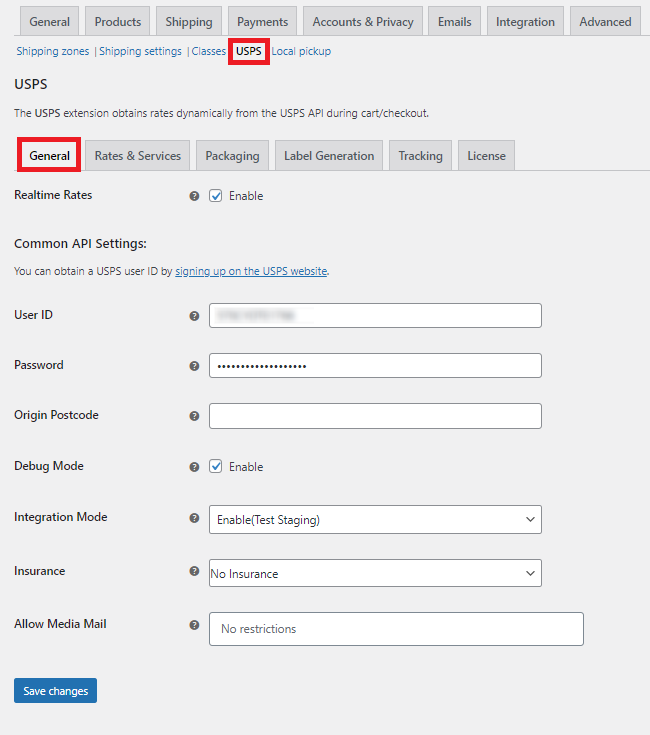
Real-time Rates: Tick this checkbox to access USPS real-time rates.
Common API Settings
The API Setting fields are as follows.
- User ID and Password: For accessing USPS APIs, you need to register for a USPS account. After successful registration, you’ll receive the User ID and Password that you need to enter in this field. If you are shipping a high volume of packages, you can avail of the e-VS facility. More on e-VS service here.
- Origin Postcode: Enter the postcode of the sender. This postcode will be used for calculating shipping rates.
- Debug Mode: If you are not getting proper rates (lesser or higher than expected), not getting all the available shipping options, or not getting any rates at all, then you can tick the Enable debug mode checkbox to find the error(s). You can also see the warning(s) by our WooCommerce USPS Shipping plugin.
By enabling debug mode, you can trace issues using log. You can see information about debugging at the top of the cart and checkout page. After enabling debug mode, add a product to the cart. Go to the cart or checkout page to see the debugging information.
- Integration Mode: You have 3 options here. Enabling production staging will generate test labels in the USPS production servers. Enabling test staging will generate test labels in the USPS test/staging servers. They return a label but do not generate and send a shipping service file to eVS in both test staging and product staging. These are the test modes. If you want to switch to live mode, choose accordingly.
- Insurance: Insurance provides coverage in the event that the packages are lost or damaged while in transit. If a shipper requires protection for items, then insurance may be arranged at an additional cost by USPS.
The plugin offers three options for insurance –- Customer Choice: If you select this option, customers will get an insurance field in the checkout page, where they can choose to opt for insurance for the packages.
- Mandatory: Applies insurance to all the packages compulsorily.
- No insurance (default option): Insurance is not applied to the packages.
- Restrict Media Mail: Select the Shipping class(es) for which you want to include Media Mail Rate. Read more about Media Mail, here.
Click Save Changes once all settings are configured.
Rates & Services
This section contains settings that will determine the services that will be made available to the customers in your WooCommerce store. The settings are as shown below.

- Method Title: Allows you to set a custom title for the USPS shipping method. This title will be visible on the cart and checkout page under Shipping options.
- Method Availability: This field allows you to select countries, for which you want to offer USPS shipping methods.
There are two options:- All Countries: Choose this option if you want to offer USPS shipping methods all over the world. This option is selected, by default.
- Specific Countries: Provides options to select desired countries. The USPS shipping method will be available only in selected countries.
- Show Rates: Allows you to choose when the real-time rates should be displayed for the customer. You can choose to show rates whenever they are available or choose to display only when customers enter their destination postal code on the cart page.
- Shipping Rates: Allows you to choose the type of shipping rates you want to offer.
There are two types –- Use Click-N-Ship Rates: If this option then shipping rates are the same as what you get while printing postage online using Click-N-Ship for specific services. Online rates are discounted prices. Read more about them here.
- Use OFFLINE Rates: If this option is selected, then shipping rates are normal post office rates.
Note: Online rates are lesser than offline rates.
Estimated Delivery Date Settings
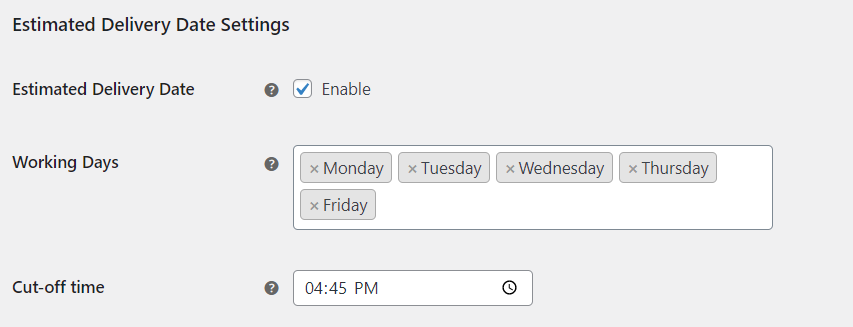
- Estimated Delivery Date: When this option is enabled, an estimated delivery date for each USPS service will be displayed.
- Working Days: Select your regular business days, based on which, the estimated delivery date will be determined. The shipment is only scheduled to take place on business days.
- Cut-off time: Set your shipment’s cut-off time. Orders received after the cut-off time will be processed on the following business day. Based on this, the estimated delivery date will be calculated.
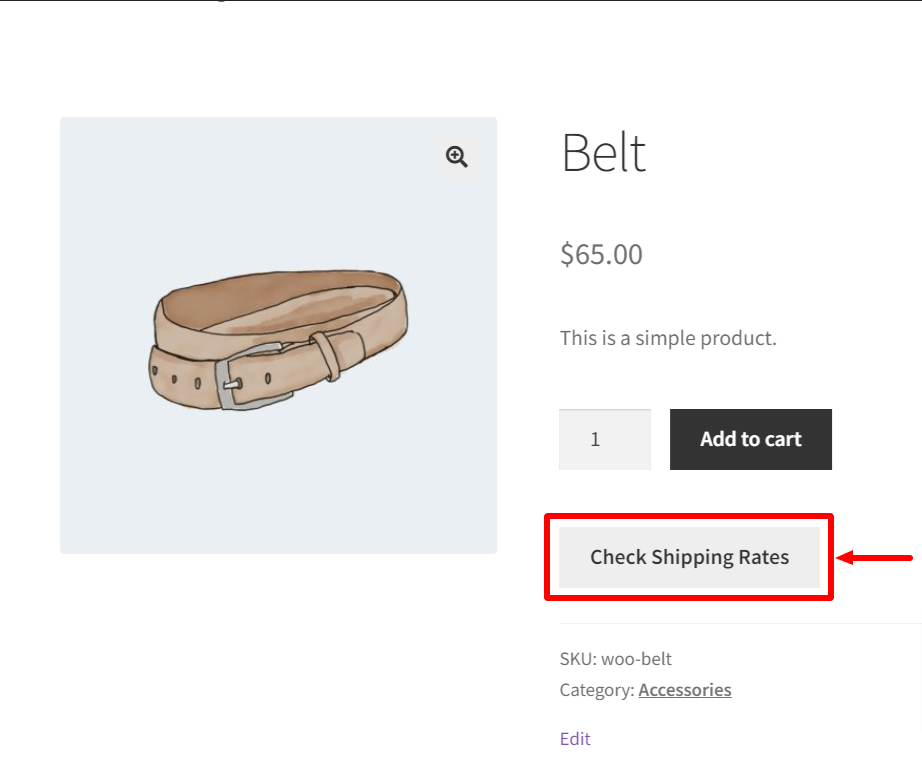
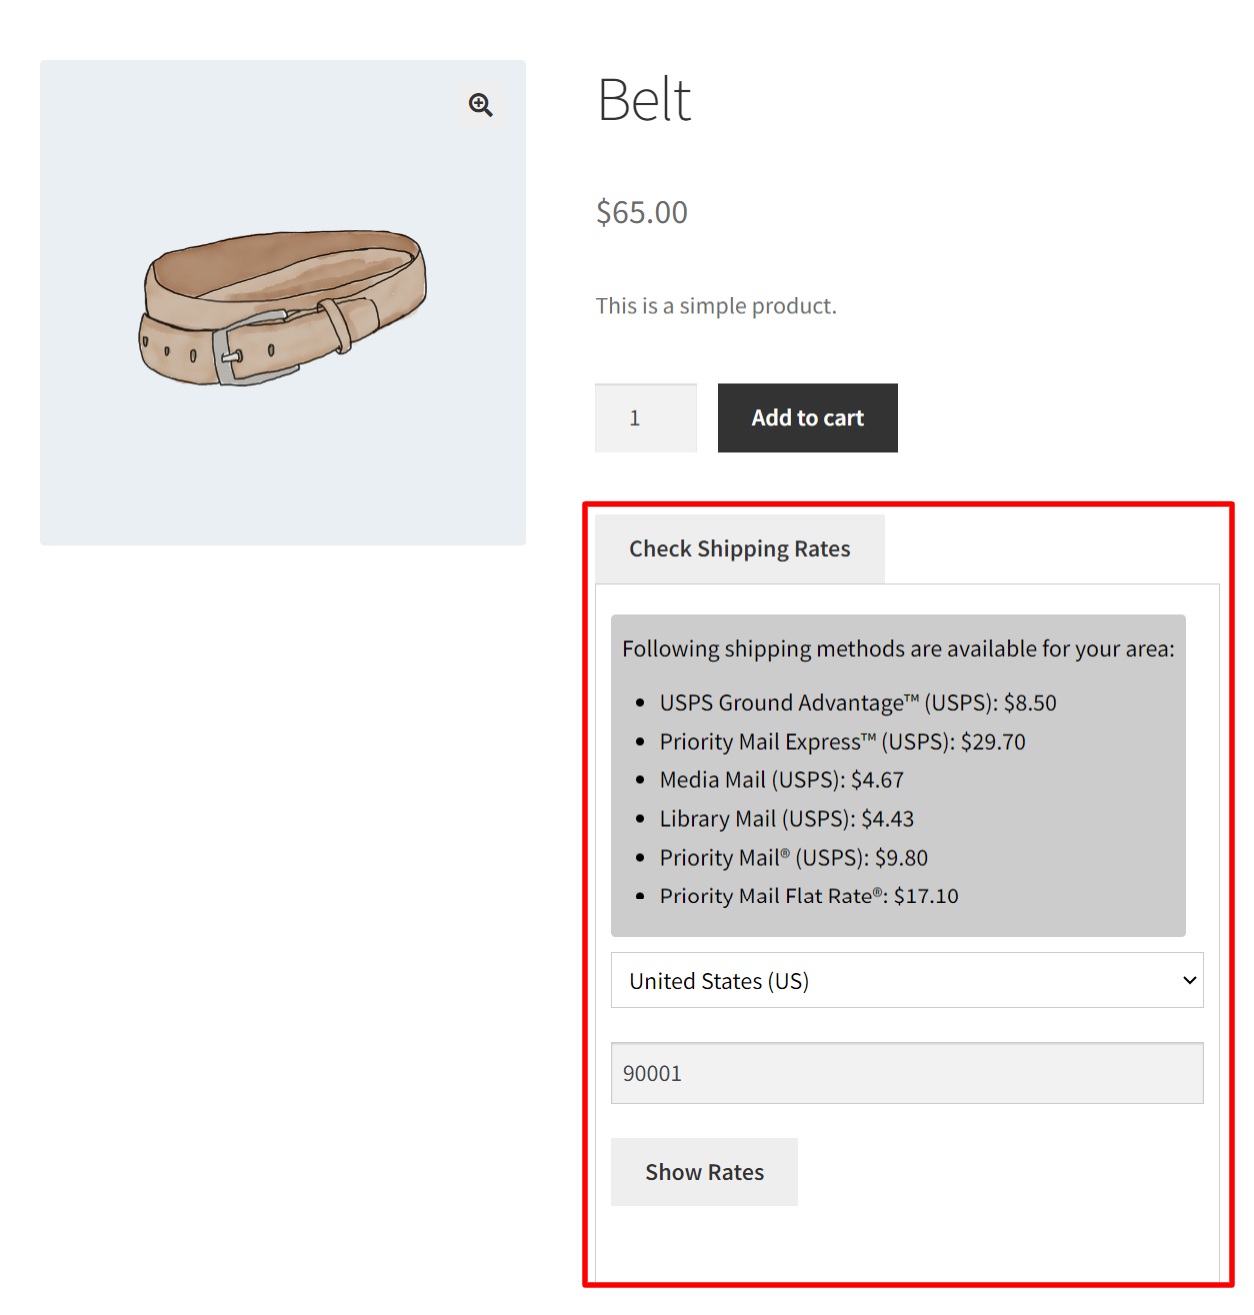
Shipping Calculator
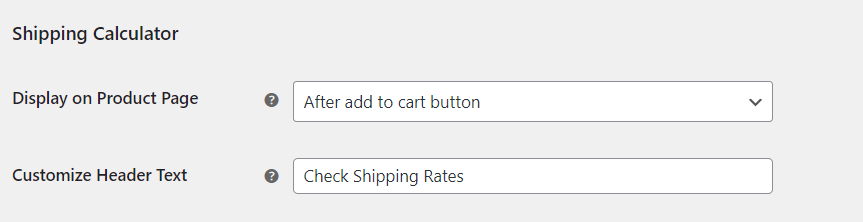
- Display on Product Page: From the drop-down menu, choose where on the product page the shipping calculator should be displayed. ‘None’, ‘after add to cart button’, and ‘before add to cart button’ are the available options. Select none if you don’t want it to be displayed on the product page.
- Customize Header Text: Set the title for the shipping calculator that the user sees on the product page.
Rates API Settings
The following settings determine the rates you offer to your customers.

- Standard API Services: USPS provides standard services for domestic and international shipments which are listed in the USPS Service section. Tick this checkbox to enable standard services provided by USPS API. This option enables non-flat rate services.
- Rates Preferred: This setting allows you to choose the types of rates of your choice.
The available options are as shown below:- Retail Rate: If this option is selected, then only retail rates are shown to the customer.
- Commercial Rates: If this option is selected, then commercial rates(rates for bulk shipping) are shown to the customers. In case if the commercial rates are not available for shipping service, then retail rates are shown to customers.
- Fallback: If USPS API fails to return any rates, the fallback rate will be applied. This allows your customers to check out the process even when USPS does not return any rates.
Flat Rate settings
Flat rates are not supported for label printing. The settings are as shown below:

- Boxes & envelopes: This field offers the option to use USPS Flat rate service for shipping. It charges a single fixed rate for a service, regardless of any destination within the country.
The available options are as shown below:- Yes – Enable flat rate services: This option enables flat rate services which in turn enable support for USPS flat rate boxes. Flat rates are hardcoded in our WooCommerce USPS plugin. There are no USPS API calls made to get Flat rates.
- No – Disable flat rate service: This option disables Flat rate service.
- Enable Priority flat rate services only: Enables only Priority flat-rate services.
- Enable Express flat rate services only: Enables only Express flat-rate service.
Following are the USPS Flat rates services supported by the plugin:
- Priority Mail Express Flat Rate Envelope
- Priority Mail Express Legal Flat Rate Envelope
- Priority Mail Express Padded Flat Rate Envelope
- Priority Mail Flat Rate Envelope
- Priority Mail Small Flat Rate Box
- Priority Mail Medium Flat Rate Box – 2
- Priority Mail Medium Flat Rate Box – 1
- Priority Mail Flat Rate large Box
- Priority Mail Large Flat Rate Board Game Box
- Priority Mail Padded Flat Rate Envelope
- Priority Mail Gift Card Flat Rate Envelope
- Priority Mail Window Flat Rate Envelope
- Priority Mail Small Flat Rate Envelope
- Priority Mail Legal Flat Rate Envelope
- Priority Mail Regional Rate Box A Top Load
- Priority Mail Regional Rate Box B Top Load
- Priority Mail Express International Legal Flat Rate Envelope
- Priority Mail Express International Padded Flat Rate Envelope
- Priority Mail International Flat Rate Envelope
- Priority Mail International Padded Flat Rate Envelope
- Priority Mail International Small Flat Rate Box
- Priority Mail International Medium Flat Rate Box – 2
- Priority Mail International Medium Flat Rate Box – 1
- Priority Mail International Large Flat Rate Box
- Express Flat Rate Service: Specify the customized name for Express Flat Rate Service.
- Priority Flat Rate Service: Specify the customized name for Priority Flat Rate Service.
- Flat Rate Fee: Enter Flat Rate Fee which is the additional charge on the flat shipping rate. If you enter a negative amount value, then that entered amount gets subtracted from the flat shipping rate. This amount is per-box excluding tax. For example, the amount 2.50, or a percentage value of 5%.
Tip: Leave this field blank to disable Flat Rate Fee.
USPS Services
Offer Rates: You can choose to offer all returned rates from USPS or offer the cheapest rate only.
Services: USPS provides different types of shipping methods that are suited to the different needs of the customer. Our WooCommerce USPS shipping plugin supports the following services –
USPS Domestic service:
- First-Class Mail ® Stamped Letter
- First-Class Mail® Large Envelope
- First-Class Mail@ Postcards
- First-Class™ Large Postcards
- First-Class Mail® Metered Letter
- USPS Ground Advantage™
- USPS Ground Advantage™ HAZMAT
- USPS Ground Advantage™ Hold For Pickup
- USPS Ground Advantage™ Parcel Locker
- USPS Ground Advantage™ Cubic HAZMAT
- USPS Ground Advantage™ Cubic
- USPS Ground Advantage™ Cubic Hold For Pickup
- USPS Ground Advantage™ Cubic Parcel Locker
- Priority Mail Express™ Hold for Pickup
- Priority Mail Express™
- Priority Mail Express™ Sunday/Holiday
- Media Mail
- Library Mail
- Priority Mail@
- Priority Mail@ Keys and IDs
- Priority Mail® Hold For Pickup
- Priority Mail® Regional Rate Box A
- Priority Mail® Regional Rate Box B
USPS International services:
- Priority Mail Express International™
- Priority Mail International®
- Global Express Guaranteed® (GXG)
- Global Express Guaranteed® Envelope
- Global Express Guaranteed® Non-Document Rectangular
- Global Express Guaranteed® Non-Document Non-Rectangular
- USPS GXG™ Envelope
- First-Class Mail ® International Letters
- First-Class Mail ® International Large Envelope
- First-Class Package International Service™
- International Postcard
You can enable the desired services. For more details on the services provided by USPS, visit this page.
The USPS services settings are as given below:

You can select services as per your requirements. Non-selected services are not shown to the customer even if they are available services from USPS.
The services table is divided into the following four columns:
- The first column allows you to set a custom name for the USPS services.
- The second column lists all the USPS services. You can tick the checkbox of the desired service(s) that you wish to offer to your customers.
- The third and fourth column allows you to set price adjustments(positive or negative), in terms of amount value or a percentage value.
For example, consider the shipping cost of a First-Class Mail® Stamped Letter returned by USPS is $5.
Case 1: Price adjustment of $5, for First-Class Mail® Stamped Letter –

The total cost displayed for First-Class Mail® Stamped Letter is $10 ($5+$5).
Case 2: Price adjustment of 10%, for First-Class Mail® Stamped Letter –
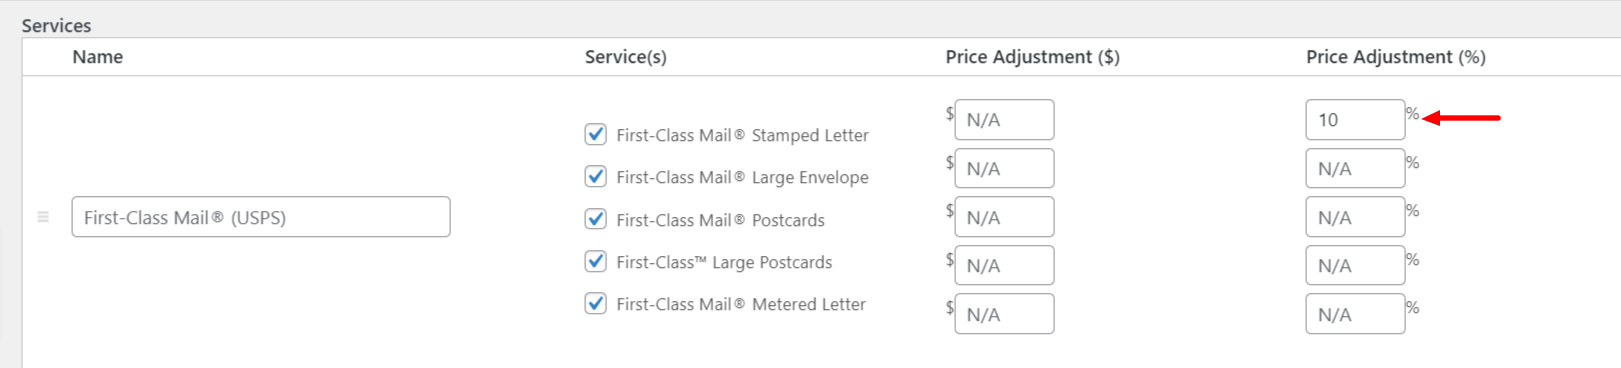
The total cost displayed for First-Class Mail® Stamped Letter is $5.5 (the 10% of 5 is added to 5).
Case 3: Price adjustment of $5 and 10%, for First-Class Mail® Stamped Letter –
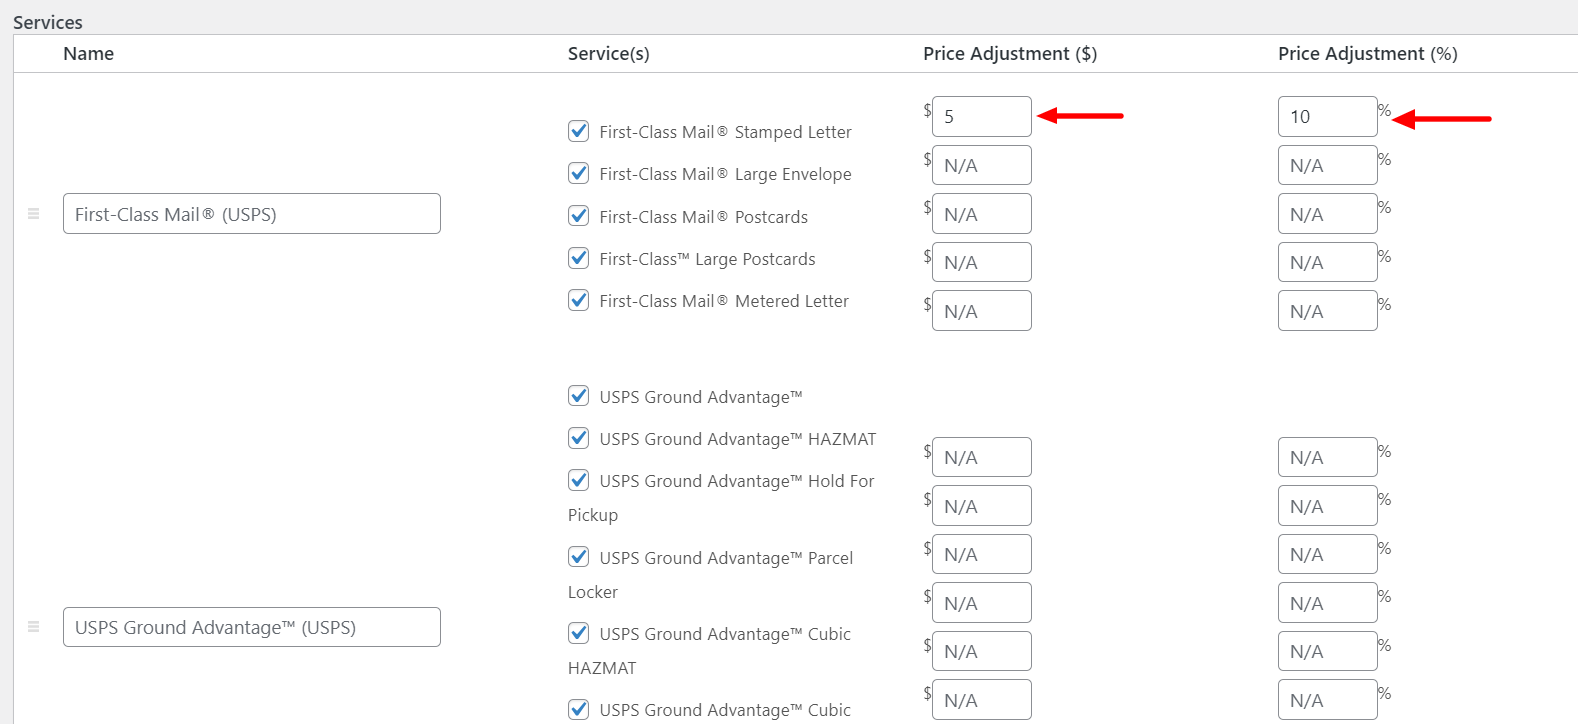
The total cost displayed for First-Class Mail® Stamped Letter is $10.5 (the 10% of 5 is added to 5 + 5 to get the actual).
Save your settings once they are configured.
Packaging
The packaging settings are as shown below.

Parcel packing
Our WooCommerce USPS shipping plugin provides four methods for parcel packaging. They are:
- Pack Items Individually: In this option, each item in the cart is packed separately. Total shipping cost is calculated by adding shipping cost for each item. This option is selected by default.
For example, the shipping cost of Item X is $10. If the customer adds two quantities of Item X to the cart, the total shipping cost is $10 x 2, which is $20.
- Pack into boxes with weight and dimensions: If packing items individually does not suit your business, then you can define custom box sizes under Box Dimensions section. All the cart items are packed into custom boxes defined in Box Dimensions settings. The best fit box is automatically chosen from the defined boxes. This is the recommended option.
You can read through setting up box dimensions to understand box packing in detail.

Box Dimensions: This setting is applicable only when Pack into boxes with weight and dimension is selected. Here, you can define the outer and inner dimensions of boxes. Outer dimensions are the dimensions of the package. Inner dimensions are the dimensions of the product.
For a heavy packing box, enter the weight of the box so that it is added to the product weight, to calculate shipping rates. You can tick the respective Letter checkbox if you want to mail letters. Based on your requirements, you can add or remove box dimensions.
- Weight-based: In this option, items with a maximum of 12 inches in length, width, or height are grouped together for packaging. The total weight of these grouped items is passed to the USPS API to get the real-time rates. But Items that are larger than 12 inches in length, width, or height are packed individually.
- Weight-based(improved): Enter the maximum weight limit for packages. In this option, the weight of all the cart items is summed up and items are packed with maximum weight limit in the box(es) and passed to API to get rates. In addition to this, you can specify the process of packing, that is, you can pack heavier items first, pack lighter items first or pack items purely divided by weight. Below is a screenshot showing the order total weight settings.

Unpacked Item
There is a possibility that an item(s) may remain unpacked because the available box(es) cannot accommodate it. It is also possible that item size/shape is not regular so it cannot be clubbed together with other items. To take care of such unpacked items, use one of the options as given below:
- Get a quote for the unpacked item by itself: This option gets the shipping rate individually for each unpacked item.
- Ignore the item – do not quote: This option neglects the unpacked item. But you get the quotes for the packed items.
- Use the Fallback Price: This option uses the Fallback price which is mentioned in the Rate Option Settings.
- Abort – do not return any quotes for the standard services: This option does not give any quotes. You do not even get the quotes that are returned according to the customized Box Dimension.
Lastly, click on the Save Changes button.
Label Generation
The Print Label API Setting fields are as shown below:
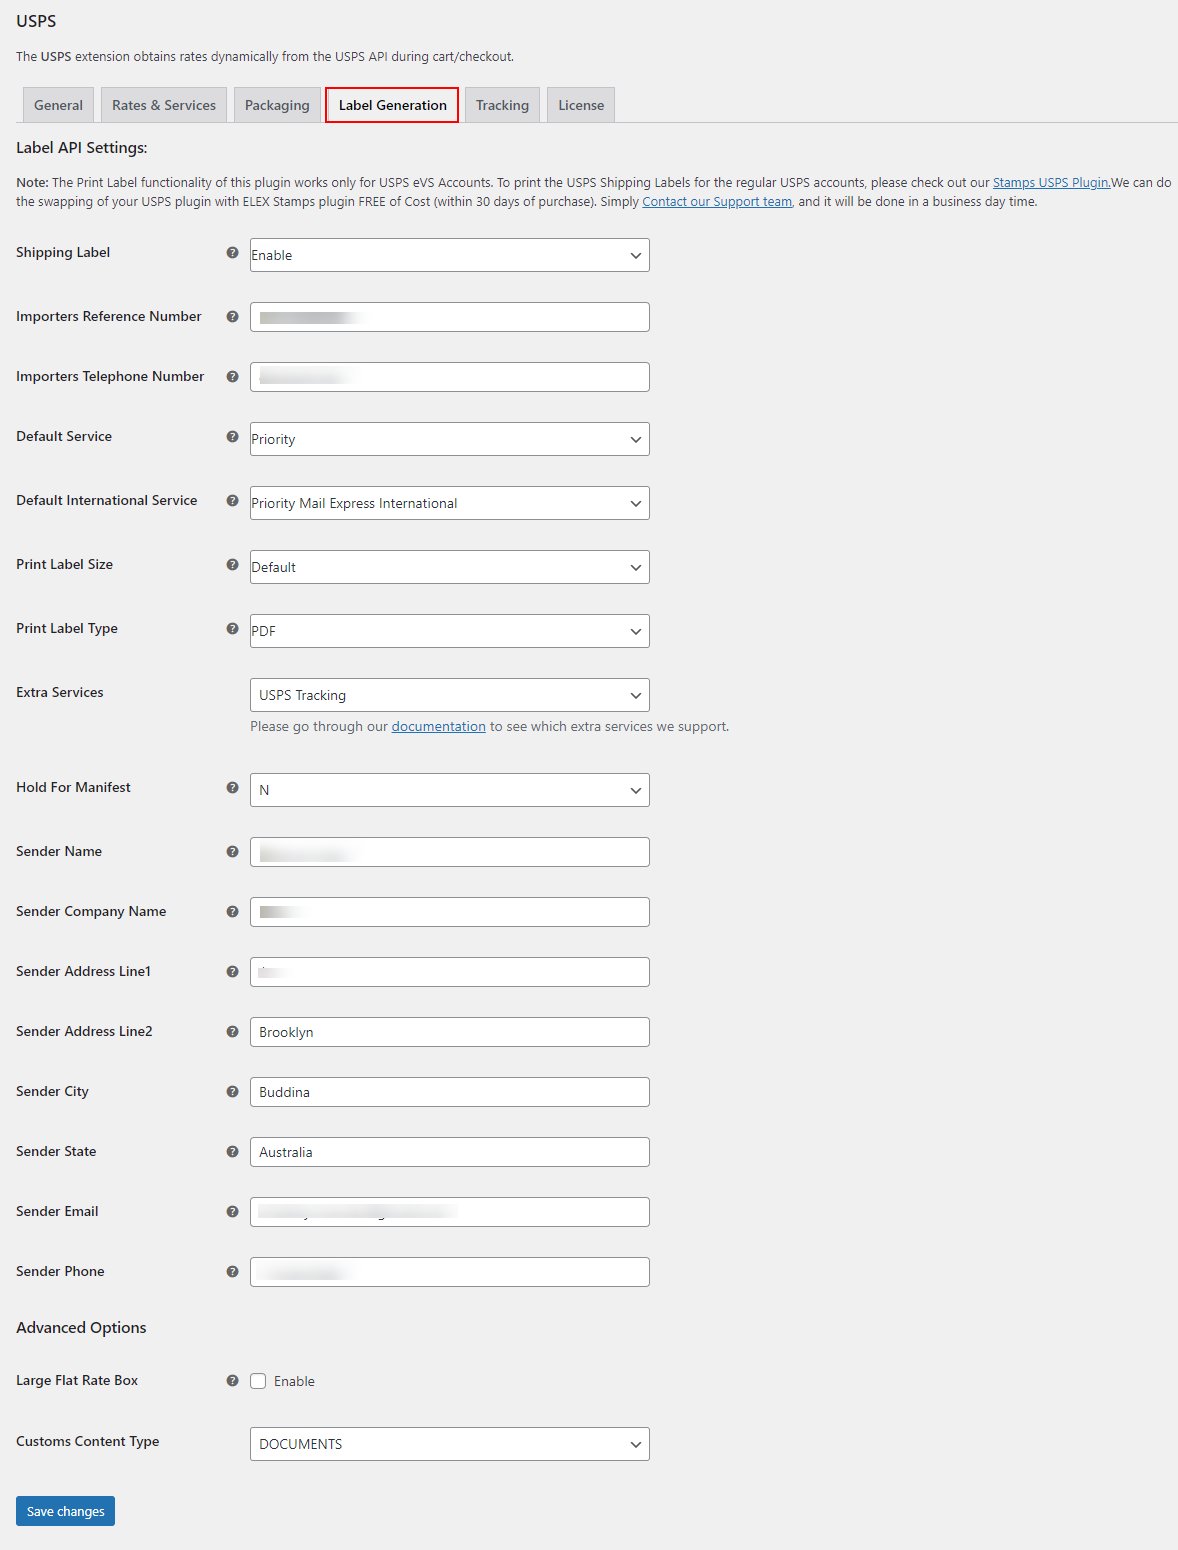
Label API Settings:
- Shipping Label: You can choose to enable or disable the label generation option by selecting the required option from this drop-down list.
- Importers Reference Number: Enter your tax registration number in this field. You can enter the taxation number you would get after the registration based on the country to which you are exporting or shipping packages. Preface the number value with ‘IOSS’, or the specific text based on the destination country to help the customs to distinguish the IOSS, VAT, or any other country’s identification number from other issued tax identification numbers. The maximum field size is 40 characters. This value will be passed to the customs and printed on the shipping label.
- Importers Telephone Number: Enter your 10 digits registered telephone number here.
- Default Service for Print Label: With this field, you can set default Print Label service according to requirement. The available options are as given below:
- Automatic: In this option, whatever service customer selects is automatically selected from the admin side also. You as the Admin do not need to change the service type as per the customer selection. If Automatic is not selected and you select one of the available services as a default but the customer selects some other service than default service, then you must change to the same service manually in the admin order page.
Note: This feature is not available for international shipping. - Priority: Delivering 7 days a week, this is the fastest domestic service for time-sensitive letters, documents, or merchandise.
- Standard Post: Reliable and economical ground service for less-than-urgent deliveries and over-sized packages.
- Media Mail: Media Mail is a cost-effective way to send educational materials. This service has restrictions on the type of media that can be sent.
- Library mail: Used by qualifying institutions like libraries, universities, zoos, and research institutions to mail educational and research material.
- Automatic: In this option, whatever service customer selects is automatically selected from the admin side also. You as the Admin do not need to change the service type as per the customer selection. If Automatic is not selected and you select one of the available services as a default but the customer selects some other service than default service, then you must change to the same service manually in the admin order page.
- Default International Service: Select default international service while printing the labels. The selected service will be chosen as the default service while printing the label. There are 4 default services available such as Priority Mail Express International, Priority Mail International, First-Class Mail International, and Global Express Guaranteed.
- Print Label Size: With this field, you can set the size for Print Labels.
The available options are as given below:- Default: This option generates labels with a size of 8 x 11 inches.
- Compact: This option generates labels with a size of 4 x 6 inches for international shipping. For domestic shipping, if the shipment is too small, then only the barcode is displayed on labels. For domestic shipping, labels get generated in bar-code mode only.
Note: In the bar code mode, the address is not displayed in the label generated by USPS.
- Print Label Type: With this field, you can set a required file format for printing the labels.
The available options are as given below:- PDF: This option prints the label in Portable Document Format which is used to present a document in an independent manner of application, software, hardware, and operating systems.
- TIF: This option prints the label in Tag Image File Format which is a common format for exchanging raster graphics (bitmap) images between application programs, including those used for scanner images.
- Extra Services: These extra services combine with USPS services listed in the Rates and Services section explained in the earlier section of this article.
The plugin offers the following extra services:- USPS Tracking
- Insurance
- Signature Confirmation
- Signature Confirmation with Insurance
- Signature Requested
- Certified Mail
- Certified Mail RRE
- Signature Waived
- 10:30 AM Delivery
Only the following service combinations are supported by the plugin:
- Priority Mail Certified Mail
- Priority Mail Certified Mail RRE
- Priority Mail USPS Tracking
- Priority Mail Insurance <= $500
- Priority Mail Insurance > $500
- Parcel Select Signature Confirmation with Insurance <= $500
- Priority Mail Signature Confirmation with Insurance <= $500
- Priority Mail Signature Confirmation
- Bound Printed Matter USPS Tracking
- Bound Printed Matter Signature Confirmation
- Bound Printed Matter Insurance > $500
- Bound Printed Matter Insurance <= $500
- Bound Printed Matter Signature Confirmation with Insurance <= $500
- Media Mail USPS Tracking
- Media Mail Signature Confirmation
- Media Mail Insurance > $500
- Media Mail Insurance <= $500
- Media Mail Signature Confirmation with Insurance <= $500
- Library Mail USPS Tracking
- Library Mail Signature Confirmation
- Library Mail Insurance > $500
- Library Mail Insurance <= $500
- Library Mail Insurance <= $500 Signature Confirmation
- Parcel Select USPS Tracking
- Parcel Select Signature Confirmation
- Parcel Select Insurance > $500
- Parcel Select Insurance <= $500
- Priority Mail Express PO-Add Signature Waived
- Priority Mail Express PO-Add with Insurance
- Priority Mail Express PO-Add Signature Requested
- Hold for Manifest: Select either Y (yes) or N (no) for holding the manifest record for possible inclusion in SCAN requests. Shipment Confirmation Acceptance Notice (SCAN) Form is a single form containing a master barcode that links all the labels you have printed for the packages that are ready for drop off or pick up service. Once the master barcode is scanned, it will show the package volume to be picked up. Hence, it should match the shipment notice and the number of packages you have to be picked up. But if it doesn’t match the volume, it will still be picked up and shipped. Read how to generate SCAN Forms.
- Sender Details: Enter sender name, company name, address, email address (to trigger email notification while creating shipment) and contact number.
Advanced Options

- Large Flat Rate Box: Enable this option to set the container field as a large flat rate box.
- Customs Content-Type: Select the type of package in this drop-down list. Based on the content type selected, additional rates will be added to the product price in the request.
Following content types are supported by the plugin:- MERCHANDISE
- GIFT
- DOCUMENT
- SAMPLE
- RETURN
- HUMANITARIAN
- DANGEROUS GOODS
Click Save Changes to save the settings.
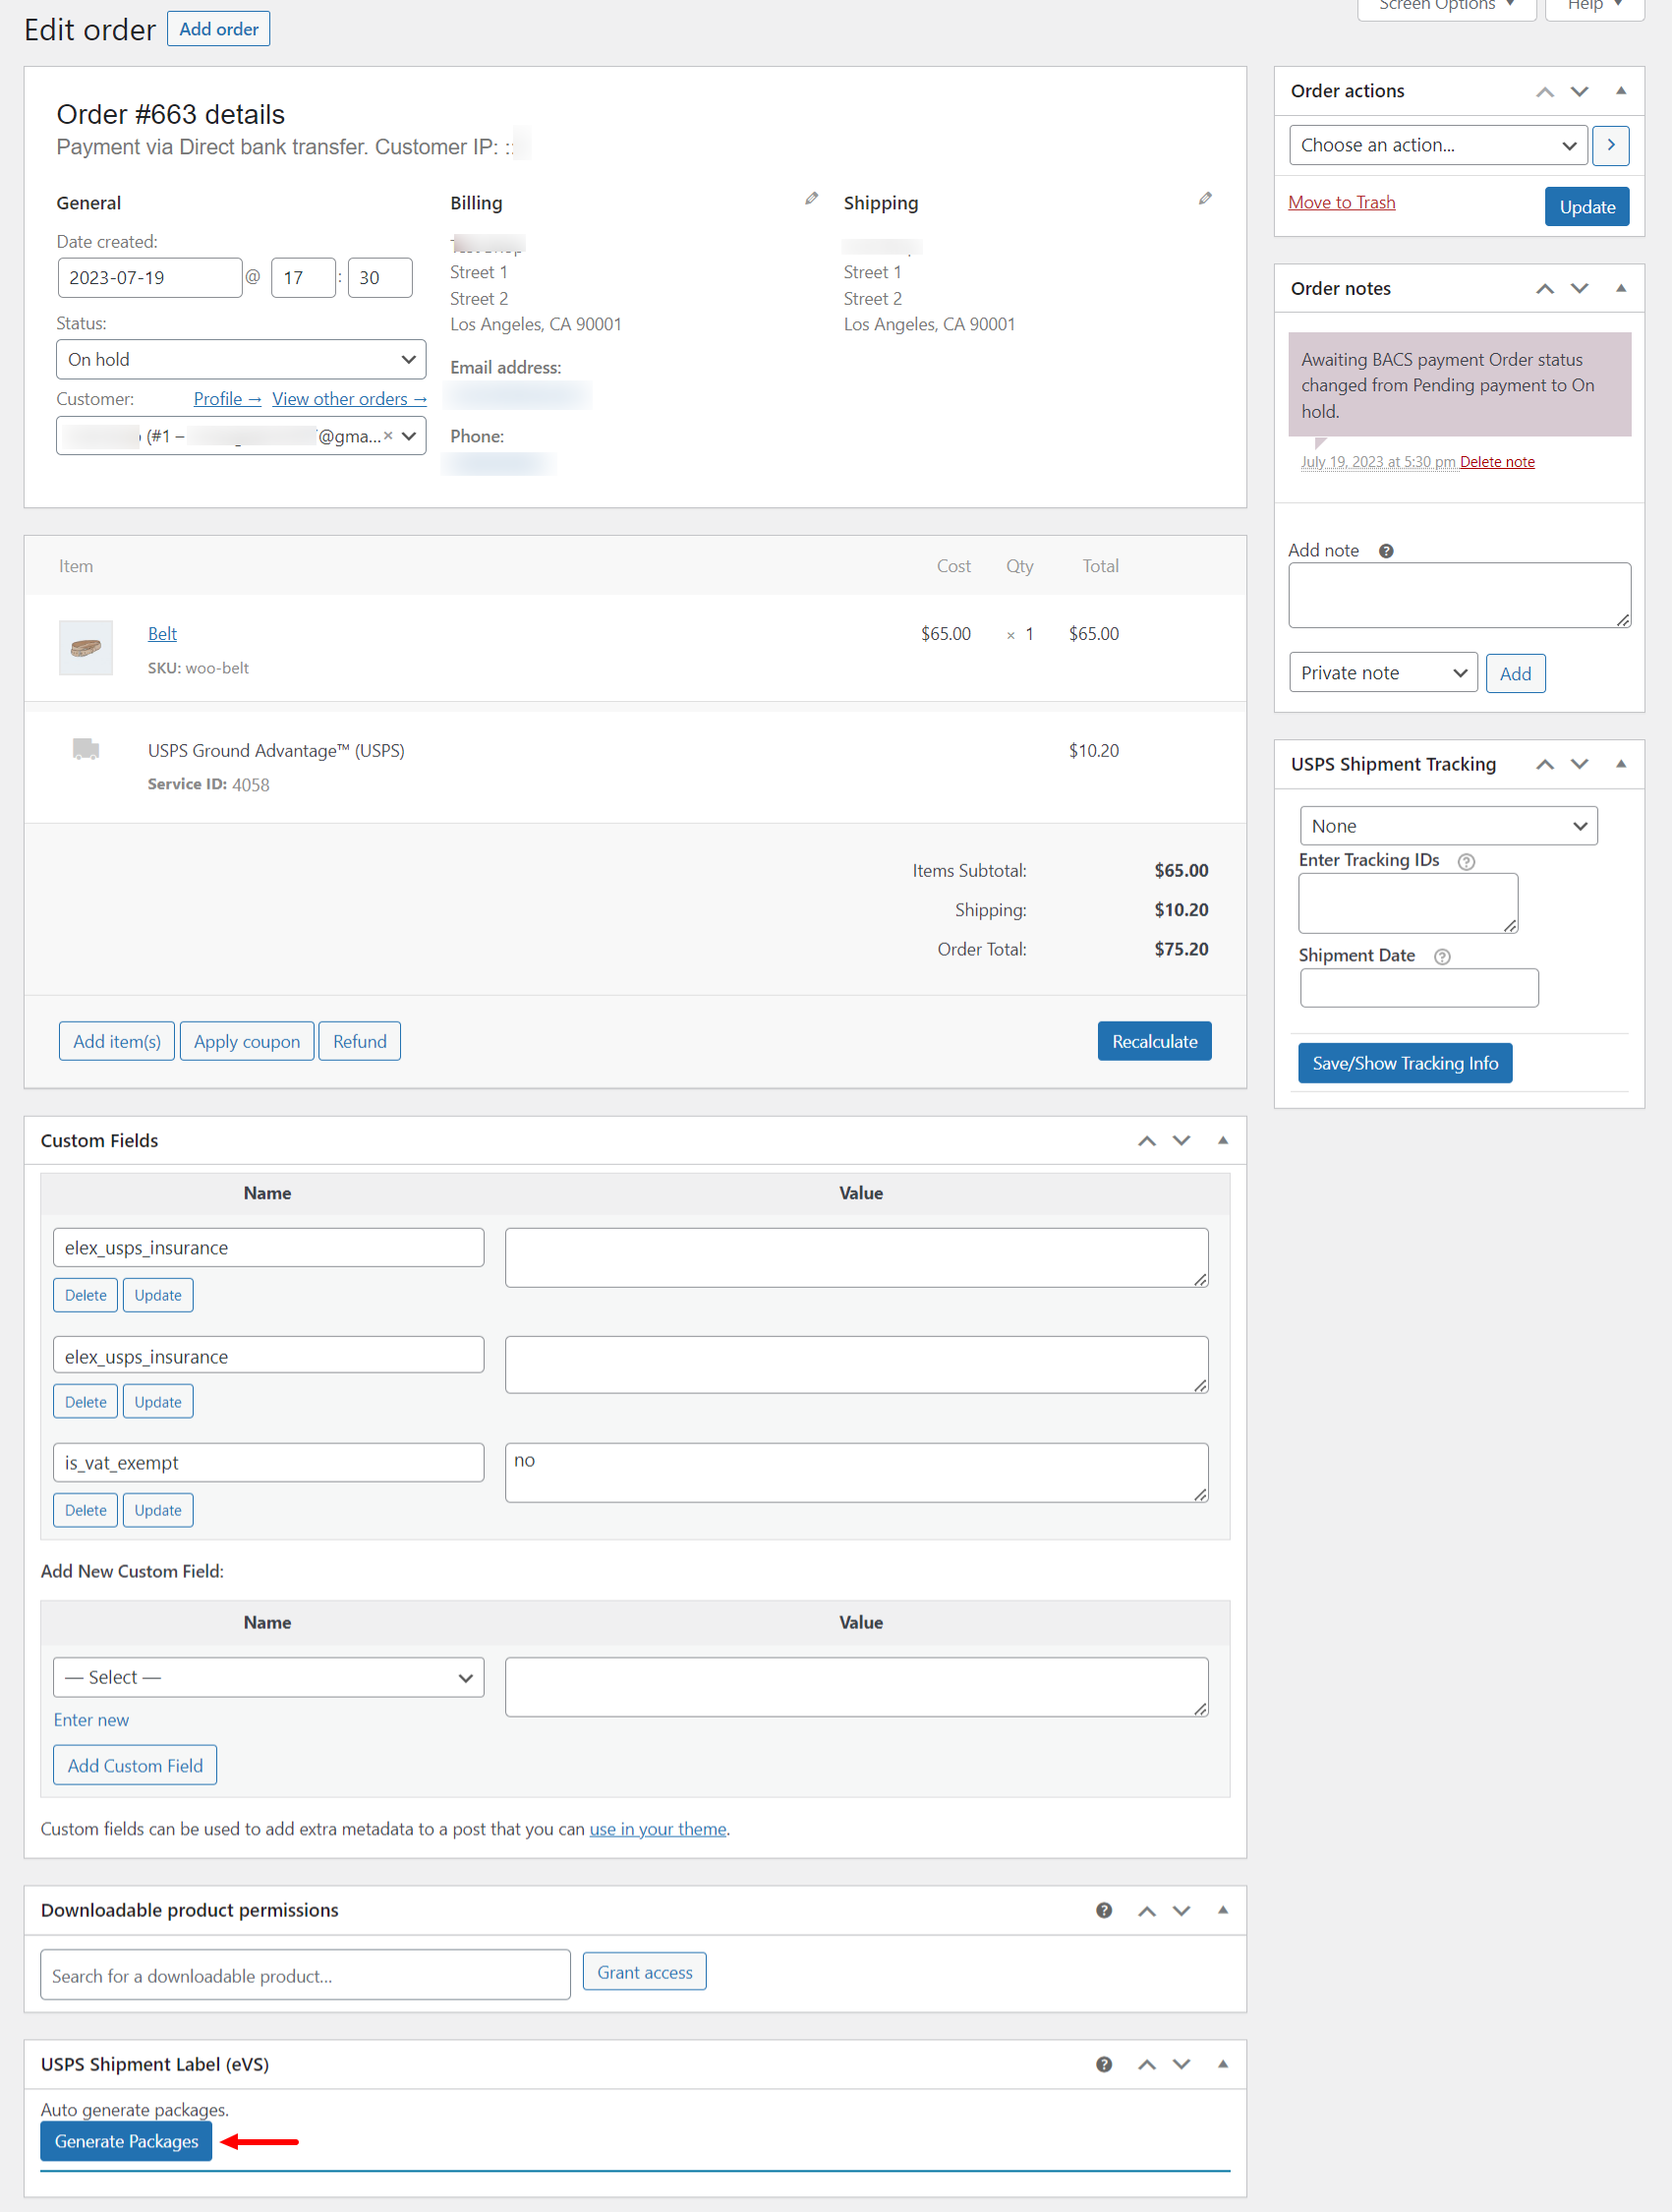
Once your customers place an order, move to your WooCommerce admin order page to generate shipping labels. You can choose a preferred service from your side by replacing the option chosen by the customer before generating the label.
Check how to choose a preferred service with the help of an example.
Here, the customer has chosen USPS Ground Advantage as the shipping option to place the order.
Go to WooCommerce > Orders > Choose the order to be processed for shipment and label generation.
Check the screenshot:
After clicking the button, you will have an option to choose a preferred service from your side by replacing the service chosen by the customer.
Go to the USPS Shipment Label (eVS) > Click on the button marked in the below screenshot.
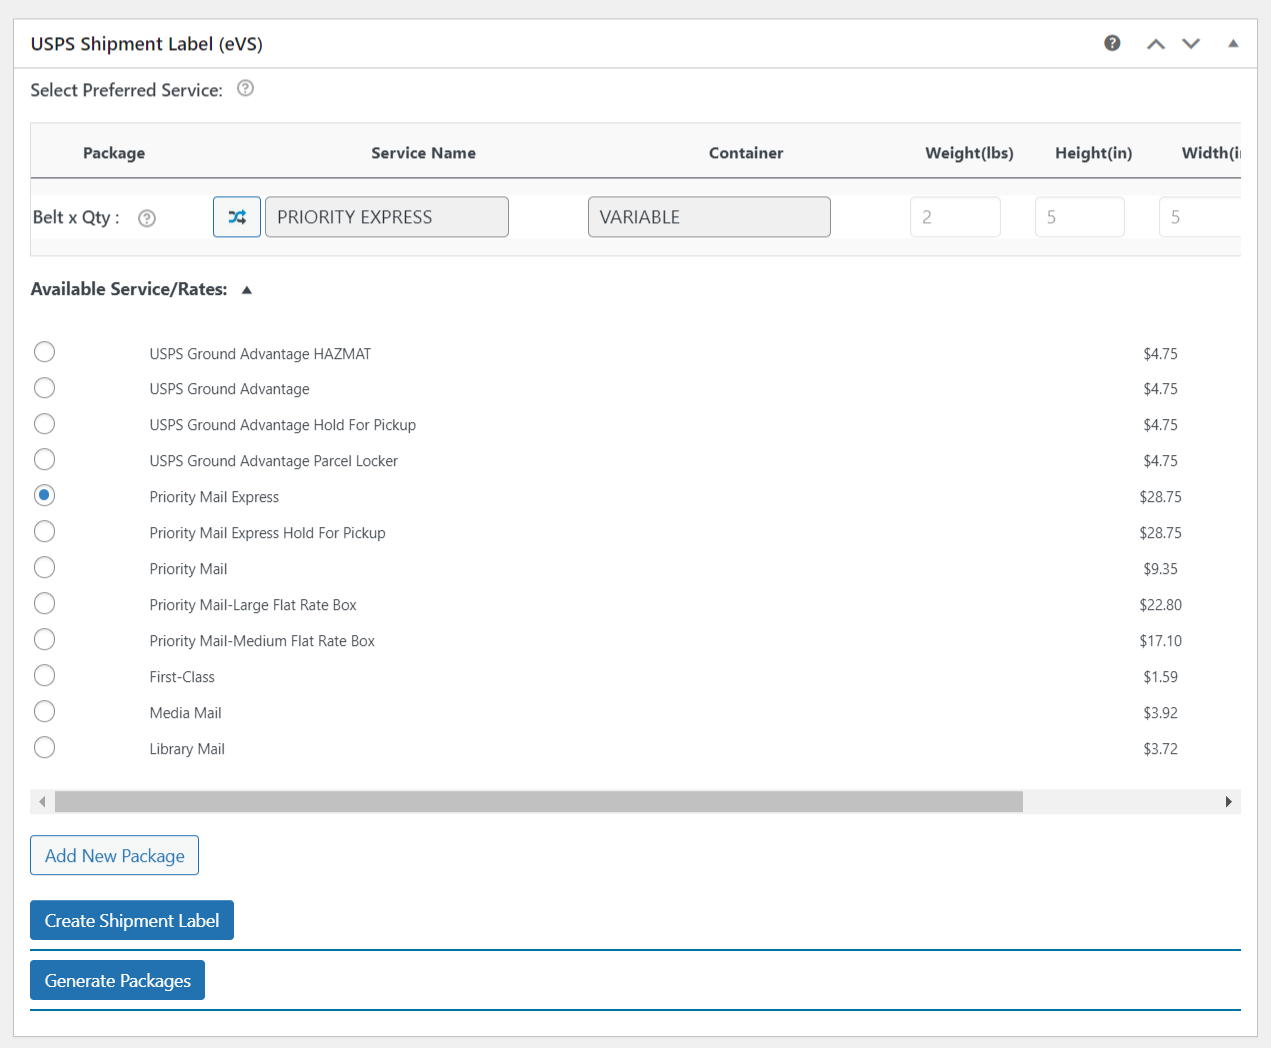
A list of services will be displayed as preferred services from which you can choose one before proceeding with the shipment. The service chosen by the customer was USPS Ground Advantage, but here I have selected Priority Mail Express. You can choose any service convenient for you by changing the service chosen by the customers before generating labels and shipments.
Tracking
The Shipment Tracking API Setting fields are as shown below:
- Shipment Tracking: It provides information to customers about the route of a package and the anticipated date and time of delivery.
The available options are as given below:- Disable for Customer: This option disables tracking information only at the customer end. That is, on the order page of the customer. The store admin can still utilize this feature.
- Enable: This option enables USPS shipment tracking for you(store admin) as well as customers. Once the ordering by the customer is complete, it sends an automatic email to the customer with tracking information.
- Disable: This option disables USPS shipment tracking for you as well as for customers.
- Mode to Enter Tracking ID: Tracking ID is given to packages when they are shipped. Tracking IDs are useful for knowing the location of time-sensitive deliveries.
The available options are as given below:- Automatic: The tracking ID is generated while creating labels. This tracking ID is populated the Enter Tracking ID textbox under USPS Shipment tracking on the Order page.
- Manual: As Admin you must enter shipment tracking ID manually after generating labels. You can get the tracking ID from the particular Order details page in the Admin area (WooCommerce > Orders).
- Custom Shipment Message: Allows you to set a custom shipment tracking message. Leave the text field empty for default message.
Finally, click on Save Changes to save all the settings.
Demonstration
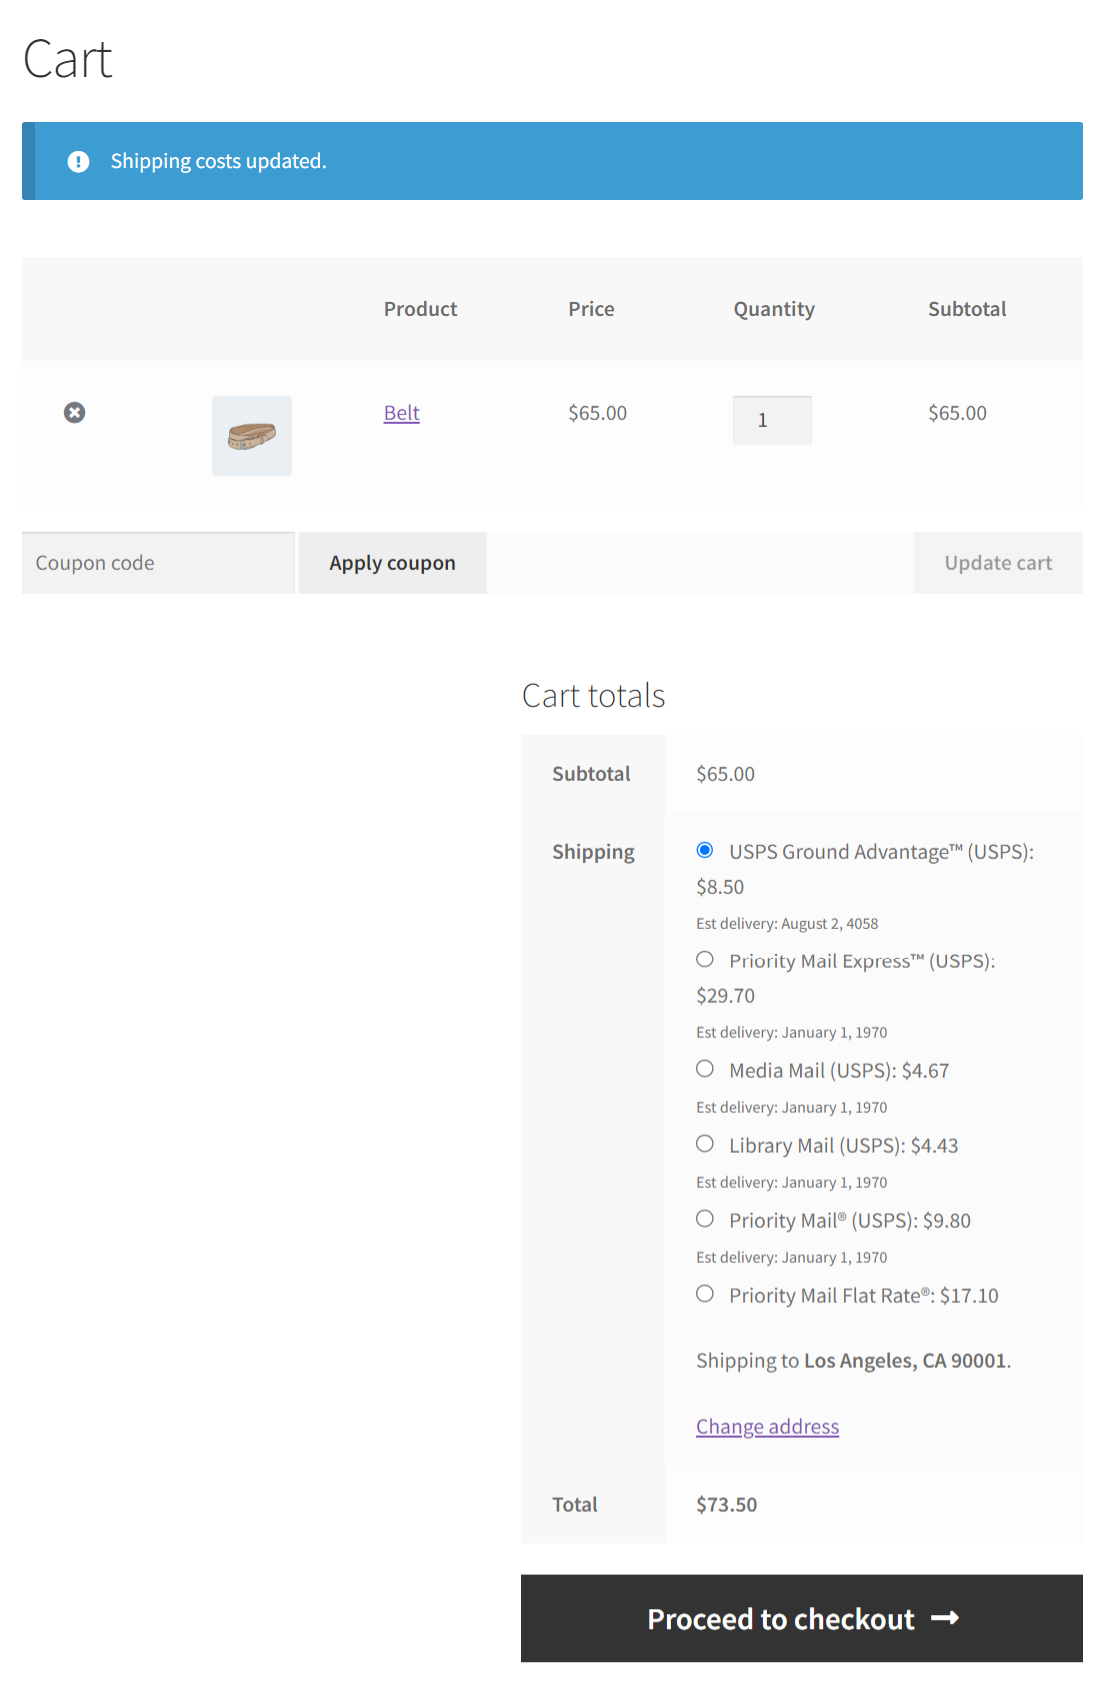
Let us now move to our WooCommerce cart page to see the applied changes.
The following screenshot shows USPS Domestics rates and services.
The USPS International rates and services will be displayed as shown in the screenshot below.

How to print USPS Labels?
Once your customers place an order, move to your WooCommerce admin order page to generate shipping labels.
Open the desired order and scroll down to find the USPS Shipment (eVS) meta-box as shown in the screenshot below.
Next, click on Generate Packages. Further settings appear where you can update the previously selected service.
If you have multiple packages, you can select separate services for them. You can also add additional packages if you want. Finally, click Create Shipment Label to proceed.

Once the label is generated, you receive the shipment tracking ID as well. Next, click on the Print Label button to print the shipping label.

Following is a screenshot of a sample Domestic Label.

The USPS Shipment Label instruction and online e-Label Record are as shown below.

For international shipments, the label is generated as shown below.

In addition to this, the international shipping document also includes Custom declaration and Dispatch Note. Sample documents are as shown in the below screenshot.


Check the video below to understand how to create USPS Shipping labels:
How to track USPS Shipments?
Move to the USPS Shipment Tracking meta-box to track shipments.
USPS Shipments can be tracked in two ways: by Store Admins in the back-end and by their Customers at the front-end.
In the back-end, the store admins can manually enter the tracking ID if they are not creating the shipment using the plugin. They can enter multiple tracking IDs separated by commas and click on the Add Shipment ID button, as shown in the screenshot below.
Otherwise, the plugin will automatically generate the tracking ID when the store admins create shipments using the plugin, as shown in the screenshot below.
If store admins want to track the shipments, they can open the desired order and click on the tracking icon next to the tracking number (received after creating the shipment).
Customers can get the shipment tracking information on their My-Account page. Under Order, click required #OrderNumber, the tracking information appears as shown in the screenshot below.
You can also watch the below video tutorial for a better understanding of tracking USPS shipments in WooCommerce.
How to generate a USPS SCAN Form?
The SCAN Form generation settings are placed separately from the plugin settings. You can find these settings under WooCommerce > USPS SCAN Form section, as shown in the screenshot below.

There are three settings in this section:
- SCAN Method: A SCAN API request is submitted. There are three ways the SCAN request can be submitted.
They are –- ALL – Include all PICs for the USERID submitted regardless of the SHIPDATE on the held PICs. In other terms, select this option to print SCAN forms for all shipment orders for which you haven’t printed. Please note it will only include the order(s) for which you have generated the labels and the scan form was not printed for that shipment previously.
- Order ID – Submits the specific PICs of the WooCommerce Order IDs that are entered. You can specify the order IDs separated by commas without any space, for which you want to print the scan form. Make sure the shipments are created for those orders.
- Date of Label Generation – Include all PICs for the USERID submitted on the request for the specified date. The SCAN form will include all the orders you have created the shipment(s) for the selected date.
- Form: Designates the desired label option selected by the customer.
Select one of the valid entries –- 3152 – Generates PS Form 3152 and prints only the shipper’s address and the master barcode.
- 5630 – Generates PS Form 5630 and prints the total number of packages and the services used for shipment. It also has the master barcode and the shipper’s address.
- Mail Time: Enter the mail time. This denotes the time of mail to be tendered to Postal Service.
For example, 02:30 PM should be entered as ‘143000’ in HHMMSS (24 hours) format.
Once you configured your required settings, click on the Generate button. After the form is generated, click on the Download link.
Below is a screenshot of a sample 3152 form.

A sample 5630 form will be as shown in the screenshot below.

Check this video to understand the process of generating USPS SCAN Form:
To know more about the product, check out ELEX WooCommerce USPS Shipping Plugin with Print Label.
Or check out the documentation section for more related articles.
2 Comments. Leave new
My web desinger added this plugin and never showed me how to set it up and print labels. I have done some studying myself and have disabled flat rate becasue my product will not go in any of the boxes, I have disabled any international shipping and any small shipments. I have a product that is 7 ouces total and it is 11″x6″x3″ I have certain size boxes that will accomodate multiples of this item. I have put in the weight of the product and I have also added in the dimension of the boxes and weight. With this being said, I got my first order and my customer picked First Class Mail for shipping. She shouldn’t have been able to pick this option because it was over the alloted weight for First Class. But it allowed her to pick and pay for it. When I went to click and print the label, it only gave me the option to pick Priority and it cost a lot more. She paid $5.20 where I was going to have to pay $7.84. I am not trying to make money on shipping , I just want them to pay the bare minimum without me cutting into my profit. What am I doing wrong????!!!! I have read so many articles and have changed my settings so many times and nothing. Can someone help me or guide me a resource.Web desinger is not a go to option.
Hello, By using our ELEX USPS plugin you will be able to print label with the service the end customer has selected. This particular scenario you have mentioned needs to be analysed further. Also, there will be some configuration issues in the settings page because of which the eligible services are not been shown. Could you please raise a support ticket at https://support.elextensions.com/ with the screen shot of the settings page. We shall definitely help you to figure it out.