What can we help you with?
How to set up ELEX WooCommerce Australia Post Shipping Plugin with Print Label & Tracking? (with Video)
This article intends to provide detailed, step-by-step instructions that’ll help you understand how to set up ELEX WooCommerce Australia Post Shipping Plugin with Print Label & Tracking. Refer to the product page to know more about the other various features of the plugin. If you want to use the StarTrack service, read our article on configuring the plugin with a StarTrack account. If you have a MyPost Business account and would like to use it as the preferred service, please read our article on setting up the plugin with a MyPost Business account.
Australia Post provides postal services in Australia and its overseas territories. Australia Post is the trading name, Australian Postal Corporation (formerly the Australian Postal Commission) is the Australian Government-owned entity responsible for the service.
Our WooCommerce Australia Post shipping plugin provides easy, seamless integration of WooCommerce with Australia Post services. In addition to accessing real-time shipping rates, the plugin also provides print label and shipment tracking facilities.
Overview
Some of the major highlights of the plugin include:
- Real-time shipping rates: Based on the shipping destination address, product weights, and dimensions, the plugin fetches real-time rates for both domestic and international services.
- Print shipment label: You can print shipping labels from order pages in the back-end of your WooCommerce store. Postage is automatically paid on the printed labels using your Australia Post account.
- Shipment Tracking: A barcode is added to the shipment label, with the help of which, the shipments can be tracked.
- Box Packing: You can select the desired box packing method. This will also affect the shipping rates displayed on your cart/checkout page.
All these features (and many more!) are bundled into one solution to serve your WooCommerce-Australia Post shipping integration needs for your online store.
Getting started with ELEX WooCommerce Australia Post Shipping Plugin with Print Label & Tracking
Read an article to know how to complete the checkout process on ELEX. You can also read how to download, install, activate ELEX plugins.
Once the plugin is installed and activated, you can navigate to plugin settings in two ways:
- Dashboard > WooCommerce > Shipping > Australia Post (E-parcel & Startrack) (or)
- Dashboard > Plugins > Installed Plugins > ELEX WooCommerce Australia Post Shipping With Tracking > Settings.
Now that we have explored the features of the plugin, and have installed it, let’s get down to configure the plugin.
General Settings
The general settings are as shown below.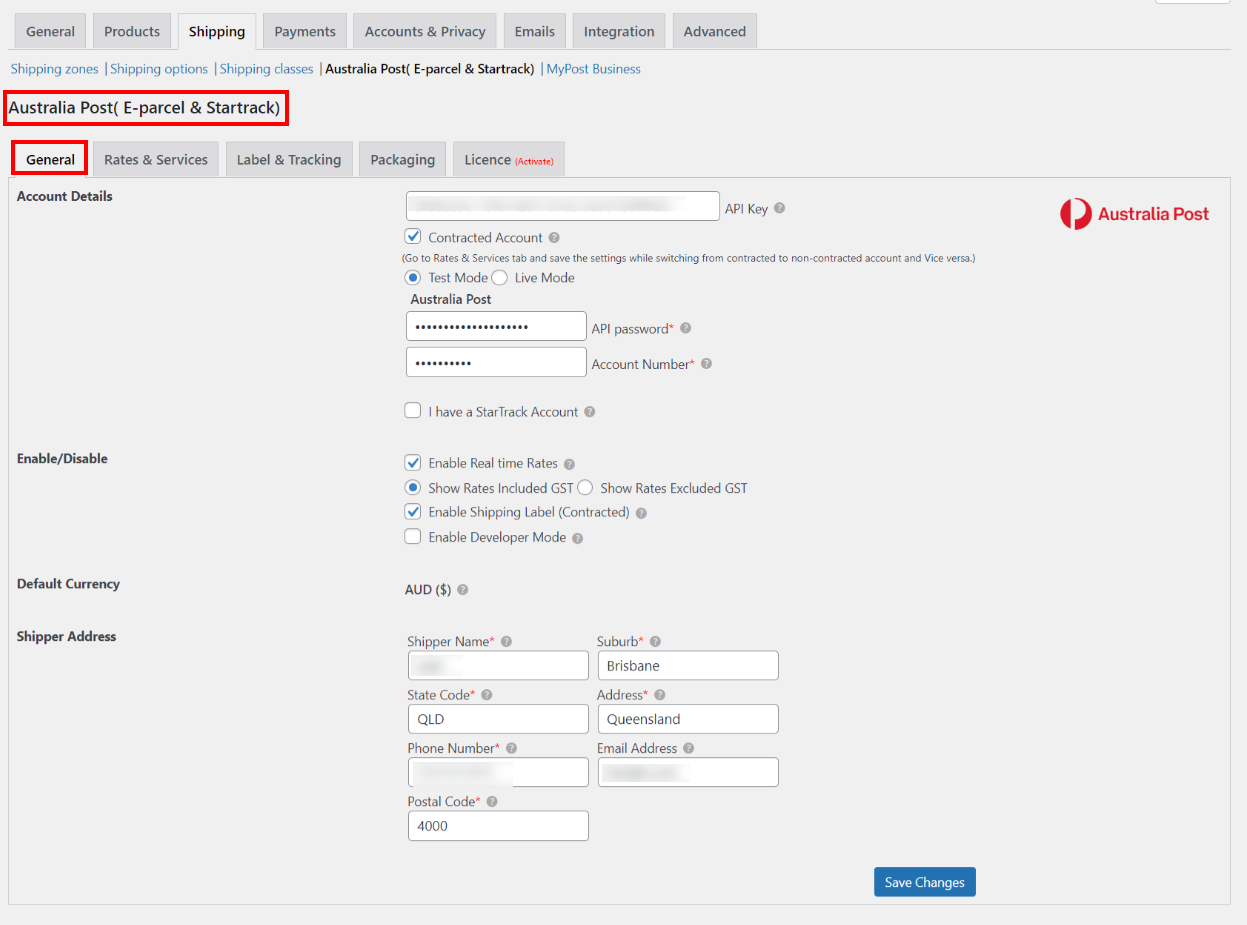
- Account Details: Enter the API Key that you have received after registering for an Australia Post account. This key is applicable for both contracted and non-contracted rates.
How to register for Australia Post?
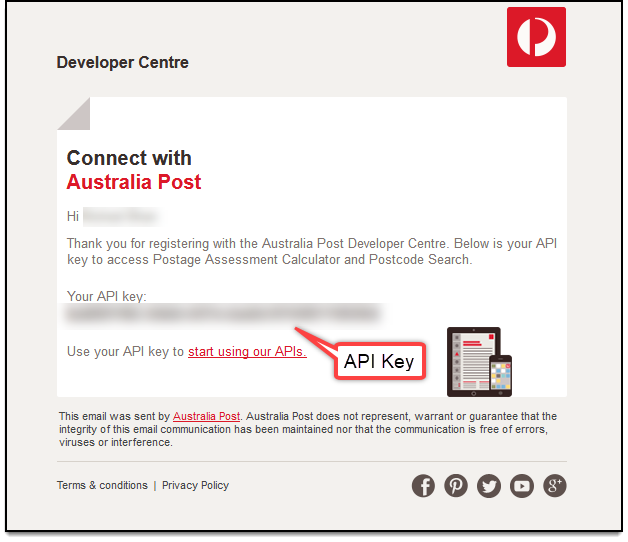
To obtain an API key, register for Australia Post and obtain the key from this page. Follow the given procedure to receive your API key.
After registration, you will also receive an email containing your API key.
A screenshot of a sample email content is shown below.
Remember, if you have registered for a general account, you can only access Australia Post real-time rates with our WooCommerce Australia Post plugin. If you wish to enable printing shipping labels, shipment tracking, and box packing facilities, sign up for a contracted/business account.
How to obtain Australia Post credentials?
You can read our article to understand how to register for an Australia Post account, obtain credentials, and use them in our plugin.
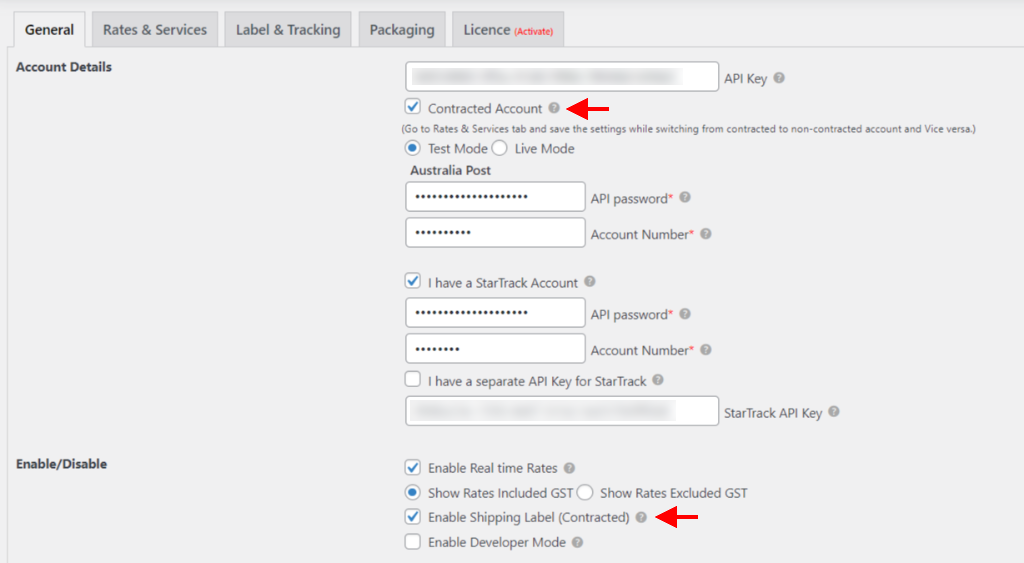
If you wish to avail Australia Post contracted rates for your WooCommerce store, enable the Contracted Account checkbox. Once enabled, further settings appear which allow you to switch between Test Mode and Live Mode. Enter your respective API Password and Australia Post account number in the given text fields.
Further, you can enable StarTrack services, by ticking the respective setting. If you have a separate API Key for the StarTrack account, you can enable the option and enter your StarTrack API Key.
Note: From version 2.3.6, you can use eParcel and StarTrack accounts together. You can access both the rates and services simultaneously. This article explains all the settings for eParcel services, for StarTrack, you can read the respective guide.
- Enable Real-time rates & Developer Mode: Enable the real-time rates checkbox to access Australia Post real-time rates.

If you are not getting proper rates (lesser or higher than expected), not getting all the available shipping options, or not getting any rates at all, then you can tick the Enable Developer Mode checkbox to find the error(s). You can also see the warning(s) by our WooCommerce Australia Post Shipping plugin.
By enabling debug mode, you can trace issues using log. You can see information about debugging at the top of the cart and checkout page. After enabling debug mode, add a product to the cart. Go to the cart or checkout page to see the debugging information.
If you have enabled contracted rates, an additional setting titled generating shipping label will appear in this section. If you wish to enable shipping label generation, tick the Enable Shipping Label checkbox.
- Enable Multi-Vendor: This option will be available if you have installed WooCommerce Multi-Vendor Support for ELEX Shipping Plugins in your WooCommerce store. If you have enabled this option, the shipper address set on the Multi-Vendor plugin will be overridden by the shipper address you add below.
To know more about WooCommerce Multi-Vendor Support for ELEX Shipping plugins and its configuration, check the article: How to set up WooCommerce Multi-Vendor Add-On for ELEX Shipping Plugins?
- Default Currency: Shows the default currency of Australia Post.
- Shipper Address: Enter shipper name, address (the address from where the items will be shipped), contact number, and email address in the respective text fields.
Click Save Changes once you have configured all settings.
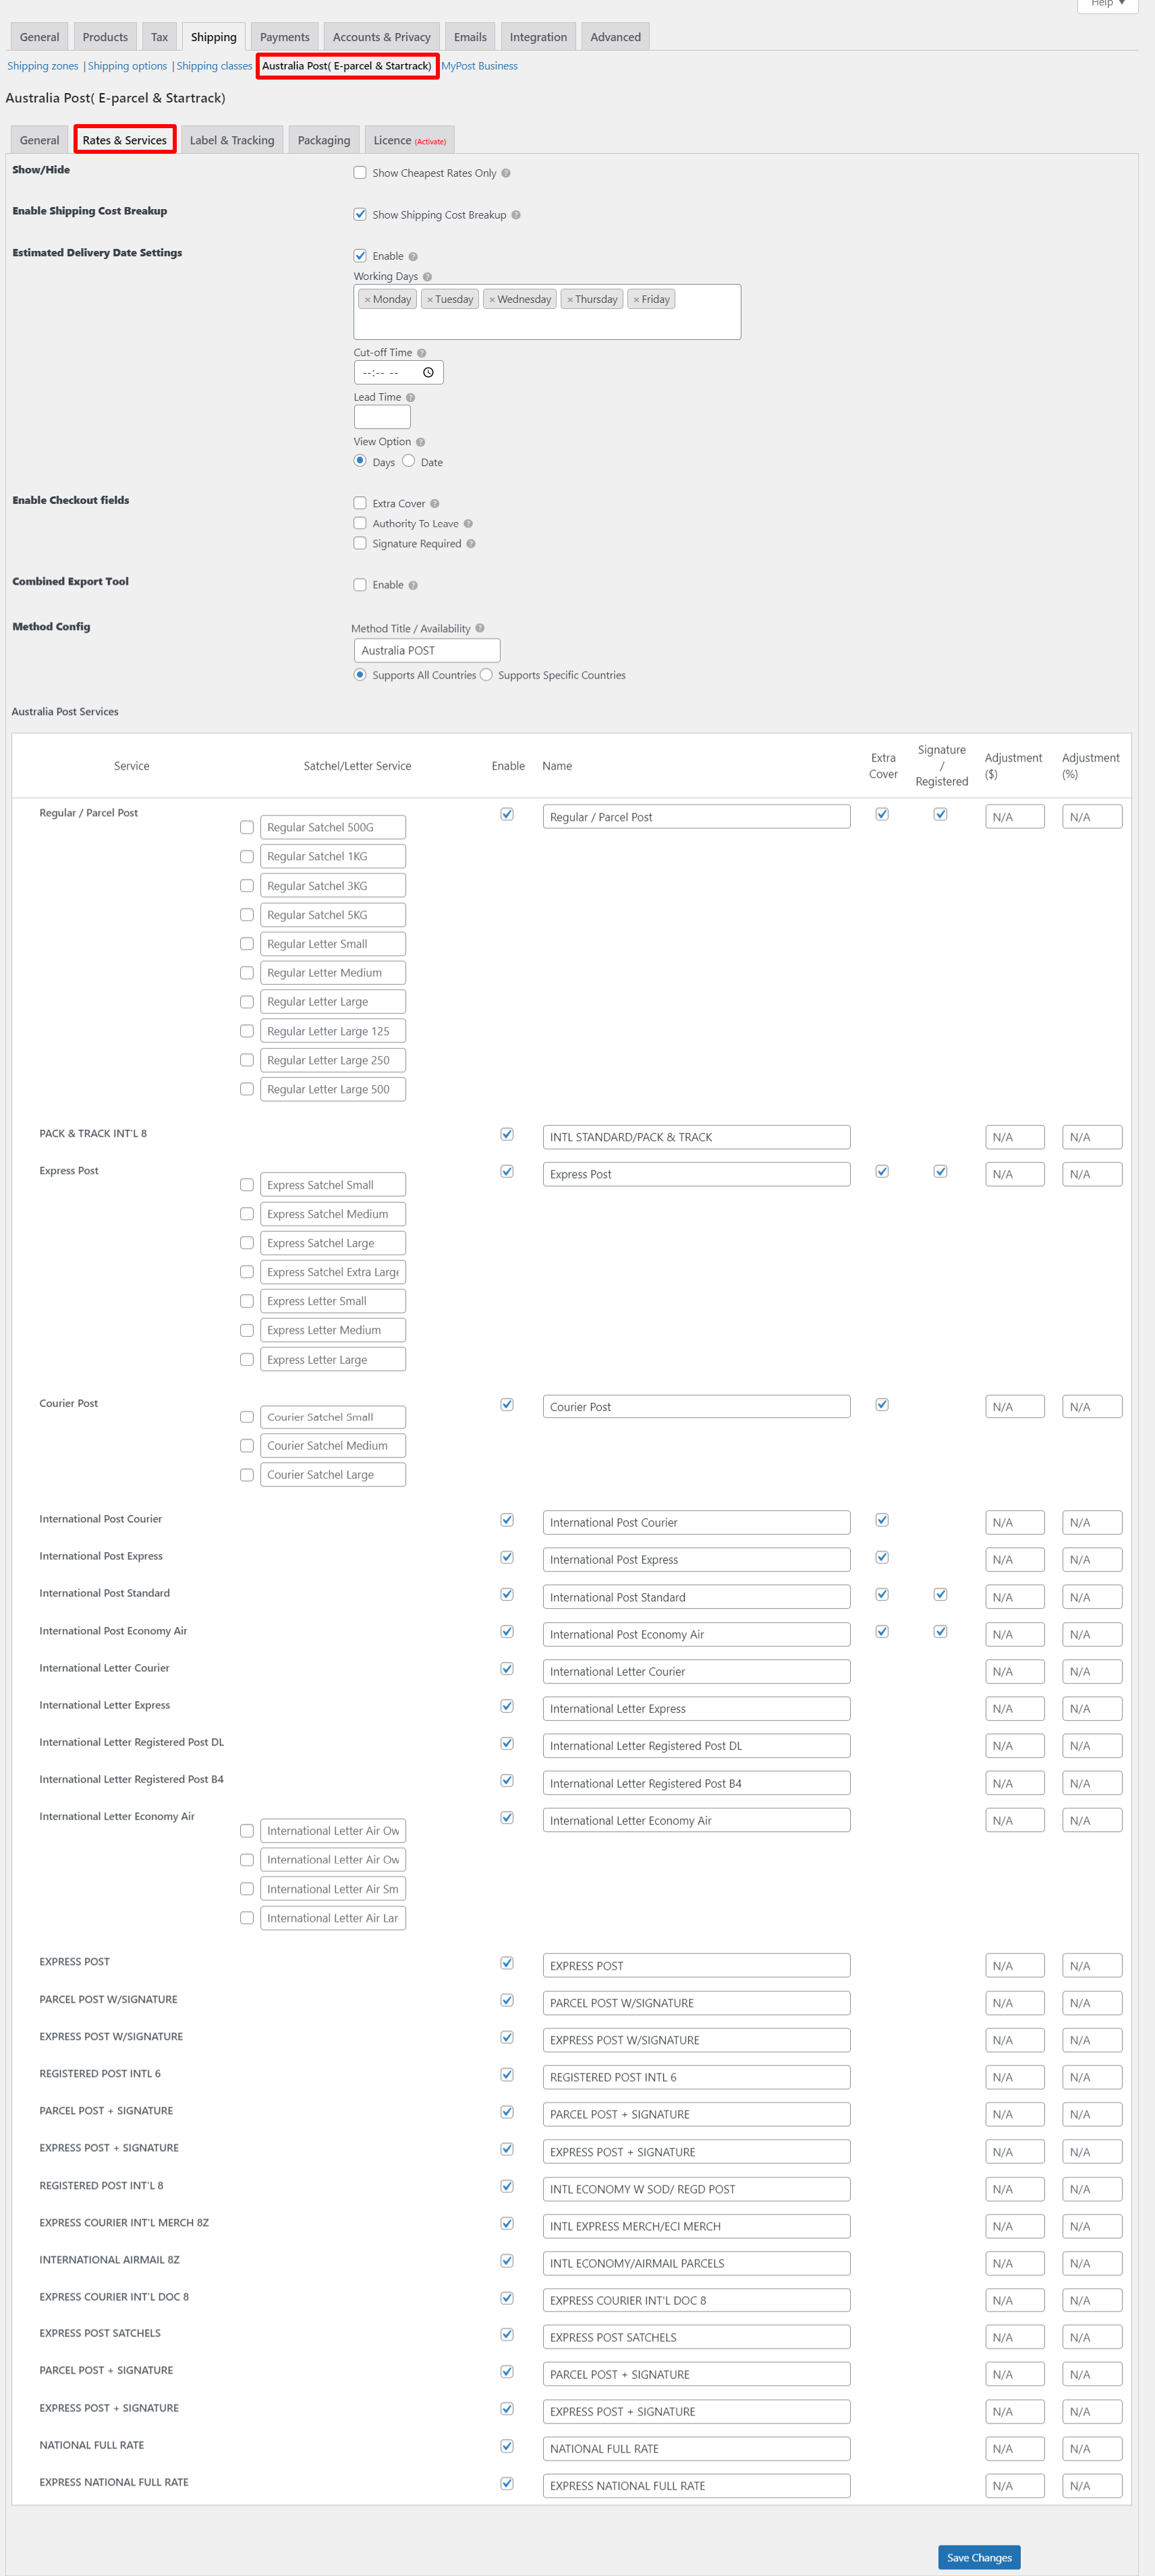
Rates & Services
This tab contains settings for configuring Australia Post services and how they will be displayed on the front-end of your store.
The tab for Non Contracted accounts will display as:
If you have enabled the Contracted Account and the StarTrack account, the tab will be displayed as:
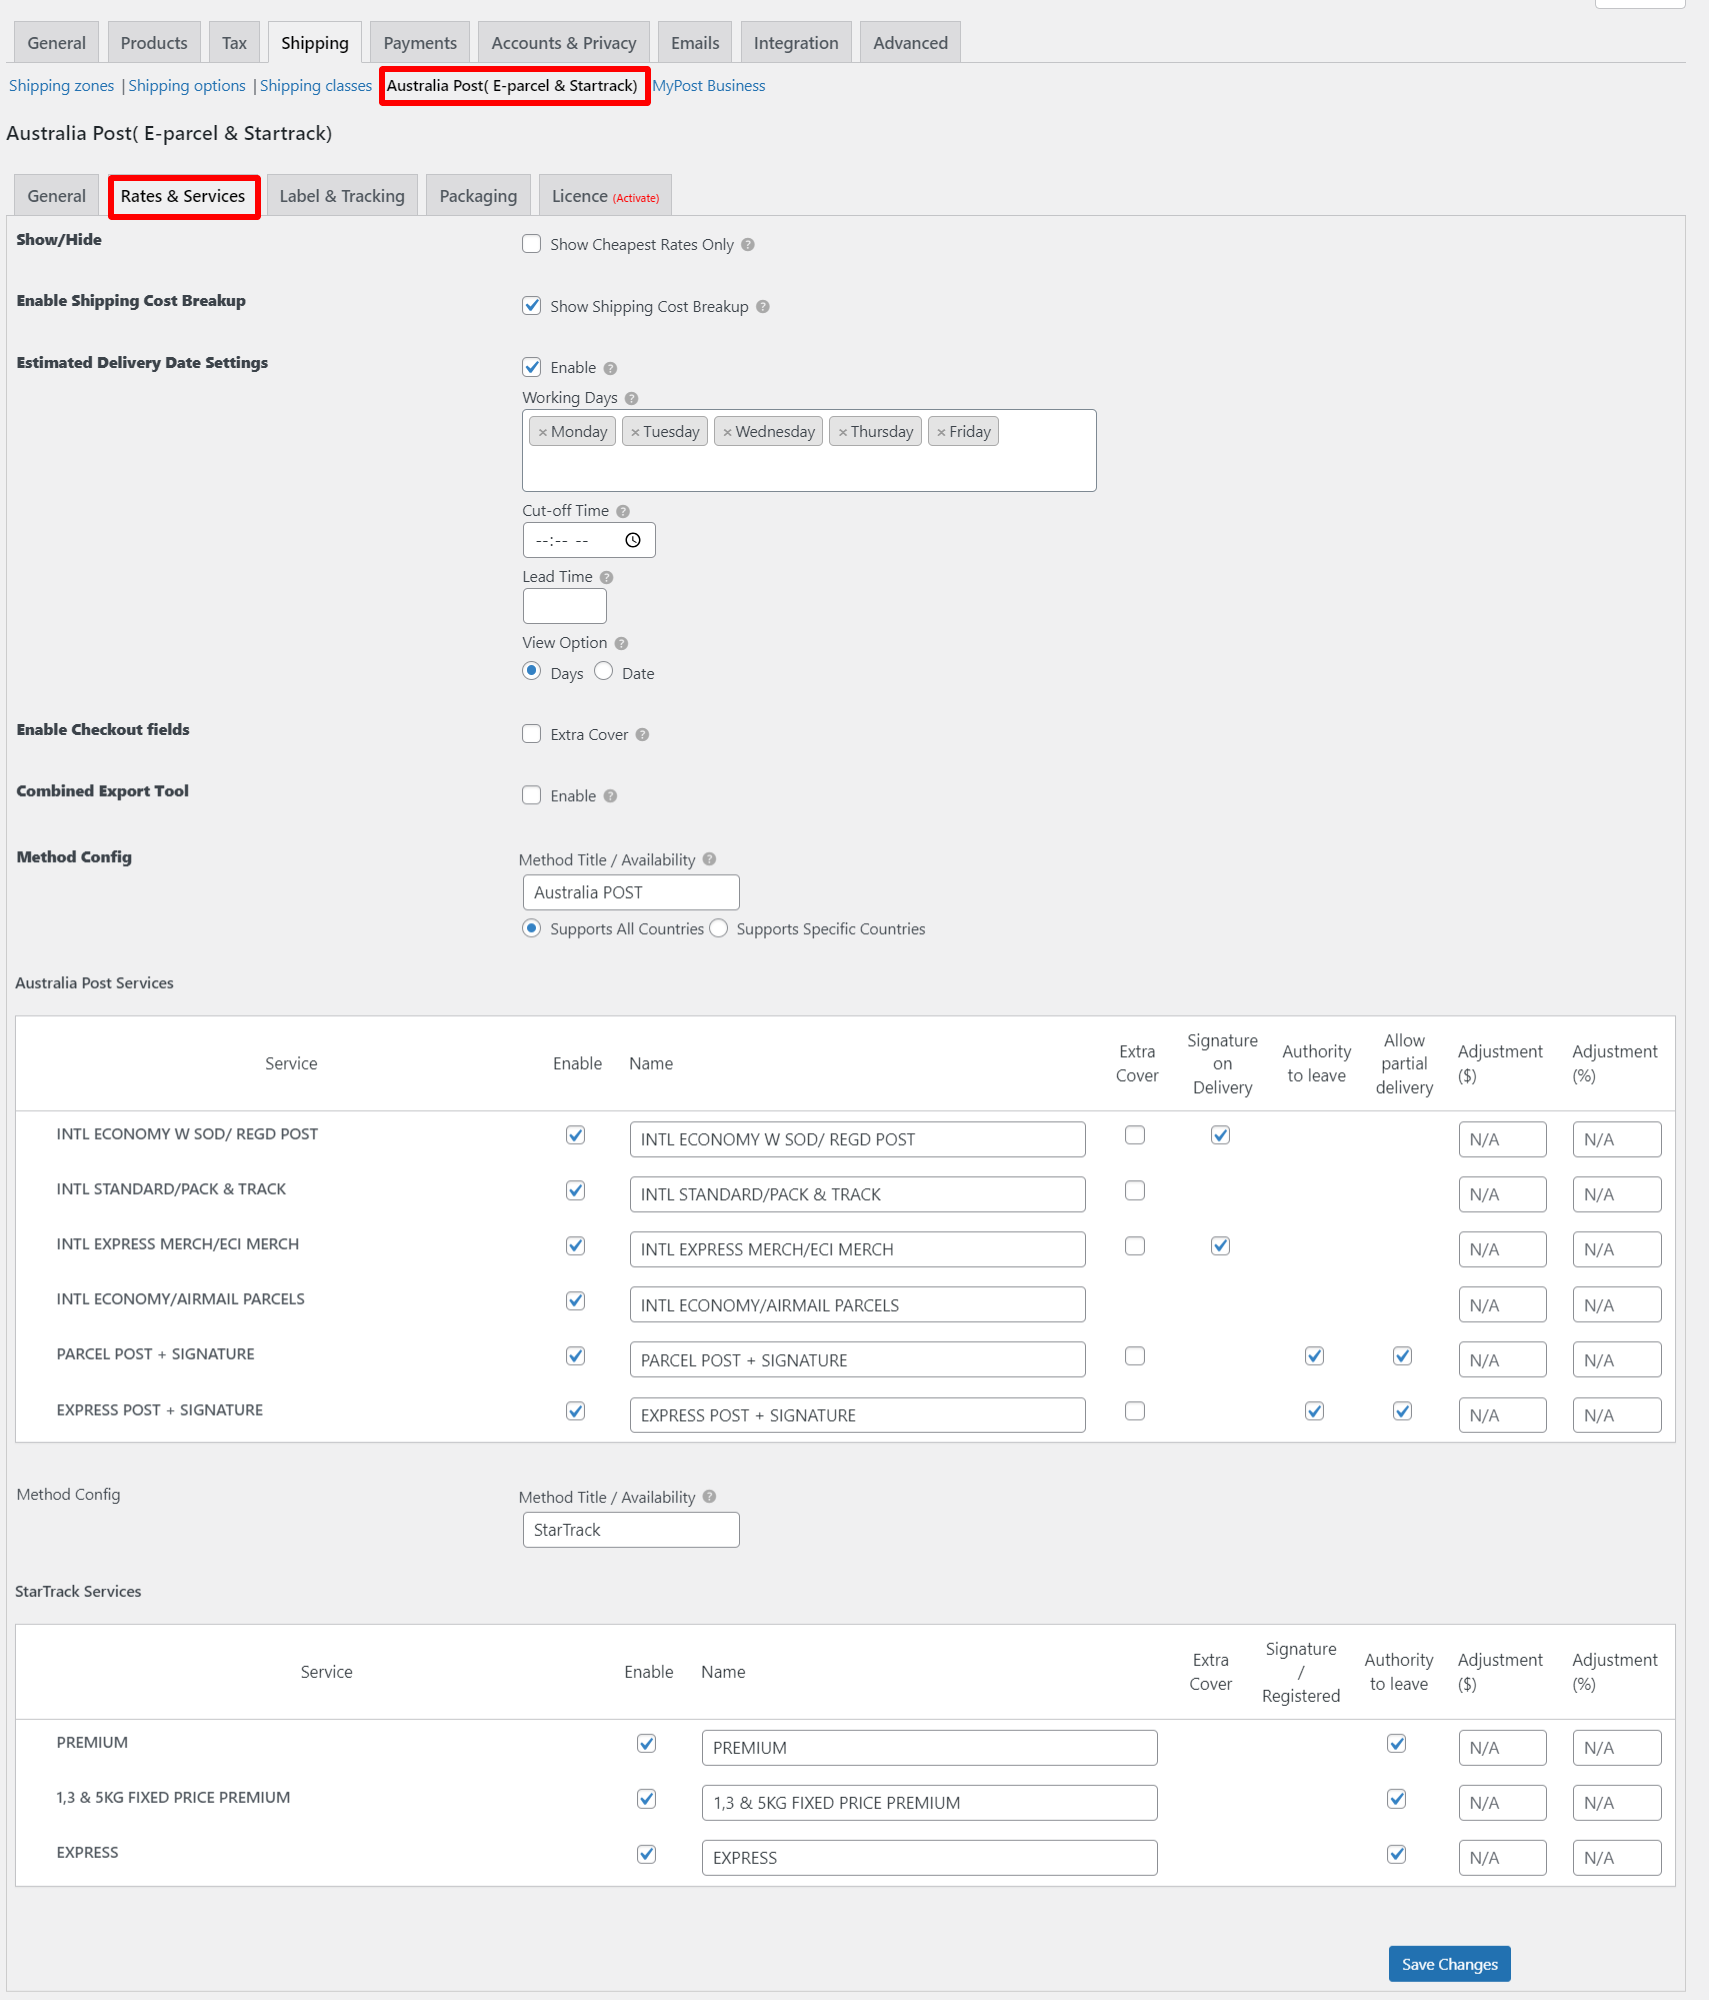
- Show/Hide services:
- Show Cheapest Rate Only – This option shows services only with the cheapest quote from the selected Australia Post services in the Services section (discussed in the latter part of this article).
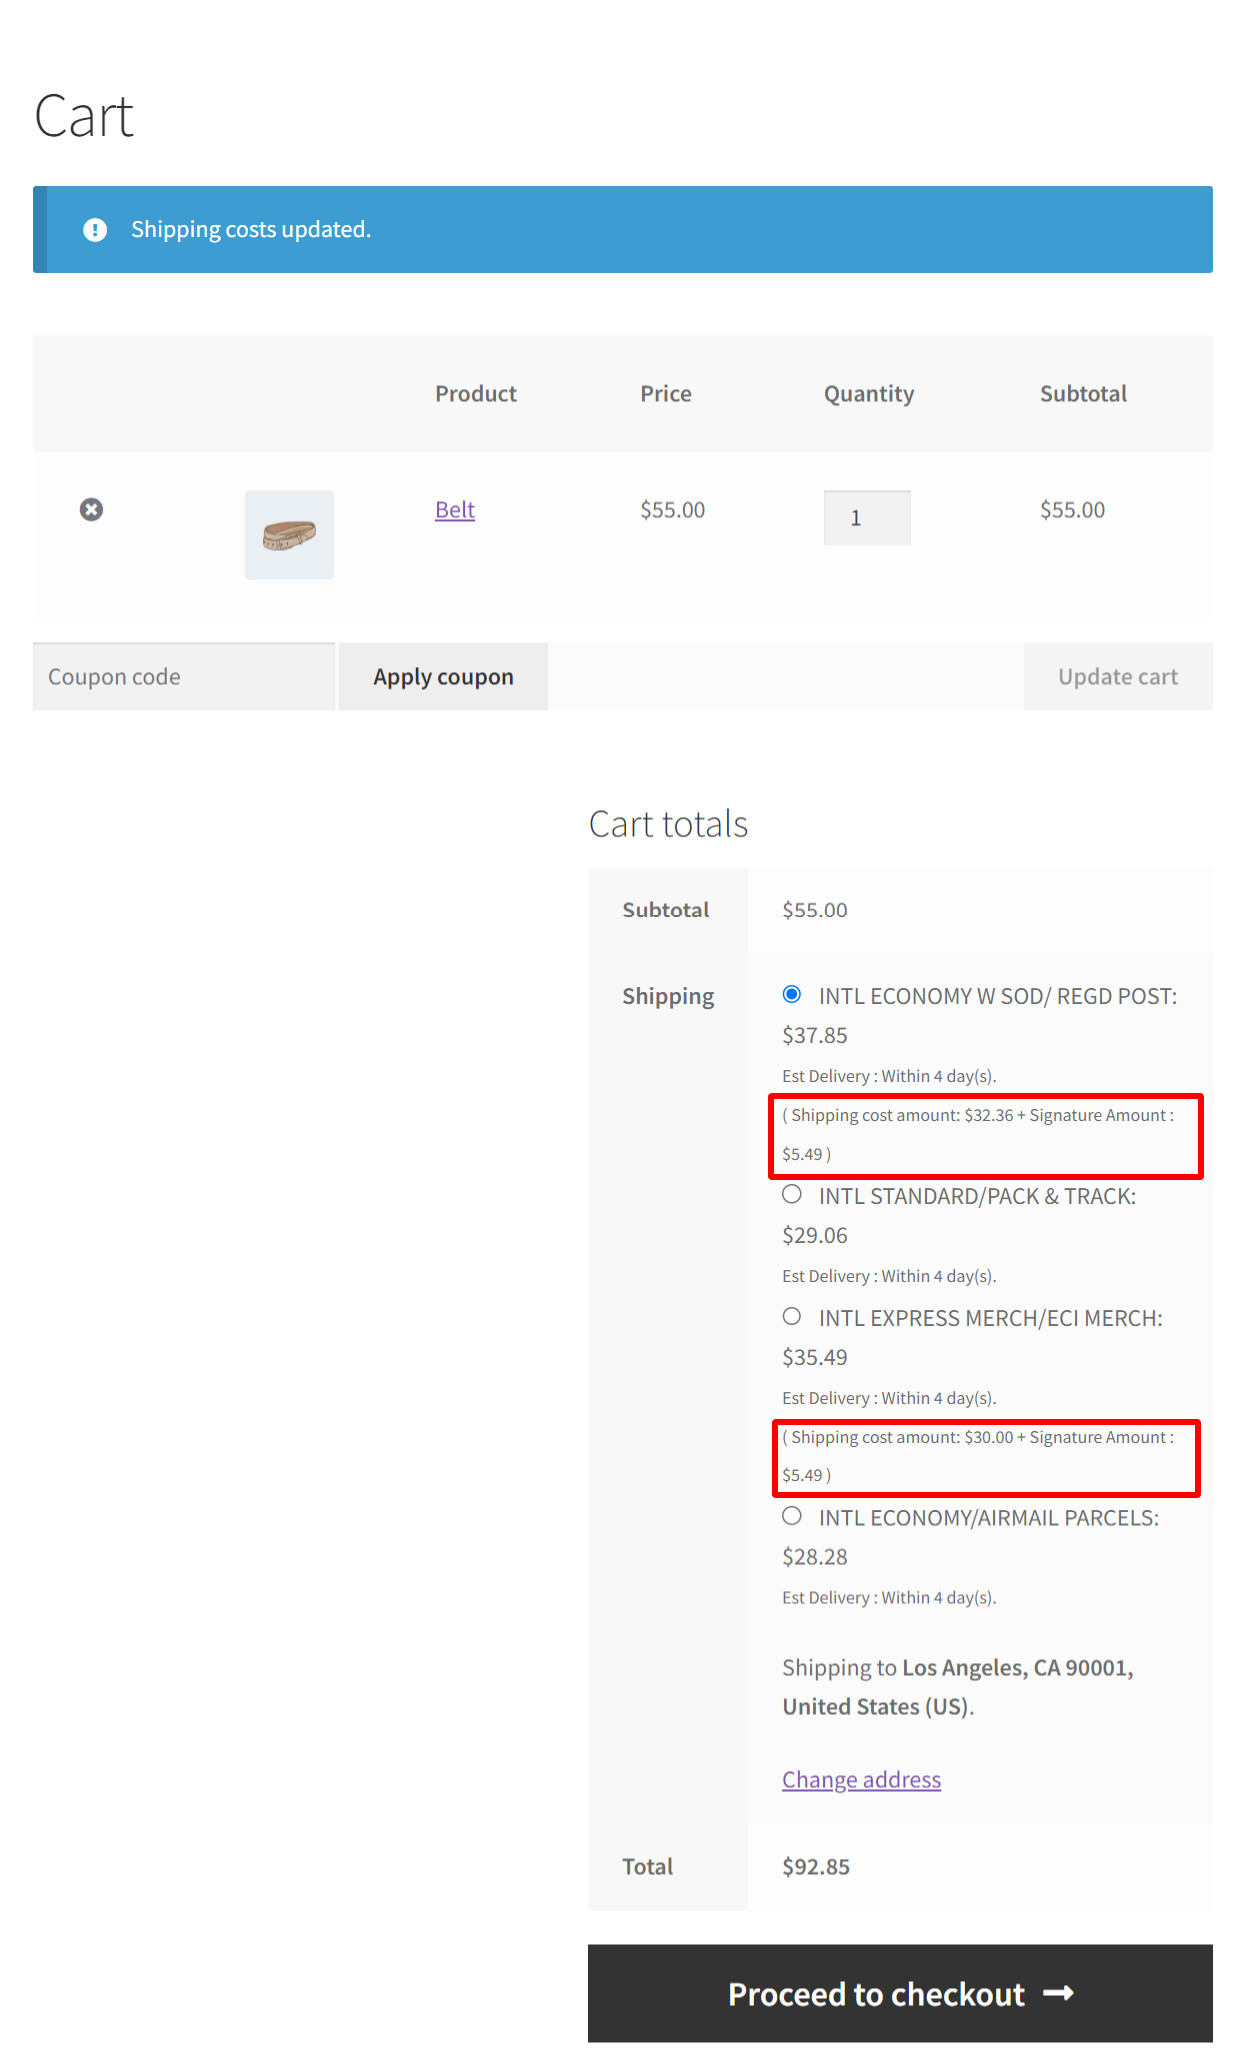
- Enable Shipping Cost Breakup: Enable this option to display the shipping cost breakup on the cart and checkout page.
- Estimated Delivery Date Settings- Enable the checkbox to show the estimated delivery date for the chosen services.
- Working Days: You can select your working days from the drop-down menu for calculating the estimated delivery date, as shipments only happen on working days.
- Cut-off Time: Provide a cut off time here. The orders placed after the cut-off time will be shipped on the next working day.
- Lead Time: If you need more days to initiate the shipment due to some reasons, you can add the required number of days here. Lead time will be added to the number of days calculated with the working days and cut-off time. The total days will be taken to calculate the estimated delivery date.
- View Option: You can either choose Days or Date to display the estimated delivery date to the customers. If you choose Days, it will display the total number of days required to deliver the order. If you choose the Date, it will display the exact date of delivery.
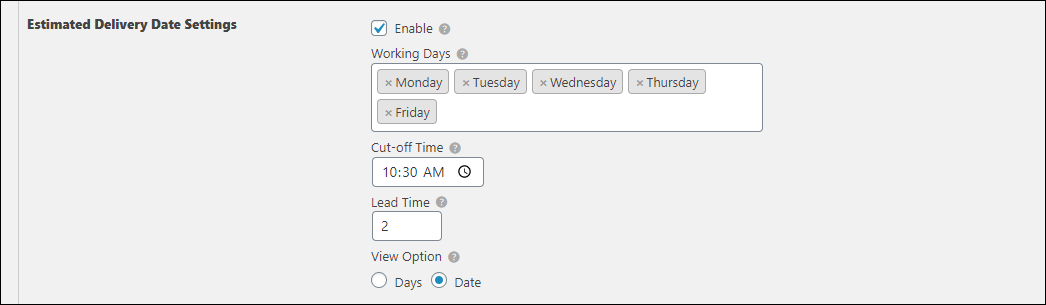
In the above example, 2 days (Lead time) will be added with the delivery days calculated with working days and the cut-off time, for calculating the total days for delivery.
- Enable Checkout fields: These options will be available to the customers on the checkout page.
- Extra Cover – This setting is used to add an insurance amount to the product. Once a customer enables this option on the checkout page, $2 will be charged per $100 of the total product amount.
For example, if three products of $30 each are bought, then the extra cover amount will be $2. Hence the total amount will be $92 ($30×3+$2). If a customer adds one more product of the amount, then the extra cover amount will be $4. Hence the total amount will be $124 ($120+$4). - Authority to Leave – Once this option is checked by the customers, the package can be left at the door.
- Signature Required – When enabled by the customer, the package delivery person must take the signature of the person accepting the package. An amount of $2.95 is charged for this type of service.
- Extra Cover – This setting is used to add an insurance amount to the product. Once a customer enables this option on the checkout page, $2 will be charged per $100 of the total product amount.
If you have enabled the Contracted Account, only the Extra Cover option will be available for customers.
- Combined Export Tool: Enable the Australia Post Combined Export Tool that retrieves estimated duties and taxes for the shipment. Enable this option, if you want to collect the VAT and Duties for international shipment.
- Show rate: Enable this option to show the breakdown of estimated duties and taxes on the Cart and Checkout pages.
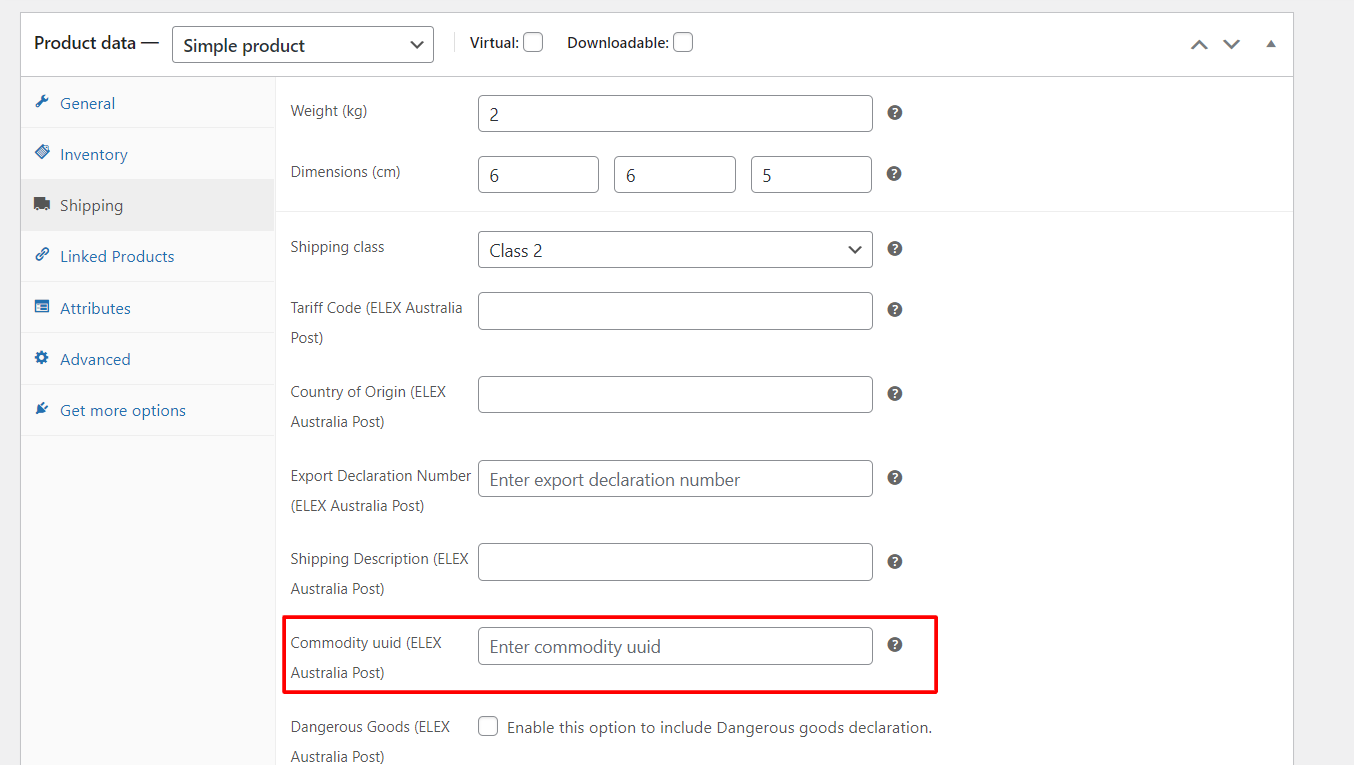
To use this option for a specific product, you have to add the commodity UUID on the product page dashboard.
- Method Config:
- Method Title – Enter a custom method title for the Australia Post shipping method. This method title will be displayed on the cart and checkout pages.
- Method Availability – This field allows you to select countries, for which the Australia Post shipping method will be available.
There are two options:
- Supports All Countries: Choose this option if you offer Australia Post shipping method to all over the world. This option is selected, by default.
- Supports Specific Countries: Provides an option to select desired countries. The Australia Post shipping method will be available only in selected countries.
Australia Post Services
Our WooCommerce Australia Post Shipping plugin supports the following domestic and international services.
- Regular / Parcel Post
- Express Post
- Courier Post
- International Post Courier
- International Post Express
- International Post Standard
- International Post Economy Air
- International Letter Courier
- International Letter Express
- International Letter Registered Post DL
- International Letter Registered Post B4
- International Letter Economy Air
- EXPRESS POST
- PARCEL POST W/SIGNATURE
- EXPRESS POST W/SIGNATURE
- REGISTERED POST INTL 6:
- PACK & TRACK INT’L 8:
- PARCEL POST + SIGNATURE
- EXPRESS POST + SIGNATURE
- REGISTERED POST INT’L 8
- EXPRESS COURIER INT’L MERCH 8Z
- INTERNATIONAL AIRMAIL 8Z
- EXPRESS COURIER INT’L DOC 8
- EXPRESS POST EPARCEL
- EXPRESS POST SATCHELS
- EPARCEL 1
- PARCEL POST + SIGNATURE
- PARCEL POST + SIGNATURE
- NATIONAL FULL RATE
- EXPRESS NATIONAL FULL RATE
You can enable/disable desired services.
The services table for Non Contracted accounts will be divided into the following seven columns:
- The first column represents all service names.
- In the second column, you can select the desired services by ticking the respective Enable checkbox. Non-selected services are not shown to the customer, even though they are available services from Australia Post.
- You can set a custom service name in the third column titled, Name.
- Tick the Extra Cover checkbox for additional insurance of goods, if you are sending some valuable or important items. The extra cover provides cover for a specified value of your item if the item is lost or damaged while being carried by Australia Post.
For more information, see the Extra Cover option. - Tick the Signature/Registered checkbox to get a signature from the customer receiving the package, at the time of delivery.
- The last two columns are used for price adjustments. You can add or subtract the required amount to/from actual shipping cost. Use minus sign (-) for subtracting the amount. You can specify the price by a percentage or amount value.
For example, consider the shipping cost of Regular/Parcel Post returned by Australia Post is $5.
Case 1: For price adjustment of $5, for Regular Post:
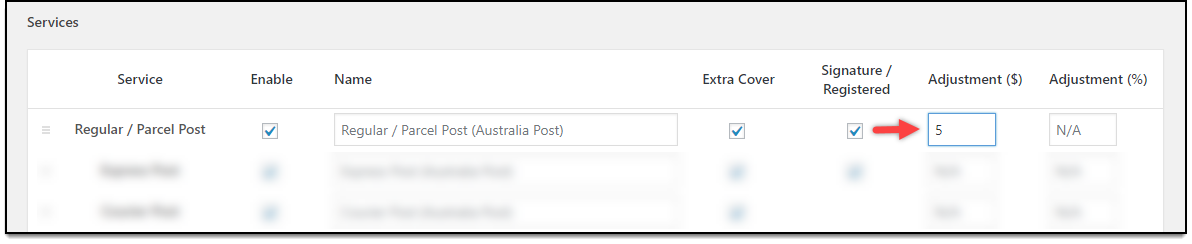
Total cost displayed Regular Post is $10($5+$5).
Case 2: For price adjustment of 10%, for Regular Post:

Total cost displayed Regular Post is $5.5(The 10% of 5 is added to 5 + 5 to get the actual).
Case 3: For price adjustment of $5 and 10%, for Regular Post:
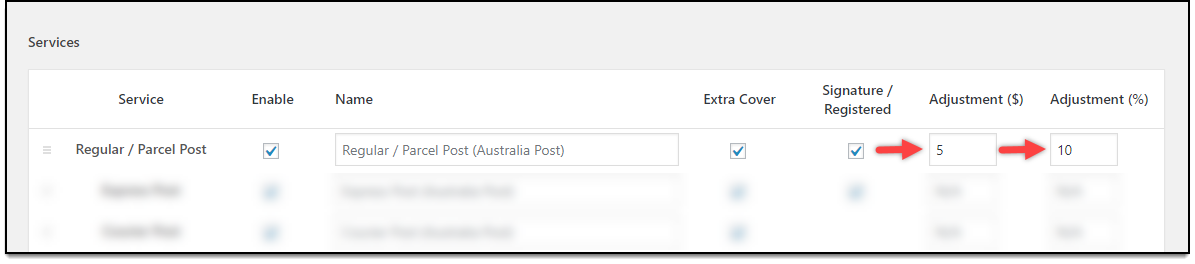
Total cost displayed Regular Post is $10.5 (The 10% of 5 is added to 5 + 5 to get actual).
If you have enabled your Contracted Account, the services table will have 2 additional columns – Authority to leave, and Allow partial delivery.
- Authority to Leave – Once this option is checked by the customers, the package can be left at the door.
- Allow partial delivery – If this option is enabled, one order can be shipped in multiple parts.
Click Save Changes to save the settings.
Label & Tracking
The label and tracking settings are as shown below.
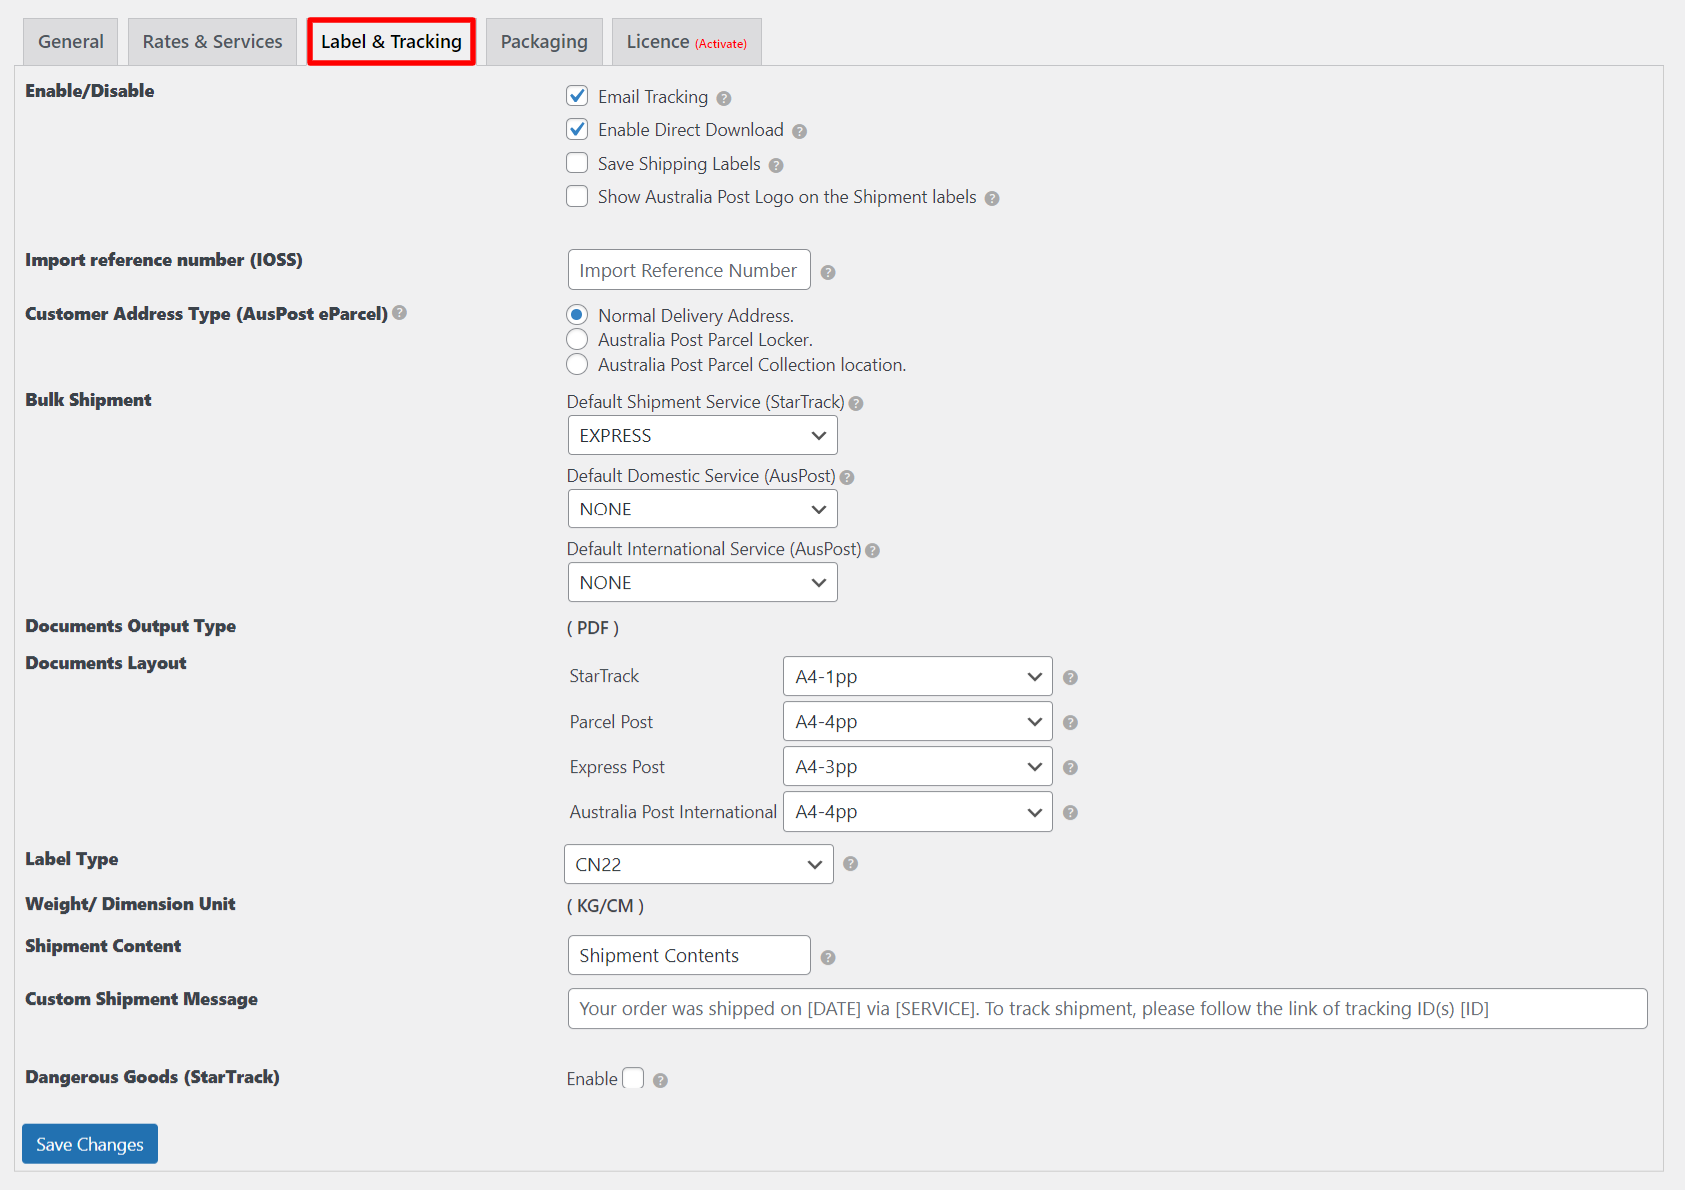
- Enable/Disable settings:
- Email Tracking – Tick this checkbox to send shipment tracking information to your customers via email.
- Enable Direct Download: Tick this checkbox to configure a single click download for labels, instead of following the traditional document printing procedure.
- Save Shipping Labels – Enable this to save the shipping label generated, to the wp-content folder. These labels can be fetched anytime in the future when required.
- Show Australia Post Logo on the Shipment labels: Enable this setting to show the Australia Post logo on the shipment labels.
- Import reference number (IOSS): Enter your IOSS tax registration number in this field to make the shipments to EU countries barrier-free.This value will be passed to the customs and printed on the shipping label.
- Customer Address Type: Choose one of the following options to specify the type of customers’ address.
- Normal Delivery Address – For customers with a general house address.
- Australia Post Parcel Locker – For customers who opt for parcel locker facility.
- Australia Post Parcel Collection location – For customers who choose the desired Australia Post pickup location to collect their parcel.
- Bulk Shipment: This option will be available only if you have enabled the Contracted Account. Choose the default domestic and international service for bulk generation of domestic and international shipment labels respectively. Also, choose the default service for StarTrack service, if you have enabled the StarTrack account. This label generation is processed in WooCommerce Orders page. If there are no shipping services defined for an order, the default services defined in these settings will be taken into consideration.
- Documents Output Type: This shows the default output format for printing documents, that is PDF.
- Documents Layout: Choose from the following desired layouts for printing the label.
- For Australia Post eParcel contracted account:
- Parcel Post –
- A4 – 1pp (per page)
- A4 – 4pp
- THERMAL-LABEL-A6-1PP
- Express Post –
- A4 – 1pp
- A4 – 3pp
- THERMAL-LABEL-A6-1PP
- Australia Post International –
- A4 – 1pp
- THERMAL-LABEL-A6-1PP
- Parcel Post –
- For Australia Post StarTrack account:
- A4-1pp
- A4-2pp
- A4-1pp Landscape
- A4-2pp Landscape
- A6-1pp
- For Australia Post eParcel contracted account:
- Label Type: Select the type of label for international shipments. The available options include:
- CN22
- CN23
- Weight/Dimension Unit: Shows the default weight and dimension unit, that is KG/CM.
Note: The above two settings are defaults in Australia Post. You cannot change to another format or unit in the plugin settings.
- Shipment Content: You can provide a description of the shipping contents. This description will be printed on all the printed documents and is usually required for security checks and customs.
- Custom Shipment Message: The plugin provides flexibility to customize shipment tracking messages. This message will appear in the email, WooCommerce Admin order page, and Customer’s Orders section (under the My-Account page).
The setting is as shown in the below screenshot.

You can use placeholders to fill in the details of the shipment, automatically. You can frame the message by including tags [DATE], [SERVICE], and [ID]. Details of these tags are given below.
| Tag | Description |
| [DATE] | Shipment date will be replaced in the order page tracking section. |
| [SERVICE] | Selected shipping service will be replaced in the order page tracking section. |
| [ID] | Tracking code will be replaced in the order page tracking section. |
Let us look at how shipment tracking messages can be framed:
- Default message: When all fields are filled in the Shipment Tracking section on the individual order admin page, the shipment tracking message appears as given below:
Your order was shipped on 2018-01-01 via Australia Post. To track the shipment, please follow the link of shipment IDs EN428785455IN, and EN428785456IN.
Note: The link on shipment IDs leads to the live tracking details on their website.
- No Shipment IDs: In this case, the default message will be displayed as shown below:
Your order was shipped on 2018-01-01 via Australia Post.
- No Dates: If you have not mentioned the [DATE] tag, the message is shown as:
Your order was shipped via Australia Post. To track the shipment, please follow the link of shipment IDs EN428785455IN, and EN428785456IN.
- No Tracking IDs and Date: Admin can even proceed with only selecting shipping service, and ignoring the tracking ID field and date field. The message is as given below:
Your order was shipped via Australia Post Service.
Once all settings are configured, save changes.
If you encounter any errors regarding shipping rates, methods, and label printing, refer to this article to get the solutions: How to Troubleshoot WooCommerce Australia Post Shipping Plugin with Print Label & Tracking?
Parcel Packaging
You can get real-time rates for items using API. With the price calculator, you get real-time postage rates for domestic, as well as international shipping. Real-time rates are calculated based on product dimensions and weight, and the best-fitted box rates are returned from Australia Post. These rates will depend on the method used for packing the parcel. Our WooCommerce Australia Post plugin offers three types of parcel packing methods.
They are as shown below.

1. Individual Packing
In this option, each item in the cart is packed separately. Total shipping cost is calculated by adding the shipping cost of each item. This option is selected by default.
For example, the shipping cost of Item X is $10. If the customer adds two quantities of Item X to the cart, the total shipping cost is $10 x 2, which is $20.
Group Shipping
You can enable group shipping for showing the best price to the customers on checkout while the customer purchases multiple products and has chosen individual packing as the packing option. Australia Post will not calculate the shipping cost of the individual packages if you have enabled it. Instead of that, Australia Post will return the best price for the shipping if a user purchases multiple products and chooses individual packing.

Check an example of before and after enabling the group shipping on the checkout page.
Before enabling Group Shipping:
After enabling Group Shipping:
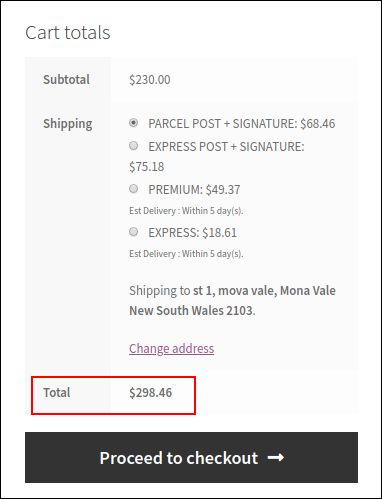
You can see the difference in the total amount before and after enabling Group Shipping.
One point you should keep in mind is that, Group Shipping is not applicable for international shipping.
Using the Group Shipping feature, you can also print multiple labels on a single page. Check How to print multiple Australia Post labels on a Sticker Sheet using ELEX WooCommerce Australia Post Shipping Plugin? for more details.
2. Pack into boxes with weight and dimensions
If packing items individually does not suit your business, then you can define custom box sizes under the Box Dimensions section. All the cart items are packed into custom boxes defined in Box Dimensions settings. The best fit box is automatically chosen from the defined boxes. This is the recommended option and is available only for Contracted accounts. You can read through setting up box dimensions to understand box packing in detail.
Box Dimensions: This setting is applicable only when Pack into boxes with weight and dimension is selected. You can choose any packing algorithm such as,
- Volume Based Packing(Default)
- Stack First Packing
By default, it will take volume-based packing. If you want to pack the products with Stack First Packing, you can choose it accordingly. For more details about Stack First Packing, checkout the document: What is Stack First Bin Packing Algorithm?
For a heavy packing box, enter the weight of the box so that it is added to product weight, to calculate shipping rates. You can tick the respective Letter checkbox if you want to mail letters. Based on your requirement, you can add or remove box dimensions.
For example, consider you have product X of dimensions 9 x 5 x 2 and weigh 10 lbs. You can set up boxes as shown in the below screenshot.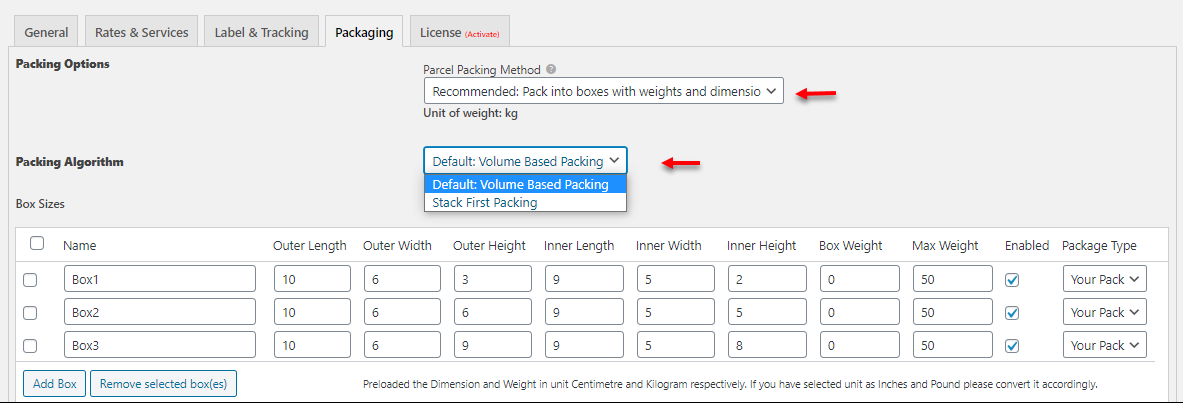
For shipping,
- If there is one unit of product X in the cart, then Box1 is selected for packing.
- If there are two units of product X in the cart, then Box2 is selected.
- If there are four units of product X in the cart, then Box3 is selected.
Likewise, you need to define inner and outer sizes for each logical box, according to the packing style being followed for different products with different quantities.
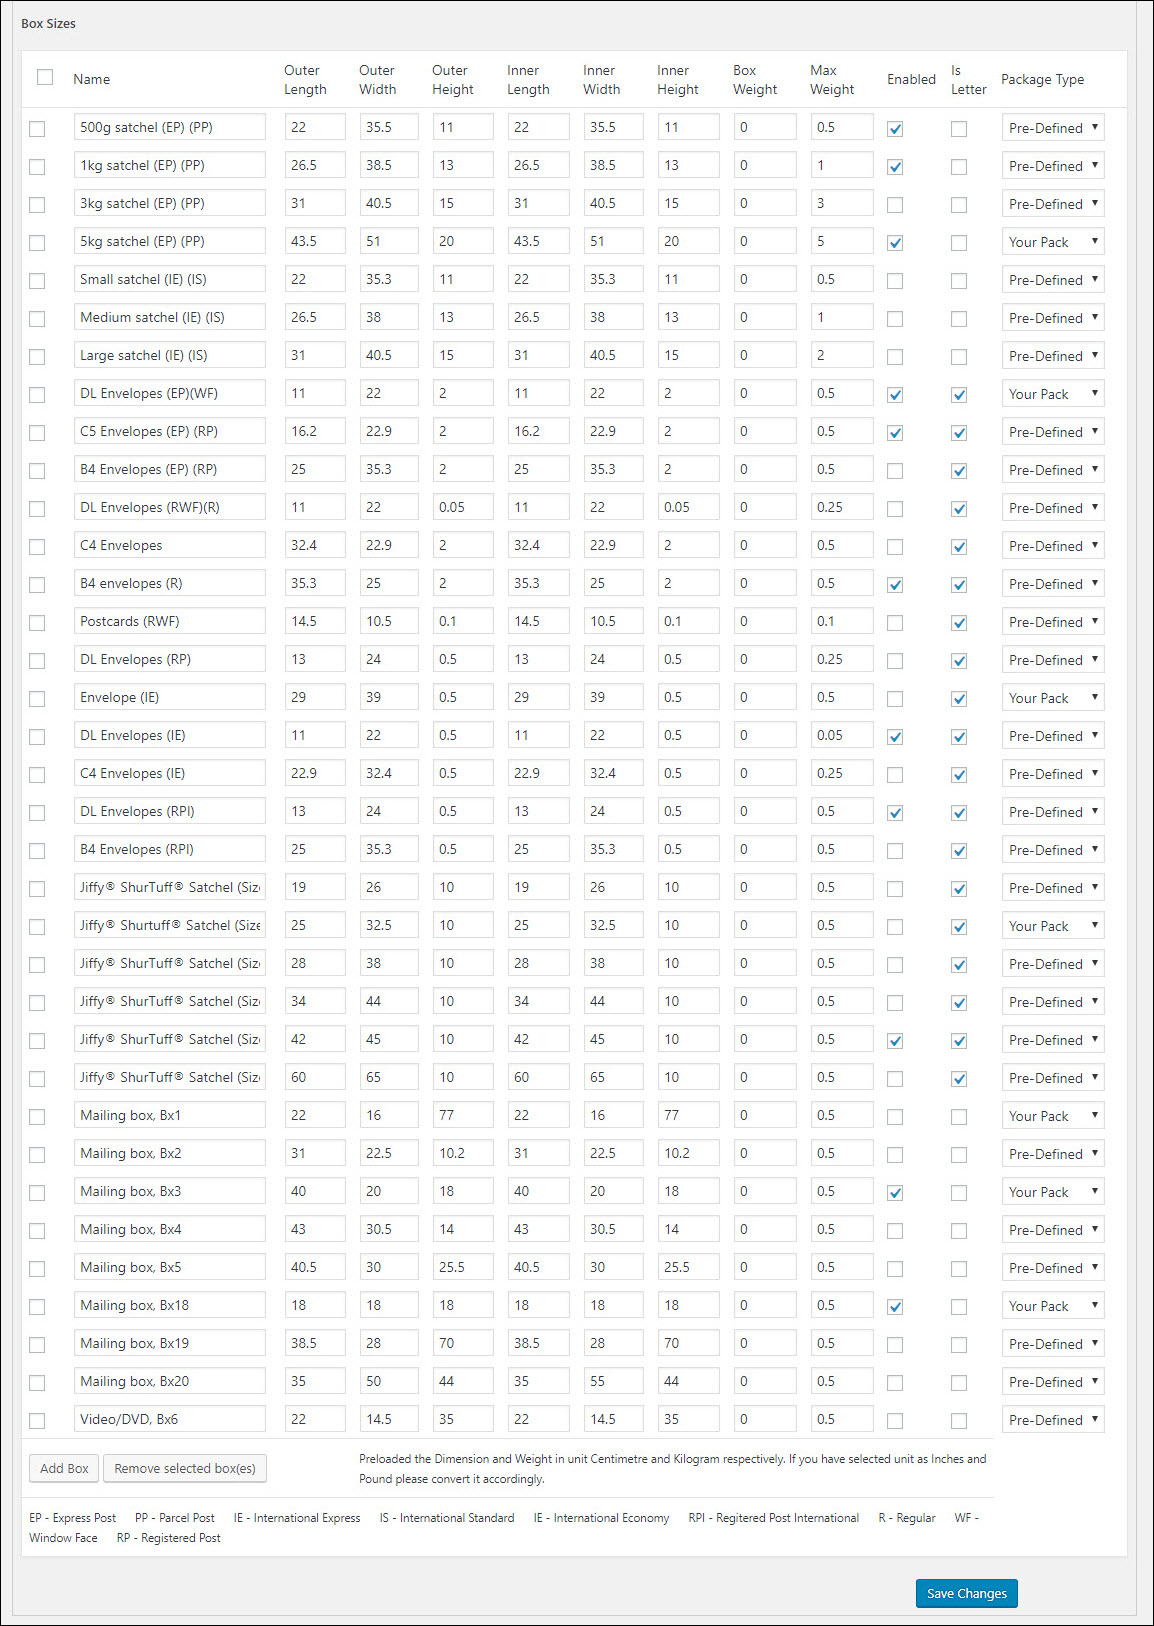
For Non-contracted accounts, the plugin offers a few predefined boxes for Satchels and Envelopes as listed below:
- 500g satchel (EP) (PP)
- 1kg satchel (EP) (PP)
- 3kg satchel (EP) (PP)
- 5kg satchel (EP) (PP)
- Small satchel (IE) (IS)
- Medium satchel (IE) (IS)
- Large satchel (IE) (IS)
- DL Envelopes (EP)(WF)
- C5 Envelopes (EP) (RP)
- B4 Envelopes (EP) (RP)
- DL Envelopes (RWF)(R)
- C4 Envelopes
- B4 envelopes (R)
- Postcards (RWF)
- DL Envelopes (RP)
- Envelope (IE)
- DL Envelopes (IE)
- C4 Envelopes (IE)
- DL Envelopes (RPI)
- B4 Envelopes (RPI)
- Jiffy® ShurTuff® Satchel (Size 1)
- Mailing box, Bx1
- Video/DVD, Bx6
Enable the box sizes you want to use for packaging. The settings are as shown in the screenshot below.
3. Weight Based:
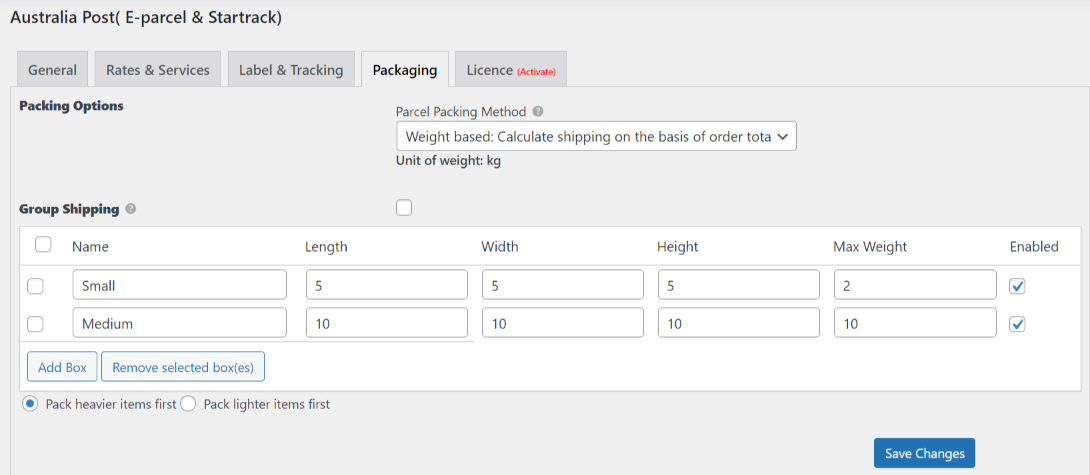
This option enables you to package your products based on the product weight. You can create boxes and choose the maximum weight for each one. Here you also have the option to choose to pack heavier items first or lighter items first.
Finally, click Save Changes to save the plugin settings.
International shipment settings at Product-level
Different products might need a different level of processing.
If you are shipping globally, you must enter the following details for every product. These settings can be found in the Shipping section of the WooCommerce Product Data meta-box of each product.
The settings are as shown in the below screenshot.

The settings include:
- Tariff Code (Australia Post): HS is an international standardized system of names and numbers to classify products. Shop owners can provide the HS number of the product so that international shipments are processed smoothly.
- Country of Origin (Australia Post): Enter the country of origin.
- Shipping Description (Australia Post): A description that will be printed on the commercial invoice.
Validating Dangerous Goods with Australia Post
This setting is available in individual product settings. If you are shipping dangerous goods, you can enable this setting and select the required category of dangerous good.
To access this setting, open a product page to edit, move to the product data meta-box, and go to the Shipping section.

Tick the checkbox to enable the dangerous goods option of the product. Further, you need to specify the type of goods you are selling from the following options:
- Radio Active Excepted Limited Quantity UN2910
- Radio Active Excepted Instruments/Articles UN2911
- Bio-Substance B UN3373
- Lithium-Ion/Polymer Contained in Equipment UN3481
- Lithium Metal & Alloy contained in Equipment UN3091
Read more on Dangerous and prohibited goods and packaging guide.
Tips
Let’s now see how these settings are applied.
Demonstration
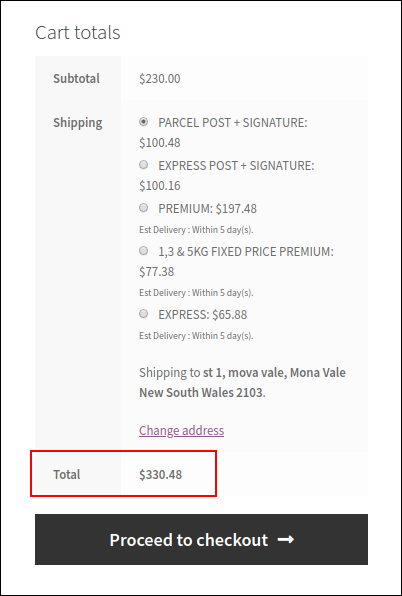
Once all the plugin settings are configured and saved, you can move to the front-end of your WooCommerce store to see the affected changes.
A screenshot of the sample cart page is shown below.

How to print labels for Contracted accounts with WooCommerce Address Post plugin?
Once you have enabled Contracted Rates option, in addition to getting contracted rates for your Australia Post account, you can generate shipping labels as well.
The following steps show how to generate a shipment label when an order is placed with a contracted Australia Post account:
- Open an order to view order details. Click on the Generate Packages button to start generating the packages of the order, as shown in the screenshot below.

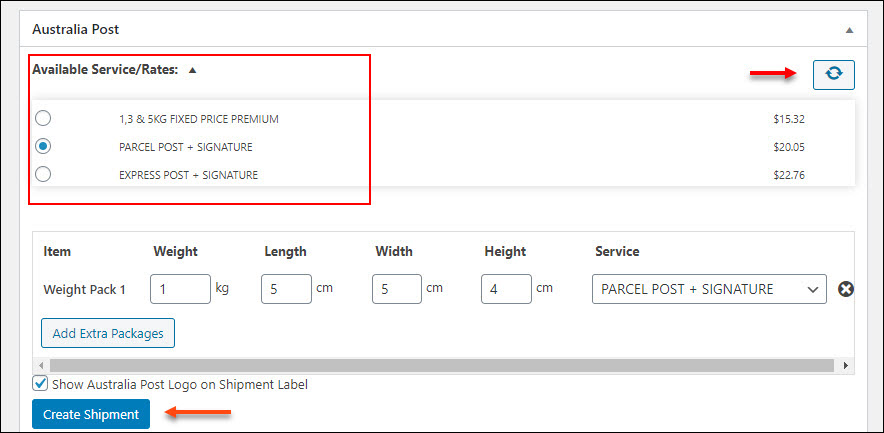
- The Create Shipment option for the order is displayed as shown below.

The shipment information includes the item name and its respective weight and dimension. The plugin allows you to change the shipping service for each package and an option to show/hide Australia Post logo on the shipping label.
For international shipments, an additional setting is provided where you need to specify the product classification. This information is mandatory for sending packages outside Australia.
The following is a screenshot of the options available for product classification.

If you select the GIFT, SAMPLE, DOCUMENT or RETURN option, the commercial charges(or customs) will not be charged. If you have selected the OTHER option, the shipment will be treated as commercial and will be charged accordingly.
- Before creating the shipment of individual orders, you can also choose the preferred service from your side by changing the service chosen by the customer. You can click on the refresh button, and choose a preferred service from the list before creating the shipment. Check the screenshot:
Watch the video to see how you can choose the preferred services.
To create a shipment, Click the Create Shipment button.
- Next, the shipping service ID and shipment number will be generated as shown in the screenshot below.

Finally, click on the Print Label button to print the Australia Post label.
A screenshot of the sample Australia Post domestic shipment label is shown below.

International shipping document contains four labels – One to attach to the item, one Australia Post copy, one Customs copy and one for Sender. A sample international shipping label is as shown below.

How to generate Order Summary/Manifest with ELEX WooCommerce Australia Post plugin?
The plugin offers a separate dashboard to generate and print the Australia Post Order Manifest. This differentiation is to help you download/print multiple order manifests at once. You can access these settings from WooCommerce > AusPost Manifest.
Note that before you generate Australia Post Order Manifests, you need to create shipments and also generate labels for the orders.
In the earlier section of this article, you saw how to create a shipment for printing labels. If you want to generate a single order manifest, you can follow the same procedure for creating a shipment as explained for printing labels. If you want to generate multiple order manifests, you should create multiple shipments. Luckily, our plugin provides an option for creating bulk shipments.
The steps to generate a single Order Manifest is also the same, except for the bulk shipment creation process.
Steps to generate Australia Post Order Manifest in Bulk:
1. Creating Bulk Shipments for Australia Post– Go to the WooCommerce Orders page and select the orders for bulk shipment creation by ticking the checkbox on the left of each order, as shown in the screenshot below.

Next, go to the ‘Bulk Actions’ dropdown list, select Create Australia Post Shipment option, and click Apply, as shown in the below screenshot.

Once the shipments are created, a shipment message will be displayed as shown in the screenshot below.

2. Generating Australia Post Shipping Labels – Once the shipments are created, you need to open each order and generate labels by clicking on the Print Label button. The settings are as shown in the below screenshot.
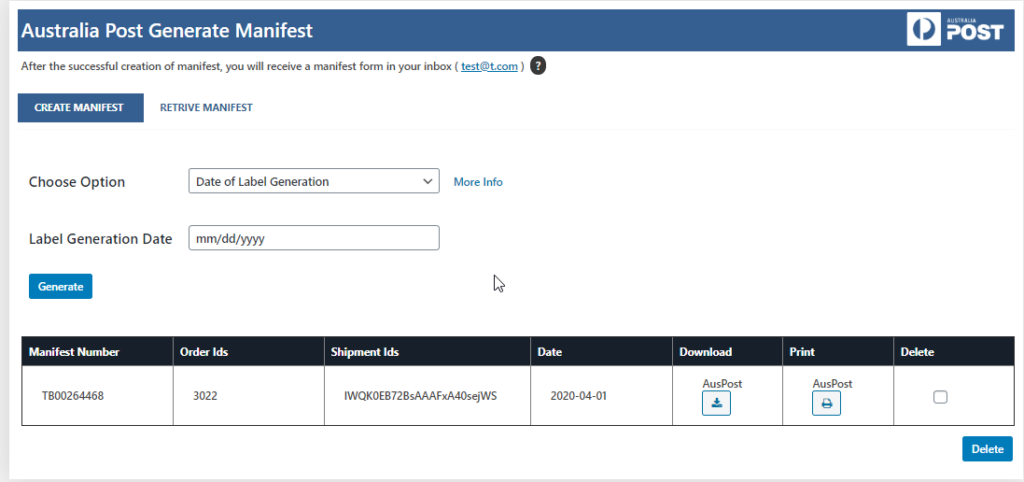
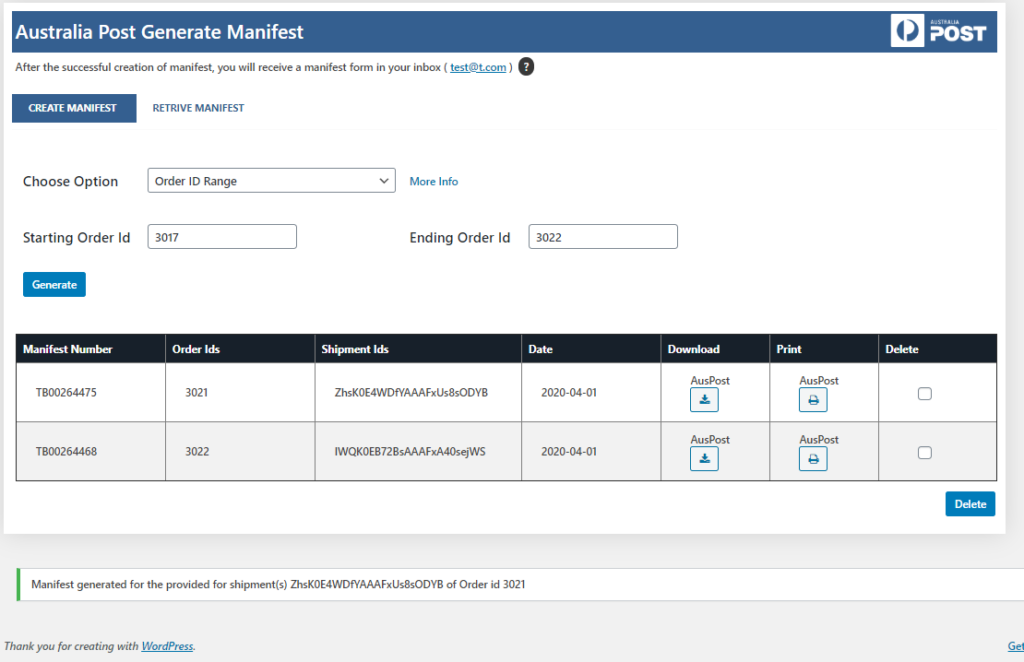
3. Generating Australia Post Order Manifest – Go to WooCommerce > AusPost Manifest.
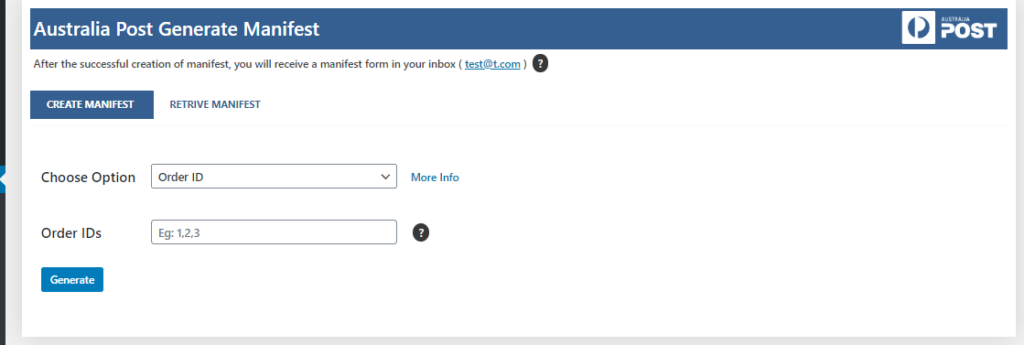
You can generate Order Manifest in three ways:
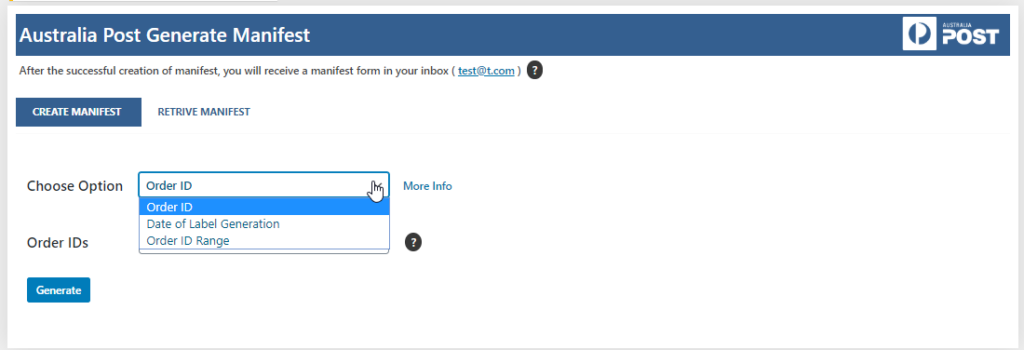
- Order ID – Enter multiple order IDs separated by commas.

- Date of Label Generation – Choose a date of label generation. The order manifests of all the orders whose shipments are created for the given date are generated.

- Order ID Range – You can enter start and end order-ids and generate a manifest for a range of orders.
 When you click on More Info you get the following information :

 When you click on More Info you get the following information :
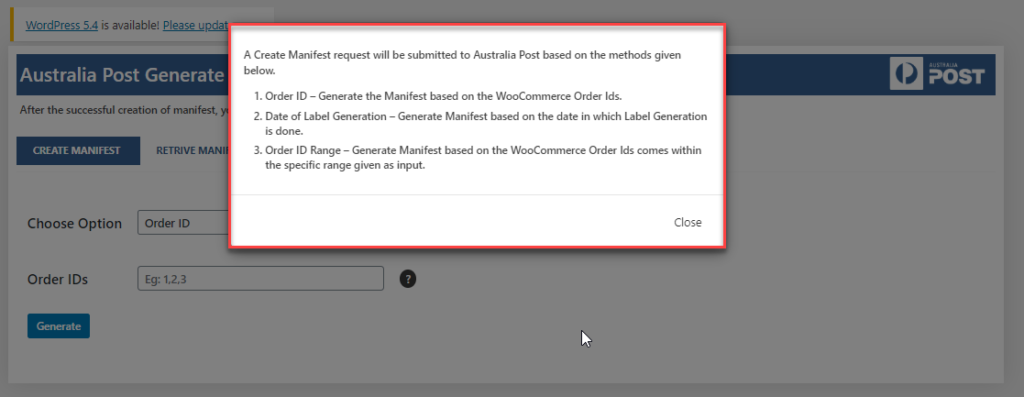
For a demonstration, let us select the first option, i.e, to enter the desired Order ID. Once the order is entered, click on the Generate New button.

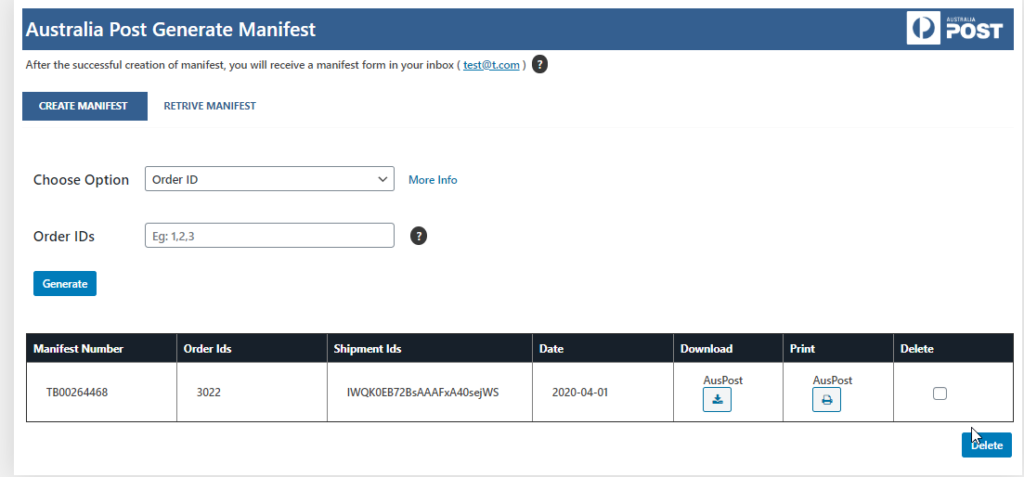
3. Downloading/Printing Order Manifest – Once the order manifests are generated, the plugin shows a table with contents related to the order manifest. You can see the Manifest Number, Order IDs involved, Shipment IDs, Date of creation of manifest, download & print buttons, as shown in the screenshot below.

A sample Australia Post Order Manifest is as shown in the below screenshot.

How to configure WooCommerce Australia Post Shipment Tracking?
Here’s how you can add tracking information to the back-end of your WooCommerce store.
- Go to Dashboard > WooCommerce > Orders.
- Click an order number for which you want to track the shipment.
- Under AusPost Shipment Tracking section, select the carrier as Australia Post.
- Enter shipment tracking ID generated while creating the shipment, and date of shipment in the given fields.
A sample order page is shown in the screenshot below.
- Finally, click on the Save/Show Tracking Info button.
- Customers can view the shipment tracking information under the Orders section of their My-Account page. Click on the required order number to view the tracking information.
A sample order page is shown in the below screenshot.
Customers can click the Shipment ID to see the status of the package.
Note: Customers also get shipment tracking information through order completion email.
How to generate Australia Post shipping labels in bulk?
To generate shipping labels in bulk, you would need our ELEX WooCommerce Australia Post Bulk Label Printing Add-On. Once you have purchased this add-on, you can read how to bulk print Australia Post shipping labels to set up the add-on.
How to generate Australia Post return labels?
To generate Australia Post return labels, you can integrate our ELEX WooCommerce Australia Post Return Label Add-On. Once you have purchased this add-on, you can refer to an article: How to print Australia Post return labels with ELEX WooCommerce Australia Post Return Label Add-On?
For using this plugin with a StarTrack account, read How to set up ELEX WooCommerce Australia Post Shipping Plugin with StarTrack Account?
Read how to set up ELEX WooCommerce Australia Post Shipping Plugin with MyPost Business Account to use this plugin with a MyPost Business account.
To explore more details about the plugin, go check out ELEX WooCommerce Australia Post Shipping Plugin with Print Label & Tracking. Or check out the product documentation section for more related articles.
You can also check out other WooCommerce and WordPress plugins in ELEX.