What can we help you with?
How to integrate WooCommerce Multi-Vendor plugins in WSDesk?
If you are struggling with issues related to multiple vendors, this article is for you. In this article, we will guide you through What is WooCommerce Multi-Vendor plugin? How does it help? Why should you use WSDesk integration with WooCommerce multi-vendor plugins? and What are the Top 3 Free WooCommerce multi-vendor plugins for WSDesk?
Some of the big dogs in e-commerce stores which are multi-vendors are Amazon, Etsy, eBay etc…Some popular list of multi-vendor online shops for you includes CS. Cart Multi-Vendor, WordPress with the Marketify Theme, Magento with Marketplace, Arcadier, Yo!Kart, Sharetribe, X-cart Multi-Vendor etc…
Unfortunately, some of the more popular e-commerce platforms such as Shopify and Squarespace are not able to provide multi-vendor interfaces for you.
What is a WooCommerce Multi-vendor plugin?
With WooCommerce Multi-Vendor plugin you can instantly turn a WooCommerce powered store into a marketplace complete with multiple vendors, products, and payout settings. This plugin converts your e-commerce store into a fully functional marketplace having multiple sellers with separate seller profile and this gives the sellers the functionality of adding products from the seller panel.
Allow multiple vendors to sell via your site and in return take a commission on sales to cover the costs of managing the site while you focus your efforts on building a community.
Why use a WooCommerce Multi-vendor?
- Create a marketplace that can sell anything. From physical, hand-made products to digital downloads like photographs, themes, fonts, audio or video and even time-based bookings with our integration with WooCommerce Bookings.
- Continue selling your own products. Display vendor products for sales right alongside your own products.
- Set vendor specific commission rates. Incentivize new vendors to join your marketplace or reward loyal or high earning with vendor-specific commission rates – while still setting a separate base commission rate across your marketplace.
- Reduce your admin. Allow vendors to manage their own products. Give vendors the ability to manage their own products.
- Don’t pay commissions on orders that are not completed. Set commissions to only are assigned to vendors once the order is the completed.
- Stay on top of your marketplace with sales reports. Get an overall view of vendor sales, commissions and earnings per month by the vendor.
- Delay commission payments to account for returns. Use PayPal Mass Payments to delay commission payments in case of returns on physical products.
Scenario
Now let us see how Justin, one of the store owner who has many vendors manages his customer queries efficiently using the integration of multi-vendor plugin.
Justin in his online store sells electronic gadgets of different companies. He has many vendors who sell him various products. Regarding customer issues, earlier he used to look into all issues, categorize them and redirect them to different vendors for the solutions. But after the integration of WooCommerce Multi-Vendor plugins with WSDesk, his customers are now able to select the vendors while submitting their concerns. So that his vendors can directly look into the customer issues and solve it without him being one of the pivots. Thus the store owner doesn’t need to be bothered about any issues raised by the customers for the vendors.
Consider a more specific example,
He receives a lot of tickets regarding technical issues. Since he cannot answer any of those queries, he had to contact the support team for the particular product individually. And then he would wait for the replies from the support team and then answers his customers. As you can see this process is really time-consuming. Due to this, many times his customers were frustrated as a result of the delayed replies. This was affecting his business. And then only he decided to integrate WooCoommerce Multi-Vendor plugin with his WSDesk helpdesk. All these problems were now a history.
As soon as he made the integration, his customers could easily select the appropriate vendor and the vendors could directly reply to the queries. So here, in this case, time is efficiently managed and Justin doesn’t need to bother about those issues. Now all of his customers are happy and his business is going well.
Top 3 Free multi-vendor plugins for WSDesk
Gone are the days when a website would have to be built from scratch. And definitely gone are the days a developer would have to sit hours in front of the screen, coding away millions of lines of code to create an eCommerce site from a blank canvas.
Especially with the advent of Woocommerce, life has become easy for business-men interested in an eCommerce site of their own. And to make life easier for you, here are the top 3 free Multi-Vendor Plugins for Woocommerce; because come on, who doesn’t like more business that comes in with more vendors?
WC Vendors
Create your own marketplace and allow vendors to sell just like Etsy, Envato, eBay, or Amazon type sites! This allows other sellers/vendors to sell tangible products, virtual products, or downloads on your site. With this plugin, your vendors receive commissions you set on products they sell from your store.
WC Vendors was released to the market in October of 2014 having gotten its roots from Product Vendors by Matt Gates dating back to 2011. It is one of the best multi-vendor marketplace plugins for WordPress and WooCommerce on the market. It is the most feature-packed free plugin available for operating a WooCommerce based multi-vendor store. Many have tried to imitate, only to put all the useful features in their paid versions.
Dokan Multivendor Marketplace
Dokan is the best front end multi-vendor marketplace on WordPress, powered by WooCommerce. Build your own Amazon, Shopify, eBay, Magento like a marketplace in just 30 minutes. Dokan is the fastest way to start e-commerce and earn through commissions with products ranging from digital, physical to a variable.
Like many others, Dokan works well with almost any theme that supports WooCommerce. With an intuitive backend to easily segregate between the different sections one would need to see and measure, the team has taken pains to not only ensure the quality but also worked hard on bettering it UI, which is a great add-on.
In case you are planning to use, Dokan Multivendor plugin and are selling physical products, you might want to check out the ELEX DHL Shipping plugin which seamlessly integrates with Dokan Multi-Vendor.
YITH WooCommerce Multi-Vendor
YITH WooCommerce Multi-Vendor is the WooCommerce plugin explicitly developed to switch your WooCommerce website into a multivendor platform that will let you earn from commissions without you to lift a finger.
With 100% WPML compatibility, YITH boasts of a huge list of Premium Features that add to its effectiveness – Seller vacation module, paying commissions using bulk actions, add or remove links to vendor shop in the product page and also in the category page, setting a minimum value for withdrawal of commissions etc.
Still comparatively new to the foray, it’s soon catching up on the race. With users reporting minor flaws while setting up a site with multiple authors, it seems to be taking the reviews seriously and clearing up the glitches.
Why should you use WSDesk integration with WooCommerce multi-vendor plugins?
In addition to various other useful features, WSDesk provides support for multi-vendor solutions as well. This allows your customers to select the vendor of their respective product while raising a ticket in the contact form. Also, vendors can view tickets that are addressed to them and view general reports. You can achieve this by integrating WSDesk with any WooCommerce multi-vendor plugin available in the market.
Efficient time management
This integration helps you in time management since the store owner doesn’t need to look into each ticket, categorize them, approach the particular vendor for a solution and then replying to the customers. All of this time is saved with the integration since the vendors can directly look into the customer issues and solve it by themselves.
Solves communication gap
The effective way of communication must be in such a way that the person who is raising the ticket should be connected directly to the person who is providing the solution.
Reduced manual efforts
In case, if you are not using any multi-vendor plugin you have to manually send all the queries to the respective support team and receive an answer and send it back to the customer who raised the ticket. You can reduce all these efforts by using this integration.
How to integrate WooCommerce Multi-Vendor plugins in WSDesk?
Here’s a quick video tutorial:
In addition to various other useful features, WSDesk provides support for multi-vendor solutions as well. This allows your customers to select a vendor of their respective product while raising a ticket in the contact form. Also, vendors can view tickets that are addressed to them and view general reports. You can achieve this by integrating WSDesk with any WooCommerce multi-vendor plugin available in the market.
Pre-requisites: Install WC Vendors plugin and assign vendor roles to specific users. You can read the respective documentation for more help.
Following are the steps that will help you configure the settings:
1) Selecting vendor roles in WSDesk:
Before assigning a WSDesk role for a vendor, you should select the type of vendors that you want to merge with WSDesk. To do this, navigate to WSDesk > Settings > WooCommerce section.
The following is a screenshot of WooCommerce settings in WSDesk:
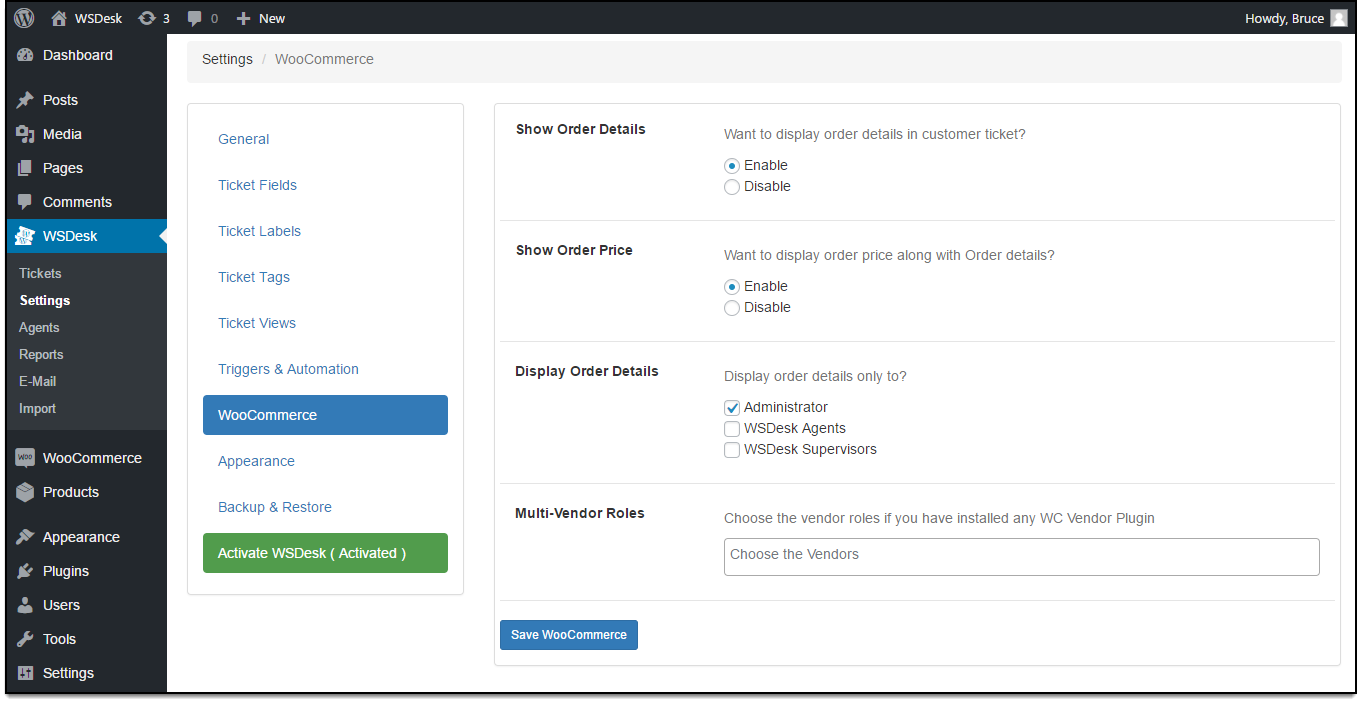
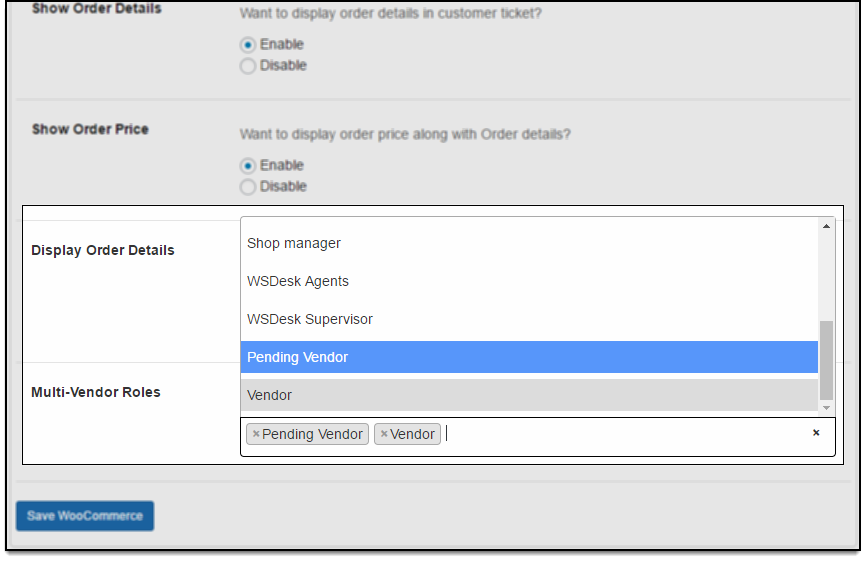
In the Multi-Vendor Roles setting option, select the appropriate vendor role that you want to merge with WSDesk. By default, the WC Vendor plugin provides two vendor roles – Vendor and Pending Vendor. You can select your option(s) as shown in the screenshot below:
2) Assigning WSDesk roles to vendors:
Move to WSDesk > Agents > Add Agents section to assign a vendor a WSDesk user role.
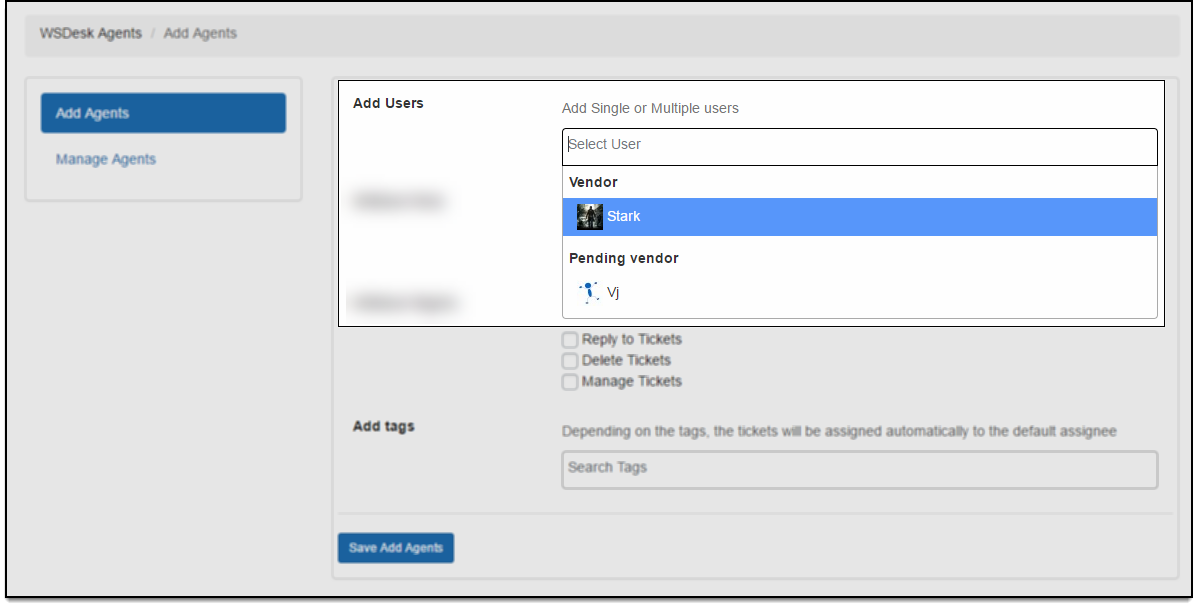
First, select the desired user/vendor from the Add Users option as shown below:
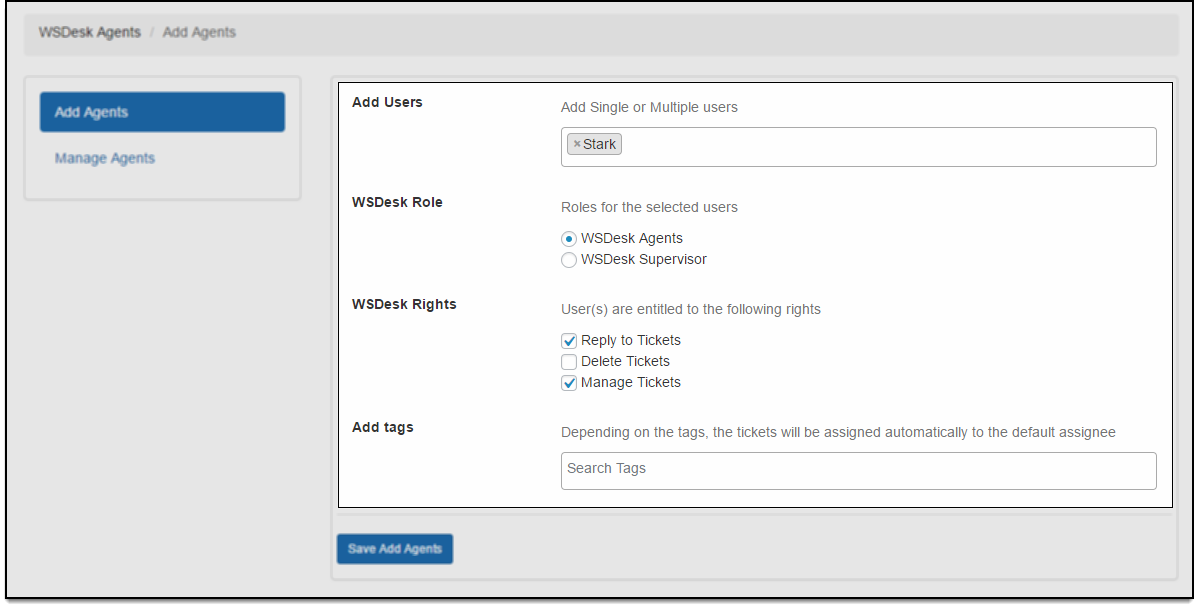
Next, select the appropriate WSDesk Role. For this demonstration, we have assigned WSDesk Agent role to Vendor Stark. Tick user rights that you want to assign to the user in the WSDesk Rights option. The user rights may vary based on the WSDesk user role selected. If you wish to add tags to the user, you can add them in the Add tags option. This option will help in filtering tickets and automatically assign them to the default assignee, whenever they are used.
These settings are configured as shown below:
3) Adding a vendor field in the support form:
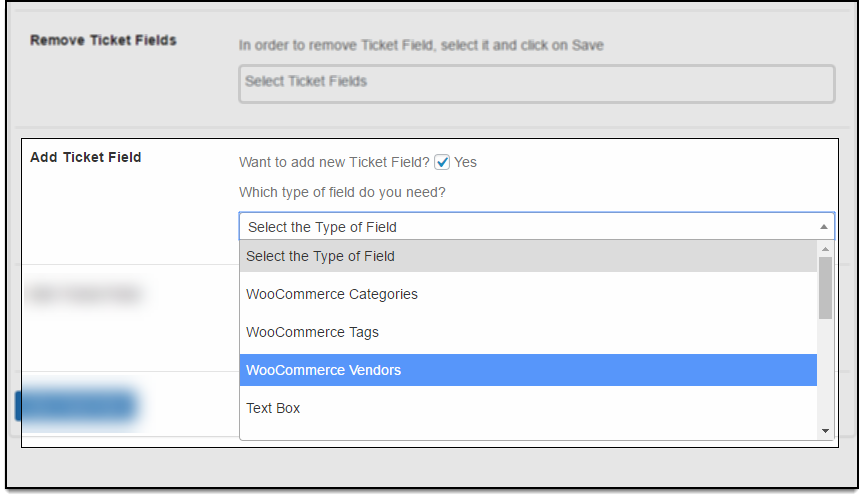
A vendor field should be added in the support form, which will help customers select a vendor for the respective product. To do this, move to WSDesk > Settings > Ticket Fields section. Click Add Ticket Field option to reveal further settings as shown below:
To add a vendor field, select WooCommerce Vendors option. Further settings will be displayed as shown below:
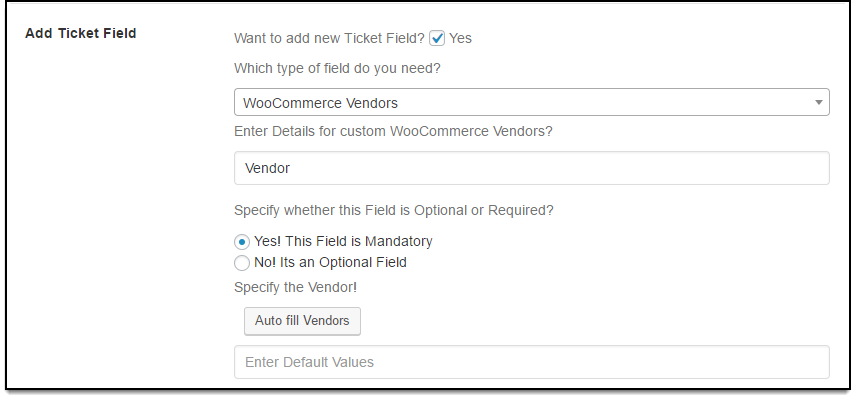
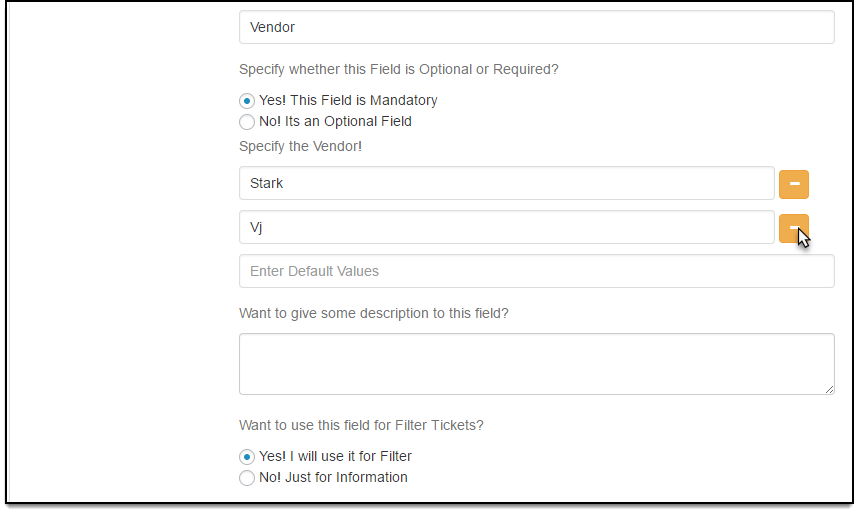
Enter a custom field name. For this demonstration, we will keep it as a Vendor, and set the field to be mandatory. Click Autofill Vendors to display all available vendors. The settings appear as shown below:
You can select the desired vendor(s), enter a description for the field, and configure the field for filtering tickets. Remember to move the vendor field from Available Fields to Selected Fields, so that the newly created field is displayed in the support form. Finally, click Save changes.
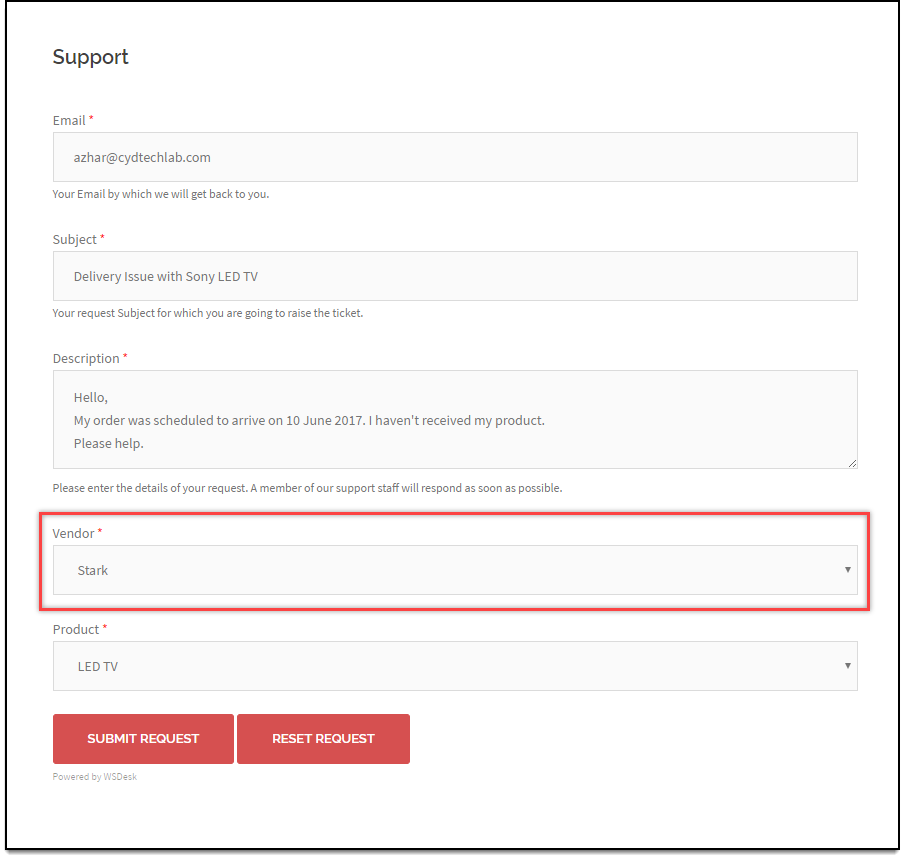
In your customer support form page, a customer can raise a ticket and specify the respective product vendor. A screenshot of the support form is as shown below:
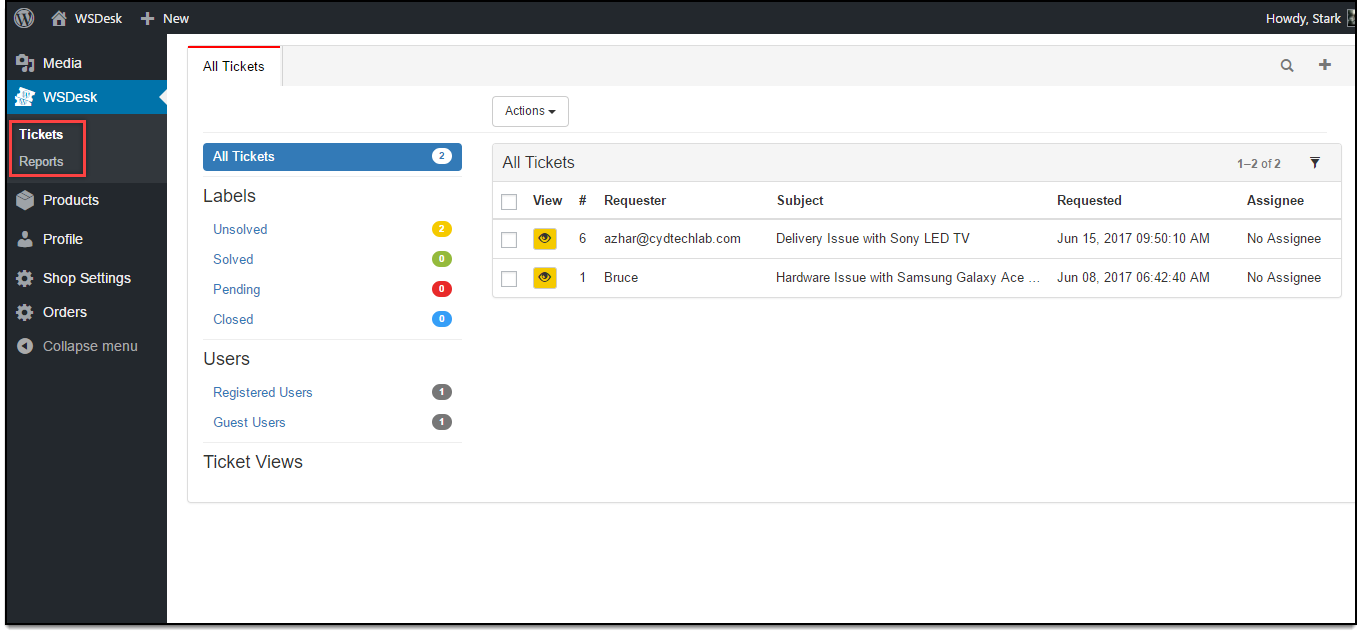
When a vendor logs-in to the site, he/she can view respective tickets as well as reports in the WSDesk setting tab as shown below:
The reports dashboard is a generalized view and displays data from other users and vendors as well.
How to assign a ticket to a vendor from the WSDesk Tickets page?
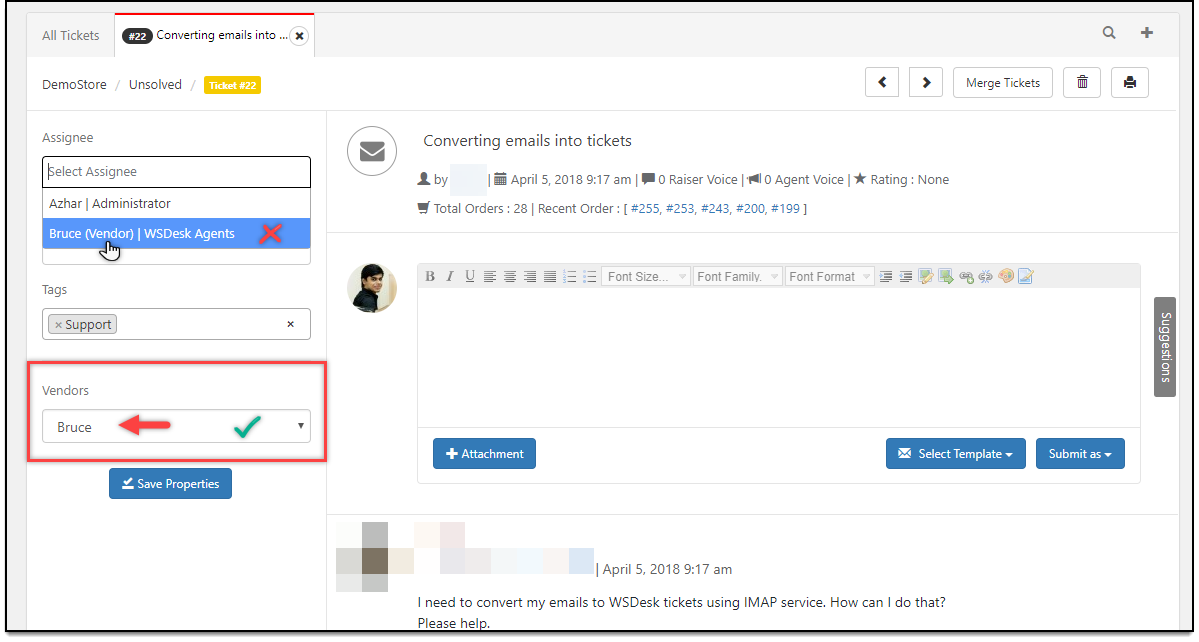
You can assign tickets manually to a vendor on the individual ticket page. To do this, you do not need to select the vendor from the Assignee drop-down field, rather you need to select it from the Vendors drop-down list.
In the sample screenshot shown below, the ticket is assigned to vendor ‘Bruce’ when selected from the Vendors drop-down list. In effect, the ticket will be shown to the vendor in the Tickets dashboard when he logs in to his WSDesk account.
Conclusion
So no more worries regarding issues related to multiple vendors. WSDesk enables an easy integration with many WooCommerce multi-vendor plugins. Now improve your business and customer satisfaction with the easy integration of WSDesk with the multi-vendor plugins.
To explore more details about the plugins, go check out WSDesk – WordPress Helpdesk Plugin.
Read the product setting up article to understand the plugin, in detail. Or check out the product documentation section for more related articles.
You can also check out other WordPress and WooCommerce plugins in ELEX.


