What can we help you with?
How to integrate WooCommerce with Australia Post StarTrack?
StarTrack courier service is one of the modules of Australia Post shipping service. It caters only to domestic regions of Australia like CBD (Central Business District) of Melbourne and metropolitan areas of Australia’s major capital cities. If your store is located in Australia and you ship only within Australia, then StarTrack service can be suitable for you. Unlike Australia Post eParcel services, StarTrack does not have complexities for domestic shipping service. The services are relatively faster and unambiguous.
When it comes to WooCommerce, there are relatively few developers that provide integration of StarTrack with WooCommerce. One of the most trusted is the ELEX (an Official Australia Post eCommerce Platform Partner) with its ELEX WooCommerce Australia Post Shipping Plugin with Print Label & Tracking.
This article will show you how to integrate WooCommerce with Australia Post StarTrack with our ELEX plugin, step-by-step.
Pre-requisites:
- Australia Post API Key
- StarTrack API Password and Account Number
- WooCommerce plugin
- ELEX WooCommerce Australia Post Shipping Plugin with Print Label & Tracking
Integrating WooCommerce with Australia Post StarTrack
After you have downloaded, installed and activated the ELEX plugin, follow the below steps.
1. Obtaining AusPost StarTrack credentials
To access Australia Post StarTrack rates and services, you need three credentials; API Key, StarTrack API Password, and StarTrack Account Number.
To register and obtain the API Key, you can follow the steps explained in our article on obtaining Australia Post credentials. The process of obtaining StarTrack API Password and StarTrack Account Number is pretty much the same as explained in the said article.
An important point to remember here is that the API Password and Account Number are different for regular Australia Post eParcel and StarTrack services, but the API key can be the same. Hence, make sure you have the right credentials.
2. Providing credentials in the ELEX plugin
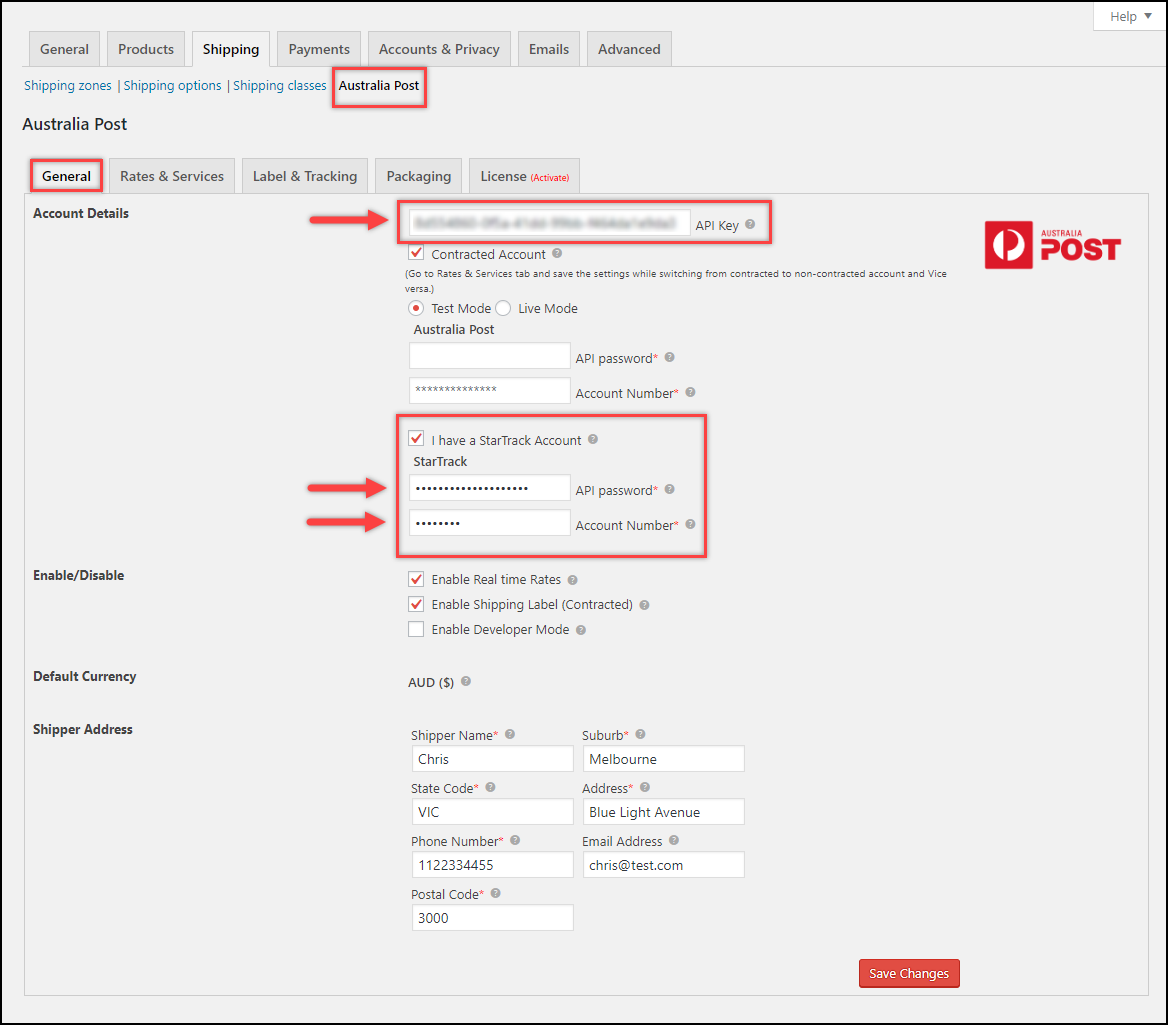
Go to the General tab of the ELEX WooCommerce Australia Post plugin.
Provide the obtained StarTrack credentials in the first step in the given fields, as shown in the screenshot. Remember to choose the Test or Live mode accordingly.
3. Enabling Real-time rates and Shipping label generation
In the General tab of the ELEX plugin, enable the Real-time Rates and Shipping Label settings to access live shipping rates and generate shipping labels respectively.

In addition, you also need to specify the shipper address. This address will be used for shipping rates calculation and will be printed in the shipping documents.
Quick note: From version 2.3.6, you can use eParcel and StarTrack accounts together. You can access both the rates and services simultaneously. If you want to use eParcel services, you need to provide its credentials in its respective fields.
4. Configuring Rates and Services
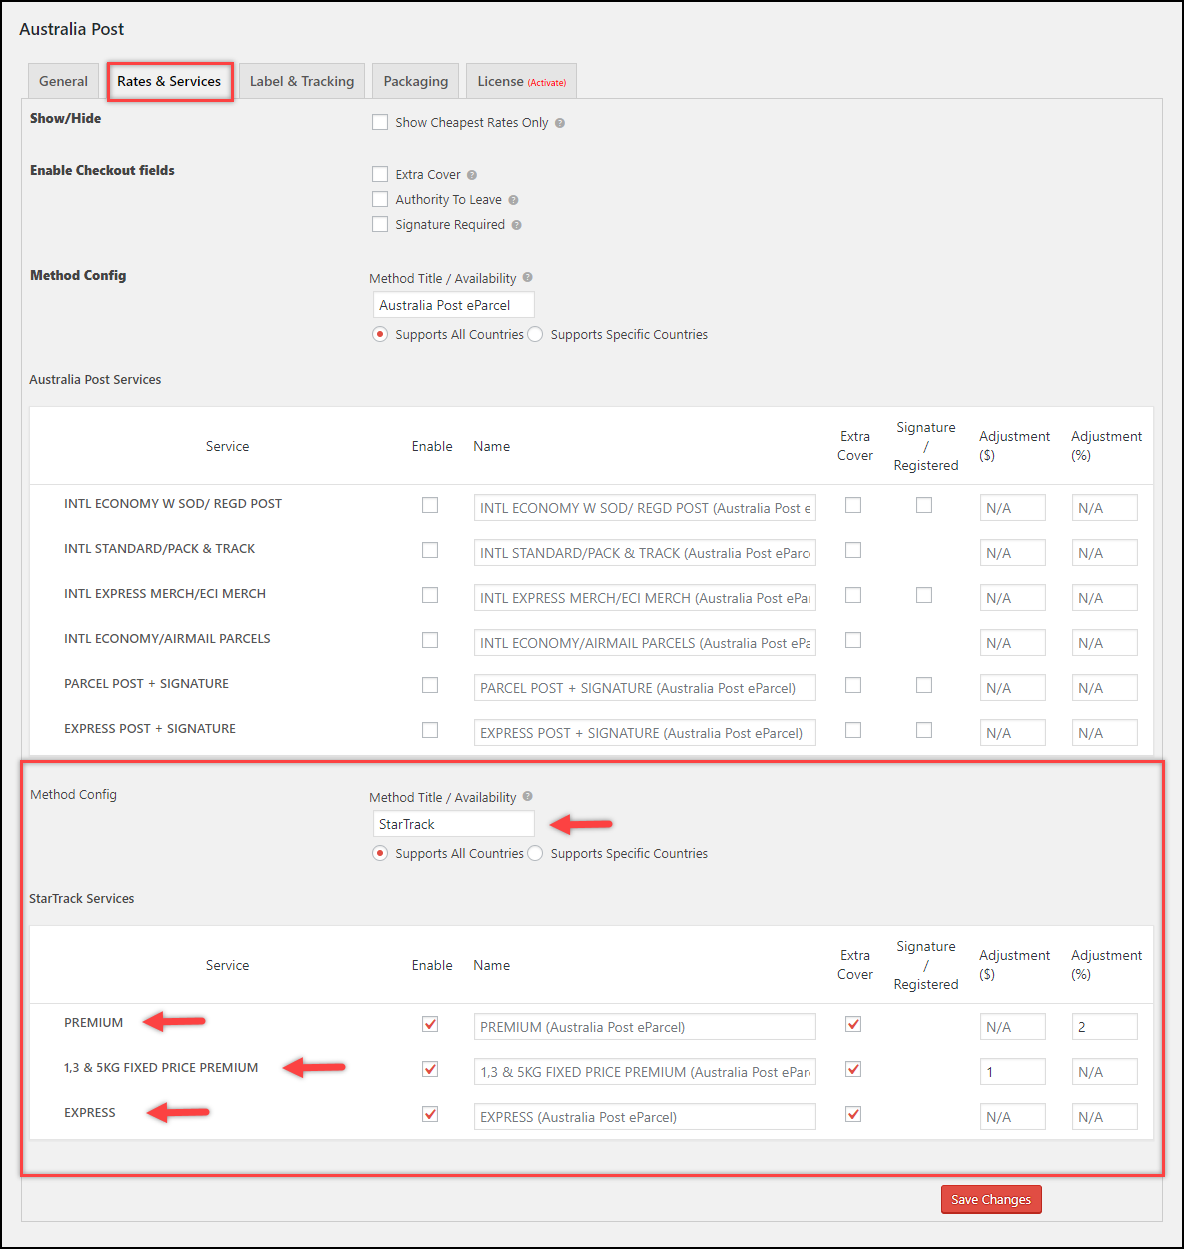
Next, in the Rates & Services, tab you can configure the StarTrack services, Mandatory Extra Cover (Insurance), Signature Required, and Authority to Leave settings. You can also choose to show only the cheapest rates on the checkout page.
Also, you can enable desired services, adjust prices (in terms of discount or markup), update method title, and enable extra cover for each service. The services returned depends on the StarTrack account. In the sample screenshot shown below, the StarTrack services returned are PREMIUM, 1,3 & 5KG FIXED PRICE PREMIUM, and EXPRESS.
5. Configuring Label and Tracking
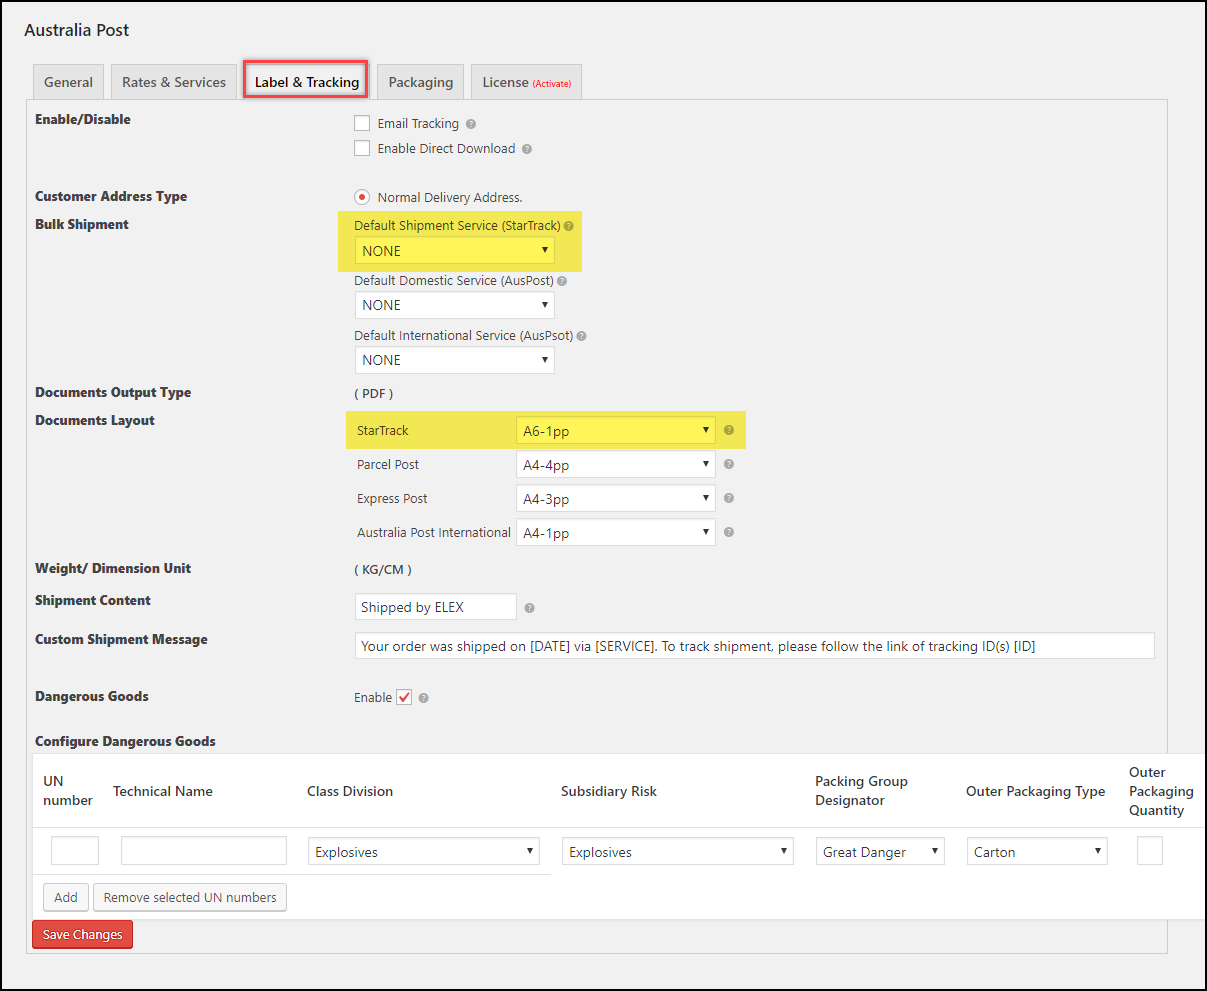
With these set of settings, you can enable email tracking, direct download of shipping labels (instead of preview), setting default shipping service for bulk shipment creation, shipping label sizes, shipment content, custom shipment message, and settings to handle dangerous goods, as shown below.
Refer the Label and Tracking section of the product documentation for a detailed explanation of each setting.
6. Choosing Parcel Packaging method
Live shipping rates are calculated based on product dimensions and weight, and the best-fitted box rates are returned from Australia Post. This rates will depend on the method used for packing the parcel.
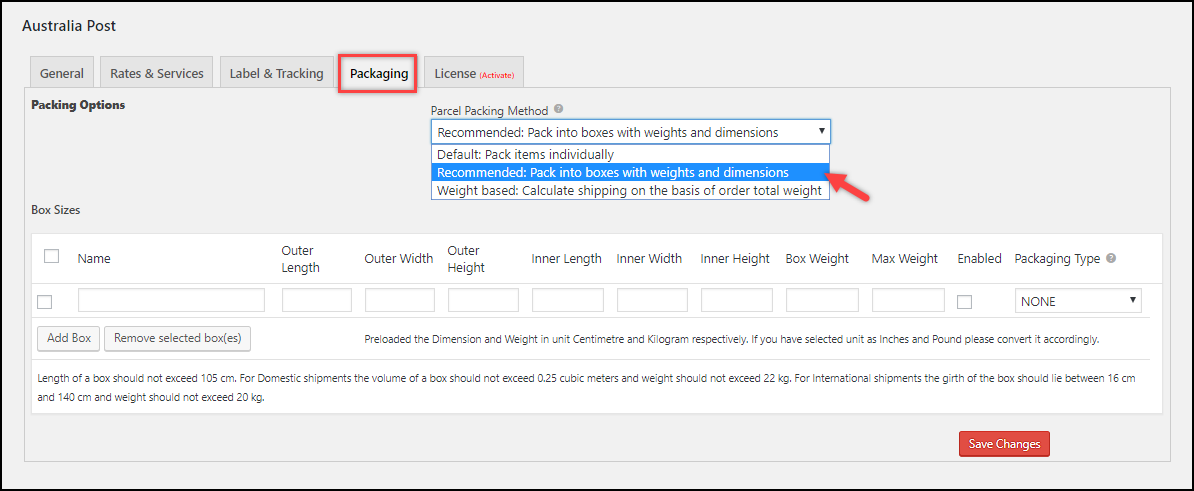
The plugin offers three types of parcel packing methods:
- Individual Packing
- Pack into boxes with weight and dimensions
- Order Total Weight
A complete, step-by-step explanation about these parcel packaging options is given in the Parcel Packaging section of the main documentation.
Demonstration
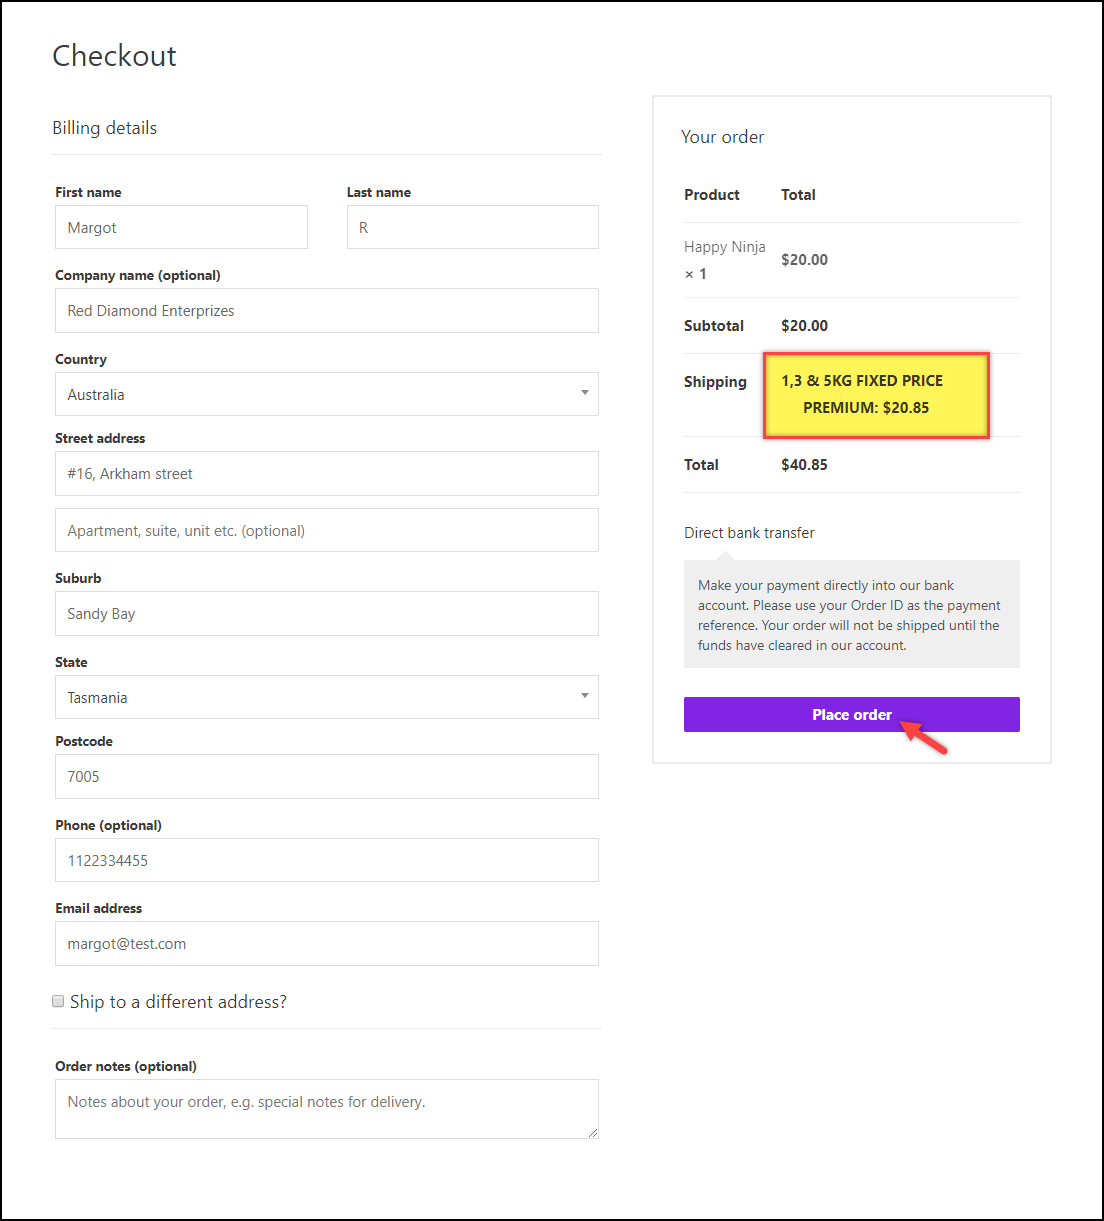
When a customer adds a product to the cart on your store, the checkout shows the best StarTrack rates and services that suit the packages, as shown in the screenshot below.
After the customer has placed the order, the store owner can then go to the WooCommerce orders dashboard and open the required order for proceeding with shipment creation.
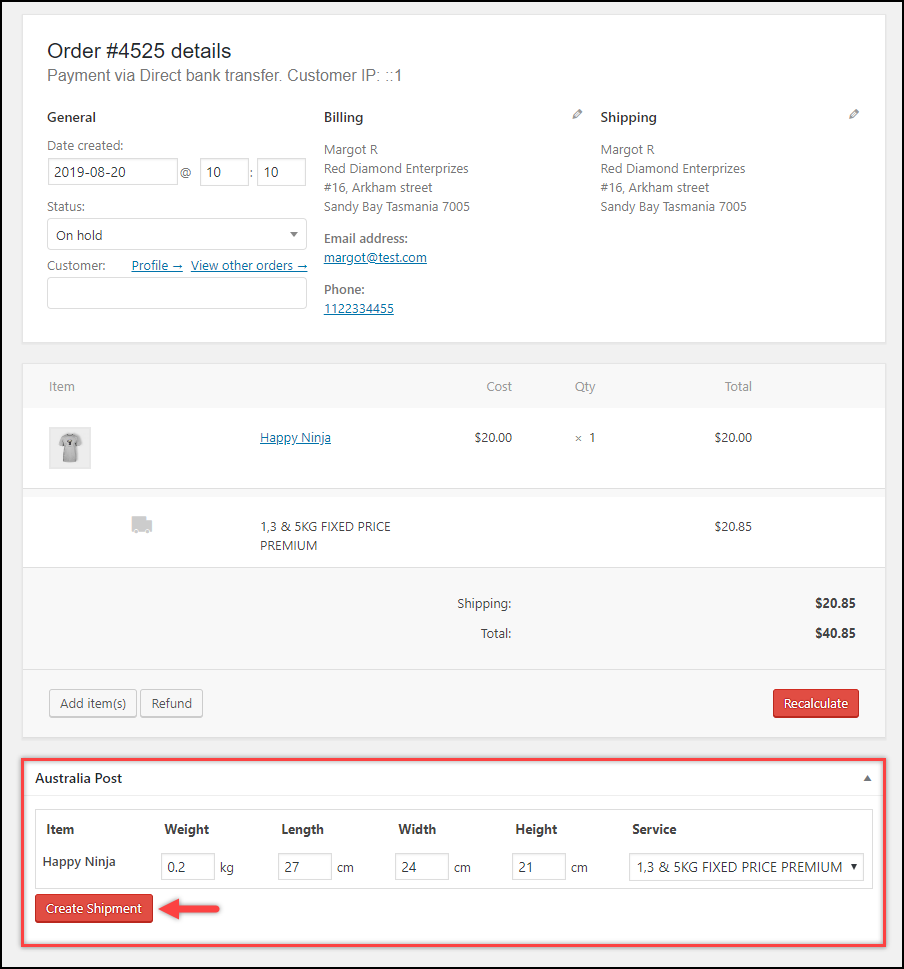
The store owner can scroll down the order page to find the Australia Post meta-box. This box shows all the packages with their respective weight and dimension. The plugin also allows the store owner to change the StarTrack service to be used for shipment. The store owner can then click on the Create Shipment button to proceed further, as shown in the screenshot below.
Next, the shipment is created with shipment number returned from Australia Post. The store owner can click Generate Label to generate the shipping label.

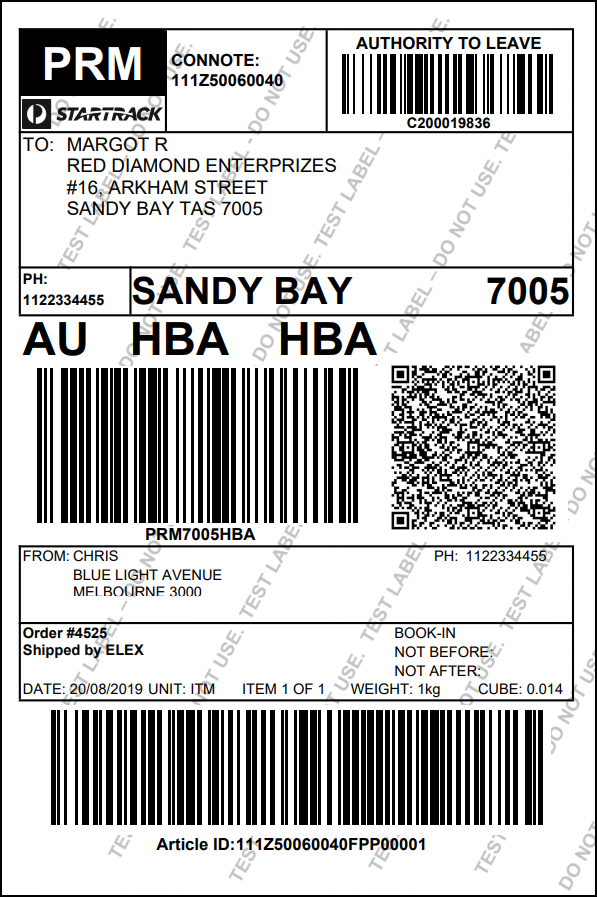
Finally, the StarTrack shipping label is now ready to be printed. The store owner can click on the Print Label button to view/print the label.

A sample Australia Post StarTrack shipping label is as shown below.
In this way, you can integrate WooCommerce with Australia Post StarTrack.
To explore more details about the plugins, go check out ELEX WooCommerce Australia Post Shipping Plugin with Print Label & Tracking.
Read the product documentation to understand the plugin, in detail. Or check out the knowledge base for more related articles.
You can also check out other WooCommerce and WordPress plugins in ELEX.
