What can we help you with?
How to Set Up ELEX WordPress Embed YouTube Video Gallery?
This article intends to provide detailed, step-by-step instructions to help you understand how to set up the ELEX WordPress Embed YouTube Video Gallery. Refer to the product page to learn more about the plugin’s other various features.
YouTube is a free video-sharing platform that makes it simple to watch and upload videos online, as you undoubtedly already know. Access to YouTube is available to almost half of all internet users worldwide and more than two billion people use YouTube each month. People can access the platform on their phones, tablets, and laptops, making it one of the most popular video streaming networks in the world.
The ELEX WordPress Embed YouTube Video Gallery plugin enables you to add unlimited YouTube video galleries to your website via the YouTube API using powerful shortcodes that can be added to any page per your requirements. In addition to adding galleries, you can also set up automated syncs to ensure every change in the youtube channel/playlist gets automatically updated on the created gallery. The gallery layout can be completely customized and it is designed to load quickly.
Overview
The following are a few of the plugin’s key features:
- Embed YouTube galleries that include videos, channels, playlists, and handles.
- Perform manual syncs or auto-sync your galleries according to a predetermined schedule.
- Add an intro video at the very top of your gallery.
- Embed a subscribe button to the gallery so that it redirects users to the specified YouTube channel and increases the subscriber count.
- Add one or multiple videos to individual product galleries with the help of direct WooCommerce integration.
- Make use of the live preview functionality to see how your gallery will appear once published.
- Generated YouTube galleries work flawlessly on mobile, tablet, and desktop displays.
- Shortcodes are generated for each video gallery which can easily be added to any page on your website.
- You can choose a text type or a numeric pagination style for your gallery to enhance the layout, loading time, and user experience.
- Activate the video playback choices for inline or pop-up depending on your needs.
- Videos, playlists, or channels are retrieved using the YouTube API key.
- There are several customization options available.
Getting started with the ELEX WordPress Embed YouTube Video Gallery
To learn how to finish the checkout procedure on ELEX, check out this article. The download, installation, and activation of ELEX plugins are covered in this article.
You have two options for accessing plugin settings after the plugin has been installed and activated:
- Dashboard > YouTube Gallery > Create (or)
- Dashboard > Plugins > Installed Plugins > ELEX WordPress Embed YouTube Video Gallery > Settings.
My Gallery, Create, Settings, and Help & Support are the four primary tabs that house the plugin settings. Let’s get started configuring the plugin:
Create
Under the create tab, you create galleries by adding videos, playlists, channel URLs, or channel handles to the source list, and customize and preview its layout.
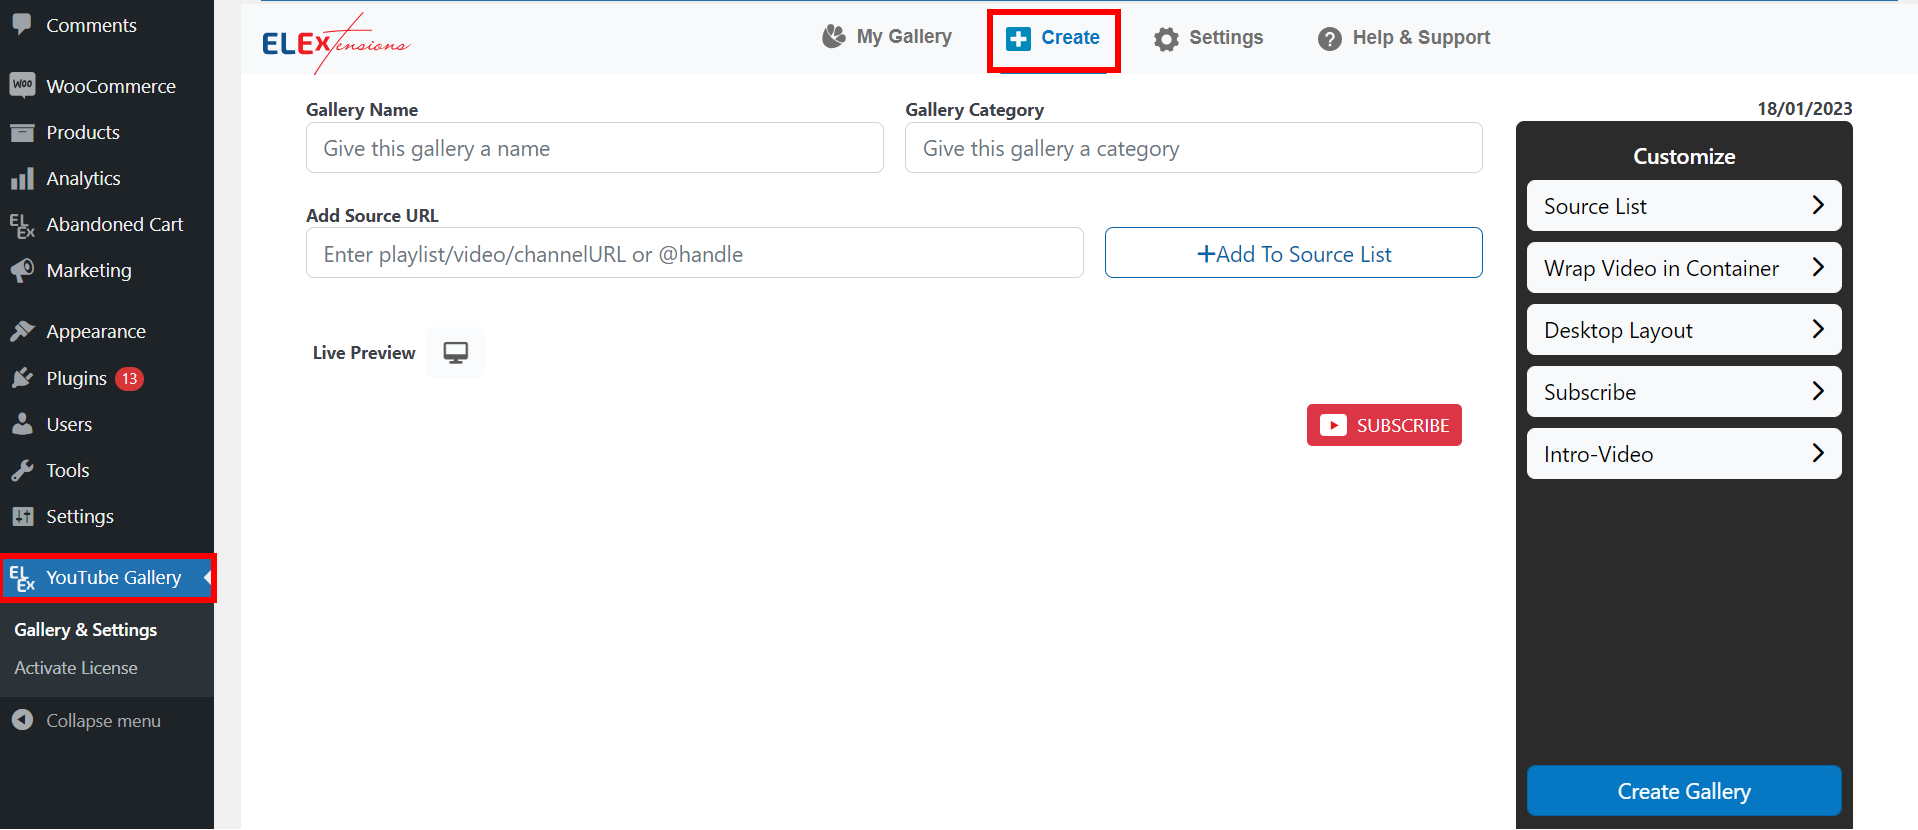
- Gallery Name: Enter a suitable name for the new gallery.
- Gallery Category: Enter a suitable gallery category. This category will not be visible to the visitors of your website but it will help you organize and categorize your galleries if you are working with multiple galleries.
- Add Source URL: Copy the YouTube video/playlist/channel link/channel handle and paste it and click ‘+Add To Source List’ to add the video/videos to your gallery source list.
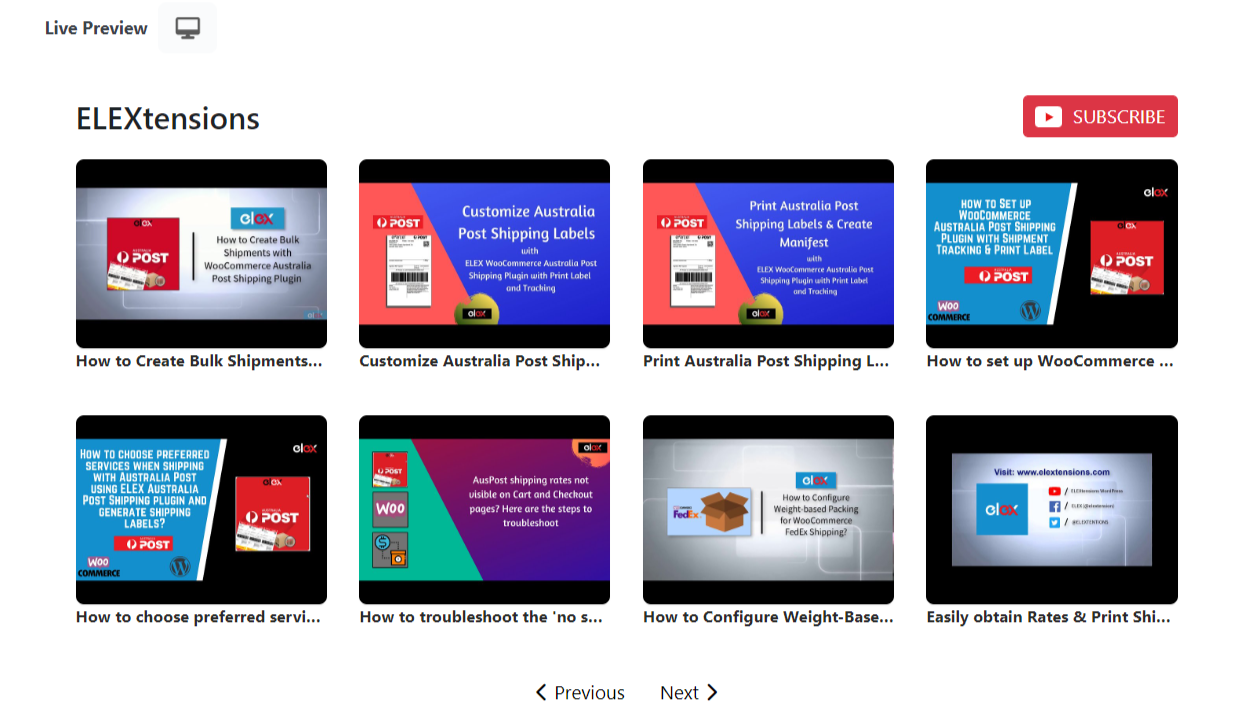
- Live Preview: The live preview section displays how the gallery will look on the live site.
Under the Customize Menu:
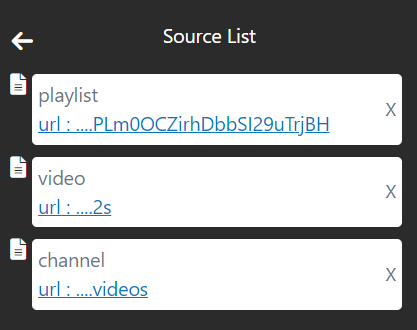
- Source List: Displays the source URLs for all of the videos, playlists, and channels added to the corresponding gallery. You can remove the videos/galleries/playlists from here by clicking on the Remove button.
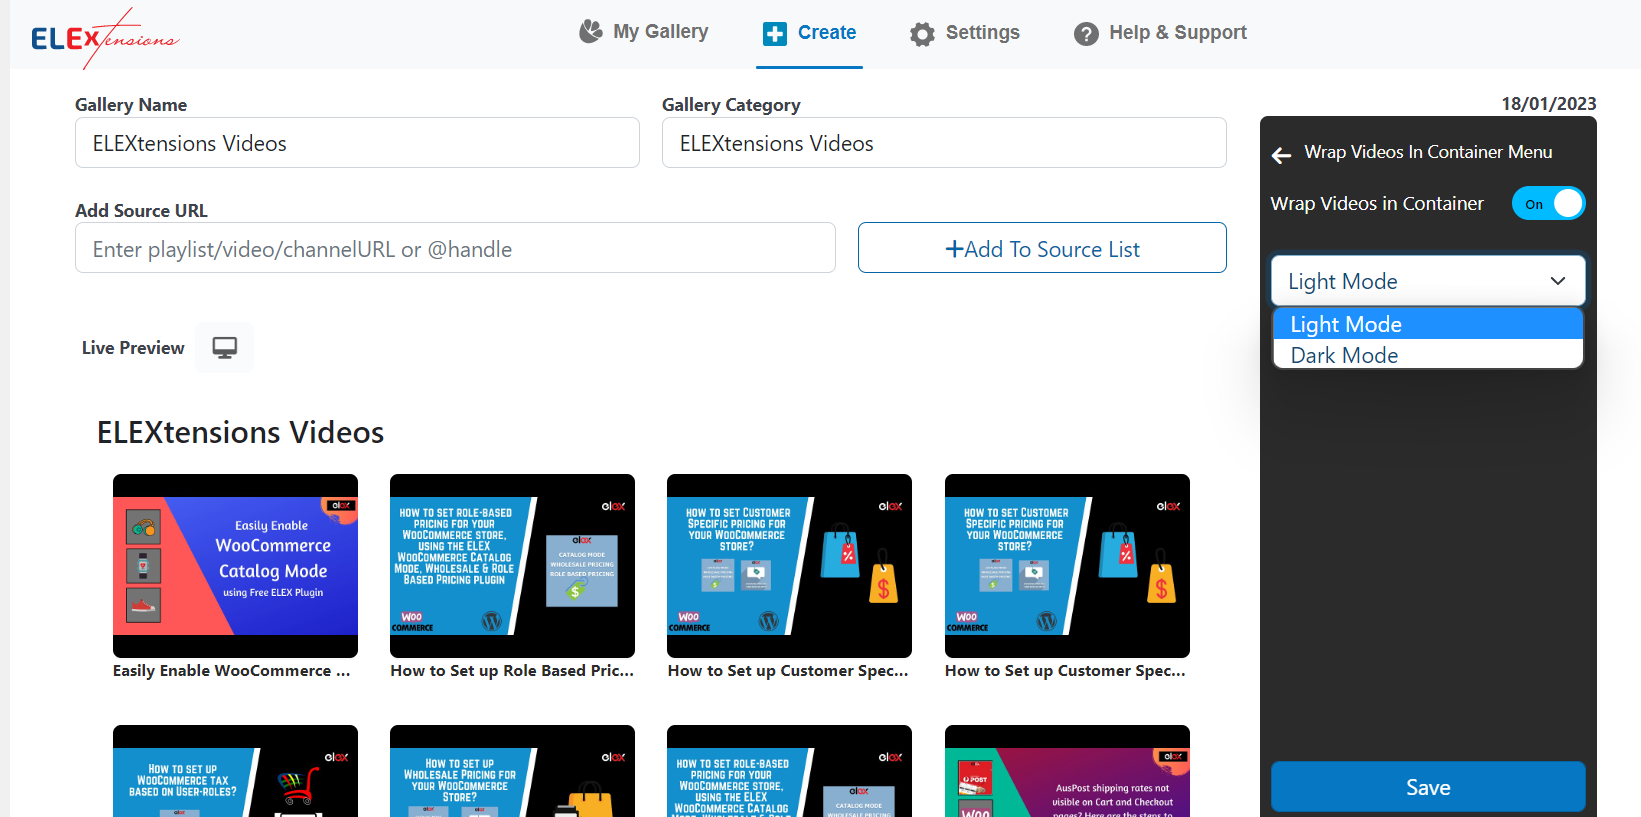
- Wrap Videos in Container: Choose between light mode and dark mode based on the design of your website.
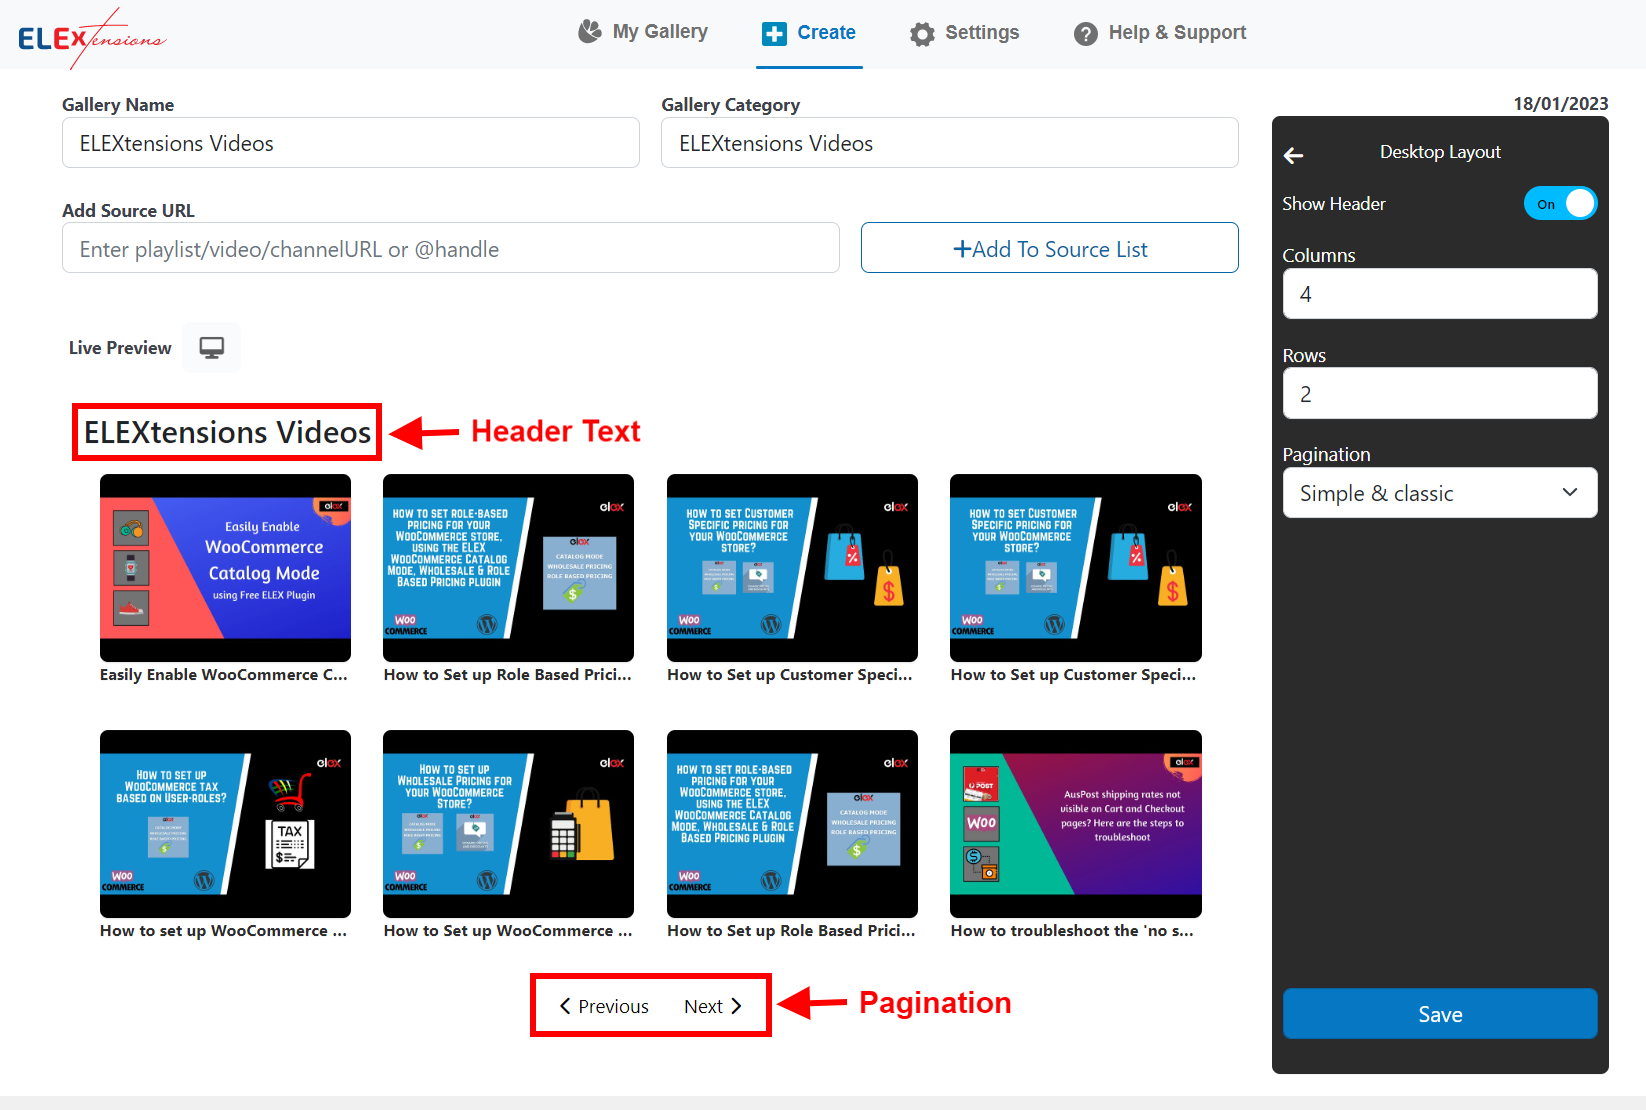
Under Desktop Layout:
- Show Header: You can choose to display or hide the header text at the top of the gallery.
- Columns: Select the number of columns you want to display in the particular gallery
- Rows: Select the number of rows you want to display in the particular gallery
- Pagination: Select the type of pagination you want to display at the bottom of the gallery. The two alternatives are Simple and Classic, which would include the previous and next buttons, and the numerical kind would have numbered pages.
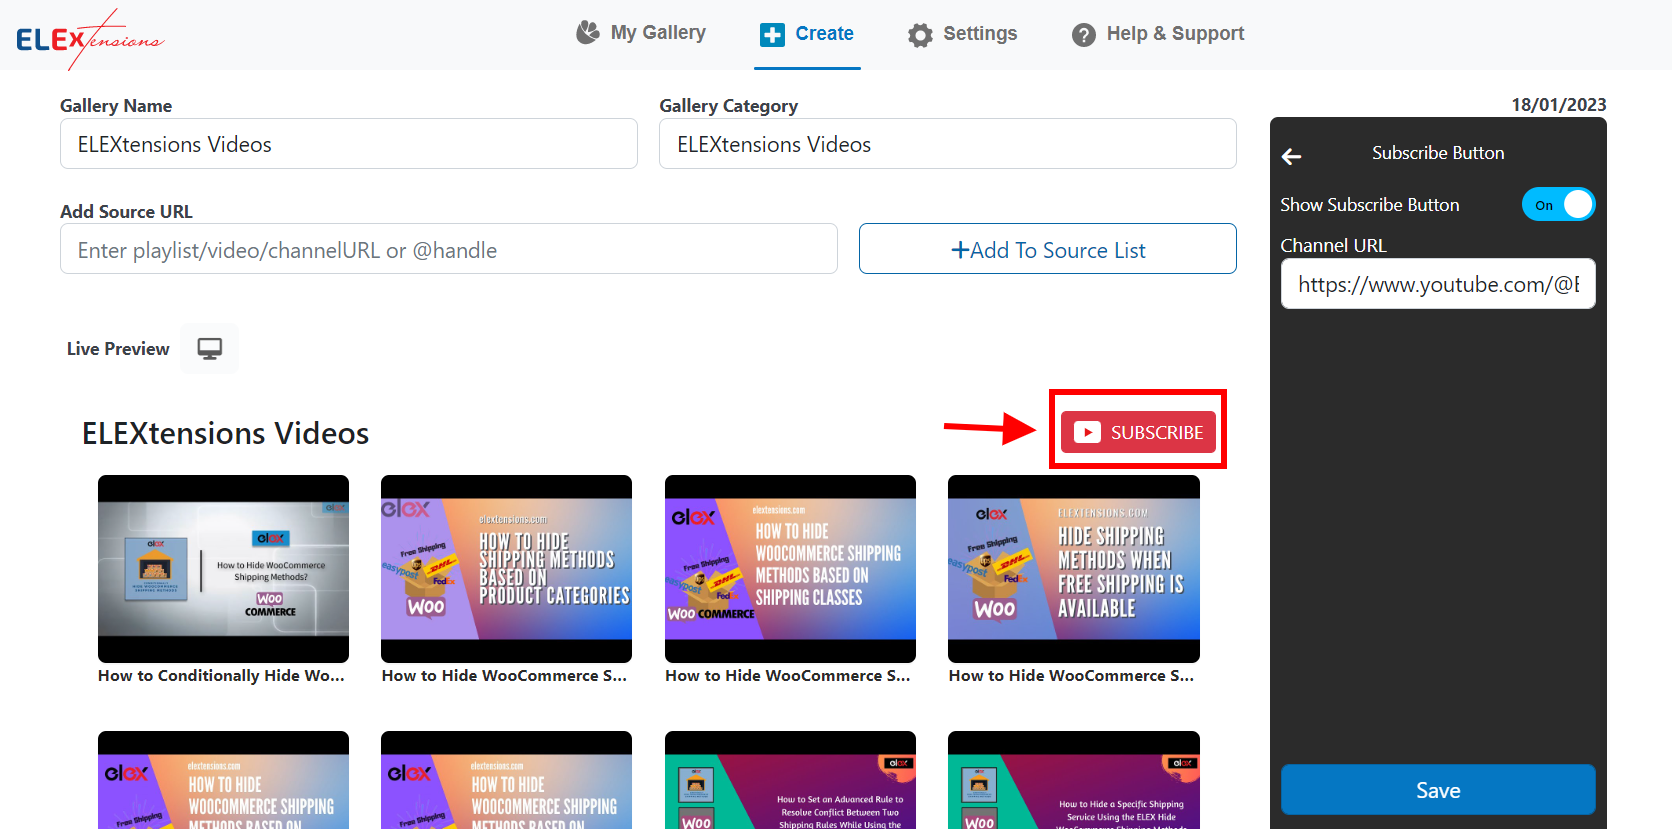
Subscribe Button: Enable or disable the Subscribe button to be displayed on the top of the gallery and enter the channel URL upon enabling it. Users will be redirected to the entered YouTube channel upon clicking the subscribe button.
Intro Video: You can add an Intro video by toggling the Show Intro Video button on and entering the URL of the video that you want to display as the introductory video to your gallery.

You can preview all of the changes in the live preview section. Once you are done configuring the settings, click Save.
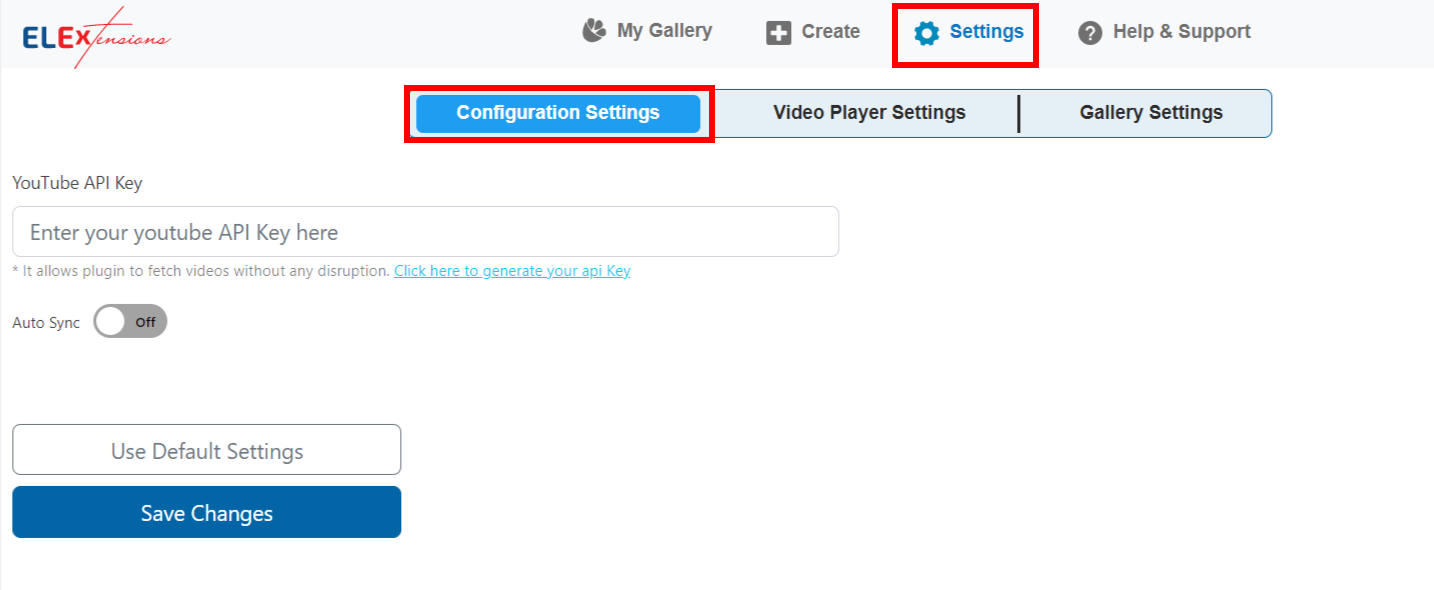
Settings
The settings tab consists of three sub-menus – Configuration Settings, Video Player Settings, and Gallery Settings. These settings will be applied globally over all of your galleries by default, which can later be modified by editing the settings for individual galleries. Let’s go through each of them step by step.
Configuration Settings
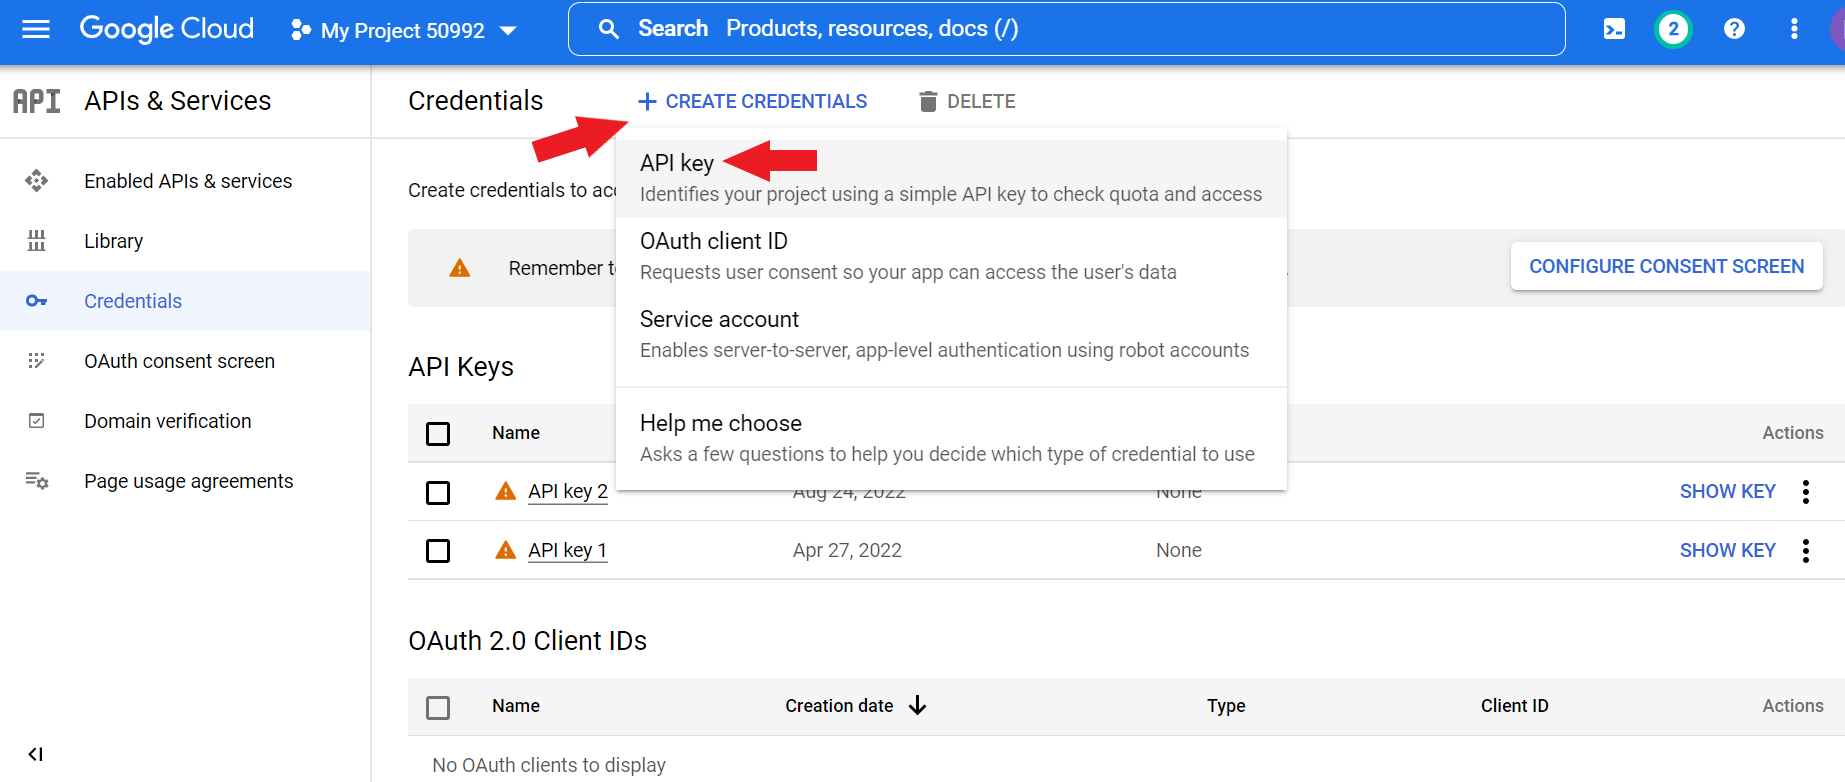
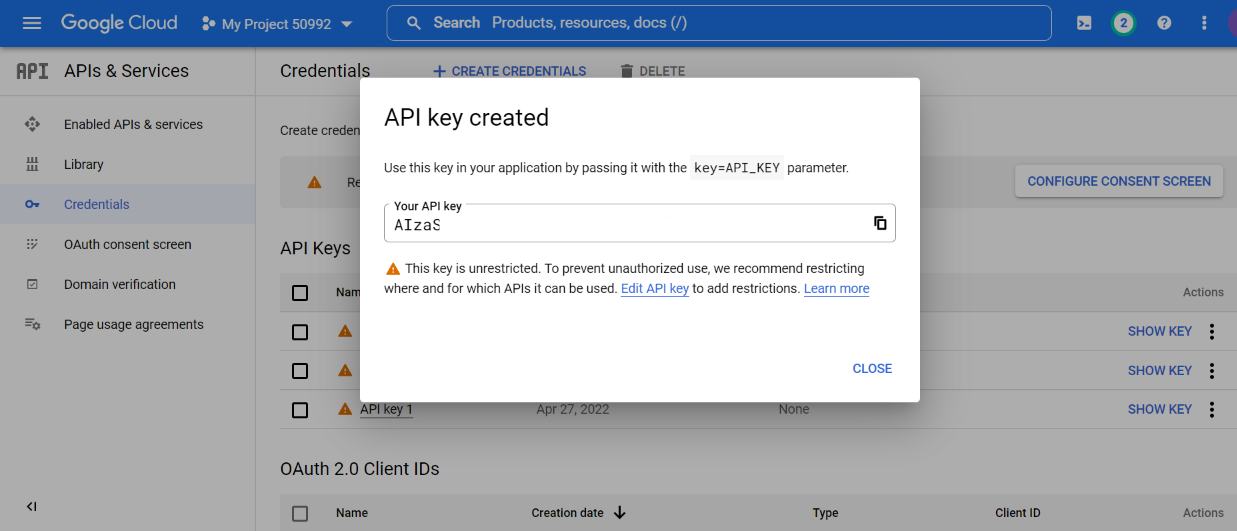
YouTube API Key: Enter your YouTube API key here. If you haven’t already, head to Enabled API & Services, do a search for “YouTube API,” and switch it on. To generate your API key, click here. On this page, click create credentials.
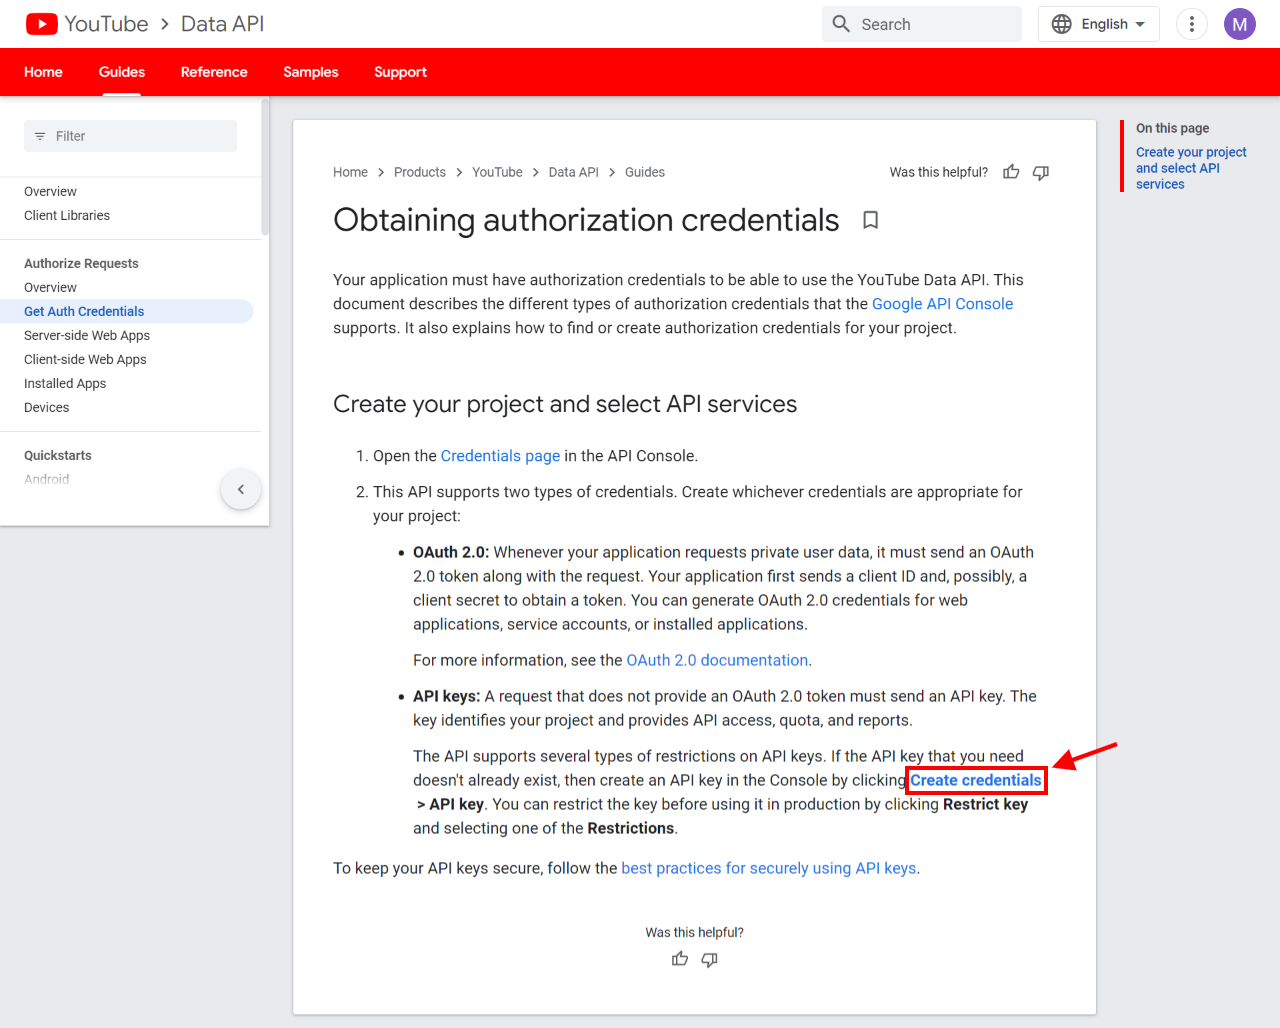
You will be redirected to the Google Cloud Console. On this page, click Create Credentials > API Key.
Below is an example of a generated API key. Simply paste this created API key to the plugin’s YouTube API key field.
Auto Sync: Enable this button to automatically sync your youtube channel or playlist on a timely basis so that your gallery is always up to date.
Time Interval: Upon enabling auto-sync the time interval drop-down menu will appear. Here you can set the interval at which you want the gallery to be automatically synced. The available options are – daily, every 7 days, every 15 days, and every 30 days.
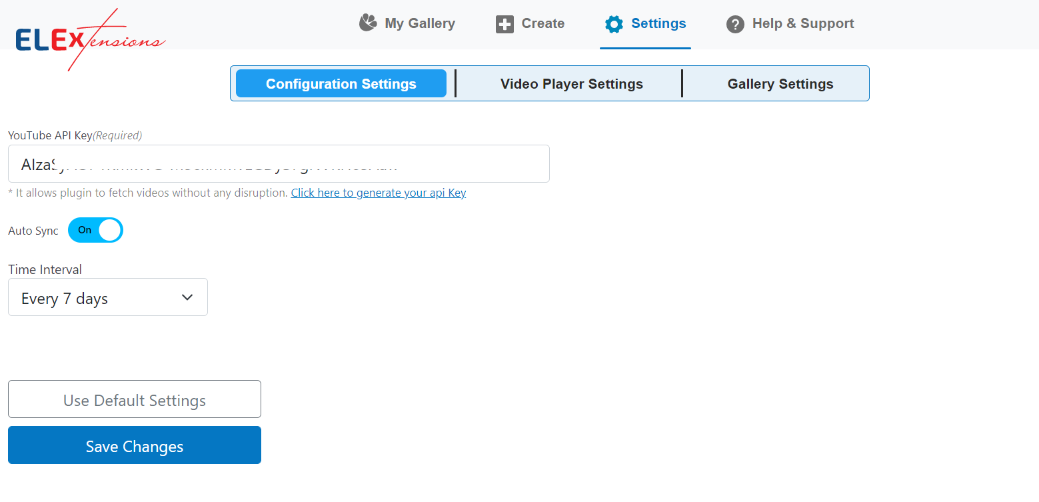
Use Default Settings: Removes the API Key and other preferences and brings back the configuration settings to their initial state.
To save your preferences, click Save.
Video Player Settings
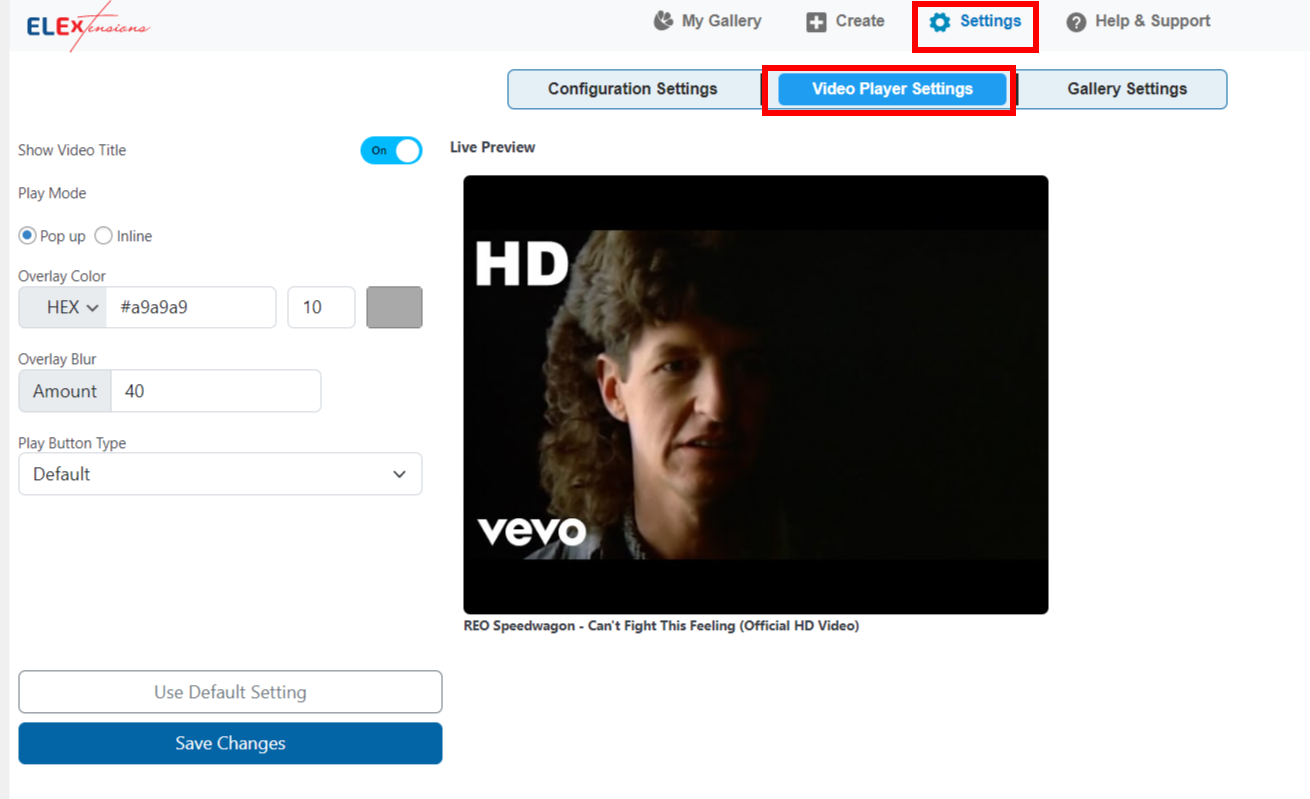
- Show Video Title: Choose whether you want the title of the video to be displayed on top of the video.
- Play Mode: The two available modes are pop-up and inline.
- Pop-up: The video plays in a pop-up window upon clicking on it.
- Inline: The video plays on the gallery layout itself and does not open as a separate pop-up window.
- Overlay Color: Select the overlay color for the video player.
- Overlay Blur: Add your desired amount of overlay blur for the video player.
- Play Button Type: Change the play button form from rectangular with rounded corners to circular, the background color, icon color, and hover animation to customize the play button.

You can preview all of the changes in the live preview section. Once you have configured all the settings, click Save.
Gallery Settings
This tab enables you to set the default global gallery settings which can later be modified on individual gallery settings.
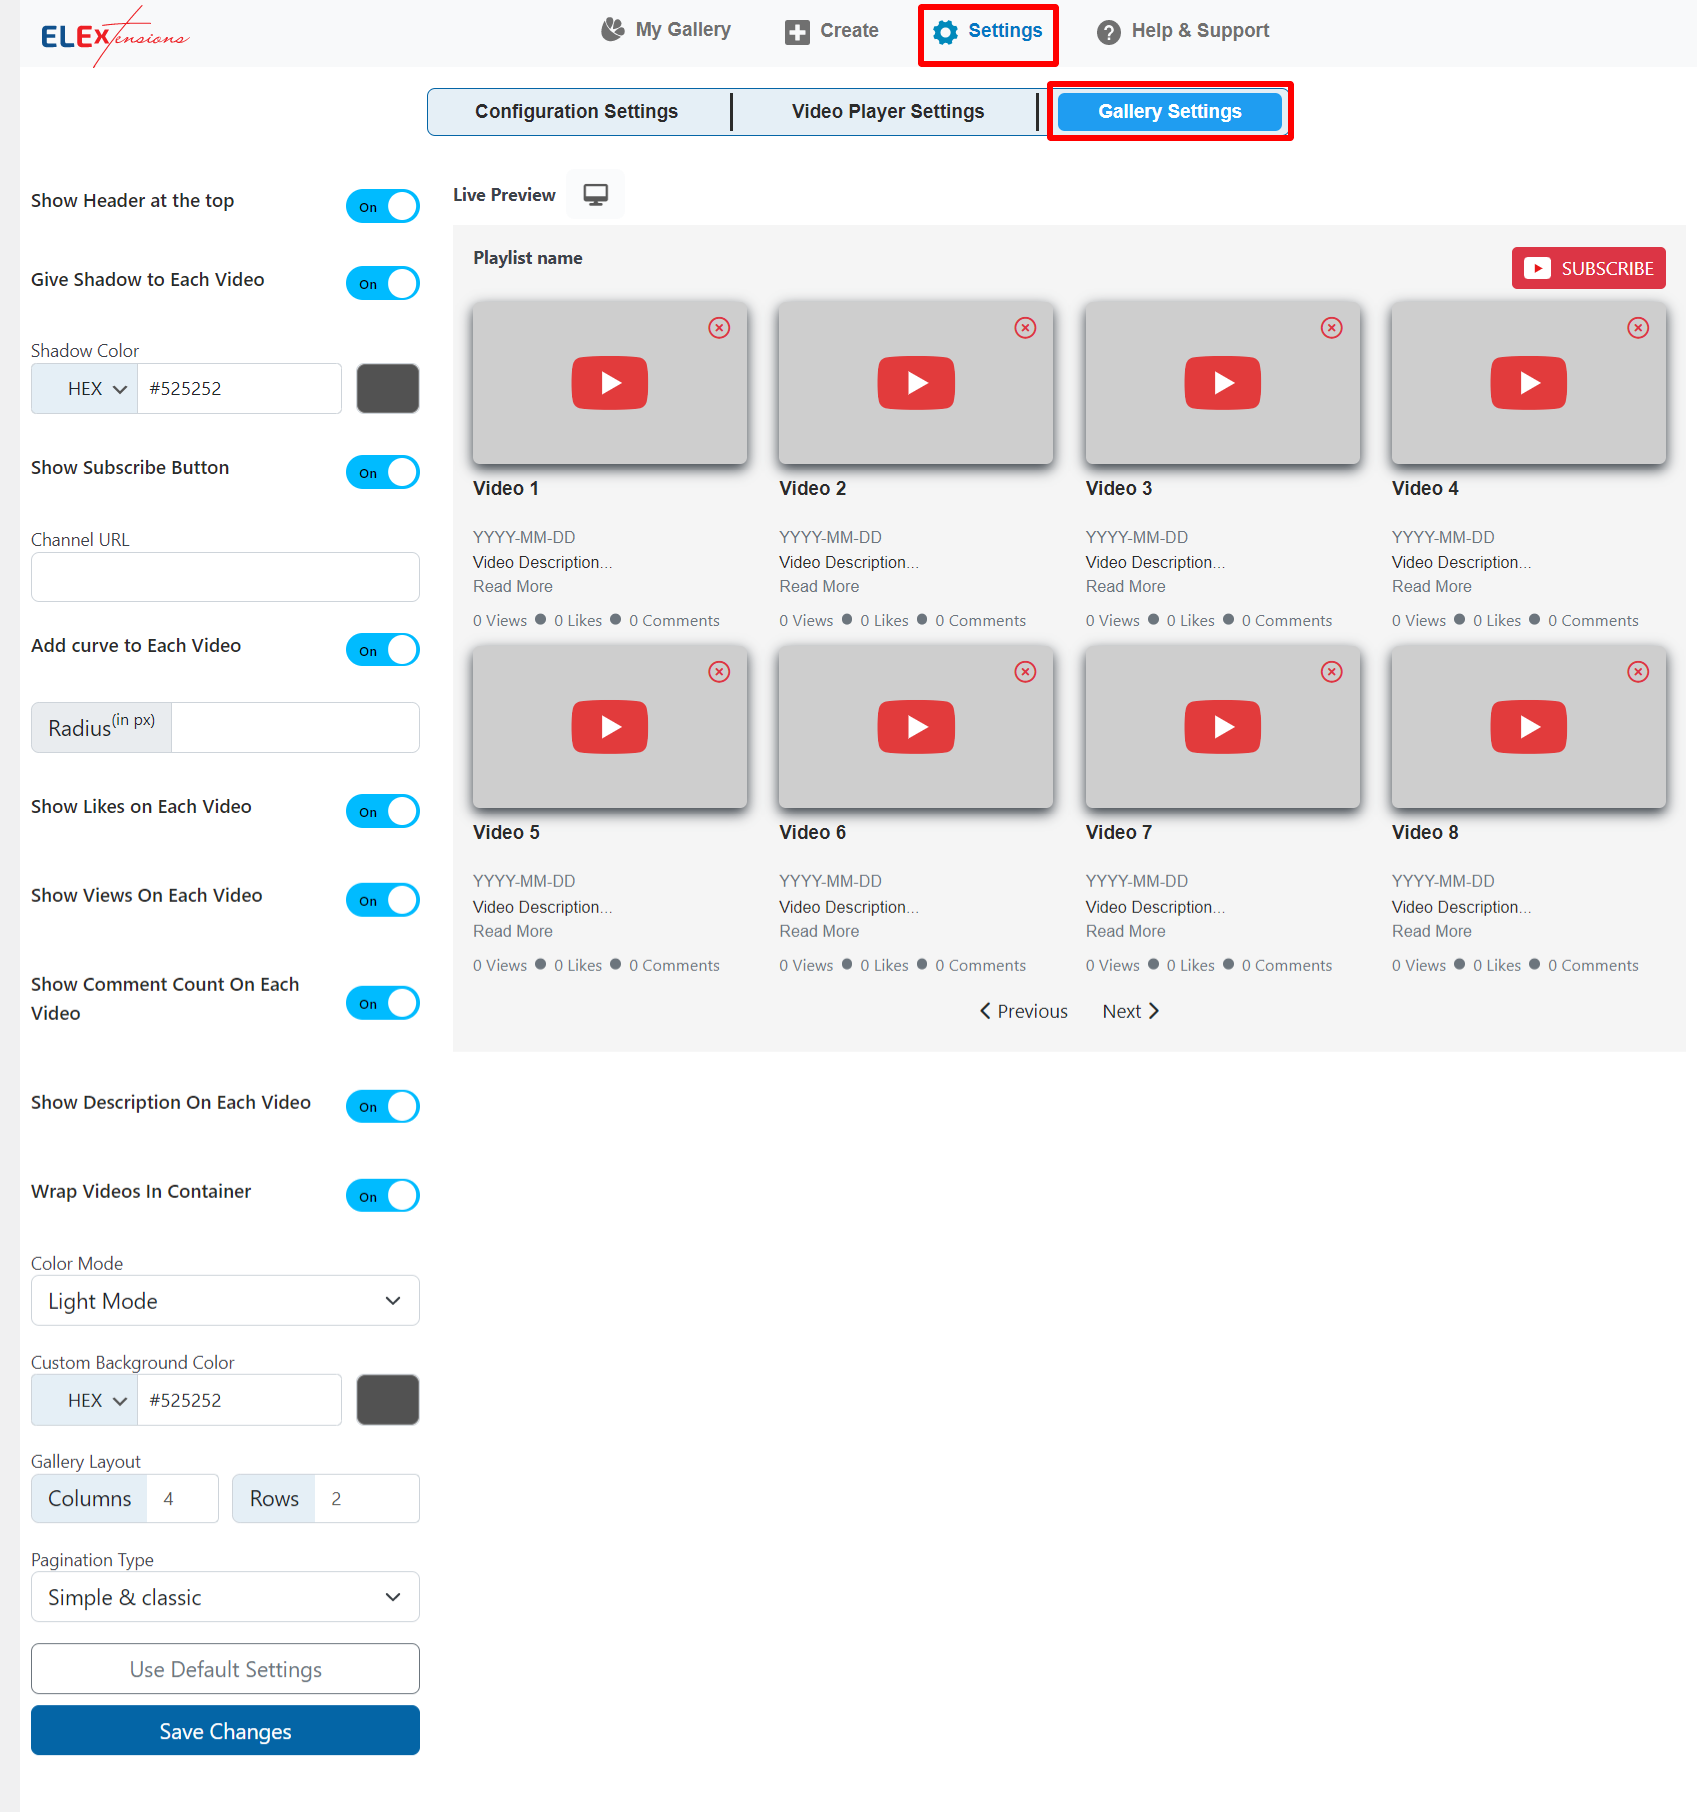
- Show Header at the top: Enable this option to display the Gallery name on the top of each gallery.
- Give Shadow to Each Video: Add a customized shadow color to the videos in your gallery.
- Show Subscribe Button: Enable this option to display the Subscribe button on the top of each gallery.
- Channel URL: This is the URL your users will be redirected to when they click on the Subscribe button.
- Add Curve to Each Video: Add a curve or rounded corners to the videos displayed in your YouTube Video Gallery. You can adjust the radius of the curve to your liking.
- Show Likes on Each Video: Enabling this option will display the number of likes received by each video in the gallery. This can help viewers gauge the popularity of the videos.
- Show Views on Each Video: Display the number of views that each video in the gallery has received. This can help viewers determine which videos are most popular or have been viewed the most.
- Show Comment Count on Each Video: Enabling this option will display the number of comments posted on each video in the gallery. This can help viewers gauge the engagement level of each video.
- Show Description on Each Video: Display the description of each video in the gallery beneath the video thumbnail. This can provide viewers with more information about the content of each video.
- Wrap Videos in Container: Choose between light or dark mode based on your preference and website design.
- Gallery Layout: Choose the number of rows and columns that you want to display in each gallery.
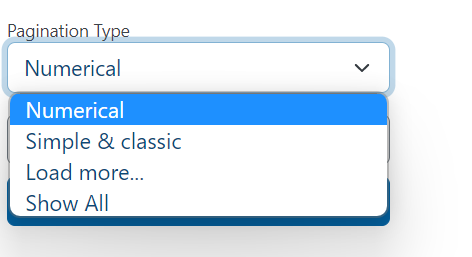
- Pagination Type: Choose between Simple & Classic, Numerical, Load More, and Show all pagination types that will display a previous & next button or numbered pages respectively at the end of the gallery.
You can preview all of the changes in the live preview section. When you are done configuring the settings, click Save.
My Gallery
This tab displays the list of all the created galleries.
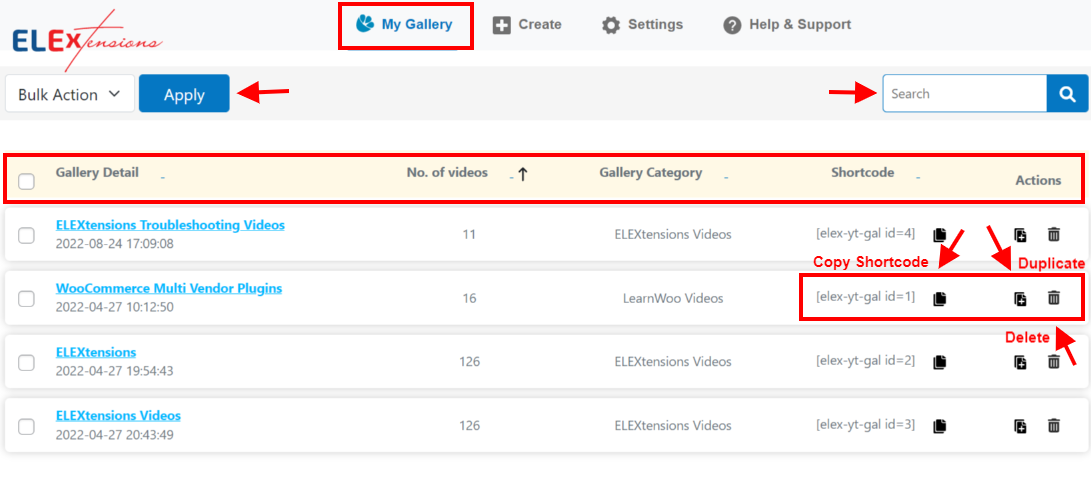
Gallery Detail: Displays the gallery name along with its date and time of creation. You can click on the gallery name to edit it individually. We will demonstrate that below.
No.of Videos: Displays the number of videos in the respective gallery. It is sorted based on the creation date by default and can also be sorted based on highest to lowest and vice versa.
Gallery Category: The category you added while creating each gallery will be displayed here.
Shortcode: This is the shortcode generated by the plugin for each gallery. You can simply click the copy icon beside each shortcode to copy it.
Actions: You can duplicate or delete the created gallery by clicking on the respective actions.
Bulk Action: By checking the box beside each of the galley names you can delete them in bulk from the bulk action section. All the galleries can also be deleted in bulk if needed by clicking on the checkbox beside gallery detail and running the bulk delete action.
Search: When you are dealing with multiple galleries, you can benefit from the search feature by searching for galleries based on name or categories.
Editing Individual Galleries
You can edit and delete the galleries individually by clicking on the Gallery name on the My Gallery Page.
Here you can edit the gallery name and category and add more videos, playlists, and channels to the gallery. You can also sync the added playlists and channels by clicking Sync Manually.
Under the Customize menu:
- Shortcode: The gallery shortcode is displayed here. You can copy it by simply clicking the copy button beside it.
- Source List: Displays the source URLs for all of the videos, playlists, and channels added to the corresponding gallery. You can remove the videos/galleries/playlists from here by clicking the Remove (X) button.
- Wrap Videos in Container: Edit between light mode or dark mode based on the website design.
- Desktop Layout: Edit if you want to display the header text, the number of rows and columns, and the pagination type.
- Subscribe: Edit if you want to display the subscribe button on the top of each gallery. You can also edit the channel URL to which the users will be redirected upon clicking the Subscribe button.
- Intro-video: Edit if you want to display an intro video on the top of each gallery. The video URL can also be edited here.
- Trash: Any video or source that is deleted from the gallery is moved to the trash. You have the option to restore them from the trash to the gallery while editing.
You can preview all of the changes in the live preview section. When you are done configuring the settings, click Save.
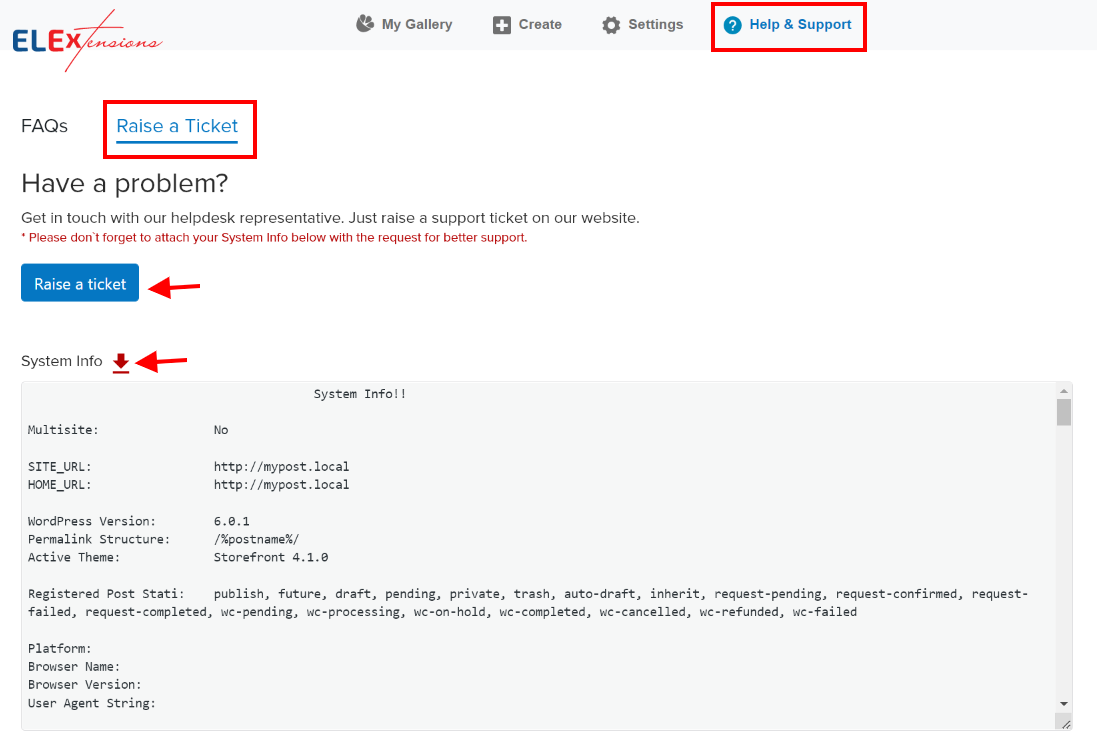
Help & Support
This tab is divided into two sub-menus – FAQs and Raise a Ticket. The FAQ section, as the name suggests, lists all the frequently asked questions for faster issue resolution.
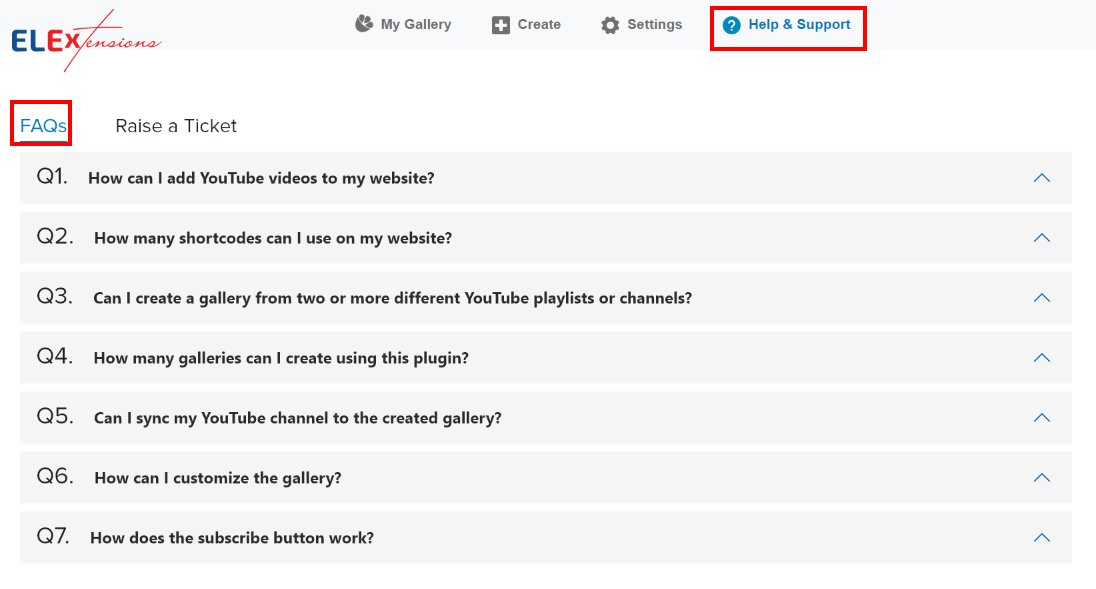
Under the Raise a Ticket tab, you can raise a support ticket right from the backend of your WordPress website. It also enables you to download and attach your system information along with your support ticket for easier and faster resolution.
Demonstration
Let’s add a video galley to one of our website pages to demonstrate:
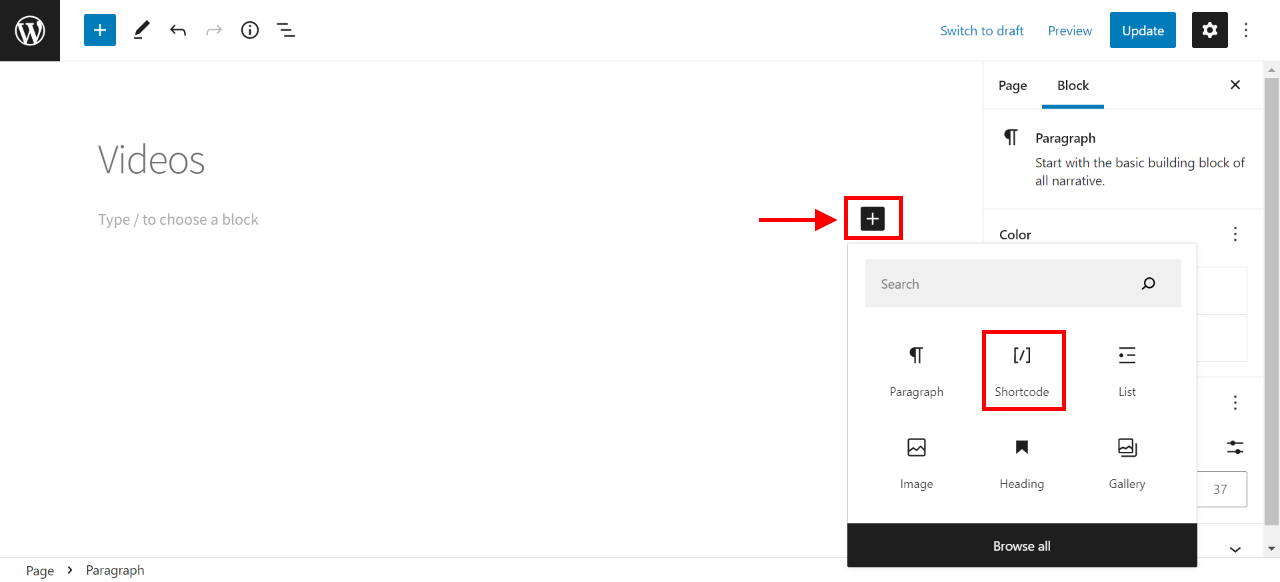
Begin by editing the page you want to add the video gallery to on the backend of your website. On the block editor, click the ‘+’ button and then click Shortcode.
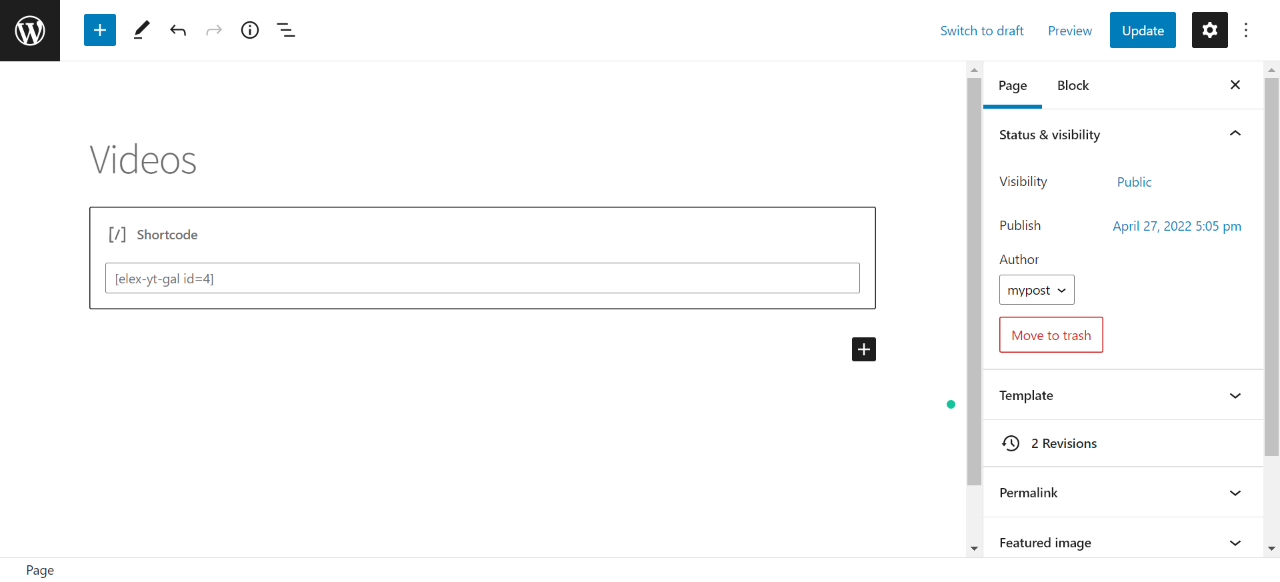
Next, simply enter the copied shortcode and click update. That’s all it takes! Let’s look at the results.

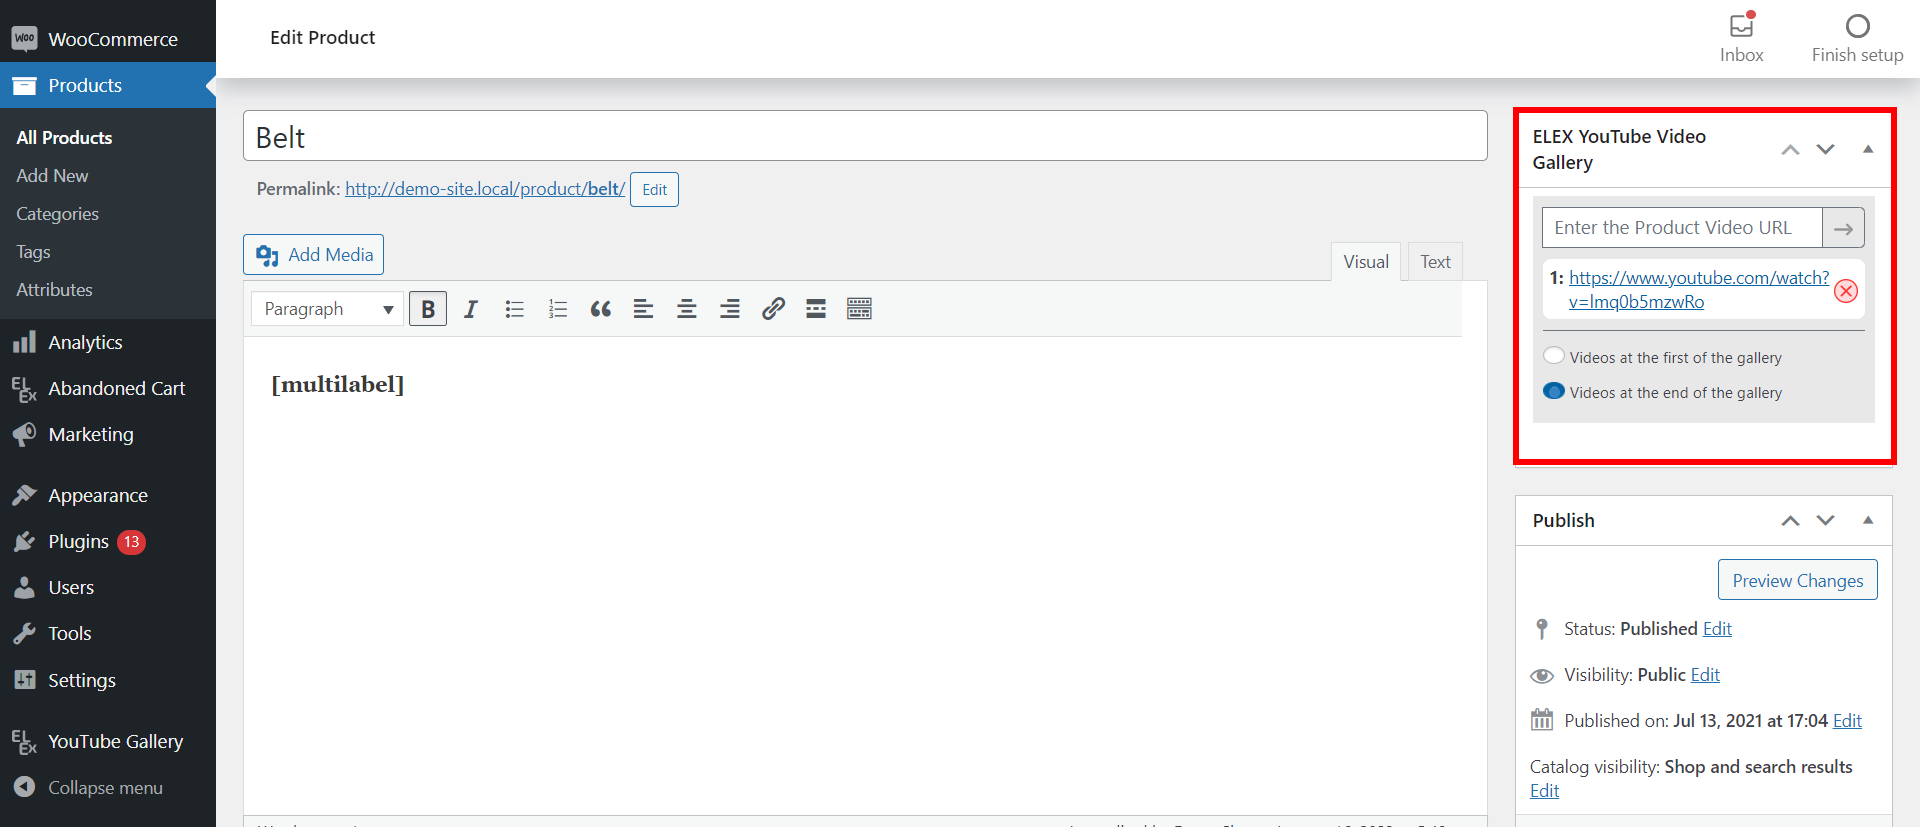
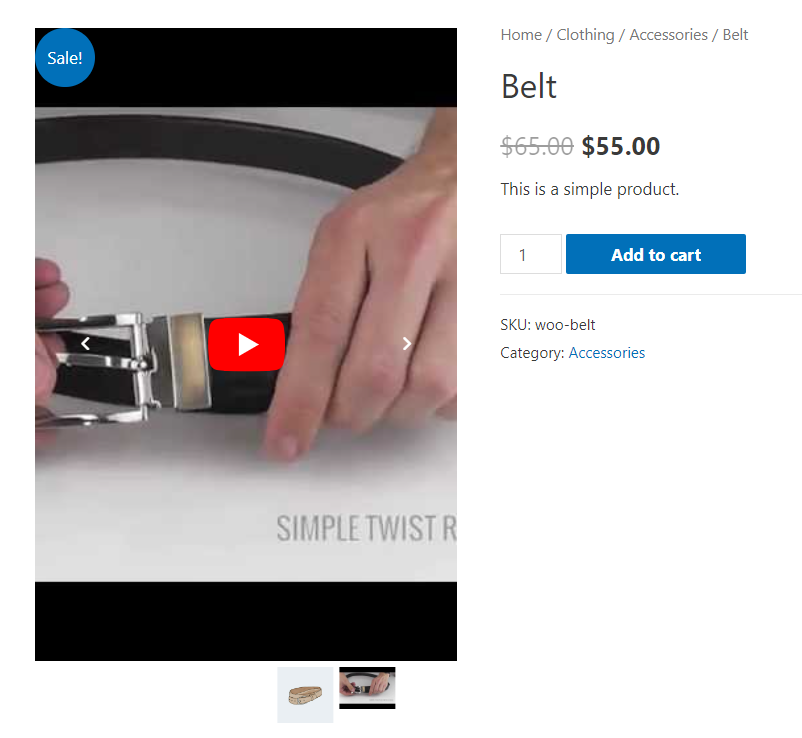
WooCommerce Integration
For any individual WooCommerce product, you have the choice of either including single or numerous product videos in the product image gallery. These videos can be set up to display either at the beginning or the end of each product image gallery, depending on the preferences that you have selected.
You can set these up by navigating to the WordPress Dashboard > Products > Individual Product
This is how it looks on the product page:
To explore more details about the plugin, go check out ELEX WordPress Embed YouTube Video Gallery.
You can also check out other WooCommerce and WordPress plugins in ELEX.