What can we help you with?
How to set up ELEX WooCommerce Australia Post Shipping Plugin with MyPost Business Account?
This post will give you full, step-by-step instructions on how to set up the ELEX WooCommerce Australia Post shipping plugin with your MyPost business account. Read the main plugin documentation for instructions on configuring the plugin with a conventional Australia Post eParcel account and other options. More information about the plugin’s additional features may be found on the product page.
Australia Post offers postal services throughout the country and its overseas territories. The Australian Postal Corporation (previously the Australian Postal Commission) is the Australian Government-owned corporation responsible for the operation. Australia Post is the trading name.
What is Australia Post MyPost Business?
MyPost Business is a business account and courier service that provides a customizable option to ship parcels for your company. It’s best for companies that deliver less than 2,000 packages each year. If you deliver more than 2000 parcels per year, the Australia Post eParcel courier is a good choice. MyPost provides volume-based pricing and discounts to new and smaller eCommerce businesses. With MyPost, the more packages you send, the more money you save on shipping. MyPost Business, which offers volume-based savings in five tiers, is perhaps the best place to start for purchases of 10-200 per month. The discounts start to rise quickly the more packages you send, and your limit is revised weekly. It costs nothing to create a MyPost Business account, so there’s no risk in trying it out, especially if you are just starting out and looking to save money on shipping. You can read this PDF document to know more about MyPost Business.
Over the last four years, MyPost Business has helped numerous Australian retailers handle domestic and global shipping with a free account. It’s never been easier to ship better than it is now, with no credit information and no need to promise a minimum or constant volume of packages. You must have a MyPost Business account as well as a ReachShip account to integrate MyPost Business services with your Australia Post account.
Benefits of using a MyPost business account
- Volume-based discount.
- No minimum or consistent parcel volume.
- There are standard and express shipping options available.
- Rates for shipping can be compared.
- Generate shipping labels in bulk.
- Domestic and international services are supported.
- All of your domestic and international shipments can be managed and tracked from your WooCommerce dashboard.
- Customers receive tracking updates.
- Insurance and signature option.
Setting up ELEX WooCommerce Australia Post Shipping Plugin with the MyPost Business account
The main documentation of the plugin with the eParcel and StarTrack accounts already includes a detailed, step-by-step explanation. This article will only cover the setup of the MyPost Business account.
You can access the ELEX WooCommerce Australia Post Shipping Plugin with MyPost Business settings from WooCommerce > Shipping > MyPost Business.
General settings
Go to WooCommerce > Shipping > MyPost Business > General.
In this tab, enter your ReachShip Client ID and Client Secret, which you can find in the My Account section of your ReachShip account.
The complete settings can be seen in the screenshot below.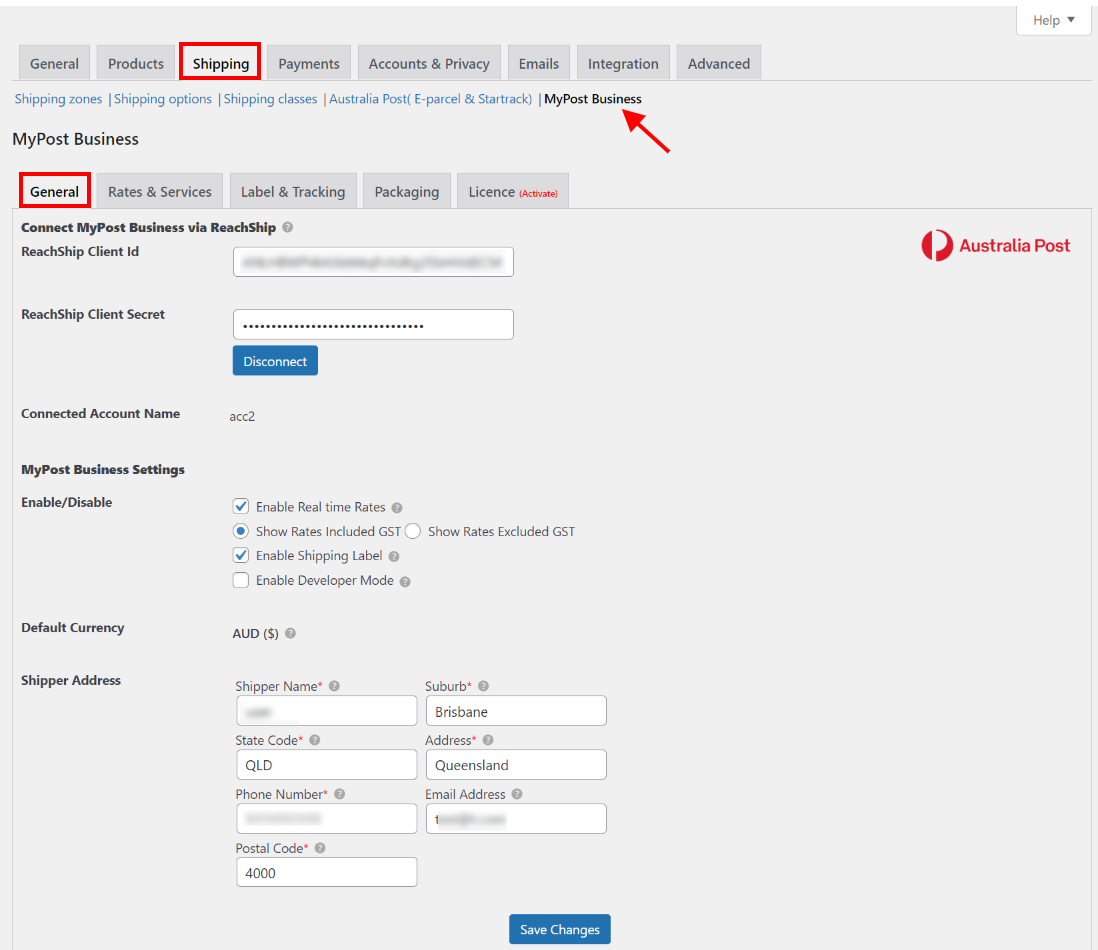
How to obtain ReachShip Client ID and Client Secret?
If you do not have a ReachShip account, you can click here to create one. For a step-by-step guide on how to create a ReachShip account, click here.
Once your ReachShip account is created, go to Settings > Shipping.
Under shipping settings, in the ‘Filter by Carrier Name’ drop-down menu, select Australia Post (My Post)

In the pop-up box that appears, you have to enter your MyPost Account Name and MyPost Merchant Token. To create a MyPost Account, click here.

If you already have a MyPost Account, enter your MyPost Account Name and Merchant Token as shown in the screenshot below. This will link your MyPost account to ReachShip.

Next, to obtain your ReachShip Client ID and Client Secret, navigate to ReachShip > Settings > API. These are the credentials that you will have to enter in the general tab of the MyPost Business plugin.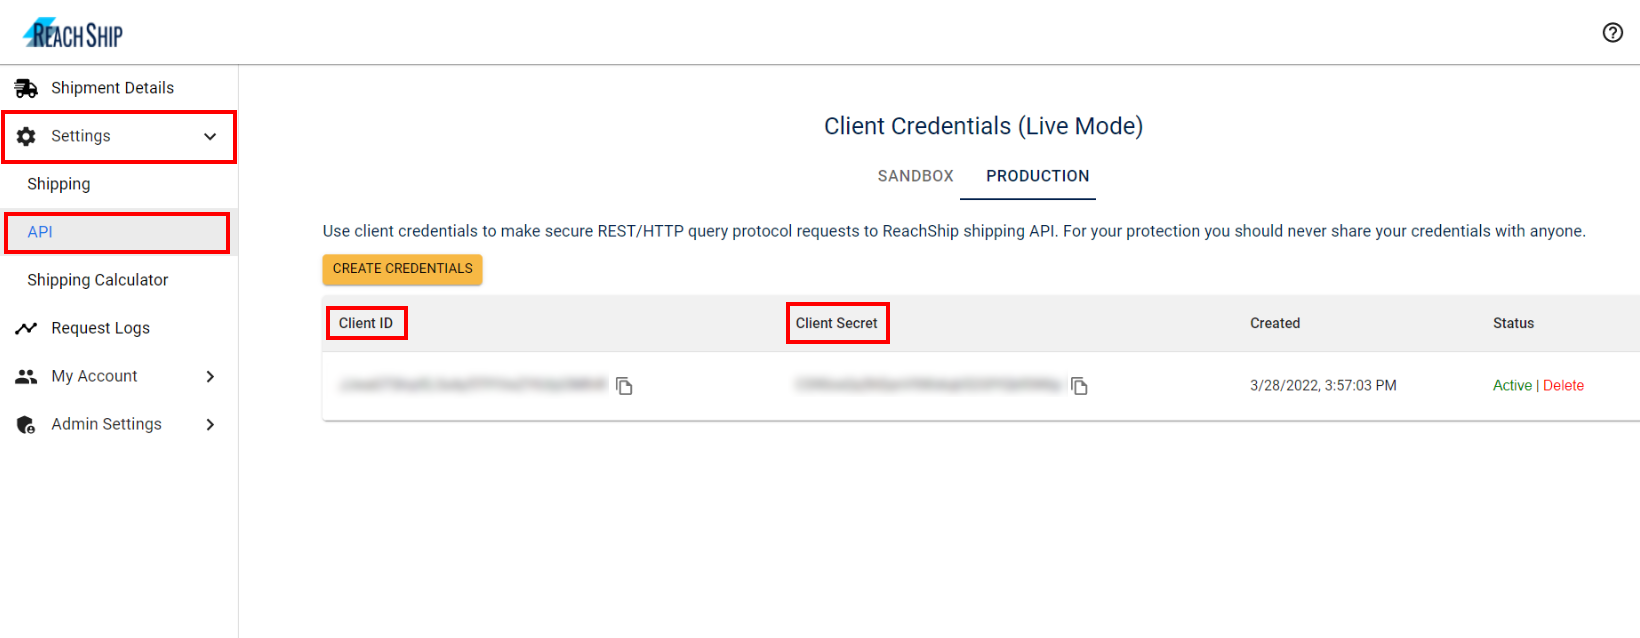
Coming back to plugin general settings, enter the obtained Client ID and Secret to connect MyPost Business account via ReachShip and click Connect.
MyPost Business Settings:
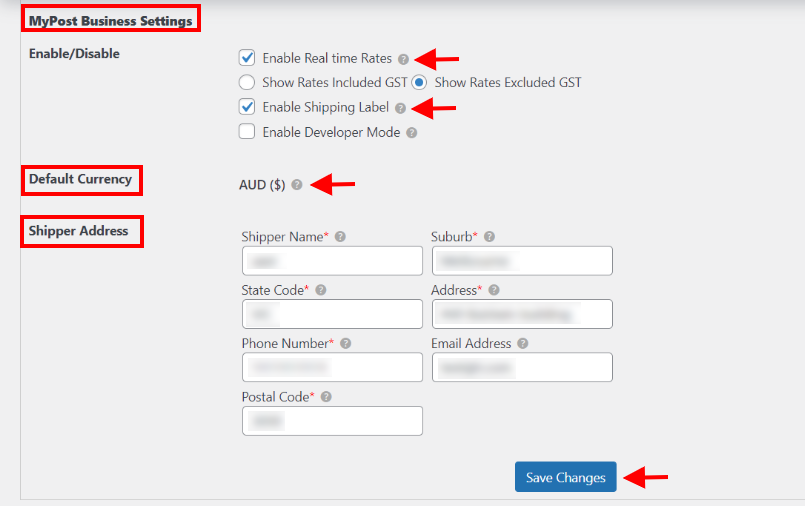
- Next under MyPost Business settings, enable Real-time Rates to display live shipping rates via Australia Post API to your customers on the cart and checkout pages. You have the option of displaying shipping rates that include or exclude GST.
- Enable Shipping Label to get an option to generate shipping labels from the order admin page via MyPost business. To hide the label creation button, keep it unchecked. Note: You can only create shipping labels if the merchant token has been authorized.
- You can debug the plugin by enabling Developer mode. The Cart and Checkout page would display the Request and Response information obtained by the API. Once your site is live, we do not recommend activating Developer mode to prevent unwanted data from being displayed on the website’s frontend.
Default Currency: The default currency is obtained from the WooCommerce currency settings. In order to use the MyPost Business account services, Australian Dollars should be your default currency.
Shipper Address: Enter the shipper name, phone number, email address, and address details such as state code, postal code, suburb, etc.
To save the settings, click Save Changes.
Rates and Services Settings
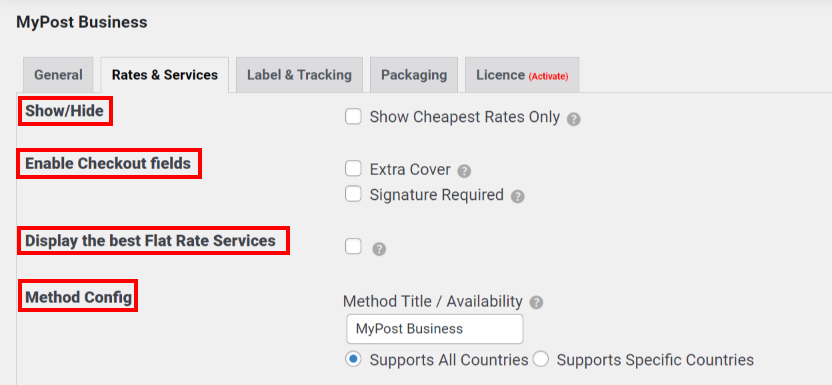
Under this tab, you can enable or disable checkout fields such as insurance (extra cover) and receiver’s signature, set a custom method title, and select the domestic and international services you want to enable.
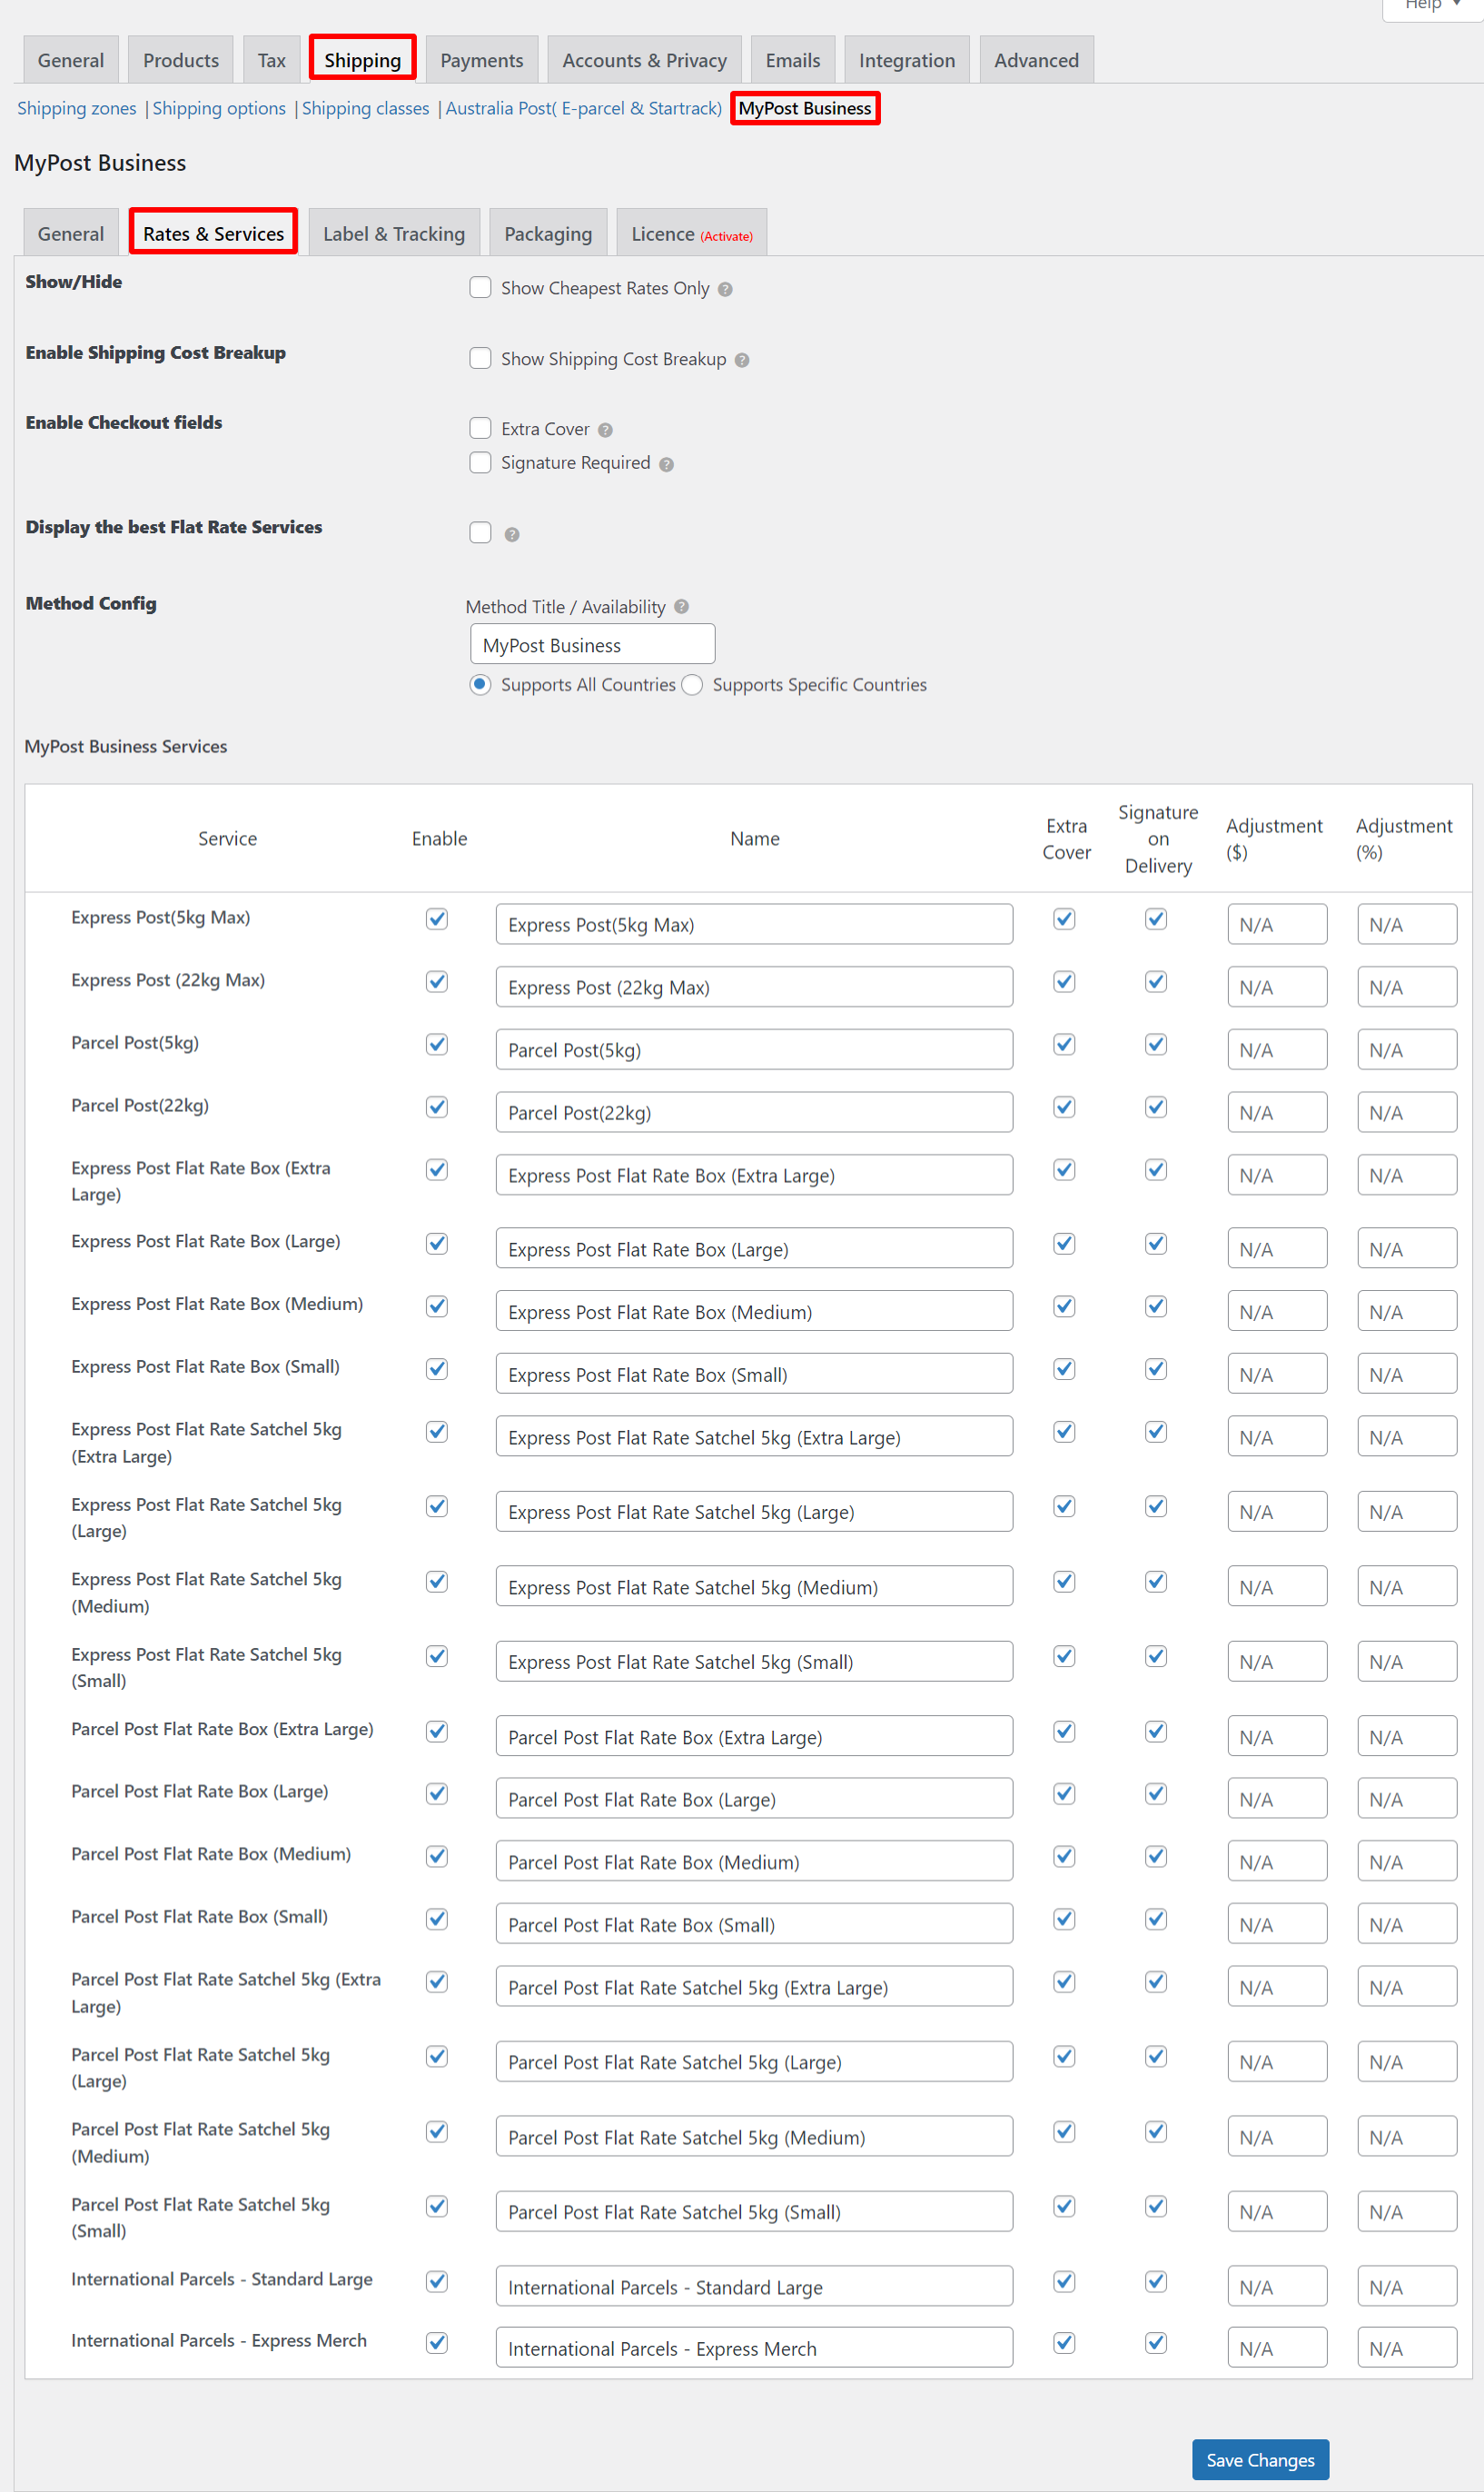
- Show/Hide Cheapest Rates only: When you enable this, only the cheapest shipping rate obtained from MyPost will be displayed on the cart and checkout pages.
- Enable Checkout fields:
- Extra Cover: You can enable the option to add Extra Cover if you want further peace of mind when shipping an item. It covers loss or damage to your item while it is in Australia Post’s care.
- Signature Required: Enable this feature to allow customers to select Signature Required on Delivery for an extra layer of security.
- Display the best Flat Rate Services: If this field is enabled, the Cart and Checkout pages will only show the cheapest flat rate services between Parcel Post, Express Post Satchel, and Boxes.
- Method Config: Under the method title/availability textbox, enter the method name that will appear in the cart and checkout pages if the MyPost live shipping rates are enabled. You can also choose to enable services in all countries or only in a few specific countries.
MyPost Business Services: Here you have the option to enable or disable each service offered by MyPost, enter a custom service name for each of them, enable or disable extra cover and signature on delivery for each service, and add price adjustments in the form of amount or percentages.
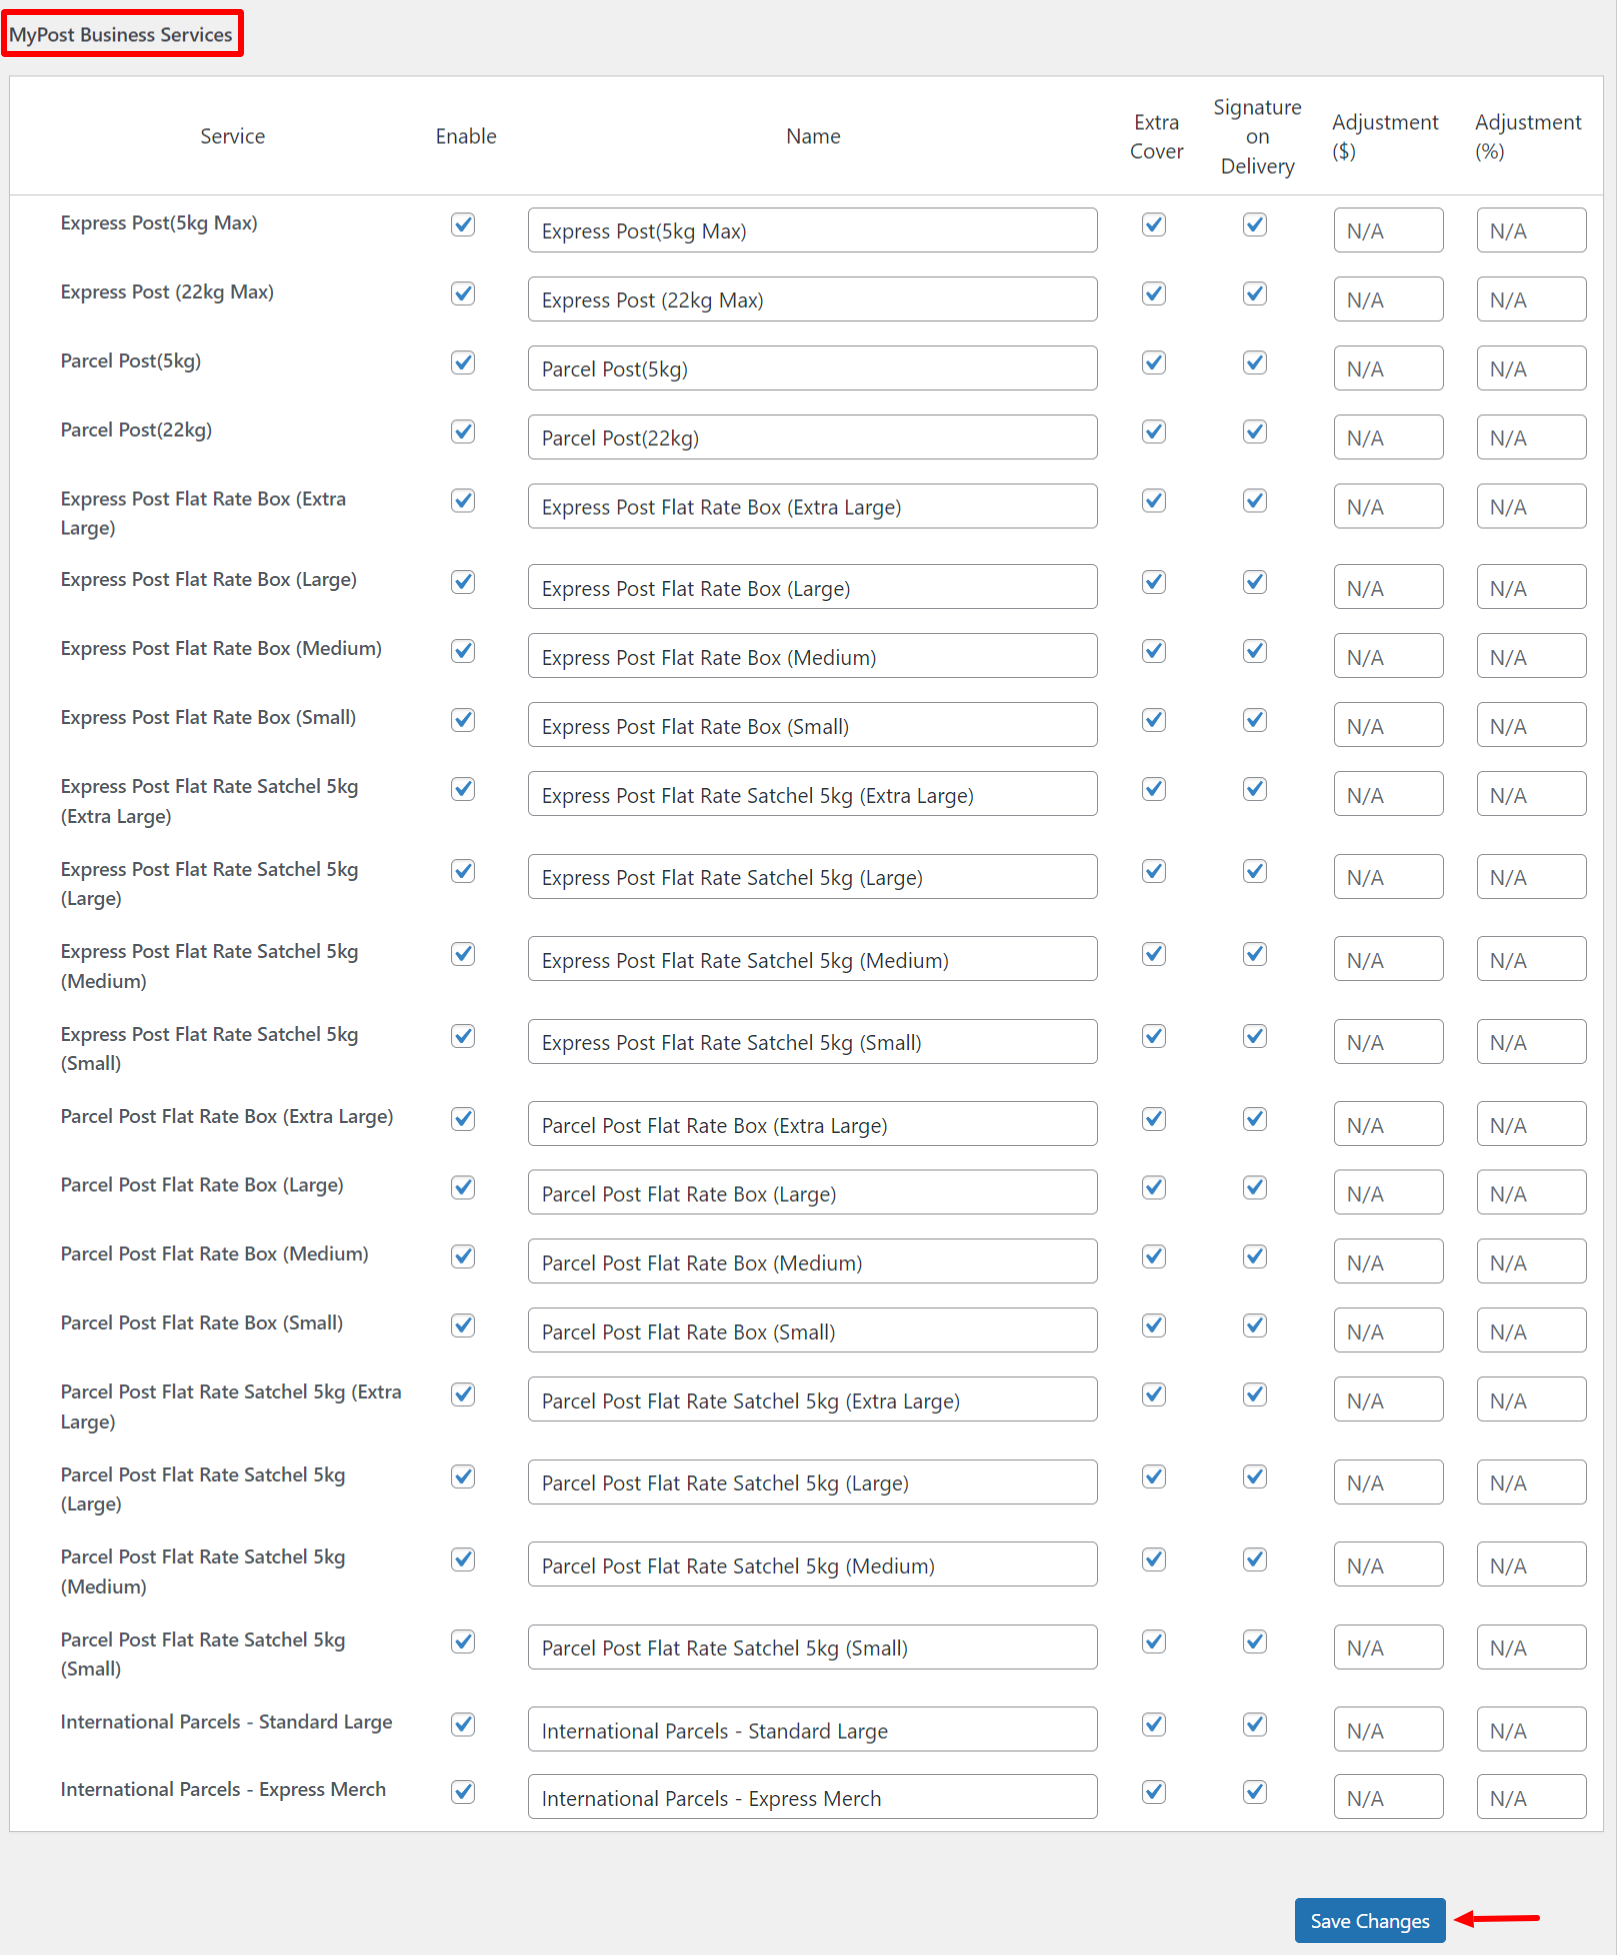
The services offered by MyPost Business are:
- Express Post (5kg Max)
- Express Post (22kg Max)
- Parcel Post (5kg)
- Parcel Post (22kg)
- Express Post Flat Rate Box (Extra Large)
- Express Post Flat Rate Box (Large)
- Express Post Flat Rate Box (Medium)
- Express Post Flat Rate Box (Small)
- Express Post Flat Rate Satchel 5kg (Extra Large)
- Express Post Flat Rate Satchel 5kg (Large)
- Express Post Flat Rate Satchel 5kg (Medium)
- Express Post Flat Rate Satchel 5kg (Small)
- Parcel Post Flat Rate Box (Extra Large)
- Parcel Post Flat Rate Box (Large)
- Parcel Post Flat Rate Box (Medium)
- Parcel Post Flat Rate Box (Small)
- Parcel Post Flat Rate Satchel 5kg (Extra Large)
- Parcel Post Flat Rate Satchel 5kg (Large)
- Parcel Post Flat Rate Satchel 5kg (Medium)
- Parcel Post Flat Rate Satchel 5kg (Small)
- International Parcels – Standard Large
- International Parcels – Express Merch
Enable the services you want to activate and click Save Changes.
Label and Tracking Settings
Under this tab, you can configure all the shipping label generation, printing, and tracking settings.
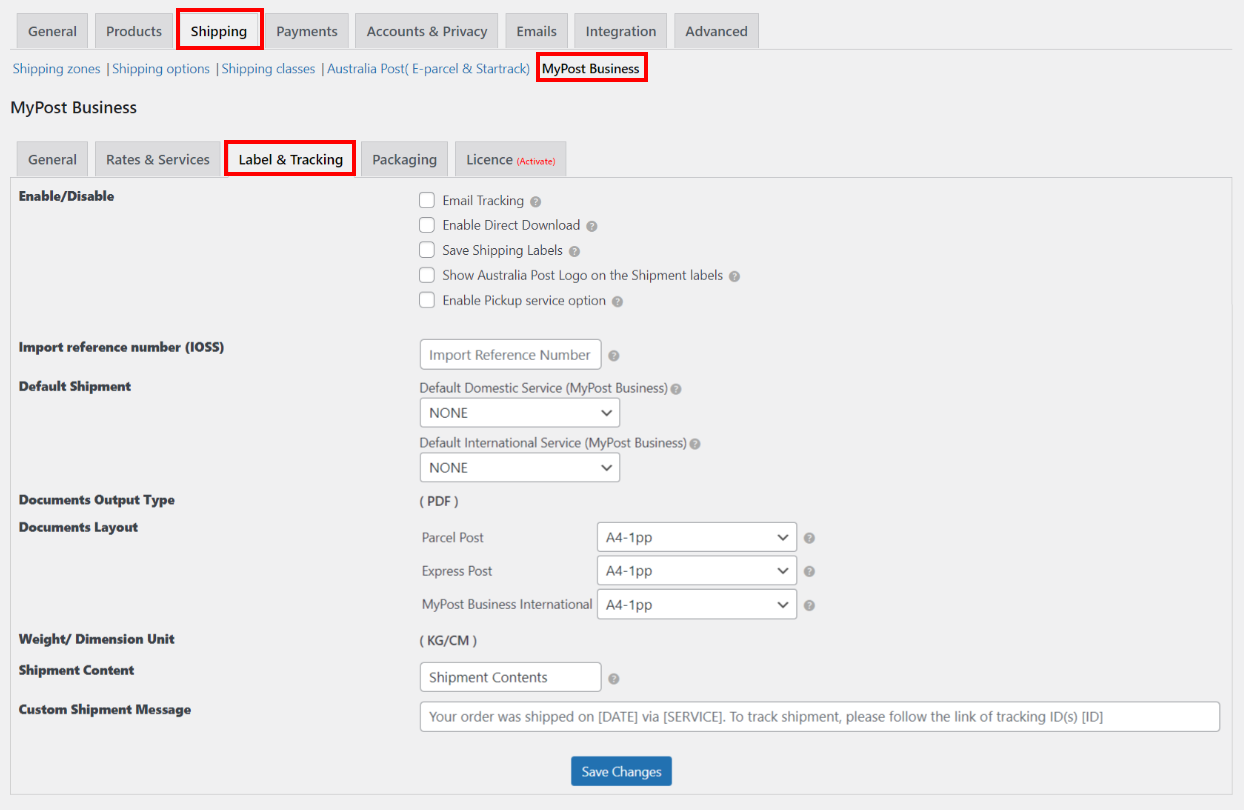
Enable/Disable:

- Email Tracking: Enable this option to send the shipment tracking information to the customer through email via the MyPost Business API.
- Enable Direct Download: Instead of opening in a new browser tab, the label will be downloaded directly if you enable this option.
- Save Shipping Labels: You can save the created shipping label in your WordPress database in the wp-content folder if you enable this option. This will allow you to retrieve the shipping labels in the future even if they are not accessible via the shipping carrier API.
- Show Australia Post Logo on the Shipment labels: You may choose whether or not to display the MyPost Business logo on the shipping labels by enabling or disabling this option.
- Enable Pickup service option: Enabling this option allows the MyPost Business Pickup service option to appear on the MyPost Business Bulk Shipments Generation page. Please note that the pickup service is only accessible when creating bulk shipments, not when placing individual orders.

Import reference number (IOSS): In this section, provide your IOSS tax registration number to make shipping to EU nations easier. This number will be forwarded to customs and displayed on the shipping documents.
Default Shipment: Choose the default domestic and international shipping service, which will be used if no MyPost Business service is selected during the checkout.
Documents Output Type: This displays the PDF output format, which is the default option when printing documents.
Documents Layout: For printing the label, select one of the following layouts.
Parcel Post
- A4 – 1pp (per page)
- A4 – 4pp
- THERMAL-LABEL-A6-1PP
Express Post
- A4 – 1pp
- A4 – 4pp
- THERMAL-LABEL-A6-1PP
MyPost Business International
- A4 – 1pp
Weight/Dimension Unit: Displays the default weight and dimension units, which are kilograms and centimeters. The weight and dimension parameters in Australia Post are default. The plugin settings do not allow you to change the format or unit.

Shipment Content: You have the option of providing a description of the shipment contents. This description will appear on all printed documents and is frequently necessary for security and customs checks.
Custom Shipment Message: The plugin allows you to customize your shipment tracking message. This message will be displayed in the tracking notification email, the WooCommerce Admin order page, and the Customer’s Orders page (under the My-Account page). You can fill in the information about the shipment automatically by using placeholders. You can add tags like [DATE], [SERVICE], and [ID] to the message to frame it. The details of these tags are provided below.
| Tag | Description |
| [DATE] | Shipment date will be replaced in the order page tracking section. |
| [SERVICE] | Selected shipping services will be replaced in the order page tracking section. |
| [ID] | Tracking code will be replaced in the order page tracking section. |
Consider the following examples of shipment tracking messages:
Default message: The shipment tracking message displays as follows when all fields in the Shipment Tracking section of the individual order admin page are filled out: Your order was shipped on 2022-01-01 via MyPost Business. To track the shipment, please follow the link of shipment IDs EN428785455IN, EN428785456IN. Please keep in mind that the link on shipment IDs takes you to their website’s live tracking details.
No shipment IDs: In this scenario, the default message will be displayed as: Your order was shipped on 2022-01-01 via MyPost Business.
No Dates: If you have not specified the [DATE] tag, the message is shown as: Your order was shipped via MyPost Business. To track the shipment, please follow the link of shipment IDs EN428785455IN, EN428785456IN.
No Tracking IDs and Date: Admin can even proceed with only selecting shipping service, and overlooking the tracking ID field and date field. The message is as shown: Your order was shipped via MyPost Business.
When you’ve finished configuring everything, click Save changes.
Packaging Settings
This section contains settings that help you decide how items will be packed, before sending them to MyPost Business.
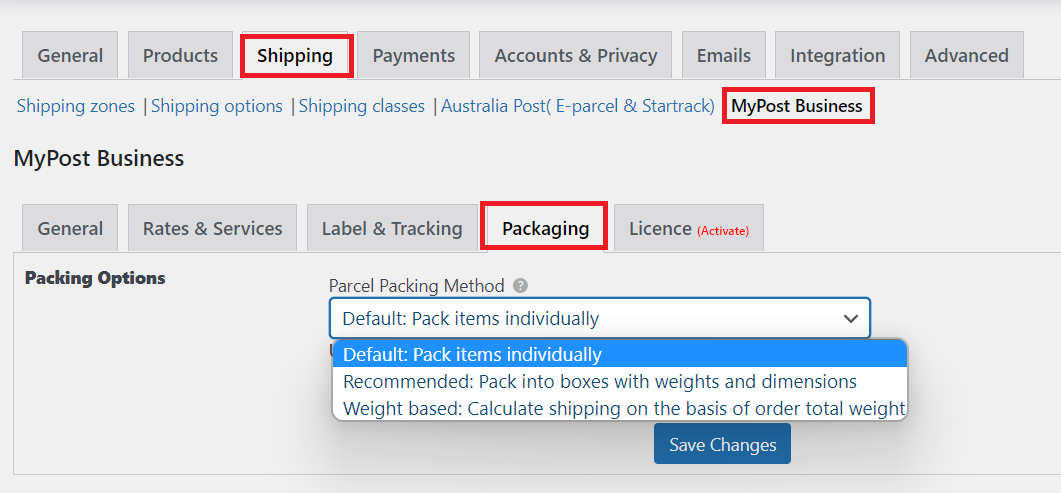
Packaging Options
MyPost Business provides three parcel packing methods. They are:
1. Pack Items Individually
This is the default option, in which each item in the cart is packed separately. As a result, multiple products will be packaged in multiple boxes. By adding the shipping costs for each item, the total shipping cost is calculated. Product X, for example, has a delivery cost of £10. The total shipping cost will be £20 if the buyer adds two units of product X to the cart. The default unit of weight is kilograms. The settings are as follows.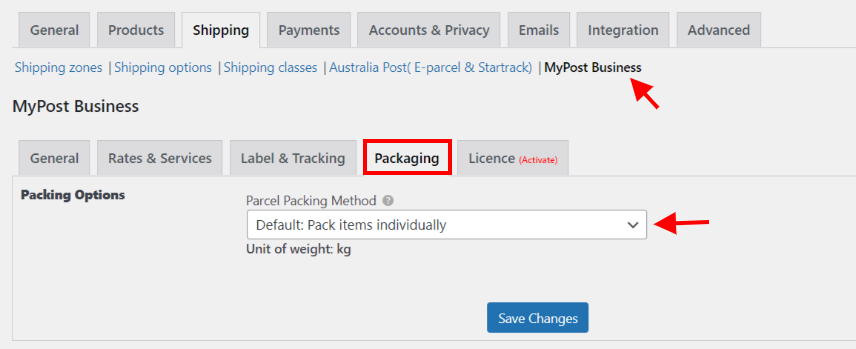
2. Pack into boxes with weight and dimensions
If packing products separately does not work for your company, you can define the needed box sizes in the Box Sizes table. All of the products in the cart are packaged into custom boxes that are specified in the Table of Box Sizes. Following the plugin’s installation, a few boxes are automatically added. From the defined boxes, the best fit box is automatically selected.
The packaging unit’s weight and dimensions are measured in kilograms and centimeters (kg, cm).
There are two packing algorithms you can choose from: Volume-based packing and Stack first packing. The volume-based box packing method aims to fit the product into the box by taking into account the total volume of both the product and the box. The stack first algorithm compares the product dimension to the box dimension, and the products are stacked or piled on top of one another based on the length, breadth, or height of the products as well as the box they are packed into.
The settings are as follows.
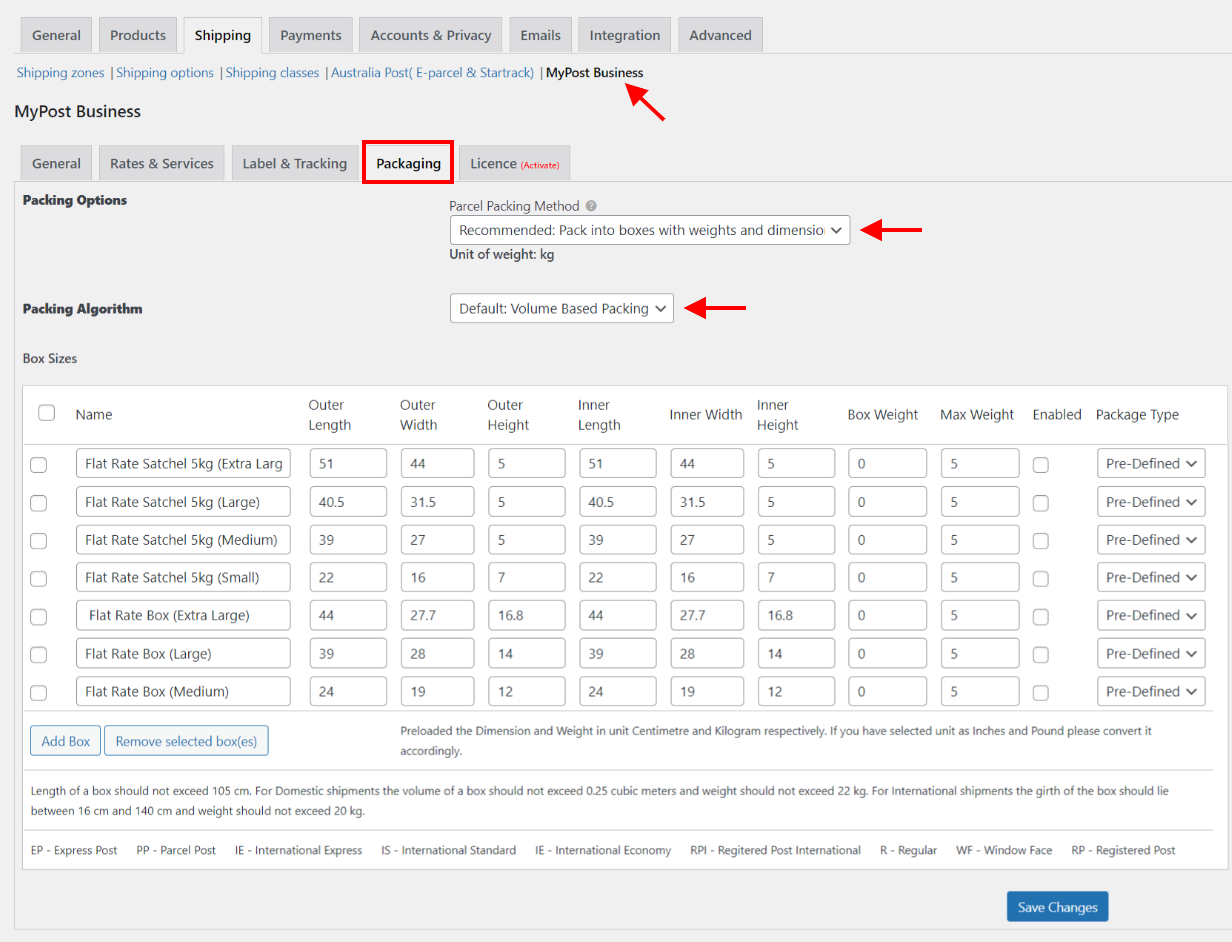
Box dimensions can be specified here. In order to determine shipping charges for a heavy packing box, specify the weight of the box so that it is added to the product weight. By selecting the Add Box button, you may customize the best fit box(es) for your product(s). You can add or remove boxes based on your needs. Similarly, by selecting or deselecting a name checkbox, you can activate or disable a specific box.
In addition, from the Package Type drop-down list, pick the needed package type for the required box. The following are the available options:
Pre-Defined: These are the most common packing boxes. When you install the plugin, these boxes are automatically added.
Your Pack: The item will be packed into a customized box if you choose this option.
The plugin offers a few predefined boxes as listed below:
- Flat Rate Satchel 5kg (Extra Large)
- Flat Rate Satchel 5kg (Large)
- Flat Rate Satchel 5kg (Medium)
- Flat Rate Satchel 5kg (Small)
- Flat Rate Box (Extra Large)
- Flat Rate Box (Large)
- Flat Rate Box (Medium)
If you choose this option, item(s) may stay unpacked because the available box(es) cannot contain it. It is also possible that the item’s size/shape is unusual, in which case it cannot be combined with other products. These items are packaged individually.
3. Weight Based
This option enables you to package your products based on the product weight. You can create boxes and choose the maximum weight for each one. Here you also have the option to choose to pack heavier items first or lighter items first.
The weight of the packaging unit is given in kilograms (kg).
The weight-based package settings are as follows.
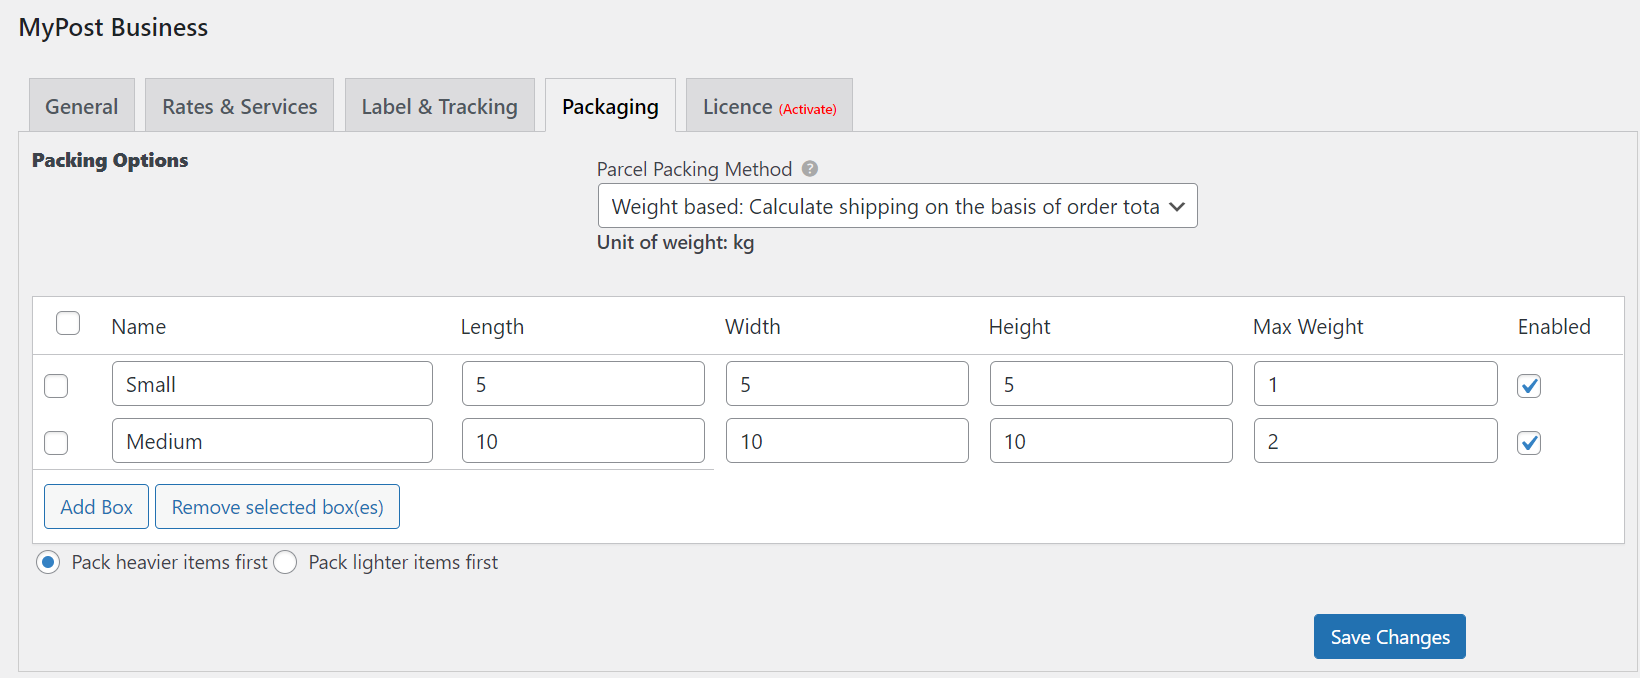
MyPost Business provides the following methods for packing the items:
- Pack heavier items first
- Pack lighter items first
Finally, click Save Changes.
Demonstration
MyPost Business Domestic Services on the Cart and Checkout page
Once you’ve specified all of the settings, navigate to your store’s front-end to test them. The following screenshot shows how the MyPost Business account services will be displayed on the checkout page.

How to print MyPost shipping labels?
The following steps show how to generate a shipment label when an order is placed with MyPost business:
To access order details, open an order from WooCommerce orders. As shown in the screenshot below, click Generate Packages to begin generating the order’s packages.

The order’s Create Shipment option is displayed as shown below.
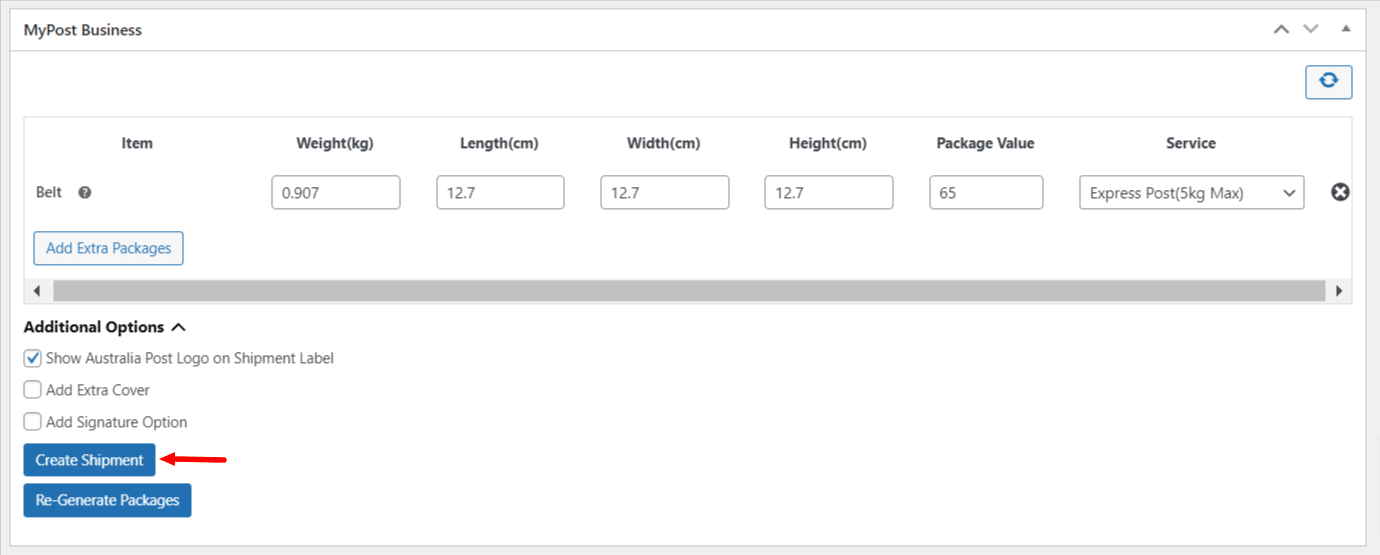
The item name, as well as its weight and dimensions, package value, and service, are included in the shipment information. The additional options enable you to show or remove the Australia Post logo on the mailing label, add extra cover, and add a signature option for an added layer of security.
Click Create Shipment to start a shipment.
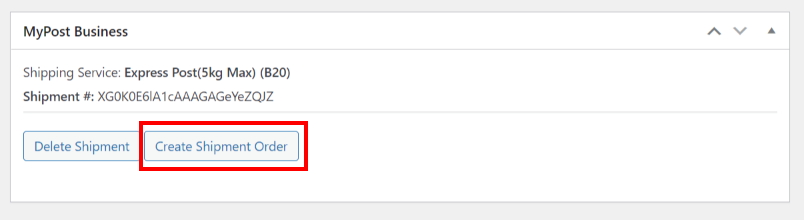
Following that, as seen in the screenshot below, the shipping service ID and shipment number will be generated. Click create shipment order.
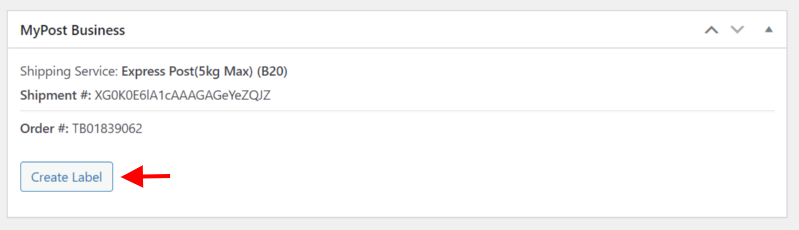
Once the shipment order is created, click create label.
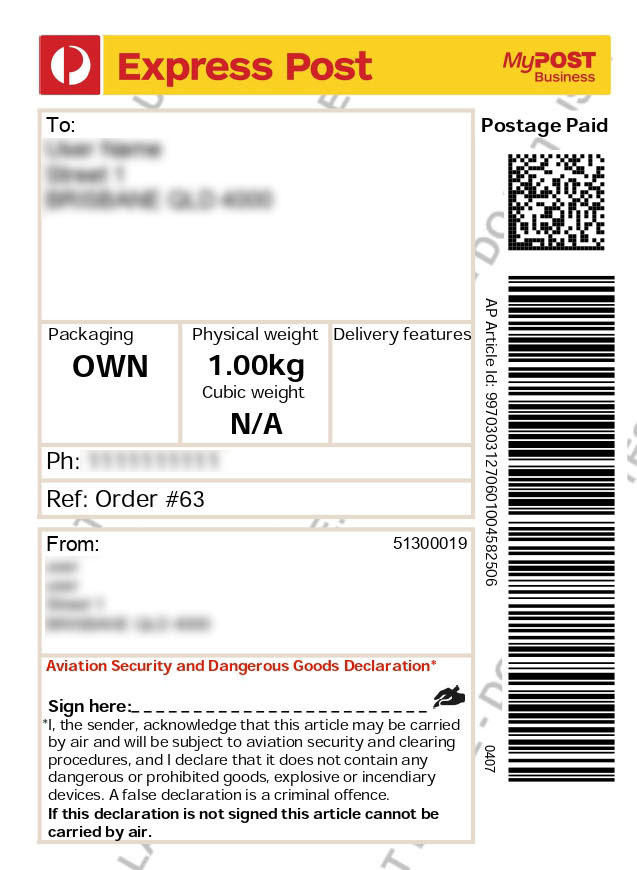
Finally, to print the MyPost label, click Print Label.
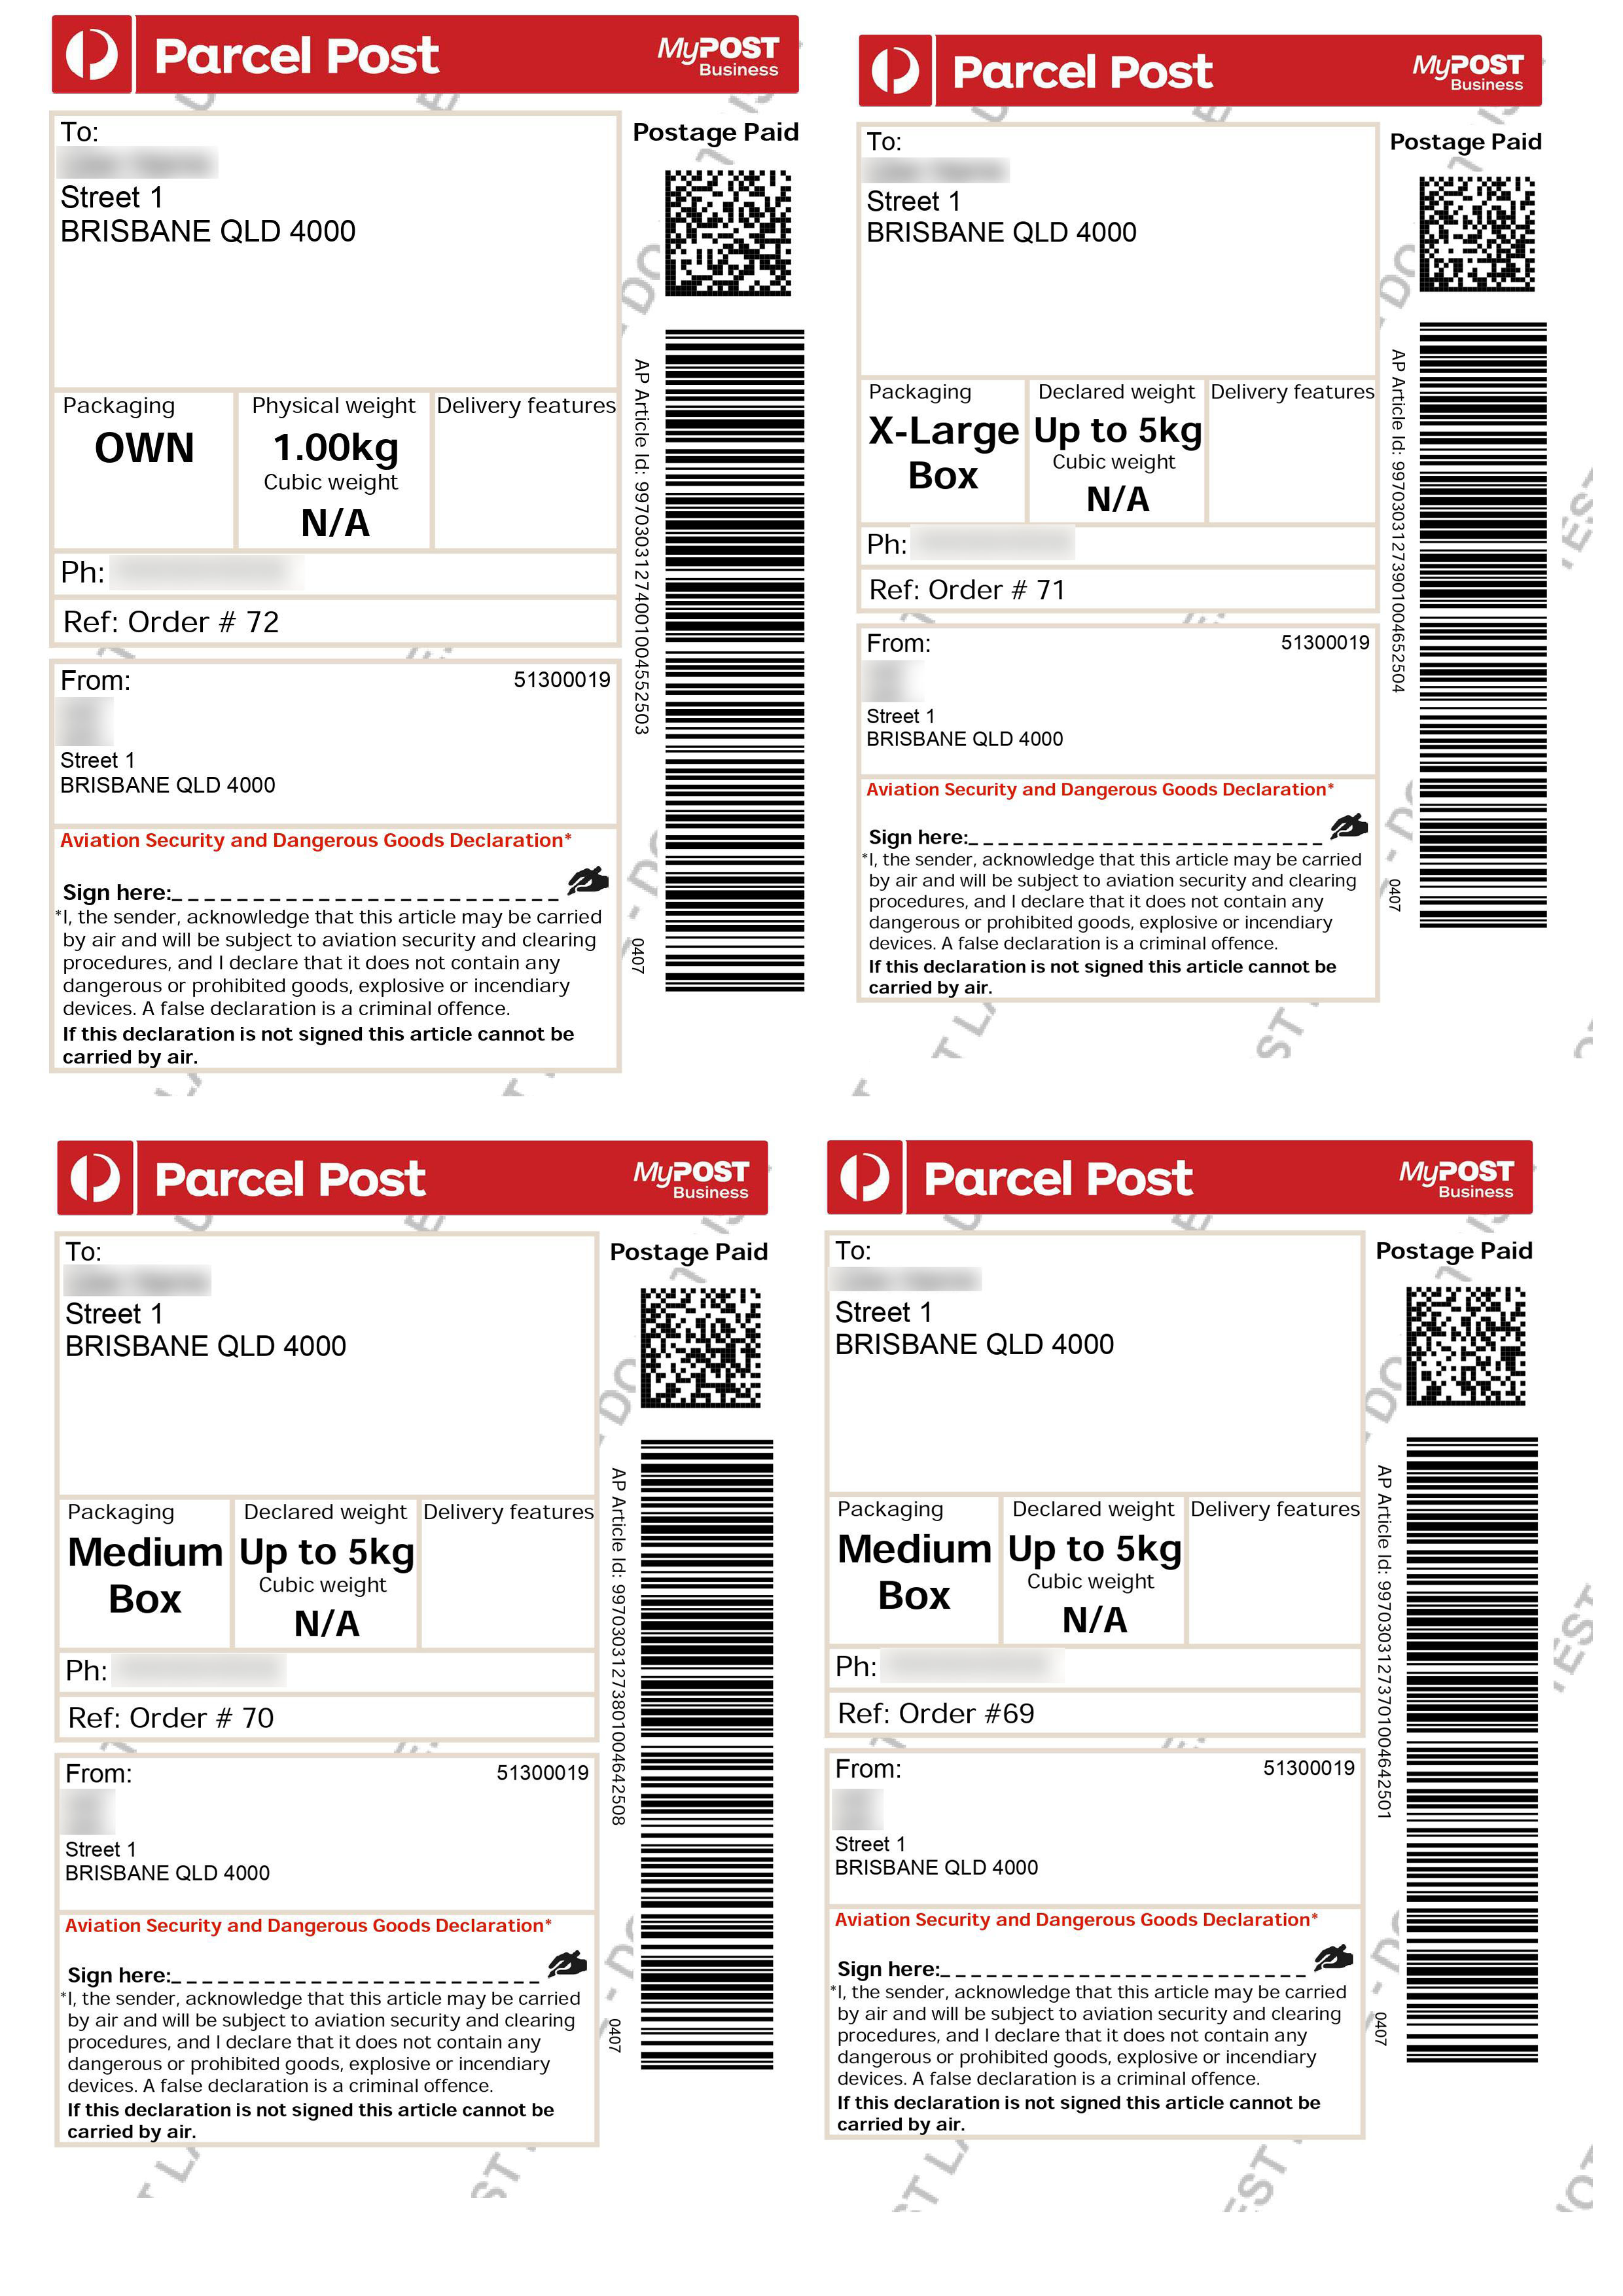
Below is a screenshot of a sample domestic MyPost shipment label.
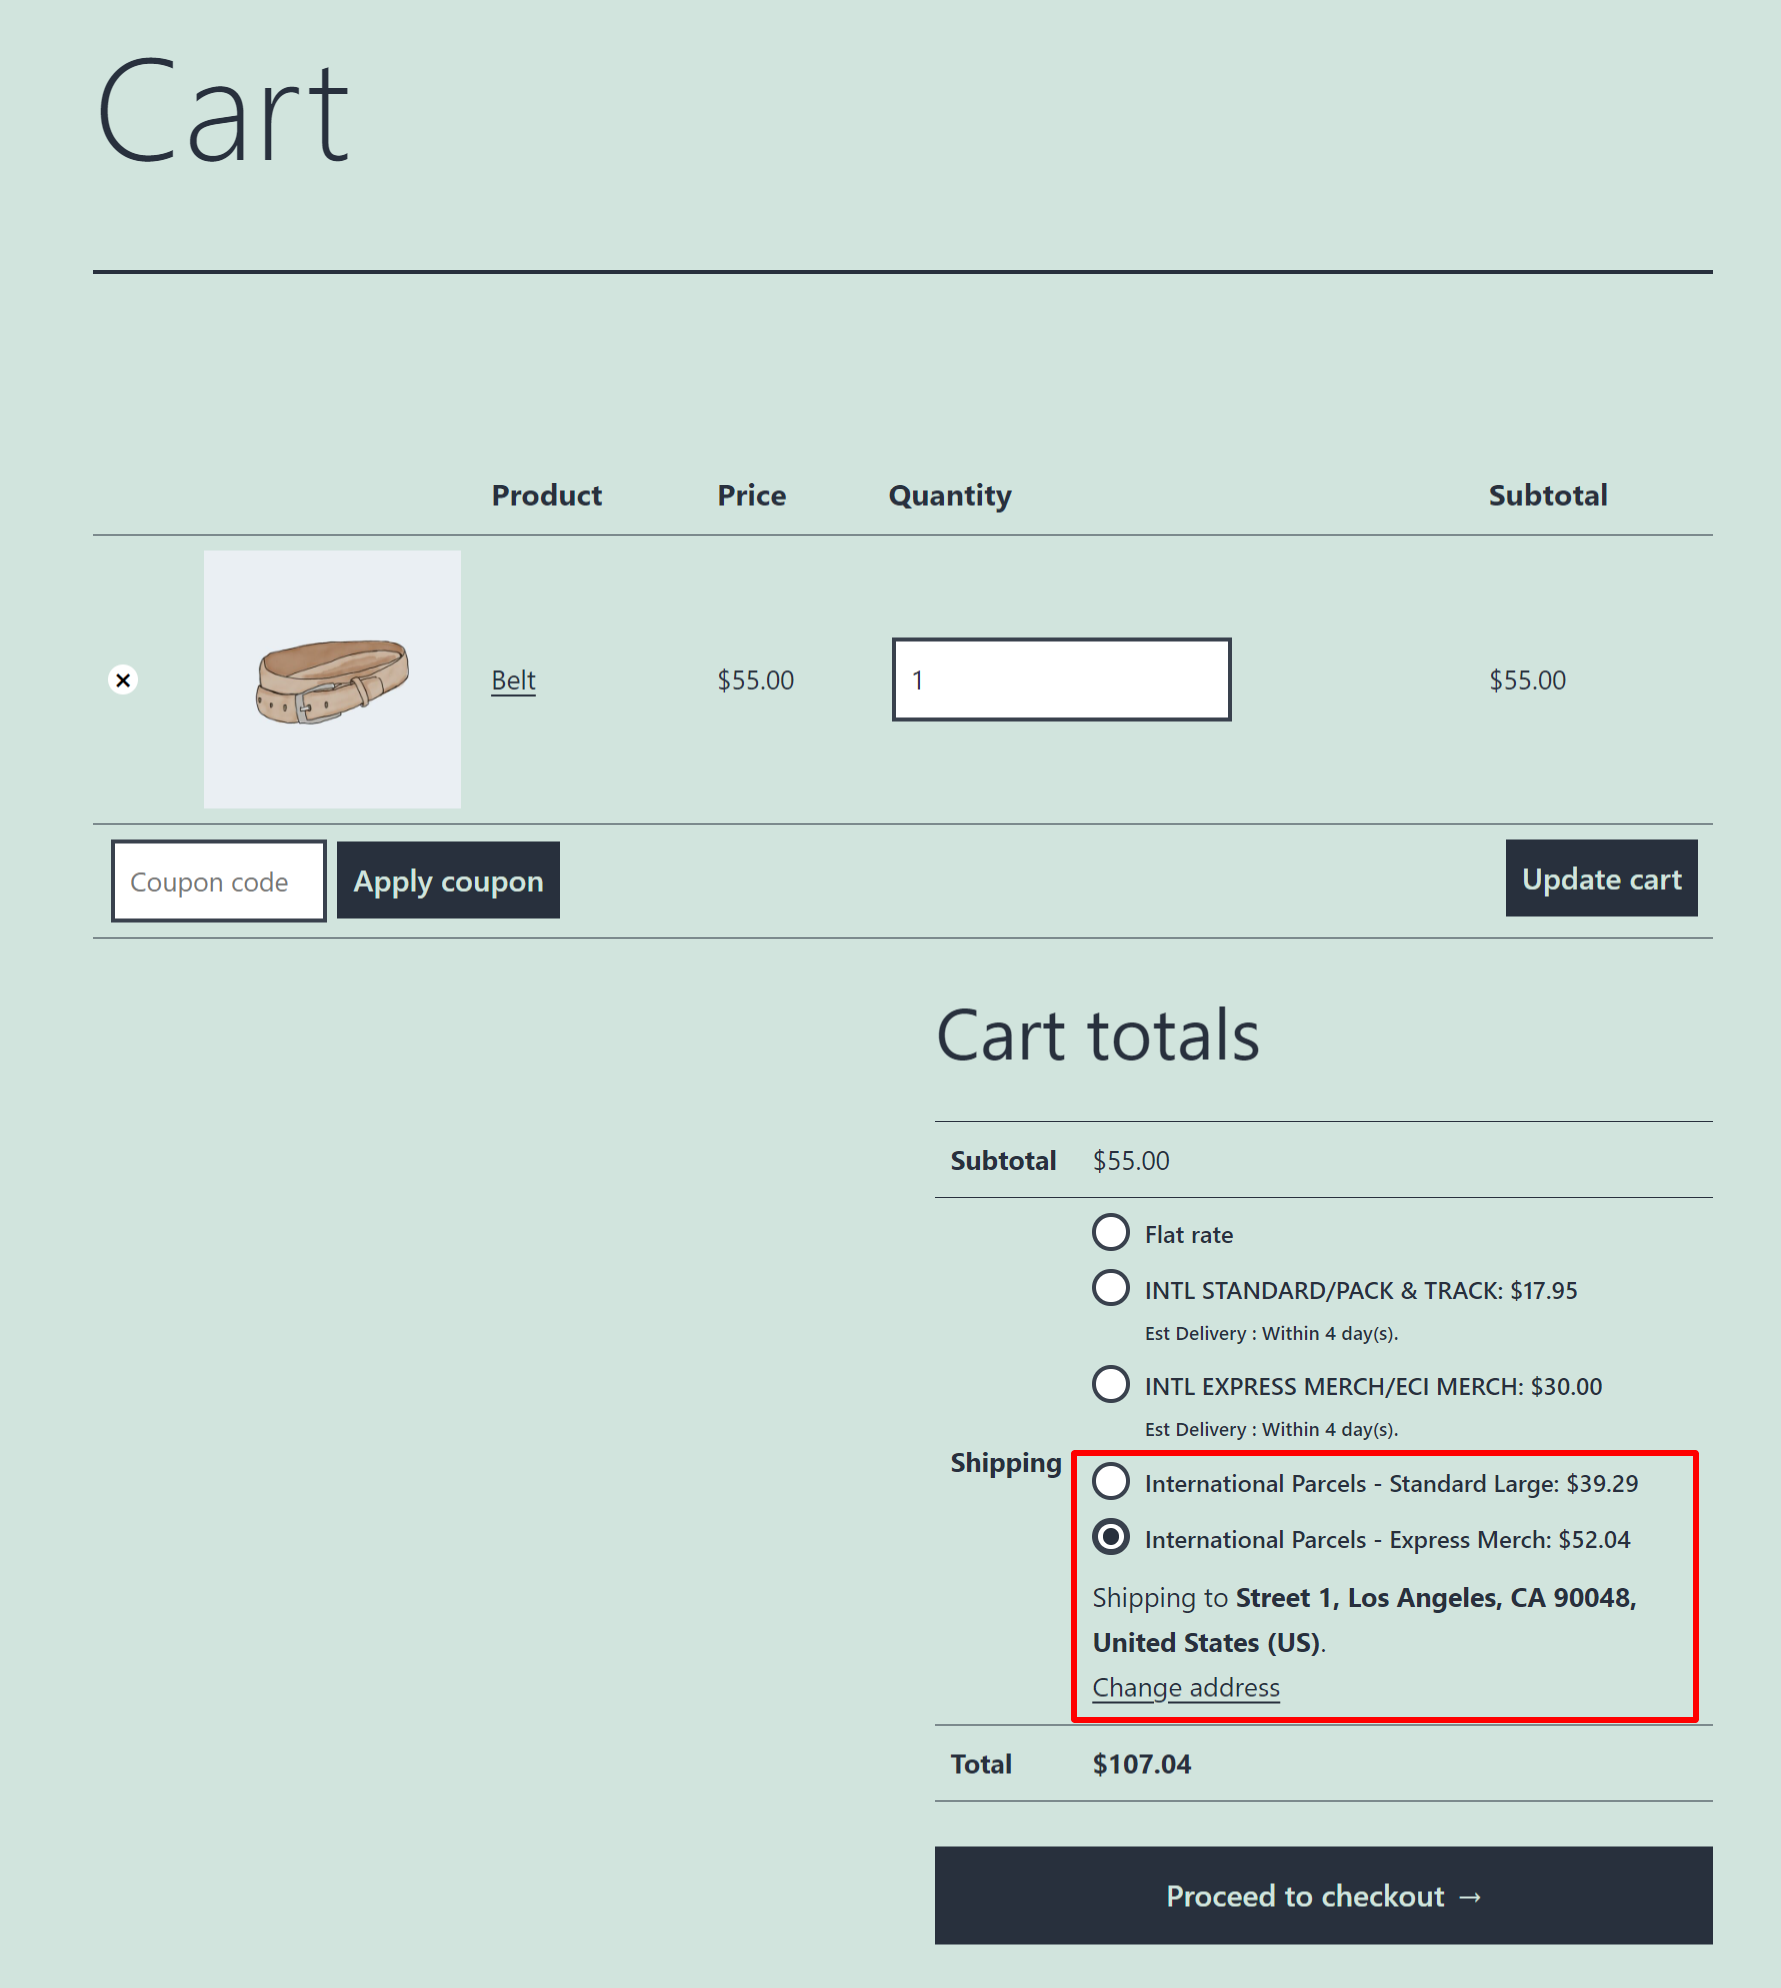
MyPost International Services on the Cart and Checkout Page
The following screenshot shows how the MyPost Business account services will be displayed on the cart and checkout pages.
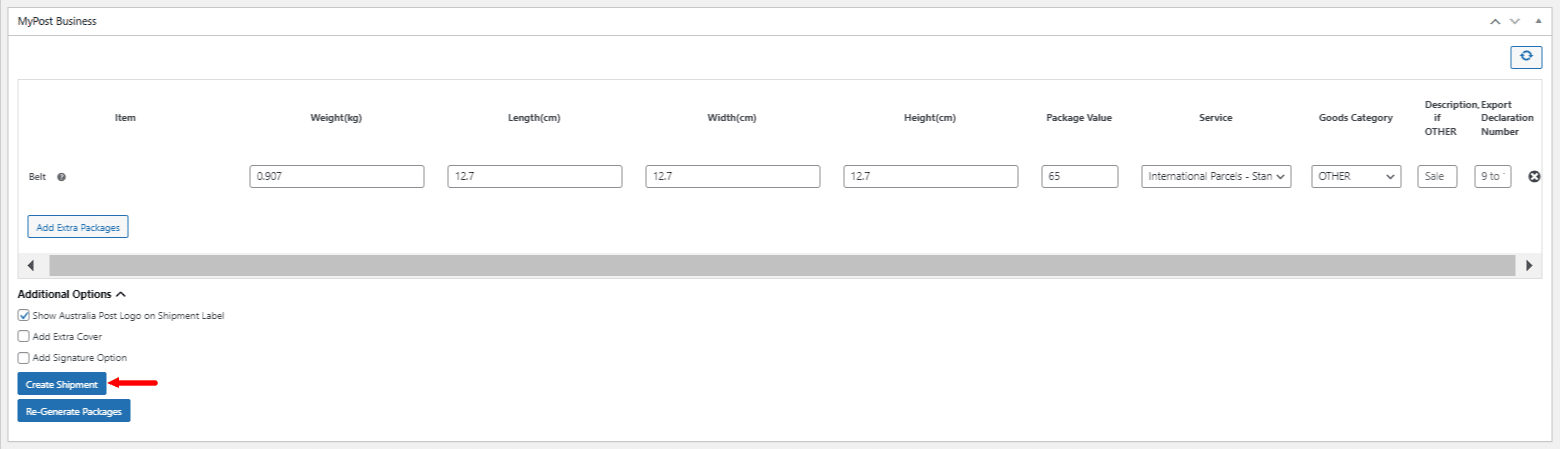
The process of printing international shipping labels remains the same. On the order details page, scroll down to the very end, and in the MyPost Business section, click Generate Packages.

Next, enter the package weight, length, width, and height, package value, edit the service if needed, select the goods category, enter the description, and the export declaration number. Under additional options, you can choose to show the Australia Post Logo on the shipment label, add extra cover, add a signature option, and click Create Shipment.
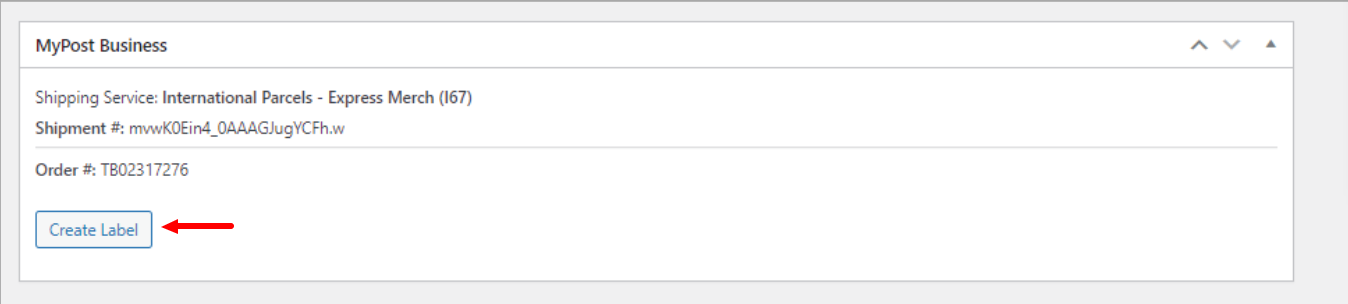
Once the order is created, click Create Label.
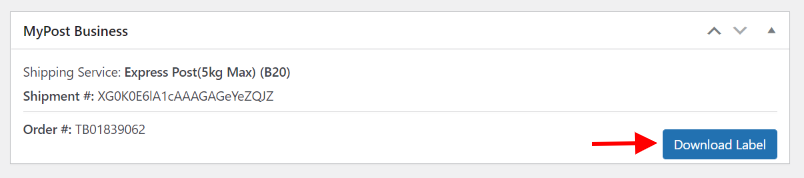
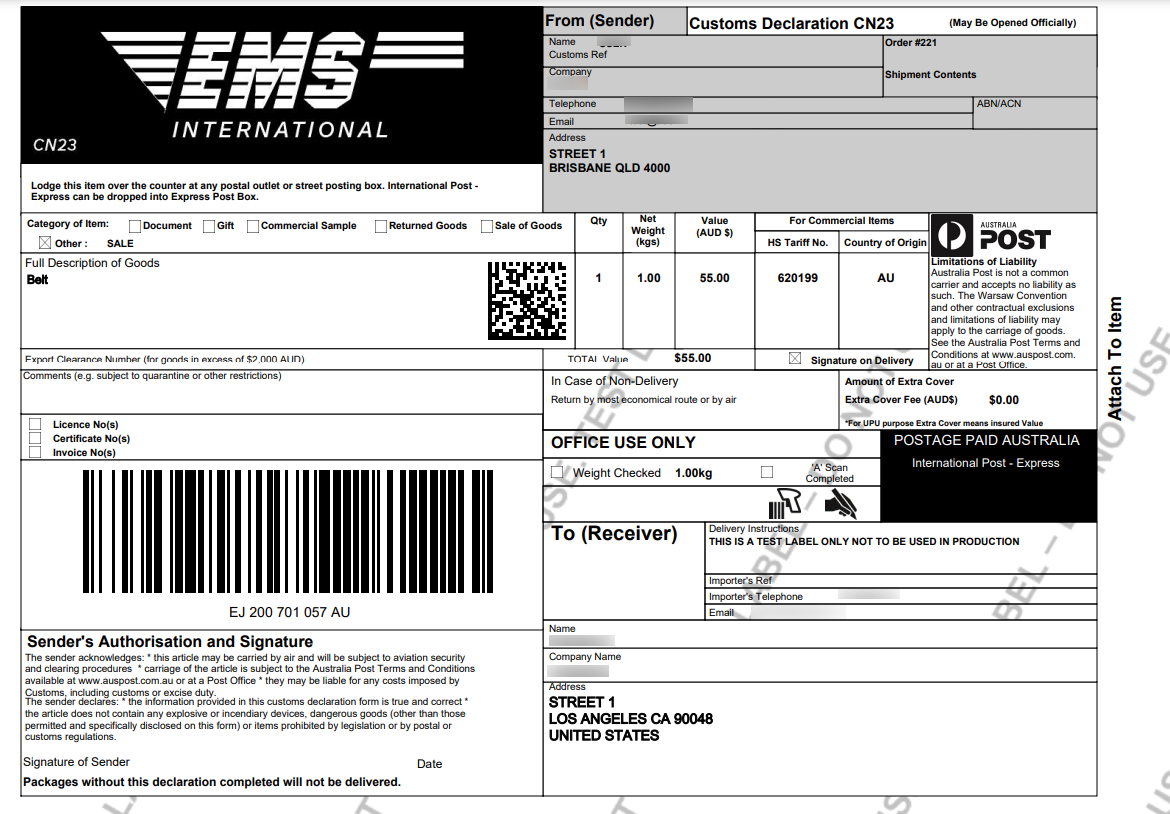
Finally, click Download Label.

Below is a screenshot of a sample international MyPost shipment label.
MyPost Business Bulk Shipments Generation and Pickup
Bulk shipment generation and pickup are integrated into your ELEX Australia Post (MyPost) plugin. The shipment will be generated by Bulk Shipment based on the Packaging Option chosen on the Settings page. The Australia Post service selected by the customer during the checkout process will be selected by default. If it’s not available, the label will be printed using the default services provided in the Label and Tracking settings of the MyPost plugin. Bulk shipment generation saves your business a lot of time and resources. For more control over picking the service and adjusting the package dimensions, you can print labels from individual WooCommerce order pages.
To start creating shipments in bulk, navigate to the WordPress Dashboard panel > WooCommerce > MyPost Business Bulk Shipments

Bulk Shipment and Pickup Generation
Choose Option: Based on the filters in the ‘Choose Option’ drop-down menu, a bulk order request will be sent to MyPost Business:
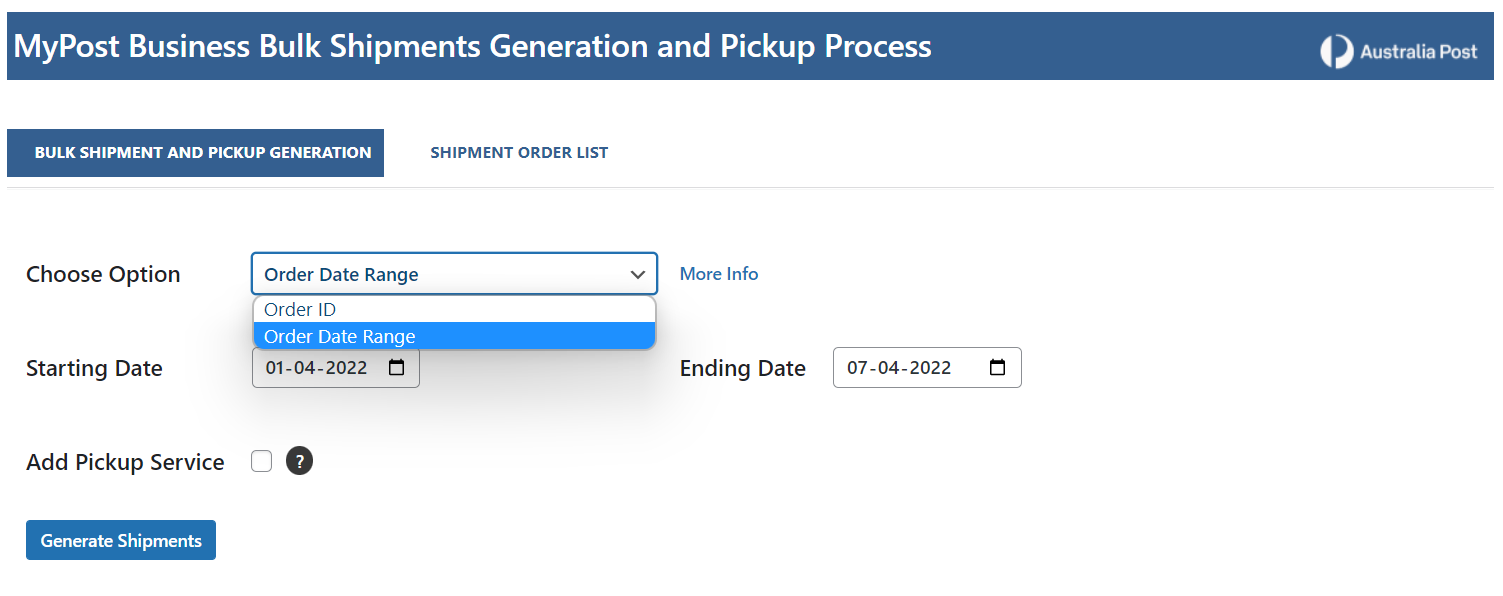
- Order IDs – Enter order ids that you want to create shipments for separated by a comma.
- Date Range – Enter a range of dates and bulk shipments will be created for all the orders created within the given date range.
The maximum number of bulk shipments that can be generated at the same time is 50. Multiple shipment IDs can be generated for a single order based on the packaging method chosen in the packaging settings.
Add Pickup Service: With bulk MyPost shipment generation, you can add a pickup service if needed. If necessary, you can add a pickup service to bulk MyPost shipment creation. Pickups can be scheduled for the same day if requested before 1 p.m., or the following business day. If a scheduled pickup falls on a weekend or a holiday, it will be collected the next business day.

Set the pickup date and time as per your requirements and click Generate Shipments.
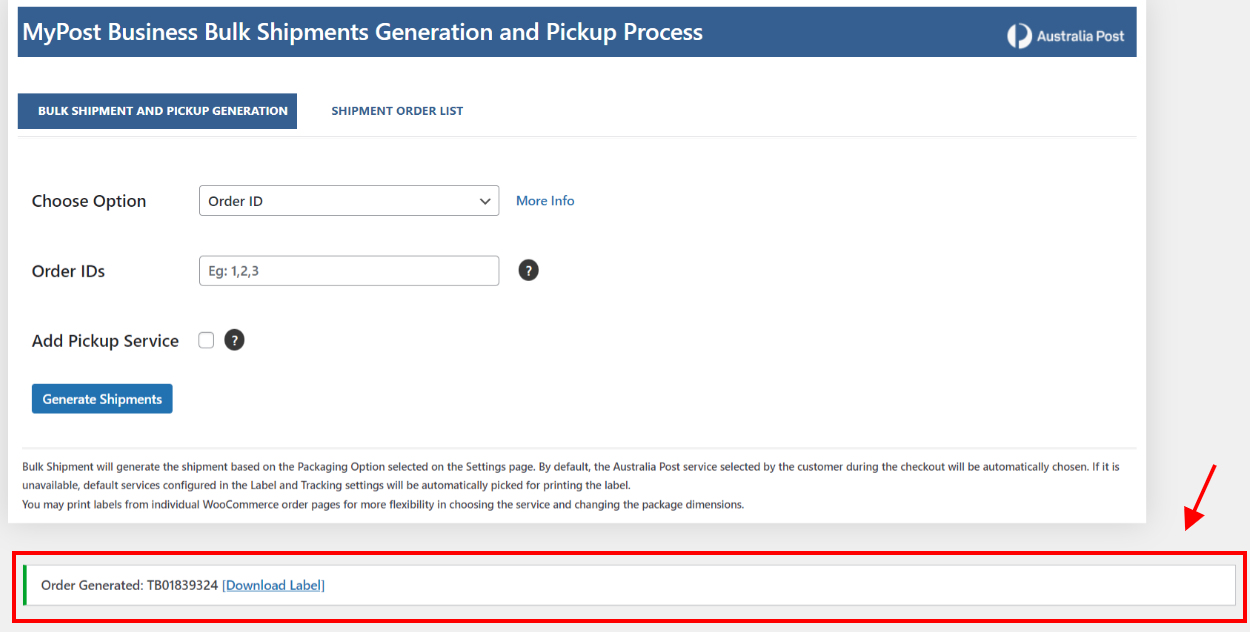
The MyPost shipments generated in bulk are shown in the below screenshot.
Shipment Order List
Under this tab, you can manage all your bulk shipment orders and print shipping labels as well.
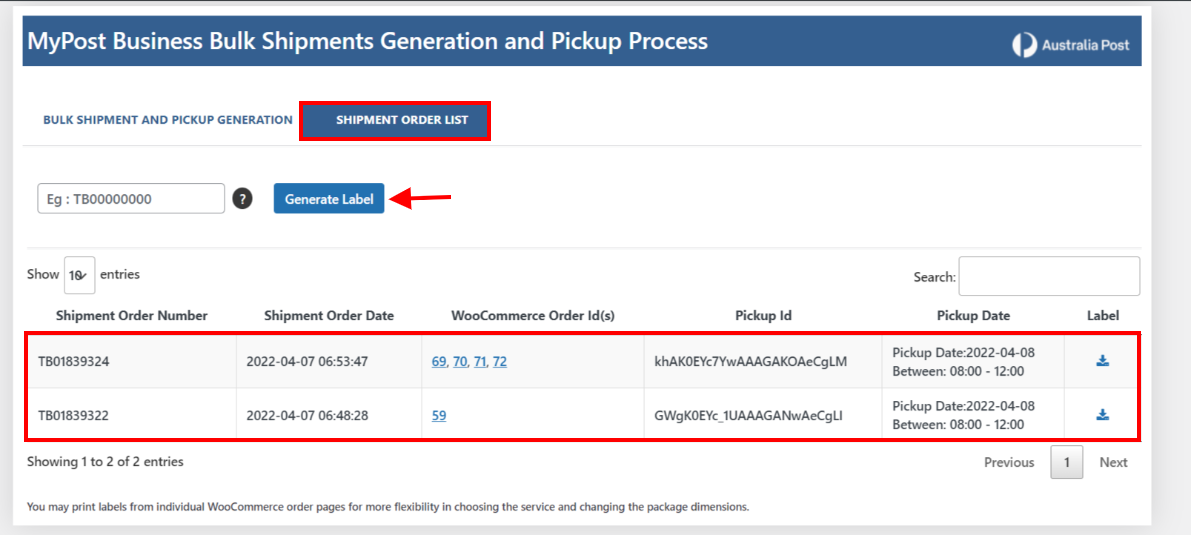
Enter the shipment order `number to generate labels, view and manage shipment order numbers and dates, view WooCommerce order IDs that have been included in the bulk shipment, view pickup ID and pickup date, and download the shipping label.
You can download the ELEX WooCommerce Australia Post Shipping Plugin with Print Label & Tracking here.
You can also check out other WooCommerce and WordPress plugins in ELEX.