What can we help you with?
Generate WooCommerce USPS Shipping Labels for Flat Rates using USPS eVS Account
This article shows you a step-by-step tutorial on how to generate WooCommerce USPS Shipping Labels for Flat Rates using USPS eVS Account. You can achieve this using ELEX WooCommerce USPS Shipping Plugin with Print Label. To understand the other features of the plugin in detail, you can read the product documentation.
What is USPS Flat Rate Box service?
USPS Flat Rate Boxes are special services that do not require weight calculation up to 70lbs. In short, the packages or envelopes are charged a “flat rate”, instead of weight-based or destination-based calculations. This service is much cheaper when compared to the regular USPS services and delivers in 1-3 business days.
Since other USPS service rates change dynamically, eCommerce merchants have now starting to prefer flat rate boxes service, as it is more feasible and affordable. This is because no additional charges are added for Saturday delivery, residential/commercial rates, and so on. The flat rate box service is available for both domestic and international shipments. USPS has a different set of prices based on the service and dimension of the boxes. You can check out the flat rate prices yourself. The rate is the same irrespective of the state (in the US).
Types of USPS Flat Rate Box services
The flat rate service is coupled with following two USPS services to deliver the packages and enveloped in no time:
Generating WooCommerce USPS Shipping Labels for Flat Rates
The ELEX WooCommerce USPS Shipping Plugin allows you to access real-time rates, print eVS shipping labels, and track shipments. Hence, you need to have an eVS account to use this plugin. If you do not want the eVS postage, we have other alternatives in the form of ELEX WooCommerce Stamps.com Shipping Plugin and ELEX WooCommerce EasyPost Shipping Plugin. The Stamps.com and EasyPost offer a different set of prices for flat rates themselves.
To get started, you need to signup for a USPS account and enter the User ID that you receive in the plugin settings. You can read the General Settings section of the product documentation to know more.
Follow the below steps for generating USPS eVS labels.
1. Enabling USPS Real-time rates
First and foremost, you need to enable USPS real-time rates to send and receive rate requests from USPS.
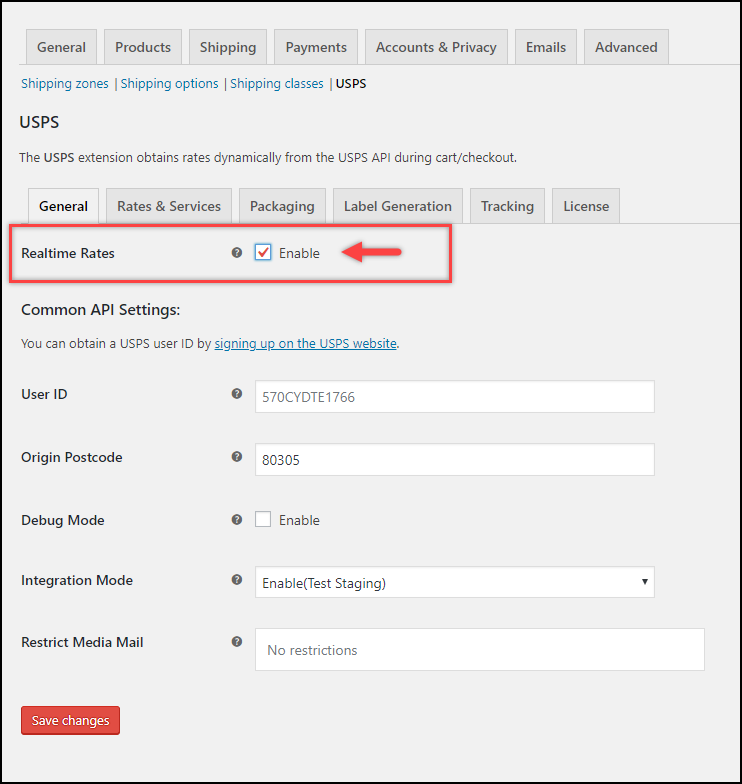
Go to WooCommerce > Shipping > USPS > General section.
Tick the Real-time Rates check box to enable live shipping rates from USPS, as shown in the screenshot below.
2. Configuring USPS Flat Rate Boxes
Move to the Rates & Services tab, scroll down to find the Flat Rate section, as shown in the below screenshot.
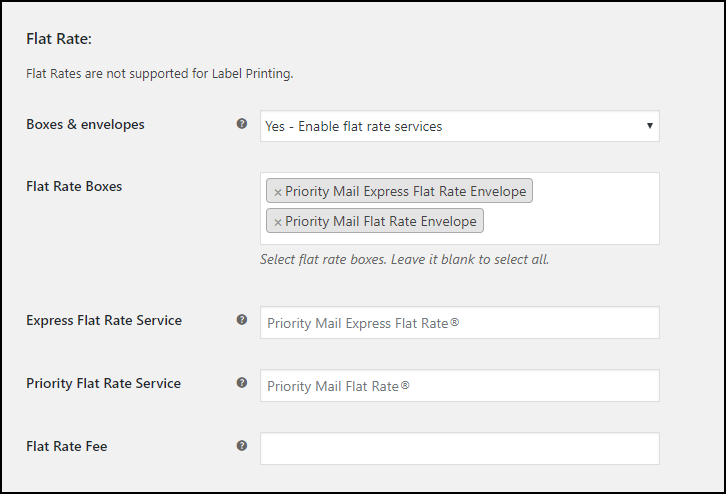
The plugin offers you four options:
- Yes – Enable flat rate services ~ To enable USPS flat rate box services.
- No – Disable flat rate services ~ To completely disable all the flat rate services.
- Enable Priority flat rate services only ~ To enable only USPS priority flat rate services. You need to select priority flat rate boxes in the subsequent Flat Rate Boxes setting.
- Enable Express flat rate services only ~ To enable only USPS priority express flat rate services. You need to select priority express flat rate boxes in the subsequent Flat Rate Boxes setting.
The plugin offers the following USPS Flat Rate Boxes:
- Priority Mail Express Flat Rate Envelope
- Priority Mail Express Legal Flat Rate Envelope
- Priority Mail Express Flat Rate Box
- Priority Mail Express Padded Flat Rate Envelope
- Priority Mail Flat Rate Envelope
- Priority Mail Small Flat Rate Medium Box
- Priority Mail Flat Rate Medium Box
- Priority Mail Flat Rate Large Box
- Priority Mail Large Flat Rate Board Game Box
- Priority Mail Flat Rate Small Box
- Priority Mail Padded Flat Rate Envelope
- Priority Mail Gift Card Flat Rate Envelope
- Priority Mail Window Flat Rate Envelope
- Priority Mail Small Flat Rate Envelope
- Priority Mail Legal Flat Rate Envelope
- Priority Mail Regional Rate Box A Top Load
- Priority Mail Regional Rate Box B Top Load
- Priority Mail Express International Flat Rate Envelope
- Priority Mail Express International Legal Flat Rate Envelope
- Priority Mail Express International Padded Flat Rate Envelope
- Priority Mail International Flat Rate Envelope
- Priority Mail International Padded Flat Rate Envelope
- Priority Mail International Small Flat Rate Box
- Priority Mail International Medium Flat Rate Box
- Priority Mail International Large Flat Rate Box
Express Flat Rate Service & Priority Flat Rate Service Labels
You can customize the label for both Express and Priority flat rate services. This label will be shown on the checkout page. You can provide custom label names or leave it blank to use the default ones.
The settings are as shown in the screenshot below.

Flat Rate Fee
In addition to the flat rate boxes, you can add additional charges to the flat rates returned from USPS. If you enter a negative amount value, then that specified amount gets subtracted from the flat shipping rate. This amount is per-box excluding tax.
For example, to specify an amount of $3, you can enter the value “3”. For a percentage value of 5% of the flat rate charge, enter the value “5%”.

Additionally, you can enable desired USPS services as well. Check the list of USPS services that this plugin provides.
Save all the settings, once configured.
3. Checkout using USPS Flat Rate Box service
When customers add a product in the cart and move to the Cart/Checkout page, they can see the USPS Flat Rate service as shown in the screenshot below.
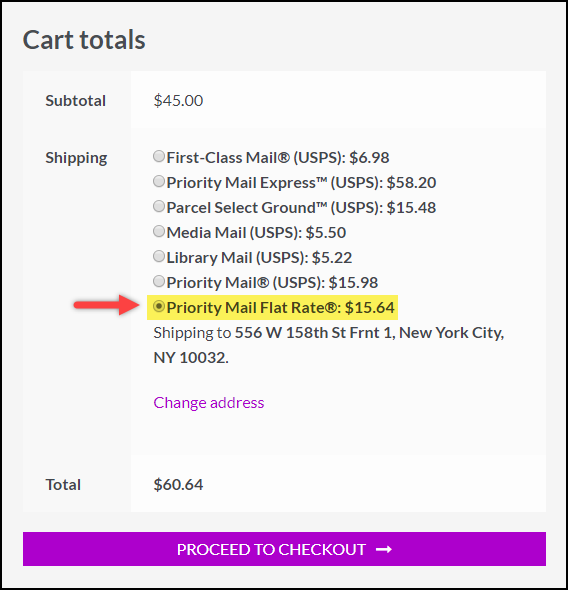
The plugin will automatically choose the best box from the flat rate box selection, and show the customers the respective charges.
Once the order is placed, you can go to the WooCommerce Orders dashboard to label generation.
4. Generating USPS eVS Labels for Flat Rates
Follow the below steps to generate and print USPS eVS labels.
Step 1: Generating Packages
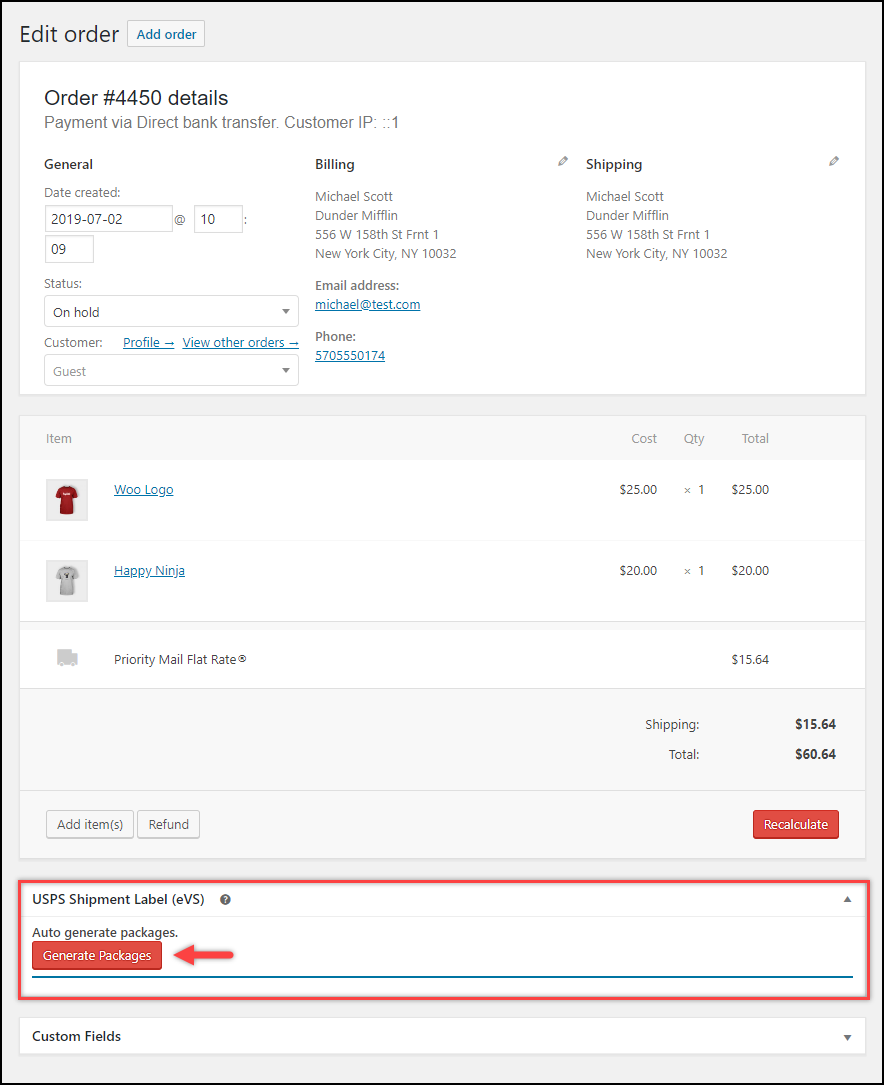
Open the desired order to print labels. Scroll down to find the USPS Shipment Label (eVS) meta-box. Click on the Generate Packages button as shown in the below screenshot.
Step 2: Creating a Shipment Label
You can change the USPS service of each package and change the containers. The plugin also allows you to add additional packages.
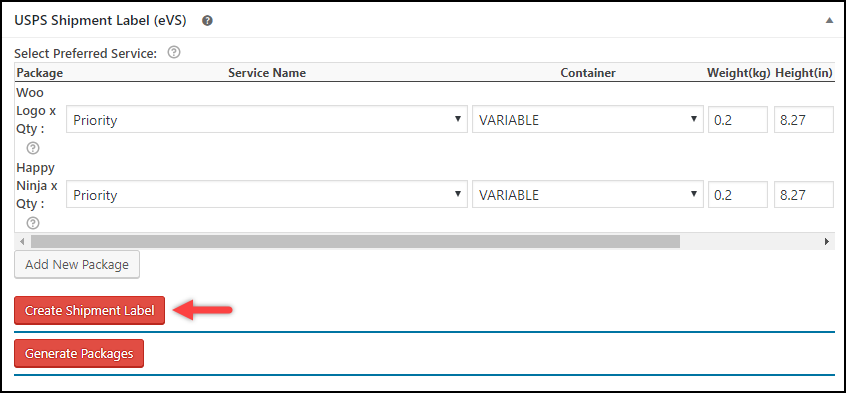
Once your settings are ready, click Create Shipment Label.
Step 3: Printing USPS eVS Labels and obtaining USPS eVS Tracking number
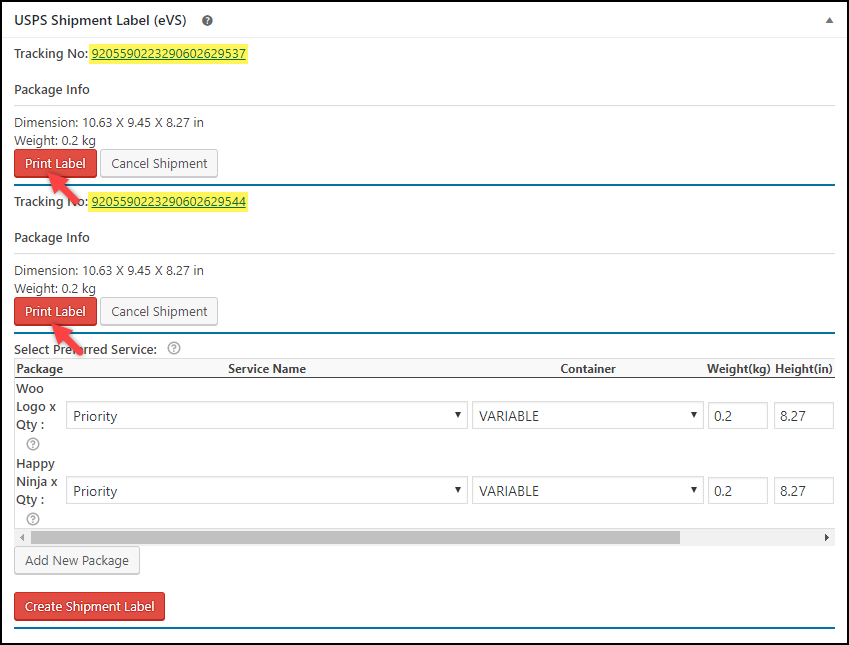
Finally, you will receive a USPS eVS Tracking number (highlighted in the below screenshot) for each package, that you can use to track the package. You will also see an option to print the label, as shown in the below screenshot.
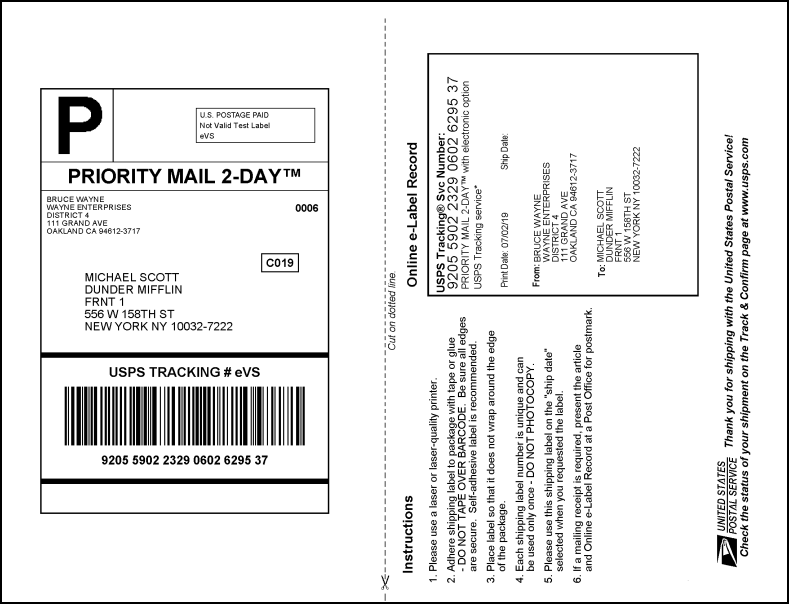
Below is a sample USPS eVS label generated using the ELEX WooCommerce USPS Shipping Plugin.
In this way, you can generate WooCommerce USPS Shipping Labels for Flat Rates using USPS eVS Account. You can achieve this using ELEX WooCommerce USPS Shipping Plugin with Print Label.
Few common USPS queries:
- Where to get the USPS flat rate boxes?
One of the best things about this service is the boxes or shipping supplies are provided by USPS free of charge. You can get it from any USPS post office or get it delivered at your address at no cost! - How much is the USPS priority mail flat rate?
Although they are “flat” rates, the change in rates is completely dependent on USPS. Hence, you can check the latest flat rate box prices here. Also, you can keep yourself updated with the change in rates. - Are there any shipping restrictions for Flat Rate Boxes?
USPS follows the same shipping restrictions as for other services.
To explore more details about the plugins, go check out ELEX WooCommerce USPS Shipping Plugin with Print Label.
Read the product documentation to understand the plugin, in detail. Or check out the knowledge base section for more related articles.
You can also check out other WooCommerce and WordPress plugins in ELEX.
