What can we help you with?
How to Customize Support Forms in WSDesk?
This article will show you how to customize support forms in WSDesk. To explore features of the plugin, visit the product page.
Customizing Support Forms in WSDesk
Once the plugin is installed, three pages are created with forms, by default:
- Customer support page – Allows customers to raise a ticket. Contains the shortcode [wsdesk_support display=”form”].
- Existing ticket request page – Allows customers to view their existing tickets. Contains the shortcode [wsdesk_support display=”check_request”].
- Customer ticket reply page – Allows customers to reply to the ticket from the front-end of the website. Contains the shortcode [wsdesk_support display=”form_support_request_table”].
Tip: A short-code is used to embed files or create objects that would normally require a lot of code, in just one single line.
If you are updating to version 4.0.0, then you need to create the existing ticket request page & the customer ticket reply page and add the respective shortcodes manually. The pages are created automatically for version 4.0.0 and further.
The look and feel of the forms are purely dependent on your website theme.
For this plugin, we are using a short-code to display support page with two button options, which customers can click to submit a new request or to check an existing request.
A screenshot of sample support page front-end is as shown below:

As mentioned above, the support page has two buttons:
- SUBMIT A REQUEST: Allows a customer to submit a new request. Once you click this button, a support form is displayed, as shown in the screenshot below.

By default, there are three ticket fields in the support form: Email, Subject, and Description (HTML supported). You can add, edit or even remove custom fields in your support form. These settings are described with more details later in this article.
- CHECK YOUR EXISTING REQUEST: Allows customers to check their existing request. If guest users check for an existing request, they will be prompted to log in to their account. The ticket information includes the ticket number, subject to the request, request date, agent assignee and ticket status, as shown in the screenshot below.

Alternate methods to display the support form and existing tickets:
1. Displaying support form with existing tickets
The two-button option is the default option to display the Support page. However, the plugin offers an alternative option to display the support page in the front-end. Here the support form is displayed along with existing request information in one single page, as opposed to two different pages seen in the previous two-button option.
To achieve this, you have to modify the short-code on the support page as shown below:
Change [wsdesk_support] to [wsdesk_support display=form]
The changes in the support page will be affected as shown below:
Click on the CHECK EXISTING REQUEST button to view your existing ticket requests as shown in the screenshot below.

2. Displaying existing request tickets on a separate page
If you wish to display existing request tickets table on a separate page, you should use [wsdesk_support display=check_request] short-code. The existing request tickets table will still be available on the main support page, by default. Hence to hide this, you can add the following CSS code:
//CSS to hide existing existing tickets
<style>
.support_option_choose{
display:none;
}
</style>
3. Displaying existing request tickets with information from additional fields
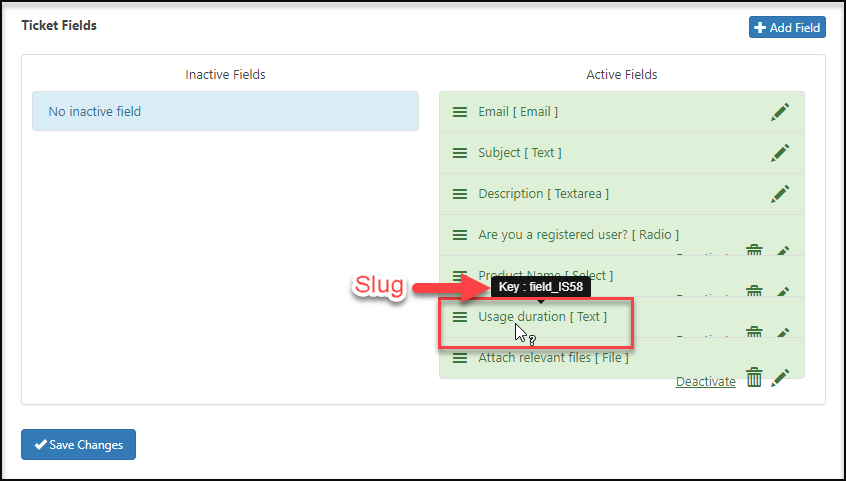
You can also display information from additional fields that you created in the existing requests for each customer. For this, use the short-code [wsdesk_support display=check_request fields=slug1,slug2]. In this short-code, you can add the respective slug of the ticket fields whose information you want to display. Separate the slugs by a comma in the short-code. You can get the slug for each field by hovering the cursor over the ticket field name.
For example, we are adding the short-code [wsdesk_support display=check_request fields=field_IS58]. The display of existing tickets will include the information from this field as an additional column (see below screenshot).

4. Displaying support form by reordering ticket fields
You can change the order of the ticket fields based on your preferences. For this, [wsdesk_support display=form_only fields=request_email,request_title] short-code has to be added.
A sample support form with custom re-ordering of ticket fields is shown in the screenshot below.

Note: If you are in the Visual mode in WordPress prior to 5.0, switch to Text mode. As the shortcodes can only be added in Text mode. In the Gutenberg editor, click the plus button, and search for Shortcode block. Add the shortcode you want to add to the editor and save and publish the post or page.
To explore more details about the plugins, go check out WSDesk – WordPress Helpdesk Plugin.
Read the product setting up article to understand the plugin, in detail. Or check out the product documentation section for more related articles.
You can also check out other WordPress and WooCommerce plugins in ELEX.
4 Comments. Leave new
Is there a way to set the size of the user’s image/icon in the backend and frontend? Or do I need to use CSS?
Right now, Setting the size for the user’s image/icon option is not available on the support form. However, you can use the CSS code to achieve your requirement.
I cannot find documentation anywhere how to define the “My Tickets” and “Support” pages? Since installing the plugin, the two links appear on customer account menu, but no where can I find where to define the url for the page? When clicked it goes to a 404 page?
Thanks for reaching out to us!
1. To create a support form and display the existing ticket menu on the front end of your website, please refer to our documentation for the available shortcodes and add them to the WordPress pages.
https://prnt.sc/T98cgg_b47_7
2. To resolve the 404 error, you can try clicking “Save Changes” on the WordPress permalink settings page without modifying any settings. This action helps clear the cache, which occasionally causes the issue.
https://prnt.sc/sQYv8hhMS0Mo