What can we help you with?
How to Automate WooCommerce FedEx Shipping & Print Label on your Web-Store?
Offering FedEx shipping services will definitely improve the prospects of your WooCommerce store. However, you might still have to go through a lot of manual actions when you try to get one of the services. In this article, we will show you how to automate WooCommerce FedEx Shipping on your store. With the help of ELEX EasyPost Shipping plugin, you will be able to display FedEx services on your cart and checkout pages, print labels directly as well as generate tracking code. It helps you automatically create packages specific to each order placed on your store. You will be also able to provide the delivery date estimate as well as provide shipping insurance. We will demonstrate with an example how you can automate the entire FedEx shipping process on your WooCommerce store.
Once you install and activate the ELEX EasyPost Shipping plugin, you will be able to configure the settings to display FedEx rates on your Cart and Checkout pages with an option of Insurance and Estimated Delivery date. Later, when a customer places an order, you will be able to create packages and print shipping labels from your order admin page. Along with the shipping labels, a tracking code too will be generated, which will be automatically included in your order completion emails.
Now, let’s look at each of these stages in the WooCommerce FedEx shipping process, and understand the specific plugin settings that will enable each.
Watch the video below or continue to read on.
Displaying live FedEx shipping rates
One of the primary aspects of WooCommerce FedEx shipping process is displaying live shipping rates on your Cart and Checkout pages. Your customers will be able to choose a FedEx service that is convenient for them. We will look into the set up process for this quickly.
You will find the settings for the ELEX EasyPost plugin when you navigate through WooCommerce > Settings > Shipping > EasyPost.
Here, first you will see a general settings tab. Enable real time rates and enter the API settings. You will find the Live and Test API keys from your EasyPost account settings.

Next, on the Rates and Services tab, you need to configure some details.
These include a title for your shipping method, the countries where the shipping method will be available to, and the location details of where you are sending from (zip code, state code and country).
On this screen, you can also enter a Fallback Rate. In case the EasyPost API does not return any rates, this fallback rate will be displayed to facilitate the smooth checkout for the user.
You also need to choose whether you want to enable Commercial or Residential rates. FedEx services will be charged differently based on the choice you make here. Choose appropriately based on your store requirement.
Finally, you can enable FedEx services. All the available FedEx services will be displayed below.

When you choose FedEx as your EasyPost carrier, all the available FedEx services will be displayed. In fact, you can also choose UPS and USPS services in addition to FedEx with the help of this plugin.
You can make price adjustments to the available services if required. Adjust the rate of each FedEx shipping service by a fixed amount or a percentage value. For markups, enter positive values, and for discounts enter negative values.
Here you can also change the display order of the services by simply dragging and dropping the services.

How customers will see the available shipping services?
When your customers add products to Cart, they will be able to see the available FedEx services, rates and their estimated delivery dates.

Label Generation Settings
When customers place orders on your store, you can go to the specific order detail page and create shipments based on the service chosen and box dimensions. For this, you have to configure the plugin settings first, which we will see now.
On the Label Generation tab, you will be able to configure a few settings related to FedEx label printing.
In the first section, you can choose the file format for the labels from PDF, PNG, ZPL and EPL. Here you can enable Insurance offered by EasyPost. EasyPost charges a premium of 1% of insured value and will handle all the claims, and in most cases, claims are settled within 30 days.
The plugin allows you to generate shipments in bulk. You can choose two services that will be selected by default while printing shipping labels.
You need to enter the full origin address with email and phone number. For international shipping, you have to enter a Customs Description as well.
There is also a field for Return address. You can enable this field to enter an address for returns, which is different from the origin address. When you tick the checkbox, fields will be displayed to enter alternate address.
Save changes after setting up everything.

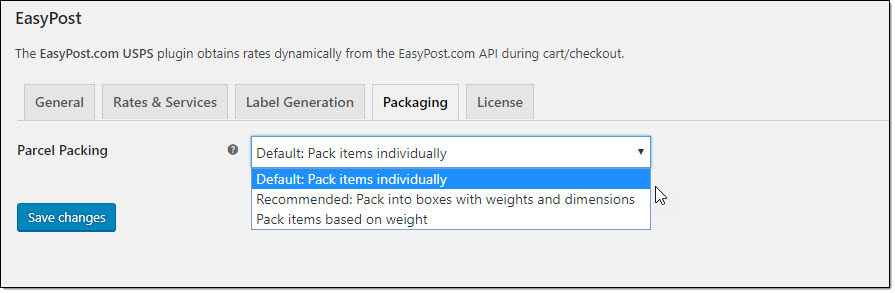
Box Packing settings
The plugin helps you with Parcel Packing as well. There are three options
- Pack items individually – Here each item in an order will be packed separately. So, depending on the number of items, the shipping charges will increase as well.
- Pack into boxes with weight and dimensions – This is the recommended scenario for parcel packing. You can define multiple boxes based on the weight and dimensions of your products. When customers place an order, depending on the number of items and their dimensions, the best box will be picked up by the plugin. The displayed shipping rates also will be based on the available boxes.
- Pack items based on weight – Here items will be packed solely based on their weight and not dimensions. You can specify the maximum weight for a package and the way items will be packed in the box.
Please note: For this plugin to work correctly, all your products need to have weight and dimensions set in the product data field. If you have a lot of products without weight and dimensions added to them, you can use ELEX Bulk Edit plugin to quickly manage this.
Creating shipments and printing labels on the order details page
When a customer places an order, you can visit the order detail page to create shipment and print labels. Simply click the Generate Packages button to create shipments based on the Parcel Packing option you have chosen in the plugin settings page.

The plugin will display package information now. Choose the required FedEx service, check if the dimensions are correct; and click the Create Shipment button.

You will see the shipment is created now. There will be a tracking code as well, which will be sent to the customer with the order completion email.
You can click the Print Label button to open the shipping label on a new tab on the browser window.

You can print the label directly if a printer is connected, or save it to print later.

Bulk shipment creation
The plugin also allows bulk label creation. Go to Orders section (WooCommerce > Orders) and choose multiple orders which you want to create shipments. Now from the Bulk Actions drop-down, choose Create EasyPost Shipment, and click Apply. Shipments will be created for all the selected orders using the default service that you have selected in the plugin settings page.

Hope you got an idea on how to automate WooCommerce FedEx shipping using ELEX EasyPost Shipping Plugin.
Check the detailed documentation for a better understanding of the plugin.
Contact our support team for any clarifications.