What can we help you with?
How to Auto-generate & Email DHL Express labels with ELEX WooCommerce DHL Express Auto-Generate & Email Labels Add-On?
This article explains the step-by-step tutorial to Auto-generate & Email DHL Express labels with ELEX WooCommerce DHL Express Auto-Generate & Email Labels Add-On. For more information on the plugin, refer to the product page.
DHL Express is a unit of DHL shipping service that provides domestic as well as international shipping service for courier and parcel services. DHL is a German-based company and is one of the most popular shipping services in the world.
This Add-On works only with ELEX WooCommerce DHL Shipping Plugin with Print Label & Tracking which allows you to access real-time rates from DHL Express, print shipping labels, track shipments, and helps in packing items into boxes. Although the plugin is capable of providing DHL Paket and DHL eCommerce services, this add-on works only for DHL Express.
You can watch the video tutorial below.
Overview
Some of the major highlights of this add-on include:
- Automatically create shipments and generate shipping as well as return labels – Once an order moves to the selected status, the add-on creates shipments and generates the shipping and return labels for each package in the order.
- Get notified of all shipping labels – The add-on sends an email notification to the shop owner to whenever the order is placed and the shipment is created. You can also choose to notify your customer.
- Track shipments – The email notification will also contain a tracking URL that allows the recipient(s) to track the shipments.
- Get notified when shipment fails – When a shipment fails to create, you can notify shop owners about it. The shop owners can then resolve the issue and create the shipment manually.
Prerequisites
To auto-generate and email DHL Express labels, you need the following:
- ELEX WooCommerce DHL Express / eCommerce / Paket Shipping Plugin with Print Label
- ELEX WooCommerce DHL Express Auto-Generate & Email Labels Add-On
Getting started with ELEX WooCommerce DHL Express Auto-Generate & Email Labels Add-On
Read an article to know how to complete the checkout process on ELEX. You can also read how to download, install, activate ELEX plugins.
The core label printing process is determined with the ELEX WooCommerce DHL Shipping Plugin settings and not the add-on settings. Hence you need to set up the ELEX WooCommerce DHL Express Shipping Plugin first and then proceed with auto-generating shipping labels.
Now that we have explored the features of the add-on, and have installed it, let’s get down to configure it.
Go to WooCommerce > Shipping > DHL Express > Auto Label Generate Add-On.
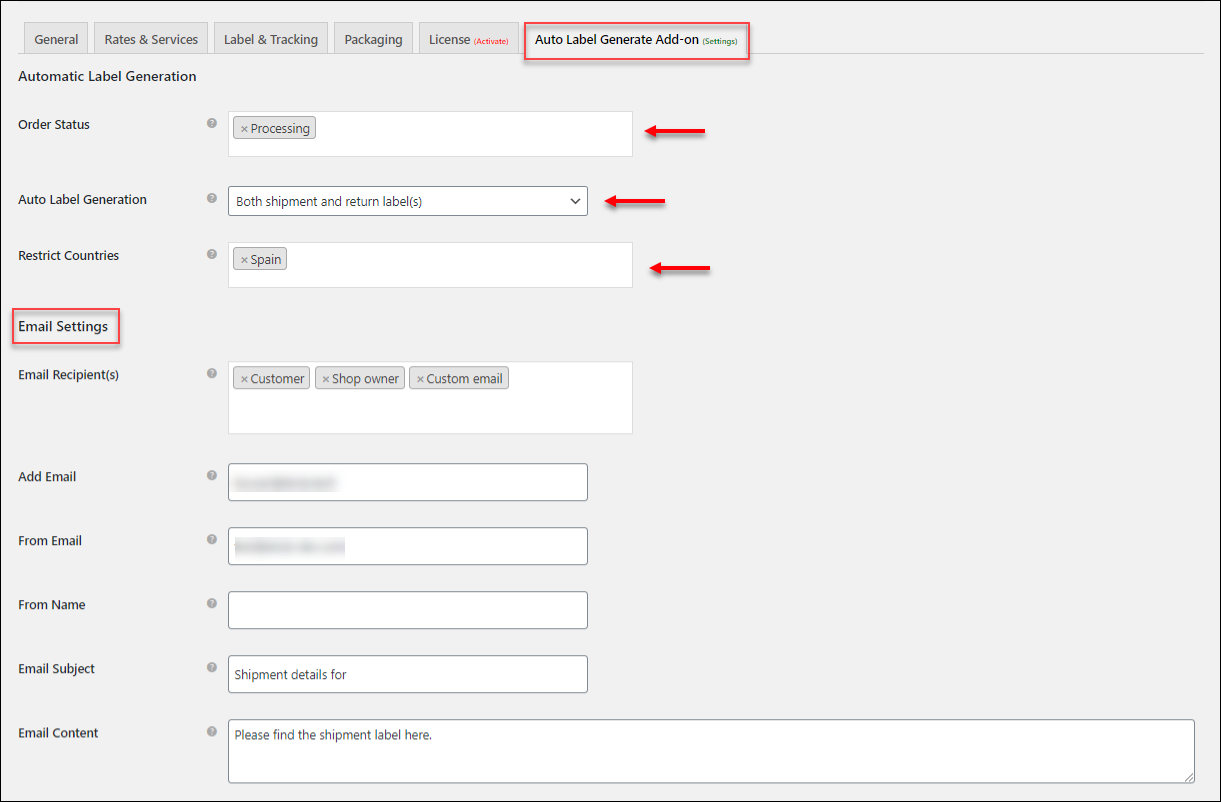
Order Status
Choose the WooCommerce order status(es) from the given drop-down list for which you want to auto-generate shipping labels. When an order moves to one of the selected statuses, the add-on automatically creates a shipment, generates shipping label(s) and sends it to the selected email recipients.
If a shipment is already created for order and the order moves to one of the configured order statuses, the add-on will simply fetch the generated label URL and email DHL Express it to recipients.
Auto-Label Generation
You can choose to generate only shipping labels or both shipping labels and return labels. For return label generation, you need to enable the return label generation setting and enter Return Label Account Number, in the Label & Tracking settings of the parent plugin.
Restrict Countries
If you want to restrict some countries’ shipping addresses from generating shipment and return labels automatically, you can choose those countries from the drop-down list.
Email Settings
The email settings for the add-on are as follows:

- Email Recipient(s): You can choose to send the auto-generated emails to the Customer and Shop owner. You can also select a Custom email option and add desired email addresses for custom recipients.
- Add Email: This setting appears when you select a Custom email option for the email recipient. You can enter multiple email addresses by separating them with commas.
If you have enabled any multi-vendor plugin in your store, you can also add the Vendor user role as a recipient. Check the screenshot below:

- From Email: The add-on automatically takes the store’s admin email address as the sender email address. You can choose to enter any desired email ID as well.
- From Name: Enter the sender name in this setting. This could your name or the name of your organization.
- Email Subject: Enter a subject for your emails. If you are sending emails to your customers, you might want to use catchy phrases or terms that describe your business. The respective order IDs will be appended to the subject line automatically.
- Email Content: Enter your desired content to describe your customers’ orders. The label(s) will be appended at the end of the content automatically.
Shipment Failed Email Notification Settings
There may be instances when a shipment fails to create. For example, the shipping service selected by the customer might fail to return any rates, the customer selects a default shipping method, or third-party shipping service other than the ones offered by the ELEX WooCommerce DHL plugin. Hence in such cases, the add-on will help you notify the failure of shipment creation, via email. You can then go back to the respective WooCommerce order, create the shipment and generate the labels manually.
The settings are as shown below.

- Email Notification: Tick this checkbox to enable shipment failed email notification.
- Email Subject: Enter the desired subject line for your shipment fail emails. The respective order ID will be appended to the subject line.
- Email Content: Enter desired content for shipment failure notification.
Click on the Save Changes button once all settings are configured.
Demonstration
When an order is placed successfully using DHL shipping service, the add-on will automatically create shipments using the ELEX WooCommerce DHL Shipping Plugin and notify the selected email recipient(s). A sample email is as shown in the below screenshot.

As shown in the image above, click on the given link to view the shipping label of the respective order. To track the shipment, click the respective shipment URL. Each label will have a separate shipment tracking link.
Below is a sample label generated by ELEX DHL Express Shipping Plugin.

In this way, you can auto-generate and email DHL shipping labels with ELEX WooCommerce DHL Express Auto-Generate & Email Labels Add-On.
To explore more details about the add-on, go check out ELEX WooCommerce DHL Express Bulk Label Printing Add-On.
Or check out the parent product – ELEX WooCommerce DHL Express / eCommerce / Paket Shipping Plugin with Print Label and its product documentation for a better understanding of the plugin.
You can also check out other WooCommerce and WordPress plugins in ELEX.