What can we help you with?
How to Show Free Shipping and Print Shipping Label with Stamps.com Shipping Plugin for WooCommerce
In this article, we’ll discuss a situation, as enquired by one of our customers. Aydian wants to show free shipping for all the products in his WooCommerce store. And from the back end, he wants to print USPS postage-paid shipping labels. He also wants to know whether he can automate tracking for the packages. This can be achieved easily with ELEX Stamps.com Shipping Plugin with USPS Postage for WooCommerce.
The Actual Query
1. We only want to offer free shipping to our customers, and we only want to ship in the regular retail ground. Can we limit these options so all customers see is a Free Shipping option, and on the back end, the labels will only print in that one method?
2. When the tracking number is generated as the label is printing, does that trigger the order update email to the customer with the tracking info in place, or do we have to manually click and send out that email?
Understanding Retail and Commercial Pricing By USPS
USPS provides the commercial base pricing for all its online users. These rates are slightly lesser than the retail rates. For instance, USPS Retail Ground rates are listed in the online API as Priority Mail. The screenshots below show the difference between the two types of rates.
Commercial Base—Letters, Large Envelopes & Parcels (Starts From $6.55 online)
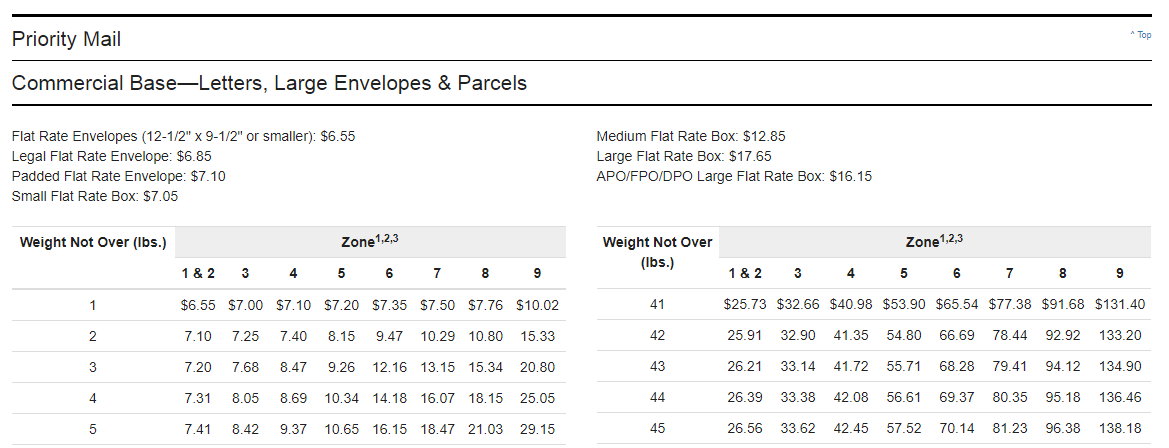
USPS Retail Ground (Starts From $6.70 at the Post Office)

Find the complete list of pricing.
USPS Retail Ground—Limited Overland Routes (LOR)
1. USPS Retail Ground—LOR retail prices are only available for items mailed within the state of Alaska for pieces delivered to or from the eligible intra-Alaska ZIP Codes in DMM Exhibit 150.1.3.
2. USPS Retail Ground—LOR retail prices are not available through online or commercial postage payment.
[/porto_content_box]How Stamps.com Shipping Plugin with USPS Postage for WooCommerce Help Aydian?
Aydian wants to:
- Show Free Shipping on Cart/Checkout pages.
- Print USPS Postage paid shipping labels with only one service i.e. USPS Retail Ground, which would be Commercial Base—Letters, Large Envelopes & Parcels as the API considers the commercial base pricing.
- Track the packages.
This is possible with our ELEX Stamps.com Shipping Plugin with USPS Postage for WooCommerce. Before we proceed with the solution, let’s see the:
Pre-requisites for using the Stamps.com Shipping Plugin with USPS Postage for WooCommerce.
- A Stamps.com Account
- Stamps.com Shipping Plugin with USPS Postage for WooCommerce.
- API Keys that you can obtain by logging in to your ELEX account.
If you don’t have an account with Stamps.com, register for one now.
Each of the new ELEX Customers gets a 4-week trial of Stamps.com services and a $50 Off a Digital Scale and $50 Off a Label Printer. As a new Stamps.com customer, you will receive $50 off both a Digital Scale (35 lb, 70 lb, or 400 lb) and a Label Printer (SDC ProLabel and Zebra GC420d). Shipping and handling are free. You get to keep the scale and/or printer with no additional obligation.
Setting the Free Shipping
You can start by enabling the Test Mode API as it is safe to test the plugin’s functionality in the Test API Mode. Once you get it all right you can switch to the Live API Mode.
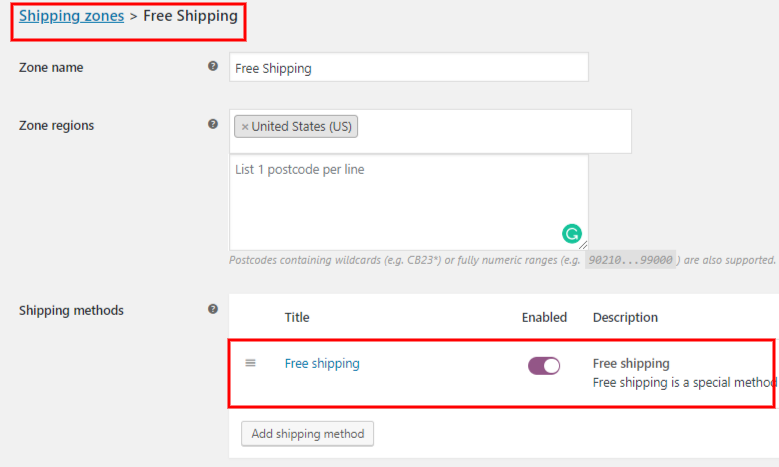
To enable free shipping, navigate to your Dashboard> WooCommerce> Settings> Shipping > Shipping Zones. Give a name to the zone and add regions to it. Then add ‘Free Shipping’ by selecting it from the available 3 shipping methods. You can select different conditions to trigger the free shipping. For instance, you can ask for a coupon code or a minimum cart total for free shipping.
Assigning a shipping method to a zone enables free shipping for the region you select for the zone. Now, to have free shipping as the only shipping method on the cart page, you need to disable real-time rates in the Stamps.com settings. We’ll see this in the next section.
Free Shipping On The Cart Page
Disabling Real-time Shipping Rates
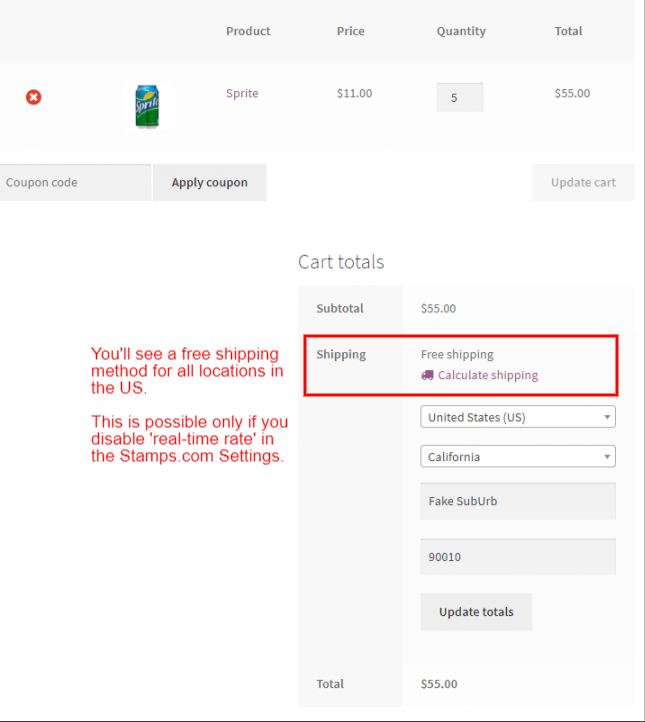
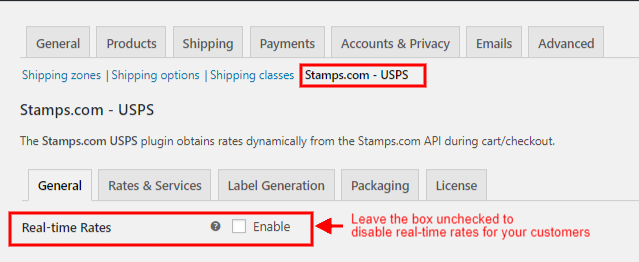
As we have to show the free shipping option only, first you need to disable real-time rates from Stamps.com settings page. This will prevent the real-time rate from being available on the cart/checkout pages. So now the only shipping method available at the cart/checkout will be ‘Free Shipping’ for the US region.
Note: With only one shipping zone defined (the ‘Free shipping’ zone in this example, the plugin will show ‘No shipping methods available’ if the customer is not from the US). To show the shipping method for other regions you can add more than one shipping zone to cover these regions.
Setting A Service for Printing Labels
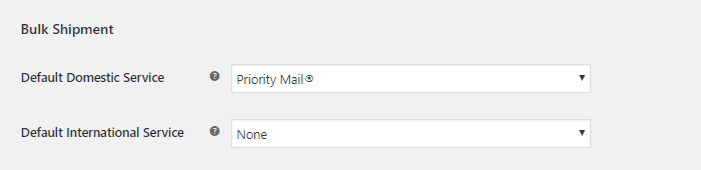
Now Aydian plans to print USPS labels for a particular service for all his shipments. So the bulk shipment creation option seems to be a perfect fit. To set a default service for printing labels in bulk, you have to navigate to the ‘Label Generation’ tab in the Stamps.com- USPS settings.
Find the ‘Label Generation’ tab by following the string here: Dashboard> WooCommerce> Settings> Shipping> Stamps.com – USPS> Label Generation. Select the desired service from the drop-down. Aydian should select ‘Priority Mail’ so that he gets the commercial version of USPS Retail Ground.
To customize the label, you can select the ‘Label Type’, which is the format of the file of the label. You also get to select from a wide range of values of paper size and the print layout of the labels. Finally, you can also choose the ‘Hidden Postage’ feature to hide the amount you paid for the postage. This will keep your product pricing formula a secret for your customers.
Creating Bulk Shipment
To use the bulk shipment feature properly, you should set a default service just as we saw in the last section. Once you have a default service navigate to the ‘Orders’ page. Here at the ‘Bulk Action’ box choose the option of ‘Create Stamps USPS Shipment’. Now select the order you want to create the shipments for. All the shipments will be created using the service you select in the ‘Default Domestic Service’. Once the shipments are created you can do to the respective orders and print the shipping labels. You can also cancel a shipment and recreate a new one in the respective edit order pages.

The Edit Order Page
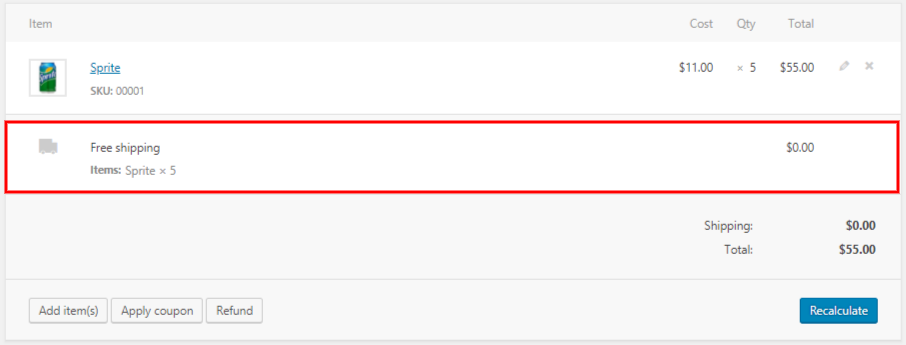
The edit order page allows you to edit various sections including the shipping service. It contains an order overview which shows the items, its cost, quantity, the shipping rates and the total amount of the transaction.
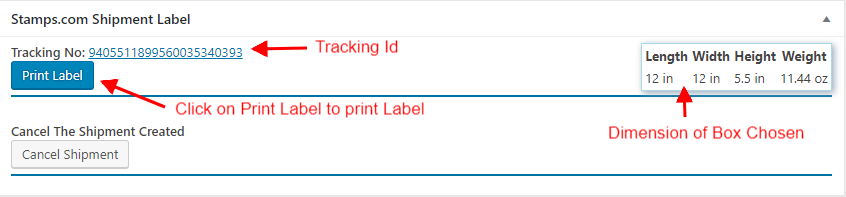
Next, you can find the box with shipment details you just created using bulk shipment feature. The shipment created contains the selected services for shipment, the box selected for packing and the dimensions of the box used. You can change each of these as per requirement. When you use a default service to create bulk shipments, you can’t change the service in the edit order page. Apart from the service, other shipment details can be edited even if you use ‘bulk shipment option.

If you don’t want to make any change in shipment details, click on the ‘Create Shipment’ button to get the tracking Id and the print label option. Or if you choose bulk shipment creation, you get the ‘Print Label’ directly after you create bulk shipments for the orders.
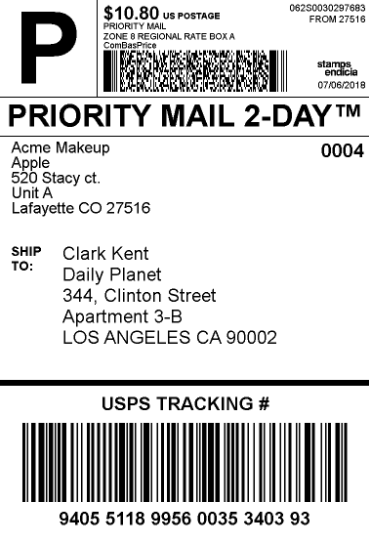
Sample Label
Clicking on ‘Print Label’ creates USPS labels with the service of your choice. If there are multiple boxes, labels are created for each of the boxes. A sample label created with USPS Priority Mail is shown below.
Tracking
Tracking services come built-in with the premium plugin. Each shipment gets it’s tracking Id and this tracking information is sent to your customers via an automated mail. You can send the tracking Id manually too.
Concluding Comments
So with such an easy solution to a typical problem, Aydian is now among our 40,000+happy customers. We at ELEX offer you a long list of WooCommerce extensions which go through continuous updates. If you already have one of our plugins, you can renew the subscription at 50% discount for a year of updates and premium support.
Check out our plugins for more information or contact our online support for human support.