Offers always attract new customers as well as let your potential customers stick to your products. In the competitive market, it is necessary to offer something unique and special to make the customers happy and satisfied. They will choose your store again and again if you are offering some exclusive price drops to the products. With WooCommerce and a robust dynamic pricing plugin, you can easily set up the offers for your products.
If you have just ramped up your e-commerce business, or you are selling a limited number of products, you can pick a free dynamic pricing plugin without spending much on it. Later you can upgrade to an advanced premium dynamic pricing plugin for more different offers. In this article let us discuss how to set up WooCommerce dynamic pricing free of cost with ELEX WooCommerce Dynamic Pricing and Discounts plugin.
How to Set Up WooCommerce Dynamic Pricing Free of Cost with ELEX WooCommerce Dynamic Pricing and Discounts Plugin?
This handy and robust dynamic pricing plugin helps to set up offers with 2 discount rules such as discounts on products and discounts on product categories. You can set the calculation mode for calculating discounts if a product is eligible for multiple price discounts. And there is an option to display all offers applicable for a particular product in a consolidated pricing table with this plugin.
Check the steps to configure the offers.
Step 1: Install and activate ELEX WooCommerce Dynamic Pricing and Discounts plugin.
You can download it freely from WordPress or from the respective product page. After downloading it, install and activate the plugin.
Go to WooCommerce -> Dynamic Pricing.
A new tab will be opened to configure the offer rules. There you can find 2 discount rules.
- Product Rules
- Category Rules
Step 2: Set up product rules
You can use this rule for applying offers and discounts for individual products as well as a particular category of products in your WooCommerce store. You can only apply the discount to a single category with product rule. You can go for category rules if you want to apply offers to multiple product categories together. You can display the pricing table only for the offers by product rules.
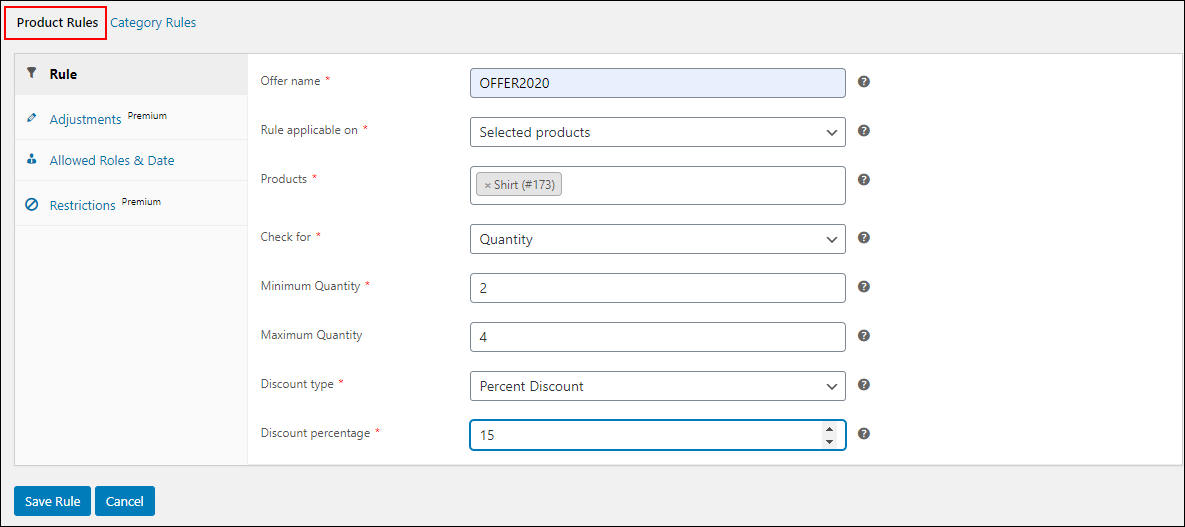
Click on Product Rules -> Add New Rule.
Enter the following details:
Offer name: Give a name to identify the offer. For example, OFFER2020.
Rule applicable on: Choose how the offer needs to be applied to your WooCommerce store such as based on selected products, all products in the category, and all products in the cart. In accordance with the selected option, you can enter the products’ name, a category, and the number of products that should be there in the cart for applying this product rule.
Check for: Apply the offer based on the quantity, price, and weight of the product. Choose an option and enter its minimum and maximum range to check it with the products for applying offers.
Discount type: You can choose a discount type from the following:
- Percent discount: Enter a percentage of the actual price to be deducted from the existing product price of the WooCommerce products.
- Flat discount: You can enter an amount to be deducted from the subtotal level in the cart page of your WooCommerce store.
- Fixed price: Enter a fixed price to replace the actual price of the WooCommerce products.
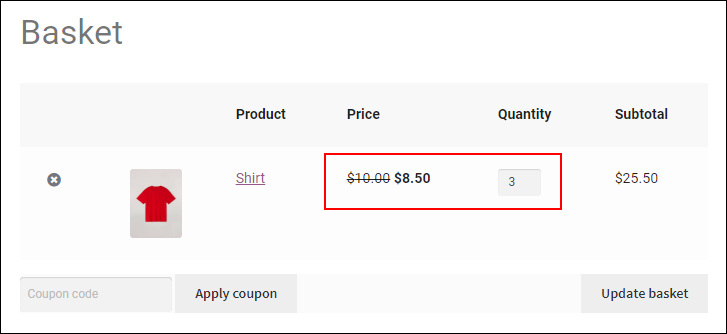
In the example of the above screenshot, if a customer purchases 2-4 shirts, a 15% discount will be applied to every Shirt in the cart.
It will reflect on the cart page as the below screenshot:
Next, you can click on Allowed Roles & Date.
Choose specific user roles to whom this offer should be applicable and the duration of the discount to be live on your site. For unlocking Adjustments and Restrictions options, update to its premium version.
After setting up the rule, click on Save Rule.
After saving any rule in this plugin, you can see it in a table below the tab, along with two options to edit and delete the discount rule. You can drag and drop the rules to set the priority of execution if a product is eligible for multiple rules.
Step 3: Set up category rules
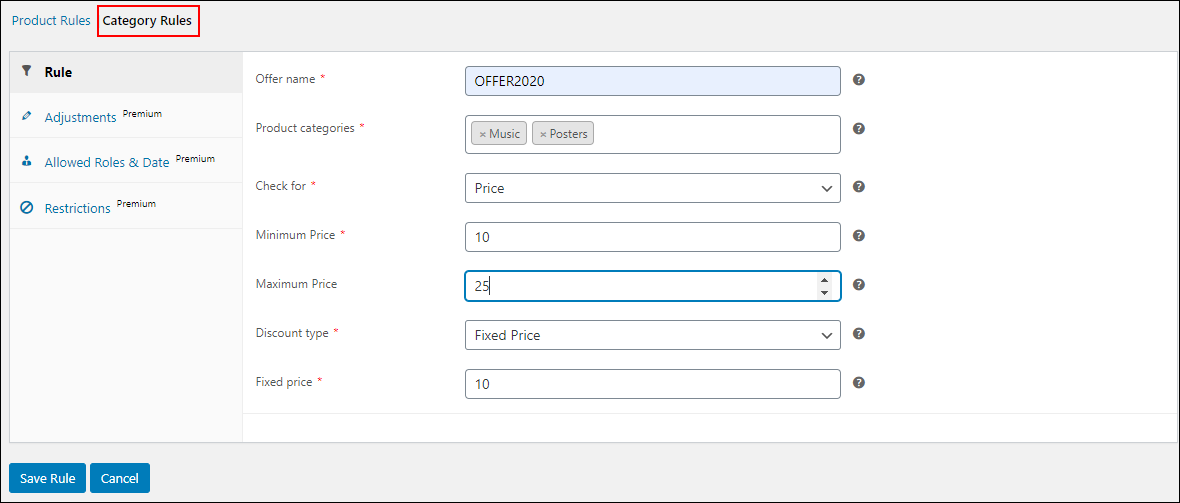
For setting up discounts for multiple product categories, click on Category Rules -> Add New Rule.
Enter the following details:
Offer name: Enter an offer name.
Product categories: You can select the required product categories in your WooCommerce store from the drop-down list. The offer will be applicable to all products under the selected categories.
Check for: You have 4 options here to be checked for applying the discount such as the number of items, weight, price, and total units. After choosing an option you can enter its minimum and maximum range for applying the rules.
Discount type: As in the product rules, category rules also has 3 types of discounts such as:
- Percent discount: Enter a percentage of the existing product price to be deducted from the product price.
- Flat discount: Enter the flat discount amount to be deducted from the subtotal level in the cart page of your store.
- Fixed price: The fixed price you have entered here will replace the actual price of the products.
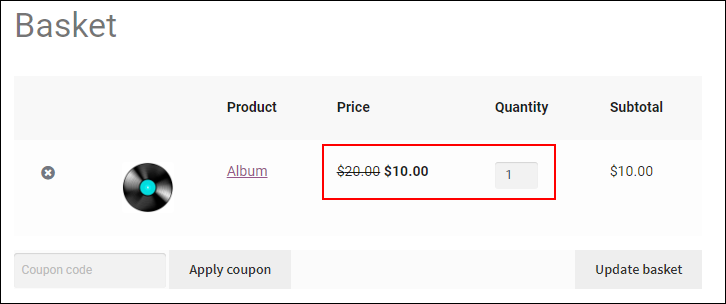
In the above example on the screenshot, All products come under Music, and Posters categories in a price range of $10 – $25 will be set to a fixed price of $10 after the update.
It will reflect on the cart page as:
In the category rules, you cannot assign the rules to specific user roles like in Product Rules. For unlocking that, you need to upgrade to its premium version. After configuring the details for the category rules properly, you can click on Save Rule.
You can find all the saved rules in a table and, drag and drop the rules to set its priority of execution.
Step 4: Set up the execution order
After setting up the individual orders with product rules and category rules, the next step is to set up the order of execution based on the priority of rules. For that, go to the Settings tab.
Here, you can set the order in which it should be applied to the eligible products for both rules.

Set up the priority of the execution of rules, by clicking on the Up and Down buttons to move the rules up and down according to the priority as you need.
Step 5: Set up calculation mode
You can choose any calculation mode from the three options such as the best discount, first match rule, and all matched rules.
Best discount
If you have chosen this calculation mode, it will calculate all discounts that are applicable for a product and apply the best discount. By default, the best discount will be applicable to the products if you did not choose any calculation mode.
First match rule
The first match rule will apply the first matching rule according to the execution order box and also considers the priority in the discount rule tables you have set as well.
All matched rules
All available rules will be applied to a product if it is eligible for multiple discount rules.
Step 6: Display pricing table on the product page
As I have mentioned earlier, you can display the pricing table for showing all the available offers applicable to the products in their individual product pages. This will help the customers to understand all the offers available for that particular product before purchasing it.
You can set the following details:
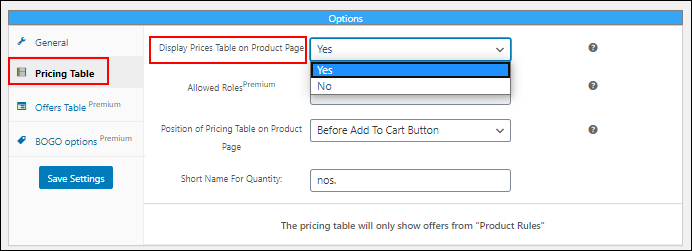
Display Prices Table on Product Page: Choose ‘yes’ or ‘no’ accordingly for displaying and not displaying the pricing table on the individual product pages. By default, it will be set as ‘yes’.
Position of Pricing Table on Product Page: Set the position of the pricing table on the product page by selecting an option from the drop-down pick up list. There are 12 options available for you to place the pricing table on the product page such as:
- Before Product
- After Product
- Before Product Summary
- In Product Summary
- After Product Summary
- Before Add To Cart Button
- After Add To Cart Button
- Before Add To Cart Form
- After Add To Cart Form
- Product Thumbnails
- Product Meta Start
- Product Meta End
Short Name For Quantity: Enter a custom label name for displaying the quantity of products according to your requirements. By default, it will be ‘nos.’
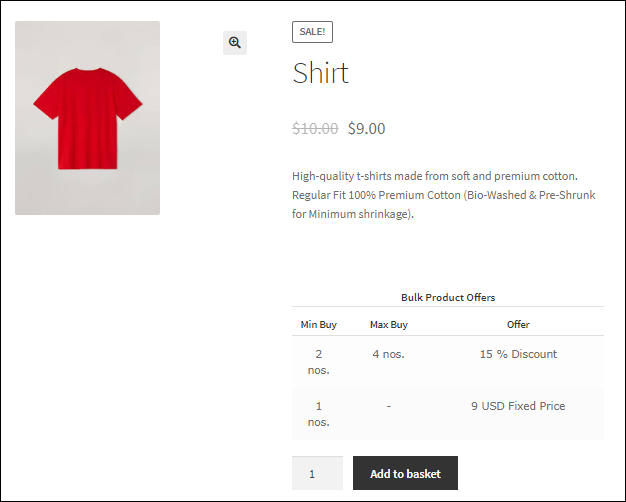
Check out an example of the pricing table:
You can click on Save Settings after configuring the rules and settings. The offers will be live according to the duration you have set. Or you can manually activate and deactivate the offers.
Conclusion
You can easily create and execute these discounts and offers in your WooCommerce store free of cost by following the above steps. If you want to provide more advanced features like Combinational Rules, Category Combinational Rules, Cart Rules, Buy and Get Free Offer (BOGO) Rules, Buy and Get Offer (BOGO) Category Rules, Tag Rules, and BOGO Tag Rules, you can upgrade to its premium version. Besides these rules, you can also apply some advanced restrictions, and role-based offers seamlessly.


