What can we help you with?
How to Create Bulk Shipment with Stamps.com Shipping Plugin with USPS Postage for WooCommerce
This article demonstrates the steps required to create bulk shipments with ELEX Stamps.com Shipping Plugin with USPS Postage for WooCommerce. Stamps.com offers discounted shipping rates to high volume shippers, and most of the time the shipment volume is high enough that you can’t create shipments for each order individually. As a result, we decided to incorporate the bulk shipment creation feature into the plugin. So, now you can select multiple orders and create bulk shipments in one go.
Let’s start with the settings required in Stamps.com Shipping Plugin with USPS Postage for WooCommerce so that you can create bulk shipments with it.
Settings for Bulk Shipment in Stamps.com Shipping Plugin with USPS Postage for WooCommerce
Once you install and set up the plugin correctly, you are ready to create bulk shipments. Before that, we’ll go through the settings required for creating bulk shipments here.
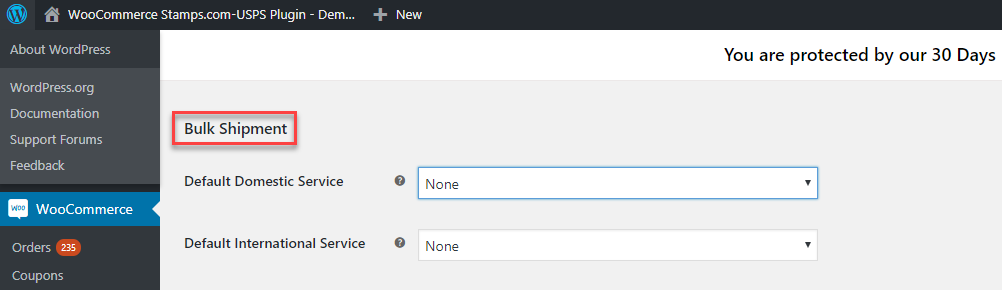
To start with, click on your WordPress Dashboard and follow the string: WooCommerce> Seettings> Shipping> Stamps.com – USPS> Label Generation.
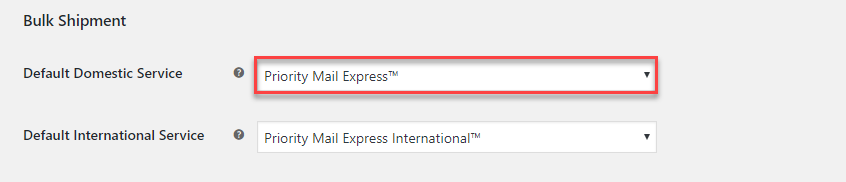
You’ll get Bulk Shipment in the Label Generation tab. To use the bulk shipments feature, you need to select one service for domestic and international shipments from the drop-down here. The service selected here will be common for all shipments that have no USPS service selected yet. For instance, if you are offering free shipping, your customer may not need to select a shipping service at cart/checkout page. In that case, the order will not have a USPS service selected for shipment creation. One more instance can be the flat rate. In the case of flat rate shipping, your customers don’t have to select a shipping service.
So you can have a default USPS service set in the settings here so that you don’t miss these type of orders. A default service option is really helpful when your shipping strategy is highly dependent on free shipping and flat rates.
If you want to use different services for different orders, you’ve to start with selecting a default service again. This means if you want a different service for the few selected orders, change the service, save the settings and go to the Orders page and create bulk shipments.
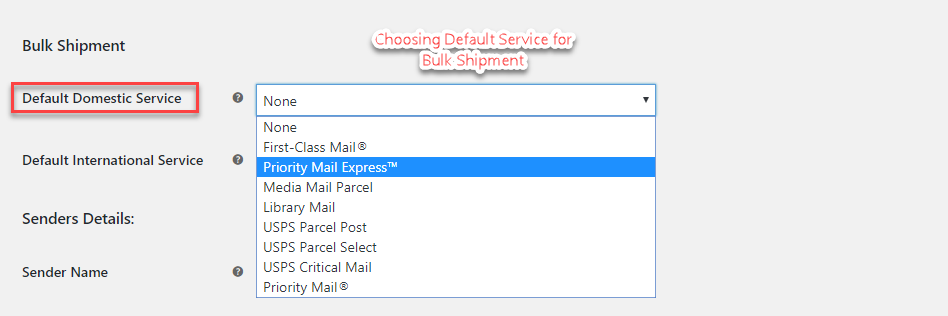
Default Domestic Services
The default services available for domestic shipments are:
- First Class Mail
- Priority Mail Express
- Media Mail Parcel
- Library Mail
- USPS Parcel Post
- USPS Parcel Select
- USPS Critical Mail
- Priority Mail
Default International Services
The default services available for international services are:
- Priority Mail Express International
- Priority Mail International
- First Class Package Service International

So select the service you want to use for creating bulk shipment using WooCommerce Samps.com Shipping Plugin with USPS Postage for WooCommerce.
Creating Bulk Shipment with Stamps.com Shipping Plugin with USPS Postage for WooCommerce
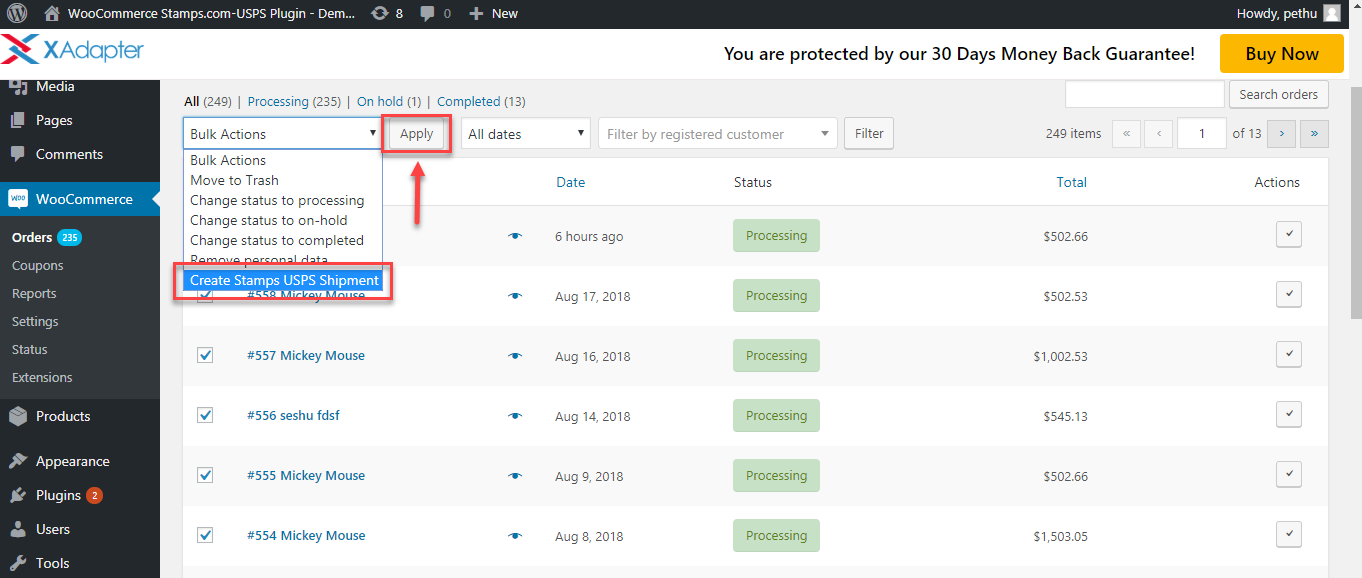
You get the option of bulk Stamps USPS shipment in the Bulk action drop-down (screenshot below). The services selected by your customers are used to create the bulk shipments. For instance, if order #568 has Priority Mail and order #555 has First Class Mail selected during the cart/checkout, the shipments will be created based on these services automatically. In other cases, when no service is available in the orders, the default services selected by you during the settings are used to create shipments.
So to create bulk shipments, go to Orders page and select the orders, for which you want to create shipments. You can select the individual orders by checking the corresponding boxes on the left. Once you select the orders, click on ‘Bulk Actions’ to get the drop-down (as shown below) and select ‘Create Stamps USPS Shipment’. Finally, click on ‘Apply’, that will create the bulk shipments.
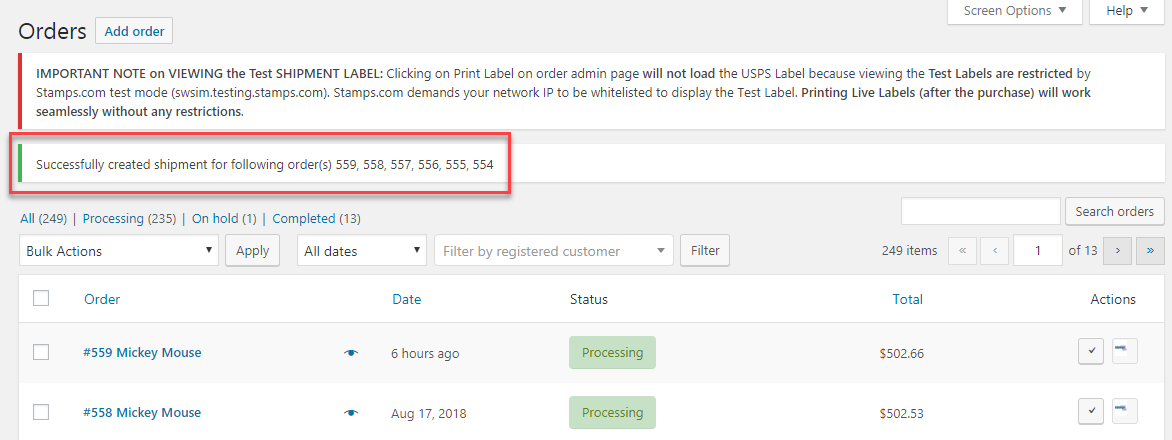
As soon as the shipment creation is completed, you get a confirmation message on the top of the Orders page (screenshot below). If there are orders with already created shipments, you’ll be notified of them too. Now, you can move to the individual Edit Order Pages and print the labels.
You should keep in mind that all the shipments created will have one default service that you select during the settings. If you used a different service by mistake you can cancel the shipment at the Edit Order page.
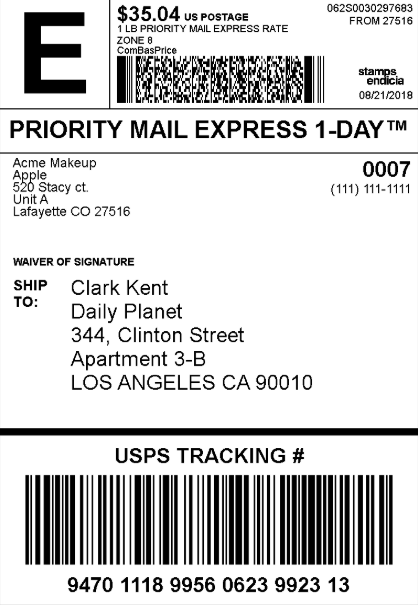
Printing Label
You can go for printing labels for individual orders as per your requirement. To do so click on the particular order number to go to Edit Order page (screenshot below). There you get the option to print labels and the tracking number generated.
If you want, you can cancel the shipments too. Click on cancel shipments to create shipments again.

The shipments created for orders without any preselected service use the default services for shipping rates and shipment. For instance, if selected default domestic service is Priority Mail Express, the labels will be created as per the charges of Priority Mail Express.
Sample Label
About the Plugin
- Compatible with WooCommerce 3.0.
- The license entitles 1 year of support & updates.
- No monthly fees or yearly subscription.
- Extend support & updates after 1 year at 50% discount.
- You are protected by our 30 Day Money Back Guarantee.
Closing Comments
ELEX (under the brand of XAdapter) is a Stamps.com Approved Integration Partner and ELEX Stamps.com Shipping Plugin with USPS Postage for WooCommerce is a result of the partnership. The plugin helps WooCommmerce store owners to show real-time shipping rates, print postage-paid shipping labels and offer automated tracking services to their customers. Stamps.com also provides an easy solution for e-VS by USPS which requires a minimum shipment volume to print online labels. On top of this, Stamps.com users get discounted pricing for USPS postages.
Further Readings
How to Show Free Shipping and Print Shipping Label with Stamps.com Shipping Plugin for WooCommerce?