Want to emulate your pricing strategy on your WooCommerce store? Here is the ideal way to get it done. The WooCommerce Name Your Price plugin is perfect when it comes to offering your customers the opportunity to decide how much they want to spend on your product. In this article, we take a look at how easily you can set up WooCommerce Name Your Price for your WordPress site.
A quick look on WooCommerce Name Your Price plugin
The ELEX WooCommerce Name Your Price plugin lets your customer enter a custom price for your products on your WooCommerce store. The plugin lets you be much more versatile when it comes to pricing your product. The customers can take the liberty of suggesting a price for your product on your WooCommerce store. Also not to incur any loss by giving the authority of pricing to your customers, shop owners also can enforce a minimum acceptable price. The plugin is indeed a great way to analyze the market and understand how much the customer is willing to pay for your products.
Here are some of the features that you do not want to miss regarding the plugin :
- Display Custom Text Before the Product Price (Prefix)
- Show Custom Text After the Product Price (Suffix)
- Apply Quick Discounts on your product prices.
- Set Prefix, Suffix, and Discounts on Individual Product Level
- Display Minimum and And Maximum Price Range of Variable Products
- And finally, great compatibility with ELEX Plugins.
All these features make the plugin the best free WooCommerce Name Your Price plugin.
Now let us see how you can set the WooCommerce Name Your Price for Your WordPress Site easily.
Steps to set up WooCommerce Name Your Price for Your WordPress Site
Here we give you a step by step process of setting up WooCommerce Name Your Price on your WordPress WooCommerce site.
Step 1: Download and install the plugin.
Download the ELEX WooCommerce Name Your Price plugin from its product page or WordPress
You can follow the basic steps to install and activate the plugin or contact the Support Team for any assistance.
Step 2: Login to WooCommerce as admin for your online store.
Here in the admin settings go to Dashboard > Plugins > Installed Plugins > ELEX WooCommerce Name Your Price Plugin > Settings. You can see the plugin settings as given in the screenshot below:
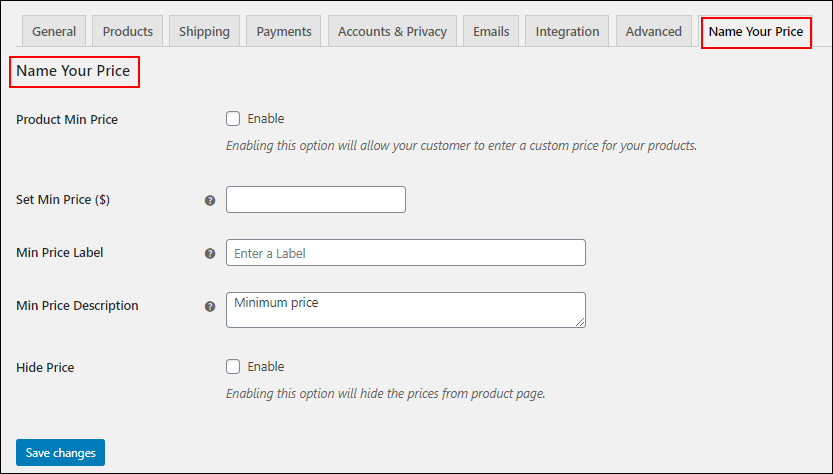
Step 3: Get the settings done correctly
Here you need to enter the Product Min Price to allow the customers to enter a price at which they want to purchase the product from your store. Next, enter the minimum price in Set Min Price. This is the minimum price at which you want to allow the customers to purchase the products. You can also leave it blank if required. If you are leaving it blank, then you are allowing your customer to purchase the product at any price they want to.
If the customer enters an amount, which is less than the minimum price you have provided, they cannot proceed with the purchase. A message will be displayed to enter an amount greater than or equal to the minimum price you have already configured in the plugin settings to proceed with the purchase.
If the customer enters a price higher than the provided minimum price you have set here, then the entered amount by the customer will be taken as the product price.
Next, you need to enter the Min Price Label, which is a custom text to display beside the field to enter the minimum price by the customer. Enter a custom description in the Min Price Description field to be displayed for the customers.
Yet another option is to hide price using the Hide Price checkbox. This option lets you hide the price from the respective product page. The customer will only see the minimum price provided by you for the product and the option to enter their desired price they want to purchase the product for.
Step 4: Just Click Save settings.
It is done.
Examples to work better
Now let’s take a look at some scenarios to give you a better idea on how the plugin works on your store.
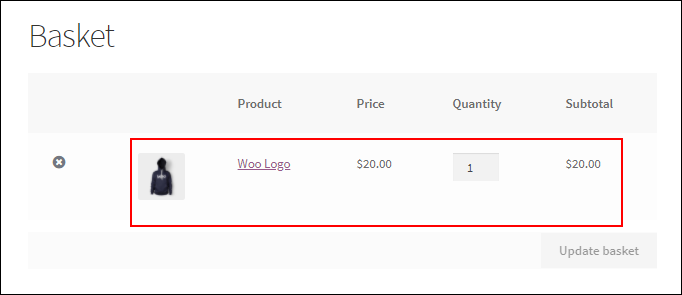
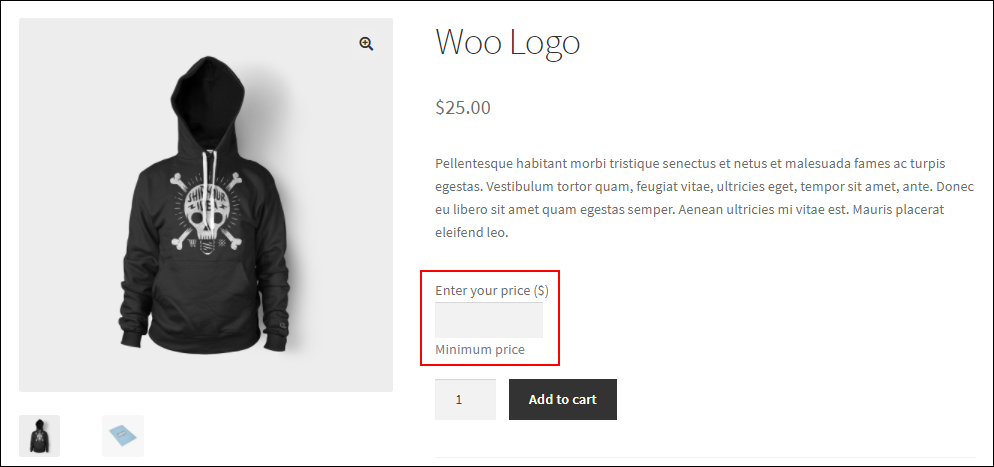
Suppose for a product you enter the minimum price at $20. Also, you have enabled the option of allowing the customer to enter the custom price for your product and the description as ‘Minimum price’. The settings will look like this in the below screenshot :

Once the settings are saved, in the front end in the store page, your product will look like this to the customer
as given in the below screenshot.

As you can see, in the above screenshot, the minimum price is displayed along with the label and the description. Your customer can either proceed to buy the product at the same price as mentioned, or can even opt to enter a price they desire. If the customer proceeds with the same price, then $20 which is the default price is considered as the price of the product. Check the screenshot given below.
What if your customer enters an amount less than the minimum price you have provided?
If the customer enters an amount, which is less than the minimum price you have provided, then a message will be displayed to enter the minimum price, if they need to proceed with the purchase.
For example, if the customer enters $15 whereas you have already provided the minimum price as $20, and clicks on the Add to Cart button, a message will be displayed to enter the price, which is not lower than the minimum price (here $20) you have set in the plugin settings as shown in the below screenshot.

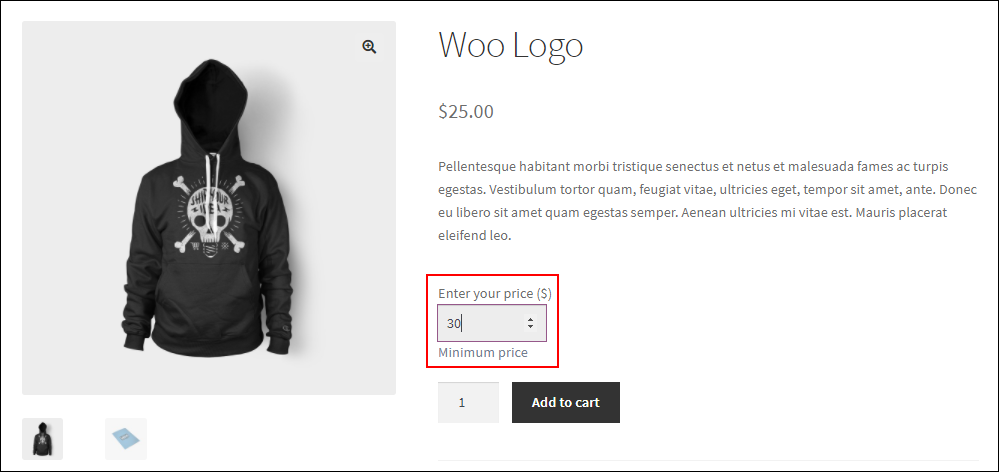
What if your customer enters a price amount, that is higher than the minimum price you set?
If the customer enters an amount which is greater than the minimum price you have provided in the plugin settings, then the entered price will be taken as the final product price and the customer is taken to the cart and checkout pages.
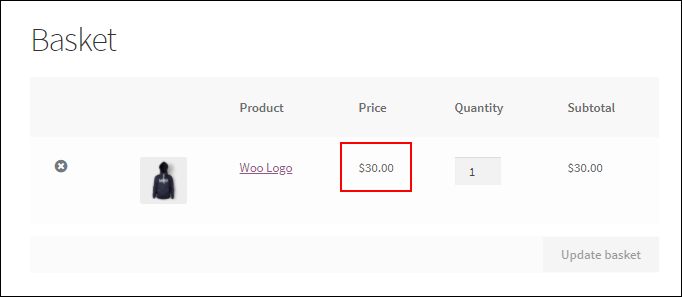
For example, if the customer enters $30, which is greater than the minimum price ($20) you have set in the plugin settings for a minimum price, the customer is billed with $30 for the product as you can see in the below screenshot.
The product price is taken as $30 even when the checkout happens.
What if you do not enter any minimum price in the settings?
If you decide not to enter any minimum price upon setting the plugin and leave it blank, then your customer can enter any price as they want to purchase your product. If you leave it blank, then the product page will look like this as given in the screenshot below.
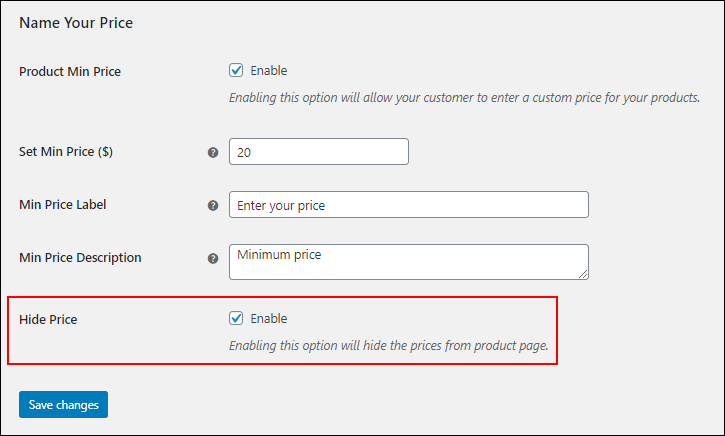
Hide Price option for better results
If you want your customers to go ahead and enter a price for your product without judging the actual price, you can do it by hiding the price for your products. Check the below screenshot for the settings :
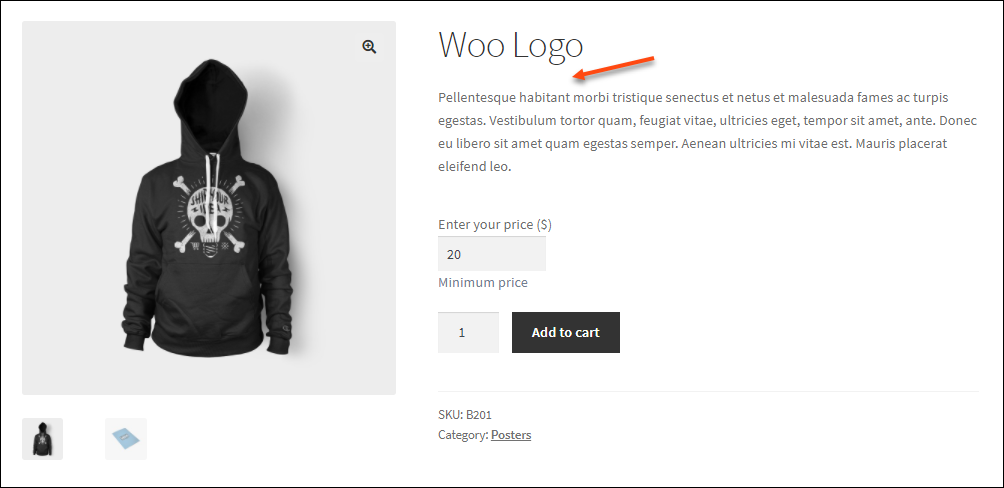
Once you save the settings, the product page will look like this:
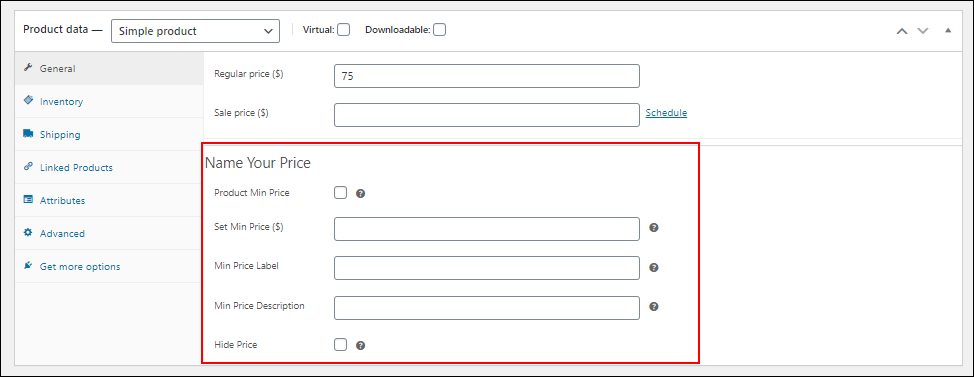
Leverage the option to set a minimum price at the individual product level
Upon enabling the plugin, you also get the privilege to set the minimum price at the individual product level as per your business need. On doing so, other products will be eligible for the minimum price you set globally on the plugin dashboard. For this go to individual product page dashboard > General settings, you can find the following settings as given in the screenshot below :
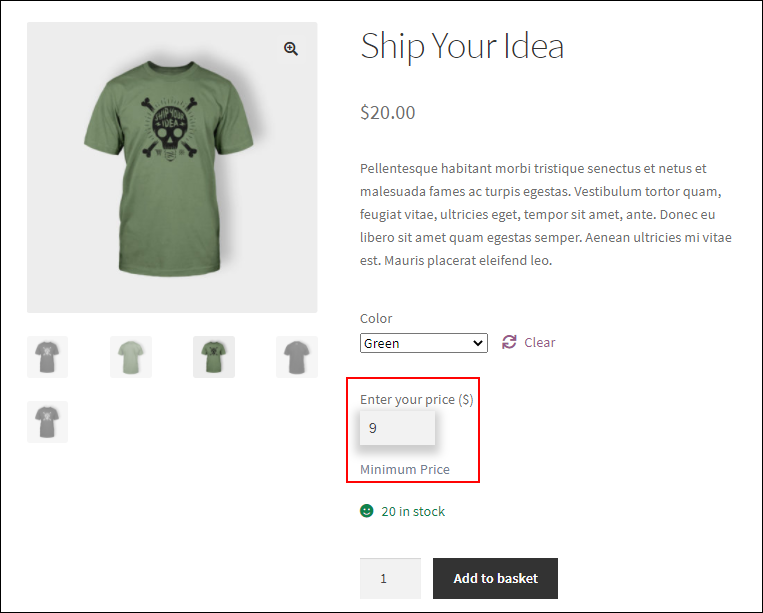
This works not just for Simple products but for variations too
If your store has product variations, then you can also set the minimum price for each variation individually. Go to the product page dashboard > Variations, you can see the following settings as shown below :
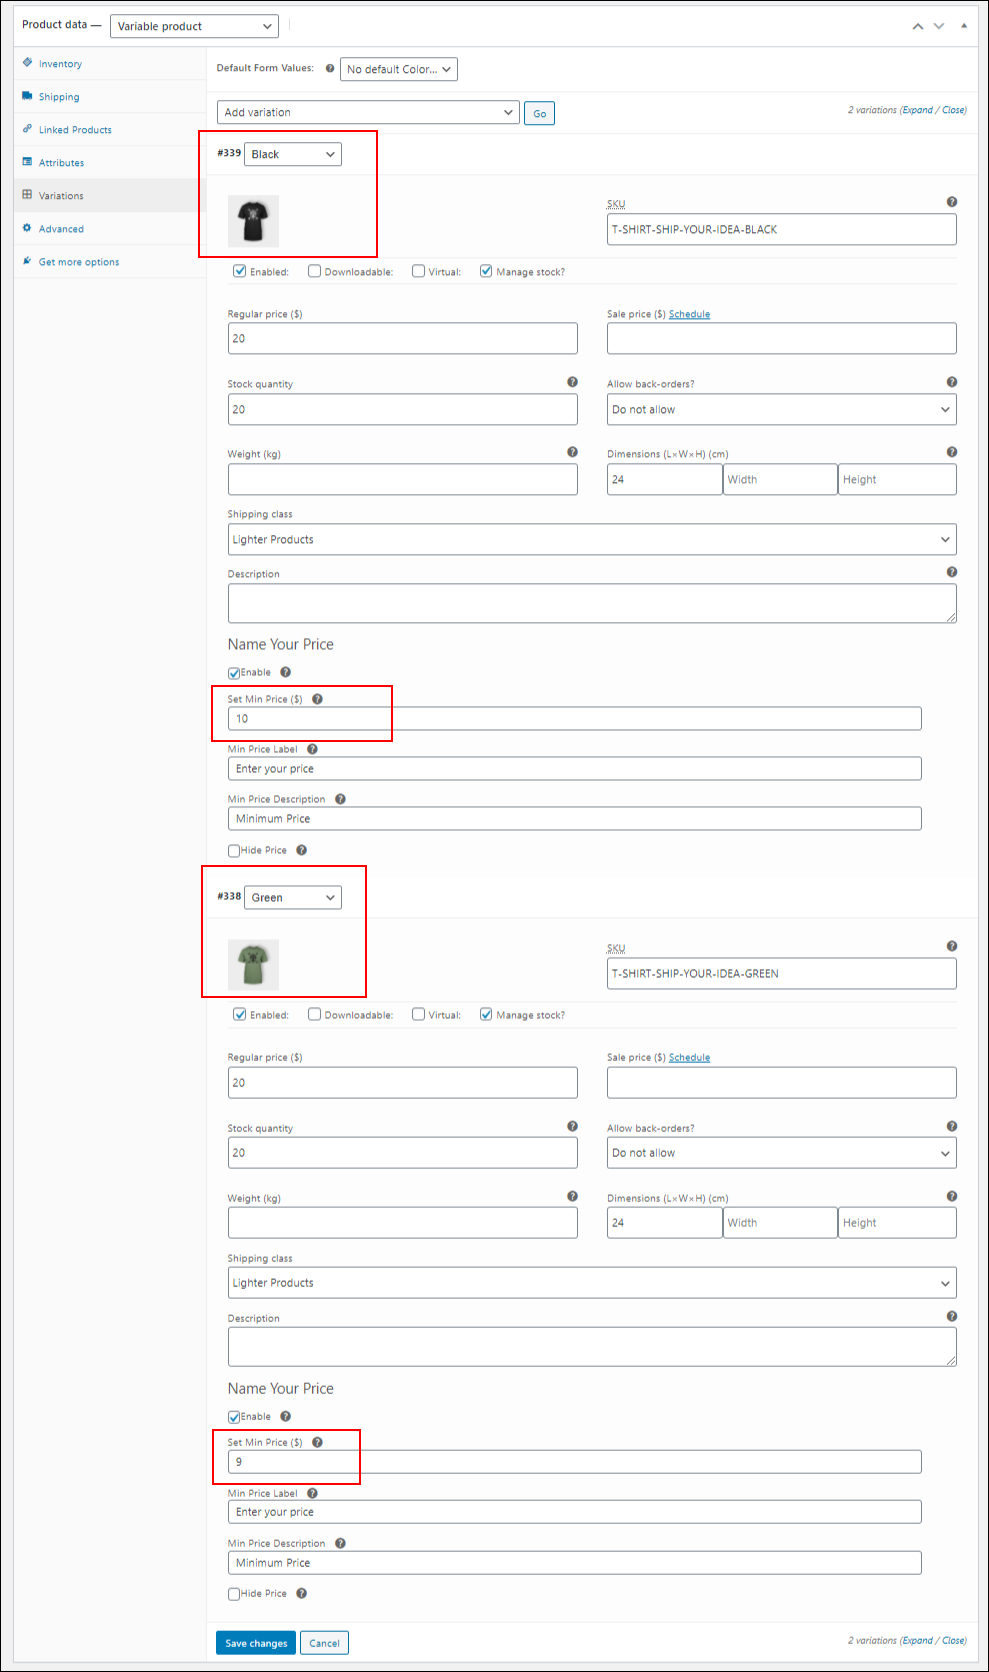
So as you can see, the variation in black colour has a minimum price set as $10 and the one in green has a minimum price set as $9. Once saved, the products look like this in the front end for your customers:
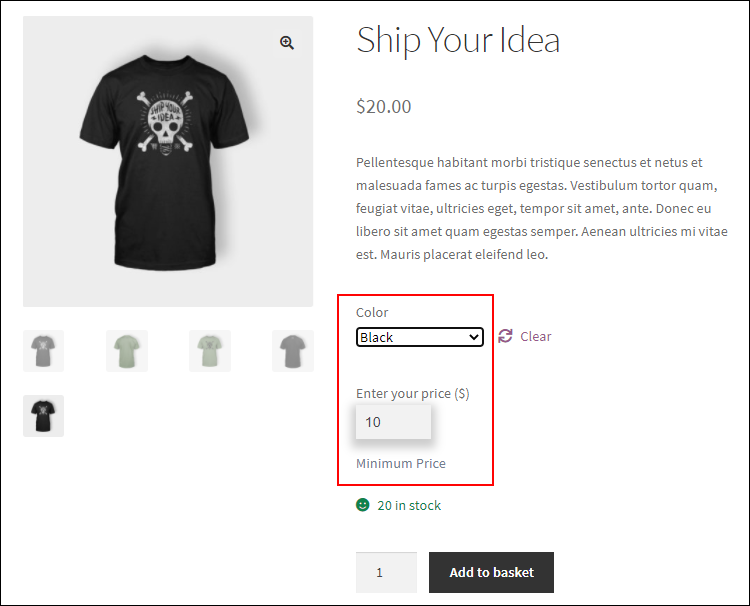
As you can see in the screenshots, for the black, $10 is the minimum price and for the green variation, the minimum price is $9.
Thus to Conclude
This is how you can easily set up the WooCommerce Name Your Price plugin on your WordPress site. As you offer the liberty to choose a custom price for your products, you are entrusting the profitability of your store in the hands of your loyal customers. It will not only boost the interest of your customers to revisit your store for future purchases but also build the trust factor amongst your customers. Boost your customer satisfaction with this simple free plugin.
Before you leave, do take a look at the popular features of the ELEX WooCommerce Name Your Price Plugin.
Further Reading:
- All About Setting Up WooCommerce Custom Price Field
- How to Add Custom Price Field to WooCommerce Product Category Page?

