A shipping label is an essential document when it comes to shipping. Without affixing the shipping label to your package you cannot send a shipment. The shipping label contains the details of the items packed and the origin and the destination of the package too as well as the barcode. Automating the collection of order data is easier with barcodes. Moreover, it eliminates the human errors encountered. It is easier to scan the barcode to obtain the data regarding the package. Won’t it be easy if you can print shipping labels right from your WooCommerce store? Let’s see how you can do it.
Introduction
When you are using a particular shipping carrier for shipping, what you will be doing is go to their respective page and then fill in the order details and then get the labels printed. The label is then printed and affixed on the package. However, in WooCommerce, by default, it is not possible to print shipping labels right from the store admin. However, using WooCommerce Shipping plugin, you can print the shipping labels for lowest USPS rates, but again there is no tracking information shared to you. You can also make use of popular WooCommerce extensions that will facilitate you to print shipping labels right from your WooCommerce store, from popular shipping carriers. These plugins not only facilitate printing shipping labels but also helps to display the shipping rates on your cart and checkout pages with accurate estimated delivery dates.
Let us take a look at how we can print the labels from the WooCommerce store using WooCommerce Shipping plugin.
Printing USPS Shipping labels using WooCommece Shipping plugin
The WooCommerce Shipping plugin is a free one, where you can buy discounted postage rates and then print them from the dashboard. Also, you need not copy and paste the details of the order to get the label printed. The plugin is built right into WooCommerce and is powered by WooCommerce services.
Read more about downloading and installing the plugin from the product page.
Once the plugin is installed, here are the steps to get the shipping labels printed.
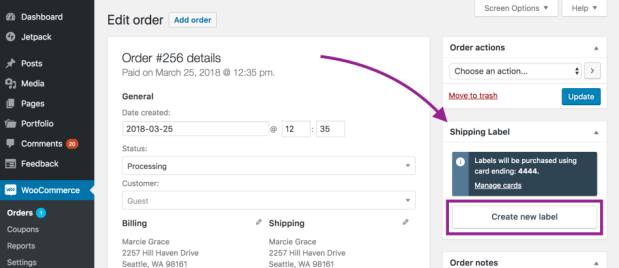
Step 1: Go to WooCommerce order pages, and then go to the order to print the label for it. Click the Create New Label button.
Step 2: Confirm the shipping address that will be printed on the label.
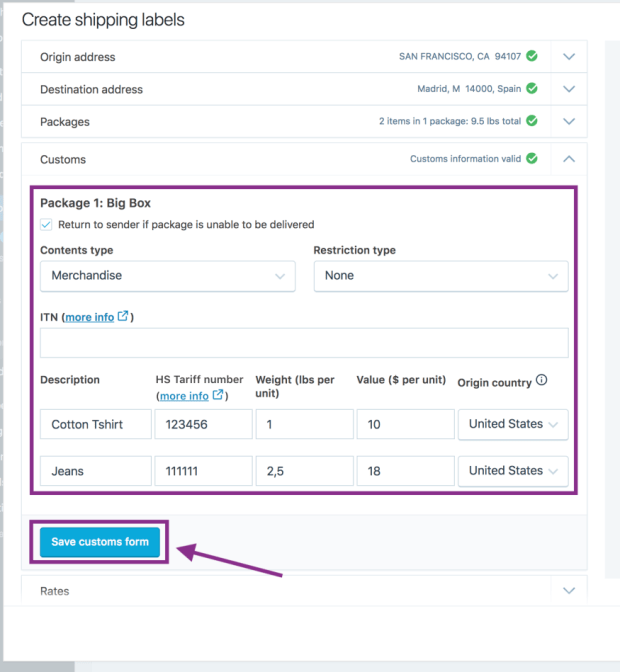
Step 3: If the destination is a different country other than the US, then you need to fill in the customs form, which you will be prompted to fill.
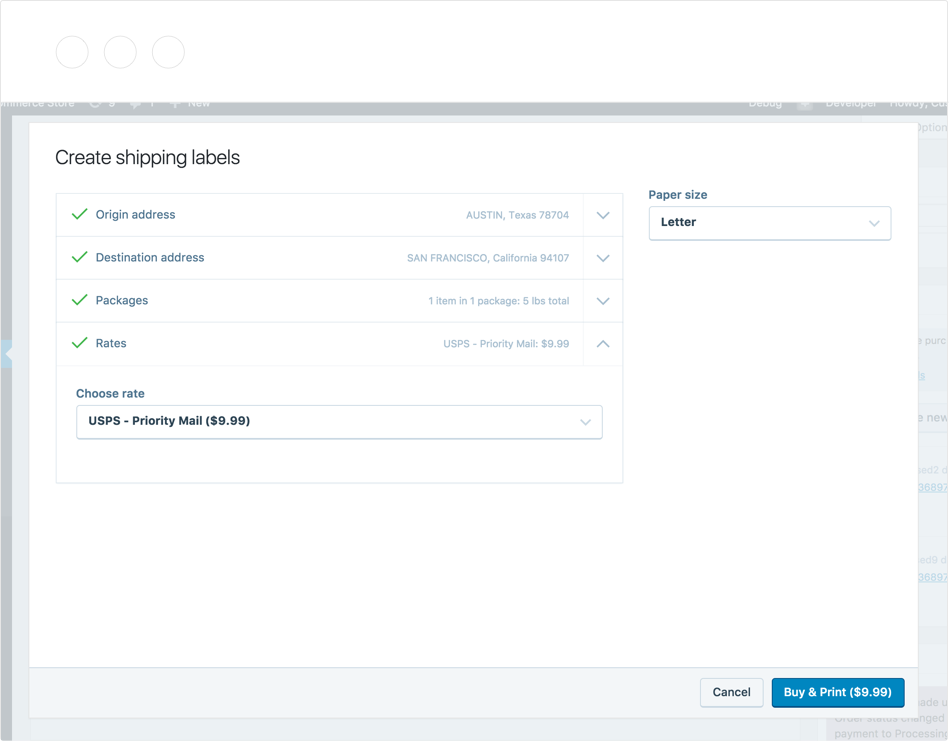
Step 4: Choose the right shipping rates to get the label printed and purchase it.
Step 5: Buy the postage and get the label printed.
Print WooCommerce shipping labels with popular shipping carriers
What if you want to print shipping labels from other popular shipping carriers like UPS, USPS, DHL, FedEx, etc. from your WooCommerce store? Then the right solution would be to get the perfect WooCommerce shipping plugins that will support the same. Let us take a look at how we can generate shipping labels for the FedEx shipping carrier, using the ELEX EasyPost Shipping plugin.
Step 1: Go to WooCommerce orders, and then choose the FedEx order for which you want to print the shipping labels.
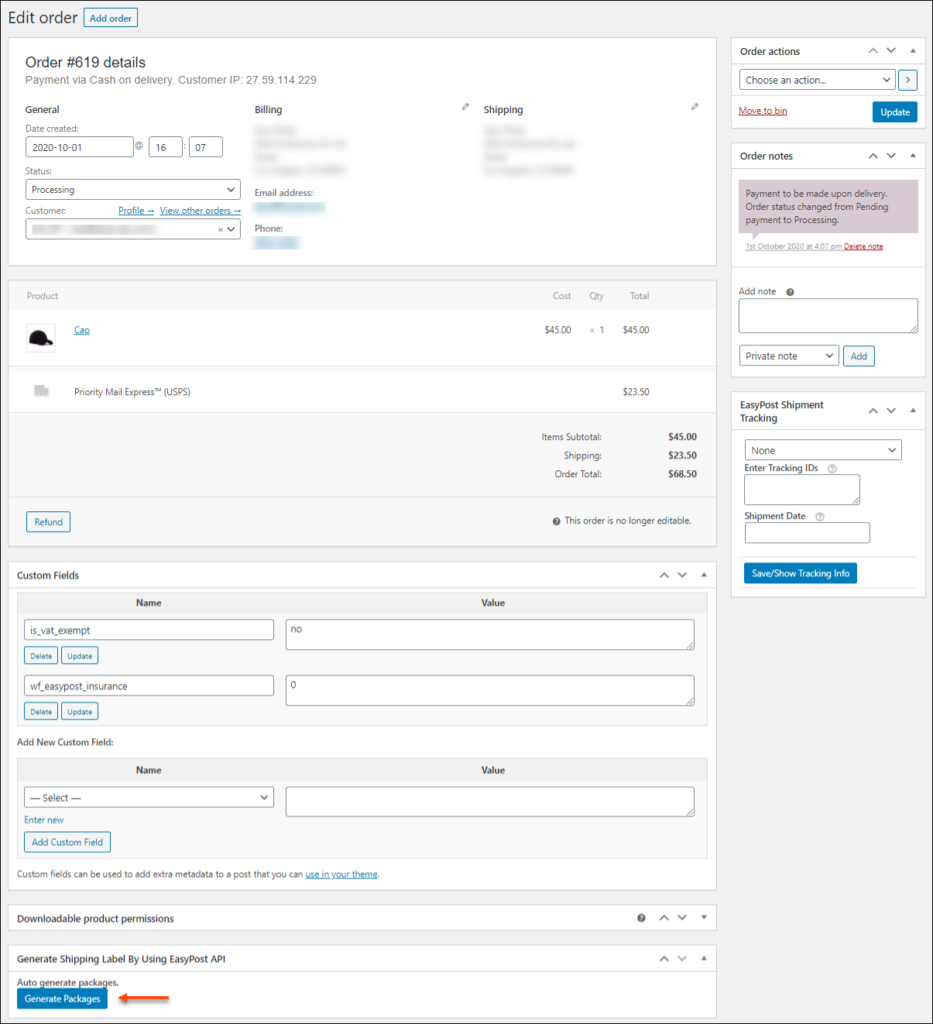
Step 2: Generate the packages for the shipment. In order to generate the packages, remember to set the packaging options in the plugin settings.
Depending upon your business strategies, choose the one that suits your business needs. Once done, click the Generate Packages button in the order page.
Step 3: Generate the shipments for the package using the FedEx shipping service. You can see that the package is generated and now you can create the shipment.
Step 4: Print the labels for the shipment. Once the order shipment is generated, the plugin will return the shipment tracking information and the label.
You can also see the tracking number from FedEx too.
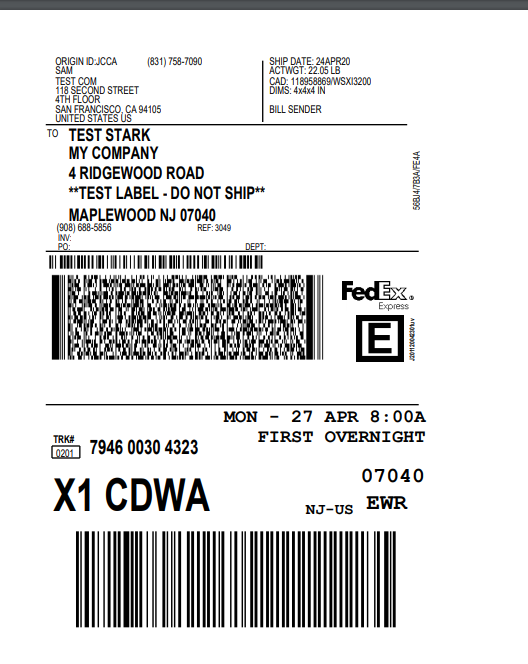
Step 5: Click the Print Label button and you can see the label as given below:
Print Shipping Labels in Bulk from WooCommerce
It won’t be a problem when you consider printing shipping labels using the method mentioned above when you are accepting just a few orders. But what if you are to deal with bulk shipments? Opening up each order from WooCommerce, and then processing each order to print labels is gonna take a lot of time. To avoid delays, it is better to process the shipments faster and then generate the shipping labels together for multiple orders. More importantly, it will augment the operational efficiency and enhance customer satisfaction.
Here, along with the shipping plugins, you can also find efficient Add-ons that will facilitate printing shipping labels in bulk for corresponding shipping carriers. Here in the ELEX website, you can find the Add-ons for the ELEX Shipping plugins, which help to print the shipping labels in bulk efficiently.
For the Add-ons to work to print the shipping labels in bulk for shipments generated using the ELEX Shipping plugins, you must also have a developer account with iLovePDF API. Using this, you can almost print 250 PDF documents. One single bulk printing operation can help to generate multiple shipping labels in it. Again you also have options to print by date or even the time period or even choose the order-ids to print the labels. You need to enter the Project Key and Secret Key you get from your developer account on iLovePDF in the respective fields for the add-on to work for you. Moreover, keep the label printing format as PDF in the Label Printing settings in the plugin.
Now let’s see how you can print the bulk shipment labels using the Easy Post shipping plugin and the bulk label printing Add-on for the same.
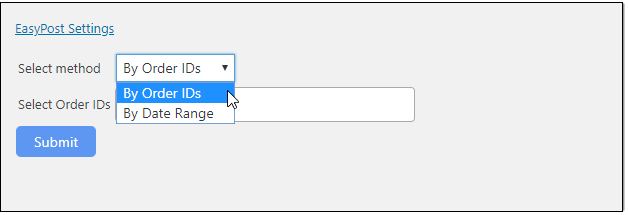
Step 1: Choose the filter option to print the shipping labels.
The add-on lets you list the orders using two filter criteria. They are :
- Using Order ID
- Using the date range provided.
When you select the option By Order IDs, you get the list of order IDs to choose from to make the list of order IDs for which you need to print the shipping labels.
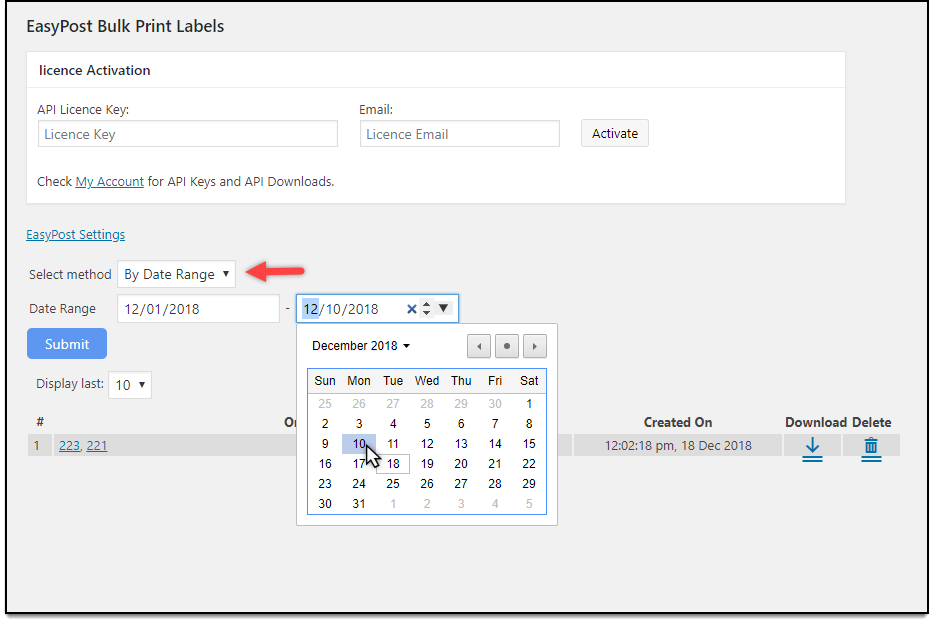
If you are choosing the date range, then you need to choose the date range and then the orders processed on those dates will be selected to print the shipping labels.
Step 2: Print the labels for the chosen filter.
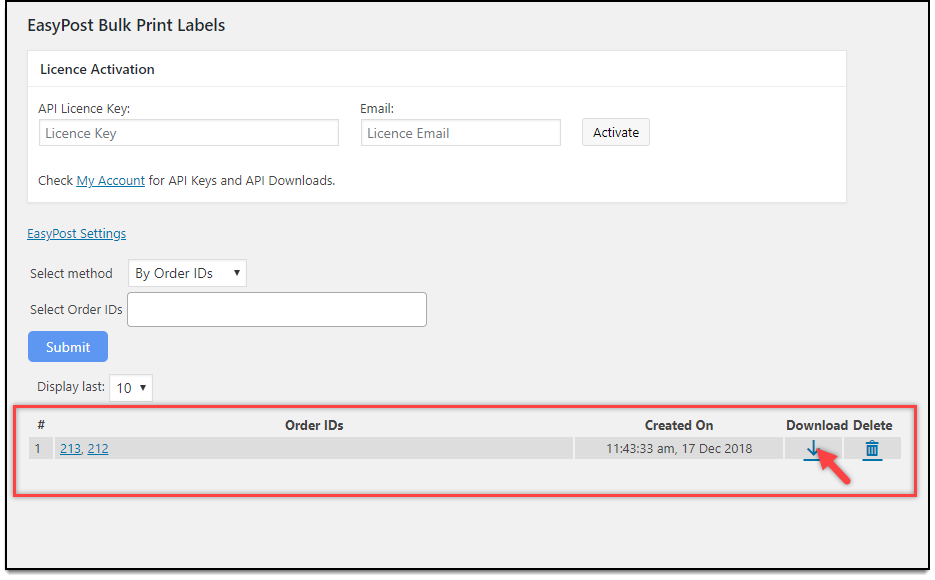
Once you submit the order IDs or the date range, you get all the labels printed. And then you can download the labels from the download option provided.
Step 3: Print the Bulk shipping labels.
Once the orders are downloaded, you can print the shipping labels as a single PDF.
Wanna save some paper on printing, you can always do it by adjusting some print settings. More details on printing multiple labels on a single sticker sheet can be found here.
Print Return Shipping Labels on your WooCommerce store
If you are dealing with return shipments, you can also facilitate the same on your WooCommerce store. The ELEX Shipping plugins have an Add-on that will allow you to print shipping labels for your return shipment using the ELEX EasyPost Shipping plugin. Once you install the add-on, you can easily configure the return label setting on your WooCommerce store. Remember that the Add-on works only with the ELEX EasyPost Shipping plugin.
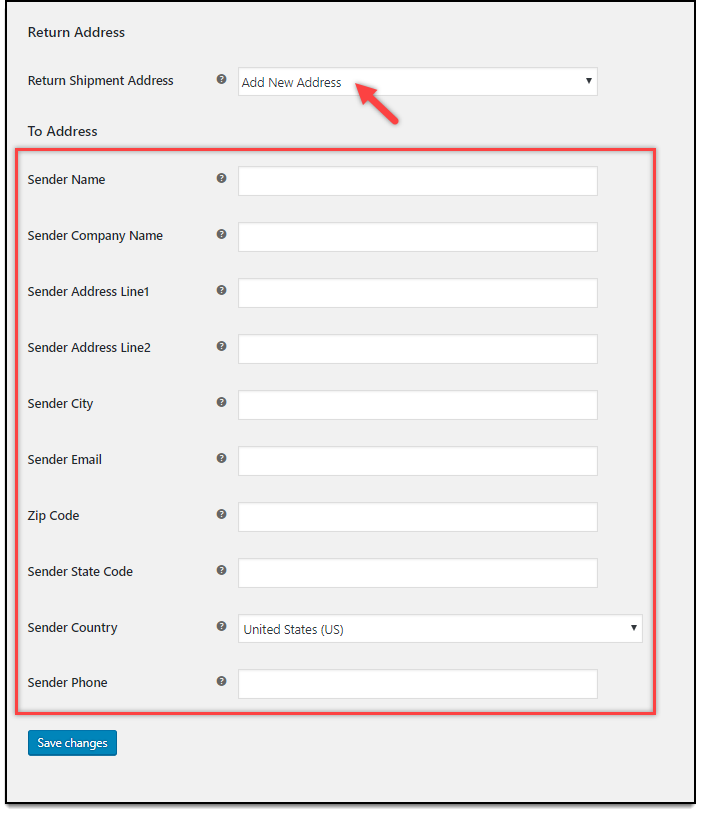
The plugin also lets you enter a different return address apart from the address provided in the shipping settings to ship the package.
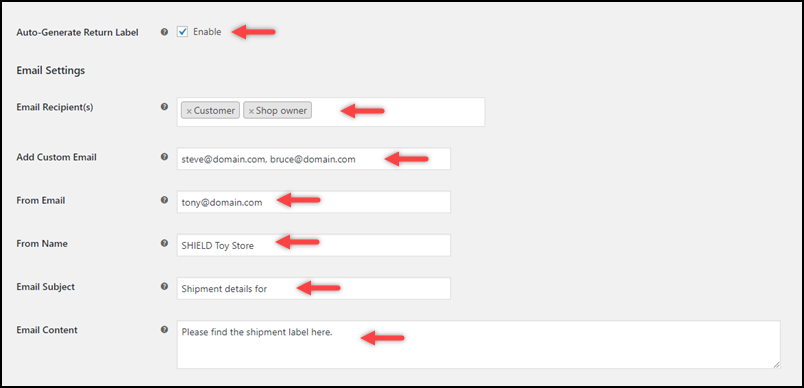
Also, you can send email notifications for your return shipping upon failure.
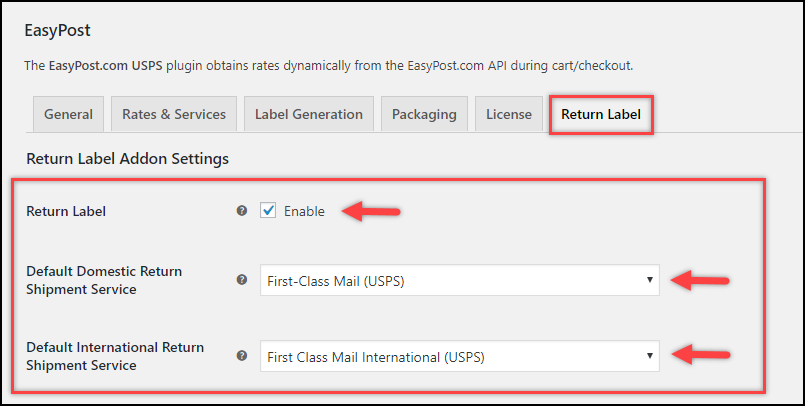
Step 1: Enable the Return label generation
Here you need to enable the option to let you print the return labels from the WooCommerce store. Also, you can choose the default service to get the return shipment.
You can also enable the automatic generation of return shipping labels here to ease the process.
All you need to do is set the respective setting to make the return label generation process easy and swift.
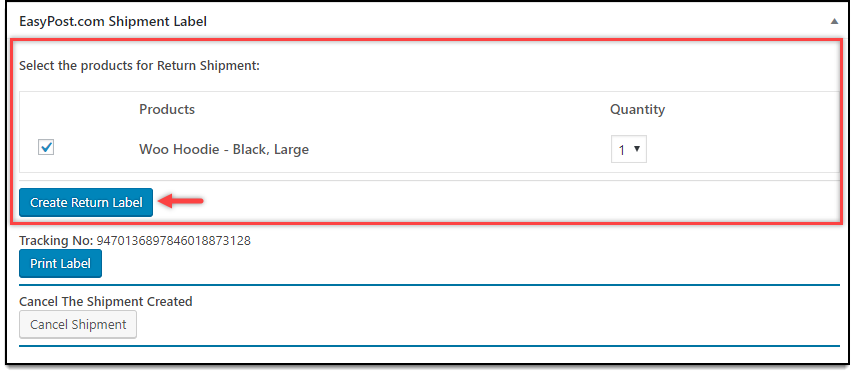
Step 2: Create the return shipping labels.
If you enable the return shipment label creation, the return labels are generated for each order item. If you want to process for a certain item, then you can do the same too.
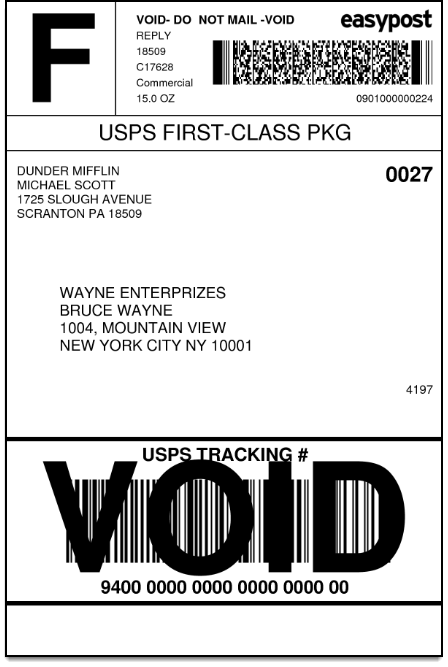
Step 3: Print the return shipping label.
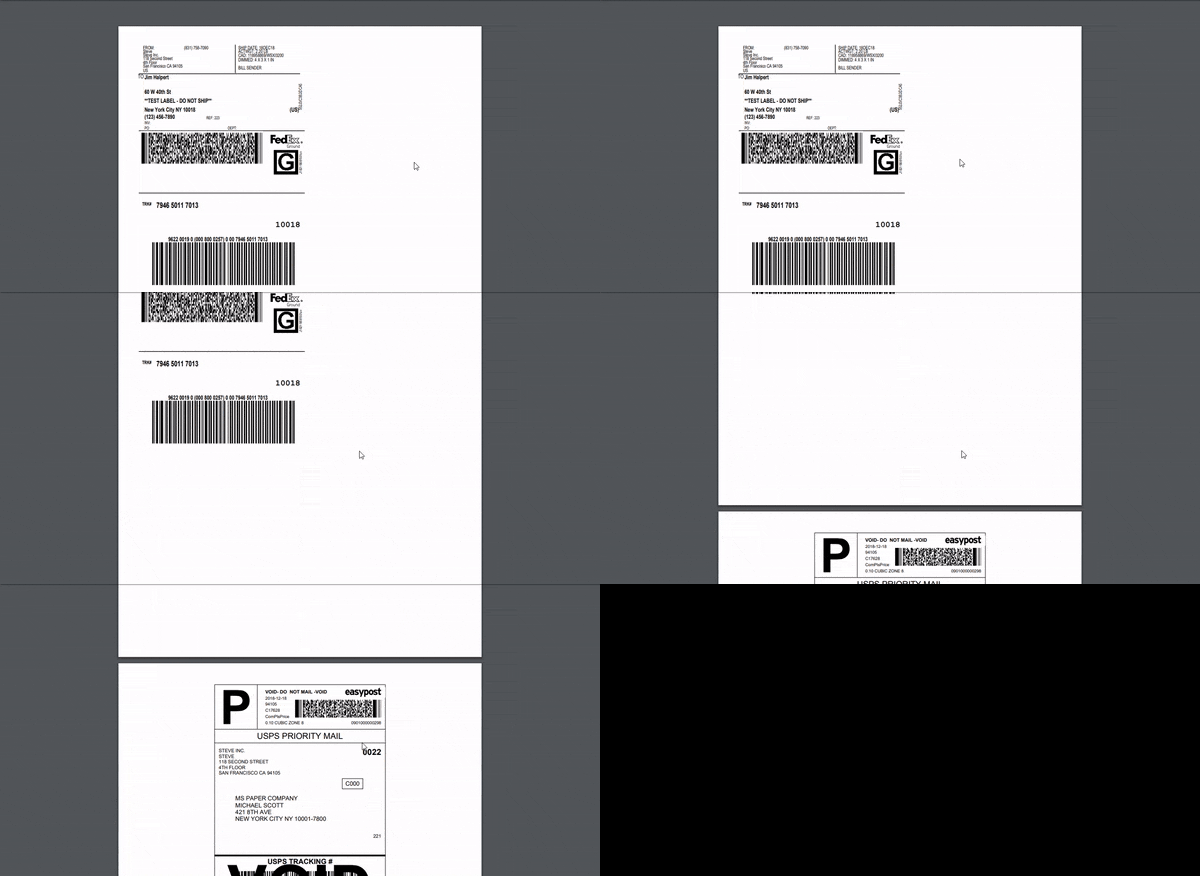
The return shipping label will look like this.
ELEX Plugins to help you print shipping labels on WooCommerce
Here are some of the shipping plugins that will help you print the shipping labels right from your WooCommerce store.
- ELEX WooCommerce USPS Shipping Plugin with Print Label
- ELEX Stamps.com Shipping Plugin with USPS Postage for WooCommerce
- ELEX EasyPost (FedEx, UPS & USPS) Shipping & Label Printing Plugin for WooCommerce
- ELEX WooCommerce DHL Express / eCommerce / Paket Shipping Plugin with Print Label
- ELEX WooCommerce Australia Post Shipping Plugin with Print Label & Tracking
All these shipping plugins not only let you print the shipping labels but also provide you with accurate tracking details of the shipments. Also, you can obtain the shipping rates on your Cart and Checkout pages with the estimated delivery dates.
To Wrap Up,
Hope you got a better understanding of how to print shipping labels from your WooCommerce store. You can always look into the product documentation for more information, or leave us a comment below.

