When it comes to selling physical goods, shipping plays a vital role. Configuring WooCommerce shipping options on your store is important and yes, it needs to be done right to ensure that it works well for you and your customers. Let us take a look at how you can configure your WooCommerce shipping options easily.
Introduction
WooCommerce is a great platform to begin with for an online store. The feasibility it provides in creating a complete eCommerce store online with just a few steps makes it much more worthy. Moreover, there are a plethora of WooCommerce extensions available that make the WooCommerce store much more perfect. With more than 60 million downloads, WooCommerce has grown tremendously from a simple customizable WordPress plugin to a completely customizable eCommerce platform. WooCommerce has a comprehensive set of shipping options as well as settings that provide much more opportunity for growth.
WooCommerce shipping options made Easy
If you take a look at the backend in WooCommerce, you can find a multitude of options available that makes it quite easy to set up shipping in your WooCommerce store. From shipping zones to calculating shipping rates, you can find many more interesting ways to get your shipping settings done right. Using the variety of extensions available, you can automatically configure the shipping options in WooCommerce. We shall look into these in more detail in the upcoming sections.
Getting Started with WooCommerce Shipping options
Before we begin with, the very first thing you do is set the locations in your WooCommerce store settings as given below:

Here we fill in the base location details, which is the location of the store. The tax rates and the shipping rates will be determined by this address. So after providing the store address, you need to go ahead and choose the selling locations. You have three choices here :
- Sell to All Countries
- Sell to All Countries, Except For…
- Sell to Specific Countries
You can choose anyone from these, depending upon your shipping needs. The next one you need to provide is shipping locations. You can choose from the below options:
- Ship to all countries you sell to
- Ship to all countries
- Ship to specific countries only
- Disable shipping and shipping calculations
Once you opt one from the list, you can go ahead and choose the default customer location. Some store owners might be selling in a localized zone, in that case, they may choose a specific area in the list to ship as the default customer location. If not, you can just not specify any location to ensure that customers from any location can purchase from you. Here are some of the options available with WooCommerce :
- No location by default: The store owner does not set any specific default location, and hence no taxes are calculated for the same.
- Shop base address: Here, you can set the base location of your store as the default customer location.
- Geolocate: This will determine the customer’s default location based on the IP address through which the customer logs in to the shop.
- Geolocate (with the page caching support): Here you can determine the customer’s default location based on the IP address through which the customer logs in. The only major difference is that you have to choose this option only if your store has a page caching support.
Once done, you can save the settings and go ahead with the rest of the settings.
Setting up Shipping Zones
The very next thing you do when you want to set up WooCommerce shipping options on the store is setting up the shipping zones. A WooCommerce shipping zone is a geographical area or space, where the items are shipped to. You can either just define a country or you can even narrow down the locations to even specific regions and also use zip codes to point the shipping zone to a particular location. You can also different shipping methods to the shipping zones.
Let’s follow these steps to set up shipping zones :
Step 1: Go To WooCommerce>> Shipping>>ShippingZones
Step 2: Add the Shipping zone

Step 3: Provide the Zone name, then choose the Zone regions concerning the Zone name. It can be Countries, states or continents.
Step 4: If you want to limit the shipping to specific zip codes, then you can click on Limit to specific zip codes. For example, you can give zip codes like 10005, etc.
Step 5: In each shipping zone, you can also go ahead and add various WooCommerce Shipping methods, which is explained next. When you are setting up a WooCommerce shipping zone, it helps you to offer rates depending upon the zone and depending upon the customer matching to the zone. With Shipping Zones you can :
- Offer to ship concerning zones and regions.
- You can also offer free-shipping depending on the shipping zones or concerning zones selected for the same.
- It is easy to offer flat-rates with various shipping zones that are added here.
- You can also limit the local pick up to specific zones or even zip codes to make it easier.
WooCommerce Shipping Methods
WooCommerce lets you, set up shipping on your store using default shipping methods like :
- free shipping,
- local pickup and
- flat-rate.

You can either set all the three or choose the ones which you want to include in your store. For example, you might be running a store in New York City and you want to offer your customers who belong to the NewYork City Free Shipping. You can set the same by choosing Free Shipping for your customer located in the New York shipping zone.
Interestingly, you can offer Free Shipping with some coupons and also some minimum spend threshold. When you set the same, you can set a title for free shipping and then provide the conditions as in the below-mentioned screenshot.
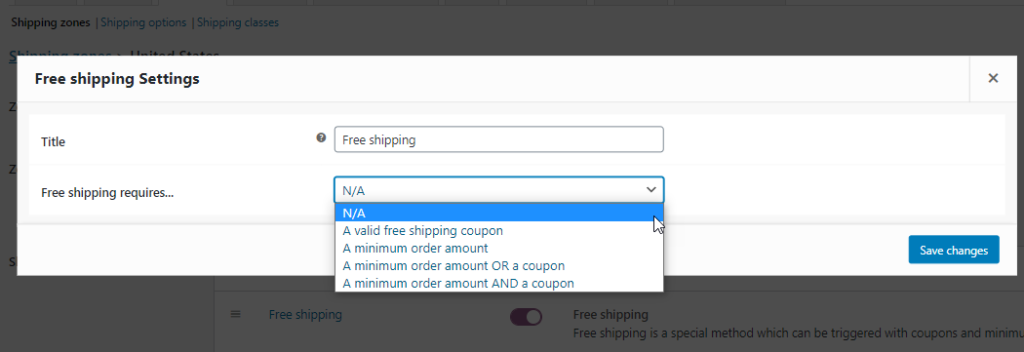
So you can set “Free shipping requires” options here as given below :
N/A: When you don’t specify any conditions and offer Free Shipping to all customers.
A valid free shipping coupon: Here the customer needs to provide a valid shipping coupon to get free shipping. You can create coupons in WooCommerce>> Coupons from the dashboard.
A minimum order amount: Here you can specify the minimum order amount that needs to be met to get free shipping.
A minimum order amount OR a coupon: The customer can either get a threshold amount on spending or use a coupon code to avail free shipping.
A minimum order amount AND a Coupon: The customer should attain a minimum threshold order amount and a coupon to get free shipping.
Similarly, if you have a local store located in California in the zip code 94105, then you might want to just offer a Local Pickup option in that particular zip code, which is much more feasible. In such cases, you can limit the Local Pickup shipping option to that particular zip code.
Using local pickup is feasible when it comes to shipping in the local area, wherein you can offer your customers to pick the parcel themselves from the shop or the order fulfilment centre. Here regardless of the customer address, the base taxes will be applied to the purchase.

Again in certain cases, you want to offer a flat rate for shipping to any location you are selling. This is mainly used when you want to charge the customers in higher shipping zones more for shipping the products versus the customers who are residing quite near fulfilment centre. You can simply choose the flat rate option for the zone. If you want to apply rates for a flat rate, you can edit the flat rate option, where you will be provided with a modal window as depicted in the below screenshot:
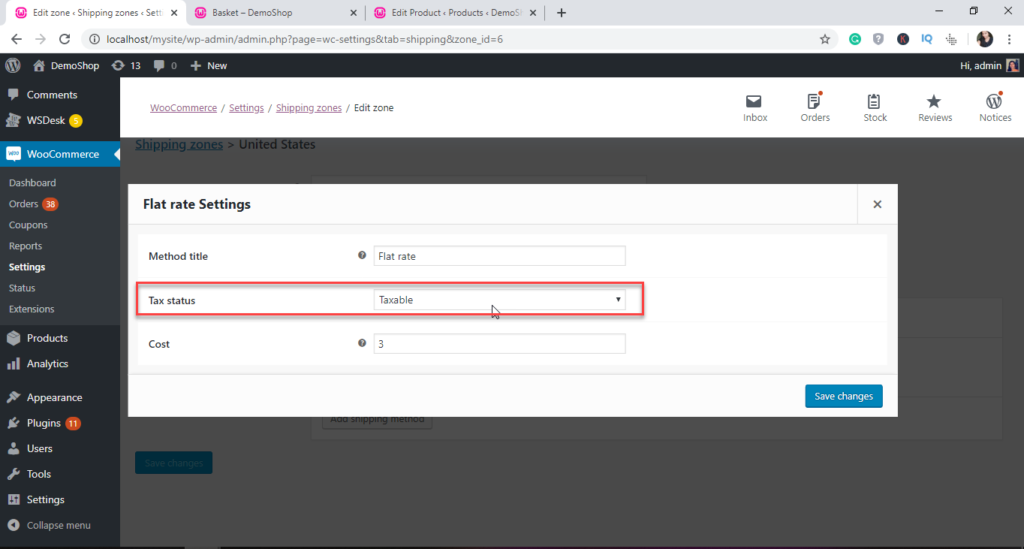
Method Title: Choose the payment method customers will see on the cart page.
Tax status: Select if the shipping method is taxable or non-taxable.
Cost: Enter the cost of shipping the entire order. You can also use [qty] and [fee] parameters to charge custom shipping rates which are explained below.
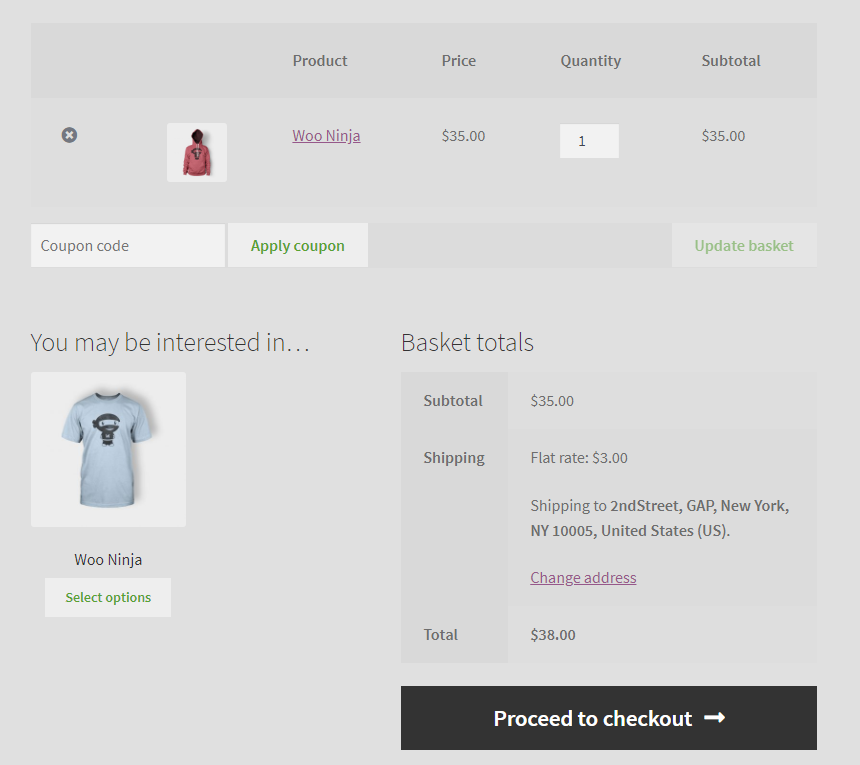
Upon doing this, when your customer purchases from your shop, the customer gets a $3- flat-rate amount charged for their order in the cart as shown in the below screenshot.
Upon doing this, when your customer purchases from your shop, the customer gets a $3, flat-rate amount charged for their order in the cart as shown in the below screenshot.
Per-Item Shipping in WooCommerce Shipping
The Per-Item shipping is charging additional charges on shipping options. These methods are developed by WooCommerce to help vendors who are shipping to various locations to charge them effectively. Here we use certain terms to develop a formula to charge the amount for shipping, they are :
[qty] – When you want to apply additional shipping charges based on the number of products in the cart, you can use this placeholder.
[fee] – When you want to set up additional shipping charges based on the total order cost, you can use this one. This one has additional arguments that you can use along with it.
Some additional arguments to go with it are :
- per cent – to set an additional shipping charge as a percentage.
- min_fee – to set a minimum value for additional charges.
- max_fee –to set a maximum value for additional charges.
Suppose you want to charge a base shipping cost of $10 and based on the order amount, you want to charge a 10% shipping charge. Here, you can also set a minimum amount, where this additional charge will be applicable, say $5.
Let’s see how you can set the same :
In the shipping field, you can provide the following: 20 + [fee per cent =”10″ min_fee=”5″]
Here it means for all orders, a base shipping charge of $10 will be applied. Along with that, 10% of the order value will be added, as an additional charge. Now, the minimum additional charge of $5 will be levied for orders with a lesser amount.
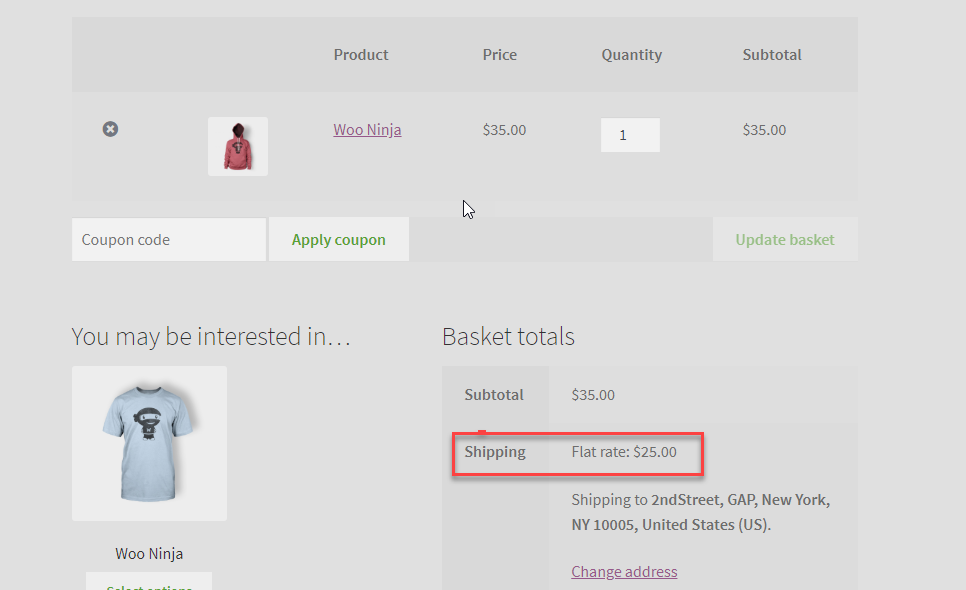
Here in the above example, when a customer is purchasing a product worth $35 from your store, the base shipping charge of $20 is applied. Along with that, ideally, 10% of $35 should be charged for the shipping, which will be $3.5. However, since you have set a minimum value of 5, the additional charge will be $5. That makes the total shipping costs to be $25.
Note: The best thing is you can add multiple shipping methods in a single zone.
Shipping Options in WooCommerce Shipping
Here we choose some of the basic shipping options to be followed in the store. The settings will look like this :

Here you can choose to opt for a shipping calculator in the cart page or hide the shipping costs until the destination address is entered by the customer. Also, you can choose the shipping destination as one of these :
- Default to the customer shipping address
- Default to the customer billing address
- Force shipping to the customer billing address.
Also, you can enable the debug mode, to check for any errors in the log that will help you rectify any errors occurring and also to show the debug mode will show the matching shipping zones and also bypass the shipping rate cache.
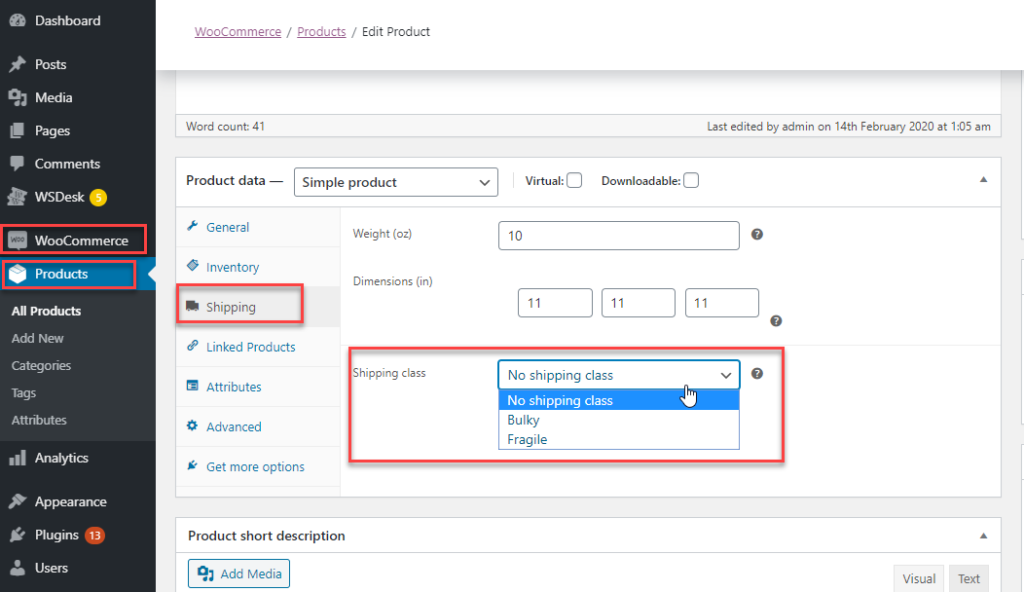
Setting up Shipping Classes for your WooCommerce store
Shipping classes are set when you are selling products of various sizes and weights. It can be used to group similar kinds of products into one group. Also, by segregating into different groups you can even configure some shipping methods like a flat rate to provide different rates to different classes of products. To do this, you need to first set up the shipping options in WooCommerce :

For example, in the above screenshot, we have used two shipping classes named Fragile and Bulky. Once added, you can go to the individual products pages and then segregate them as bulky, fragile or no shipping classes.
If you want to provide a bulk update for shipping class, you can make use of the WooCommerce bulk update option in the all product page (Products >> All Products) and choose bulk actions dropdown and then Edit and click the Apply button. There you get the option to bulk edit the products and you can choose the products for which you want to change the shipping class and then add the shipping class to it.

Now you can again get back to the shipping settings to introduce charges for each shipping class. After adding the shipping class, in the shipping options, you get to see the following options :

According to these settings, the charges will be levied on the store for specific products falling in that shipping class category as shown here :

Again if you are shipping multiple products which fall into various shipping class categories, then the total shipping fare will be the total of all the shipping charges assigned to the bulky, fragile and no- shipping class costs assigned in the shipping settings.

WooCommerce Advanced Shipping Options
What if you want to sell products of various sizes, wherein the flat-rate options by WooCommerce does not seem to be ideal? In such cases, you need some advanced methods to calculate shipping rates. Here you can opt for Table rate shipping, which is an ideal option to use. This extends the default WooCommerce shipping options to give you a highly customizable shipping option on your WooCommerce store.
What it does
You can define multiple shipping rates that are based on the price, location, weight of the product, or even the item count. Also, it allows wildcards to be used for matching multiple regions.

As you can see in the above screenshot, the Table rate shipping lets you calculate shipping rates based on various options as given. It gives the store owners a certain amount of flexibility to create rules that suit their needs. Like for example, the store owner can create a rule like if the weight of the products in the cart adds up to some value between 1lb and 5 lbs, then a shipping cost of $15 to be added to the price.
Advanced Shipping Options using Shipping plugins to integrate Popular Shipping carriers
Again, yet another aspect that we need to worry about shipping charges is when you want to make use of popular shipping carriers like UPS, FedEx, DHL, USPS etc. These shipping carriers can be easily integrated to your WooCommerce store, using the appropriate shipping plugins.
So, why do you need them?
It’s simple. These external plugins help you simplify many of your tasks. These plugins comprise all the essential settings and features you need to have for your store shipping.
- The plugin helps you fetch the real time shipping rates from popular carriers based on the addresses, the weight and dimension of the box etc., to display on the cart and the checkout pages.
- You can also get the tracking details from the order page.
- Also, you can easily print the shipping labels of popular shipping carriers right from your order page, rather than copying all the information to the shipping carrier page and generating the label for the order.
- Again dealing with return options also is easier using these plugins.
Depending upon your business needs, and the choice of shipping carrier you can choose the right shipping plugin that will support your shipping needs. Few among them are:
- ELEX WooCommerce DHL Express / eCommerce / Paket Shipping Plugin with Print Label
- ELEX WooCommerce USPS Shipping Plugin with Shipment Tracking & Print Label
- ELEX Stamps.com Shipping Plugin with USPS Postage for WooCommerce
- ELEX EasyPost (FedEx, UPS, Canada Post & USPS) Shipping & Label Printing Plugin for WooCommerce
- ELEX WooCommerce Australia Post Shipping Plugin with Print Label & Tracking
These best WooCommerce shipping plugins are ideal for your WooCommerce store and will fetch you shipping rates from plenty of popular shipping carriers. Moreover, these shipping carriers will enhance the shipping experience invariably. For example, using the ELEX EasyPost shipping plugin, you get to include four different shipping carriers in your store, depending upon your choice. Once you choose the shipping carriers in the plugin, you get to see the shipping rates on the cart page.

In this way, you provide your customer with multiple options and they can choose the cheapest and the feasible option to get their products. Also, these plugins help to even display the estimated delivery dates on the cart page to curb the anxiousness of the customers, giving them a definite date of delivery.

Hence there are much more advantages, using these advanced shipping options in your store.
To Wrap Up,
The above-mentioned processes to set up WooCommerce shipping options on your WooCommerce store will ease the overall process of configuring the best and the ideal shipping options for your store. With the above methods to configure WooCommerce shipping options, you can easily set up a simple small scale WooCommerce store which uses basic WooCommerce shipping options or you can go for advanced WooCommerce shipping options with multiple carriers to facilitate a better shipping experience for your customers.
All the Best !!
Further Reading
- How to Reduce the Shipping Cost for your WooCommerce Store?
- How to Print Shipping Labels right from your WooCommerce Store?
- Top 5 Shipping Problems & Fixes for WooCommerce WordPress eCommerce Store
- Step by Step Guide to enable Shipping Insurance with WooCommerce
- 6 Best WooCommerce Shipment Tracking Plugins for Top Shipping Carriers
- A Detailed Guide on Packing Methods for ELEX WooCommerce Shipping Plugins

